

Skip to content
KitploitKITPLOIT
도구블로그
제출
도구블로그
제출

해킹, 침투 테스트 및 사이버 보안 도구를 당신의 보안 무기고에!

Kitploit은 해킹, 사이버 보안 및 침투 테스트 도구 디렉토리입니다. 최신 프로젝트 업데이트를 발견하여 취약점을 찾고, 시스템을 분석하고, 테스트를 자동화하고, 보안을 강화하세요.

··피드·문의·개인정보·© 2026 Kitploit

도구 디렉토리

카테고리

모든 카테고리 보기
Loading categories
AutoGadgetFS — USB 테스트를 간편하게 | Kitploit
도구/GitHubGitHub/ehabhussein/autogadgetfs
FuzzingHardware HackingPenetration Testing
GitHubehabhussein/autogadgetfs

AutoGadgetFS

USB 테스트를 간편하게

저장소 보기웹사이트
123235년 전Kitploit 검토 완료

인기

모두 보기 →

커뮤니티에서 가장 많이 사용되는 도구를 찾아보세요.

모든 도구 탐색

도구 컬렉션을 둘러보세요

모든 도구 보기 →
공유

이더리움 기부 : 0xA919e40ddB0563918dDc174320D91992e0048477

목차

  1. AutoGadgetFS란 무엇인가?

  2. 요구사항

  3. 설정

    a. 기기 테스트 전용

    b. 중간에 최소 agfs 설정

    c. 디버깅 지원을 포함한 완전한 중간 agfs 설정

  4. USB 기기 클래스 지원

  5. 기능

  6. 로드맵

  7. 설치

    a. Linux

    b. Raspberry Pi Zero with WIFI

  8. AutogadgetFS 튜토리얼

  9. 스크린샷

  10. Youtube 재생목록

  11. Slack

  12. 지원

  13. 커피 한 잔 사주기 ☕️

  14. 연락처

  15. 기여하고 싶으신가요?


AutoGadgetFS란 무엇인가?

AutoGadgetFS는 USB 프로토콜에 대한 깊은 지식 없이도 USB 기기와 관련 호스트/드라이버/소프트웨어를 평가할 수 있도록 하는 오픈 소스 프레임워크입니다. 이 도구는 Python3로 작성되었으며 RabbitMQ와 WiFi 접속을 활용하여 연구자가 전 세계 어디에서나 원격으로 USB 보안 평가를 수행할 수 있게 합니다. ConfigFS를 활용하여 AutoGadgetFS는 사용자가 빠르게 기기를 복제하고 에뮬레이트할 수 있도록 하여 각 구현의 세부 사항을 깊이 파고들 필요를 없앱니다. 또한 이 프레임워크는 사용자가 자신만의 퍼저를 그 위에 만들 수 있도록 합니다.


요구사항:

  • 💻 Linux (Debian/Ubuntu/Kali)를 실행하는 호스트 머신
  • 🥧 WiFi 지원 Raspberry Pi Zero
  • 🎯 대상 머신 옵션:
    • 가상 머신
    • 독립형 머신
  • 🔌 USB micro 케이블 2개
  • 🔱 대상 USB 기기
  • 🐞 하드웨어 디버거 (선택 사항)

설정:

```bash Device testing only:

root@kitploit:~
<div style="text-align:center"><img src="https://raw.githubusercontent.com/ehabhussein/AutoGadgetFS/master/screenshots/devtest.jpeg" width="450" height="187" /></div>

<a name="MMITM"/>```bash
Minimal agfs in the middle setup:
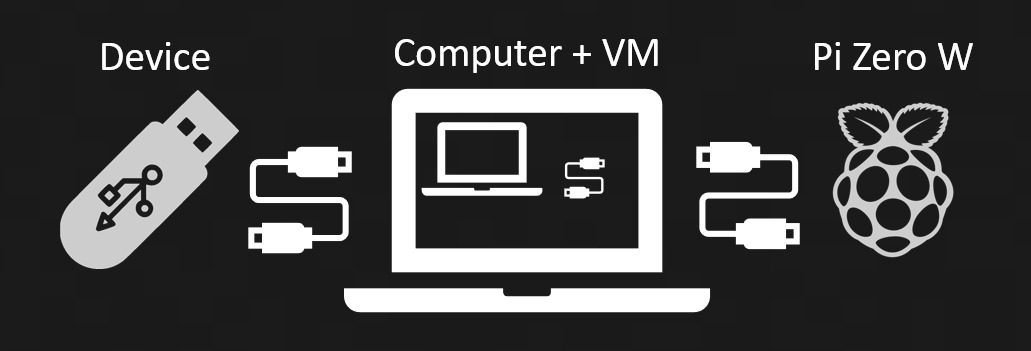
```bash Complete agfs in the middle setup with debugging support:

root@kitploit:~
<div style="text-align:center"><img src="https://raw.githubusercontent.com/ehabhussein/AutoGadgetFS/master/screenshots/scenario2.jpeg"/></div>

---

<a name="Usbdev"/>

### USB Device 클래스 지원:

[✔️] USB HID 기기 완전 지원 (중간자 공격)

[⚠️] 기기 전용 테스트 .. 모든 USB 기기 (중간자 공격 없음)

[⏳] 향후 릴리스... 모든 USB 기기 (중간자 공격)

---

<a name="Caps"/>

### 기능:

1. USB 기기를 쉽게 찾고, 선택하고, 연결할 수 있습니다.
1. 모든 USB HID 기기를 에뮬레이션합니다.
1. HID 기기에 대한 중간자 스니핑 AGFS 수행 (통신을 디스크에 저장).
1. 기기 스니핑 (모든 기기).
1. 여러 퍼저를 사용하여 기기나 호스트를 퍼징할 수 있습니다.
1. 무작위 퍼저 (고정 또는 임의 길이 패킷 사용).
1. 이전 USB 통신에서 학습하는 스마트 퍼저.
1. 설명 퍼저: 퍼저에 어떤 바이트를 퍼징할지 지시하고 나머지 패킷은 동일하게 유지.
1. 가젯 퍼저.
1. 순차 퍼저.
1. 제어 전송 열거자.
1. 파일에서 패킷 재생.
1. 저장된 USBLyzer 캡처에서 패킷 재생.
1. 패킷을 시각적으로 표시하여 통신의 리버스 엔지니어링을 쉽게 수행할 수 있습니다.
1. DFU 모드의 기기나 정보 유출 시 알림.
1. USB 기기와 호스트는 인터넷상 어디에나 있을 수 있습니다.
1. 갑작스러운 인터페이스 변경 모니터링.

---

<a name="Road"/>

### 로드맵:

1. 기기에 대한 제어 전송 요청을 스니핑하고 응답합니다.
1. 중간자 공격 및 모든 유형의 기기 에뮬레이션.
1. 콘솔/QT 기반 인터페이스.
1. RPI zero W에서 더 많은 인터페이스/엔드포인트 지원.
1. greatfet과 같은 더 많은 보드 지원.
1. 맞춤형 보드로 이전.
1. 라즈베리 파이가 모든 인터페이스에서 USB 기기 에뮬레이션을 완전히 지원하도록 작업.
1. 시퀀스 번호를 통해 송수신 패킷을 상호 연관시킵니다.

---

<a name="Installation"/>

### 설치:

<a name="Linux"/>

### Linux 머신:

* 참고: USB 패스스루 문제로 인해 WSL/WSL2는 지원되지 않습니다.

* Python3, ipython3 ,git, pip 및 rabbitMQ 서버 설치

    ```bash
    sudo apt install python3 ipython3 git python3-pip rabbitmq-server dfu-util
    sudo service rabbitmq-server start
    ```

* 저장소 클론

    ```bash
    git clone https://github.com/ehabhussein/AutoGadgetFS
    cd AutoGadgetFS
    ```

* 요구 사항 설치

    ```bash
    sudo -H pip3 install -r requirements.txt
    ```

* 더 나은 ipython 경험을 위해 prompt toolkit 다운그레이드:

    ```bash
    sudo python3 -m pip install prompt-toolkit~=2.0
    ```

* rabbitMQ 웹 인터페이스 활성화

    ```bash
    sudo rabbitmq-plugins enable rabbitmq_management
    http://localhost:15672/ to reach the web interface
    ```

* *guest:guest* 자격 증명으로 웹 인터페이스에 로그인
  * 참고: rabbitMQ를 `localhost`에 설치하지 않은 경우 다음 사용자를 추가하고 로그인하세요:
    ```bash
    sudo rabbitmqctl add_user autogfs usb4ever
    sudo rabbitmqctl set_user_tags autogfs administrator
    ```
  * rabbitMQ 구성 파일 업로드
    * 개요 탭에서 맨 아래로 스크롤하여 정의 가져오기
    * 다음 파일 업로드: *rabbitMQbrokerconfig/rabbitmq-Config.json*

    ```bash
    sudo service rabbitmq-server restart
    ```

* 설치 테스트

    ```python
    sudo ipython3
    
    Python 3.7.7 (default, Apr  1 2020, 13:48:52)
    Type 'copyright', 'credits' or 'license' for more information
    IPython 7.9.0 -- An enhanced Interactive Python. Type '?' for help.

    In [1]: import libagfs

    In [2]: x = libagfs.agfs()

    ***************************************
    AutoGadgetFS: USB testing made easy
    ***************************************
    Enter IP address of the rabbitmq server: 127.0.0.1
  
    In [3]: exit

    sudo `python3` agfsconsole.py
    
    ***************************************
    AutoGadgetFS: USB testing made easy
    ***************************************
    Enter IP address of the rabbitmq server: 127.0.0.1
    Give your project a name?!:
    ```   ```

* Patch Pyusb langID ( Not needed unless you get pyusb errors for langID ):
  * Edit the file `/usr/local/lib/python3/dist-packages/usb/util.py`
    * make changes to the `def get_string` method to look like below:

        ```python
        if 0 == len(langids):
            return "Error Reading langID"
            #raise ValueError("The device has no langid")
        if langid is None:
            langid = langids[0]
        elif langid not in langids:
            return "Error Reading langID"
            #raise ValueError("The device does not support the specified langid")
        ```

    * If you prefer to use `patch` apply the following patch to the file: `AutoGadgetFS/pyusb_patches/pyusb_langid.patch`

---

<a name="Rasp"/>

### Raspberry Pi Zero W:

* Obtain a copy of [Raspian Lite Edition](https://downloads.raspberrypi.org/raspios_lite_armhf_latest)
  * Burn the Image to the SD card using [BalenaEtcher](https://www.balena.io/etcher/)

* Mount the SD card on your machine and make the following changes:
  * In the `/path/to/sdcard/boot/config.txt` file add to the very end of the file:

    ```bash
    enable_uart=1
    dtoverlay=dwc2
    ```

  * In the `/path/to/sdcard/boot/cmdline.txt` add right after `rootwait`

    ```bash
    modules-load=dwc2
    ```

  * it should look like this make sure its on the same line:

    ```bash
    console=serial0,115200 console=tty1 root=PARTUUID=6c586e13-02 rootfstype=ext4 elevator=deadline fsck.repair=yes rootwait modules-load=dwc2
    ```

* Enable ssh:
  * in the `/path/to/sdcard/boot` directory create an empty file name ssh:

    ```bash
    sudo touch /path/to/sdcard/boot/ssh
    ```

* Enable Wifi:
  * in the `/path/to/sdcard/boot` directory create an file named `wpa_supplicant.conf`:

    ```bash
    sudo vim /path/to/sdcard/boot/wpa_supplicant.conf
    ```

  * Add the following contents:

    ```bash
    ctrl_interface=DIR=/var/run/wpa_supplicant GROUP=netdev
    update_config=1
    country=US
    network={
                ssid="<your wifi SSID>"
                psk="<your wifi password>"
                key_mgmt=WPA-PSK
             }
    ```

* Unmount the SD card and place it back into the Raspberry Pi Zero and power it on.
* Copy the content of `AutogadgetFS/Pizero/` to the Pi zero: `username: pi` & `password: raspberry`

    ```bash
    cd AutogadgetFS/Pizero/
    scp gadgetfuzzer.py removegadget.sh requirements.txt router.py pi@<pi-ipaddress>:/home/pi
    ```

* SSH into the PI Zero and setup requirements for AutoGadgetFS:

    ```bash
    ssh pi@<pi-ip-address>
    chmod +x removegadget.sh
    sudo apt update
    sudo apt install python3 python3-pip
    sudo -H pip3 install -r requirements.txt
    ```
* Upgrading the latest kernel and adding modules (* This step is optional for the current release):
    ( This will take a very long time compiling on the Pi Zero, unless you choose to cross compile the kernel see [Compiling options](https://www.raspberrypi.org/documentation/linux/kernel/building.md))

    ```bash
    sudo bash
    apt install git bc bison flex libssl-dev make libncurses5-dev screen
    screen
    mkdir Downloads
    cd Downloads/
    git clone --depth=1 https://github.com/raspberrypi/linux
    cd linux/
    make bcmrpi_defconfig
    make menuconfig
    ```

    * Enable the Modules and save the config:

    <div style="text-align:center"><img src="https://raw.githubusercontent.com/ehabhussein/AutoGadgetFS/master/screenshots/allgadgets.png"/></div>
    <div style="text-align:center"><img src="https://raw.githubusercontent.com/ehabhussein/AutoGadgetFS/master/screenshots/allgadgets2.png"/></div>
    <div style="text-align:center"><img src="https://raw.githubusercontent.com/ehabhussein/AutoGadgetFS/master/screenshots/allgadgets3.png"/></div>
    <div style="text-align:center"><img src="https://raw.githubusercontent.com/ehabhussein/AutoGadgetFS/master/screenshots/allgadgets4.png"/></div>

    * Build and use the kernel:

    ```bash
    make zImage modules dtbs
    make modules_install
    cp arch/arm/boot/dts/*.dtb /boot/
    cp arch/arm/boot/dts/overlays/*.dtb* /boot/overlays/
    cp arch/arm/boot/dts/overlays/README /boot/overlays/
    cp arch/arm/boot/zImage /boot/kernel.img
    reboot
    ```


#### And you're done!

---

<a name="Tutorial"/>

### AutoGadgetFS tutorial:

[Click to visit the tutorial](https://docs.agfs.io/)

---

<a name="Screens"/>

### Screenshots:

##### Man in the Middle:

<div style="text-align:center"><img src="https://raw.githubusercontent.com/ehabhussein/AutoGadgetFS/master/screenshots/mitm.png" /></div>

#### USB device fuzzing: 

<div style="text-align:center"><img src="https://raw.githubusercontent.com/ehabhussein/AutoGadgetFS/master/screenshots/devfuzzer.png" /></div>

#### Host side fuzzing with code covereage:

<div style="text-align:center"><img src="https://raw.githubusercontent.com/ehabhussein/AutoGadgetFS/master/screenshots/codecov.png" /></div>

#### Fuzzer based on a selection of bytes:

<div style="text-align:center"><img src="https://raw.githubusercontent.com/ehabhussein/AutoGadgetFS/master/screenshots/selectivefuzz.png" /></div>

#### Smart fuzzer based on learning traffic:

```python
In [44]: x.devSmartFuzz(engine="smart",samples=5,filename="/home/raindrop/PycharmProjects/AutoGadgetFs/binariesdb/Nud-Nuvoton-1046-20764-1590421333.5169587-Nuvoton-1046-20764-1590421600.8067
    ...: 274-device.bin")                                                                                                                                                                     


[+]일반 통계
전체 문자셋                : !"#$%&'()*+,-./0123456789:;<=>?@ABCDEFGHIJKLMNOPQRSTUVWXYZ[\]^_`abcdefghijklmnopqrstuvwxyz{|}~
제외된 문자셋           : !"#$%&'()*+,-./:;<=>?@ABCDEFGHIJKLMNOPQRSTUVWXYZ[\]^_`ghijklmnopqrstuvwxyz{|}~
최종 문자셋               : 0123456789abcdef
단어 길이                 : 128
소문자 인덱스 사용률      : 92%
소문자 인덱스 위치  : [1, 3, 4, 5, 6, 7, 8, 9, 10, 11, 12, 13, 14, 15, 16, 17, 18, 19, 20, 21, 22, 23, 24, 25, 26, 27, 28, 29, 30, 31, 32, 33, 34, 35, 36, 37, 38, 39, 40, 41, 42, 43, 44, 45, 46, 47, 48, 49, 50, 51, 52, 53, 54, 55, 56, 57, 58, 59, 60, 61, 62, 63, 64, 65, 66, 67, 68, 69, 70, 71, 72, 73, 74, 75, 76, 77, 78, 79, 80, 81, 82, 83, 84, 85, 86, 87, 88, 89, 90, 91, 92, 93, 94, 95, 96, 97, 98, 99, 100, 101, 102, 103, 104, 105, 106, 107, 108, 109, 110, 111, 112, 113, 114, 115, 121, 122, 124, 125, 127]
대문자 인덱스 사용률      : 0%
대문자 인덱스 위치  : []
숫자 인덱스 사용률           : 96%
숫자 인덱스 위치       : [0, 1, 2, 3, 4, 5, 6, 7, 8, 9, 10, 11, 12, 13, 14, 15, 16, 17, 18, 19, 20, 21, 22, 23, 24, 25, 26, 27, 28, 29, 30, 31, 32, 33, 34, 35, 36, 37, 38, 39, 40, 41, 42, 43, 44, 45, 46, 47, 48, 49, 50, 51, 52, 53, 54, 55, 56, 57, 58, 59, 60, 61, 62, 63, 64, 65, 66, 67, 68, 69, 70, 71, 72, 73, 74, 75, 76, 77, 78, 79, 80, 81, 82, 83, 84, 85, 86, 87, 88, 89, 90, 91, 92, 93, 94, 95, 96, 97, 98, 99, 100, 101, 102, 103, 104, 105, 106, 107, 108, 109, 110, 111, 112, 113, 114, 115, 116, 117, 118, 119, 120, 123, 126]
영숫자 외 인덱스 사용률           : 0%
영숫자 외 인덱스 위치       : []
카운터 통계          : 대문자: 0 , 소문자: 133071, 숫자:212017 , 영숫자 외:0
모든 문자 빈도        : 
문자:5 발견:5012 회
문자:2 발견:22563 회
문자:3 발견:12197 회
문자:8 발견:15008 회
문자:4 발견:13275 회
문자:0 발견:98056 회
문자:1 발견:17861 회
문자:f 발견:87823 회
문자:d 발견:7221 회
문자:7 발견:9614 회
문자:a 발견:11148 회
문자:6 발견:10472 회
문자:b 발견:8189 회
문자:9 발견:7959 회
문자:c 발견:9172 회
문자:e 발견:9518 회
***********************
생성됨:5 패킷
***********************
Out[44]: 
['5608305852bf2ffd61770e2c827542f20be0b0fcba09db916bd07e1734b04cb0352b1d278068064d19f033bfad6fa90e53d865693fd4fee0214f00000eb0aa2c',
 '3b083595f276e2f1353a535c32f0f59516fc9328f7673bb80262c4da11c93683afe6dcff8a7a83018d78f41498a0da4d141ebd39c361b1724f2b00000eb0aa2c',
 '0120961963495c4dab9470738b497eddde07b0d70b357795ad9554d7964761969a6d997205e17eada6fa84eb33dcfb11412f75e04c195001283900000eb0aa2c',
 '091065d52127bbc6e840e02f8e1316f1c4d9c92a23931c00cdbb8c158368852ef8fabd461b98812b51ec84e1ccc5c04aaa366fbafabec623bd3500000eb0aa2c',
 '7300cc61151b7af27a578e766f49bebb2de68c48b37a00df1030ae464f456928eedd035303e697208bf58217af728a2a346fda5c8aef0335b82e00000eb0aa2c']

In [46]: x.edap.packets                                                                                                                                                                       
Out[46]: 
['5608305852bf2ffd61770e2c827542f20be0b0fcba09db916bd07e1734b04cb0352b1d278068064d19f033bfad6fa90e53d865693fd4fee0214f00000eb0aa2c',
 '3b083595f276e2f1353a535c32f0f59516fc9328f7673bb80262c4da11c93683afe6dcff8a7a83018d78f41498a0da4d141ebd39c361b1724f2b00000eb0aa2c',
 '0120961963495c4dab9470738b497eddde07b0d70b357795ad9554d7964761969a6d997205e17eada6fa84eb33dcfb11412f75e04c195001283900000eb0aa2c',
 '091065d52127bbc6e840e02f8e1316f1c4d9c92a23931c00cdbb8c158368852ef8fabd461b98812b51ec84e1ccc5c04aaa366fbafabec623bd3500000eb0aa2c',
 '7300cc61151b7af27a578e766f49bebb2de68c48b37a00df1030ae464f456928eedd035303e697208bf58217af728a2a346fda5c8aef0335b82e00000eb0aa2c']```

#### Help method:

```python3
In [15]: x.help("")                                                                                                                                               

현재 지원되는 메소드:
__________________________________________________________________________________________________________________________________________________________________
메소드                     ||-->설명
----------------------------------------------------------------------------------------------------------------------------
MITMproxy            ||-->이 메소드는 RabbitMQ에 연결하여 todev 큐에서 수신된 메시지를 수신 대기합니다.
____________________________________________________________________________________________________________________________
MITMproxyRQueues     ||-->이 메소드는 todev 큐에서 읽어 요청을 장치 자체로 전송합니다.
____________________________________________________________________________________________________________________________
SmartFuzz            ||-->이 메소드는 호스트나 장치에서 스니핑한 내용을 기반으로 패킷을 생성합니다.
____________________________________________________________________________________________________________________________
chgIntrfs            ||-->이 메소드를 사용하면 인터페이스를 변경하고 다른 인터페이스를 선택할 수 있습니다.
____________________________________________________________________________________________________________________________
clearqueues          ||-->이 메소드는 설정된 RabbitMQ 큐의 모든 큐를 지웁니다.
____________________________________________________________________________________________________________________________
clonedev             ||-->이 메소드는 매개변수가 필요 없으며, 나중에 공유하거나 사용할 경우를 대비해 장치의 백업을 저장합니다.
____________________________________________________________________________________________________________________________
createctrltrsnfDB    ||-->제어 전송 열거에서 열거된 값을 포함하는 SQLite 데이터베이스를 생성합니다.
____________________________________________________________________________________________________________________________
createdb             ||-->usblyzer 캡처에서 SQLite 테이블과 열을 생성합니다.
____________________________________________________________________________________________________________________________
decodePacketAscii    ||-->이 메소드는 패킷 바이트를 다시 ASCII로 디코딩합니다.
____________________________________________________________________________________________________________________________
describeFuzz         ||-->이 메소드는 패킷을 설명하고 퍼징할 바이트를 선택할 수 있게 해줍니다.
____________________________________________________________________________________________________________________________
devEnumCtrltrnsf     ||-->이 메소드는 제어 전송 요청의 가능한 모든 조합을 열거합니다.
____________________________________________________________________________________________________________________________
devReset             ||-->이 메소드는 장치를 재설정합니다.
____________________________________________________________________________________________________________________________
devWrite             ||-->이 메소드와 함께 사용하여 장치에 쓰려면 startSniffReadThread(self,endpoint=None, pts=None, queue=None,channel=None)를 실행해야 합니다.
____________________________________________________________________________________________________________________________
devctrltrnsf         ||-->이 메소드는 대상 장치에 제어 전송 요청을 보낼 수 있게 해줍니다.
____________________________________________________________________________________________________________________________
deviceInfo           ||-->호스트에 연결된 모든 USB의 완전한 정보를 가져옵니다.
____________________________________________________________________________________________________________________________
deviceInterfaces     ||-->장치의 모든 인터페이스와 엔드포인트를 가져옵니다.
____________________________________________________________________________________________________________________________
devrandfuzz          ||-->이 메소드는 urandom을 사용하여 생성된 고정 크기 또는 임의 크기 패킷을 만들 수 있게 해줍니다.
____________________________________________________________________________________________________________________________
devseqfuzz           ||-->이 메소드는 순차적으로 증가하는 패킷을 생성하여 장치로 전송할 수 있게 해줍니다.
____________________________________________________________________________________________________________________________
findSelect           ||-->이 메소드는 연결된 모든 USB 장치를 열거하고 대상 장치와 해당 엔드포인트를 선택할 수 있게 해줍니다.
____________________________________________________________________________________________________________________________
help                 ||-->AutogadgetFS 도움말 메소드
____________________________________________________________________________________________________________________________
hostwrite            ||-->이 메소드는 호스트에 패킷을 쓰며, 장치를 제어하는 소프트웨어나 드라이버를 대상으로 합니다.
____________________________________________________________________________________________________________________________
hstrandfuzz          ||-->이 메소드는 urandom을 사용하여 생성된 고정 크기 또는 임의 크기 패킷을 만들어 호스트 큐로 전송할 수 있게 해줍니다.
____________________________________________________________________________________________________________________________
monInterfaceChng     ||-->인터페이스 변경을 모니터링하는 메소드입니다. def startMonInterfaceChng(self)에서 호출됩니다.
____________________________________________________________________________________________________________________________
newProject           ||-->다른 것을 테스트 중인 경우 새 프로젝트 이름을 생성합니다.
____________________________________________________________________________________________________________________________
releasedev           ||-->장치를 해제하고 커널 드라이버를 다시 연결합니다.
____________________________________________________________________________________________________________________________
removeGadget         ||-->이 메소드는 RaspberryPI에서 가젯을 제거합니다.
____________________________________________________________________________________________________________________________
replaymsgs           ||-->이 메소드는 USBLyzer 파싱 데이터베이스를 검색하여 호스트에서 장치로의 메시지 하나 또는 모든 메시지를 재생할 수 있는 옵션을 제공합니다.
____________________________________________________________________________________________________________________________
searchmsgs           ||-->이 메소드를 사용하면 USBlyzer 데이터베이스 생성에서 저장된 모든 메시지에 대해 패턴을 검색하고 선택할 수 있습니다.
____________________________________________________________________________________________________________________________
setupGadgetFS        ||-->gadgetFS 변수를 설정합니다: Linux 전용, Raspberry Pi Zero에서 최적 옵션.
____________________________________________________________________________________________________________________________
showMessage          ||-->오류, 경고 또는 정보 메시지를 표시합니다.
____________________________________________________________________________________________________________________________
sniffdevice          ||-->장치와 호스트 간의 통신을 읽습니다.
____________________________________________________________________________________________________________________________
startMITMusbWifi     ||-->USB 대상 장치를 모니터링하는 스레드를 시작합니다.
____________________________________________________________________________________________________________________________
startMonInterfaceChng||-->이 메소드는 장치의 인터페이스 구성이 갑자기 변경될 경우를 대비하여 10초마다 장치를 모니터링할 수 있게 해줍니다.
____________________________________________________________________________________________________________________________
startQueuewrite      ||-->호스트와 통신하기 위해 큐에 연결을 초기화합니다.
____________________________________________________________________________________________________________________________
startSniffReadThread ||-->장치로부터 응답을 지속적으로 읽는 스레드로서, 전달하는 인자(pts 또는 queue)에 따라 동작합니다.
____________________________________________________________________________________________________________________________
stopMITMusbWifi      ||-->호스트와 장치 간의 중간자 스레드를 중지합니다.
____________________________________________________________________________________________________________________________
stopMonInterfaceChang||-->인터페이스 모니터 스레드를 중지합니다.
____________________________________________________________________________________________________________________________
stopQueuewrite       ||-->호스트 머신과 통신을 담당하는 스레드를 중지합니다.
____________________________________________________________________________________________________________________________
stopSniffing         ||-->startSniffReadThread()에 의해 시작된 스니핑 스레드를 종료합니다.
____________________________________________________________________________________________________________________________
usblyzerparse        ||-->이 메소드는 usblyzer에서 내보낸 XML을 파싱하여 데이터베이스로 가져옵니다.
____________________________________________________________________________________________________________________________

In [16]: x.help("findSelect")                                                                                                                                                                 
****
[+]findSelect 메소드에 대한 도움말:
[-]서명: findSelect(self, chgint=None)


[+]findSelect 도움말:
이 메소드는 연결된 모든 USB 장치를 열거하고 대상 장치와 해당 엔드포인트를 선택할 수 있게 해줍니다.
****```

---

#### AutoGadgetFS console. A much simpler way to use AGFS:

<div style="text-align:left"><img src="https://raw.githubusercontent.com/ehabhussein/AutoGadgetFS/master/screenshots/agfsconsole.png"/></div>


---

<a name="Youtube"/>

### Youtube Playlist:

[Youtube Playlist](https://www.youtube.com/playlist?list=PLKozlVgM6RQjNHmpWR2RBiFCtufV03o6Z)

---

<a name="Slack"/>

### Join Slack:

Visit [AutogadgetFS Slack Channel](https://join.slack.com/t/autogadgetfs/shared_invite/zt-emgcv3ol-unG_axHmSQlk~5GcBddhlQ)

---

<a name="Support"/>

### Supported by:

<img src="https://assets.kitploit.com/production/public/readmes/3835/31aa30e1b311728af097fe24cefc4db7272ad971ffe64bac8d4d4e36a542fc9e.jpg" width="166" height="166"> <img src="https://raw.githubusercontent.com/ehabhussein/AutoGadgetFS/master/screenshots/JetBrains.png" width="166" height="166">  <img src="https://raw.githubusercontent.com/ehabhussein/AutoGadgetFS/master/screenshots/pyusb.png" width="166" height="166"> 

---

<a name="Donate"/>

### Buy me a coffee to support the development of this project

## Ethereum Donations : 0xA919e40ddB0563918dDc174320D91992e0048477

---
<a name="Contact"/>

### Contact me:

### 📧: <[email protected]>

### 🐦 : <https://twitter.com/0xRaindrop>

---

<a name="Cont"/>

### Contribute:

We're looking for developers to make this tool great! send me an 📧: <[email protected]> if you feel you'd like to be a part of this.
도구 다운로드