 cyberark/mitm_intercept
Burp 및 기타 도구를 통해 비HTTP 프로토콜을 가로채고 수정하는 약간 덜 해킹적인 방법.

Burp 및 기타 도구를 통해 SSL 및 TLS 가로채기 지원으로 비HTTP 프로토콜을 가로채고 수정하는 약간 덜 해킹적인 방법입니다. 이 도구는 연구원 및 두꺼운 클라이언트 보안 평가를 수행하는 응용 침투 테스터를 위한 것입니다.
mitm_relay 프로젝트의 개선된 버전입니다.
CyberArk Labs 연구 부서의 작업의 일환으로, 우리는 TCP를 통한 SSL 및 TLS 통신을 검사하고 패킷 콘텐츠를 즉석에서 수정할 수 있는 방법이 필요했습니다. 이를 위한 많은 방법이 있습니다(예를 들어, 잘 알려진 Burp Suite 확장 NoPE), 그러나 어떤 경우에는 그 어느 것도 우리에게 적합하지 않았습니다. 결국 우리는 mitm_relay를 발견하게 되었습니다.
mitm_relay는 Burp Suite의 프록시와 같은 기존 HTTP 가로채기 소프트웨어를 통해 모든 TCP 기반 프로토콜의 MITM을 수행하는 빠르고 쉬운 방법입니다. 특히 두꺼운 클라이언트 보안 평가에 유용합니다. 하지만 완전히 작동하지 않아서 사용자 정의가 필요했습니다. 많은 사용자 정의 끝에, 새로운 변경마다 많은 작업이 필요했고, 결국 더 모듈식 방식으로 모든 것을 다시 작성하게 되었습니다.
우리는 다른 사람들이 이 스크립트를 유용하게 사용할 수 있기를 바라며, 기능 추가가 쉬울 것이라고 기대합니다.
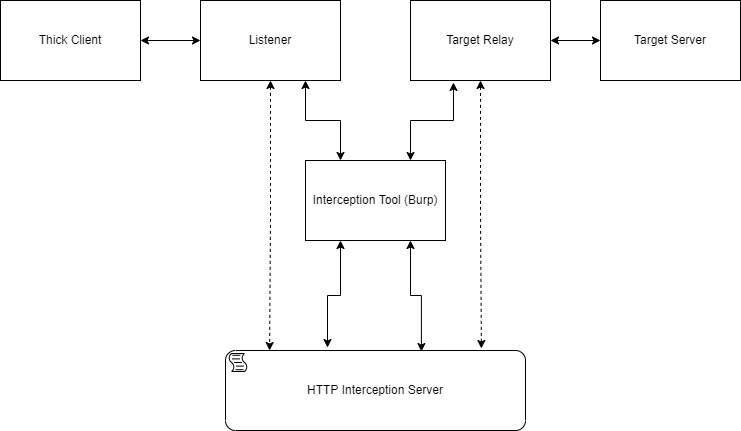
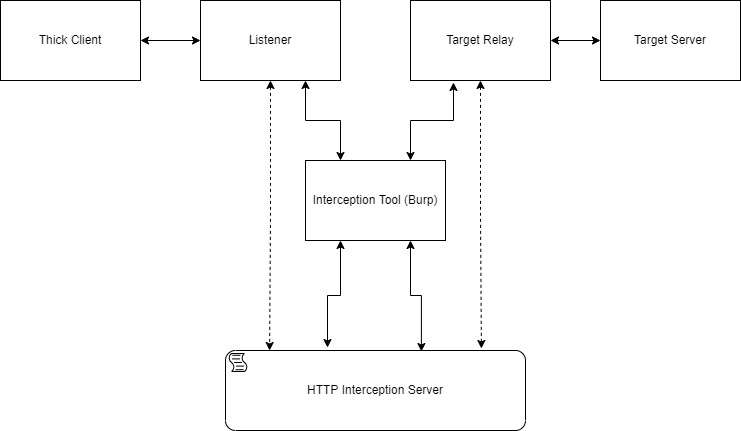
먼저 리스너의 주소와 포트를 구성해야 합니다. 각 리스너에 대해 대상(주소와 포트)도 구성해야 합니다. 리스너로부터 수신된 모든 데이터는 URL에 "CLIENT_REQUEST"를 포함하는 HTTP POST 요청의 본문에 래핑됩니다. 대상으로부터 수신된 모든 데이터는 URL에 "SERVER_RESPONSE"를 포함하는 HTTP POST 요청의 본문에 래핑됩니다. 이러한 요청은 로컬 HTTP 가로채기 서버로 전송됩니다.
HTTP 프록시를 구성하고 burp suite와 같은 도구를 HTTP 가로채기 도구로 사용하여 메시지를 볼 수 있는 옵션이 있습니다. 이렇게 하면 Burp의 "Match and Replace", 확장 프로그램 또는 수동으로 메시지를 쉽게 수정할 수 있습니다(가로채는 프로토콜의 시간 제한 메커니즘이 매우 짧을 수 있음을 기억하십시오).
메시지를 수정하는 또 다른 방법은 HTTP 가로채기 서버가 메시지를 수신할 때 실행할 Python 스크립트를 사용하는 것입니다.
HTTP 가로채기 서버로 전송된 메시지의 본문은 셸에 출력됩니다. 수정 스크립트가 제공된 경우 변경 후 메시지가 출력됩니다. 모든 수정 후에 가로채기 서버는 HTTP 응답 본문으로 다시 에코합니다.
SSL/TLS 통신을 복호화하려면 mitm_intercept에 클라이언트가 리스너와 핸드셰이크를 시작할 때 수락할 인증서와 키를 제공해야 합니다. 대상 서버가 핸드셰이크에 특정 인증서를 요구하는 경우 인증서와 키를 제공하는 옵션이 있습니다.
일반적인 트래픽 흐름을 보여주는 작은 차트:
mitm_intercept는 최신 버전의 Python 3(Python 3.9)과 호환되며 Windows와도 호환됩니다(예: Windows에는 socket.MSG_DONTWAIT가 없음). "STARTTLS" 사용 옵션을 유지했으며 "Mixed" 모드라고 부릅니다. SSL 키 로그 파일 사용이 업데이트되었으며(사용하는 내장 옵션은 Python 3.8부터 새로 도입됨), SNI 헤더를 변경하는 옵션을 추가했습니다. 이제 들어오고 나가는 통신 관리는 socketserver에 의해 수행되며, 모든 데이터는 데이터 표현 및 수정을 처리하는 ThreadingHTTPServer의 하위 클래스로 전송됩니다. 이렇게 하면 수정 스크립트가 응답에 적용한 변경 사항을 볼 수 있습니다(Burp 사용에 편리). 또한 OpenSSL 암호 목록 형식을 사용하여 스크립트가 사용하는 사용 가능한 암호를 변경할 수 있습니다.
$ python -m pip install requestsusage: mitm_intercept.py [-h] [-m] -l [u|t:]<interface>:<port> [[u|t:]<interface>:<port> ...] -t
[u|t:]<addr>:<port> [[u|t:]<addr>:<port> ...] [-lc <cert_path>]
[-lk <key_path>] [-tc <cert_path>] [-tk <key_path>] [-w <interface>:<port>]
[-p <addr>:<port>] [-s <script_path>] [--sni <server_name>]
[-tv <defualt|tls12|tls11|ssl3|tls1|ssl2>] [-ci <ciphers>]
mitm_intercept version 1.6
options:
-h, --help show this help message and exit
-m, --mix-connection Perform TCP relay without SSL handshake. If one of the relay sides starts an
SSL handshake, wrap the connection with SSL, and intercept the
communication. A listener certificate and private key must be provided.
-l [u|t:]<interface>:<port> [[u|t:]<interface>:<port> ...], --listen [u|t:]<interface>:<port> [[u|t:]<interface>:<port> ...]
Creates SSLInterceptServer listener that listens on the specified interface
and port. Can create multiple listeners with a space between the parameters.
Adding "u:" before the address will make the listener listen in UDP
protocol. TCP protocol is the default but adding "t:" for cleanliness is
possible. The number of listeners must match the number of targets. The i-th
listener will relay to the i-th target.
-t [u|t:]<addr>:<port> [[u|t:]<addr>:<port> ...], --target [u|t:]<addr>:<port> [[u|t:]<addr>:<port> ...]
Directs each SSLInterceptServer listener to forward the communication to a
target address and port. Can create multiple targets with a space between
the parameters. Adding "u:" before the address will make the target
communicate in UDP protocol.TCP protocol is the default but adding "t:" for
cleanliness is possible. The number of listeners must match the number of
targets. The i-th listener will relay to the i-th target.
-lc <cert_path>, --listener-cert <cert_path>
The certificate that the listener uses when a client contacts him. Can be a
self-sign certificate if the client will accept it.
-lk <key_path>, --listener-key <key_path>
The private key path for the listener certificate.
-tc <cert_path>, --target-cert <cert_path>
The certificate that used to create a connection with the target. Can be a
self-sign certificate if the target will accept it. Doesn't necessary if the
target doesn't require a specific certificate.
-tk <key_path>, --target-key <key_path>
The private key path for the target certificate.
-w <interface>:<port>, --webserver <interface>:<port>
Specifies the interface and the port the InterceptionServer webserver will
listens on. If omitted the default is 127.0.0.1:49999
-p <addr>:<port>, --proxy <addr>:<port>
Specifies the address and the port of a proxy between the InterceptionServer
webserver and the SSLInterceptServer. Can be configured so the communication
will go through a local proxy like Burp. If omitted, the communication will
be printed in the shell only.
-s <script_path>, --script <script_path>
A path to a script that the InterceptionServer webserver executes. Must
contain the function handle_request(message) that will run before sending it
to the target or handle_response(message) after receiving a message from the
target. Can be omitted if doesn't necessary.
--sni <server_name> If there is a need to change the server name in the SSL handshake with the
target. If omitted, it will be the server name from the handshake with the
listener.
-tv <defualt|tls12|tls11|ssl3|tls1|ssl2>, --tls-version <defualt|tls12|tls11|ssl3|tls1|ssl2>
If needed can be specified a specific TLS version.
-ci <ciphers>, --ciphers <ciphers>
Sets different ciphers than the python defaults for the TLS handshake. It
should be a string in the OpenSSL cipher list format
(https://www.openssl.org/docs/manmaster/man1/ciphers.html).
For dumping SSL (pre-)master secrets to a file, set the environment variable SSLKEYLOGFILE with a
file path. Useful for Wireshark.
임의의 프로토콜을 가로채려면 통신을 리스너로 전달해야 합니다. 그 방법은 클라이언트가 작동하는 방식에 따라 다릅니다. 때로는 DNS 주소를 사용하며, hosts 파일을 변경하여 리스너 주소를 확인하는 것으로 충분합니다. 주소가 하드코딩된 경우 더 창의적인 방법을 적용해야 합니다(일반적으로 라우팅 테이블 수정, 클라이언트 패치 또는 VM 및 iptables 사용).
HTTP 가로채기 서버는 -s 플래그로 제공된 스크립트를 실행할 수 있습니다. 이 스크립트는 HTTP 요청이 수신될 때 실행됩니다. HTTP 가로채기 서버의 응답은 스크립트를 실행한 후 수신된 요청입니다.
