
Skip to content
KitploitKITPLOIT
도구블로그
제출
도구블로그
제출

해킹, 침투 테스트 및 사이버 보안 도구를 당신의 보안 무기고에!

Kitploit은 해킹, 사이버 보안 및 침투 테스트 도구 디렉토리입니다. 최신 프로젝트 업데이트를 발견하여 취약점을 찾고, 시스템을 분석하고, 테스트를 자동화하고, 보안을 강화하세요.

··피드·문의·개인정보·© 2026 Kitploit

도구 디렉토리

카테고리

모든 카테고리 보기
Loading categories
wafparan01d3 — Quick WAF "paranoid" Doctor Evaluation | WAFPARAN01D3 Tool | Kitploit
도구/GitHubGitHub/alt3kx/wafparan01d3
Defensive ToolsScripting & AutomationConfiguration AuditingWeb SecurityPenetration Testing
GitHubalt3kx/wafparan01d3

wafparan01d3

Quick WAF "paranoid" Doctor Evaluation | WAFPARAN01D3 Tool

저장소 보기
2464년 전Kitploit 검토 완료

인기

모두 보기 →

커뮤니티에서 가장 많이 사용되는 도구를 찾아보세요.

모든 도구 탐색

도구 컬렉션을 둘러보세요

모든 도구 보기 →
공유

빠른 WAF "패러노이드" 진단 평가

wafparano1d3
WAFPARAN01D3

웹 애플리케이션 방화벽 패러노이아 레벨 테스트 도구.
— alt3kx.github.io에서

Paranoia Levels(패러노이아 레벨) 소개

본질적으로 Paranoia Level(PL, 패러노이아 레벨)은 Core Rule Set의 공격성을 얼마나 강하게 설정할지 정의할 수 있게 해줍니다.
참조: https://coreruleset.org/20211028/working-with-paranoia-levels/

작동 방식

  • wafparan01d3.py python3 스크립트는 GET 파라미터를 기반으로 HTTP 요청의 서로 다른 부분에 배치된 인코딩된 payload를 사용하여 악성 요청을 수집하며, 평가 결과는 사용자 머신에 생성되는 디버그 리포트 파일 wafparan01d3.log에 기록됩니다.
  • 기본 구성 레벨을 사용하여 다양한 공격 또는 payload를 설정하면서 각 WAF 패러노이아 레벨의 동작과 응답을 관찰합니다.
  • 아래의 PoC는 기본 "Mock"을 설정하고 백엔드를 시뮬레이션하여 처음부터 기본 설치 및 구성을 제공하며, 현재 배포된 WAF를 재사용합니다.
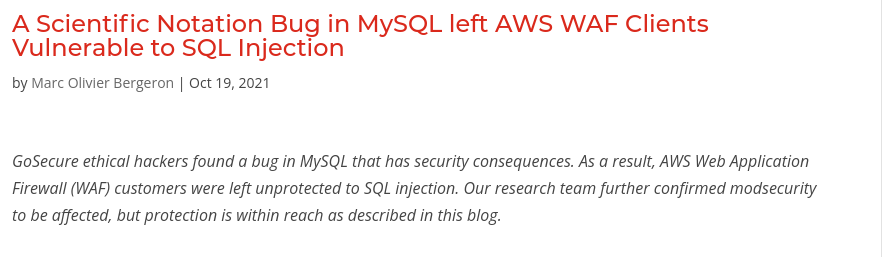
  • 사용 가능한 기본 payload는 mysql_gosecure.txt로, gosecure의 연구 "A Scientific Notation Bug in MySQL left AWS WAF Clients Vulnerable to SQL Injection"(여기 https://www.gosecure.net/blog/2021/10/19/a-scientific-notation-bug-in-mysql-left-aws-waf-clients-vulnerable-to-sql-injection/ 참조)를 기반으로 합니다. 기본 구성에서 또는 다양한 규칙/ID를 단계적이고 신속하게 비활성화하여 modsecurity를 사용하는 WAF를 서로 다른 패러노이아 레벨로 평가합니다.
접근 방식

  • Pentesters: 권한 있는 "쉘"을 사용하여 WAF Linux 박스에 제한적으로 접근하는 GreyBox 범위로, DEV/STG/TEST 환경에서 다양한 payload를 전송하며 WAF Apache 구성 파일을 시작/리로드 및 편집할 수 있습니다.
  • 보안 책임자: 조직의 각 솔루션에 적용할 WAF 패러노이아 레벨에 대한 최선의 결정을 내립니다.
  • 블루팀: 조직에서 규칙을 집행하고, 최상의 알림을 제공하며, 오탐(false positive) 결과를 줄입니다.
  • 통합업체: 더 깊은 트러블슈팅을 수행하고 규칙을 신속하게 커스터마이징하거나 가상 패치를 생성하여 적절한 WAF 패러노이아 레벨을 정의합니다.

개념 증명(PoC): Ubuntu 20.04.3 및 OWASP Core Rule Set (CRS) v3.3.2 기반

참조: https://www.inmotionhosting.com/support/server/apache/install-modsecurity-apache-module/

초기 설치

  1. 소프트웨어 리포지토리 업데이트:
root@kitploit:~
$ sudo apt update -y && sudo apt dist-upgrade -y
  1. 필수 패키지 설치:
root@kitploit:~
$ sudo apt-get install build-essential -y
  1. ubuntu용 apache2 설치(설치되지 않은 경우):
root@kitploit:~
$ sudo apt-get install apache2 -y
  1. ModSecurity Apache 모듈 다운로드 및 설치:
root@kitploit:~
$ sudo apt install libapache2-mod-security2 -y
  1. ubuntu용 curl 설치(설치되지 않은 경우):
root@kitploit:~
$ sudo apt-get install curl vim gridsite-clients net-tools -y
  1. Apache 서비스 재시작:
root@kitploit:~
$ sudo systemctl restart apache2
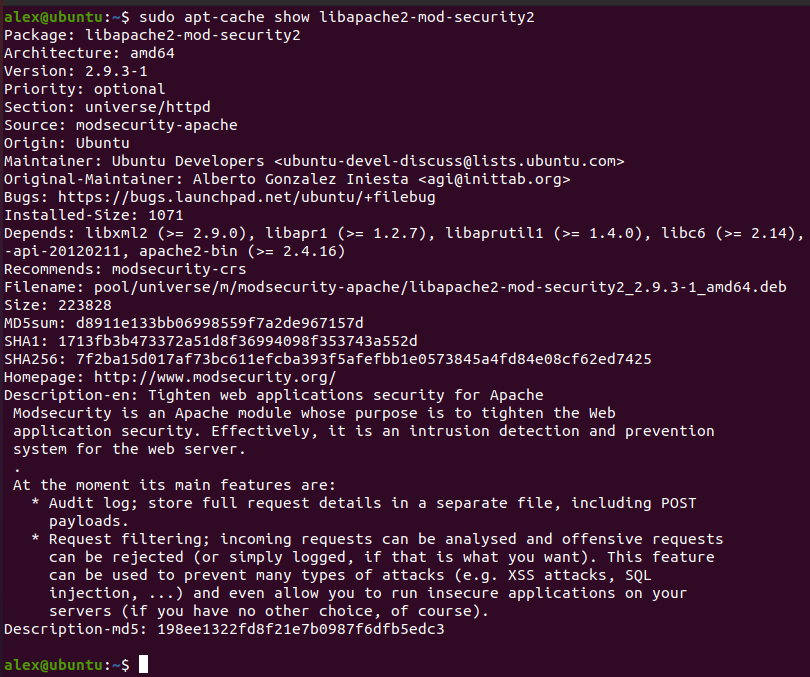
  1. 설치된 소프트웨어 버전이 최소 2.9.x인지 확인:
root@kitploit:~
$ sudo apt-cache show libapache2-mod-security2
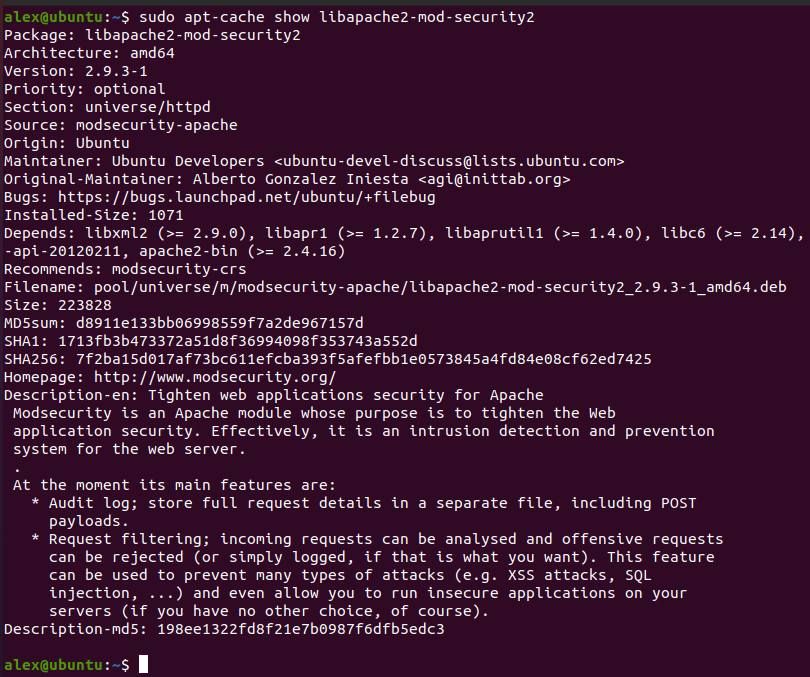
install

ModSecurity 구성

  1. 파일 복사 및 이름 변경:
root@kitploit:~
$ sudo cp /etc/modsecurity/modsecurity.conf-recommended /etc/modsecurity/modsecurity.conf

다음으로 ModSecurity 감지 모드를 변경합니다. 먼저 cd /etc/modsecurity 폴더로 이동합니다.
2. vi, vim, emacs 또는 nano로 ModSecurity 구성 파일을 편집합니다.

root@kitploit:~
$ sudo vim /etc/modsecurity/modsecurity.conf
  1. 파일 상단 근처에 SecRuleEngine DetectionOnly가 보일 것입니다. DetectionOnly를 On으로 변경합니다.

원래 값: SecRuleEngine DetectionOnly
새 값: SecRuleEngine On
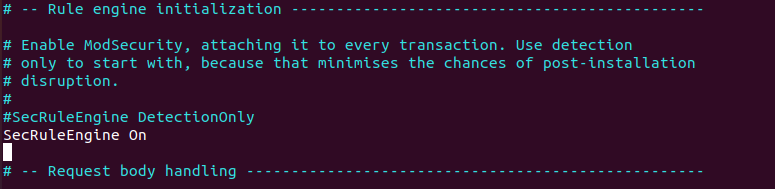
modsec

  1. 변경 사항을 저장합니다.
  2. Apache 재시작:
root@kitploit:~
$ sudo systemctl restart apache2

OWASP Core Rule Set 다운로드

  1. CoreRuleSet.org/installation에서 최신 CRS를 다운로드합니다.
root@kitploit:~
$ cd ~
$ wget https://github.com/coreruleset/coreruleset/archive/refs/tags/v3.3.2.zip
  1. 체크섬을 검증하고 여기 https://coreruleset.org/installation/ 에 공개된 값과 일치하는지 확인합니다.
root@kitploit:~
$ sha1sum v3.3.2.zip && echo ProvidedChecksum
88f336ba32a89922cade11a4b8e986f2e46a97cf  v3.3.2.zip
ProvidedChecksum 
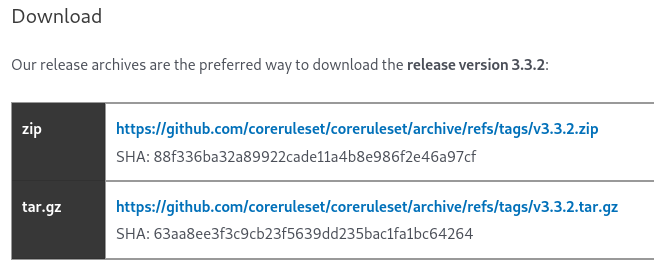
checksum

  1. zip 파일의 압축을 해제합니다.
root@kitploit:~
$ unzip v3.3.2.zip
  1. 새 디렉토리의 CRS 설정 파일을 ModSecurity 디렉토리로 이동합니다:
root@kitploit:~
$ sudo mv coreruleset-3.3.2/crs-setup.conf.example /etc/modsecurity/crs/crs-setup.conf
  • (선택 사항이지만 권장) 새 디렉토리의 rules 디렉토리를 ModSecurity 디렉토리로 이동합니다:
root@kitploit:~
$ sudo mv coreruleset-3.3.2/rules/ /etc/modsecurity/crs/
  1. Apache security2.conf 파일을 편집하여 ModSecurity 규칙을 로드하도록 합니다:
root@kitploit:~
$ sudo vim /etc/apache2/mods-enabled/security2.conf
root@kitploit:~
<IfModule security2_module>
        # Default Debian dir for modsecurity's persistent data
        SecDataDir /var/cache/modsecurity

        # Include all the *.conf files in /etc/modsecurity.
        # Keeping your local configuration in that directory
        # will allow for an easy upgrade of THIS file and
        # make your life easier
        IncludeOptional /etc/modsecurity/crs-setup.conf
        IncludeOptional /etc/modsecurity/rules/*.conf

        # Include OWASP ModSecurity CRS rules if installed
        #IncludeOptional /usr/share/modsecurity-crs/*.load
</IfModule>
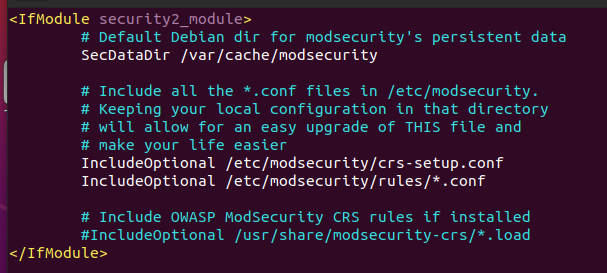
secmodule

  1. 기본 ModSecurity 구성 파일과 새 CRS 구성 파일이 모두 나열되어 있는지 확인합니다. 첫 번째 줄의 conf 파일 경로는 이미 포함되어 있을 수 있습니다. 두 번째 파일 경로는 /rules 디렉토리를 이동한 위치여야 합니다.
  2. /etc/apache2/apache2.conf 편집
root@kitploit:~
$ sudo vim /etc/apache2/apache2.conf

다음 코드를 복사하여 붙여넣고 저장합니다.

root@kitploit:~
# Include list of ports to listen on
Include ports.conf

Include /etc/modsecurity/modsecurity.conf
Include /etc/modsecurity/crs/crs-setup.conf
Include /etc/modsecurity/crs/rules/*.conf
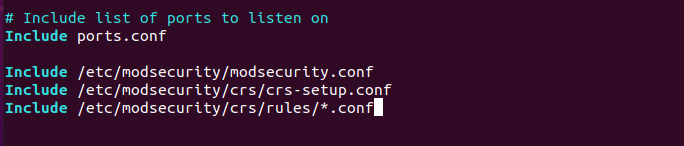
ports

Apache 로드 모듈 Rewrite 및 Proxy

  1. 다음 모듈을 복사합니다. Proxy 및 Rewrite 모듈을 활성화합니다.
root@kitploit:~
$ cd /etc/apache2
$ sudo cp mods-available/proxy_http.load mods-enabled
$ sudo cp mods-available/proxy.load mods-enabled/
$ sudo cp mods-available/rewrite.load mods-enabled/
  1. Apache 재시작
root@kitploit:~
$ sudo systemctl restart apache2

테스트 "Mocks"용 Virtualhost 추가

  1. 포트 추가, /etc/apache2/ports.conf 편집
root@kitploit:~
$ sudo vim /etc/apache2/ports.conf

다음 코드를 복사하여 붙여넣고 저장합니다.

root@kitploit:~
# If you just change the port or add more ports here, you will likely also
# have to change the VirtualHost statement in
# /etc/apache2/sites-enabled/000-default.conf

Listen 8080
Listen 18080

<IfModule ssl_module>
        Listen 443
</IfModule>

<IfModule mod_gnutls.c>
        Listen 443
</IfModule>
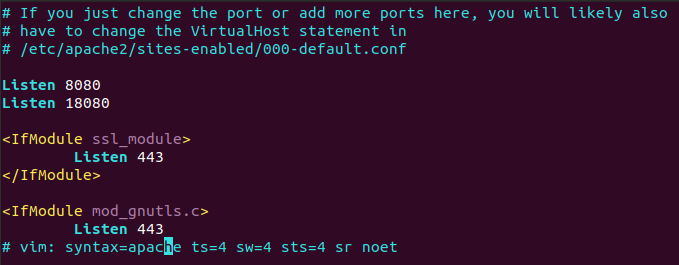
ports2

  1. /etc/apache2/sites-enabled로 이동하여 001-test.conf 파일을 생성합니다.
root@kitploit:~
$ cd /etc/apache2/sites-enabled/
$ sudo touch 001-test.conf
$ sudo vim 001-test.conf

다음 코드를 복사하여 붙여넣고 저장합니다.

root@kitploit:~
<VirtualHost *:8080>
        ServerName test.domain:8080

        SecRuleEngine On

        ErrorLog ${APACHE_LOG_DIR}/test_error.log
        CustomLog ${APACHE_LOG_DIR}/test_access.log combined
        SecAuditLog ${APACHE_LOG_DIR}/test_audit.log

        ProxyPass / http://127.0.0.1:18080/
        ProxyPassReverse / http://127.0.0.1:18080/
</VirtualHost>
  1. /etc/apache2/sites-enabled로 이동하여 002-moc.conf 파일을 생성합니다.
root@kitploit:~
$ cd /etc/apache2/sites-enabled/
$ sudo touch 002-moc.conf
$ sudo vim 002-moc.conf

다음 코드를 복사하여 붙여넣고 저장합니다.

root@kitploit:~
<VirtualHost 127.0.0.1:18080>

        ErrorLog ${APACHE_LOG_DIR}/moc_error.log
        CustomLog ${APACHE_LOG_DIR}/moc_access.log combined

        RewriteEngine On
        RewriteRule ^(.*)$ $1 [R=200,L]
</VirtualHost>
  1. Apache 재시작
root@kitploit:~
$ sudo systemctl restart apache2
  1. /etc/apache2/conf-enabled 안에 wafparan01d3_rulesremove.conf 파일을 생성합니다.
root@kitploit:~
$ sudo touch /etc/apache2/conf-enabled/wafparan01d3_rulesremove.conf
  1. Apache 리로드
root@kitploit:~
$ sudo service apache2 reload

FE 및 BE(mock) 테스트

root@kitploit:~
Must be specify a domain , edit the following lines  

Windows:
C:\Windows\System32\drivers\etc\hosts
192.168.56.106 test.domain <-- add this line and specify your IP address  

Linux: 
/etc/hosts
192.168.1.23 test.domain <-- add this line and specify your IP address 

$ curl -i -k -s -XGET http://test.domain:8080/
HTTP/1.1 200 OK
Date: Mon, 22 Nov 2021 06:31:41 GMT
Server: Apache/2.4.41 (Ubuntu)
Content-Length: 571
Content-Type: text/html; charset=iso-8859-1
Vary: Accept-Encoding

<!DOCTYPE HTML PUBLIC "-//IETF//DTD HTML 2.0//EN">
<html><head>
<title>200 OK</title>
</head><body>
<h1>OK</h1>
<p>The server encountered an internal error or
misconfiguration and was unable to complete
your request.</p>
<p>Please contact the server administrator at 
 [no address given] to inform them of the time this error occurred,
 and the actions you performed just before this error.</p>
<p>More information about this error may be available
in the server error log.</p>
<hr>
<address>Apache/2.4.41 (Ubuntu) Server at 127.0.0.1 Port 18080</address>
</body></html>

$ curl -i -k -s -XGET http://localhost:18080/
HTTP/1.1 200 OK
Date: Mon, 22 Nov 2021 06:27:17 GMT
Server: Apache/2.4.41 (Ubuntu)
Content-Length: 571
Content-Type: text/html; charset=iso-8859-1

<!DOCTYPE HTML PUBLIC "-//IETF//DTD HTML 2.0//EN">
<html><head>
<title>200 OK</title>
</head><body>
<h1>OK</h1>
<p>The server encountered an internal error or
misconfiguration and was unable to complete
your request.</p>
<p>Please contact the server administrator at 
 [no address given] to inform them of the time this error occurred,
 and the actions you performed just before this error.</p>
<p>More information about this error may be available
in the server error log.</p>
<hr>
<address>Apache/2.4.41 (Ubuntu) Server at localhost Port 18080</address>
</body></html>

사용 방법

도움이 필요하면 help 옵션을 사용할 수 있습니다. 기본 사용법은 정의된 다양한 인수를 전달하는 것입니다.
예시:

root@kitploit:~
$ sudo python3 wafparan01d3.py -h 

           (                                  )   ) (       )
 (  (      ))\ )          ) (      )        ( /(( /( )\ ) ( /(
 )\))(  ( /(()/( `  )  ( /( )(  ( /(  (     )\())\()|()/( )\())
((_)()\ )(_))(_))/(/(  )(_)|()\ )(_)) )\ ) ((_)((_)\ ((_)|(_)\
_(()((_|(_)(_) _((_)_\((_)_ ((_|(_)_ _(_/( /  (_) (_)_| |__ (_)
\ V  V / _` |  _| '_ \) _` | '_/ _` | ' \)) () || |/ _` ||_ \
 \_/\_/\__,_|_| | .__/\__,_|_| \__,_|_||_| \__/ |_|\__,_|___/
                |_|

                    ~ WAFPARANO1D3 : v1.1 ~
     The Web Application Firewall Paranoia Level Test Tool.

usage: wafparan01d3.py [-h] [--run [_RUN]] [--debug [_DEBUG]] [--pl [_PARANOIALEVEL ...]] [--proxy [_PROXY]] [--payload [_PAYLOAD]] [--rules-remove [_RULESREMOVE]] [--log [_LOG]] [--domain [_DOMAIN]] [--conf-file [_CONF_FILE]]
                       [--time-sleep [_TIME_TO_SLEEP]] [--time-sleep-request [_TIME_TO_SLEEP_REQUEST]] [--desc [_DESC]] [--output-desc [_OUTPUT_DESC]]

optional arguments:
  -h, --help            show this help message and exit
  --run [_RUN]          Run script
  --debug [_DEBUG]      Debug mode
  --pl [_PARANOIALEVEL ...]
                        Define paranoia level Ex. -pl 2
  --proxy [_PROXY]      Define Proxy. Ex: http://127.0.0.1:8081
  --payload [_PAYLOAD]  Define payload file. Ex. --payload payload2.txt
  --rules-remove [_RULESREMOVE]
                        Define rules remove file. Ex. --rules-remove rules1.txt
  --log [_LOG]          Define path of the log file. Ex. --log /var/log/apache/wafparan01d3.log
  --domain [_DOMAIN]    Define your domain. Ex. --domain example.domain:8080
  --conf-file [_CONF_FILE]
                        Define configuration file. Ex. --conf-file /opt/modsecurity/crs/rules/INITIALIZATION.conf
  --time-sleep [_TIME_TO_SLEEP]
                        Sleep time per PL. Ex. --time-sleep 3
  --time-sleep-request [_TIME_TO_SLEEP_REQUEST]
                        Sleep time per Request. Ex. --time-sleep-request 3
  --desc [_DESC]        Description of the script and authors
  --output-desc [_OUTPUT_DESC]
                        Description of the output on console mode.
                                                              

선택적 인수(Optional Arguments)

root@kitploit:~
$ sudo python3 wafparan01d3.py -h 
	- show the help message

$ sudo python3 wafparan01d3.py --run
	- run the script with default options.

$ sudo python3 wafparan01d3.py --run --debug
	- Print every line on console.
	
$ sudo python3 wafparan01d3.py --run --pl 1
	- Run the script in assigned Paranoia Level.
	- By default runs on Paranoia Level 1, 2, 3, 4

$ sudo python3 wafparan01d3.py --run --payload file_payload2.txt
	- Define the payload file that you want to send to WAF.
	- By default takes the file mysql_gosecure.txt

$ sudo python3 wafparan01d3.py --run --rules-remove rules_removex.txt
	- Define the rules that you want to remove on GWAF.
	- Example of the file: 
		- Default 920000 920001 920002
	- By default takes the files: rules_remove1.txt, rules_remove2.txt, rules_remove3.txt, rules_remove4.txt

$ sudo python3 wafparan01d3.py --run --log /home/waf_user/paranoia.log
	- Define LOG File.
	- By default print the log on paranoia_debug.log

$ sudo python3 wafparan01d3.py --run --domain mydomain.test.com
	- Define Domain of Front End WAF.
	- By default runs over domain domain.test:8080
	
$ sudo python3 wafparan01d3.py --run --conf-file /opt/modsecurity/crs/rules/INITIALIZATION.conf
	- Define the configuration file to update the Paranoia Level
	- By default takes /etc/modsecurity/crs/rules/REQUEST-901-INITIALIZATION.conf

$ sudo python3 wafparan01d3.py --run --time-sleep 3
	- Define the time to sleep per Paranoia Level.

$ sudo python3 wafparan01d3.py --run --time-sleep-request 2
	- Define the time to sleep per request send to WAF.

$ sudo python3 wafparan01d3.py --desc
	- Print the description of the script and the authors.

데모

최신 OWASP Core Rule Set CRS 3.3.2를 사용하여 WAF ModSecurity 및 'Mock'을 배포하는 VM 환경(Ubuntu)을 실행하면 wafparan01d3.py를 사용해 볼 수 있습니다. ModSecurity 패러노이아 레벨을 평가하며 쉽게 커스터마이징할 수 있습니다.

실행 방법:

root@kitploit:~
$ git clone https://github.com/alt3kx/wafparan01d3.git
$ cd wafparan01d3
$ sudo python3 wafparan01d3.py --help 
root@kitploit:~
$ sudo python3 wafparan01d3.py --run

wafparan01d3_001

root@kitploit:~
$ sudo python3 wafparan01d3.py --run --debug --proxy http://192.168.56.1:8081

wafparan01d3_002

root@kitploit:~
$ sudo python3 wafparan01d3.py --run --debug --pl 1 2 --proxy http://192.168.56.1:8081 --log test.log --domain vulnerable.domain:8080 --time-sleep-request 1 --time-sleep 1 --rules-remove my_rules_remove.txt --payload my_payload.txt

wafparan01d3_003

WAF 규칙 과학적 표기법(WAF Rule Scientific Notation)

https://github.com/mindhack03d/WAF-Rule-Scientific-Notation

작성자

Alex Hernandez 일명 (@_alt3kx_)
Jesus Huerta 일명 @mindhack03d

도구 다운로드