
git lfs install          # one-time setup
git clone https://github.com/ucsb-mlsec/VulnLLM-R.git
cd VulnLLM-R
# If you cloned before installing Git LFS, run: git lfs pull
conda create -n vulnscan python=3.11
conda activate vulnscan
pip install -e . -e ./vulscan/train/LLaMA-Factory -e ./vulscan/model_zoo
# generate VulnLLM-R-7B's results
python -m vulscan.test.test --output_dir results/test_data --dataset_path ./datasets/test/function_level/ ./datasets/test/repo_level/ --language python c java --model UCSB-SURFI/VulnLLM-R-7B --requests_per_minute 1000 --save --use_cot --batch_size 4 --tp 2 --vllm --max_tokens 8192 --random_cwe

python -m vulscan.test.test_hf \
      --output_dir results/test_hf \
      --hf_dataset UCSB-SURFI/VulnLLM-R-Test-Data \
      --hf_split repo_level function_level \
      --language c python java \
      --model UCSB-SURFI/VulnLLM-R-7B \
      --save --use_cot --vllm --tp 2

# [optional] generate other models' results with our shell script
# remember to add your API keys to .env file if you want to run commercial models
# use ./run_test.sh -h for more options
./vulscan/test/run_test.sh -o results/test_data -t 2 # -o means output directory, -t means tensor parallelism
./vulscan/test/run_test.sh -o results/test_data -M o3-mini # -M means model name, which runs only one model.
./vulscan/test/run_test.sh -o results/test_data -M gpt-5.4 -e high # -e sets reasoning effort (e.g., none/low/medium/high/xhigh)
./vulscan/test/run_test.sh -o results/test_data -M claude-opus-4-6 -e high

# [optional] draw plot to compare with other models
python plots/plot_language_comparison_models.py --results-dir results/test_data
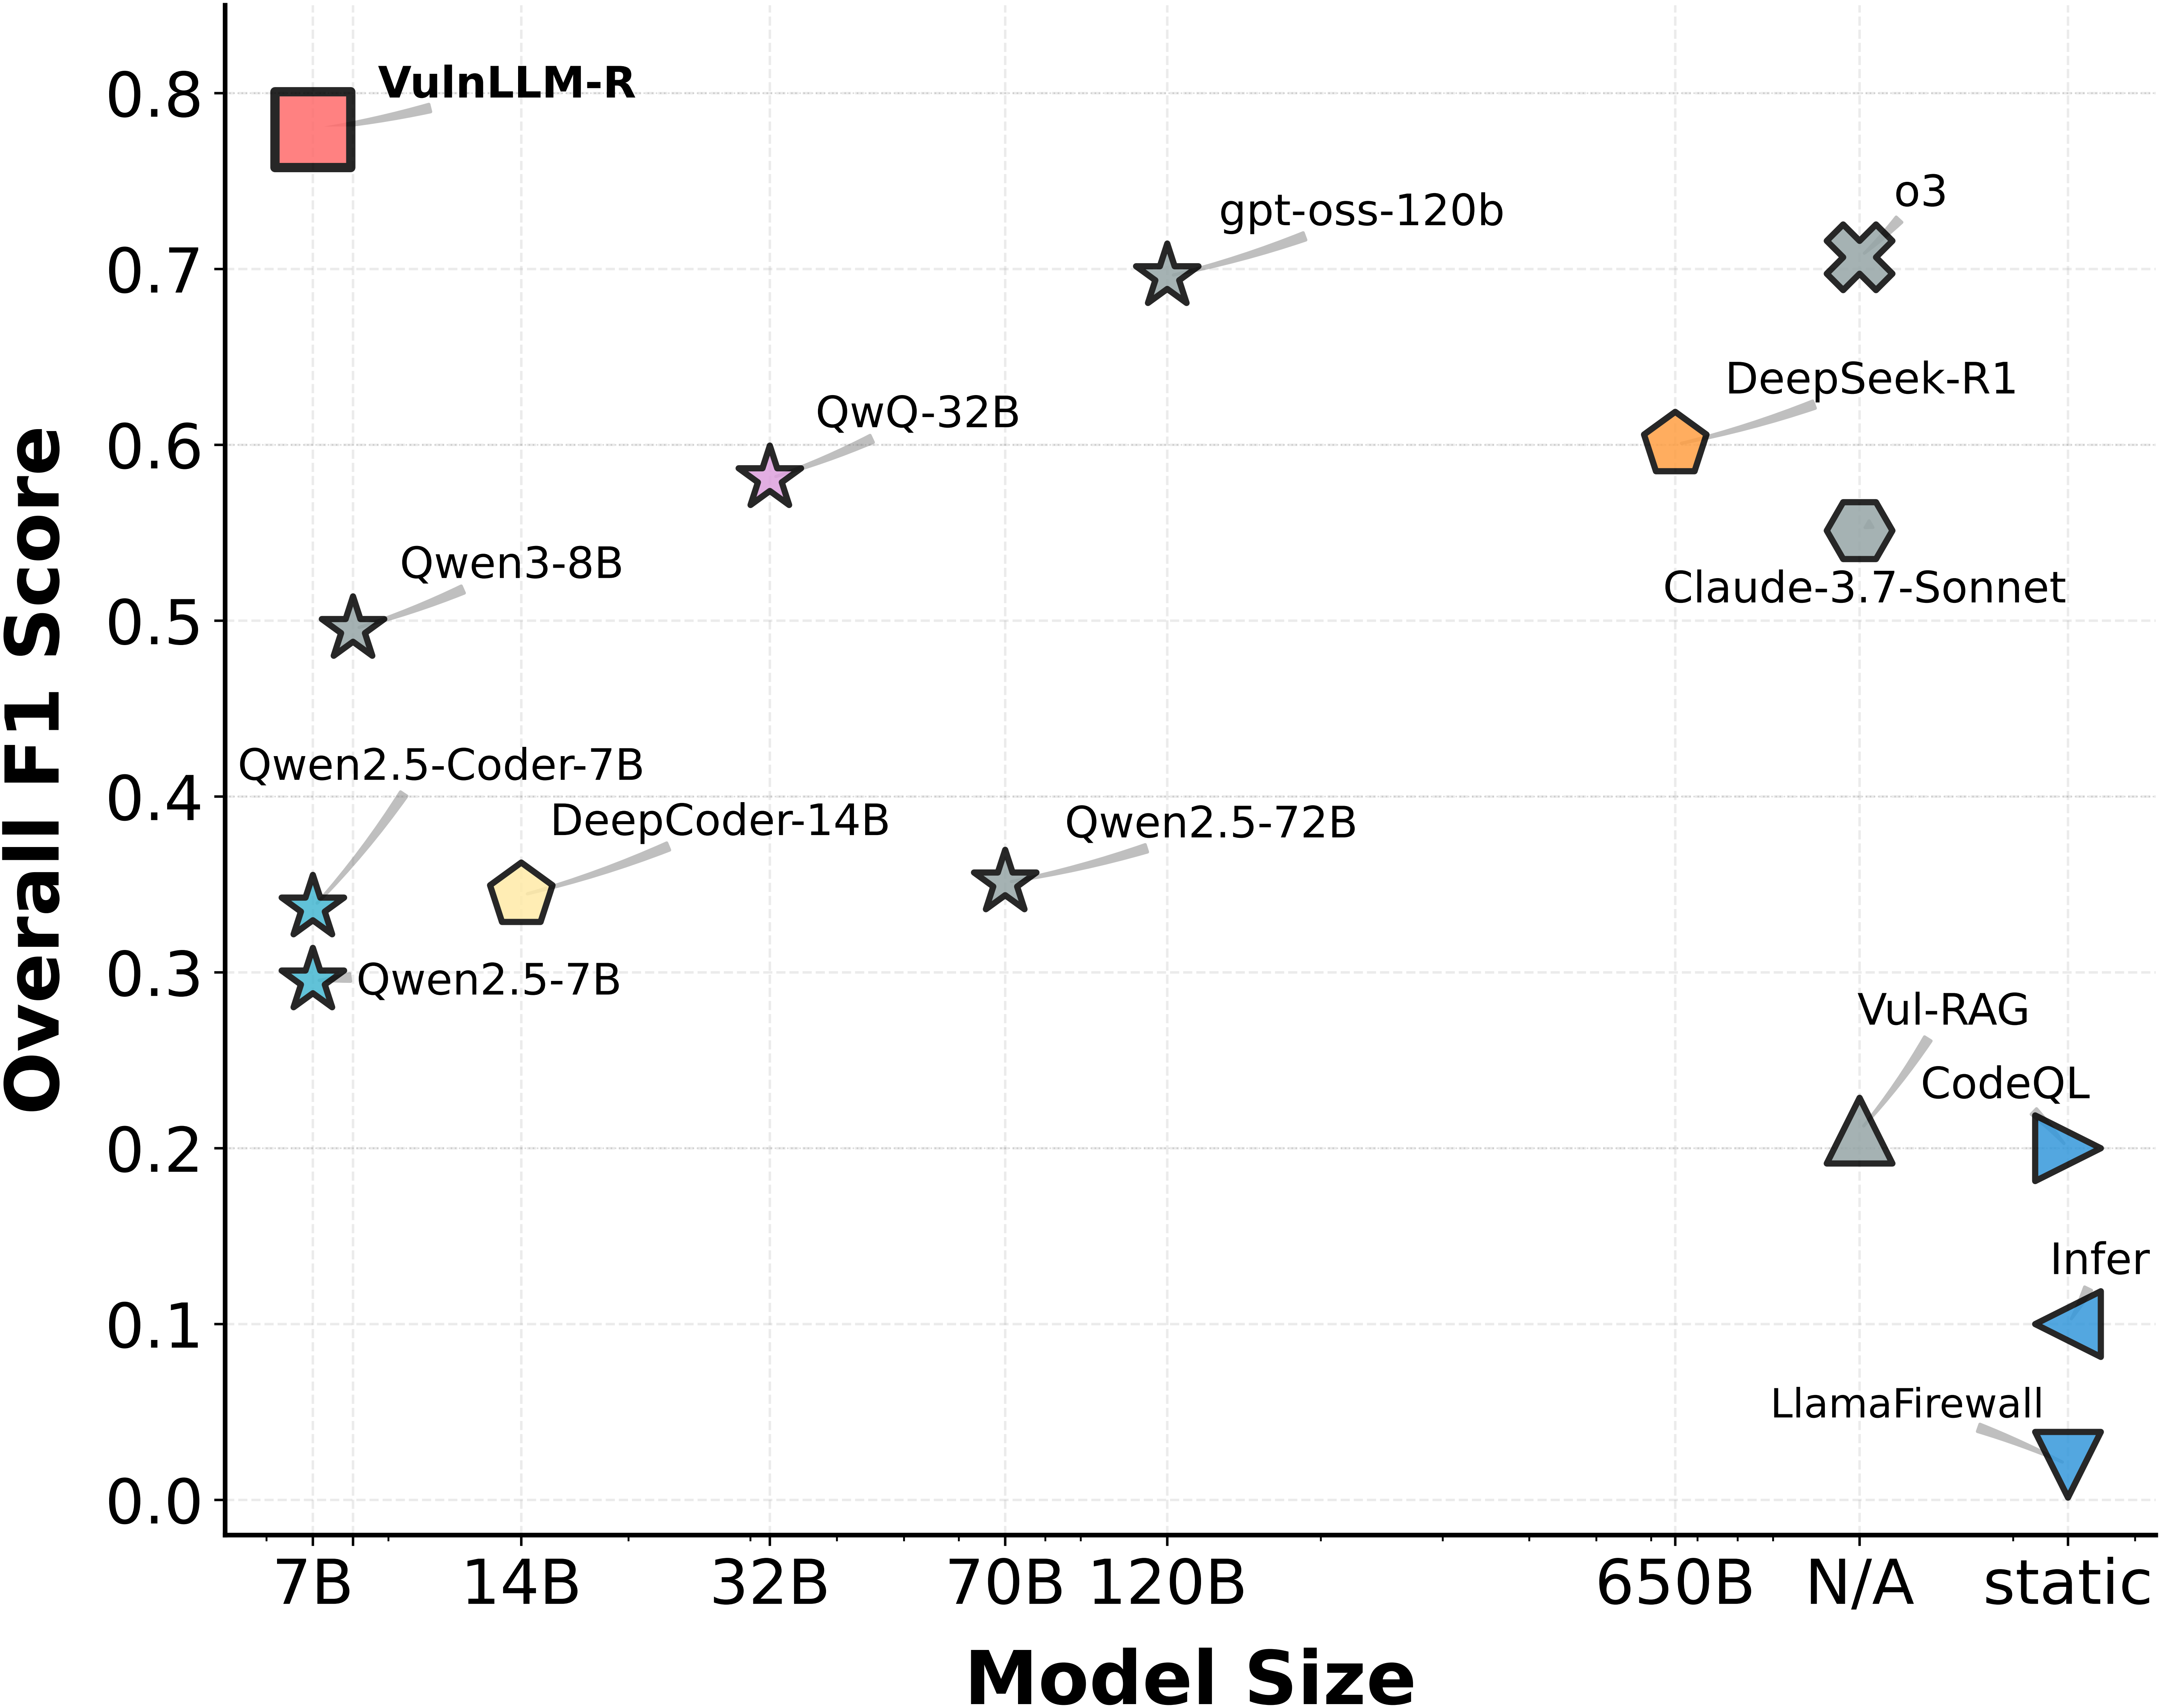
python plots/plot_model_size_scatter.py --results-dir results/test_data # Note: Labels may overlap with scatter points. Adjust text positions manually if needed.
また、蒸留データセットの推論を削減したバージョンも提供しています:
既存の関数レベルの脆弱性検出データセットを統合します: PrimeVul [1]、 SecCodePLT [2]、 Juliet [3]、 Sven [4]、 およびArvo [5]。 これらのデータセットの中で、PrimeVulが最も複雑な関数を持っています。 私たちはclean(PrimeVulなし)とnoisy(PrimeVulあり)の2つのトレーニングセットを作成します。 これにより、比較的単純なデータセットでトレーニングし、複雑なPrimeVulデータセットでテストできます。 PrimeVulを含むトレーニングセットをnoisyと名付けたのは、データセットがノイジーであるという意味ではないことに注意してください。 これはプロジェクトの初期に使用した、比較的恣意的な名前です。
vulscan/data_process/data_utilsにはデータセットを処理および統合するための一連のスクリプトが
あります。
raw_to_us.py: 生データを当データセットに統合し、冗長なデータを削除しますcheck_cwe_correct.py: CWEカテゴリごとの精度を計算しますgenerate_arvo_raw_data.py: arvoデータセットから構造化された生データを生成しますarvo_to_us.py: arvoの構造化生データを当データセットの形式に再フォーマットしますsplit_good_bad_for_juliet.py: 生のJuliet 1.3データセットからデータを抽出し、必要な形式に変換します。これは
clean_datasetの一部を構成しますadd_sven_to_clean_dataset.py: Svenデータセットからデータを抽出し、clean_datasetの一部を構成しますsync_large_small.py: noisy_dataset/large_train/cの変更を
noisy_dataset/small_train/cに同期しますremove_testing_from_training.py: 各データにhumanタグを追加します。これは人間によって検証され、
テストデータとして使用されることを意味します
-data_utils.py: データセットにrelated_cweフィールドを追加しますdatasets/clean_dataset: PrimeVulを含まないトレーニングデータ
datasets/clean_dataset/python にはSVENとSecCodePLTのデータが含まれますdatasets/clean_dataset/c にはJulietとSVENのデータが含まれますdatasets/noisy_dataset
datasets/noisy_dataset/small_train: 選択されたCWEを含むPrimeVulとSVENのトレーニングデータが含まれます(
このデータセットのPrimeVulデータをトレーニングに使用します)datasets/noisy_dataset/large_train: より多くのCWEを含むPrimeVul、SVEN、SecCodePLTのトレーニングデータが含まれます
(このデータセットは後でより大きなモデルのトレーニングに使用できます)datasets/noisy_dataset/test: 人間によって検証されたPrimeVulの小さなテストセットdatasets/test
datasets/test/test_clean: SVEN、SecCodePLT、Julietのテストデータ。トレーニングセットに含まれない
OOD CWEを含みますdatasets/test/test_primevul_pair: 元のPrimeVulテストデータvulscan/data_process/data_utils/get_cwe_stat.pyを実行すると、データセットのヒストグラムを取得できます| データセット | 言語 | トレーニング/テスト | CWE | # 良性 | # 脆弱性 | 平均長 |
|---|---|---|---|---|---|---|
| Clean (seccodeplt) | Python | トレーニング | 20 | 1281 | 1281 | 741 |
| Clean (juliet) | C/C++ | トレーニング | 22 | 1716 | 1653 | 3689 |
| Hard (primevul filtered) | C/C++ | トレーニング | 26 | 2717 | 2952 | 4689 |
| Long Context (Oss-fuzz) | C/C++ | トレーニング | 3 | 475 | 604 | 12761 |
| Simple (seccodeplt) | Python | テスト | 24 (6 ood) | 74 | 74 | 814 |
| Simple (juliet) | C/C++ | テスト | 38 (14 ood) | 358 | 376 | 2575 |
| Hard (PrimeVul, SecLLMHolmes) | C/C++ | テスト | 13 (5 ood) | 145 | 152 | 4545 |
| Long Context (Oss-fuzz) | C/C++ | テスト | 3 (0 ood) | 0 | 320 | 18929 |
| primevul test (noisy) | C/C++ | テスト | 56 (34 ood) | 421 | 422 | 5341 |
データセットを構築した後、トレーニングセット用の推論データを生成します。
DeepSeek-r1とQwQの推論モデルに問い合わせて推論データを生成し、推論チェーンが非常に長いものを
フィルタリングして除外します。
推論データを生成するコードはvulscan/data_process/generate_reasoningにあり、推論データは
datasets/reasoning_data
に保存されます。
cd vulscan/data_process/generate_reasoning
generate_reasoning/generate.pyは、推論データを生成するためのメインスクリプトです。
各データポイントに対してn個の推論データサンプルを生成し、正しい答えが得られた
最短のものを選択します。
QwQモデルとDeepSeek-r1モデル(公式APIより遅いが安定しているtogether.AI APIを使用)で実行する例は
以下のとおりです:
python generate.py \
--tp 2 \
--dataset_type clean_dataset \
--batch_size 200 \
--n 8 \
--training_set train \
--model_name Qwen/QwQ-32B

# or
python generate.py \
--dataset_type noisy_dataset \
--batch_size 200 \
--n 8 \
--training_set small_train \
--model_name together-deepseek-reasoner \
--together_deepseek
生の推論データを生成した後、別のモデルを使用して、構造を壊さずにそれらを要約して短くすることができます
python extract_reasoning.py
さらに、generate_reasoning/filter.pyを使用して、特定の長さに基づいて推論データをフィルタリングできます。num_processesは
お使いのCPUコア数に応じて変更してください。
python filter.py \
--dataset_type noisy_dataset \
--training_set small_train \
--model_name Qwen/QwQ-32B \
--filter_input_length 16000 \
--filter_all_length 32000 \
--num_processes 16 \
--filter_correct_only # for filtering wrong predictions
# --model_name together-deepseek-reasoner \
最後に、トレーニング対象のモデル(Qwen-Instruct)用に、生成した推論データを再フォーマットする必要があります。

