
Skip to content
KitploitKITPLOIT
ツールブログ
提出
ツールブログ
提出

ハッキング、侵入テスト、サイバーセキュリティツールをあなたのセキュリティアーセナルに!

Kitploitはハッキング、サイバーセキュリティ、ペネトレーションテストのツールディレクトリです。最新のプロジェクトアップデートを見つけて、脆弱性の発見、システム分析、テストの自動化、セキュリティの強化を行いましょう。

··フィード·お問い合わせ·プライバシー·© 2026 Kitploit

ツールディレクトリ

カテゴリ

すべてのカテゴリを見る
Loading categories
BlockGuard — BlockGuardは、プロセスレベルでファイルアクセスをインターセプトし制御するWindows Data Loss Prevention (DLP) エージェントです。実行可能ファイルのパス、暗号学的ハッシュ、Authenticode署名、整合性レベルによって識別される許可されたプロセスのみが保護されたファイルを読み取れるようにします。 | Kitploit
ツール/GitHubGitHub/m2l33k/blockguard
認証と認可防御ツール暗号化/復号化ツール構成監査データ流出インシデントレスポンスログ分析
GitHubm2l33k/blockguard

BlockGuard

BlockGuardは、プロセスレベルでファイルアクセスをインターセプトし制御するWindows Data Loss Prevention (DLP) エージェントです。実行可能ファイルのパス、暗号学的ハッシュ、Authenticode署名、整合性レベルによって識別される許可されたプロセスのみが保護されたファイルを読み取れるようにします。


リポジトリを見る
5ヶ月前未レビュー

人気

すべて見る →

コミュニティで最も使われているツールを見つけましょう。

すべてのツールを探索

ツールコレクションを閲覧

すべてのツールを見る →
共有

BlockGuard — Trusty

.NET 9 Windows License DLP

🛡️ BlockGuard — プロセスベースのファイルアクセスセキュリティエージェント

BlockGuard は、Windows のデータ損失防止(DLP)エージェントであり、プロセスレベルでファイルアクセスを傍受・制御します。実行可能ファイルパス、暗号ハッシュ、Authenticode 署名、整合性レベルによって識別される承認済みプロセスのみが保護されたファイルを読み取れるようにし、それ以外のすべてのプロセスは NTFS ACL を介して OS カーネルレベルでデフォルト拒否されます。


📑 目次

  • 特徴
  • アーキテクチャ
  • UI 管理インターフェース
  • 前提条件
  • クイックスタート
  • 設定
  • エージェントの実行
  • 動作確認
  • プロジェクト構造
  • 動作の仕組み
  • トラブルシューティング
  • セキュリティ上の考慮事項
  • コントリビューション

✨ 特徴


🏗️ アーキテクチャ

BlockGuard は3層モジュラーアーキテクチャを採用しています。``` ┌─────────────────────────────────────────────────────────────────┐ │ BlockGuard.Agent (Windows Service) │ │ Orchestrates all layers │ ├───────────────────┬─────────────────────┬───────────────────────┤ │ Layer 1 │ Layer 2 │ Layer 3 │ │ MONITORING │ POLICY & IDENTITY │ PROTECTION │ │ │ │ │ │ • ETW Kernel │ • Process Identity │ • DPAPI Encryption │ │ File Trace │ Validator (6 │ • Structured Audit │ │ • ACL Enforcer │ checks) │ Logger (JSON) │ │ (deny-by- │ • Policy Evaluator │ │ │ default) │ (AND-logic │ │ │ │ rules) │ │ │ │ • Identity Cache │ │ │ │ (LRU + TTL) │ │ └───────────────────┴─────────────────────┴───────────────────────┘

root@kitploit:~
---
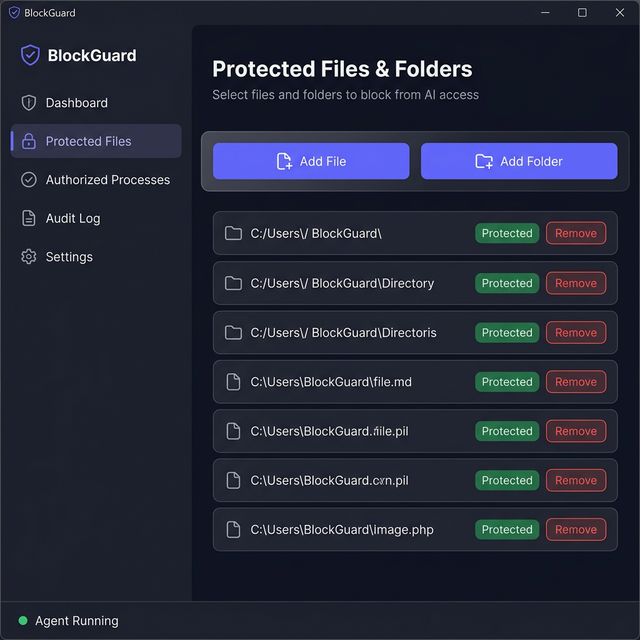
## 🖥️ UI管理インターフェース

BlockGuardは、視覚的なインターフェースを通じて保護されたファイルやフォルダを管理する**WPFデスクトップアプリケーション**を含んでいます。`appsettings.json`を手動で編集する必要はありません。

<p align="center">
  <img src="https://assets.kitploit.com/production/public/readmes/12349/51a9b7894117382666d869cee59860a33698f666133bd23c6b6cd48b225d942c.png" alt="BlockGuard UI" width="640" />
</p>

### 機能

- **ダッシュボード** — 保護ステータスの概要(ファイル総数、フォルダ数、暗号化状態)
- **保護されたファイル** — ファイルブラウザダイアログを介して、AIアクセスから保護するファイルやフォルダを追加/削除
- **アクティビティログ** — すべての設定変更のリアルタイムログ
- **設定** — 設定ファイルのパスとエージェント情報を表示
- **エージェントステータス** — BlockGuardエージェントサービスが実行中かどうかを示すライブインジケーター

### UIの起動方法```powershell
# From the project root
dotnet run --project src/BlockGuard.UI

注記: UIはAgentプロジェクトのappsettings.jsonを読み書きします。変更を保存した後、BlockGuard Agentサービスを再起動して反映させてください。


📋 前提条件

BlockGuardを実行する前に、以下のものがWindowsマシンにインストールされていることを確認してください:

必要条件最低バージョン確認コマンド

.NET 9 SDKのインストール(未インストールの場合)```powershell

Download from https://dotnet.microsoft.com/download/dotnet/9.0

Or use winget:

winget install Microsoft.DotNet.SDK.9

root@kitploit:~
---

## 🚀 クイックスタート

### 1. リポジトリをクローンする```powershell
git clone [email protected]:m2l33k/BlockGuard.git
cd BlockGuard

2. 依存関係の復元```powershell

dotnet restore BlockGuard.sln

root@kitploit:~
### 3. ソリューションの構築```powershell
dotnet build BlockGuard.sln --configuration Release

次のように表示されるはずです:``` Build succeeded. 0 Warning(s) 0 Error(s)

root@kitploit:~
### 4. 保護パスとルールの設定

`src/BlockGuard.Agent/appsettings.json` を編集して、**保護するファイル**と**許可するプロセス**を定義します。```json
{
  "BlockGuard": {
    "ProtectedPaths": [
      "C:\\Secrets\\ai-model-keys",
      "C:\\Secrets\\api-credentials.json"
    ],
    "AuthorizedProcesses": [
      {
        "RuleName": "AI-Model-Inference-Engine",
        "ExecutablePath": "C:\\Program Files\\MyAI\\inference.exe",
        "MinimumIntegrityLevel": "Medium",
        "RequireSignature": false
      }
    ]
  }
}

5. 実行 (開発モード)```powershell

Run as Administrator (required for ETW + ACL operations)

dotnet run --project src/BlockGuard.Agent

root@kitploit:~
---

## ⚙️ 設定

すべての設定は `src/BlockGuard.Agent/appsettings.json` の `"BlockGuard"` セクションにあります。

### 保護パス

保護するファイルまたはディレクトリの配列。ディレクトリは再帰的にすべてのファイルを保護します。```json
"ProtectedPaths": [
  "C:\\Secrets\\ai-model-keys",
  "C:\\Secrets\\api-credentials.json",
  "D:\\Confidential\\reports"
]

許可されたプロセスのルール

各ルールは、プロセスがアクセスを許可されるために一致する必要がある条件を定義します。null以外のすべてのフィールドが一致する必要があります(AND論理)。

例:パスベースのルール(AIモデルプロセス用)```json { "RuleName": "AI-Model-Inference-Engine", "ExecutablePath": "C:\Program Files\MyAI\inference.exe", "ExpectedFileHash": null, "ExpectedSignerSubject": null, "MinimumIntegrityLevel": "Medium", "RequireSignature": false }

root@kitploit:~
**例: 署名ベースのルール (署名された管理ツール向け)**```json
{
  "RuleName": "Signed-Management-Tool",
  "ExecutablePath": null,
  "ExpectedFileHash": null,
  "ExpectedSignerSubject": "CN=Contoso Security",
  "MinimumIntegrityLevel": "High",
  "RequireSignature": true
}

例: ハッシュ固定ルール (最大の改ざん防止のために)```json { "RuleName": "Pinned-Data-Processor", "ExecutablePath": "C:\Tools\processor.exe", "ExpectedFileHash": "a1b2c3d4e5f67890abcdef1234567890abcdef1234567890abcdef1234567890", "ExpectedSignerSubject": null, "MinimumIntegrityLevel": "Medium", "RequireSignature": false }

root@kitploit:~
### その他のオプション

| オプション | デフォルト | 説明 |
|---|---|---|
| `IdentityCacheTtlSeconds` | `30` | 検証済みプロセスIDがキャッシュされる時間(秒) |
| `HandleTimeoutSeconds` | `60` | 一時的なACL許可の最大期間(秒) |
| `AuditLogPath` | `C:\ProgramData\BlockGuard\Logs\audit.json` | JSON監査ログファイルのパス |
| `EnableDpapiEncryption` | `true` | 保護されたファイルを保存時にDPAPIで暗号化 |
| `DpapiScope` | `LocalMachine` | DPAPIスコープ: `LocalMachine` または `CurrentUser` |

---

## 🏃 エージェントの実行

### オプション A: 開発モード(コンソール)

テストとデバッグに最適です。**昇格された(管理者)PowerShell** から実行してください:```powershell
dotnet run --project src/BlockGuard.Agent --configuration Release

次のようなコンソール出力が表示されます:``` [03:15:22 INF] [BlockGuard.Agent.BlockGuardService] ======================================== BlockGuard Security Agent Starting Protected Paths: 2 Authorized Rules: 2 PID: 12345

[03:15:22 INF] [BlockGuard.Monitoring.AclEnforcer] Locked down file 'C:\Secrets\api-credentials.json' [03:15:22 INF] [BlockGuard.Protection.DpapiWrapper] Encrypted file 'C:\Secrets\api-credentials.json' [03:15:22 INF] [BlockGuard.Monitoring.EtwFileTraceSession] ETW file trace session started successfully. [03:15:22 INF] [BlockGuard.Agent.BlockGuardService] BlockGuard is now actively protecting 2 path(s).

root@kitploit:~
Press `Ctrl+C` を押して停止します。

### オプション B: Windows サービスとしてインストール(本番環境)```powershell
# 1. Publish a self-contained build
dotnet publish src/BlockGuard.Agent -c Release -r win-x64 --self-contained -o C:\BlockGuard

# 2. Create the Windows Service
sc.exe create BlockGuard binPath= "C:\BlockGuard\BlockGuard.Agent.exe" start= auto obj= "NT AUTHORITY\SYSTEM" DisplayName= "BlockGuard Security Agent"

# 3. Set the service description
sc.exe description BlockGuard "Process-based file access security agent (DLP)"

# 4. Start the service
sc.exe start BlockGuard

サービスの管理:```powershell

Check status

sc.exe query BlockGuard

Stop

sc.exe stop BlockGuard

Remove (uninstall)

sc.exe delete BlockGuard

root@kitploit:~
## ✅ 動作確認

以下の手順でBlockGuardがファイルを正しく保護していることを確認してください。

### テスト1: ビルド検証```powershell
# From the project root directory
dotnet build BlockGuard.sln

# Expected: Build succeeded with 0 Error(s)

テスト2: エージェントの起動を確認```powershell

Open an elevated (Administrator) PowerShell

dotnet run --project src/BlockGuard.Agent

root@kitploit:~
**✅ 期待される出力:**
- `BlockGuard Security Agent Starting` メッセージ
- `CRITICAL` または `FATAL` エラーがないこと
- `ETW file trace session started successfully`
- `BlockGuard is now actively protecting X path(s)`

**❌ `ETW session — insufficient privileges` が表示される場合:**
- 管理者として実行していません。PowerShell を右クリック → "管理者として実行"

### テスト 3: ACL ロックダウンの確認

エージェント起動後、保護されたファイルがロックダウンされていることを確認します:```powershell
# Create a test protected file
New-Item -Path "C:\Secrets" -ItemType Directory -Force
Set-Content -Path "C:\Secrets\api-credentials.json" -Value '{"api_key": "secret123"}'

# Start the agent (it will lock down the file)
dotnet run --project src/BlockGuard.Agent

# In ANOTHER non-admin terminal, try to read the file:
Get-Content "C:\Secrets\api-credentials.json"
# Expected: Access Denied error

テスト4: icaclsでACLの状態を確認```powershell

icacls "C:\Secrets\api-credentials.json"

Expected output (only SYSTEM and Administrators):

C:\Secrets\api-credentials.json NT AUTHORITY\SYSTEM:(F)

BUILTIN\Administrators:(F)

No other users/groups should be listed

root@kitploit:~
### テスト5: 監査ログの検査

エージェントがしばらく実行された後、監査ログを確認してください:```powershell
# View the last 10 audit entries
Get-Content "C:\ProgramData\BlockGuard\Logs\audit.json" | Select-Object -Last 10

期待される出力 (JSON lines):```json {"type":"operational","timestamp":"2026-03-05T02:30:00Z","eventType":"AgentStart","message":"BlockGuard security agent starting."} {"type":"access_decision","timestamp":"2026-03-05T02:30:05Z","verdict":"deny","reason":"No authorization rule matched this process identity.","file":"C:\Secrets\api-credentials.json","processId":5678}

root@kitploit:~
### テスト6: ETWイベントキャプチャの確認

エージェントが実行中に、2つ目のターミナルを開き、保護されたファイルへのアクセスを試みてください:```powershell
# Terminal 1: Agent is running with console output
dotnet run --project src/BlockGuard.Agent

# Terminal 2: Try reading a protected file with notepad
notepad.exe "C:\Secrets\api-credentials.json"

ターミナル1では、次のようなログエントリが表示されるはずです:``` [03:20:15 WRN] [AUDIT] DENIED access to 'C:\Secrets\api-credentials.json' by PID 9876 (C:\Windows\System32\notepad.exe). Reason: No authorization rule matched

root@kitploit:~
### テスト7: 不正アクセスがブロックされることを確認(AIモデル)

未承認のプロセス(例えば、不正なAIモデル)が保護されたフォルダやファイルを読み取ろうとすると、エージェントは即座にアクセスを拒否します。AIには厳格な**アクセス拒否**エラーが返され、その試行はログに記録されます:

<p align="center">
  <img src="https://assets.kitploit.com/production/public/readmes/12349/d2a2e20c0fc60e8b3a5f614b0a53c6c7275b634e93b1ce0b9fe4440c38215fac.png" alt="不正アクセス拒否" width="600" />
</p>

### テスト8: DPAPI暗号化を確認```powershell
# Check that the .enc file was created
Test-Path "C:\Secrets\api-credentials.json.enc"
# Expected: True

# Check that the original plaintext file was securely deleted
Test-Path "C:\Secrets\api-credentials.json"
# Expected: False (if EnableDpapiEncryption is true)

テスト9: 改ざん検出

エージェントの実行中に、手動で不正なACLエントリを追加します:```powershell

In an elevated terminal, add a rogue permission

icacls "C:\Secrets\api-credentials.json.enc" /grant Users:R

Wait up to 60 seconds...

The agent should detect the tampering and log:

[CRT] ACL TAMPERING DETECTED on 'C:\Secrets\api-credentials.json.enc'! Re-applying lockdown.

root@kitploit:~
### Test 10: ログディレクトリの確認```powershell
# Check both log locations
Get-ChildItem "C:\ProgramData\BlockGuard\Logs\"

# Expected files:
# audit.json              (structured JSON audit log)
# blockguard-20260305.log (daily rolling application log)

クイック確認チェックリスト


📁 プロジェクト構造```

BlockGuard/ ├── BlockGuard.sln # Solution file ├── README.md # This file ├── architecture_overview.md # Detailed architecture documentation ├── assets/ │ ├── Untitled.jpg # Project logo (Trusty mascot) │ └── blockguard_ui_mockup_*.png # UI mockup screenshot │ ├── src/ │ ├── BlockGuard.Core/ # Shared models, interfaces, configuration │ │ ├── Configuration/ │ │ │ └── BlockGuardOptions.cs # Strongly-typed config (paths, rules, timeouts) │ │ ├── Interfaces/ │ │ │ ├── IAclEnforcer.cs # ACL management contract │ │ │ ├── IAuditLogger.cs # Audit logging contract │ │ │ ├── IDpapiWrapper.cs # DPAPI encryption contract │ │ │ ├── IFileAccessMonitor.cs # ETW monitoring contract │ │ │ ├── IPolicyEvaluator.cs # Policy evaluation contract │ │ │ └── IProcessIdentityValidator.cs # Process identity contract │ │ └── Models/ │ │ ├── AccessDecision.cs # Verdict + reason + matched rule │ │ ├── FileAccessEvent.cs # ETW event: file, PID, operation │ │ └── ProcessIdentity.cs # Hash, signature, SID, integrity │ │ │ ├── BlockGuard.Monitoring/ # Layer 1: Monitoring & Interception │ │ ├── EtwFileTraceSession.cs # Real-time kernel file ETW consumer │ │ └── AclEnforcer.cs # NTFS ACL lockdown + temp grants │ │ │ ├── BlockGuard.Policy/ # Layer 2: Policy & Identity Engine │ │ ├── ProcessIdentityValidator.cs # 6-layer P/Invoke validation │ │ ├── PolicyEvaluator.cs # AND-logic rule matching │ │ └── IdentityCache.cs # Thread-safe LRU cache (TTL) │ │ │ ├── BlockGuard.Protection/ # Layer 3: Decryption & Handle Manager │ │ ├── DpapiWrapper.cs # DPAPI encrypt/decrypt + secure delete │ │ └── AuditLogger.cs # Structured JSON audit logging │ │ │ ├── BlockGuard.Agent/ # Windows Service entry point │ │ ├── Program.cs # DI container, Serilog, hosting │ │ ├── BlockGuardService.cs # Main orchestrator (5-phase startup) │ │ └── appsettings.json # Configuration file │ │ │ └── BlockGuard.UI/ # WPF Desktop Management Interface │ ├── App.xaml / App.xaml.cs # Application resources & dark theme │ ├── MainWindow.xaml / .cs # Main window with sidebar navigation │ ├── ViewModels/ │ │ └── MainViewModel.cs # MVVM ViewModel (commands, config I/O) │ └── Services/ │ └── ConfigurationService.cs # Reads/writes appsettings.json

root@kitploit:~
---

## 🔬 仕組み

### 起動シーケンス(5フェーズ)```
Phase 1: ACL Lockdown
  └─ Strip all permissions from protected files
  └─ Grant access only to SYSTEM + Administrators
  └─ Disable ACL inheritance

Phase 2: DPAPI Encryption (optional)
  └─ Encrypt each protected file at rest
  └─ Securely delete plaintext (overwrite with random data)
  └─ Store ciphertext as .enc files

Phase 3: Event Subscription
  └─ Register handler for file access events

Phase 4: ETW Monitoring
  └─ Start kernel-level file trace session
  └─ Filter events by protected paths
  └─ Emit FileAccessEvent for each match

Phase 5: Integrity Check Loop
  └─ Every 60 seconds, verify ACLs are intact
  └─ Auto-remediate if tampering detected

アクセスリクエストフロー```

┌─────────────┐ ┌───────────────┐ ┌──────────────────┐ │ Process │ │ ETW Kernel │ │ Policy │ │ reads file │────▶│ File Provider │────▶│ Evaluator │ └─────────────┘ └───────────────┘ └──────────────────┘ │ ┌────────┴────────┐ ▼ ▼ ┌──────────┐ ┌──────────┐ │ ALLOW │ │ DENY │ │ │ │ │ │ Grant │ │ ACL is │ │ temp ACL │ │ already │ │ (60s) │ │ blocking │ └──────────┘ └──────────┘ │ │ ▼ ▼ ┌────────────────────────────┐ │ Audit Logger (JSON) │ └────────────────────────────┘

root@kitploit:~
### プロセス検証(6つのチェック)

保護されたファイルにプロセスがアクセスする際、BlockGuardは以下を検証します:

1. **実行可能パス** — フルパスを解決し正規化(パストラバーサルを防止)
2. **SHA-256ハッシュ** — ディスク上のバイナリのハッシュを計算(ファイル置き換えを検出)
3. **Authenticode署名** — デジタル署名チェーンを検証(未署名/改ざんされたバイナリを検出)
4. **プロセス所有者SID** — トークンを照会して実行アカウントを特定
5. **整合性レベル** — 必須ラベル(信頼されていない/低/中/高/システム)を読み取り
6. **親プロセスID** — プロセス作成チェーンを追跡(インジェクションを検出)

すべてのチェックは**フェイルクローズ(fail-closed)** です:いずれかの検証ステップが失敗した場合、アクセスは**拒否(DENIED)** されます。

---

## 🛠️ トラブルシューティング

### 「ETWセッション — 権限が不十分です」

**原因:** エージェントが管理者/SYSTEM権限で実行されていません。

**修正方法:**```powershell
# Right-click PowerShell → "Run as Administrator"
dotnet run --project src/BlockGuard.Agent

"ACLを変更できません — エージェントに必要な権限がありません"

原因: エージェントは昇格された権限なしではファイルパーミッションを変更できません。

修正: 上記と同じ — 管理者として実行してください。

"保護されたパスが存在しません。スキップします。"

原因: appsettings.json 内のパスがマシン上に存在しません。

修正: 最初にディレクトリとファイルを作成してください:```powershell New-Item -Path "C:\Secrets\ai-model-keys" -ItemType Directory -Force Set-Content -Path "C:\Secrets\api-credentials.json" -Value '{"key":"value"}'

root@kitploit:~
### クローン後のビルドエラー

**修正:** NuGet パッケージを復元します:```powershell
dotnet restore BlockGuard.sln
dotnet build BlockGuard.sln

「孤立したETWセッションを破棄しました」

原因: 以前のエージェントインスタンスがクラッシュし、ゾンビ状態のETWセッションが残りました。これは自動的にクリーンアップされます — これはWARNINGであり、エラーではありません。

エージェントが起動後すぐに停止する

原因: 設定エラーの可能性があります。ログファイルを確認してください:```powershell Get-Content "C:\ProgramData\BlockGuard\Logs\blockguard-*.log" | Select-Object -Last 50

root@kitploit:~
---

## 🔒 セキュリティに関する考慮事項

### このエージェントができること
- ✅ ACLの強制により、許可されていないプロセスが保護されたファイルを**読み取る**ことを防止
- ✅ ETWを介してすべてのファイルアクセス試行をリアルタイムで検出および**監査**
- ✅ DPAPIを使用してファイルを**保存時に**暗号化
- ✅ ACLの改ざんを検出し**自動修復**

### このエージェントができないこと
- ❌ **ファイル読み取りの実行中ブロック** — これはユーザーモードエージェントです。真の実行中ブロックにはカーネルミニフィルタードライバーが必要です
- ❌ **カーネルレベルの攻撃を阻止** — 悪意のあるカーネルドライバーはNTFS ACLを迂回できます
- ❌ **管理者によるオーバーライドを防止** — 管理者アカウントはACLを削除できます(改ざん検出により軽減)

### 本番環境での推奨事項

1. **`NT AUTHORITY\SYSTEM`として実行** — コンソールアプリではなくWindowsサービスを使用
2. **エージェントバイナリに署名** Authenticode証明書を使用して自己改ざんを防止
3. **BitLockerを有効化** ボリューム上でフルディスク暗号化(DPAPIを補完)
4. **監査ログをSIEMに転送** 集中監視のため
5. **セキュアブート + ドライバー署名の強制を有効化** カーネルレベルの迂回を防止

---

## 🤝 コントリビューション

1. リポジトリをフォーク
2. 機能ブランチを作成: `git checkout -b feature/my-feature`
3. 変更をコミット: `git commit -m "Add my feature"`
4. ブランチにプッシュ: `git push origin feature/my-feature`
5. プルリクエストを開く

### コードスタイル
- C#の命名規則に従う (パブリックメンバーはPascalCase)
- すべてのパブリックAPIにXMLドキュメントコメントを追加
- すべての検証は**フェイルクローズド** (エラー時は拒否) であること
- すべてのネイティブハンドルを`finally`ブロックで明示的に破棄
- 使用後に機密メモリバッファをゼロでクリア

---

## 📄 ライセンス

このプロジェクトはMITライセンスの下でライセンスされています。詳細は[LICENSE](https://github.com/m2l33k/blockguard/blob/HEAD/LICENSE)を参照してください。

---

<p align="center">
  <b>セキュリティ第一の原則に基づいて構築されたWindowsファイル保護。</b>
  <br/>
  <sub>BlockGuard — あなたのデータにはロックだけでなくガードが必要だからです。</sub>
</p>
ツールをダウンロード
特徴説明
デフォルト拒否 ACLエージェント起動時に保護ファイルをロックダウン — SYSTEM と Administrators のみアクセス可能
リアルタイム ETW 監視Windows イベントトレーシングによるカーネルレベルのファイル I/O イベント取得
6層のプロセス検証実行可能ファイルパス、SHA-256 ハッシュ、Authenticode 署名、所有者 SID、整合性レベル、親プロセスチェーン
DPAPI ファイル暗号化保護ファイルは Windows Data Protection API で保存時に暗号化
自動期限付き一時アクセス承認済みプロセスには時間制限付きの ACL 付与が行われ、自動的に期限切れ
改ざん検出定期的な整合性チェックにより ACL 変更を検出し自動修復
構造化監査ログすべてのアクセス試行の JSON 監査証跡(SIEM 対応)
Windows サービスNT AUTHORITY\SYSTEM で動作するバックグラウンド Windows サービス
Windows OS
Windows 10 / Server 2019
winver
.NET SDK9.0dotnet --version
管理者特権必須管理者としてターミナルを実行
フィールド型説明
RuleNamestringこのルールの人間可読な名前(監査ログで使用)
ExecutablePathstring?許可された実行ファイルのフルパス(大文字小文字を区別しない)
ExpectedFileHashstring?実行ファイルのSHA-256ハッシュ(改ざん検出)
ExpectedSignerSubjectstring?Authenticode証明書のサブジェクト(例:"CN=Contoso")
MinimumIntegrityLevelstring最小のWindows整合性レベル:Untrusted、Low、Medium、High、System
RequireSignaturebooltrueの場合、実行ファイルは有効なAuthenticode署名を持っている必要があります
#テスト確認方法期待される結果
1ビルドdotnet build BlockGuard.sln0 エラー
2エージェント起動dotnet run --project src/BlockGuard.Agent (管理者として実行)起動バナー、CRITICALエラーなし
3ACLロックダウンicacls <protected-file>SYSTEMと管理者のみ
4不正アクセスのブロック管理者以外の端末から保護ファイルを読み取るアクセス拒否
5ETWキャプチャエージェント実行中に保護ファイルを読み取るコンソールにDENIEDログエントリ
6監査ログGet-Content C:\ProgramData\BlockGuard\Logs\audit.json判定付きのJSONエントリ
7DPAPI暗号化Test-Path <file>.enc.encファイルが存在する
8改ざん検出icacls <file> /grant Users:R その後60秒待機自動修復がログに記録される