
Azureベースのクライアントインベントリとドリフト検出ツールで、Windows構成データ(アンチウイルス、パッチ適用、Bitlocker)をLogAnalyticsに収集し、KQL駆動のダッシュボードやSentinelアラートに利用します。


あなたはコントロールできていますか? - それとも、パッチ適用、アンチウイルス、BitLocker有効化などのコアインフラストラクチャプロセスが逸脱していませんか?または、LenovoやDellの保証に対して保証状態を確認できる高度なインベントリを実行したいですか?それなら、読み続けてください。
ClientInspector をチェックしてください。これにより、完全なクライアント環境に関する素晴らしい洞察を得ることができます。
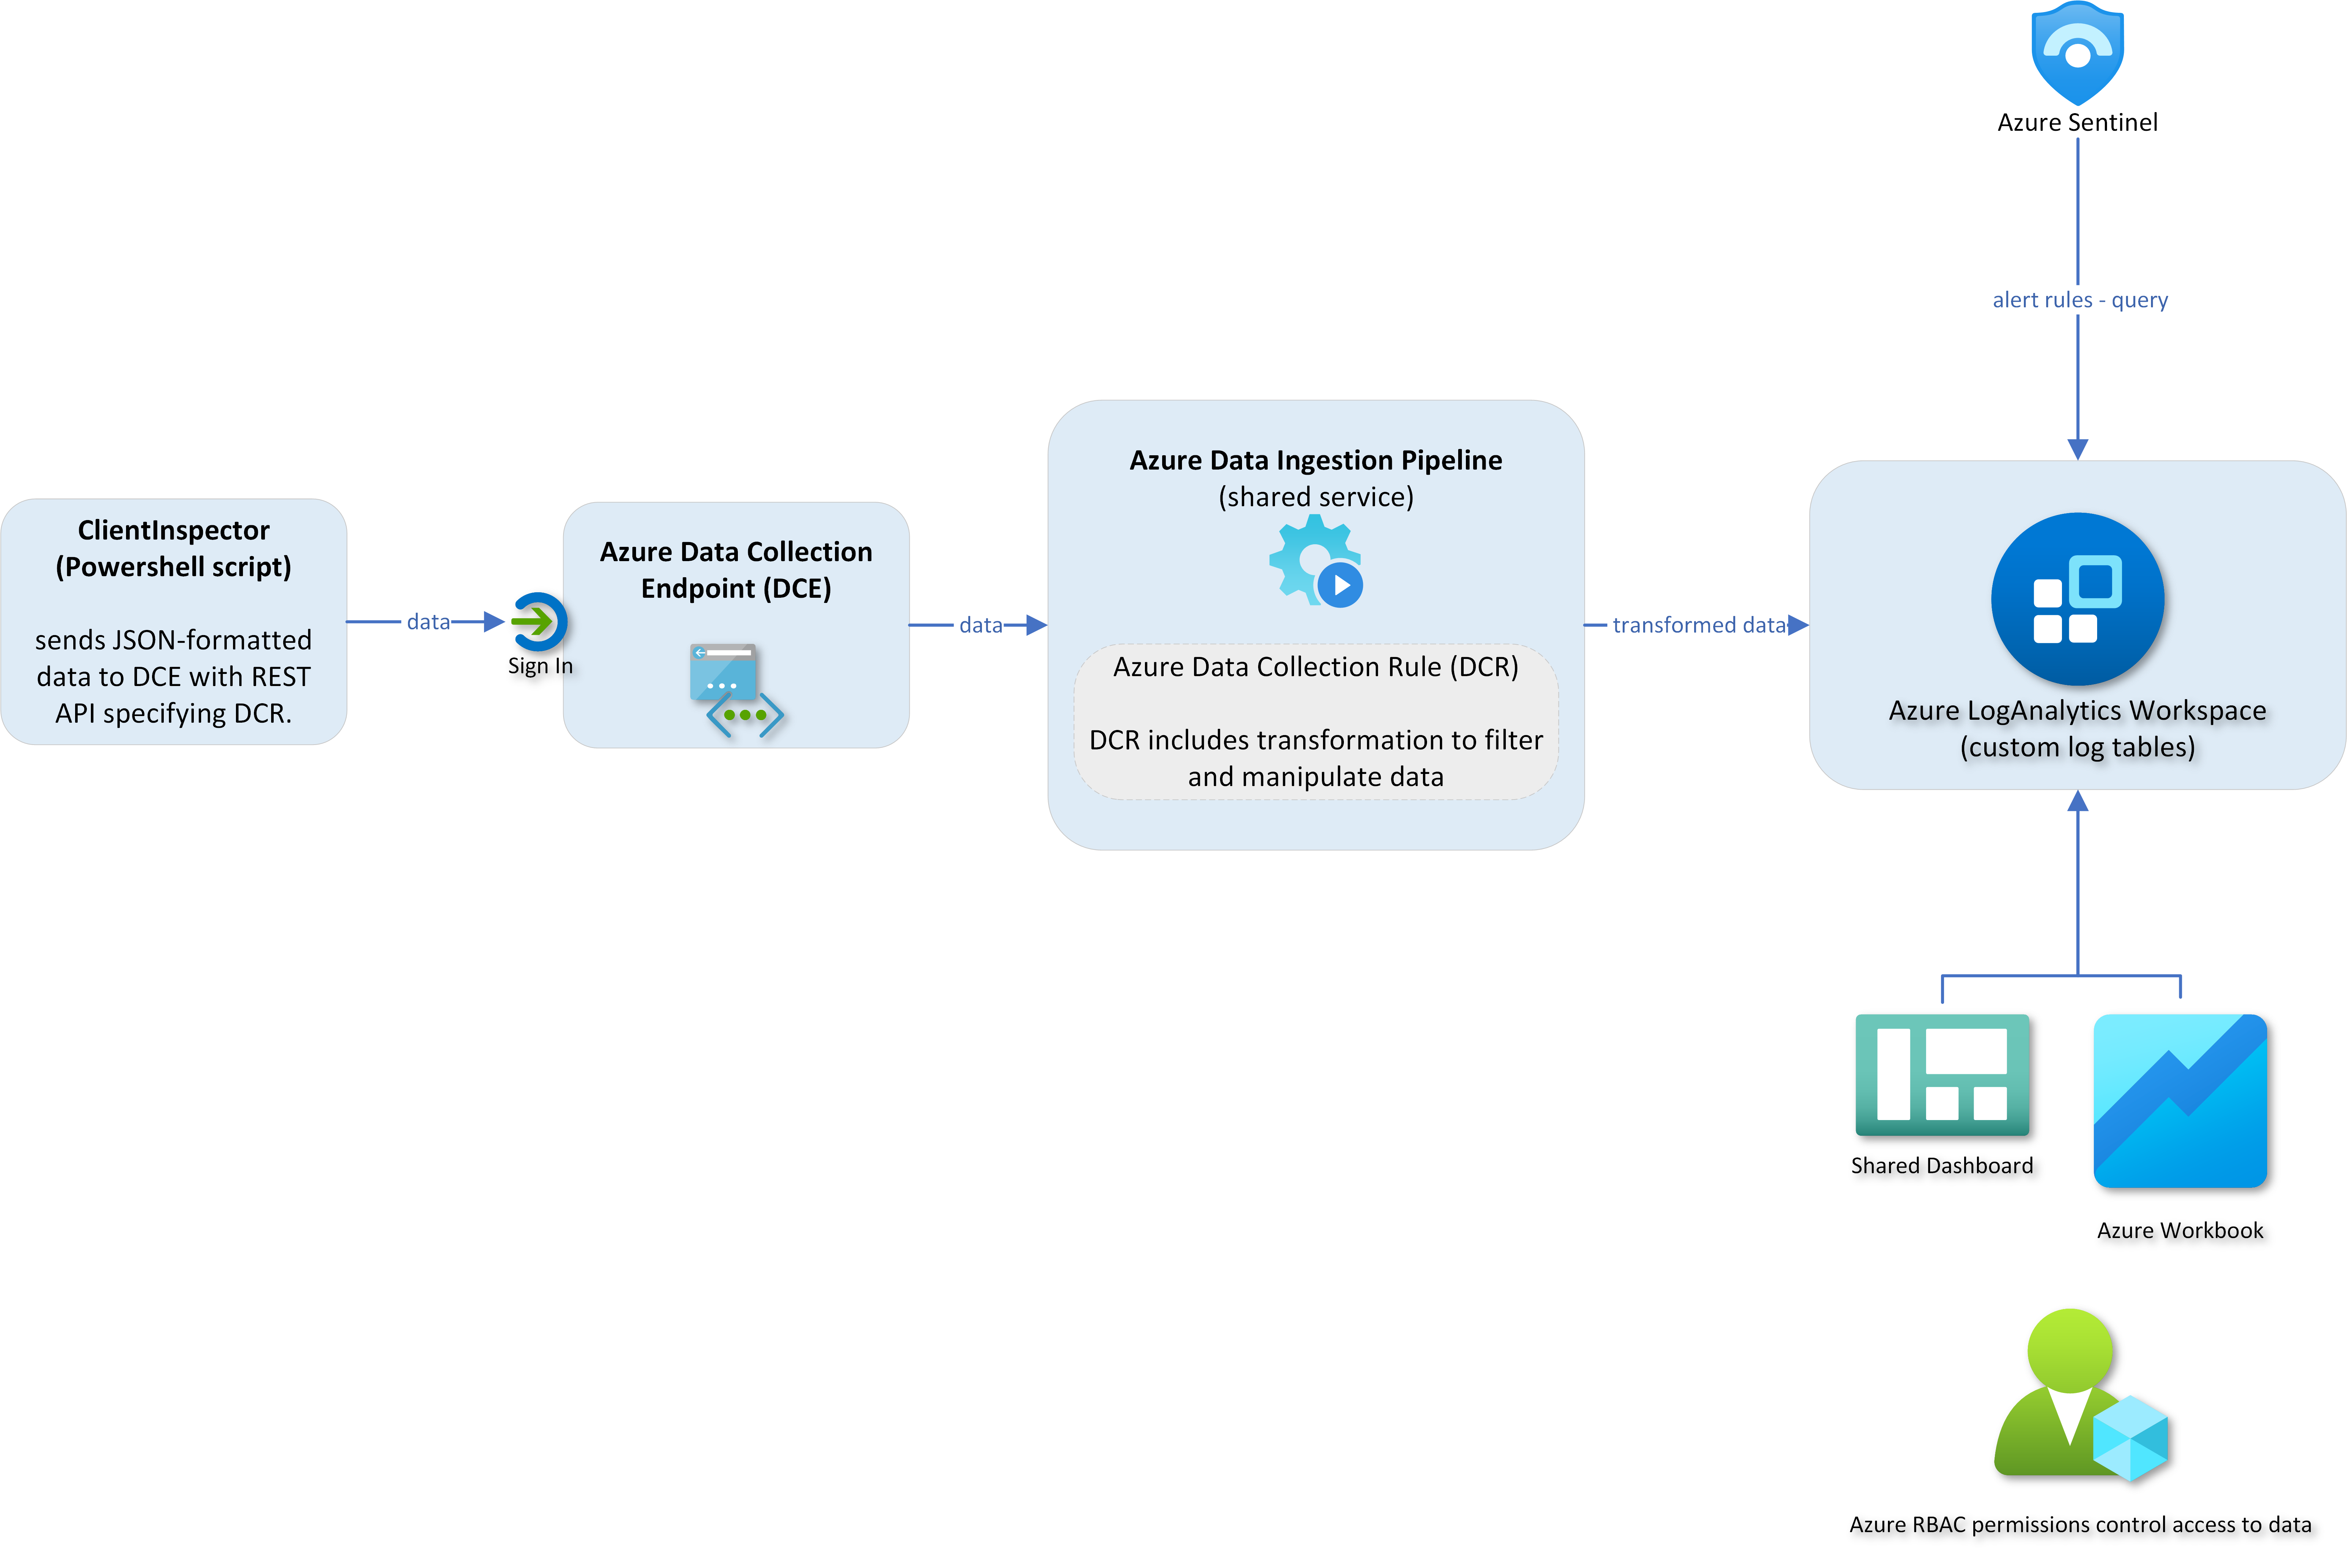
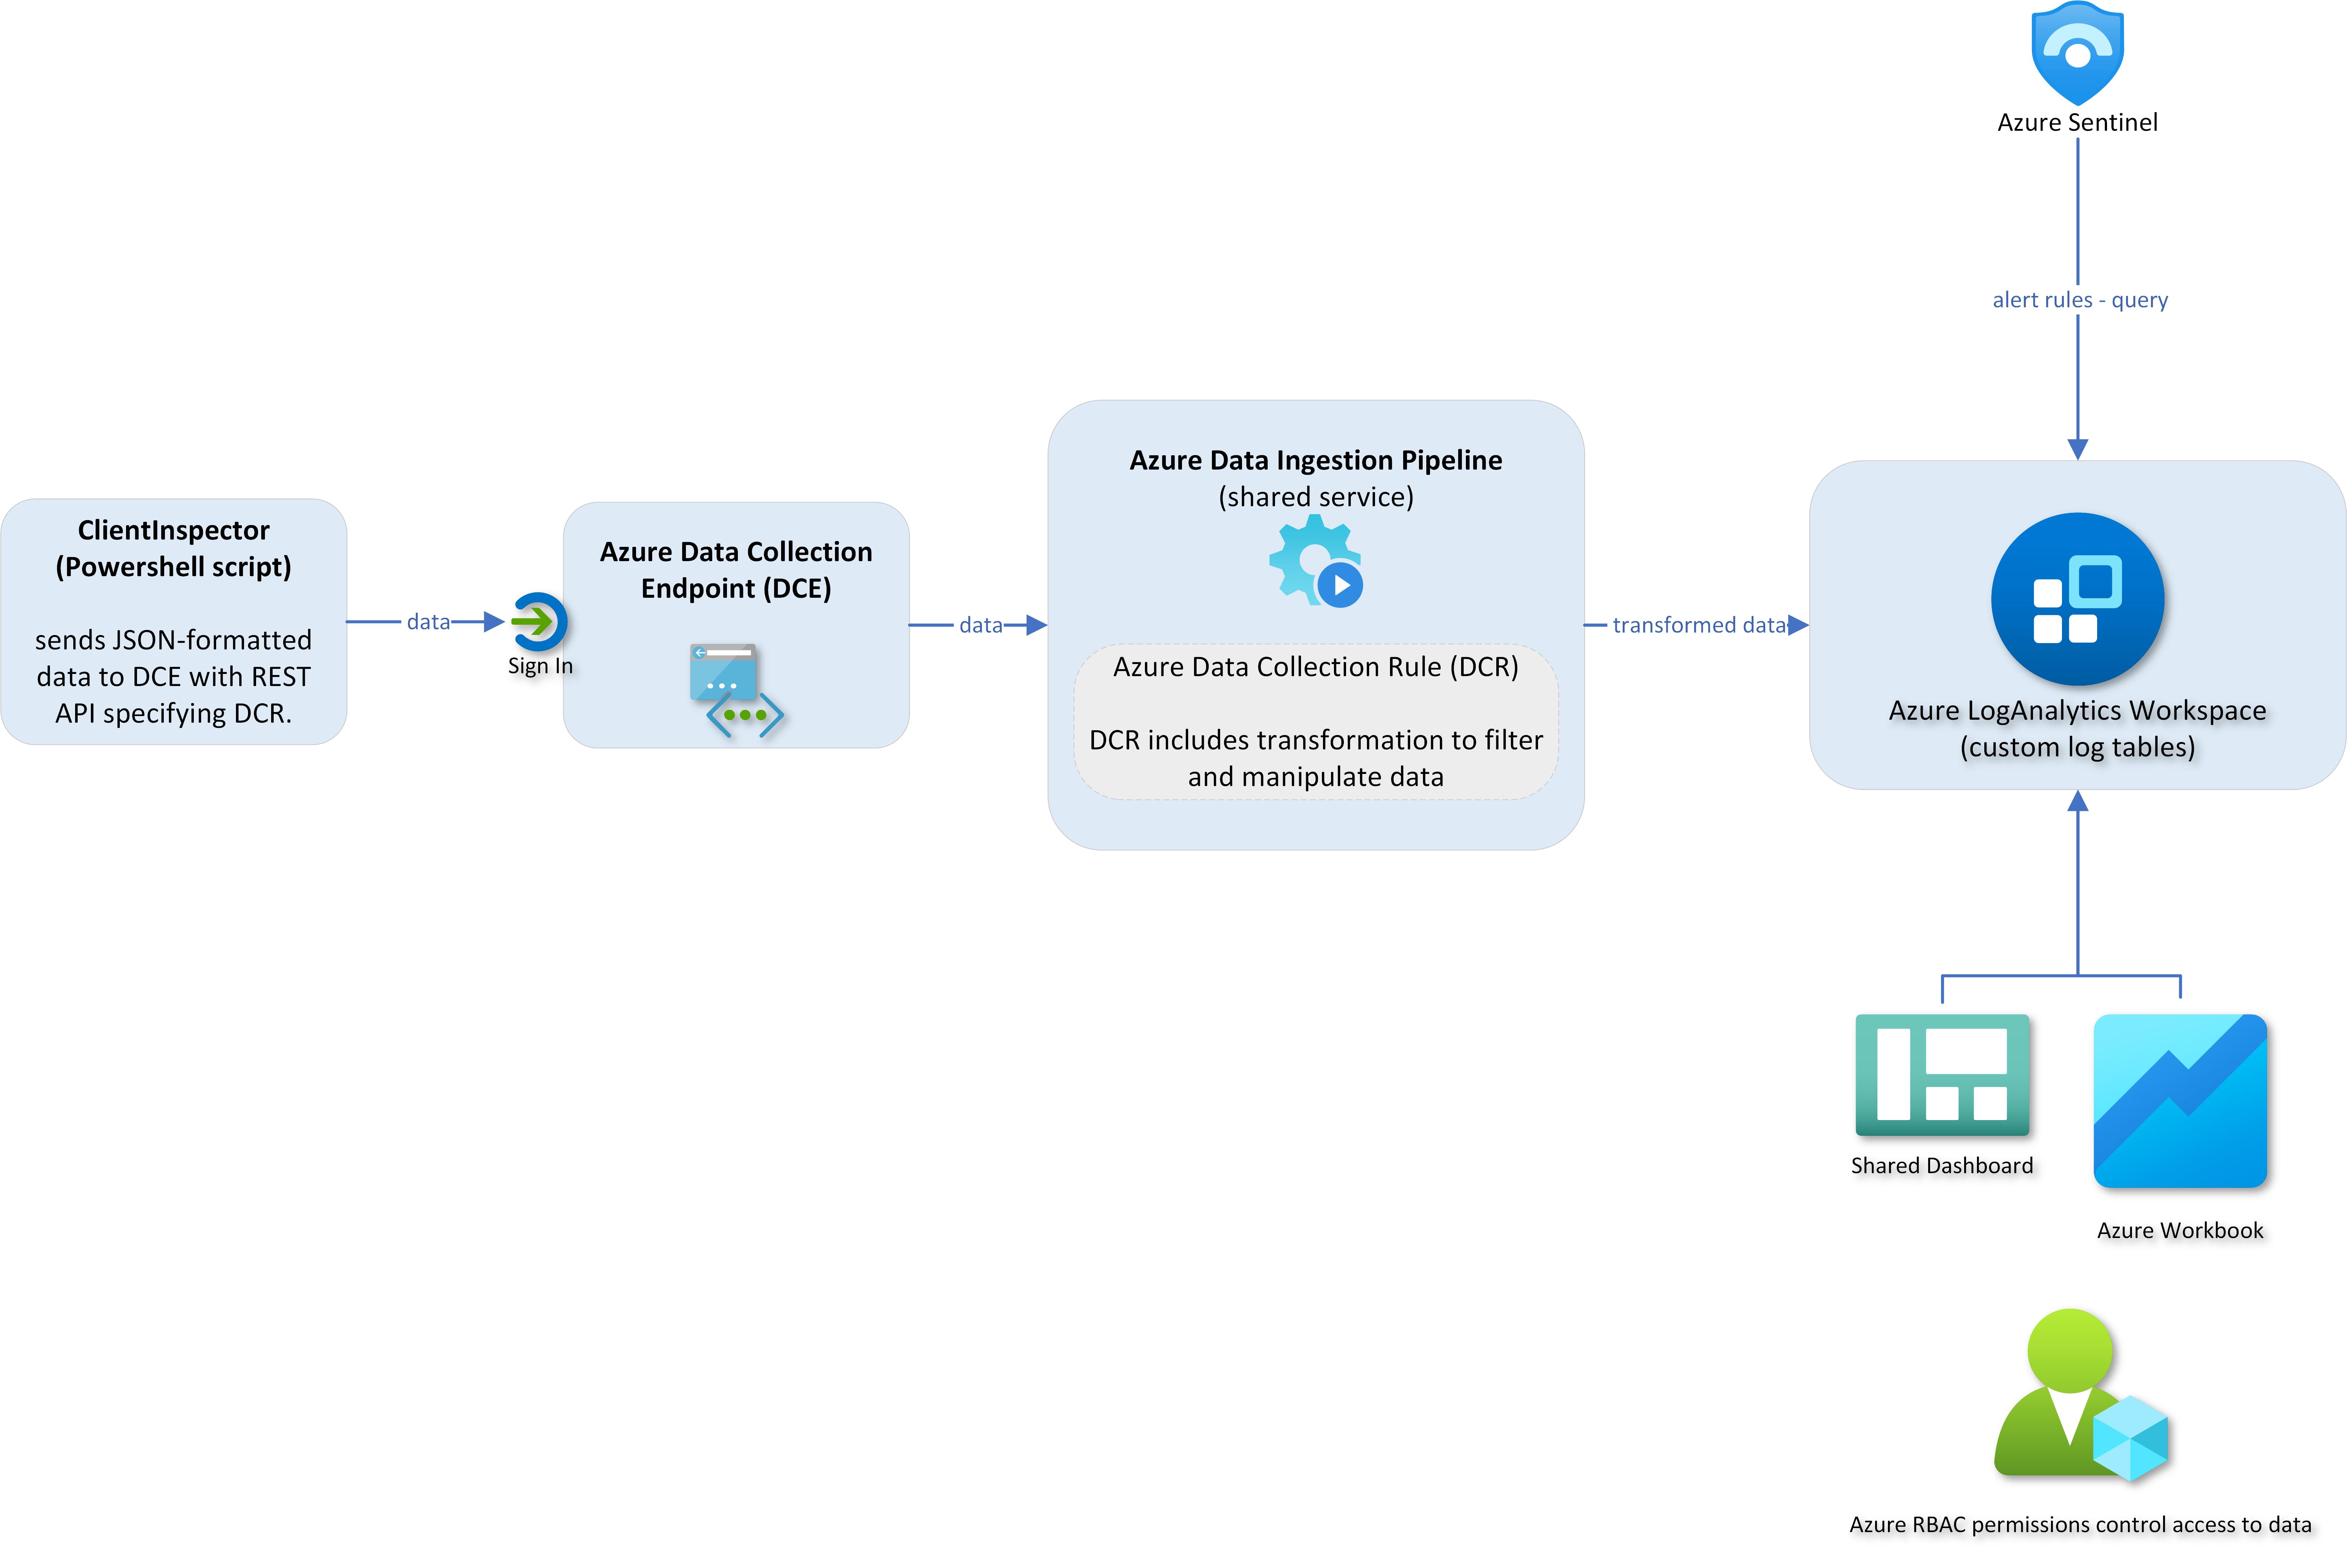
ClientInspector はコミュニティに無料で提供されています。Azure Log Ingestion Pipeline、Azure Data Collection Rules、Azure LogAnalytics を使用してクライアントからデータを取得し、Azure Monitor と Azure Dashboards で表示し、Microsoft Sentinel を使用して「逸脱アラート」を受け取る方法を示すクールなショーケースとして構築されています。
ClientInspector (v2) は、収集したデータを Log ingestion API、Azure Data Collection Rules (DCR)、Azure Data Collection Endpoints (DCE) を使用して、Azure LogAnalytics ワークスペース の カスタムログ にアップロードします。


重要なのは、私はMicrosoftのセキュリティおよび管理スタックと競合するような独立した管理ツールを構築しようとしているわけではないということです。
Microsoft Azure/M365 の管理およびセキュリティスタックに勝るものはありません。それらはロックスターソリューションです。
しかし、私はログ機能と、クライアント、サーバー、クラウド、サードパーティシステムからデータを取得し、そのデータからクールで価値のある情報を得る力に非常に情熱を持っています。
サーバー向けの同様のソリューションとしてServerInspectorがあります。残念ながら、公開されていません。
Microsoft製品チームの素晴らしい皆さんに大感謝 - あなたたちはロックスターです 😄
楽しい探索を 😄
どのようなデータが収集されますか?
望ましい状態のダッシュボード - データから環境の洞察を得るには?
データをクエリするには? - Kusto (KQL) が答えです
アーキテクチャ、スキーマ、ネットワーキング
実装
依存関係
ClientInspector.ps1 の実行 - 3つのモード
ClientInspector のサンプル出力
セキュリティ
ClientInspector データセットのレイアウト
Verbose モードと詳細ヘルプ
コスト - これらのデータを保存するのにどれくらいかかりますか?
バグ発見時はお知らせください
連絡先
ビデオ 3m 19s - コマンドラインを使用した ClientInspector の実行 (通常モード)
ビデオ 1m 40s - 2つのテーブルとDCRの自動作成 (Verbose モード)
ビデオ 1m 37s - 2つのテーブルとDCRの自動作成 (通常モード)
ビデオ 1m 34s - DCRとテーブルのスキーマを確認
ビデオ 2m 19s - データ操作
ビデオ 1m 58s - データに対する Kusto クエリ
ビデオ 3m 01s - ダッシュボード
ビデオ 0m 48s - データの使用例 - Lenovo 保証データベースの検索
ビデオ 7m 25s - ClientInspector DeploymentKit を使用したデプロイ
ClientInspector は、Windows クライアントから多くの素晴らしい情報を収集し、そのデータを Azure LogAnalytics カスタムテーブル に送信するために使用できます。
このスクリプトは以下の情報を収集します(設定、情報、構成、状態):
お客様のニーズに合わせて、さらにクールなデータコレクションを自由に追加してください。コミュニティに参加したい場合は、コミュニティ全体の利益になると考えるコレクションがあれば、メールでお送りください。
PowerShell で取得できる任意のソースデータ(WMI、CIM、外部データ、REST API、XML 形式、JSON 形式、CSV 形式など)を使用できます。
データを送信する前に、それらが有効であり、無関係なデータが削除されていることを確認するために、通常、データを操作する必要があることを理解することが非常に重要です。
ClientInspector は、PowerShell モジュール AzLogDcIngestPS 内の 24 の関数すべてを使用して、ソースデータの操作を処理し、データ内の「ノイズ」を除去、テーブル/DCR 内の禁止された列の名前を変更、さらに UserLoggedOn、CollectionTime、Computer などの追加の洞察による透明性のニーズをサポートします。
Write-Output "" Write-Output "Collecting Bios information ... Please Wait !"
$DataVariable = Get-CimInstance -ClassName Win32_BIOS
#-------------------------------------------------------------------------------------------
#-------------------------------------------------------------------------------------------
$DataVariable = Convert-CimArrayToObjectFixStructure -data $DataVariable -Verbose:$Verbose
$DataVariable = Add-CollectionTimeToAllEntriesInArray -Data $DataVariable -Verbose:$Verbose
$DataVariable = Add-ColumnDataToAllEntriesInArray -Data $DataVariable -Column1Name Computer -Column1Data $Env:ComputerName -Column2Name UserLoggedOn -Column2Data $UserLoggedOn -Verbose:$Verbose
$DataVariable = Filter-ObjectExcludeProperty -Data $DataVariable -ExcludeProperty __*,SystemProperties,Scope,Qualifiers,Properties,ClassPath,Class,Derivation,Dynasty,Genus,Namespace,Path,Property_Count,RelPath,Server,Superclass -Verbose:$Verbose
AzLogDcrIngestPSで利用可能な関数の詳細とその使用方法については、こちらをご覧ください
初期デプロイメントの一環として、ClientInSpectorV2-DeploymentKitを使用すると、多くのAzureダッシュボードとAzure Workbooksにアクセスできます。
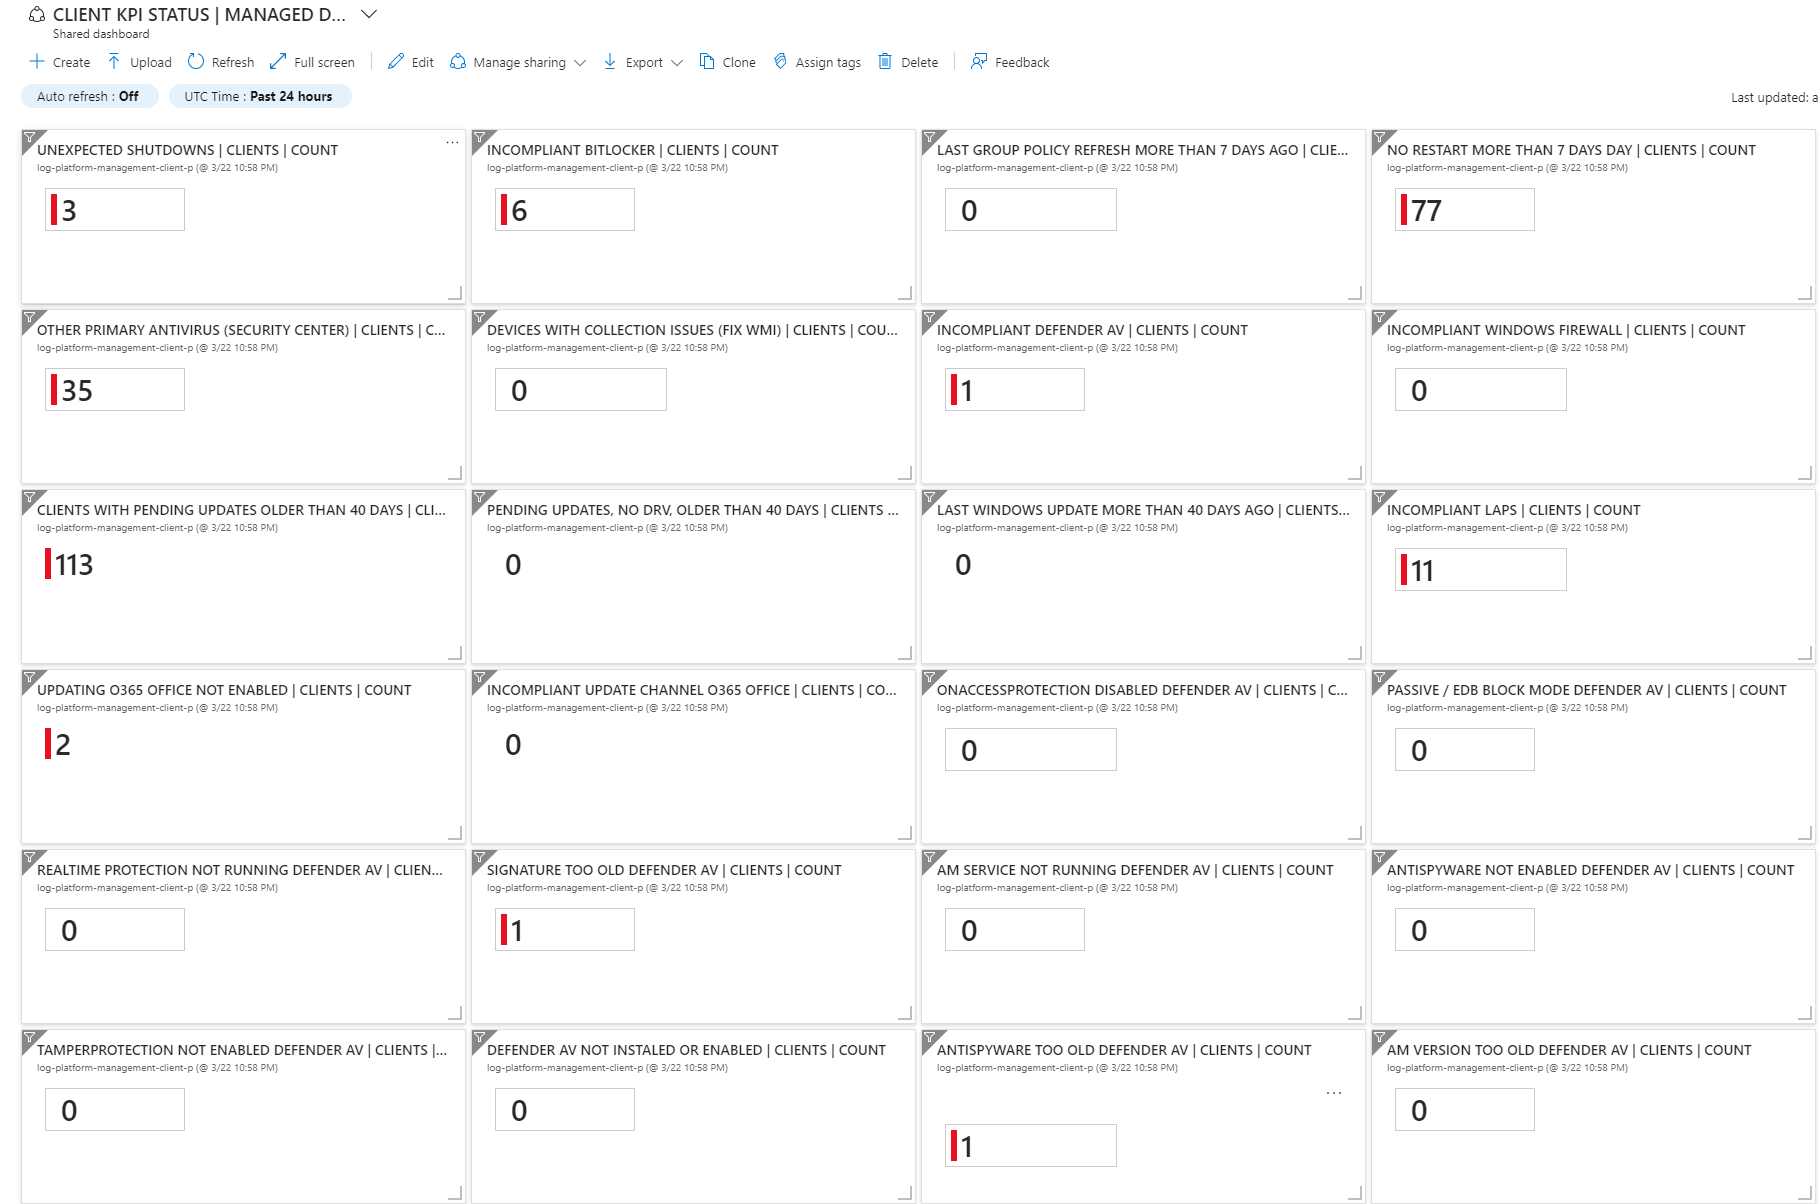
ダッシュボードの考え方は、インフラストラクチャが「望ましい状態」から逸脱している場所を示すことです。それらを、インフラストラクチャが制御下にないKPIと考えてください。
パッチ適用やアンチウイルス管理のタスクを持つ代わりに、コンピュータがパッチ適用されていない場所、アンチウイルスのリアルタイム保護が実行されていない場所、または過去24時間以内にブルースクリーンが発生したマシンを示すKPIを持つことを検討できます。
これはMicrosoft Secure Scoreと同じ概念です。


提供されるAzure Workbooksの完全なリストを見るためのリンク
サンプルのAzureダッシュボードはすべて、Azure Workbooksからピン留めされた部分に基づいて作成されています。そのため、ドリルダウンしたい場合は、リンクをクリックすると詳細情報にアクセスできます。

ダッシュボードやワークブックを追加したい場合は、通常、KQLクエリを使用してカスタムログテーブルの収集データを調査することから始めます。目的のクエリが見つかったら、ワークブックに新しいビューを作成し、お気に入りをダッシュボードにピン留めできます。
Kusto言語を知らない場合は、実際に触ってみることをお勧めします。非常に強力な言語です。
動画 1分58秒 - データに対するKustoクエリ
動画 3分01秒 - ダッシュボード
Kusto Query Languageを使って最初のクエリを書く
以下は、ClientInspectorのデータに基づいた、始めるための4つのサンプルクエリです。
高度なハンティングを行いたい場合は、テーブル内で従来のKusto (KQL) クエリを使用できます。
#----------------------------------------------------------------------------------------------------------------------
#----------------------------------------------------------------------------------------------------------------------
$LogAnalyticsWorkspaceId = "e74ca75a-c0e6-4933-a4f7-e5ae943fe4ac"
#----------------------------------------------------------------------------------------------------------------------
#---------------------------------------------------------------------------------------------------------------------- $Query = @' InvClientComputerInfoBiosV2_CL | summarize TimeGenerated = arg_max(TimeGenerated,) by Computer | join (InvClientComputerInfoSystemV2_CL | summarize TimeGenerated = arg_max(TimeGenerated,) by Computer) on $left.Computer == $right.Computer | join (InvClientComputerOSInfoV2_CL | summarize TimeGenerated = arg_max(TimeGenerated,*) by Computer) on $left.Computer == $right.Computer | project Computer, UserLoggedOn, SerialNumber, Manufacturer, PCSystemType, SystemFamily, Model, Windows=Caption2, WindowsVersion=Version1, TimeGenerated '@
write-output "Collecting computer information from LogAnalytics" $Query = Invoke-AzOperationalInsightsQuery -WorkspaceId $LogAnalyticsWorkspaceId -Query $Query $ComputerInfoArray = $Query.Results $ComputerInfoArray
</details>
## サンプルクエリ 4: データを他のソースと統合する(Lenovo保証データベースに対する保証確認)
データをAzure LogAnalyticsに取り込んだら、DellやLenovoの保証データなどの他のソースと、REST APIルックアップを介して統合を開始できます。
[動画 0分48秒 - データの使用例 - Lenovo保証データベースに対するルックアップ](https://youtu.be/3ZDyTwiLU0w)
以下は、PowerShellスクリプトによって自動生成された出力の例です。コンピューターとシリアル番号のリストを抽出し、Lenovo保証データベースをルックアップして、コンピューターの購入日と保証状態に関する情報を取得しています。
[サンプル保証出力(Excel)、ClientInspectorが収集したデータに基づく](https://github.com/KnudsenMorten/ClientInspectorV2/raw/main/img/WarrantyInfo.xlsx)
<br>
# アーキテクチャ、スキーマ、ネットワーキング
ClientInspector(v2)は、収集したデータを **Log Ingestion API**、**Azure Data Collection Rules (DCR)**、**Azure Data Collection Endpoints (DCE)** を使用して、**Azure LogAnalytics ワークスペース**内の **カスタムログ** にアップロードします。

## スキーマ
DCRとLogAnalyticsテーブルの両方にスキーマがあり、ソースオブジェクトのスキーマと一致する必要があります。これは、AzLogDcrIngestPSモジュールの関数を使用して処理されます。
[動画 1分40秒 - 2つのテーブルとDCRの自動作成(詳細モード)](https://youtu.be/rIUNs3yT-eI)
[動画 1分37秒 - 2つのテーブルとDCRの自動作成(通常モード)](https://youtu.be/khQMDcON6r8)
[動画 1分34秒 - DCRとテーブルのスキーマを確認](https://youtu.be/NDSNhvpa4Gs)
AzLogDcrIngestPSはスキーマ管理のために2つのモードをサポートしています:**Merge** と **Overwrite**
### SchemaMode = Merge(デフォルト)
SchemaMode = Merge に設定すると、ソースオブジェクトの新しいプロパティがログ分析の現在のスキーマに追加(マージ)されます。DCRはログ分析テーブルからスキーマをインポートして、それらが同一であることを保証します。
デフォルトモードはMergeです。関数で変数SchemaModeを定義しない場合:
CheckCreateUpdate-TableDr-Structure
CreateUpdate-AzLogAnalyticsCustomLogTableDcr
CreateUpdate-AzDataCollectionRuleLogIngestCustomLog
### SchemaMode = Overwrite
SchemaMode = Overwrite に設定すると、DCRとテーブルのスキーマが、ソースオブジェクトのスキーマに基づいて上書き(更新)されます。
## ネットワーキング
データアップロードのためにAzureに接続する方法は3つあります:
|アップロード方法|接続の詳細|OS準拠|
|:------------|:-------------------|:------------|
|パブリックアクセス|RESTエンドポイントがDCEのパブリックIP経由でDCEに送信|エンドポイントはTLS 1.2をサポート|
|プライベートアクセス|RESTエンドポイントがDCEのプライベートリンク経由でDCEに送信|エンドポイントはTLS 1.2をサポート|
|ログハブ|RESTエンドポイントが[log-hub](https://github.com/KnudsenMorten/AzLogDcrIngestPSLogHub) を介してデータを送信 - 私が構築したコンセプト|エンドポイントはTLS 1.2をサポートしていない。<br> Azureはこれらのデバイスからの直接接続を受け入れない|
### インターネット接続エンドポイント - OSレベルの準拠

ファイアウォールで以下のエンドポイントを許可する必要があります:
|エンドポイント|目的|ポート|方向|HTTPSインスペクションをバイパス|
|:-------|:------|:----|:-------|:----------------------|
|global.handler.control.monitor.azure.com|アクセス制御サービス|ポート443|送信|はい|
|dce logs ingestion uri<br><br>サンプル<br>https://dce-log-platform-management-client-demo-p-iur0.westeurope-1.ingest.monitor.azure.com|ログデータの取り込み|ポート443|送信|はい|
<br>
### インターネットアクセスがない、またはOSレベルの非準拠(例:TLS 1.0/1.1実行時)
[こちらのリンクからログハブのコンセプトを確認してください](https://github.com/KnudsenMorten/AzLogDcrIngestPSLogHub)

<br>
# 実装
すべてを立ち上げて実行するのは非常に簡単であると感じていただけることを願っています。以下の3つの手順が概要です。
始める前に、以下のイントロでコンポーネントについて詳しく読むことをお勧めします。
<details>
<summary>ClientInspectorの一部として使用されるAzureコンポーネントの紹介</summary>
<br>
以下のコンポーネントが必要です:
| Azureリソース | 目的 | 詳細情報 |
| :------------- | :----- | :----- |
| 任意のRESTエンドポイント | データを送信するソース | |
| Log Ingestion API | 古いHTTP Data Collector APIを置き換える新しいAPI | https://learn.microsoft.com/ja-jp/azure/azure-monitor/logs/logs-ingestion-api-overview |
| Data Collection Endpoint (DCE)| エンドポイントからの通信のエントリポイント。データは **Azure Data Collection Endpoint Ingestion Uri** に送信されます。単一のDCEで複数のDCRをサポートできるため、異なるソースとターゲットテーブルに異なるDCRを指定できます。 | https://learn.microsoft.com/ja-jp/azure/azure-monitor/essentials/data-collection-endpoint-overview?tabs=portal |
| Data Collection Rules (DCR) | データ収集ルールは、収集するデータ(スキーマ)を定義し、そのデータをどこに送信または保存するかを指定します。DCRは入力データの構造とターゲットテーブルの構造を理解する必要があります。両者が一致しない場合、変換を使用してソースデータをターゲットテーブルに適合させることができます。変換を使用してソースデータをフィルタリングしたり、その他の計算や変換を実行したりすることもできます。 | https://learn.microsoft.com/ja-jp/azure/azure-monitor/essentials/data-collection-rule-overview |
| Azure LogAnaltyics ワークスペース | データはAzure LogAnalyticsのカスタムログに送信されます | https://learn.microsoft.com/ja-jp/azure/azure-monitor/logs/log-analytics-overview |
| Azure Workbooks | デプロイの一環として、サンプルワークブックがデプロイされます | https://learn.microsoft.com/ja-jp/azure/azure-monitor/visualize/workbooks-overview |
| Azure Dashboards | デプロイの一環として、サンプルワークブックがデプロイされます | https://learn.microsoft.com/ja-jp/azure/azure-monitor/visualize/tutorial-logs-dashboards |
| Kusto (KQL) | Kusto (KQL) クエリを使用してデータを分析できます | https://learn.microsoft.com/ja-jp/azure/azure-monitor/logs/get-started-queries |
</details>
環境にClientInspectorをセットアップする手順は次のとおりです:
1. [ClientInSpectorV2-DeploymentKitを使用して環境をセットアップする](https://github.com/KnudsenMorten/ClientInspectorV2-DeploymentKit)
2. ClientInspectorを初めて実行する(初期セットアップ) - 詳細は以下を参照
<details>
<summary>Azure LogAnalyticsテーブルとData Collection Rulesの初期セットアップを構成する方法(初回)</summary>
<br>
テーブル/DCR管理用の参照コンピュータを用意することをお勧めします。これにより、変更が必要な場合(たとえば、ソースオブジェクトスキーマが変更された場合など)、管理されたプロセスになります。
<br>
<br>
構成:
1. DeploymentKitを実行すると、ClientInspectorファイルが自動的に準備されるため、変数を挿入するだけで済みます。```js
$TenantId = "xxxx"
$LogIngestAppId = "xxxx"
$LogIngestAppSecret = "xxxx"
$DceName = "xxxx"
$LogAnalyticsWorkspaceResourceId = "xxxx"
$AzDcrPrefixClient = "xxx"
$AzDcrSetLogIngestApiAppPermissionsDcrLevel = $false
$AzDcrLogIngestServicePrincipalObjectId = "xxx"
$AzDcrDceTableCreateFromReferenceMachine = @()
$AzDcrDceTableCreateFromAnyMachine = $true
検出スクリプト ClientInspector_Detection.ps1 をダウンロード します(右クリックして「リンク先を保存」を選択)。
お好みのエディタでファイルを開きます。インベントリを実行する頻度を調整します。```js ##################################
##################################
$RunEveryHours = 8
$LastRun_RegPath = "HKLM:\SOFTWARE\ClientInspector"
$LastRun_RegKey = "ClientInSpector_System"
3. 次に、修復ジョブを作成する必要があります。Microsoft Intune ポータル -> Reports -> Endpoint Analysis --> Proactive remediations に移動し、以下のようにスクリプトパッケージを作成します。
注: 修復スクリプトには、**ClientInspector.ps1** ファイルを使用します。


### Intune の制限
注: Intune には、修復スクリプトのサイズが 200 Kb に制限されています。**

この制限に達した場合は、スクリプトを 2 つに分割することを提案します。


2 つ目のファイルのヘッダーとして、UserLoggedOn セクションを含むヘッダーセクションを忘れずに含めてください。UserLoggedOn は、ログオンしているユーザーを表示するために使用されます。
サンプルスクリプトセットアップを用意しました。[sample script-setup](https://github.com/KnudsenMorten/ClientInspectorV2/tree/main/Sample%20intune%20setup%20if%20file%20size%20is%20more%20than%20200%20Kb)。これで分割方法を確認できます。注: これらのスクリプトのコードは更新されていないため、マスターの ClientInspector ファイルからセクションを取るようにしてください。
基本的な構造は次のとおりです。
ファイル 1 には、ヘッダー + UserLoggedOn (セクション 1) + セクション 2-9 が含まれ、HKLM\Software\ClientInspector\ClientInspector_System_1 にチェックフラグを書き込みます。
ファイル 2 には、ヘッダー + UserLoggedOn (セクション 1) + セクション 10-18 が含まれ、HKLM\Software\ClientInspector\ClientInspector_System_2 にチェックフラグを書き込みます。


</details>
<details>
<summary>ConfigMgr (または CMD ファイルを実行するその他のツール) を使用してデプロイする方法は?</summary>
<br>
従来のパッケージとデプロイメントを使用してインベントリスクリプトを実行します。
1. [CMD ファイル ClientInspector.cmd をダウンロード](https://github.com/KnudsenMorten/ClientInspectorV2/raw/main/ConfigMgr/ClientInspector.cmd) (右クリックして 'リンク先を保存' を選択)
2. ConfigMgr パッケージソースディレクトリに (例: ClientInspector という名前で) ソース構造を作成します。
3. 必要な 2 つのファイル **ClientInspector.cmd** と **ClientInspector.ps1** をディレクトリにコピーします。
4. パッケージを作成し、パッケージが **ClientInspector.cmd** を実行するように指定します。
5. デプロイメントを作成します。
</details>
<br>
# 依存関係
## Powershell モジュール AzLogDcringestPS - 私 (Morten Knudsen) が作成
ClientInspector には Powershell モジュール **AzLogDcrIngestPS** が必要です。
Powershell モジュール **AzLogDcrIngestPS** の主な機能は次のとおりです。
* ソースオブジェクトのスキーマに基づいて DCR とテーブルを自動的に作成/更新
* スキーマの命名規則に関する問題を検証します。問題が見つかった場合は、それを軽減します。
* ソースオブジェクトの構造が変更された場合、DCR とテーブルのスキーマを更新
* DCR またはテーブルに問題が発生した場合の自動修正
* 送信したくないデータ列がある場合、ソースオブジェクトからデータを削除可能
* CIM または PS オブジェクトに基づくソースオブジェクトを PSCustomObjects/配列に変換可能
* UserLoggedOn、Computer、CollectionTime などの関連情報を各レコードに追加可能
以下のリンクを使用して、モジュールの詳細情報を確認できます。
[AzLogDcrIngestPS (Github)](https://github.com/KnudsenMorten/AzLogDcrIngestPS)
[AzLogDcrIngestPS (Powershell Gallery)](https://www.powershellgallery.com/packages/AzLogDcrIngestPS)
[AzLogDcrIngestPSLogHub (Github)](https://github.com/KnudsenMorten/AzLogDcrIngestPSLogHub)
<br>
## サードパーティの Powershell モジュール
Windows Update 情報の取得には、よく知られた Powershell モジュール PSWindowsUpdate を使用することを好みます。
|モジュール名|目的|詳細情報|クレジット|
|:---------|:------|:--------|:-----|
|NuGet|多くの Powershell モジュール (AzLogDcrIngestPS を含む) をデプロイするために使用される共通パッケージプロバイダー<br><br>スクリプト実行時にパッケージプロバイダーが自動的にコンピューターにインストールされます|[Link](https://www.nuget.org/packages)|
|PSWindowsUpdate|Windows Update 情報の収集 (保留中の更新、インストール済み更新など)<br><br>スクリプト実行時にモジュールが自動的にコンピューターにインストールされます|[Link](https://www.powershellgallery.com/packages/PSWindowsUpdate)|Michal Gajda
<br>
# Running ClientInspector.ps1 - 3 つのモード
ClientInspector は、必要な Powershell モジュールをインストール/更新/インポートする 3 つの方法をサポートしています: **Download**、**PsGallery**、**LocalPath**
デフォルトでは、PsGallery から最新バージョンをダウンロードし、CurrentUser スコープにインストールします。
[Video 3m 19s - Running ClientInspector using commandline (normal mode)](https://youtu.be/4kA4BE0zJ9g)
## .\ClientInspector.ps1 -function:LocalPath
ClientInspector は、スクリプトが実行されるディレクトリで **AzLogDcrIngest.psm1** ファイルを探します。AzLogDcrIngest.psm1 が見つからない場合はスクリプトが終了します。それ以外の場合は、Import-Module を実行します。
例```
.\ClientInspector.ps1 -verbose:$false -function:localpath
ClientInspector | Inventory of Operational & Security-related information
Developed by Morten Knudsen, Microsoft MVP - for free community use
Using AzLogDcrIngestPS module from local path D:\scripts\ClientInspectorV2
$DataVariable = ValidateFix-AzLogAnalyticsTableSchemaColumnNames -Data $DataVariable -Verbose:$Verbose
$DataVariable = Build-DataArrayToAlignWithSchema -Data $DataVariable -Verbose:$Verbose
このコマンドを実行して、ソースオブジェクトを確認できます。````
# Get insight about the schema structure of an object BEFORE changes. Command is only needed to verify columns in schema
Get-ObjectSchemaAsArray -Data $DataVariable -Verbose:$Verbose


Start Powershellをローカル管理者として起動する
このコマンドを使用してスクリプトを起動する```js C:\ClientInspector\ClientInspector.ps1 -verbose:$true
4. ClientInspectorは10〜20分間実行され、環境内の実際の構造に基づいて、必要なテーブルとデータ収集ルールを作成します。画面上の結果を確認し、エラー(赤色)がないか確認してください。
5. すべてが問題なさそうであれば、スクリプトを再実行すると、はるかに速く処理が進みます。Kustoクエリを使用して、各テーブルにデータが取り込まれていることを確認してください。注:バックエンドでパイプラインを作成する必要があるため、最初のデータアップロードには約10〜15分かかる場合があります。
6. 最後の変更として、パラメータ内の2つのパラメータを変更して、リファレンスマシンから実行する場合にのみClientInspectorがスキーマ変更を行うように指示する必要があります。```js
$AzLogDcrTableCreateFromReferenceMachine = @("<<MyReferenceMachineComputerName>>") # sample @("ComputerName")
$AzLogDcrTableCreateFromAnyMachine = $false # important so changes can only happen on reference machine
ClientInspector は、Github リポジトリから最新バージョンをダウンロードし、実行のたびにローカルパスに保存します(約 300 KB)
例``` .\ClientInspector.ps1 -verbose:$false -function:download
ClientInspector | Inventory of Operational & Security-related information Developed by Morten Knudsen, Microsoft MVP - for free community use
Downloading latest version of module AzLogDcrIngestPS from https://github.com/KnudsenMorten/CientInspectorV2 into local path D:\scripts\ClientInspectorV2
## .\ClientInspector.ps1 -function:PsGallery -scope [AllUsers|CurrentUser]
このパラメータには別のパラメータが必要です: -scope [AllUsers | CurrentUser]
ClientInspectorは、選択されたスコープにモジュールがインストールされているか確認します。
インストールされていない場合、Powershell Galleryから最新バージョンを自動的にダウンロードし、import-moduleを実行します。
クライアントが最新バージョンを実行している場合は、そのまま続行します。
例```
.\ClientInspector.ps1 -verbose:$false -function:PSGallery -scope:CurrentUser
ClientInspector | Inventory of Operational & Security-related information
Developed by Morten Knudsen, Microsoft MVP - for free community use
Powershell module was not found !
Installing in scope currentuser .... Please Wait !
チャンク固有のルール:
ClientInspector | Inventory of Operational & Security-related information Developed by Morten Knudsen, Microsoft MVP - for free community use
Checking latest version at PsGallery for AzLogDcrIngestPS module OK - Running latest version
</details>
<br>
## ClientInspectorのサンプル出力
[ビデオ 3分19秒 - コマンドラインを使用したClientInspectorの実行(通常モード)](https://youtu.be/4kA4BE0zJ9g)
<br>
# セキュリティ
## コード署名
**ClientInspector.ps1ファイル**と**AzLogDcrIngestPSモジュール(AzLogDcrIngest.psm1)** は、私のコード署名証明書(2LINKIT - 自社)で署名されています。これにより、スクリプトに署名が必要な場合でも実行できます。もちろん、独自の内部コード署名証明書を使用して署名することもできます。

公開鍵証明書を[ダウンロード](https://github.com/KnudsenMorten/ClientInspectorV2/raw/main/Trusted_Publisher_Certificate/2LINKIT-TrustedPublisher.cer)し、'信頼された発行元'コンテナに配置して発行元(2LINKIT - 自社)を信頼してください。これはIntuneまたはグループポリシーを使用して展開できます。


### Intune展開では信頼された発行元は不要
デフォルトでは、Intuneは修復スクリプトを実行する際にBYPASSを行います。
## 構造
**ClientInspector**のセキュリティは4つのレイヤーに分かれています:**データ入力**、**データアップロード**(バックエンドへの送信)、**データ表示**(ダッシュボード)、および**スキーマ管理**です。
| フェーズ | セキュリティ実装 | 委任 / アクセス許可 |
|:------|:------------------------|:------------------------|
|データ入力(収集)|このフェーズは、実際の収集に使用する方法(Intune、ConfigMg、その他のサードパーティ)によって制御されます|スクリプトは、ハードウェアとWindowsからコアデータを収集するために、ローカル管理者(システムコンテキスト)として実行する必要があります|
|データアップロード|Logs Ingestion APIの認証はDCEで行われ、標準のAzure Resource Manager認証を使用します。<br><br>一般的な戦略は、アプリケーションIDとアプリケーションキーを使用することです。これはClientInspectorでも使用されている方法です。<br><br>Azure AppIdとSecretは、簡素化のためにClientInspectorのヘッダーに保存されます。<br><br>AppIdとSecretを保存するためにAzure Keyvaultを使用することも可能です|[詳細はClientInspectV2-DeploymentKitで説明](https://github.com/KnudsenMorten/ClientInspectorV2-DeploymentKit#security-1)|
|データ表示|Azure RCACアクセス許可|Azure LogAnalytics、Azure Workbooks、Azure Dashboardsへのアクセスを許可します|
|スキーマ管理|方法1: Azure RBAC(推奨)<br><br>方法2: シークレットまたは証明書を使用したAzureアプリ|[詳細はClientInSpectorV2-DeploymentKitで説明](https://github.com/KnudsenMorten/ClientInspectorV2-DeploymentKit#azure-rbac-security-adjustment-separation-of-permissions-between-log-ingestion-and-tabledcr-management)|
<br>
# ClientInspectorデータセットのレイアウト
各データセット(bios、applications、bitlockerなど)は、同じ4フェーズ構造で構築されています。
## フェーズ1/4 - 変数(命名 - データの送信先)```
#-------------------------------------------------------------------------------------------
# Variables
#-------------------------------------------------------------------------------------------
$TableName = 'InvClientComputerInfoSystemV2' # must not contain _CL
$DcrName = "dcr-" + $AzDcrPrefixClient + "-" + $TableName + "_CL"
#-------------------------------------------------------------------------------------------
#-------------------------------------------------------------------------------------------
Write-Output "" Write-Output "Collecting Computer system information ... Please Wait !"
$DataVariable = Get-CimInstance -ClassName Win32_ComputerSystem
## フェーズ 3/4 - データ操作 (データが正しい形式であることを確認し、"ノイズ"を除去し、関連情報を追加する)```
#-------------------------------------------------------------------------------------------
# Preparing data structure
#-------------------------------------------------------------------------------------------
# convert CIM array to PSCustomObject and remove CIM class information
$DataVariable = Convert-CimArrayToObjectFixStructure -data $DataVariable -Verbose:$Verbose
# add CollectionTime to existing array
$DataVariable = Add-CollectionTimeToAllEntriesInArray -Data $DataVariable -Verbose:$Verbose
# add Computer & UserLoggedOn info to existing array
$DataVariable = Add-ColumnDataToAllEntriesInArray -Data $DataVariable -Column1Name Computer -Column1Data $Env:ComputerName -Column2Name UserLoggedOn -Column2Data $UserLoggedOn
# Validating/fixing schema data structure of source data
$DataVariable = ValidateFix-AzLogAnalyticsTableSchemaColumnNames -Data $DataVariable -Verbose:$Verbose
# Aligning data structure with schema (requirement for DCR)
$DataVariable = Build-DataArrayToAlignWithSchema -Data $DataVariable -Verbose:$Verbose
#-------------------------------------------------------------------------------------------
#-------------------------------------------------------------------------------------------
CheckCreateUpdate-TableDcr-Structure -AzLogWorkspaceResourceId $LogAnalyticsWorkspaceResourceId -SchemaMode Merge -AzAppId $LogIngestAppId -AzAppSecret $LogIngestAppSecret -TenantId $TenantId -Verbose:$Verbose
-DceName $DceName -DcrName $DcrName -TableName $TableName -Data $DataVariable -LogIngestServicePricipleObjectId $AzDcrLogIngestServicePrincipalObjectId
-AzDcrSetLogIngestApiAppPermissionsDcrLevel $AzDcrSetLogIngestApiAppPermissionsDcrLevel -AzLogDcrTableCreateFromAnyMachine $AzLogDcrTableCreateFromAnyMachine
-AzLogDcrTableCreateFromReferenceMachine $AzLogDcrTableCreateFromReferenceMachine
#-----------------------------------------------------------------------------------------------
#-----------------------------------------------------------------------------------------------
Post-AzLogAnalyticsLogIngestCustomLogDcrDce-Output -DceName $DceName -DcrName $DcrName -Data $DataVariable -TableName $TableName ` -AzAppId $LogIngestAppId -AzAppSecret $LogIngestAppSecret -TenantId $TenantId -Verbose:$Verbose
<br>
**ヒント: エラー513 - エンティティが大きすぎます**
デフォルトでは、ClientInspectorはレコードごとの計算された平均サイズに基づいてデータをバッチで送信します。レコードセットのサイズが異なる場合、エラー513が発生する可能性があります。
原因は、各アップロードの1MB制限(Azure Pipelineの制限)に達していることです。Microsoftは共有環境であるため、より小さなデータチャンクを多数受信することを望んでいます。インストールされているすべてのアプリケーションのリストを取得する際にこの問題を確認しました。どうやらアプリケーションは非常に異なるサイズの情報を保存しているようです。
この問題を軽減するには、Postコマンドにパラメータ **-BatchAmount <1バッチあたりに送信するレコード数>** を追加します。確実にするには、1に設定してください。```
Post-AzLogAnalyticsLogIngestCustomLogDcrDce-Output -DceName $DceName `
-DcrName $DcrName `
-Data $DataVariable `
-TableName $TableName `
-AzAppId $LogIngestAppId `
-AzAppSecret $LogIngestAppSecret `
-TenantId $TenantId `
-BatchAmount 1 `
-Verbose:$Verbose `
#-----------------------------------------------------------------------------------------------
#-----------------------------------------------------------------------------------------------
$Schema = Get-ObjectSchemaAsArray -Data $Data
$StructureCheck = Get-AzLogAnalyticsTableAzDataCollectionRuleStatus -AzLogWorkspaceResourceId $AzLogWorkspaceResourceId -TableName $TableName
-DcrName $DcrName -SchemaSourceObject $Schema
-SchemaMode $SchemaMode
-AzAppId $AzAppId -AzAppSecret $AzAppSecret
-TenantId $TenantId `
-Verbose:$Verbose
#-----------------------------------------------------------------------------------------------
#-----------------------------------------------------------------------------------------------
$Schema = Get-ObjectSchemaAsHash -Data $Data -ReturnType Table
-Verbose:$Verbose
CreateUpdate-AzLogAnalyticsCustomLogTableDcr -AzLogWorkspaceResourceId $AzLogWorkspaceResourceId -SchemaSourceObject $Schema
-SchemaMode $SchemaMode
-TableName $TableName -AzAppId $AzAppId
-AzAppSecret $AzAppSecret -TenantId $TenantId
-Verbose:$Verbose
$Schema = Get-ObjectSchemaAsHash -Data $Data -ReturnType DCR
CreateUpdate-AzDataCollectionRuleLogIngestCustomLog -AzLogWorkspaceResourceId $AzLogWorkspaceResourceId -SchemaSourceObject $Schema
-SchemaMode $SchemaMode
-DceName $DceName -DcrName $DcrName
-TableName $TableName -LogIngestServicePricipleObjectId $LogIngestServicePricipleObjectId
-AzDcrSetLogIngestApiAppPermissionsDcrLevel $AzDcrSetLogIngestApiAppPermissionsDcrLevel -AzAppId $AzAppId
-AzAppSecret $AzAppSecret -TenantId $TenantId
-Verbose:$Verbose
$AzDcrDceDetails = Get-AzDcrDceDetails -DcrName $DcrName -DceName $DceName
-AzAppId $AzAppId -AzAppSecret $AzAppSecret
-TenantId $TenantId `
-Verbose:$Verbose
Post-AzLogAnalyticsLogIngestCustomLogDcrDce -DceUri $AzDcrDceDetails[2] -DcrImmutableId $AzDcrDceDetails[6]
-TableName $TableName -DcrStream $AzDcrDceDetails[7]
-Data $Data -BatchAmount $BatchAmount
-AzAppId $AzAppId -AzAppSecret $AzAppSecret
-TenantId $TenantId `
-Verbose:$Verbose
<br>
# 詳細モード & その他のヘルプ
何が起こっているかについてより詳細な情報を得たい場合は、詳細モード(-verbose:$true)を有効にできます。```
.\ClientInspector.ps1 -verbose:$true -function:localpath
Powershell ISEを使用してテストしたい場合は、変数$Verboseを使用してverboseモードを有効にすることもできます。``` $Verbose = $false # can be $true or $false
AzLogDcrLogIngestPSモジュールの構文や例についてヘルプを表示したい場合は、get-moduleと入力してください。```
PS get-command -module AzLogDcrIngestPS
CommandType Name Version Source
----------- ---- ------- ------
Function Add-CollectionTimeToAllEntriesInArray 1.1.17 AzLogDcrIngestPS
Function Add-ColumnDataToAllEntriesInArray 1.1.17 AzLogDcrIngestPS
Function Build-DataArrayToAlignWithSchema 1.1.17 AzLogDcrIngestPS
Function CheckCreateUpdate-TableDcr-Structure 1.1.17 AzLogDcrIngestPS
Function Convert-CimArrayToObjectFixStructure 1.1.17 AzLogDcrIngestPS
Function Convert-PSArrayToObjectFixStructure 1.1.17 AzLogDcrIngestPS
Function CreateUpdate-AzDataCollectionRuleLogIngestCusto... 1.1.17 AzLogDcrIngestPS
Function CreateUpdate-AzLogAnalyticsCustomLogTableDcr 1.1.17 AzLogDcrIngestPS
Function Delete-AzDataCollectionRules 1.1.17 AzLogDcrIngestPS
Function Delete-AzLogAnalyticsCustomLogTables 1.1.17 AzLogDcrIngestPS
Function Filter-ObjectExcludeProperty 1.1.17 AzLogDcrIngestPS
Function Get-AzAccessTokenManagement 1.1.17 AzLogDcrIngestPS
Function Get-AzDceListAll 1.1.17 AzLogDcrIngestPS
Function Get-AzDcrDceDetails 1.1.17 AzLogDcrIngestPS
Function Get-AzDataCollectionRuleTransformKql 1.1.17 AzLogDcrIngestPS
Function Get-AzDcrListAll 1.1.17 AzLogDcrIngestPS
Function Get-AzLogAnalyticsTableAzDataCollectionRuleStatus 1.1.17 AzLogDcrIngestPS
Function Get-ObjectSchemaAsArray 1.1.17 AzLogDcrIngestPS
Function Get-ObjectSchemaAsHash 1.1.17 AzLogDcrIngestPS
Function Post-AzLogAnalyticsLogIngestCustomLogDcrDce 1.1.17 AzLogDcrIngestPS
Function Post-AzLogAnalyticsLogIngestCustomLogDcrDce-Output 1.1.17 AzLogDcrIngestPS
Function Update-AzDataCollectionRuleDceEndpoint 1.1.17 AzLogDcrIngestPS
Function Update-AzDataCollectionRuleResetTransformKqlDef... 1.1.17 AzLogDcrIngestPS
Function Update-AzDataCollectionRuleTransformKql 1.1.17 AzLogDcrIngestPS
Function ValidateFix-AzLogAnalyticsTableSchemaColumnNames 1.1.17 AzLogDcrIngestPS
特定のコマンドレットのヘルプを取得する - get-help Add-CollectionTimeToAllEntriesInArray -full``` get-help Add-CollectionTimeToAllEntriesInArray -full
NAME Add-CollectionTimeToAllEntriesInArray
SYNOPSIS Add property CollectionTime (based on current time) to all entries on the object
SYNTAX Add-CollectionTimeToAllEntriesInArray [-Data] []
DESCRIPTION Gives capability to do proper searching in queries to find latest set of records with same collection time Time Generated cannot be used when you are sending data in batches, as TimeGenerated will change An example where this is important is a complete list of applications for a computer. We want all applications to show up when queriying for the latest data
PARAMETERS -Data Object to modify
Required? true
Position? 1
Default value
Accept pipeline input? false
Accept wildcard characters? false
<CommonParameters>
This cmdlet supports the common parameters: Verbose, Debug,
ErrorAction, ErrorVariable, WarningAction, WarningVariable,
OutBuffer, PipelineVariable, and OutVariable. For more information, see
about_CommonParameters (https:/go.microsoft.com/fwlink/?LinkID=113216).
INPUTS None. You cannot pipe objects
OUTPUTS Updated object with CollectionTime
-------------------------- EXAMPLE 1 --------------------------
PS C:\>#-------------------------------------------------------------------------------------------
# Variables
#-------------------------------------------------------------------------------------------
$Verbose = $true # $true or $false
#-------------------------------------------------------------------------------------------
# Collecting data (in)
#-------------------------------------------------------------------------------------------
$DNSName = (Get-CimInstance win32_computersystem).DNSHostName +"." + (Get-CimInstance win32_computersystem).Domain
$ComputerName = (Get-CimInstance win32_computersystem).DNSHostName
[datetime]$CollectionTime = ( Get-date ([datetime]::Now.ToUniversalTime()) -format "yyyy-MM-ddTHH:mm:ssK" )
$UserLoggedOnRaw = Get-Process -IncludeUserName -Name explorer | Select-Object UserName -Unique
$UserLoggedOn = $UserLoggedOnRaw.UserName
$DataVariable = Get-CimInstance -ClassName Win32_Processor | Select-Object -ExcludeProperty "CIM*"
#-------------------------------------------------------------------------------------------
# Preparing data structure
#-------------------------------------------------------------------------------------------
$DataVariable = Convert-CimArrayToObjectFixStructure -data $DataVariable -Verbose:$Verbose
$DataVariable
# add CollectionTime to existing array
$DataVariable = Add-CollectionTimeToAllEntriesInArray -Data $DataVariable -Verbose:$Verbose
$DataVariable
#-------------------------------------------------------------------------------------------
# Output
#-------------------------------------------------------------------------------------------
VERBOSE: Adding CollectionTime to all entries in array .... please wait !
Caption : Intel64 Family 6 Model 165 Stepping 5
Description : Intel64 Family 6 Model 165 Stepping 5
InstallDate :
Name : Intel(R) Core(TM) i7-10700 CPU @ 2.90GHz
Status : OK
Availability : 3
ConfigManagerErrorCode :
ConfigManagerUserConfig :
CreationClassName : Win32_Processor
DeviceID : CPU0
ErrorCleared :
ErrorDescription :
LastErrorCode :
PNPDeviceID :
PowerManagementCapabilities :
PowerManagementSupported : False
StatusInfo : 3
SystemCreationClassName : Win32_ComputerSystem
SystemName : STRV-MOK-DT-02
AddressWidth : 64
CurrentClockSpeed : 2904
DataWidth : 64
Family : 198
LoadPercentage : 1
MaxClockSpeed : 2904
OtherFamilyDescription :
Role : CPU
Stepping :
UniqueId :
UpgradeMethod : 1
Architecture : 9
AssetTag : To Be Filled By O.E.M.
Characteristics : 252
CpuStatus : 1
CurrentVoltage : 8
ExtClock : 100
L2CacheSize : 2048
L2CacheSpeed :
L3CacheSize : 16384
L3CacheSpeed : 0
Level : 6
Manufacturer : GenuineIntel
NumberOfCores : 8
NumberOfEnabledCore : 8
NumberOfLogicalProcessors : 16
PartNumber : To Be Filled By O.E.M.
ProcessorId : BFEBFBFF000A0655
ProcessorType : 3
Revision :
SecondLevelAddressTranslationExtensions : False
SerialNumber : To Be Filled By O.E.M.
SocketDesignation : U3E1
ThreadCount : 16
Version :
VirtualizationFirmwareEnabled : False
VMMonitorModeExtensions : False
VoltageCaps :
PSComputerName :
CollectionTime : 12-03-2023 16:08:33
RELATED LINKS https://github.com/KnudsenMorten/AzLogDcrIngestPS
<br>
# コスト - このデータの保存にはどのくらいの費用がかかりますか?
**500** クライアントが **毎日** ClientInspector インベントリを実行した場合、おおよそ **月額 DKK 200 / USD 27** かかります。
<br>
# バグ・発見事項についてお知らせください
現在、ClientInspectorV1 は何千台ものコンピュータで使用されています(ServerInspectorV1 は何千台ものサーバで使用されています)。
ClientInspectorV2 は V1 からの完全な再構築であり、新しい命名規則などを導入して展開中であるため、バグが見つからないことを保証することはできません。
しかし、**保証できるのは**、私の空き時間が許す限り迅速に修正するということです。発見事項は [email protected] までメールでお送りください。
GitHub サイトのフォークをご検討いただくか、ダッシュボード/ワークブックや ClientInspector スクリプトのアップデートに注目してください。
また、ClientInspector はさまざまな設計やプラットフォームをカバーするように構築されていますが、独自の構成があり、コレクションやダッシュボードでカバーされていない場合もあります。
しかし、オープンなアプローチにより、ダッシュボード、ワークブック、ClientInspector スクリプトを調整して、100% 機能するようにすることができます。これは、Azure のログ記録技術を活用するためのショーケースと考えてください。有料の 24 時間 365 日サポート製品ではありません。誰でも無料で使用できます。
<br>
# 連絡先
ソリューションについてご意見があれば、または単に私とつながりたい場合は、以下のチャネルからご連絡ください。ぜひつながりましょう。
[GitHub](https://github.com/KnudsenMorten)
[Twitter](https://twitter.com/knudsenmortendk)
[ブログ](https://mortenknudsen.net/)
[LinkedIn](https://www.linkedin.com/in/mortenwaltorpknudsen/)
[Microsoft MVP プロフィール](https://mvp.microsoft.com/en-us/PublicProfile/5005156?fullName=Morten%20Knudsen)
[Sessionize](https://sessionize.com/mortenknudsen/)
[メール](mailto:[email protected])
<br>
# Microsoft プロダクトチームの素晴らしい皆様に心から感謝します - あなた方はロックスターです :smile:
最後に、AzLogDcrIngestPS PowerShell モジュールの構築や、日々の Azure ログおよび表示機能に関する作業で一緒に仕事をした数名の方々に多大な謝意を表します。
|名前|役割|
|:---|:---|
|Ivan Varnitski|プログラムマネージャー - Azure Pipeline|
|Evgeny Ternovsky|プログラムマネージャー - Azure Pipeline|
|Nick Kiest|プログラムマネージャー - Azure データ収集ルール|
|Oren Salzberg|プログラムマネージャー - Azure LogAnalytics|
|Guy Wild|テクニカルライター - Azure LogAnalytics|
|John Gardner|プログラムマネージャー - Azure ワークブック|
|Shikha Jain|プログラムマネージャー - Azure ワークブック|
|Shayoni Seth|プログラムマネージャー - Azure Monitor エージェント|
|Jeff Wolford|プログラムマネージャー - Azure Monitor エージェント|
|Xema Pathak|プログラムマネージャー - Azure VMInsight (Azure Monitor エージェントとの統合)|
