
Skip to content
KitploitKITPLOIT
StrumentiBlog
Invia
StrumentiBlog
Invia

Strumenti di Hacking, PenTest e Cybersecurity per il tuo Arsenale di Sicurezza!

Kitploit è una directory di strumenti di hacking, cybersecurity e pentesting. Scopri gli ultimi aggiornamenti dei progetti per trovare vulnerabilità, analizzare sistemi, automatizzare i test e rafforzare la tua sicurezza.

··Feed·Contatto·Privacy·© 2026 Kitploit

Directory degli strumenti

Categorie

Vedi tutte le categorie
Loading categories
Blue-Team-Notes — You didn't think I'd go and leave the blue team out, right? | Kitploit
Strumenti/GitHubGitHub/purp1ew0lf/blue-team-notes
Memory ForensicsNetwork ForensicsMalware AnalysisDigital ForensicsLearning & EducationIncident ResponseCurated ResourcesLog Analysis
GitHubpurp1ew0lf/blue-team-notes

Blue-Team-Notes

You didn't think I'd go and leave the blue team out, right?

Vedi Repository
1.8k2470 giorni faRevisionato da Kitploit

Più Popolari

Vedi tutti →

Scopri gli strumenti più utilizzati dalla nostra community.

Esplora tutti gli strumenti

Sfoglia la nostra collezione di strumenti

Vedi tutti gli strumenti →
Condividi
Contenuto non disponibile nella lingua richiesta. Visualizzazione della versione inglese.

Blue Team Notes

A collection of one-liners, small scripts, and some useful tips for blue team work.

I've included screenshots where possible so you know what you're getting.

Contact me

If you see a mistake, or have an easier way to run a command then you're welcome to hit me up on Twitter or commit an issue here.

If you want to contribute I'd be grateful for the command and a screenshot. I'll of course add you as a contributor

If you want to find me elsehwere, for reasons(?), searching 'Dray Agha' on the internets should find whatever it is you're looking for.

Did the Notes help?

I hope the Blue Team Notes help you catch an adversary, thwart an attack, or even just helps you learn. If you've benefited from the Blue Team Notes, would you kindly consider making a donation to one or two charities.

Donate as much or little money as you like, of course. I have some UK charities you could donate to: Great Ormond Street - Children's hospital, Cancer Research, and Feeding Britain - food charity

Table of Contents

  • Shell Style
  • Windows
    • OS Queries
    • Account Queries
    • Service Queries
    • Network Queries
    • Remoting Queries
    • Firewall Queries
    • SMB Queries
    • Process Queries
    • Recurring Task Queries
    • File Queries
    • Registry Queries
    • Driver Queries
    • DLL Queries
    • AV Queries
    • Log Queries
    • Powershell Tips
  • Linux
    • Bash History
    • Grep and Ack
    • Processes and Networks
    • Files
    • Bash Tips
  • macOS
    • Reading .plist files
    • Quarantine Events
    • Install History
    • Most Recently Used (MRU)
    • Audit Logs
    • Command line history
    • WHOMST is in the Admin group
    • Persistence locations
    • Transparency, Consent, and Control (TCC)
    • Built-In Security Mechanisms
  • Malware
    • Rapid Malware Analysis
    • Unquarantine Malware
    • Process Monitor
    • Hash Check Malware
    • Decoding Powershell

As you scroll along, it's easy to lose orientation. Wherever you are in the Blue Team Notes, if you look to the top-left of the readme you'll see a little icon. This is a small table of contents, and it will help you figure out where you are, where you've been, and where you're going
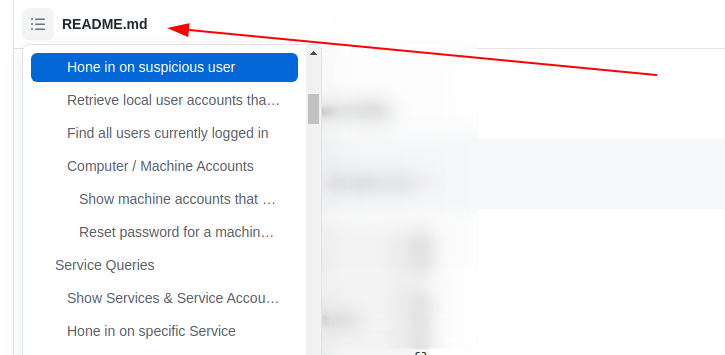
image

As you go through sections, you may notice the arrowhead that says 'section contents'. I have nestled the sub-headings in these, to make life a bit easier.
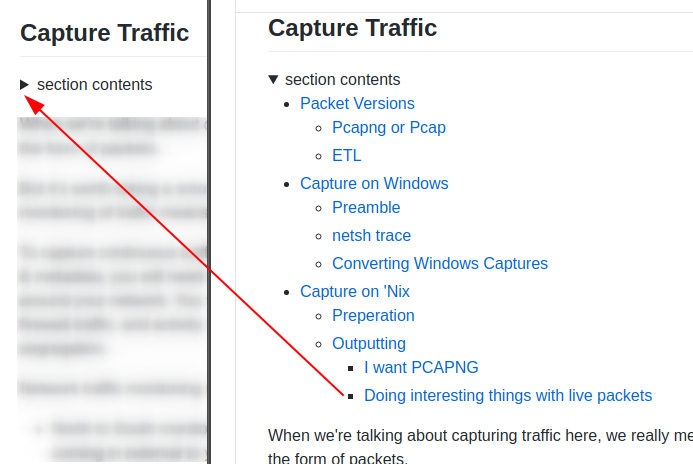
image


Shell Style

section contents
  • Give shell timestamp
    • CMD
    • Pwsh
    • Bash

Give shell timestamp

For screenshots during IR, I like to have the date, time, and sometimes the timezone in my shell

CMD

root@kitploit:~
setx prompt $D$S$T$H$H$H$S$B$S$P$_--$g
:: all the H's are to backspace the stupid microsecond timestamp
:: $_ and --$g seperate the date/time and path from the actual shell
:: We make the use of the prompt command: https://docs.microsoft.com/en-us/windows-server/administration/windows-commands/prompt
:: setx is in fact the command line command to write variables to the registery
:: We are writing the prompt's new timestamp value in the cmd line into the reg so it stays, otherwise it would not stay in the cmdline when we closed it.
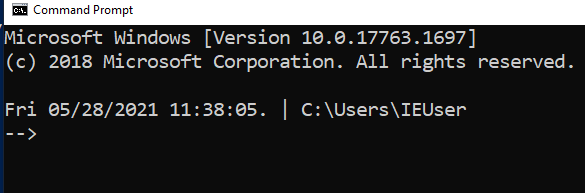
image

Pwsh

root@kitploit:~
###create a powershell profile, if it doesnt exist already
New-Item $Profile -ItemType file –Force
##open it in notepad to edit
function prompt{ "[$(Get-Date)]" +" | PS "+ "$(Get-Location) > "}
##risky move, need to tighten this up. Change your execution policy or it won't
#run the profile ps1
#run as powershell admin
Set-ExecutionPolicy RemoteSigned

image

Bash

root@kitploit:~
##open .bashrc
sudo nano .bashrc
#https://www.howtogeek.com/307701/how-to-customize-and-colorize-your-bash-prompt/
##date, time, colour, and parent+child directory only, and -> promptt
PS1='\[\033[00;35m\][`date  +"%d-%b-%y %T %Z"]` ${PWD#"${PWD%/*/*}/"}\n\[\033[01;36m\]-> \[\033[00;37m\]'
      ##begin purple  #year,month,day,time,timezone #show last 2 dir #next line, cyan,->prompt #back to normal white text
#restart the bash source
source ~/.bashrc

image

Windows

section contents
  • OS Queries
  • Account Queries
  • Service Queries
  • Network Queries
  • Remoting Queries
  • Firewall Queries
  • SMB Queries
  • Process Queries
  • Recurring Task Queries
  • File Queries
  • Registry Queries
  • Driver Queries
  • DLL Queries
  • Log Queries
  • Powershell Tips

I've generally used these Powershell queries with Velociraptor, which can query thousands of endpoints at once.

OS Queries

section contents
  • Get Fully Qualified Domain Name
  • Get OS and Pwsh info
    • Hardware Info
  • Time info
    • Human Readable
    • Machine comparable
    • Compare UTC time from Local time
  • Update Info
    • Get Patches
    • Manually check if patch has taken
      • Microsoft Support Page
      • On Host
      • Discrepencies

Get Fully Qualified Domain Name

root@kitploit:~
([System.Net.Dns]::GetHostByName(($env:computerName))).Hostname

# Get just domain name
(Get-WmiObject -Class win32_computersystem).domain

image

Get OS and Pwsh info

This will print out the hostname, the OS build info, and the powershell version

root@kitploit:~
$Bit = (get-wmiobject Win32_OperatingSystem).OSArchitecture ; 
$V = $host | select-object -property "Version" ; 
$Build = (Get-WmiObject -class Win32_OperatingSystem).Caption ; 
write-host "$env:computername is a $Bit $Build with Pwsh $V

image

Hardware Info

If you want, you can get Hardware, BIOS, and Disk Space info of a machine

root@kitploit:~
#Get BIOS Info
gcim -ClassName Win32_BIOS | fl Manufacturer, Name, SerialNumber, Version;
#Get processor info
gcim -ClassName Win32_Processor | fl caption, Name, SocketDesignation;
#Computer Model
gcim -ClassName Win32_ComputerSystem | fl Manufacturer, Systemfamily, Model, SystemType
#Disk space in Gigs, as who wants bytes?
gcim  -ClassName Win32_LogicalDisk |
Select -Property DeviceID, DriveType, @{L='FreeSpaceGB';E={"{0:N2}" -f ($_.FreeSpace /1GB)}}, @{L="Capacity";E={"{0:N2}" -f ($_.Size/1GB)}} | fl

## Let's calculate an individual directory, C:\Sysmon, and compare with disk memory stats
$size = (gci c:\sysmon | measure Length -s).sum / 1Gb;
write-host " Sysmon Directory in Gigs: $size";
$free = gcim  -ClassName Win32_LogicalDisk | select @{L='FreeSpaceGB';E={"{0:N2}" -f ($_.FreeSpace /1GB)}};
echo "$free";
$cap = gcim  -ClassName Win32_LogicalDisk | select @{L="Capacity";E={"{0:N2}" -f ($_.Size/1GB)}} 
echo "$cap"

image

Time info

Human Readable

Get a time that's human readable

root@kitploit:~
Get-Date -UFormat "%a %Y-%b-%d %T UTC:%Z" 

image

Machine comparable

This one is great for doing comparisons between two strings of time

root@kitploit:~
[Xml.XmlConvert]::ToString((Get-Date).ToUniversalTime(), [System.Xml.XmlDateTimeSerializationMode]::Utc) 

image

Compare UTC time from Local time

root@kitploit:~
$Local = get-date;$UTC = (get-date).ToUniversalTime();
write-host "LocalTime is: $Local";write-host "UTC is: $UTC"

image

Update Info

Get Patches

Will show all patch IDs and their installation date

root@kitploit:~
get-hotfix|
select-object HotFixID,InstalledOn|
Sort-Object  -Descending -property InstalledOn|
format-table -autosize

image

Find why an update failed

root@kitploit:~
$Failures = gwmi -Class Win32_ReliabilityRecords;
$Failures | ? message -match 'failure'  | Select -ExpandProperty message 

Manually check if patch has taken

This happened to me during the March 2021 situation with Microsoft Exchange's ProxyLogon. The sysadmin swore blind they had patched the server, but neither systeminfo of get-hotfix was returning with the correct KB patch.

The manual workaround isn't too much ballache

Microsoft Support Page

First identify the ID number of the patch you want. And then find the dedicated Microsoft support page for it.

For demonstration purposes, let's take KB5001078 and it's corresponding support page. You'll be fine just googling the patch ID number.

image

Then click into the dropdown relevant to your machine. image

Here you can see the files that are included in a particular update. The task now is to pick a handful of the patch-files and compare your host machine. See if these files exist too, and if they do do they have similar / same dates on the host as they do in the Microsoft patch list?

On Host

Let us now assume you don't know the path to this file on your host machine. You will have to recursively search for the file location. It's a fair bet that the file will be in C:\Windows\ (but not always), so lets' recursively look for EventsInstaller.dll

root@kitploit:~
$file = 'EventsInstaller.dll'; $directory = 'C:\windows' ;
gci -Path $directory -Filter $file -Recurse -force|
sort-object  -descending -property LastWriteTimeUtc | fl *

We'll get a lot of information here, but we're really concerned with is the section around the various times. As we sort by the LastWriteTimeUtc, the top result should in theory be the latest file of that name...but this is not always true.

image

Discrepencies

I've noticed that sometimes there is a couple days discrepency between dates.

image

For example in our screenshot, on the left Microsoft's support page supposes the EventsInstaller.dll was written on the 13th January 2021. And yet our host on the right side of the screenshot comes up as the 14th January 2021. This is fine though, you've got that file don't sweat it.


Account Queries

section contents
  • Users recently created in Active Directory
  • Hone in on suspicious user
  • Retrieve local user accounts that are enabled
  • Find all users currently logged in
    • Find all users logged in across entire AD
  • Evict User
    • Force user logout
    • Force user new password
    • Disable AD Account
    • Evict from Group
  • Computer / Machine Accounts
    • Show machine accounts that are apart of interesting groups.
    • Reset password for a machine account.
  • Query Group Policy
  • All Users PowerShell History

Users recently created in Active Directory

Run on a Domain Controller.

Change the AddDays field to more or less days if you want. Right now set to seven days.

The 'when Created' field is great for noticing some inconsistencies. For example, how often are users created at 2am?

root@kitploit:~
import-module ActiveDirectory;
$When = ((Get-Date).AddDays(-7)).Date; 
Get-ADUser -Filter {whenCreated -ge $When} -Properties whenCreated |
sort whenCreated -descending 

image

Hone in on suspicious user

You can use the SamAccountName above to filter

root@kitploit:~
import-module ActiveDirectory;
Get-ADUser -Identity HamBurglar -Properties *

image

Retrieve local user accounts that are enabled

root@kitploit:~
 Get-LocalUser | ? Enabled -eq "True"

image

Find all users currently logged in

root@kitploit:~
qwinsta
#or
quser

Find all users logged in across entire AD

If you want to find every single user logged in on your Active Directory, with the machine they are also signed in to.

I can reccomend YossiSassi's Get-UserSession.ps1 and Get-RemotePSSession.ps1.

This will generate a LOT of data in a real-world AD though.

image

Evict User

Force user logout

You may need to evict a user from a session - perhaps you can see an adversary has been able to steal a user's creds and is leveraging their account to traverse your environment

root@kitploit:~
#show the users' session
qwinsta

#target their session id
logoff 2 /v

2021-11-15_15-03

Force user new password

From the above instance, we may want to force a user to have a new password - one the adversary does not have

for Active Directory
root@kitploit:~
$user = "lizzie" ; $newPass = "HoDHSyxkzP-cuzjm6S6VF-7rvqKyR";

#Change password twice. 
#First can be junk password, second time can be real new password
Set-ADAccountPassword -Identity $user -Reset -NewPassword (ConvertTo-SecureString -AsPlainText "6;wB3yj9cI8X" -Force) -verbose
Set-ADAccountPassword -Identity $user -Reset -NewPassword (ConvertTo-SecureString -AsPlainText "$newPass" -Force) -verbose

image

For local non-domain joined machines
root@kitploit:~
#for local users
net user #username #newpass
net user frank "lFjcVR7fW2-HoDHSyxkzP"

image

Disable AD Account

root@kitploit:~
#needs the SAMAccountName
$user = "lizzie"; 
Disable-ADAccount -Identity "$user" #-whatif can be appended

#check its disabled
(Get-ADUser -Identity $user).enabled

#renable when you're ready
Enable-ADAccount -Identity "$user" -verbose

image

image

Disable local Account

root@kitploit:~
# list accounts with  Get-LocalUser
Disable-LocalUser -name "bad_account$"
image

Evict from Group

Good if you need to quickly eject an account from a specific group, like administrators or remote management.

root@kitploit:~
$user = "erochester"
remove-adgroupmember -identity Administrators -members $User -verbose -confirm:$false

image

Computer / Machine Accounts

Adversaries like to use Machine accounts (accounts that have a $) as these often are overpowered AND fly under the defenders' radar

Show machine accounts that are apart of interesting groups.

There may be misconfigurations that an adversary could take advantadge.

root@kitploit:~
Get-ADComputer -Filter * -Properties MemberOf | ? {$_.MemberOf}

image

Reset password for a machine account.

Good for depriving adversary of pass they may have got. Also good for re-establishing trust if machine is kicked out of domain trust for reasons(?)

root@kitploit:~
Reset-ComputerMachinePassword

All Users PowerShell History

During an IR, you will want to access other users PowerShell history. However, the get-history command only will retrieve the current shell's history, which isn't very useful.

Instead, PowerShell in Windows 10 saves the last 4096 commands in a particular file. On an endpoint, we can run a quick loop that will print the full path of the history file - showing which users history it is showing - and then show the contents of that users' PwSh commands

root@kitploit:~
$Users = (Gci C:\Users\*\AppData\Roaming\Microsoft\Windows\PowerShell\PSReadline\ConsoleHost_history.txt).FullName
$Pasts = @($Users);

foreach ($Past in $Pasts) {
  write-host "`n----User Pwsh History Path $Past---`n" -ForegroundColor Magenta; 
  get-content $Past
}

image

And check this one too

root@kitploit:~
c:\windows\system32\config\systemprofile\appdata\roaming\microsoft\windows\powershell\psreadline\consolehost_history.txt

Service Queries

section contents
  • Show Services
  • Hone in on specific Service
  • Kill a service
  • Hunting potential sneaky services

Show Services

Let's get all the services and sort by what's running

root@kitploit:~
get-service|Select Name,DisplayName,Status|
sort status -descending | ft -Property * -AutoSize|
Out-String -Width 4096

image

Now show the underlying executable supporting that service

root@kitploit:~
Get-WmiObject win32_service |? State -match "running" |
select Name, DisplayName, PathName, User | sort Name |
ft -wrap -autosize

image

Hone in on specific Service

If a specific service catches your eye, you can get all the info for it. Because the single and double qoutes are important to getting this right, I find it easier to just put the DisplayName of the service I want as a variable, as I tend to fuck up the displayname filter bit

root@kitploit:~
$Name = "eventlog"; 
gwmi -Class Win32_Service -Filter "Name = '$Name' " | fl *

#or this, but you get less information compared to the one about tbh
get-service -name "eventlog" | fl *   

image

Kill a service

root@kitploit:~
Get-Service -DisplayName "meme_service" | Stop-Service -Force -Confirm:$false -verbose

Hunting potential sneaky services

I saw a red team tweet regarding sneaky service install. To identify this, you can deploy the following:

root@kitploit:~
Get-ItemProperty -Path "HKLM:\System\CurrentControlSet\services\*" | 
ft PSChildName, ImagePath -autosize | out-string -width 800

# Grep out results from System32 to reduce noise, though keep in mind adversaries can just put stuff in there too
Get-ItemProperty -Path "HKLM:\System\CurrentControlSet\services\*" | 
where ImagePath -notlike "*System32*" | 
ft PSChildName, ImagePath -autosize | out-string -width 800

image

Network Queries

section contents
  • Show TCP connections and underlying process
  • Find internet established connections, and sort by time established
  • Sort remote IP connections, and then unique them
    • Hone in on a suspicious IP
  • Show UDP connections
  • Kill a connection
  • Check Hosts file
    • Check Host file Time
  • DNS Cache
    • Investigate DNS
  • IPv6
    • Disable Priority Treatment of IPv6
  • BITS Queries

Show TCP connections and underlying process

This one is so important, I have it listed twice in the blue team notes

I have a neat one-liner for you. This will show you the local IP and port, the remote IP andport, the process name, and the underlying executable of the process!

You could just use netstat -b, which gives you SOME of this data

But instead, try this bad boy on for size:

root@kitploit:~
Get-NetTCPConnection |
select LocalAddress,localport,remoteaddress,remoteport,state,@{name="process";Expression={(get-process -id $_.OwningProcess).ProcessName}}, @{Name="cmdline";Expression={(Get-WmiObject Win32_Process -filter "ProcessId = $($_.OwningProcess)").commandline}} | 
sort Remoteaddress -Descending | ft -wrap -autosize

#### you can search/filter by the commandline process, but it will come out janky. 
##### in the final field we're searching by `anydesk`
Get-NetTCPConnection |
select LocalAddress,localport,remoteaddress,remoteport,state,@{name="process";Expression={(get-process -id $_.OwningProcess).ProcessName}}, @{Name="cmdline";Expression={(Get-WmiObject Win32_Process -filter "ProcessId = $($_.OwningProcess)").commandline}} 
|  Select-String -Pattern 'anydesk'

image

######## Bound to catch bad guys or your moneyback guaranteed!!!!

Find internet established connections, and sort by time established

You can always sort by whatever value you want really. CreationTime is just an example

root@kitploit:~
Get-NetTCPConnection -AppliedSetting Internet |
select-object -property remoteaddress, remoteport, creationtime |
Sort-Object -Property creationtime |
format-table -autosize

image

Sort remote IP connections, and then unique them

This really makes strange IPs stand out

root@kitploit:~
(Get-NetTCPConnection).remoteaddress | Sort-Object -Unique 

image

Hone in on a suspicious IP

If you see suspicious IP address in any of the above, then I would hone in on it

root@kitploit:~
Get-NetTCPConnection |
? {($_.RemoteAddress -eq "1.2.3.4")} |
select-object -property state, creationtime, localport,remoteport | ft -autosize

## can do this as well 
 Get-NetTCPConnection -remoteaddress 0.0.0.0 |
 select state, creationtime, localport,remoteport | ft -autosize

image

Show UDP connections

You can generally filter pwsh UDP the way we did the above TCP

root@kitploit:~
 Get-NetUDPEndpoint | select local*,creationtime, remote* | ft -autosize

image

Kill a connection

There's probably a better way to do this. But essentially, get the tcp connection that has the specific remote IPv4/6 you want to kill. It will collect the OwningProcess. From here, get-process then filters for those owningprocess ID numbers. And then it will stop said process. Bit clunky

root@kitploit:~
stop-process -verbose -force -Confirm:$false (Get-Process -Id (Get-NetTCPConnection -RemoteAddress "1.2.3.4" ).OwningProcess)

Check Hosts file

Some malware may attempt DNS hijacking, and alter your Hosts file

root@kitploit:~
gc -tail 4 "C:\Windows\System32\Drivers\etc\hosts"

#the above gets the most important bit of the hosts file. If you want more, try this:
gc "C:\Windows\System32\Drivers\etc\hosts"

Check Host file Time

Don't trust timestamps....however, may be interesting to see if altered recently

root@kitploit:~
gci "C:\Windows\System32\Drivers\etc\hosts" | fl *Time* 

image

DNS Cache

Collect the DNS cache on an endpoint. Good for catching any sneaky communication or sometimes even DNS C2

root@kitploit:~
Get-DnsClientCache | out-string -width 1000

image

Investigate DNS

The above command will likely return a lot of results you don't really need about the communication between 'trusted' endpoints and servers. We can filter these 'trusted' hostnames out with regex, until we're left with less common results.

On the second line of the below code, change up and insert the regex that will filter out your machines. For example, if your machines are generally called WrkSt1001.corp.local, or ServStFAX.corp.local, you can regex out that first poriton so it will exclude any and all machines that share this - so workst|servst would do the job. You don't need to wildcard here.

Be careful though. If you are too generic and liberal, you may end up filtering out malicious and important results. It's bettter to be a bit specific, and drill down further to amake sure you aren't filtering out important info. So for example, I wouldn't suggest filtering out short combos of letters or numbers ae|ou|34|

root@kitploit:~
Get-DnsClientCache | 
? Entry -NotMatch "workst|servst|memes|kerb|ws|ocsp" |
out-string -width 1000  

If there's an IP you're sus of, you can always take it to WHOIS or VirusTotal, as well see for other instances it appears in your network and what's up to whilst it's interacting there.

IPv6

Since Windows Vitsa, the Windows OS prioritises IPv6 over IPv4. This lends itself to man-in-the-middle attacks, you can find some more info on exploitation here

Get IPv6 addresses and networks

root@kitploit:~
Get-NetIPAddress -AddressFamily IPv6  | ft Interfacealias, IPv6Address

image

Disable Priority Treatment of IPv6

You probably don't want to switch IPv6 straight off. And if you DO want to, then it's probably better at a DHCP level. But what we can do is change how the OS will prioritise the IPv6 over IPv4.

root@kitploit:~
#check if machine prioritises IPv6
ping $env:COMPUTERNAME -n 4 # if this returns an IPv6, the machine prioritises this over IPv4

#Reg changes to de-prioritise IPv6
New-ItemProperty “HKLM:\SYSTEM\CurrentControlSet\Services\Tcpip6\Parameters\” -Name “DisabledComponents” -Value 0x20 -PropertyType “DWord”

#If this reg already exists and has values, change the value
Set-ItemProperty “HKLM:\SYSTEM\CurrentControlSet\Services\Tcpip6\Parameters\” -Name “DisabledComponents” -Value 0x20

#you need to restart the computer for this to take affect
#Restart-Computer

image

BITS Queries

root@kitploit:~
Get-BitsTransfer| 
fl DisplayName,JobState,TransferType,FileList, OwnerAccount,BytesTransferred,CreationTime,TransferCompletionTime
 
## filter out common bits jobs in your enviro, ones below are just an example, you will need to add your own context
Get-BitsTransfer|
| ? displayname -notmatch "WU|Office|Dell_Asimov|configjson" |
fl DisplayName,JobState,TransferType,FileList, OwnerAccount,BytesTransferred,CreationTime,TransferCompletionTime

## Hunt down BITS transfers that are UPLOADING, which may be sign of data exfil
Get-BitsTransfer| 
? TransferType -match "Upload" | 
fl DisplayName,JobState,TransferType,FileList, OwnerAccount,BytesTransferred,CreationTime,TransferCompletionTime

image

Remoting Queries

section contents
  • Powershell Remoting
    • Remoting Permissions
    • Query WinRM Sessions Deeper
    • Check Constrained Language
  • RDP Settings
  • Query RDP Logs
  • Current RDP Sessions
  • Check Certificates
    • Certificate Dates

Powershell Remoting

Get Powershell sessions created

root@kitploit:~
Get-PSSession

Query WinRM Sessions Deeper

You can query the above even deeper.

root@kitploit:~
get-wsmaninstance -resourceuri shell -enumerate | 
select Name, State, Owner, ClientIP, ProcessID, MemoryUsed, 
@{Name = "ShellRunTime"; Expression = {[System.Xml.XmlConvert]::ToTimeSpan($_.ShellRunTime)}},
@{Name = "ShellInactivity"; Expression = {[System.Xml.XmlConvert]::ToTimeSpan($_.ShellInactivity)}}

image

The ClientIP field will show the original IP address that WinRM'd to the remote machine. The times under the Shell fields at the bottom have been converted into HH:MM:SS, so in the above example, the remote PowerShell session has been running for 0 hours, 4 minutes, and 26 seconds.

Remoting Permissions

root@kitploit:~
Get-PSSessionConfiguration | 
fl Name, PSVersion, Permission

image

Check Constrained Language

To be honest, constrained language mode in Powershell can be trivally easy to mitigate for an adversary. And it's difficult to implement persistently. But anyway. You can use this quick variable to confirm if a machine has a constrained language mode for pwsh.

root@kitploit:~
$ExecutionContext.SessionState.LanguageMode

image

RDP settings

You can check if RDP capability is permissioned on an endpoint

root@kitploit:~
if ((Get-ItemProperty "hklm:\System\CurrentControlSet\Control\Terminal Server").fDenyTSConnections -eq 0){write-host "RDP Enabled" } else { echo "RDP Disabled" }

If you want to block RDP

root@kitploit:~
Set-ItemProperty -Path 'HKLM:\System\CurrentControlSet\Control\Terminal Server' -name "fDenyTSConnections" -value 1
#Firewall it out too
Disable-NetFirewallRule -DisplayGroup "Remote Desktop"

Query RDP Logs

Knowing who is RDPing in your enviroment, and from where, is important. Unfortunately, RDP logs are balllache. Threat hunting blogs like this one can help you narrow down what you are looking for when it comes to RDP

Let's call on one of the RDP logs, and filter for event ID 1149, which means a RDP connection has been made. Then let's filter out any IPv4 addresses that begin with 10.200, as this is the internal IP schema. Perhaps I want to hunt down public IP addresses, as this would suggest the RDP is exposed to the internet on the machine and an adversary has connected with correct credentials!!!

Two logs of interest

  • Microsoft-Windows-TerminalServices-RemoteConnectionManager/Operational
  • Microsoft-Windows-TerminalServices-LocalSessionManager%4Operational.evtx
root@kitploit:~
# if you acquire a log, change this to get-winevent -path ./RDP_log_you_acquired.evtx
get-winevent -path "./Microsoft-Windows-TerminalServices-RemoteConnectionManager%4Operational.evtx" | 
? id -match 1149 | 
sort Time* -descending | 
fl time*, message

get-winevent -path ./ "Microsoft-Windows-TerminalServices-LocalSessionManager%4Operational.evtx" | 
? id -match 21 | 
sort Time* -descending | 
fl time*, message

image

Current RDP Sessions

You can query the RDP sessions that a system is currently running

root@kitploit:~
qwinsta

:: get some stats
qwinsta /counter

image

You can read here about how to evict a malicious user from a session and change the creds rapidly to deny them future access

Check Certificates

root@kitploit:~
gci "cert:\" -recurse | fl FriendlyName, Subject, Not* 

image

Certificate Dates

You will be dissapointed how many certificates are expired but still in use. Use the -ExpiringInDays flag

root@kitploit:~
 gci "cert:\*" -recurse -ExpiringInDays 0 | fl FriendlyName, Subject, Not*  
 

Firewall Queries

section contents
  • Retreieve Firewall profile names
    • Retrieve rules of specific profile
  • Filter all firewall rules
  • Code Red
    • Isolate Endpoint

Retrieve Firewall profile names

root@kitploit:~
(Get-NetFirewallProfile).name

image

Retrieve rules of specific profile

Not likely to be too useful getting all of this information raw, so add plenty of filters

root@kitploit:~
Get-NetFirewallProfile -Name Public | Get-NetFirewallRule
##filtering it to only show rules that are actually enabled
Get-NetFirewallProfile -Name Public | Get-NetFirewallRule | ? Enabled -eq "true"

image

Filter all firewall rules

root@kitploit:~

#show firewall rules that are enabled
Get-NetFirewallRule | ? Enabled -eq "true"
#will show rules that are not enabled
Get-NetFirewallRule | ? Enabled -notmatch "true"

##show firewall rules that pertain to inbound
Get-NetFirewallRule | ? direction -eq "inbound"
#or outbound
Get-NetFirewallRule | ? direction -eq "outbound"

##stack these filters
Get-NetFirewallRule | where {($_.Enabled -eq "true" -and $_.Direction -eq "inbound")}
#or just use the built in flags lol
Get-NetFirewallRule -Enabled True -Direction Inbound

Code Red

Isolate Endpoint

Disconnect network adaptor, firewall the fuck out of an endpoint, and display warning box

This is a code-red command. Used to isolate a machine in an emergency.

In the penultimate and final line, you can change the text and title that will pop up for the user

root@kitploit:~
New-NetFirewallRule -DisplayName "Block all outbound traffic" -Direction Outbound -Action Block | out-null; 
New-NetFirewallRule -DisplayName "Block all inbound traffic" -Direction Inbound -Action Block | out-null; 
$adapter = Get-NetAdapter|foreach { $_.Name } ; Disable-NetAdapter -Name "$adapter" -Confirm:$false; 
Add-Type -AssemblyName PresentationCore,PresentationFramework; 
[System.Windows.MessageBox]::Show('Your Computer has been Disconnected from the Internet for Security Issues. Please do not try to re-connect to the internet. Contact Security Helpdesk Desk ',' CompanyNameHere Security Alert',[System.Windows.MessageBoxButton]::OK,[System.Windows.MessageBoxImage]::Information)

image


SMB Queries

section contents
  • List Shares
  • List client-to-server SMB Connections
  • Remove an SMB Share

List Shares

root@kitploit:~
  Get-SMBShare

image

List client-to-server SMB Connections

Dialect just means verison. SMB3, SMB2 etc

root@kitploit:~
Get-SmbConnection
 
#just show SMB Versions being used. Great for enumeration flaws in enviro - i.e, smb1 being used somewhere
Get-SmbConnection |
select Dialect, Servername, Sharename | sort Dialect   

image

image

Remove an SMB Share

root@kitploit:~
Remove-SmbShare -Name MaliciousShare -Confirm:$false -verbose

Process Queries

section contents
  • Processes and TCP Connections
  • Show all processes and their associated user
  • Get specific info about the full path binary that a process is running
  • Is a specific process a running on a machine or not
  • Get process hash
  • Show all DLLs loaded with a process
  • Identify process CPU usage
    • Sort by least CPU-intensive processes
  • Stop a Process
  • Process Tree

Processes and TCP Connections

I have a neat one-liner for you. This will show you the local IP and port, the remote IP andport, the process name, and the underlying executable of the process!

You could just use netstat -b, which gives you SOME of this data

image

But instead, try this bad boy on for size:

root@kitploit:~
Get-NetTCPConnection |
select LocalAddress,localport,remoteaddress,remoteport,state,@{name="process";Expression={(get-process -id $_.OwningProcess).ProcessName}}, @{Name="cmdline";Expression={(Get-WmiObject Win32_Process -filter "ProcessId = $($_.OwningProcess)").commandline}} | 
sort Remoteaddress -Descending | ft -wrap -autosize

image

Show all processes and their associated user

root@kitploit:~
get-process * -Includeusername

image

Try this one if you're hunting down suspicious processes from users

root@kitploit:~
gwmi win32_process | 
Select Name,@{n='Owner';e={$_.GetOwner().User}},CommandLine | 
sort Name -unique -descending | Sort Owner | ft -wrap -autosize

image

Get specific info about the full path binary that a process is running

root@kitploit:~
gwmi win32_process | 
Select Name,ProcessID,@{n='Owner';e={$_.GetOwner().User}},CommandLine | 
sort name | ft -wrap -autosize | out-string

image

Get specific info a process is running

root@kitploit:~
get-process -name "nc" | ft Name, Id, Path,StartTime,Includeusername -autosize 

Images

Is a specific process a running on a machine or not

root@kitploit:~
$process = "memes";
if (ps |  where-object ProcessName -Match "$process") {Write-Host "$process successfully installed on " -NoNewline ; hostname} else {write-host "$process absent from " -NoNewline ; hostname}

Example of process that is absent image Example of process that is present image

Get process hash

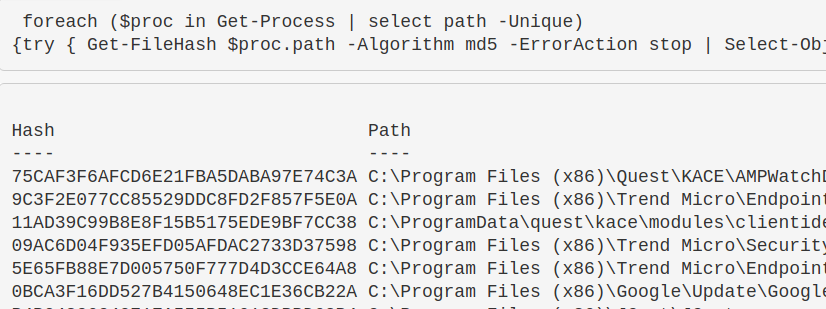
Great to make malicious process stand out. If you want a different Algorithm, just change it after -Algorithm to something like sha256

root@kitploit:~
foreach ($proc in Get-Process | select path -Unique){try
{ Get-FileHash $proc.path -Algorithm sha256 -ErrorAction stop |
ft hash, path -autosize -HideTableHeaders | out-string -width 800 }catch{}}

image

Show all DLLs loaded with a process

root@kitploit:~
get-process -name "memestask" -module 

image

Alternatively, pipe |fl and it will give a granularity to the DLLs

image

Identify process CPU usage

root@kitploit:~
 (Get-Process -name "googleupdate").CPU | fl 

image

I get mixed results with this command but it's supposed to give the percent of CPU usage. I need to work on this, but I'm putting it in here so the world may bare wittness to my smooth brain.

root@kitploit:~
$ProcessName = "symon" ; 
$ProcessName = (Get-Process -Id $ProcessPID).Name; 
$CpuCores = (Get-WMIObject Win32_ComputerSystem).NumberOfLogicalProcessors; 
$Samples = (Get-Counter "\Process($Processname*)\% Processor Time").CounterSamples; 
$Samples | Select `InstanceName,@{Name="CPU %";Expression={[Decimal]::Round(($_.CookedValue / $CpuCores), 2)}}

image

Sort by least CPU-intensive processes

Right now will show the lower cpu-using proccesses...useful as malicious process probably won't be as big a CPU as Chrome, for example. But change first line to Sort CPU -descending if you want to see the chungus processes first

root@kitploit:~
gps | Sort CPU |
Select -Property ProcessName, CPU, ID, StartTime | 
ft -autosize -wrap | out-string -width 800

image

Stop a Process

root@kitploit:~
Get-Process -Name "memeprocess" | Stop-Process -Force -Confirm:$false -verbose

Process Tree

You can download the PsList exe from Sysinternals

Fire it off with the -t flag to create a parent-child tree of the processes

example_of_ps_tree


Recurring Task Queries

section contents
  • Get scheduled tasks
    • Get a specific schtask
    • To find the commands a task is running
    • To stop the task
    • All schtask locations
    • Sneaky Schtasks via the Registry
  • Show what programs run at startup
    • Programs at login
    • Programs at PowerShell
  • Stolen Links
  • Scheduled Jobs
    • Find out what scheduled jobs are on the machine
    • Get detail behind scheduled jobs
    • Kill job
  • Hunt WMI Persistence
    • Removing it
    • A note on CIM
  • Run Keys
    • What are Run Keys
    • Finding Run Evil
    • Removing Run Evil
    • Other Malicious Run Locations
    • Evidence of Run Key Execution
  • Screensaver Persistence
  • Query Group Policy
    • Query GPO Scripts
  • Autoruns

Get scheduled tasks

Identify the user behind a command too. Great at catching out malicious schtasks that perhaps are imitating names, or a process name

root@kitploit:~
schtasks /query /FO CSV /v | convertfrom-csv |
where { $_.TaskName -ne "TaskName" } |
select "TaskName","Run As User", Author, "Task to Run"| 
fl | out-string

image

Get a specific schtask

root@kitploit:~
Get-ScheduledTask -Taskname "wifi*" | fl *

image

To find the commands a task is running

Great one liner to find exactly WHAT a regular task is doing

root@kitploit:~
$task = Get-ScheduledTask | where TaskName -EQ "meme task"; 
$task.Actions

image

And a command to get granularity behind the schtask requires you to give the taskpath. Tasks with more than one taskpath will throw an error here

root@kitploit:~
$task = "CacheTask";
get-scheduledtask -taskpath (Get-ScheduledTask -Taskname "$task").taskpath | Export-ScheduledTask
#this isn't the way the microsoft docs advise. 
     ##But I prefer this, as it means I don't need to go and get the taskpath when I already know the taskname

image

To stop the task

root@kitploit:~
Get-ScheduledTask "memetask" | Stop-ScheduledTask -Force -Confirm:$false -verbose

All schtask locations

There's some major overlap here, but it pays to be thorough.

root@kitploit:~
HKLM\Software\Microsoft\Windows NT\CurrentVersion\Schedule\Taskcache\Tree
HKLM\Software\Microsoft\Windows NT\CurrentVersion\Schedule\Taskcache\Tasks
C:\Windows\System32\Tasks
C:\Windows\Tasks
C:\windows\SysWOW64\Tasks\

You can compare the above for tasks missing from the C:\Windows directories, but present in the Registry.

root@kitploit:~
# From my man Anthony Smith - https://www.linkedin.com/in/anthony-c-smith/

$Reg=(Get-ItemProperty -path "HKLM:\Software\Microsoft\Windows NT\CurrentVersion\Schedule\Taskcache\tree\*").PsChildName
$XMLs = (ls C:\windows\System32\Tasks\).Name
Compare-Object $Reg $XMLs
image

Sneaky Schtasks via the Registry

Threat actors have been known to manipulate scheduled tasks in such a way that Task Scheduler no longer has visibility of the recuring task.

However, querying the Registry locations HKLM\Software\Microsoft\Windows NT\CurrentVersion\Schedule\Taskcache\Tree and HKLM\Software\Microsoft\Windows NT\CurrentVersion\Schedule\Taskcache\Tasks, can reveal a slice of these sneaky tasks.

Shout out to my man @themalwareguy for the $fixedstring line that regexes in/out good/bad characters.

root@kitploit:~
# the schtask for our example
# schtasks /create /tn "Find_Me" /tr calc.exe /sc minute /mo 100 /k

# Loop and parse \Taskcache\Tasks Registry location for scheduled tasks
  ## Parses Actions to show the underlying binary / commands for the schtask
  ## Could replace Actions with Trigggers on line 10, after ExpandedProperty
(Get-ItemProperty "HKLM:\Software\Microsoft\Windows NT\CurrentVersion\Schedule\Taskcache\Tasks\*").PSChildName | 
Foreach-Object {
  write-host "----Schtask ID is $_---" -ForegroundColor Magenta ;
  $hexstring = Get-ItemProperty "HKLM:\Software\Microsoft\Windows NT\CurrentVersion\Schedule\Taskcache\Tasks\$_" | Select -ExpandProperty Actions;
  $fixedstring = [System.Text.Encoding]::Unicode.GetString($hexstring) -replace '[^a-zA-Z0-9\\._\-\:\%\/\$ ]', ' '; # Obtaining the Unicode string reduces the chances of getting invalid characters, and the regex will assist in stripping each string of junk
  write-host $fixedstring
}
image

If you don't need to loop to search, because you know what you're gunning for then you can just deploy this

root@kitploit:~
$hexstring = (Get-ItemProperty "HKLM:\Software\Microsoft\Windows NT\CurrentVersion\Schedule\Taskcache\Tasks\{ID}" | 
Select -ExpandProperty Actions) -join ',' ; $hexstring.Split(" ")
## can then go to cyberchef, and convert From Decimal with the comma (,) delimineter 
image

Once you've deployed the above loop, and zoned in on a binary / one-liner that seems sus, you can query it in the other Registry location

root@kitploit:~
# Then for the ID of interest under \Taskcache\Tree subkey
  # Example: $ID = "{8E350038-3475-413A-A1AE-20711DD11C95}" ;  
$ID = "{XYZ}" ; 
get-itemproperty -path "HKLM:\Software\Microsoft\Windows NT\CurrentVersion\Schedule\Taskcache\Tree\*" | 
? Id -Match "$ID" | fl *Name,Id,PsPath
image

And then eradicating these Registry schtask entries is straight forward via Regedit's GUI, that way you have no permission problems. Delete both:

  • HKLM\Software\Microsoft\Windows NT\CurrentVersion\Schedule\Taskcache\Tasks\{$ID}
  • HKLM:\Software\Microsoft\Windows NT\CurrentVersion\Schedule\Taskcache\Tree\$Name
image image

Show what programs run at startup

root@kitploit:~
Get-CimInstance Win32_StartupCommand | Select-Object Name, command, Location, User | Format-List 

image

Some direct path locations too can be checked

root@kitploit:~
HKLM\software\classes\exefile\shell\open\command
c:\Users\*\appdata\roaming\microsoft\windows\start menu\programs\startup

Querying that last one in more detail, you have some interesting options

root@kitploit:~
#Just list out the files in each user's startup folder
(gci "c:\Users\*\appdata\roaming\microsoft\windows\start menu\programs\startup\*").fullname

#Extract from the path User, Exe, and print machine name
(gci "c:\Users\*\appdata\roaming\microsoft\windows\start menu\programs\startup\*").fullname | 
foreach-object {$data = $_.split("\\");write-output "$($data[2]), $($data[10]), $(hostname)"}

#Check the first couple lines of files' contents
(gci "c:\Users\*\appdata\roaming\microsoft\windows\start menu\programs\startup\*").fullname | 
foreach-object {write-host `n$_`n; gc $_ -encoding byte| fhx |select -first 5}
image

Programs at login

Adversaries can link persistence mechanisms to be activated to a users' login via the registry HKEY_CURRENT_USER\Environment -UserInitMprLogonScript

root@kitploit:~
#Create HKU drive
mount -PSProvider Registry -Name HKU -Root HKEY_USERS

#list all user's enviros
(gp "HKU:\*\Environment").UserInitMprLogonScript

#Collect SID of target user with related logon task
gp "HKU:\*\Environment" | FL PSParentPath,UserInitMprLogonScript

# insert SID and convert it into username
gwmi win32_useraccount | 
select Name, SID | 
? SID -match "" #insert SID between quotes 
image

You can remove this regsistry entry

root@kitploit:~
#confirm via `whatif` flag that this is the right key
remove-itemproperty "HKU:\SID-\Environment\" -name "UserInitMprLogonScript" -whatif
#delete it
remove-itemproperty "HKU:\SID-\Environment\" -name "UserInitMprLogonScript" -verbose
image

Programs at Powershell

Adversaries can link their persistence mechanisms to a PowerShell profile, executing their malice every time you start PowerShell

root@kitploit:~
#confirm the profile you are querying
echo $Profile
#show PowerShell profile contents
type $Profile

image

To fix this one, I'd just edit the profile and remove the persistence (so notepad $Profile will be just fine)

You can get a bit more clever with this if you want

root@kitploit:~
(gci C:\Users\*\Documents\WindowsPowerShell\*profile.ps1, C:\Windows\System32\WindowsPowerShell\v1.0\*profile.ps1).FullName|
Foreach-Object {
  write-host "----$_---" -ForegroundColor Magenta ; 
  gc $_ # | select-string -notmatch function ## if you want to grep out stuff you don't wanna see, uncomment
}
image

Stolen Links

Adversaries can insert their malice into shortcuts. They can do it in clever ways, so that the application will still run but at the same time their malice will also execute when you click on the application

For demo purposes, below we have Microsoft Edge that has been hijacked to execute calc on execution.

image

We can specifically query all Microsoft Edge's shortcuts to find this

root@kitploit:~
Get-CimInstance Win32_ShortcutFile | 
? FileName -match 'edge' | 
fl FileName,Name,Target, LastModified

image

This doesn't scale however, as you will not know the specific shortcut that the adversary has manipulated. So instead, sort by the LastModified date

root@kitploit:~
Get-CimInstance Win32_ShortcutFile | 
sort LastModified -desc | 
fl FileName,Name,Target, LastModified

image

Hunt LNKs at scale

This above will output a LOT, however. You may want to only show results for anything LastModified after a certain date. Lets ask to only see things modified in the year 2022 onwards

root@kitploit:~
Get-CimInstance Win32_ShortcutFile |
where-object {$_.lastmodified -gt [datetime]::parse("01/01/2022")} | 
sort LastModified -desc | fl FileName,Name,Target, LastModified

image

Scheduled Jobs

Surprisingly, not many people know about Scheduled Jobs. They're not anything too strange or different, they're just scheduled tasks that are specificially powershell.

I've written about a real life encounter I had during an incident, where the adversary had leveraged a PowerShell scheduled job to execute their malice at an oppertune time

Find out what scheduled jobs are on the machine

root@kitploit:~
 Get-ScheduledJob
 # pipe to | fl * for greater granularity

image

Get detail behind scheduled jobs

root@kitploit:~
Get-ScheduledJob | Get-JobTrigger | 
Ft -Property @{Label="ScheduledJob";Expression={$_.JobDefinition.Name}},ID,Enabled, At, frequency, DaysOfWeek
#pipe to fl or ft, whatever you like the look of more in the screenshot

image

Kill job

The following all work.

root@kitploit:~
Disable-ScheduledJob -Name evil_sched
Unregister-ScheduledJob -Name eviler_sched
Remove-Job -id 3 
#then double check it's gone with Get-ScheduledJob

#if persists, tack on to unregister or remove-job
-Force -Confirm:$false -verbose

Hunt WMI Persistence

WMIC can do some pretty evil things 1 & 2. One sneaky, pro-gamer move it can pull is persistence

In the image below I have included a part of setting up WMI persistence

image

Finding it

Now, our task is to find this persistent evil.

Get-CimInstance comes out cleaner, but you can always rely on the alternate Get-WMIObject

root@kitploit:~

Get-CimInstance -Namespace root\Subscription -Class __FilterToConsumerBinding
Get-CimInstance -Namespace root\Subscription -Class __EventFilter
Get-CimInstance -Namespace root\Subscription -Class __EventConsumer

## OR

Get-WMIObject -Namespace root\Subscription -Class __EventFilter
Get-WMIObject -Namespace root\Subscription -Class __FilterToConsumerBinding
Get-WMIObject -Namespace root\Subscription -Class __EventConsumer

image image image

Removing it

Now we've identified the evil WMI persistence, let us be rid of it!

We can specify the Name as EVIL as that's what it was called across the three services. Whatever your persistence calls itself, change the name for that

root@kitploit:~
#notice this time, we use the abbrevated version of CIM and WMI

gcim -Namespace root\Subscription -Class __EventFilter | 
? Name -eq "EVIL" | Remove-CimInstance -verbose

gcim -Namespace root\Subscription -Class __EventConsumer| 
? Name -eq "EVIL" | Remove-CimInstance -verbose

#it's actually easier to use gwmi here instead of gcim
gwmi -Namespace root\Subscription -Class __FilterToConsumerBinding | 
? Consumer -match "EVIL" | Remove-WmiObject -verbose

image

A note on CIM

You may see WMI and CIM talked about together, whether on the internet or on in the Blue Team Notes here.

CIM is a standard for language for vendor-side management of a lot of the physical and digital mechanics of what makes a computer tick. WMIC was and is Microsoft's interpretation of CIM.

However, Microsoft is going to decommision WMIC soon. So using Get-Ciminstance versions rather than get-wmiobject is probably better for us to learn in the long term. I dunno man, It's complicated.

Run Keys

What are Run Keys

I've written in depth about run keys, elsewhere

Run and RunOnce registry entries will run tasks on startup. Specifically:

  • Run reg keys will run the task every time there's a login.
  • RunOnce reg kgeys will run the taks once and then self-delete keys.
    • If a RunOnce key has a name with an exclemation mark (!likethis) then it will self-delete
    • IF a RunOnce key has a name with an asterik (* LikeDIS) then it can run even in Safe Mode.

If you look in the reg, you'll find some normal executables.

image

Finding Run Evil

A quick pwsh for loop can collect the contents of the four registry locations.

root@kitploit:~
#Create HKU drive
mount -PSProvider Registry -Name HKU -Root HKEY_USERS

(gci HKLM:\Software\Microsoft\Windows\CurrentVersion\Run, HKLM:\Software\Microsoft\Windows\CurrentVersion\RunOnce, HKU:\*\Software\Microsoft\Windows\CurrentVersion\Run, HKU:\*\Software\Microsoft\Windows\CurrentVersion\RunOnce ).Pspath |
Foreach-Object {
  write-host "----Reg location is $_---" -ForegroundColor Magenta ; 
  gp $_ | 
  select -property * -exclude PS*, One*, vm* | #exclude results here
  FL
}

#you can squish that all in one line if you need to
(gci HKLM:\Software\Microsoft\Windows\CurrentVersion\Run, HKLM:\Software\Microsoft\Windows\CurrentVersion\RunOnce, HKU:\*\Software\Microsoft\Windows\CurrentVersion\Run, HKU:\*\Software\Microsoft\Windows\CurrentVersion\RunOnce ).Pspath | Foreach-Object {write-host "----Reg location is $_---" -ForegroundColor Magenta ; gp $_ | select -property * -exclude PS*, One*, vm* |sort| fl}
image

You can also achieve the same thing with these two alternative commands, but it isn't as cool as the above for loop

root@kitploit:~

get-itemproperty "HKU:\*\Software\Microsoft\Windows\CurrentVersion\Run*" | 
  select -property * -exclude PSPR*,PSD*,PSC*,PSPAR*  | fl
get-itemproperty "HKLM:\Software\Microsoft\Windows\CurrentVersion\Run*" | 
  select -property * -exclude PSPR*,PSD*,PSC*,PSPAR*  | fl
image

Removing Run evil

Be surgical here. You don't want to remove Run entries that are legitimate. It's important you remove with -verbose too and double-check it has gone, to make sure you have removed what you think you have.

Specify the SID

root@kitploit:~
#Create HKU drive
mount -PSProvider Registry -Name HKU -Root HKEY_USERS

#List the malicious reg by path
get-itemproperty "HKU:\SID\Software\Microsoft\Windows\CurrentVersion\RunOnce" | select -property * -exclude PS* | fl

#Then pick the EXACT name of the Run entry you want to remove. Copy paste it, include any * or ! too please
Remove-ItemProperty -Path "HKU:\SID-\Software\Microsoft\Windows\CurrentVersion\RunOnce" -Name "*EvilerRunOnce" -verbose

#Then check again to be sure it's gone
get-itemproperty "HKU:\*\Software\Microsoft\Windows\CurrentVersion\RunOnce" | select -property * -exclude PS* | fl

image

Other Malicious Run Locations

Some folders can be the locations of persistence.

root@kitploit:~
#Create HKU drive
mount -PSProvider Registry -Name HKU -Root HKEY_USERS

$folders = @("HKU:\*\Software\Microsoft\Windows\CurrentVersion\Explorer\User Shell Folders","HKU:\*\Software\Microsoft\Windows\CurrentVersion\Explorer\Shell Folders","HKLM:\SOFTWARE\Microsoft\Windows\CurrentVersion\Explorer\Shell Folders","HKLM:\SOFTWARE\Microsoft\Windows\CurrentVersion\Explorer\User Shell Folders")
foreach ($folder in $folders) {
  write-host "----Reg key is $folder--- -ForegroundColor Magenta "; 
  get-itemproperty -path "$folder"  | 
  select -property * -exclude PS* | fl
}

image

Svchost startup persistence

root@kitploit:~

get-itemproperty -path "HKLM:\SOFTWARE\Microsoft\Windows NT\CurrentVersion\Svchost"

image

Winlogon startup persistence

root@kitploit:~
#Create HKU drive
mount -PSProvider Registry -Name HKU -Root HKEY_USERS

(gci "HKU:\*\Software\Microsoft\Windows NT\CurrentVersion\Winlogon").PSPath | 
Foreach-Object {
  write-host "----Reg location is $_---" -ForegroundColor Magenta ; 
  gp $_ | 
  select -property * -exclude PS* |
  FL
}
image

Find more examples of Run key evil from Mitre ATT&CK

Evidence of Run Key Execution

You can query the 'Microsoft-Windows-Shell-Core/Operational' log to find evidence if a registry run key was successful in executing.

root@kitploit:~
get-winevent -filterhashtable @{ logname = "Microsoft-Windows-Shell-Core/Operational" ; ID = 9707} |
select TimeCreated, Message, 
@{Name="UserName";Expression = {$_.UserId.translate([System.Security.Principal.NTAccount]).value}}  | 
sort TimeCreated -desc| fl
image

Screensaver Persistence

It can be done, I swear. Mitre ATT&CK has instances of .SCR's being used to maintain regular persistence

root@kitploit:~
#Create HKU drive
mount -PSProvider Registry -Name HKU -Root HKEY_USERS

gp "HKU:\*\Control Panel\Desktop\" | select SCR* | fl
# you can then go and collect the .scr listed in the full path, and reverse engineer the binary

#you can also collect wallpaper info from here
gp "HKU:\*\Control Panel\Desktop\" | select wall* | fl

image

Query Group Policy

The group policy in an Windows can be leveraged and weaponised to propogate malware and even ransomware across the entire domain

You can query the changes made in the last X days with this line

root@kitploit:~
#collects the domain name as a variable to use later
$domain = (Get-WmiObject -Class win32_computersystem).domain; 
Get-GPO -All -Domain $domain | 
?{ ([datetime]::today - ($_.ModificationTime)).Days -le 10 } | sort
# Change the digit after -le to the number of days you want to go back for

2021-09-17_15-01

Query GPO Scripts

We can hunt down the strange thinngs we might see in our above query

We can list all of the policies, and see where a policy contains a script or executable. You can change the include at the end to whatever you want

root@kitploit:~
$domain = (Get-WmiObject -Class win32_computersystem).domain;
gci -recurse \\$domain\\sysvol\$domain\Policies\ -file -include *.exe, *.ps1

2021-09-17_15-20

We can hunt down where GPO scripts live

root@kitploit:~
$domain = (Get-WmiObject -Class win32_computersystem).domain;
gci -recurse \\$domain\\sysvol\*\scripts

2021-09-17_15-04

Autoruns

Autoruns is a Sysinternals tool for Windows. It offers analysts a GUI method to examine the recurring tasks that an adversary might use for persistence and other scheduled malice.

Before you go anywhere cowboy, make sure you've filtered out the known-goods under options. It makes analysis a bit easier, as you're filtering out noise. Don't treat this as gospel though, so yes hide the things that VirusTotal and Microsoft SAY are okay.....but go and verify that those auto-running tasks ARE as legitimate as they suppose they are

image

I personally just stick to the 'Everything' folder, as I like to have full visibility rather than go into the options one by one

image

Some things in autorun may immediately stick out to you as strange. Take for example the malicious run key I inserted on the VM as an example:

image

You can right-click and ask Virus Total to see if the hash is a known-bad

image

And you can right-click and ask autoruns to delete this recurring task from existence

image

I like autoruns for digital forensics, where you take it one machine at a time. But - in my uneducated opinion - it does not scale well. A tool like Velociraptor that allows orchestration across thousands of machines can be leveraged to query things with greater granularity than Autoruns allows.

This is why I like to use PowerShell for much of my blue team work on a Windows machine, where possible. I can pre-filter my queries so I don't get distraced by noise, but moreover I can run that fine-tuned PowerShell query network-wide across thosuands of machines and recieve the results back rapidly.


File Queries

section contents
  • File Tree
  • Wildcard paths and files
  • Check if a specific file or path is alive.
  • test if files and directories are present or absent
  • Query File Contents
    • Alternate data streams
    • Read hex of file
  • Recursively look for particular file types, and once you find the files get their hashes
  • Compare two files' hashes
  • Find files written after X date
    • Remove items written after x date
  • copy multiple files to new location
  • Grep in Powershell

File tree

Fire off tree to list the directories and files underneath your current working directory, nestled under each other

image

Wildcard paths and files

You can chuck wildcards in directories for gci, as well as wildcard to include file types.

Let's say we want to look in all of the Users \temp\ directories. We don't want to put their names in, so we wildcard it.

We also might only be interested in the pwsh scripts in their \temp, so let's filter for those only

root@kitploit:~
gci "C:\Users\*\AppData\Local\Temp\*" -Recurse -Force -File  -Include *.ps1, *.psm1, *.txt | 
ft lastwritetime, name -autosize | 
out-string -width 800

image

Check if a specific file or path is alive.

I've found that this is a great one to quickly check for specific vulnerabilities. Take for example, CVE-2021-21551. The one below this one is an excellent way of utilising the 'true/false' binary results that test-path can give

root@kitploit:~
test-path -path "C:\windows\temp\DBUtil_2_3.Sys"

image

test if files and directories are present or absent

This is great to just sanity check if things exist. Great when you're trying to check if files or directories have been left behind when you're cleaning stuff up.

root@kitploit:~
$a = Test-Path "C:\windows\sysmon.exe"; $b= Test-Path "C:\Windows\SysmonDrv.sys"; $c = test-path "C:\Program Files (x86)\sysmon"; $d = test-path "C:\Program Files\sysmon"; 
IF ($a -eq 'True') {Write-Host "C:\windows\sysmon.exe present"} ELSE {Write-Host "C:\windows\sysmon.exe absent"}; 
IF ($b -eq 'True') {Write-Host "C:\Windows\SysmonDrv.sys present"} ELSE {Write-Host "C:\Windows\SysmonDrv.sys absent"} ; 
IF ($c -eq 'True') {Write-Host "C:\Program Files (x86)\sysmon present"} ELSE {Write-Host "C:\Program Files (x86)\sysmon absent"}; 
IF ($d -eq 'True') {Write-Host "C:\Program Files\sysmon present"} ELSE {Write-Host "C:\Program Files\sysmon absent"}

image

^ The above is a bit over-engineered. Here's an an abbrevated version

root@kitploit:~
$Paths = "C:\windows" , "C:\temp", "C:\windows\system32", "C:\DinosaurFakeDir" ; 
foreach ($Item in $Paths){if
(test-path $Item) {write "$Item present"}else{write "$Item absent"}}

image

We can also make this conditional. Let's say if Process MemeProcess is NOT running, we can then else it to go and check if files exist

root@kitploit:~
$Paths = "C:\windows" , "C:\temp", "C:\windows\system32", "C:\DinosaurFakeDir" ; 
if (Get-Process | where-object Processname -eq "explorer") {write "process working"} else {
foreach ($Item in $Paths){if (test-path $Item) {write "$Item present"}else{write "$Item absent"}}}

image

You can use test-path to query Registry, but even the 2007 Microsoft docs say that this can give inconsistent results, so I wouldn't bother with test-path for reg stuff when it's during an IR

Query File Contents

Seen a file you don't recognise? Find out some more about it! Remember though: don't trust timestamps!

root@kitploit:~
Get-item C:\Temp\Computers.csv |
select-object -property @{N='Owner';E={$_.GetAccessControl().Owner}}, *time, versioninfo | fl 

image

Alternate data streams

root@kitploit:~
# show streams that aren't the normal $DATA
get-item evil.ps1 -stream "*" | where stream -ne ":$DATA"
# If you see an option that isn't $DATA, hone in on it
get-content evil.ps1 -steam "evil_stream"

Read hex of file

root@kitploit:~
gc .\evil.ps1 -encoding byte | 
Format-Hex

image

Recursively look for particular file types, and once you find the files get their hashes

This one-liner was a godsend during the Microsoft Exchange ballache back in early 2021

root@kitploit:~
Get-ChildItem -path "C:\windows\temp" -Recurse -Force -File -Include *.aspx, *.js, *.zip|
Get-FileHash |
format-table hash, path -autosize | out-string -width 800

image

Compare two files' hashes

root@kitploit:~
get-filehash "C:\windows\sysmondrv.sys" , "C:\Windows\HelpPane.exe"

image

Find files written after X date

I personally wouldn't use this for DFIR. It's easy to manipulate timestamps....plus, Windows imports the original compiled date for some files and binaries if I'm not mistaken

Change the variables in the first time to get what you're looking. Remove the third line if you want to include directories

root@kitploit:~
$date = "12/01/2021"; $directory = "C:\temp"
get-childitem "$directory" -recurse|
where-object {$_.mode -notmatch "d"}| 
where-object {$_.lastwritetime -gt [datetime]::parse("$date")}|
Sort-Object -property LastWriteTime | format-table lastwritetime, fullname -autosize

image

Remove items written after x date

And then you can recursively remove the files and directories, in case malicious

root@kitploit:~
$date = "31/01/2022"; $directory = "C:\Users\Frank\AppData\"
get-childitem "$directory" -recurse|
where-object {$_.lastwritetime -gt [datetime]::parse("$date")}|
Sort-Object -property LastWriteTime | remove-item -confirm -whatif

image

Remove the last -whatif flag to actaully detonate. Will ask you one at a time if you want to delete items. Please A to delete all

image

copy multiple files to new location

root@kitploit:~
copy-item "C:\windows\System32\winevt\Logs\Security.evtx", "C:\windows\System32\winevt\Logs\Windows PowerShell.evtx" -destination C:\temp

Grep in Powershell

Change the string in the second line. You should run these one after another, as it will grep for things in unicode and then ascii.

I like to use these as really lazy low-key yara rules. So grep for the string "educational purposes only" or something like that to catch malicious tooling - you'd be surprised how any vendors take open-source stuff, re-brand and compile it, and then sell it to you.....

root@kitploit:~
ls C:\Windows\System32\* -include '*.exe', '*.dll' | 
select-string 'RunHTMLApplication' -Encoding unicode | 
select-object -expandproperty path -unique

#and with ascii
ls C:\Windows\System32\* -include '*.exe', '*.dll' | 
select-string 'RunHTMLApplication' -Encoding Ascii | 
select-object -expandproperty path -unique

image


Registry Queries

section contents
  • A note on HKCU
  • Show reg keys
  • Read a reg entry
  • Quick useful reg keys
  • Remove a reg entry
    • Removing HKCurrentUser Keys
  • Example Malicious Reg
    • Understanding Reg Permissions
    • Get-ACl
    • Convert SDDL
    • What could they do with poor permissions?
  • Hunting for Reg evil
    • Filtering Reg ImagePath
  • Query Background Activity Monitor

A note on HKCU

Just a note: Anywhere you see a reg key does HKCU - this is Current User. Your results will be limited to the user you are.

To see more results, you should change the above from HKCU, to HKU.

You often need the SID of the users you want to go and look at their information.

So for example, a query like this:

HKCU:\Control Panel\Desktop\

Becomes:

HKU\s-1-12-1-707864876-1224890504-1467553947-2593736053\Control Panel\Desktop

HKU needs to be set up to work

root@kitploit:~
New-PSDrive -PSProvider Registry -Name HKU -Root HKEY_USERS;
(Gci -Path HKU:\).name
image

Show reg keys

Microsoft Docs detail the regs: their full names, abbrevated names, and what their subkeys generally house

root@kitploit:~
##show all reg keys
(Gci -Path Registry::).name

# show HK users
mount -PSProvider Registry -Name HKU -Root HKEY_USERS;(Gci -Path HKU:\).name

##lets take HKEY_CURRENT_USER as a subkey example. Let's see the entries in this subkey
(Gci -Path HKCU:\).name

# If you want to absolutely fuck your life up, you can list the names recursively....will take forever though
(Gci -Path HKCU:\ -recurse).name

image

Read a reg entry

root@kitploit:~
 Get-ItemProperty -Path "HKLM:\SYSTEM\CurrentControlSet\Services\SysmonDrv"

image

Quick useful reg keys

Query timezone on an endpoint. Look for the TimeZoneKeyName value

  • HKLM\SYSTEM\CurrentControlSet\Control\TimeZoneInformation

Query the drives on the endpoint

  • HKLM\SYSTEM\MountedDevices

Query the services on this machine, and if you want to see more about one of the results just add it to the path

  • HKLM\SYSTEM\CurrentControlSet\Services
  • HKLM\SYSTEM\CurrentControlSet\Services\ACPI

Query software on this machine

  • HKLM\Software
  • HKLM\Software\PickOne

Query SIDs

  • HKLM\SOFTWARE\Microsoft\Windows NT\CurrentVersion\ProfileList
  • HKLM\SOFTWARE\Microsoft\Windows NT\CurrentVersion\ProfileList\[Long-SID-Number-HERE]

Query user's wallpaper. Once we know a user’s SID, we can go and look at these things:

  • HKU\S-1-5-18\Control Panel\Desktop\

Query if credentials on a machine are being cached maliciously

root@kitploit:~
# can run this network-wide
if ((Get-ItemProperty "HKLM:\SYSTEM\CurrentControlSet\Control\SecurityProviders\WDigest").UseLogonCredential -eq 1){write-host "Plain text credentials forced, likely malicious, on host: " -nonewline ;hostname } else { echo "/" }

#remediate the malice with this
reg add "HKLM\SYSTEM\CurrentControlSet\Control\SecurityProviders\WDigest" /v UseLogonCredential /t REG_DWORD /d 0
image

Remove a reg entry

If there's a malicious reg entry, you can remove it this way

root@kitploit:~

#Create HKU drive
mount -PSProvider Registry -Name HKU -Root HKEY_USERS

# Read the reg to make sure this is the bad boy you want
get-itemproperty -Path 'HKU:\*\Keyboard Layout\Preload\'
#remove it by piping it to remove-item
get-itemproperty -Path 'HKU:\*\Keyboard Layout\Preload\' | Remove-Item -Force -Confirm:$false -verbose
# double check it's gone by trying to re-read it
get-itemproperty -Path 'HKU:\*\Keyboard Layout\Preload\'

image

Removing HKCurrentUser Keys

If a Registry is under HKCU, it's not clear exactly WHO it can belong to.

image

If a Registry is under HKCU, you can figure out WHICH username it belongs to but you can't just go into HKCU in your PwSh to delete it....because YOU are the current user.

Instead, get the SID of the user

And then you can traverse to that as the path as HKU. So for example, under User_Alfonso's reg keys

root@kitploit:~
#this
HKCU:\Software\AppDataLow\Software\Microsoft\FDBC3F8C-385A-37D8-2A81-EC5BFE45E0BF

#must become this. Notice the reg changes in the field field, and the SID gets sandwiched in
HKU:\S-1-5-21-912369493-653634481-1866108234-1004\Software\AppDataLow\Software\Microsoft\FDBC3F8C-385A-37D8-2A81-EC5BFE45E0BF

To just generally convert them

root@kitploit:~

mount -PSProvider Registry -Name HKU -Root HKEY_USERS

image

Understanding Reg Permissions

Reg permissions, and ACL and SDDL in general really, are a bit long to understand. But worth it, as adversaries like using the reg.

Adversaries will look for registries with loose permissions, so let's show how we first can identify loose permissions

Get-ACl

The Access Control List (ACL) considers the permissions associated with an object on a Windows machine. It's how the machine understands privileges, and who is allowed to do what.

Problem is, if you get and get-acl for a particular object, it ain't a pretty thing

root@kitploit:~
Get-Acl -Path hklm:\System\CurrentControlSet\services\ | fl

There's a lot going on here. Moreover, what the fuck is that SDDL string at the bottom?

The Security Descriptor Definition Language (SDDL) is a representation for ACL permissions, essentially

image

Convert SDDL

You could figure out what the wacky ASCII chunks mean in SDDL....but I'd much rather convert the permissions to something human readable

Here, an adversary is looking for a user they control to have permissions to maniptulate the service, likely they want Full Control

root@kitploit:~
$acl = Get-Acl -Path hklm:\System\CurrentControlSet\services\;
ConvertFrom-SddlString -Sddl $acl.Sddl | Foreach-Object {$_.DiscretionaryAcl[0]};
ConvertFrom-SddlString -Sddl $acl.Sddl -Type RegistryRights | Foreach-Object {$_.DiscretionaryAcl[0]}
# bottom one specifices the  registry access rights when you create RegistrySecurity objects

image

What could they do with poor permissions?

An adversary in control of a loosely permissioned registry entry for a service, for example, could give themselves a privesc or persistence. For example:

root@kitploit:~
#don't actually run this
Set-ItemProperty -path HKLM:\System\CurrentControlSet\services\example_service -name ImagePath -value "C:\temp\evil.exe"

Hunting for Reg evil

Now we know how reg entries are compromised, how can we search?

The below takes the services reg as an example, and searches for specifically just the reg-key Name and Image Path.

root@kitploit:~

Get-ItemProperty -Path "HKLM:\System\CurrentControlSet\services\*" | 
ft PSChildName, ImagePath -autosize | out-string -width 800 

#You can search recursively with this, kind of, if you use wildcards in the path names. Will take longer if you do recursively search though
Get-ItemProperty -Path "HKLM:\System\CurrentControlSet\**\*" | 
ft PSChildName, ImagePath -autosize | out-string -width 800 

# This one-liner is over-engineered. # But it's a other way to be recursive if you start from a higher directory in reg
# will take a while though
$keys = Get-ChildItem -Path "HKLM:\System\CurrentControlSet\" -recurse -force ;
$Items = $Keys | Foreach-Object {Get-ItemProperty $_.PsPath };
ForEach ($Item in $Items) {"{0,-35} {1,-10} " -f $Item.PSChildName, $Item.ImagePath} 

image

Filtering Reg ImagePath

Let's continue to use the \Services\ reg as our example.

Remember in the above example of a malicious reg, we saw the ImagePath had the value of C:\temp\evil.exe. And we're seeing a load of .sys here. So can we specifically just filter for .exes in the ImagePath.

I have to mention, don't write .sys files off as harmless. Rootkits and bootkits weaponise .sys, for example.

If you see a suspicious file in reg, you can go and collect it and investigate it, or collect it's hash. When it comes to the ImagePath, \SystemRoot\ is usually C:\Windows, but you can confirm with $Env:systemroot .

root@kitploit:~
Get-ItemProperty -Path "HKLM:\System\CurrentControlSet\services\*" | 
where ImagePath -like "*.exe*" | 
ft PSChildName, ImagePath -autosize | out-string -width 800 

# if you notice, on line two we wrap .exe in TWO in wildcards. Why? 
  # The first wildcard is to ensure we're kind of 'grepping' for a file that ends in a .exe. 
    # Without the first wildcard, we'd be looking for literal .exe
  # The second wildcard is to ensure we're looking for the things that come after the .exe
     # This is to make sure we aren't losing the flags and args of an executable

# We can filter however we wish, so we can actively NOT look for .exes
Get-ItemProperty -Path "HKLM:\System\CurrentControlSet\services\*" | 
where ImagePath -notlike "*.exe*" | 
ft PSChildName, ImagePath -autosize | out-string -width 800 

#fuck it, double stack your filters to not look for an exe or a sys...not sure why, but go for it!
Get-ItemProperty -Path "HKLM:\System\CurrentControlSet\services\*" | 
? {($_.ImagePath -notlike "*.exe*" -and $_.Imagepath -notlike "*.sys*")} | 
ft PSChildName, ImagePath -autosize | out-string -width 800 

#If you don't care about Reg Entry name, and just want the ImagePath
(Get-ItemProperty -Path "HKLM:\System\CurrentControlSet\services\*").ImagePath  

image

Query Background Activity Moderator

BAM only in certain Windows 10 machines. Provides full path of the executabled last execution time

root@kitploit:~
reg query "HKLM\SYSTEM\CurrentControlSet\Services\bam\state\UserSettings" /s
# or HKLM\SYSTEM\CurrentControlSet\Services\bam\UserSettings\

OR BAMParser.ps1

image image

Driver Queries

section contents
  • Printer Drivers
  • System Drivers
    • Unsigned
    • Signed
  • Other Drivers
  • Drivers by Registry
  • Drivers by Time

Drivers are an interesting one. It isn't everyday you'll see malware sliding a malicious driver in ; bootkits and rootkits have been known to weaponise drivers. But it's well worth it, because it's an excellent method for persistence if an adversary can pull it off without blue-screening a machine. You can read more about it here

You can utilise Winbindex to investigate drivers, and compare a local copy you have with the indexed info. Malicious copies may have a hash that doesn't match, or a file size that doesn't quite match.

image

Printer Drivers

root@kitploit:~
Get-PrinterDriver | fl Name, *path*, *file* 

image

System Drivers

If drivers are or aren't signed, don't use that as the differentiation for what is legit and not legit. Some legitimate drivers are not signed ; some malicious drivers sneak a signature.

Unsigned

Get unsigned drivers. Likely to not return much

root@kitploit:~
gci C:\Windows\*\DriverStore\FileRepository\ -recurse -include *.inf|
Get-AuthenticodeSignature | 
? Status -ne "Valid" | ft -autosize

gci -path C:\Windows\System32\drivers -include *.sys -recurse -ea SilentlyContinue | 
Get-AuthenticodeSignature | 
? Status -ne "Valid" | ft -autosize

Signed

Get the signed ones. Will return a lot.

root@kitploit:~
Get-WmiObject Win32_PnPSignedDriver | 
fl DeviceName, FriendlyName, DriverProviderName, Manufacturer, InfName, IsSigned, DriverVersion

# alternatives
gci -path C:\Windows\System32\drivers -include *.sys -recurse -ea SilentlyContinue | 
Get-AuthenticodeSignature | 
? Status -eq "Valid" | ft -autosize 
#or
gci C:\Windows\*\DriverStore\FileRepository\ -recurse -include *.inf|
Get-AuthenticodeSignature | 
? Status -eq "Valid" | ft -autosize 

image

image

Other Drivers

Gets all 3rd party drivers

root@kitploit:~
Get-WindowsDriver -Online -All | 
fl Driver, ProviderName, ClassName, ClassDescription, Date, OriginalFileName, DriverSignature 

image

Drivers by Registry

You can also leverage the Registry to look at drivers

root@kitploit:~
#if you know the driver, you can just give the full path and wildcard the end if you aren't sure of full spelling
get-itemproperty -path "HKLM:\System\CurrentControlSet\Services\DBUtil*" 

#You'll likely not know the path though, so just filter for drivers that have \drivers\ in their ImagePath
get-itemproperty -path "HKLM:\System\CurrentControlSet\Services\*"  | 
? ImagePath -like "*drivers*" | 
fl ImagePath, DisplayName

(image

Drivers by Time

Look for the drivers that exist via directory diving.. We can focus on .INF and .SYS files, and sort by the time last written.

root@kitploit:~
#change to LastWriteTimeUtc if you need to.

# first directory location
gci C:\Windows\*\DriverStore\FileRepository\ -recurse -include *.inf | 
sort-object LastWriteTime -Descending |
ft FullName,LastWriteTime | out-string -width 850

# second driver location
gci -path C:\Windows\System32\drivers -include *.sys -recurse -ea SilentlyContinue | 
sort-object LastWriteTime -Descending |
ft FullName,LastWriteTime | out-string -width 850

image

DLL Queries

section contents
  • DLLs used in Processes
    • Investigate Process DLLs
  • Investigate DLLs
    • Generically
    • Invalid
    • Specifically
      • Verify

DLLs Used in Processes

We've already discussed how to show DLLs used in processes

But what about getting granular. Well, let's pick on a specific process we can see running, and let's get the DLLs involved, their file location, their size, and if they have a company name

root@kitploit:~
get-process -name "google*" | 
Fl @{l="Modules";e={$_.Modules | fl FileName, Size, Company | out-string}}

#alterntive version, just print filepath of specific process' DLL
(gps -name "google*").Modules.FileName

image

You can in theory run this without specifying a process, and it will just retrieve all of the DLLs involved in all the processes. But this will be LONG man.

Investigate Process Dlls

We can zero in on the DLLs that a process may call on

root@kitploit:~
(gps -name "google").Modules.FileName | Get-AuthenticodeSignature

image

Investigate DLLs

Generically

This will return a lot of DLLs and their last write time. I personally would avoid this approach

root@kitploit:~
gci -path C:\Windows\*, C:\Windows\System32\*  -file -force -include *.dll | fl Name, Lastwritetime

#to get signature codes for these pipe it
gci -path C:\Windows\*, C:\Windows\System32\*  -file -force -include *.dll | Get-AuthenticodeSignature
#to get hashes for these, pipe it too
gci -path C:\Windows\*, C:\Windows\System32\*  -file -force -include *.dll | get-filehash

image

Invalid

Like drivers, if a DLL is signed or un-signed, it doesn't immediately signal malicious. There are plenty of official files on a Windows machine that are unsigned. Equally, malicious actors can get signatures for their malicious files too.

You'll get a lot of results if you look for VALID, signed DLLs. So maybe filter for INVALID ones first. Both will take some time

root@kitploit:~

#get invalid
gci -path C:\Windows\*, C:\Windows\System32\*  -file -force -include *.dll |
Get-AuthenticodeSignature | ? Status -ne "Valid" 

#collect valid ones with this command
gci -path C:\Windows\*, C:\Windows\System32\*  -file -force -include *.dll |
Get-AuthenticodeSignature | ? Status -eq "Valid" 

image

Specifically

We can apply all of the above to individual DLLs. If I notice something strange during the process' DLL hunt, or if I had identified a DLL with an invalid signature. I'd then hone in on that specific DLL.

root@kitploit:~
gci -path C:\Windows\twain_32.dll | get-filehash
gci -path C:\Windows\twain_32.dll | Get-AuthenticodeSignature 

image

Verify

If you need to verify what a DLL is, you have a myriad of ways. One way is through Winbindex

Here, you can put the name of a DLL (or many of other filetypes), and in return get a whole SLUETH of data. You can compare the file you have locally with the Winbindex info, which may highlight malice - for example, does the hash match ? Or, is your local copy a much larger file size than the suggested size in the index?

image

If not Windex, you have the usual Google-Fu methods, and having the file hash will aid you here

AV Queries

section contents
  • Query Defender
    • Trigger Defender Scan
    • Check if Defender has been manipulated
    • Enable Defender monitoring

Query Defender

If you have Defender active on your windows machine, you can leverage PowerShell to query what threats the AV is facing

This simple command will return all of the threats. In the screenshot below, it shows someone attempted to download mimikatz.

root@kitploit:~
Get-MpThreatDetection

image

However, if you have numerous threat alerts, the above command may be messy to query. Let's demonstrate some augmentations we can add to make our hunt easier

root@kitploit:~
Get-MpThreatDetection | Format-List threatID, *time, ActionSuccess
#Then, take the ThreatID and drill down further into that one
Get-MpThreat -ThreatID

image

Trigger Defender Scan

root@kitploit:~
Update-MpSignature; Start-MpScan
 
#or full scan
Start-MpScan -ScanType FullScan

#Specify path
Start-MpScan -ScanPath "C:\temp"

image

Check if Defender has been manipulated

Adversaries enjoy simply turning off / disabling the AV. You can query the status of Defender's various detections

root@kitploit:~
Get-MpComputerStatus | fl *enable*

image

Adversaries also enjoy adding exclusions to AVs....however please note that some legitimate tooling and vendors ask that some directories and executables are placed on the exclusion list

root@kitploit:~
Get-MpPreference | fl *Exclu*

image

Enable Defender monitoring

If you see some values have been disabled, you can re-enable with the following:

root@kitploit:~
Set-MpPreference -DisableRealtimeMonitoring $false -verbose

image

And get rid of the exclusions the adversary may have gifted themselves

root@kitploit:~
Remove-MpPreference -ExclusionProcess 'velociraptor' -ExclusionPath 'C:\Users\IEUser\Pictures' -ExclusionExtension '.pif' -force -verbose

image

Log Queries

section contents
  • Show Logs
    • Overview of what a specific log is up to
    • Specifically get the last time a log was written to
    • Compare the date and time a log was last written to
    • Read a log file
  • WinRM & WECSVC permissions
  • Query Defender
  • Usage Log

From a security perspective, you probably don't want to query logs on the endpoint itself....endpoints after a malicious event can't be trusted. You're better to focus on the logs that have been forwarded from endpoints and centralised in your SIEM.

If you REALLY want to query local logs for security-related instances, I can recommend this awesome repo

I've tended to use these commands to troubleshoot Windows Event Forwarding and other log related stuff.

Show Logs

Show logs that are actually enabled and whose contents isn't empty.

root@kitploit:~
Get-WinEvent -ListLog *|
where-object {$_.IsEnabled -eq "True" -and $_.RecordCount -gt "0"} | 
sort-object -property LogName | 
format-table LogName -autosize -wrap

image

Overview of what a specific log is up to

root@kitploit:~
Get-WinEvent -ListLog Microsoft-Windows-Sysmon/Operational | Format-List -Property * 

image

Specifically get the last time a log was written to

root@kitploit:~
(Get-WinEvent -ListLog Microsoft-Windows-Sysmon/Operational).lastwritetime 

image

Compare the date and time a log was last written to

Checks if the date was written recently, and if so, just print sysmon working if not recent, then print the date last written. I've found sometimes that sometimes sysmon bugs out on a machine, and stops committing to logs. Change the number after -ge to be more flexible than the one day it currently compares to

root@kitploit:~
$b = (Get-WinEvent -ListLog Microsoft-Windows-Sysmon/Operational).lastwritetime; 
$a = Get-WinEvent -ListLog Microsoft-Windows-Sysmon/Operational| where-object {(new-timespan $_.LastWriteTime).days -ge 1}; 
if ($a -eq $null){Write-host "sysmon_working"} else {Write-host "$env:computername $b"}

image

Read a Log File

Again, trusting the logs of an endpoint is a dangerous game. An adversary can evade endpoint logging. It's better to utilise logs that have been taken to a central point, to trust EVENT IDs from Sysmon, or trust network traffic if you have it.

Nonetheless, you can read the EVTX file you are interesting in

root@kitploit:~
Get-WinEvent -path "C:\windows\System32\Winevt\Logs\Microsoft-Windows-PowerShell%4Operational.evtx | ft -wrap"

#Advisable to filter by Id to filter out noise
Get-WinEvent -path "C:\windows\System32\Winevt\Logs\Microsoft-Windows-PowerShell%4Operational.evtx" |
? Id -eq '4104' | ft -wrap
#this is an example ID number.

image image

WinRM & WECSVC permissions

Test the permissions of winrm - used to see windows event forwarding working, which uses winrm usually on endpoints and wecsvc account on servers

root@kitploit:~
netsh http show urlacl url=http://+:5985/wsman/ && netsh http show urlacl url=https://+:5986/wsman/

image

Usage Log

These two blogs more or less share how to possibly prove when a C#/.net binary was executed 1, 2

The log's contents itself is useless. But, the file name of the log may be telling as it will be named after the binary executed.

A very basic way to query this is

root@kitploit:~
gci "C:\Users\*\AppData\Local\Microsoft\*\UsageLogs\*", "C:\Windows\System32\config\systemprofile\AppData\Local\Microsoft\*\UsageLogs\*"
image

If you wanted to query this network wide, you've got some options:

root@kitploit:~

#Show usage log's created after a certain day
  #use american date, probably a way to convert it but meh
gci "C:\Users\*\AppData\Local\Microsoft\*\UsageLogs\*",
"C:\Windows\System32\config\systemprofile\AppData\Local\Microsoft\*\UsageLogs\*" | 
where-object {$_.LastWriteTime -gt [datetime]::parse("11/22/2022")} | 
? Name -notmatch Powershell #can ignore and filter some names

# Show usage log but split to focus on the username, executable, and machine name in case you run this network-wide via something like Velociraptor 
(gci "C:\Users\*\AppData\Local\Microsoft\*\UsageLogs\*").fullname | 
ForEach-Object{$data = $_.split("\\");write-output "$($data[8]), $($data[2]), $(hostname)"} | 
Select-String -notmatch "powershell", "NGenTask","sdiagnhost"

#For SYSTEM, you don't need to overcomplicate this
(gci "C:\Windows\System32\config\systemprofile\AppData\Local\Microsoft\*\UsageLogs\*").name |
ForEach-Object{ write-host "$_, SYSTEM, $(hostname)"}
image image

But keep in mind, an adversary changing the file name is easy and therefore this is a meh telemetry source

image

Powershell Tips

section contents
  • Get Alias
  • Get Command and Get Help
  • WhatIf
  • Clip
  • Output Without Headers
  • Re-run commands
  • Stop Truncation
    • Out-String
    • -Wrap
  • Directories
  • Transcripts

Get Alias

PwSh is great at abbreviating the commands. Unfortunately, when you're trying to read someone else's abbreviated PwSh it can be ballache to figure out exactly what each weird abbrevation does.

Equally, if you're trying to write something smol and cute you'll want to use abbrevations!

Whatever you're trying, you can use Get-Alias to figure all of it out

root@kitploit:~
#What does an abbrevation do
get-alias -name gwmi
#What is the abbrevation for this
get-alias -definition write-output
#List all alias' and their full command
get-alias

image

Get Command and Get Help

This is similar to aproposin Bash. Essentially, you can search for commands related to keywords you give.

Try to give singulars, not plural. For example, instead of drivers just do driver

root@kitploit:~
get-command *driver* 

## Once you see a particular command or function, to know what THAT does use get-help. 
# get-help [thing]
Get-Help Get-SystemDriver

image

image

WhatIf

-WhatIf is quite a cool flag, as it will tell you what will happen if you run a command. So before you kill a vital process for example, if you include whatif you'll gain some insight into the irreversible future!

root@kitploit:~
get-process -name "excel" | stop-process -whatif

image

Clip

You can pipe straight to your clipboard. Then all you have to do is paste

root@kitploit:~
# this will write to terminal
hostname
# this will pipe to clipboard and will NOT write to terminal
hostname | clip
# then paste to test
#ctrl+v

image

Output Without Headers

You may just want a value without the collumn header that comes. We can do that with -ExpandProperty

root@kitploit:~
# use the -expandproperty before the object you want. IN this case, ID
 select -ExpandProperty id 
 
# so for example
get-process -Name "google*" | select -ExpandProperty id
# lets stop the particular google ID that we want
$PID =  get-process -Name "google" | ? Path -eq $Null | select -ExpandProperty id;
Stop-Process -ID $PID -Force -Confirm:$false -verbose

image

If you pipe to | format-table you can simply use the -HideTableHeaders flag

image

Re-run commands

If you had a command that was great, you can re-run it again from your powershell history!

root@kitploit:~
##list out history
get-history
#pick the command you want, and then write down the corresponding number
#now invoke history
Invoke-History -id 38

## You can do the alias / abbrevated method for speed
h
r 43

image image

Stop Trunction

Out-String

For reasons(?) powershell truncates stuff, even when it's really unhelpful and pointless for it to do so. Take the below for example: our hash AND path is cut off....WHY?! 😡

image

To fix this, use out-string

root@kitploit:~
#put this at the very end of whatever you're running and is getting truncated
| outstring -width 250
# or even more
| outstring -width 4096
#use whatever width number appropiate to print your results without truncation

#you can also stack it with ft. For example: 
Get-ItemProperty -Path "HKLM:\System\CurrentControlSet\services\*" | 
ft PSChildName, ImagePath -autosize | out-string -width 800 

Look no elipses! image

-Wrap

In some places, it doesn't make sense to use out-string as it prints strangely. In these instances, try the -wrap function of format-table

This, for example is a mess because we used out-string. It's wrapping the final line in an annoying and strange way. ans image

root@kitploit:~
| ft -property * -autosize -wrap 
#you don't always need to the -property * bit. But if you find it isn't printing as you want, try again.
| ft -autosize -wrap 

Isn't this much better now?

image

Directories

For some investigations, I need to organise my directories or everything will get messed up. I enjoy using Year-Month-Date in my directory names!

root@kitploit:~
mkdir -p "C:\Malware_Analysis\$(Get-Date -UFormat "%Y_%b_%d_%a_UTC%Z")" 

# your working directory for today will be
echo "C:\Malware_Analysis\$(Get-Date -UFormat "%Y_%b_%d_%a_UTC%Z")"

##move to the working director
cd "C:\Malware_Analysis\$(Get-Date -UFormat "%Y_%b_%d_%a_UTC%Z")"

##save outputs to
echo 'test' > C:\Malware_Analysis\$(Get-Date -UFormat "%Y_%b_%d_%a_UTC%Z")\test.txt

image image

Transcripts

Trying to report back what you ran, when you ran, and the results of your commands can become a chore. If you forget a pivotal screenshot, you'll kick yourself - I know I have.

Instead, we can ask PowerShell to create a log of everything we run and see on the command line.

root@kitploit:~
# you can pick whatever path you want, this is just what I tend to use it for
Start-Transcript -path "C:\Malware_Analysis\$(Get-Date -UFormat "%Y_%b_%d_%a_UTC%Z")\PwSh_transcript.log" -noclobber -IncludeInvocationHeader

## At the end of the malware analysis, we will then need to stop all transcripts
Stop-transcript

#you can now open up your Powershell transcript with notepad if you want

image image image


Linux

This section is a bit dry, forgive me. My Bash DFIR tends to be a lot more spontaneous and therefore I don't write them down as much as I do the Pwsh one-liners

Bash History

section contents
  • Add add timestamps to .bash_history

Checkout the SANS DFIR talk by Half Pomeraz called You don't know jack about .bash_history. It's a terrifying insight into how weak bash history really is by default

Add add timestamps to .bash_history

Via .bashrc

root@kitploit:~
nano ~/.bashrc
#at the bottom
export HISTTIMEFORMAT='%d/%m/%y %T '
#expand bash history size too

#save and exit
source ~/.bashrc

Or by /etc/profile

root@kitploit:~
nano /etc/profile
export HISTTIMEFORMAT='%d/%m/%y %T '

#save and exit
source /etc/profile

image

Then run the history command to see your timestamped bash history

image


Grep and Ack

section contents
  • Grep Regex extract IPs
  • Use Ack to highlight

Grep Regex extract IPs

IPv4

root@kitploit:~
grep -E -o "(25[0-5]|2[0-4][0-9]|[01]?[0-9][0-9]?)\.(25[0-5]|2[0-4][0-9]|[01]?[0-9][0-9]?)\.(25[0-5]|2[0-4][0-9]|[01]?[0-9][0-9]?)\.(25[0-5]|2[0-4][0-9]|[01]?[0-9][0-9]?)" file.txt | sort | uniq 

IPv6

root@kitploit:~
egrep '(([0-9a-fA-F]{1,4}:){7,7}[0-9a-fA-F]{1,4}|([0-9a-fA-F]{1,4}:){1,7}:|([0-9a-fA-F]{1,4}:){1,6}:[0-9a-fA-F]{1,4}|([0-9a-fA-F]{1,4}:){1,5}(:[0-9a-fA-F]{1,4}){1,2}|([0-9a-fA-F]{1,4}:){1,4}(:[0-9a-fA-F]{1,4}){1,3}|([0-9a-fA-F]{1,4}:){1,3}(:[0-9a-fA-F]{1,4}){1,4}|([0-9a-fA-F]{1,4}:){1,2}(:[0-9a-fA-F]{1,4}){1,5}|[0-9a-fA-F]{1,4}:((:[0-9a-fA-F]{1,4}){1,6})|:((:[0-9a-fA-F]{1,4}){1,7}|:)|fe80:(:[0-9a-fA-F]{0,4}){0,4}%[0-9a-zA-Z]{1,}|::(ffff(:0{1,4}){0,1}:){0,1}((25[0-5]|(2[0-4]|1{0,1}[0-9]){0,1}[0-9]).){3,3}(25[0-5]|(2[0-4]|1{0,1}[0-9]){0,1}[0-9])|([0-9a-fA-F]{1,4}:){1,4}:((25[0-5]|(2[0-4]|1{0,1}[0-9]){0,1}[0-9]).){3,3}(25[0-5]|(2[0-4]|1{0,1}[0-9]){0,1}[0-9])) file.txt'
Stack up IPv4s

Great for parsing 4625s and 4624s in Windows world, and seeing the prelevence of the IPs trying to brute force you. Did a thread on this

So for example, this is a txt of all 4654s for an external pereimter server

root@kitploit:~
grep -E -o "(25[0-5]|2[0-4][0-9]|[01]?[0-9][0-9]?)\.(25[0-5]|2[0-4][0-9]|[01]?[0-9][0-9]?)\.(25[0-5]|2[0-4][0-9]|[01]?[0-9][0-9]?)\.(25[0-5]|2[0-4][0-9]|[01]?[0-9][0-9]?)" 4625s.txt | sort | uniq -c | sort -nr
image

To then prepare this to compare to the 4624s, I find it easiest to use this cyberchef recipe

image

And now, compare the brute forcing IPs with your 4624 successful logins, to see if any have successfully compromised you

root@kitploit:~
grep -iEo '192.168.1.114|192.168.1.128|192.168.1.130|192.168.1.146|192.168.1.147|192.168.1.164|192.168.1.3|192.168.1.51|51.89.115.202' 4624s.txt | sort | uniq -c | sort -nr

Use Ack to highlight

One thing I really like about Ack is that it can highlight words easily, which is great for screenshots and reporting. So take the above example, let's say we're looking for two specific IP, we can have ack filter and highlight those

Ack is like Grep's younger, more refined brother. Has some of greps' flags as default, and just makes life a bit easier.

root@kitploit:~
#install ack if you need to: sudo apt-get install ack
ack -i '127.0.0.1|1.1.1.1' --passthru file.txt

image


Processes and Networks

section contents
  • Track parent-child processes easier
  • Get a quick overview of network activity

Track parent-child processes easier

root@kitploit:~
ps -aux --forest

image

Get an overview of every running process running from a non-standard path

root@kitploit:~
sudo ls -l /proc/[0-9]*/exe 2>/dev/null | awk '/ -> / && !/\/usr\/(lib(exec)?|s?bin)\// {print $9, $10, $11}' | sed 's,/proc/\([0-9]*\)/exe,\1,'

image

Or list every process full stop

root@kitploit:~
sudo ls -l /proc/[0-9]*/exe 2>/dev/null | awk '/ -> / {print $NF}' | sort | tac

image

Get a quick overview of network activity

root@kitploit:~
netstat -plunt
#if you don't have netstat, try ss
ss -plunt

image

This alternative also helps re-visualise the originating command and user that a network connection belongs to

root@kitploit:~
sudo lsof -i

2021-12-01_09-18


Files

section contents
  • Recursively look for particular file types, and once you find the files get their hashes
  • Tree
    • Tree and show the users who own the files and directories
  • Get information about a file
  • Files and Dates
    • This one will print the files and their corresponding timestamp
    • Show all files created between two dates
  • Compare Files

Recursively look for particular file types, and once you find the files get their hashes

Here's the bash alternative

root@kitploit:~
find . type f -exec sha256sum {} \; 2> /dev/null | grep -Ei '.asp|.js' | sort

image

Tree

Tree is an amazing command. Please bask in its glory. It will recursively list out folders and filders in their parent-child relationship.....or tree-branch relationship I suppose?

root@kitploit:~
#install sudo apt-get install tree
tree 

image

But WAIT! There's more!

Tree and show the users who own the files and directories

root@kitploit:~
tree -u
#stack this with a grep to find a particular user you're looking for
tree -u | grep 'root'

image image

If you find it a bit long and confusing to track which file belongs to what directory, this flag on tree will print the fullpath

root@kitploit:~
tree -F
# pipe with | grep 'reports' to highlight a directory or file you are looking for

image

Get information about a file

stat is a great command to get lots of information about a file

root@kitploit:~
stat file.txt

image

Files and Dates

Be careful with this, as timestamps can be manipulated and can't be trusted during an IR

This one will print the files and their corresponding timestamp

root@kitploit:~
find . -printf "%T+ %p\n"

image

Show all files created between two dates

I've got to be honest with you, this is one of my favourite commands. The level of granularity you can get is crazy. You can find files that have changed state by the MINUTE if you really wanted.

root@kitploit:~
find -newerct "01 Jun 2021 18:30:00" ! -newerct "03 Jun 2021 19:00:00" -ls | sort

image

Compare Files

vimdiff is my favourite way to compare two files

root@kitploit:~
vimdiff file1.txt file2.txt

The colours highlight differences between the two. When you're done, use vim's method of exiting on both files: :q!. Do this twice

image

diff is the lamer, tamer version of vimdiff. However it does have some flags for quick analysis:

root@kitploit:~
#are these files different yes or no?
diff -q net.txt net2.txt

#quickly show minimal differences
diff -d net.txt net2.txt

image


Bash Tips

section contents
  • Fixing Mistakes
    • Forget to run as sudo?
    • Typos in a big old one liner?
    • Re-run a command in History

Fixing Mistakes

We all make mistakes, don't worry. Bash forgives you

Forget to run as sudo?

We've all done it mate. Luckily, !! has your back. The exclamation mark is a history related bash thing.

Using two exclamations, we can return our previous command. By prefixing sudo we are bringing our command back but running it as sudo

root@kitploit:~

Read more

Scarica lo strumento
  • Honeypots
    • Basic Honeypots
  • Network Traffic
    • Capture Traffic
    • TShark
    • Extracting Stuff
    • PCAP Analysis IRL
  • Digital Forensics
    • Volatility
    • Quick Forensics
    • Chainsaw
    • Browser History
    • Which logs to pull in an incident
    • USBs
    • Reg Ripper
    • Winget