
Skip to content
KitploitKITPLOIT
StrumentiBlog
Invia
StrumentiBlog
Invia

Strumenti di Hacking, PenTest e Cybersecurity per il tuo Arsenale di Sicurezza!

Kitploit è una directory di strumenti di hacking, cybersecurity e pentesting. Scopri gli ultimi aggiornamenti dei progetti per trovare vulnerabilità, analizzare sistemi, automatizzare i test e rafforzare la tua sicurezza.

··Feed·Contatto·Privacy·© 2026 Kitploit

Directory degli strumenti

Categorie

Vedi tutte le categorie
Loading categories
CVE-2024-6769 — Avvelenamento della cache di attivazione per elevare da integrità media ad alta (CVE-2024-6769) | Kitploit
Strumenti/GitHubGitHub/fortra/cve-2024-6769
Escalation di PrivilegiAnalisi delle VulnerabilitàExploitPaper e RicercaApprendimento e FormazioneBinary Exploitation
GitHubfortra/cve-2024-6769

CVE-2024-6769

Avvelenamento della cache di attivazione per elevare da integrità media ad alta (CVE-2024-6769)

Vedi Repository
78111 anno faRevisionato da Kitploit

Più Popolari

Vedi tutti →

Scopri gli strumenti più utilizzati dalla nostra community.

Esplora tutti gli strumenti

Sfoglia la nostra collezione di strumenti

Vedi tutti gli strumenti →
Condividi

Articolo del blog: CVE-2024-6769 Avvelenamento della cache di attivazione per elevare da integrità media ad alta

Questo articolo riguarda due bug concatenati: Il primo stadio è un bug di DLL Hijacking causato dal rimappaggio dell'unità ROOT e il secondo stadio è un bug di Avvelenamento della Cache di Attivazione gestito dal server CSRSS.

Il primo stadio è stato presentato in dettaglio all'Ekoparty 2023 nella presentazione intitolata "I'm High" da Nicolás Economou di BlueFrost Security. Ha spiegato come sfruttare la vulnerabilità che, all'epoca, non era ancora stata corretta da Microsoft. Ciò consentiva a un utente con INTEGRITÀ MEDIA di essere elevato ad avere PRIVILEGI LIMITATI ALTI, ma senza l'accesso completo per essere un amministratore a tutti gli effetti.

Il secondo stadio non è stato presentato a quella conferenza, sebbene siano stati suggeriti alcuni passaggi per iniziare a fare ricerche su di esso.

Per iniziare, rivedremo il primo stadio per fornire un contesto introduttivo. Da lì, ci addentreremo nella mia ricerca sul secondo stadio, approfondendo i dettagli per ottenere una escalation completa da INTEGRITÀ ALTA limitata ad Amministratore completo. Questo include un PoC funzionante completo per entrambi gli stadi per tutte le versioni di Windows, che è stato testato con successo su Windows 10, Windows 11, Windows Server 2022 e Windows Server 2019 con tutti gli aggiornamenti applicati.

Indice:

  • Revisione del primo stadio
  • Passaggi da seguire per sfruttare il secondo stadio.
  • Cos'è la Cache di Attivazione?
  • Utilizzo del Vettore di Attacco ALPC per Avvelenare la Cache di Attivazione
  • Come farà il sistema ad accettare il nostro Contesto di Attivazione?
  • Come avvelenare la Cache di Attivazione?
  • Come viene letto il mio Manifest XML incorporato?
  • Come viene analizzato il manifest XML incorporato?
  • Come è finita per essere caricata la mia falsa imm32.dll?
  • Demo video.
  • Prova di concetto funzionante
  • TL;DR Breve descrizione dei passaggi di sfruttamento

Revisione del primo stadio

Un quadrato rosso con testo bianco e un numero sopra Descrizione generata automaticamente

L'unico requisito per questo stadio è che il processo iniziale inizi a un LIVELLO DI INTEGRITÀ MEDIA e l'utente appartenga al gruppo Amministratori.

Il primo stadio dello sfruttamento può essere riassunto nei seguenti passaggi:

  1. Rimappaggio dell'unità ROOT utilizzando la funzione NtCreateSymbolicLinkObject.

Ad esempio: rimappaggio del disco da

"C:\" a "C:\users\public"

Questo rimapperà anche la cartella "system32" da

"C:\windows\system32" a "C:\users\public\windows\system32"

  1. Dopo il rimappaggio, alcuni Servizi vengono influenzati e tenteranno di caricare librerie dal nuovo system32 falso controllato dall'utente.

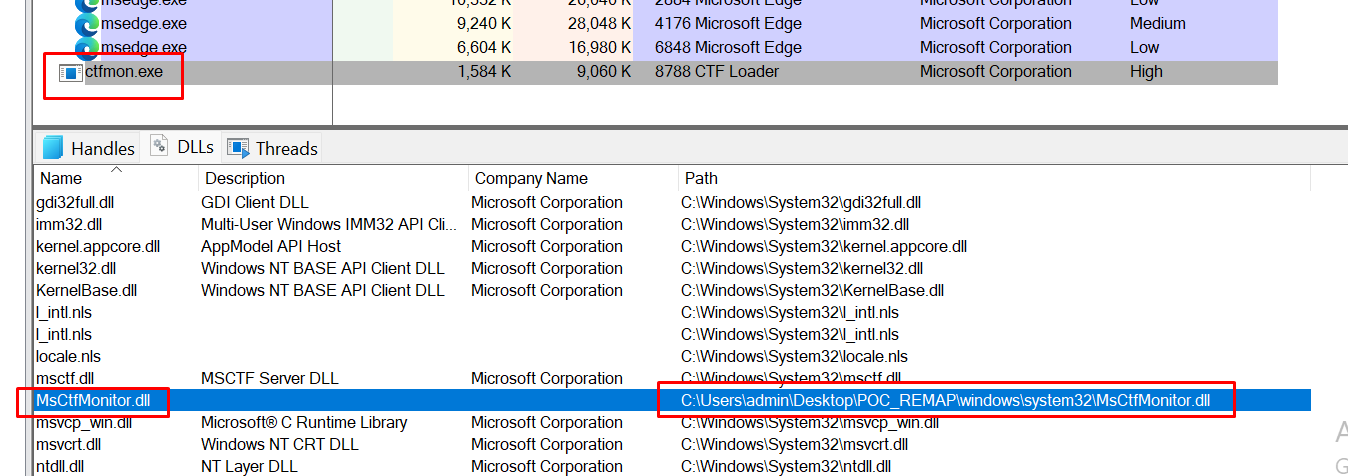
Uno di questi programmi influenzati è CTFMON, che viene eseguito a un LIVELLO DI INTEGRITÀ ALTA ma senza privilegi di Amministratore.

Normalmente, tenta di caricare il modulo chiamato MsCtfMonitor.dll dalla vera cartella system32, ma poiché l'unità ROOT è stata rimappata, cerca MsCtfMonitor.dll nel nostro system32 falso controllato, dove possiamo creare e posizionare una DLL modificata con lo stesso nome.

  1. Creare MsCtfMonitor.dll

A questo punto, posizionando la nostra versione di MsCtfMonitor.dll nella falsa cartella system32, la sua funzione DoMsCtfMonitor viene chiamata ed esegue il nostro codice a un LIVELLO DI INTEGRITÀ ALTA.
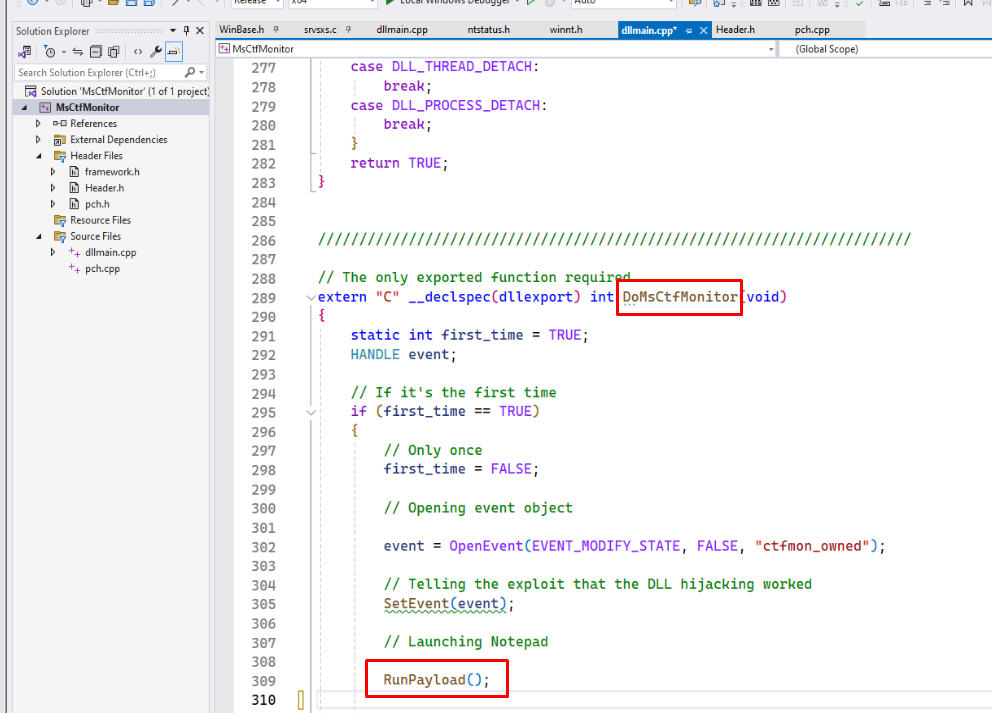
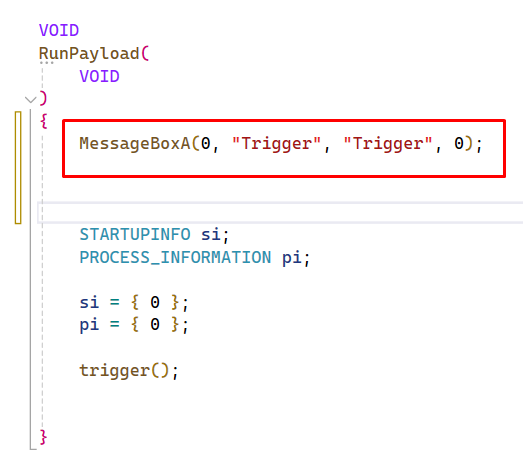
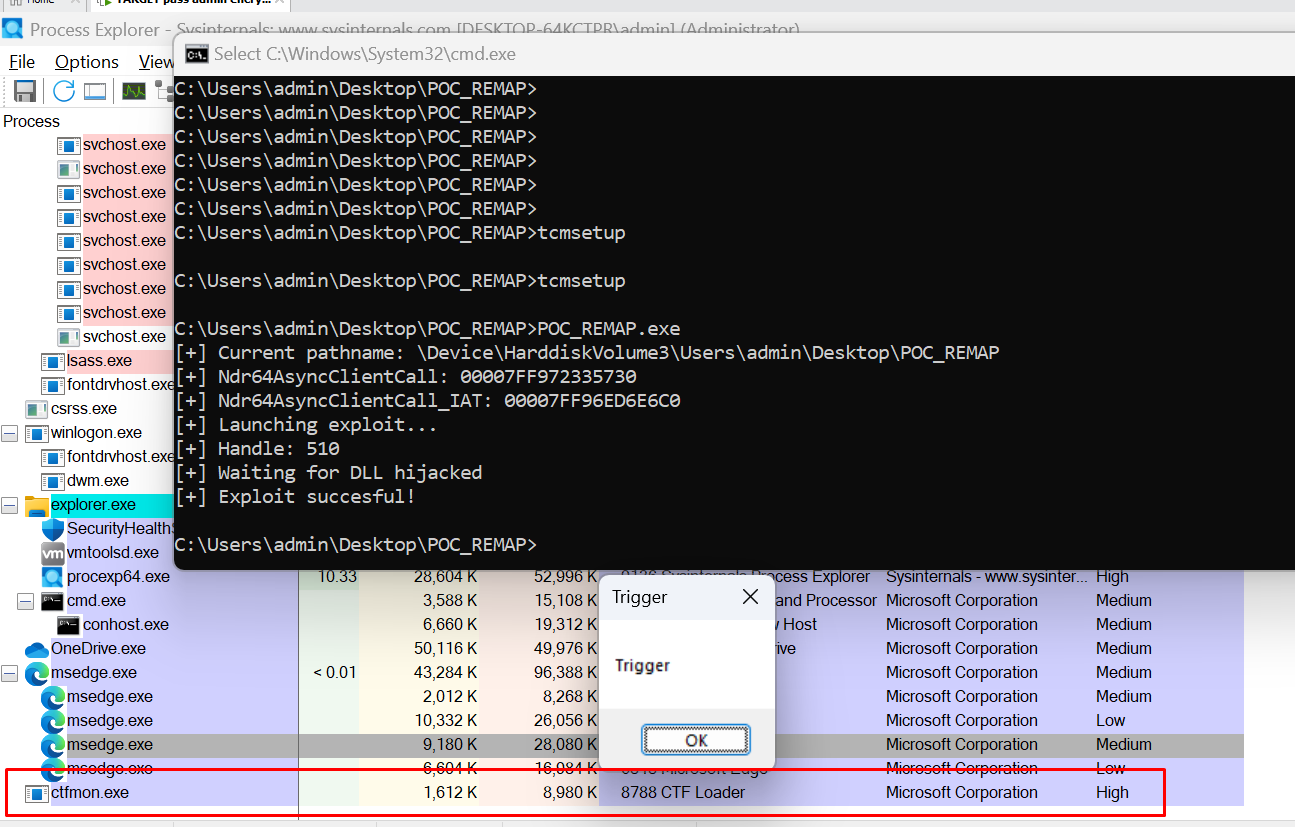
  1. Posizionare un MessageBoxA nella funzione DoMsCtfMonitor. Quando MsCtfMonitor.dll viene caricata, mostrerà il MessageBoxA "TRIGGER".

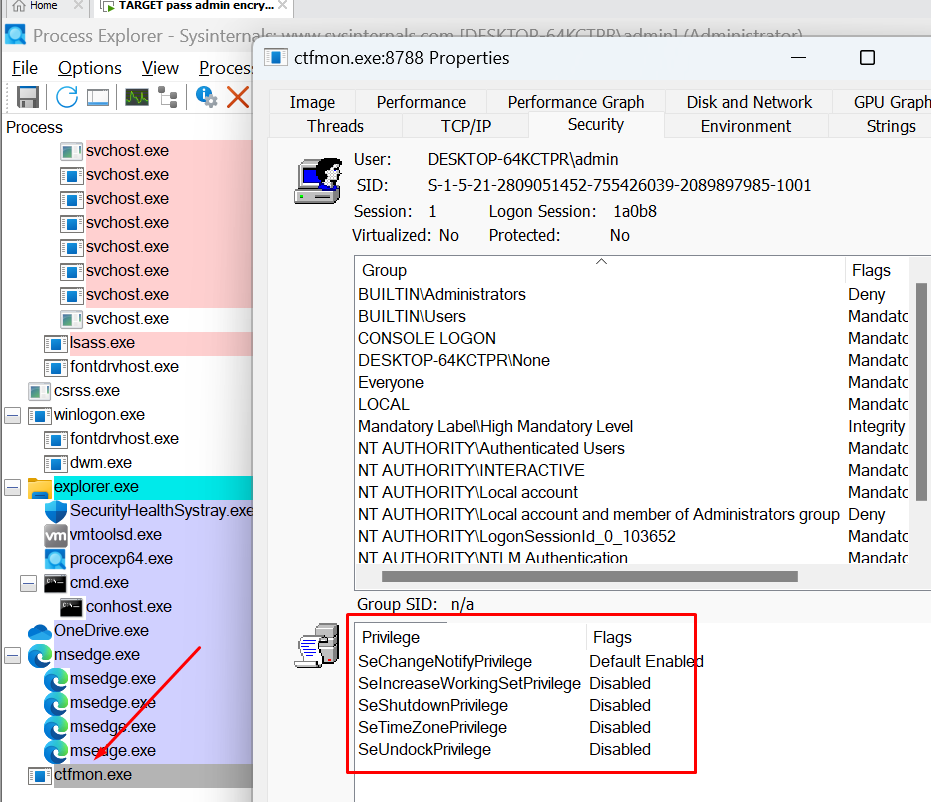
  1. Verificare che la DLL sia stata caricata nel processo CTFMON che viene eseguito al LIVELLO DI INTEGRITÀ ALTA:

Allo stesso tempo, possiamo confermare che il processo, nonostante sia a un LIVELLO DI INTEGRITÀ ALTA, non ha privilegi di Amministratore:

Passaggi per lo Sfruttamento del Secondo Stadio Un quadrato rosso con testo bianco e un numero sopra Descrizione generata automaticamente

Nella sua presentazione all'Ekoparty, Nicolas ha suggerito i seguenti passaggi per completare lo sfruttamento:
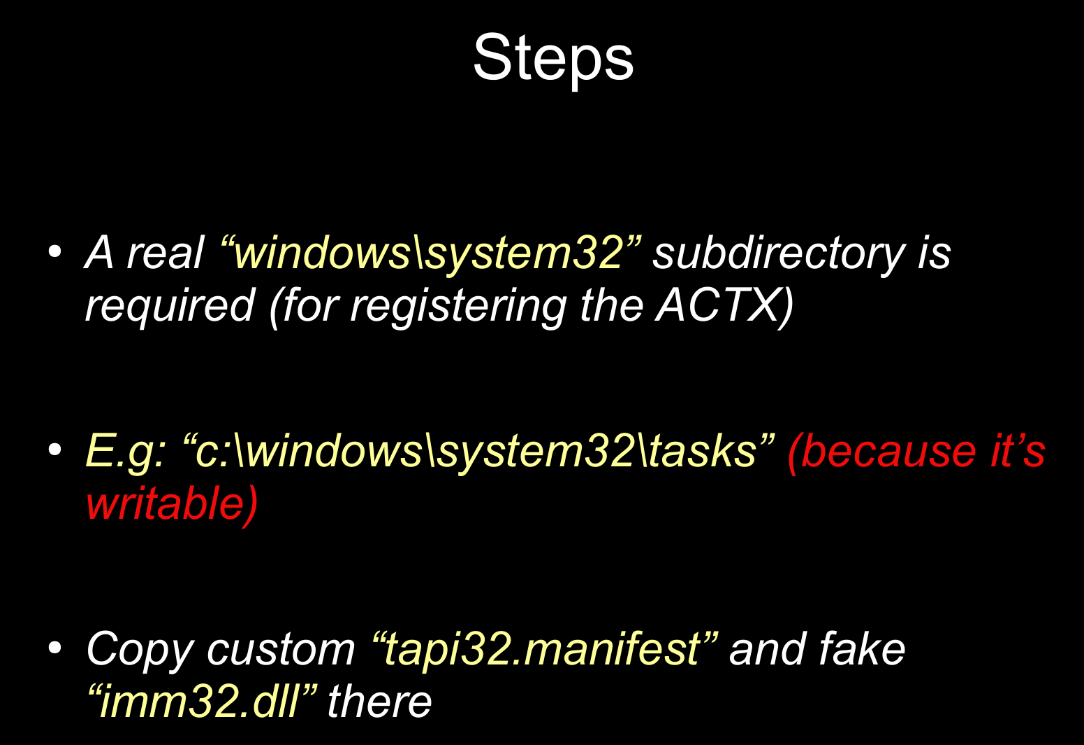
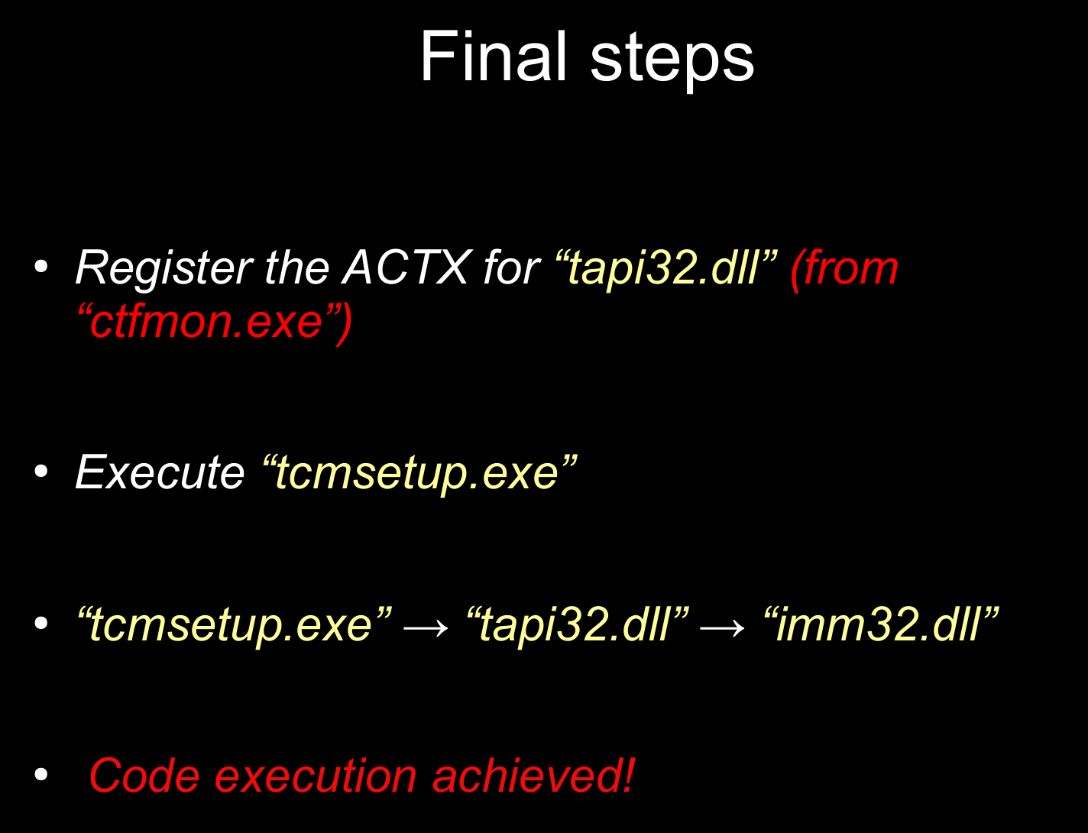
Sebbene ciò sembri semplice, richiede molto tempo per il reverse engineering e il debugging.

Approfondendo un po' la storia di questo vettore di attacco, è diventato chiaro che l'avvelenamento della Cache del Contesto di Attivazione è stato utilizzato in alcuni exploit. Di conseguenza, vale la pena imparare come lo sfruttamento è stato fatto in precedenza per fornire contesto e intuizioni aggiuntive. I dettagli su questo sfruttamento sono disponibili attraverso l'articolo della Zero Day Initiative, Activation Context Cache Poisoning: Exploiting CSRSS for Privilege Escalation.

Cos'è la Cache di Attivazione?

L'uso della cache di attivazione avviene quando un programma sta per caricare una libreria che richiede una versione specifica.

Ad esempio, se un'applicazione sta per caricare C:\Windows\System32\comctl32.dll, non c'è garanzia che la comctl32.dll in quella posizione sia la versione di cui l'applicazione ha bisogno. Questo è un caso d'uso base della Cache dei Contesti di Attivazione. Il programma può inviare una richiesta al server CSRSS per elaborare una nuova voce di Contesto di Attivazione da inserire nella cache, in modo che questo programma possa caricare la versione specifica della libreria necessaria.

A questo scopo viene utilizzato il cosiddetto manifest, che è in formato XML. Di solito è incorporato come risorsa in un file EXE o DLL. In alternativa, Windows cercherà un file manifest nella stessa cartella in cui si trova l'eseguibile del programma.

L'URL menzionato sopra ha alcuni esempi di file Manifest utilizzati da vecchi exploit, come ingannare il sistema per caricare la libreria advapi32.dll da una directory controllata dall'attaccante raggiunta tramite tecnica PATH TRAVERSAL.
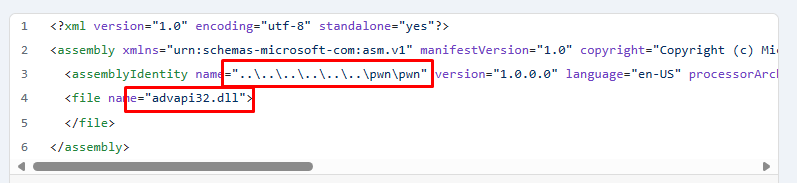
Naturalmente, alcuni vettori di attacco utilizzati sono stati corretti e sono state scoperte alcune nuove tecniche. Inoltre, nella patch di ottobre 2022 per Windows 11 22H2, è stato aggiunto un nuovo controllo.

Dopo l'implementazione di questa patch, il controllo quando un Contesto di Attivazione (ACTX) viene registrato può essere bypassato solo se il processo che aggiunge la nuova voce nella cache ha lo stesso RID o un RID superiore rispetto al processo che la utilizzerà.

In winnt.h possiamo vedere i valori RID:

La proposta per bypassare questo controllo è creare una richiesta con un Contesto di Attivazione dal processo CTFMON in cui viene eseguita la DLL modificata. Questa DLL modificata ha RID=0x3000 e dopo che la voce è stata aggiunta alla cache, TCMSETUP con RID=0x3000 caricherà tapi32.dll.

Durante il mio tentativo di seguire i passaggi, ho fatto tutte le possibili combinazioni per registrare l'ACTX usando CreateActCtx. Questo si è rivelato impossibile poiché c'era sempre un controllo che lo evitava.

È importante notare che questa funzione si trova nello spazio utente, esportata da kernel32.dll. I controlli possono essere evitati applicando una patch alla DLL in memoria, che non è molto elegante, ma è possibile e dovrebbe funzionare.

La diapositiva della presentazione di Nicolas suggerisce di usare LOW LEVEL. Tuttavia, notando la faccina ammiccante, era chiaro che usare CreateActCtx non è l'opzione migliore quando si sfrutta questo bug senza una patch.

Utilizzo del Vettore di Attacco ALPC per Avvelenare la Cache di Attivazione

Una Chiamata a Procedura Locale Avanzata (ALPC) è un meccanismo di comunicazione tra processi utilizzato per inviare messaggi ad alta velocità all'interno del sistema operativo Windows. A differenza della API Windows standard, ALPC non è direttamente disponibile per le applicazioni. Invece, è un meccanismo interno accessibile solo dai componenti del sistema operativo Windows. (E da noi.)

Ulteriori ricerche mi hanno fatto notare che alcuni vecchi exploit di Avvelenamento della Cache utilizzavano ALPC per comunicare direttamente con il server. Un esempio può essere visto nell'articolo di Philip Tsukerman, Activation Contexts—A Love Story.

La funzione CsrClientCallServer implementa l'interfaccia ALPC tra i processi Win32 e il processo CSRSS.

Quindi, si dovrebbe tentare una chiamata al processo CSRSS che funge da server usando CsrClientCallServer .

Cercando esempi in vecchi exploit, ho trovato una pagina su Packet Storm riguardante un problema di heap buffer overflow rilevante.

Quando il server CSRSS viene chiamato con il pacchetto corretto, viene ricevuto nella funzione BaseSrvSxsCreateActivationContextFromMessage, che appartiene al modulo sxssrv.dll.

La funzione ha un solo argomento: il puntatore al pacchetto ricevuto. Per fare reverse engineering, ho creato una struttura TotalMessage personalizzata.

Il pacchetto della struttura TotalMessage ha i primi 0x40 byte di HEADER, seguiti dal Messaggio del Contesto di Attivazione incorporato, la cui struttura è _BASE_SXS_CREATE_ACTIVATION_CONTEXT_MSG.

La struttura TotalMessage può essere vista qui sotto:

Ed ecco la struttura _BASE_SXS_CREATE_ACTIVATION_CONTEXT_MSG:

All'interno di questa struttura ci sono sei UNICODE_STRINGS corrispondenti alla lingua o CultureFallbacks, AssemblyDirectory, TextualAssemblyIdentity, AssemblyName, e due strutture _BASE_MSG_SXS_STREAM che contengono ciascuna un UNICODE_STRING al loro interno.

Qui sotto c'è la struttura _BASE_MSG_SXS_STREAM:

Data la difficoltà nel creare un pacchetto valido accettato dal server, vale la pena dettagliare come farlo.

Il valore del campo Flags all'interno di _BASE_SXS_CREATE_ACTIVATION_CONTEXT_MSG è molto importante poiché ci sono molte combinazioni. Senza il valore corretto del flag, non è possibile sfruttare il bug.

Ad esempio, prendiamo il codice della mia MsCtfMonitor.dll. Dopo molti tentativi, ho concluso che l'unico valore corretto dei flags per questo sfruttamento del bug è 0x41:

La combinazione di valori diversi potrebbe risultare in un valore errato del flag del percorso:

La stessa struttura TotalMessage avrà un'intestazione con dimensione=0x40 byte. I restanti 0x1f8 byte sono riservati per la struttura _BASE_SXS_CREATE_ACTIVATION_CONTEXT_MSG:

struct TotalMessage

{

signed __int64 pad[8];

_BASE_SXS_CREATE_ACTIVATION_CONTEXT_MSG message;

};

La dimensione per l'allocazione è 0x40+0x1f8:

Ho quindi assemblato le stringhe ed eseguito un Contesto della Cache di Attivazione per tapi32.dll. Si tratta di una DLL molto usata raramente che viene caricata da un processo chiamato TCMSETUP. Ha un LIVELLO DI INTEGRITÀ A PRIVILEGI ELEVATI (RID=0x3000) con gli stessi privilegi di un Amministratore.

Nel mio codice DLL, viene chiamata la funzione CaptureUnicodestring. Questa finisce per chiamare CsrCaptureMessageString:

NTSTATUS CaptureUnicodeString(LPVOID CaptureBuffer, PSTR OutputString,

PCWSTR String, ULONG Length = 0) {

if (Length == 0) {

Length = lstrlenW(String);

}

return CsrCaptureMessageString(CaptureBuffer, (PCSTR)String, Length * 2,

Length * 2 + 2, OutputString);

}

Questo passaggio è necessario per preparare correttamente il pacchetto, consentendo al sistema di copiare le stringhe del mio pacchetto nel processo CSRSS. Ciò mantiene valide le stringhe e sostituisce i miei puntatori con puntatori validi nel suo contesto.

Ho anche aggiunto un manifest XML incorporato, con la lingua "Tasks" al suo interno. Questa è una lingua inesistente, ma sarà la chiave per lo sfruttamento (Grazie a Nico per questo):

Un altro dettaglio importante nel mio codice è quando viene creato CaptureBuffer. La funzione CsrAllocateCaptureBuffer ha un argomento che definisce quante UNICODE_STRINGS deve gestire e copiare sul server.

Nel mio caso ho usato "4" stringhe:

L'argomento con valore "4" è mostrato qui sotto:

Per raggiungere il server di attivazione, la funzione CsrClientCallServer invierà il mio pacchetto dalla mia MsCtfMonitor.dll con lo stesso ApiNumber 0x1001001E dei vecchi exploit menzionati sopra.

Il blog di Geoff Chappell fornisce maggiori dettagli su CsrClientCallServer:

Ecco la chiamata a CsrClientCallServer:

Ed ecco il pacchetto da inviare, creato nella mia DLL:

Il valore Manifest.Offset punta al mio Manifest XML incorporato:

Un comando interessante per registrare il processo di attivazione è sxstrace, che viene utilizzato in una console amministratore all'interno del target.

Questo comando abilita la tracciatura e salva i risultati del log in sxstrace.etl. (Premere INVIO per finalizzare la tracciatura.)

sxstrace trace -logfile:sxstrace.etl

Il file sxstrace.etl grezzo può quindi essere convertito in un formato leggibile:

sxstrace parse -logfile:sxstrace.etl -outfile:sxstrace.txt

Il Sistema Accetta il Nostro Contesto di Attivazione?

Se il pacchetto è corretto, dovrebbe raggiungere la funzione BaseSrvSxsCreateActivationContextFromMessage nel modulo sxssrv del processo csrss. Quindi, durante il debug del kernel remoto, il contesto deve essere cambiato su questo processo. Quindi, i simboli della modalità utente devono essere ricaricati per posizionare un breakpoint su di esso:

Ho usato IDA PRO per il debug del kernel con il plugin Windbg:

Una volta che si ferma su BaseSrvSxsCreateActivationContextFromMessage, RCX punterà alla struttura TotalMessage:

Dopo i primi 0x40 byte di HEADER (riempiti dal sistema con alcuni valori come il PID del processo client, ecc...), il mio messaggio di attivazione che appartiene alla struttura _BASE_SXS_CREATE_ACTIVATION_CONTEXT_MSG può essere visto:

Notare che i puntatori alle stringhe non hanno lo stesso valore di quando li ho inviati:

Ma puntavano correttamente alle stringhe:

Quando il pacchetto è stato inviato dal client al server, il sistema ha copiato le stringhe dal mio processo al processo CSRSS e ha cambiato i puntatori nel mio pacchetto per renderli validi nel suo contesto.

Successivamente, la funzione BaseSrvSxsCreateActivationContextFromMessage controlla se le stringhe sono valide.

In un ciclo controlla sei stringhe, ma supera perfettamente il controllo. Nel mio caso ho passato solo quattro stringhe e le altre due sono zero.

Dopo altri controlli minori, chiama BaseSrvSxsCreateActivationContextFromStructEx, che è la funzione più importante nel processo di attivazione:

Come si Avvelena la Cache di Attivazione?

Una volta arrivati a BaseSrvSxsCreateActivationContextFromStructEx, r8 punterà a _BASE_SXS_CREATE_ACTIVATION_CONTEXT_MSG, che è il messaggio di attivazione:

Valuta il valore dei flag. Nel mio caso, il valore era 0x41 contro 0xD:

La funzione test può essere bypassata usando l'opzione flag che corrisponde alla convalida dell'architettura del processore (1).

Successivamente, ottiene il RID del processo chiamante e lo memorizza per un successivo confronto. In questo caso, il RID è 0x3000 poiché CTFMON ha LIVELLO DI INTEGRITÀ ALTA.

La parte più importante di questa funzione è la chiamata a BaseSrvActivationContextCacheLookupEntry:

Cerca nella Cache del Contesto di Attivazione per determinare se esiste una voce per tapi32.dll.

Chiama una funzione denominata BaseSrvActivationContextCacheCompareEntries, che confronta alcune parti della Voce del Messaggio di Attivazione con tutte le voci esistenti nella cache:

Confronta il valore LastWriteTime inviato nel mio pacchetto con lo stesso valore in tutte le voci.

Avevo precedentemente calcolato questo valore usando GetFileTime su tapi32.dll e lo avevo inviato all'interno del mio pacchetto di attivazione:

Poiché non esiste una voce per tapi32.dll, i confronti non corrisponderanno. Come previsto, restituisce l'errore 0xC0000225. Successivamente controllerà il mio ACTX per vedere se è adatto per essere aggiunto alla cache:

Il server deve leggere il mio manifest XML incorporato e l'indirizzo Manifest.Offset che vi puntava. Tuttavia, in questo nuovo contesto, non è ancora un puntatore valido. Vale la pena posizionare un breakpoint su questo valore per vedere come e quando il mio manifest XML incorporato viene letto usando questo valore.

Come viene letto il mio Manifest XML Incorporato?

Per verificare dove CSRSS legge il mio manifest XML incorporato che è stato inviato nella mia richiesta ACTX, è necessario posizionare breakpoint su Manifest.Offset. Inoltre, è necessario aggiungere breakpoint ogni volta che si ferma, se copia in un altro indirizzo.

Si ferma sul breakpoint durante la lettura dell'indirizzo del valore Manifest.Offset.

Utilizzerà questo indirizzo per leggere il mio manifest XML incorporato dal processo CTFMON usando NtReadVirtualMemory, poiché l'indirizzo inserito nel campo Manifest.Offset appartiene a quel contesto:

Il mio manifest XML incorporato viene letto e copiato nel buffer di destinazione:

Passare al contesto del processo CTFMON e verificare che il mio Manifest XML incorporato sia all'indirizzo Manifest.Offset che ho inviato in precedenza. Nel mio caso, era 0x7ff93a261470.

Il Manifest XML incorporato letto viene chiamato da SxSGenerateActivationContext. Poiché non viene trovato in nessuna voce valida nella cache, tenta di "generarlo" usando il manifest incorporato:

Da lì, inizia l'analisi del mio Manifest XML incorporato.

Come viene analizzato il Manifest XML Incorporato?

Guardando nell'ultima call stack, ho deciso di posizionare un breakpoint nella chiamata a RtlReadOutOfProcessMemoryStream per fermarmi quando il buffer era completamente riempito.

Ora è possibile posizionare un breakpoint sull'accesso alla stringa "Tasks" per fermarsi quando viene letta o elaborata dal server.

Ecco la stringa tasks all'interno del manifest XML incorporato:

Si ferma diverse volte durante la lettura e la copia:

Si ferma in CharEncoder::wideCharFromUtf8 quando converte la stringa "tasks" in caratteri wide:

Si ferma quindi nel parser XML:

Continua l'analisi degli attributi XML, come suggerisce il nome della funzione parseAttributes.

Quindi, si ferma in memcpy chiamato da ValidateElementAttributes:

È possibile posizionare un altro breakpoint dove copia:

Convalida l'attributo lingua, come suggerisce il nome della funzione SxspValidateLanguageAttribute:

Si ferma di nuovo in memcpy ma questa volta è chiamato da SxspCreateAssemblyIdentityfromIdentityElement:

Ancora una volta, si ferma in memcpy, questa volta chiamato da SxsInsertAssemblyIdentityAttribute+0xc48:

Then it stops in SxsInsertAssemblyIdentityAttribute:

It calls memcpy a final time, in this instance from BufferedStream::prepairForInput:

It then reads the string tasks here:

Then, it reads it from here:

It continues reading from here:

The names of these functions caught my attention. In the name ProbingCandidate, it includes the same words (probing manifests) used in the SXS txt log file.

It stops again here:

Next, it uses GetFileAttributesExW to check if the first file mentioned in the SXS txt log exists**.** Since it does not exist, it returns zero.

The order of the file check can be seen in the log file:

The second file does not exist because it is the path in the tasks folder to tapi32.dll:

From there, it seems to be “probing” for tapi32.manifest in tasks:

Then it reaches CProbedAssemblyInformation::ProbeManifestExistence:

It checks if my manifest file exists in tasks folder. Since it does exist, it returns no error:

Well, the tapi32.manifest in the “tasks” folder was found.

The server was forced to search for a manifest file in the “tasks” subfolder of system32 by my embedded XML manifest with the “tasks” language value inside:

If breakpoints continue to be placed to see where it uses the path, it stops in EncodingStream::Read where the tapi32.manifest file content is read.

Next, it will parse the TAPI32.manifest file content. If there is an error it will show it in the SXS TRACE log, which makes it easier to correct.

If my TAPI32.manifest file is parsed correctly, it will return to BaseSrvSxsCreateActivationContextFromStructEx without error. This avoids printing a message with the string FAILED.

In my case, the Activation Context Generation was successful, using my TAPI32.manifest file**.**

I then reached the call where my entry will be inserted into the cache.

It is passed without any problem, returning zero. This is the correct value and the entry with the crafted TAPI32.manifest on it is successfully inserted.

My entry is included in the Activation cache and the server returns an OK response to the call from the DLL from CTFMON.

The log txt file shows the complete process.

It reads the embedded XML manifest. Since its language is "Tasks" it searches for a new manifest file in the "Tasks" subfolder of system32, just as it would search for a manifest in the subfolder of system32 called "en-us" if the language was set to "en-us."

The SXS log txt file shows the message “Activation Context generation succeeded”!

How Did My Fake imm32.dll End Up Loaded?

A pair of boxing gloves Description automatically
generated

After my ACTX entry is added to the cache, if tcmsetup.exe is run, it will load tapi32.dll, and it should use my manifest file to load imm32.dll.

However, it is not that simple, as it cannot load imm32.dll because there are some checks that can prevent it from loading.

The checks are done on a posterior call to the same BaseSrvSxsCreateActivationContextFromStructEx function, so remove all the breakpoints and leave just one on it.

From there we can run TCMSETUP.EXE from a console, although my PoC executes TCMSETUP from MsCtfMonitor.dll after the Activation Cache poisoning is completed:

It stops on the breakpoint many times. Every time it stops, look at the structure pointed by r8 to see if it corresponds to a request related to tapi32.dll.

After many stops for other modules, a request for TCMSETUP.exe appears:

We see in the call stack that it comes from the moment the process is created. It is called to check if it has any entry in the activation cache for TCMSETUP.

Keep it running until the call arrives for TAPI32.dll. Before this occurs, there will be several calls for TCMSETUP.

Finally, the packet that arrives must be very similar to the one made previously from my DLL when I inserted the entry in the cache. However, now it stops when TCMSETUP tries to load TAPI32.dll.

At this point I noticed some important values in this package.

Extending from the beginning of the _BASE_SXS_CREATE_ACTIVATION_CONTEXT_MSG structure 0x40 bytes upwards, assign the TotalMessage structure. The PID of the process that makes the request for TAPI32.dll is TCMSETUP since it wants to load the DLL.

Changing the context to the TCMSETUP process, the Manifest.Offset value can be seen pointing to some embedded XML manifest.

Open tapi32.dll in NOTEPAD to see that the received XML embedded manifest is the same as the one included in the file.

TCMSETUP reads the file resource previously to read the manifest and put it in the packet as the embedded XML manifest.

After that, the comparison is performed again by the BaseSrvActivationContextCacheCompareEntries function, which is called from BaseSrvSxsCreateActivationContextFromStructEx. Now my entry for tapi32.dll is also in the cache.

BaseSrvActivationContextCacheCompareEntries is called within a cycle to compare the actual request with every entry of the Activation Context Cache (as is mine).

At first it compares both LastWriteTime values, as they are equal, it continues comparing more values.

This LastWriteTime value is crucial. If there are different values it will discard my cached entry and my imm32.dll will not be loaded.

It goes ahead and stops at the next check.

Now, it checks the ResourceName value which must be 0x7c in both.

Then it compares the language of the actual ACTX packet, which is "en-us", with the language of my cached entry. The language of my cached entry is also "en-us".

My package has the same language value:

Then, it compares the processor architecture, which in this instance will be 9 in both cases:

Then, it compares both Manifest.path.

I built the same path without hardcoding by using the System Directory value:

Then it compares the AssemblyDirectory, which is also the same:

If all comparisons are correct, it returns zero. This means that it found my entry in the activation cache and it will be used.

Remember that when I sent my request the first time to add the entry, the comparison returned an error since there was no entry in the cache for TAPI32.dll. Since my entry was previously added, now it returns zero.

After that, it compares RIDs of TCMSETUP with CTFMON, as both have RID = 0x3000 the process continues.

A full explanation of the RID patch is available in a blog from the Zero Day Initiative.

This is the code for this patch:

R15 has the RID of the caller TCMSETUP = 0x3000 and the buffer has stored the RID=0x3000 of the CTFMON process.

As was stated earlier, Microsoft added this RID check patch in October 2022.

After that patch has been implemented, if you want to try to add the tapi32.dll entry to the cache using the same MsCtfMonitor.dll from a MEDUIM INTEGRITY LEVEL PROCESS (0x2000) the entry will be added to the cache, but it will fail. This is because the RID of the caller process 0x2000 is stored and when you try to execute TCMSETUP with RID=0x3000 for load imm32, the RIDs are compared and the entry is removed.

In that hypothetical case, R15 will have the RID=0x3000 of the TCMSETUP process that requested to load tapi32.dll, the “buffer” variable will have stored the RID=0x2000 of the process that added the entry to the cache that has a MEDIUM INTEGRITY LEVEL.

On the newest versions of Windows, cache poisoning will not work if the process requesting the entry to be added is inferior to the executor and the entry is removed. Previous versions that were released prior to this patch will work without problems with any RID.

Returning to this case, the RID check is passed and both processes have the same RID=0x3000. Consequently, the entry is not deleted and it continues without any errors.

The server returns the response to TCMSETUP. When it loads tapi32.dll it will use my entry with the tapi32.manifest file, which will load imm32.dll from tasks folder.

This is the complete way from LoadLibrary to where TCMSETUP makes the request to the activation cache

when loading tapi32.dll.

BasepCreateActCtx is the one that makes its request to the CSRSS server. An attempt needs to be made to see when it ends up loading the IMM32.dll module.

Looking at kernel32.dll, it calls CsrBasepCreateActCtxCommon. Inside, there is a server call similar to the one made from my DLL to insert my cache entry.

It uses the same ApiNumber as mine.

When executing TCMSETUP, a breakpoint can be placed there when it returns from the server, after my tapi32.manifest file is accepted.

This is the entire call stack until the call to the server in CsrBasepCreateActCtxCommon is produced.

Breakpoints are placed on the return of some functions of the call stack.

When it stops, it can be observed that imm32.dll was loaded from the "tasks" folder:

Validation can be achieved using PROCESS MONITOR that TCMSETUP loads IMM32.dll from the "tasks" folder.

The just executed CMD process has HIGH privileges.

Also, it has the same privileges as Administrator.

With these privileges we can now install any program that needs elevation to administrator and write to any folder. For example, writing to SYSTEM32 or any program installation folder, as can be seen in the VIDEO DEMO below.

Here are the privileges previous to the exploitation (Integrity level Medium not Administrator):

And now here are the privileges after the exploitation (Integrity level High FULL Administrator):

At this point it is a good opportunity to easily elevate to SYSTEM, dropping some crafted DLL into a system folder.

Video Demo and PoC A cartoon of a tv with boxing gloves Description automatically generatedA gold medal with a red ribbon Description automatically generated

Watch the video here and the functional Proof of Concept is here

TL; DR: Brief description of exploitation steps

  • I sent a crafted ACTX message to the CSRSS server.

  • This ACTX message had an embedded XML Manifest with an offset that pointed to it.

  • When the server received it, it used that offset to read the embedded XML manifest from the CTFMON process context.

  • The embedded XML manifest was parsed. If accepted, it would try to load a second external manifest from an external folder.

  • The folder to read depended on the language field in the embedded XML manifest controlled by me.

  • In my case the embedded XML manifest had “tasks” as its language. For that reason, it searched in the “tasks” subdirectory of system32 for an external manifest and found it.

  • It parsed the tapi32.manifest file created by me, and accepted it, allowing it to load the external IMM32.dll from the same “tasks” folder.

Thanks to Nicolas Economou as his presentation was the starting point for my research and the publication of this blogpost.

Ricardo Narvaja

Scarica lo strumento