
An AWS tool to help you create a point in time assessment of your AWS account using Prowler.
Cybersecurity remains a very important topic and point of concern for many CIOs, CISOs, and their customers. To meet these important concerns, AWS has developed a primary set of services customers should use to aid in protecting their accounts. Amazon GuardDuty, AWS Security Hub, AWS Config, and AWS Well-Architected reviews help customers maintain a strong security posture over their AWS accounts. As more organizations deploy to the cloud, especially if they are doing so quickly, and they have not yet implemented the recommended AWS Services, there may be a need to conduct a rapid security assessment of the cloud environment.
We have developed an inexpensive, easy to deploy, secure, and fast solution to provide our customers with a security assessment report. These reports are generated using the open source project Prowler. Prowler performs point in time security assessment based on AWS best practices and can help quickly identify any potential risk areas in a customer’s deployed environment. If you are interested in conducting these assessments on a continuous basis, AWS recommends enabling Security Hub’s Foundational Security Best Practices standard. If you are interested in integrating your Prowler assessment results with Security Hub, you can follow the instructions in the .
Note: Prowler is not an AWS owned solution. Customers should independently review Prowler before running this solution. Any dependencies associated with Prowler should be kept up to date. This solution installs a pinned version of Prowler (currently 5.41.0) from the pip package installer, so that a change to Prowler's output format cannot break a scan without warning. To move to a newer release, edit the
pip3 install prowler==line in2-sat2-codebuild-prowler.yaml.
📕 For more in depth step-by-step instructions, visit module 2 in the SHIP Workshop.
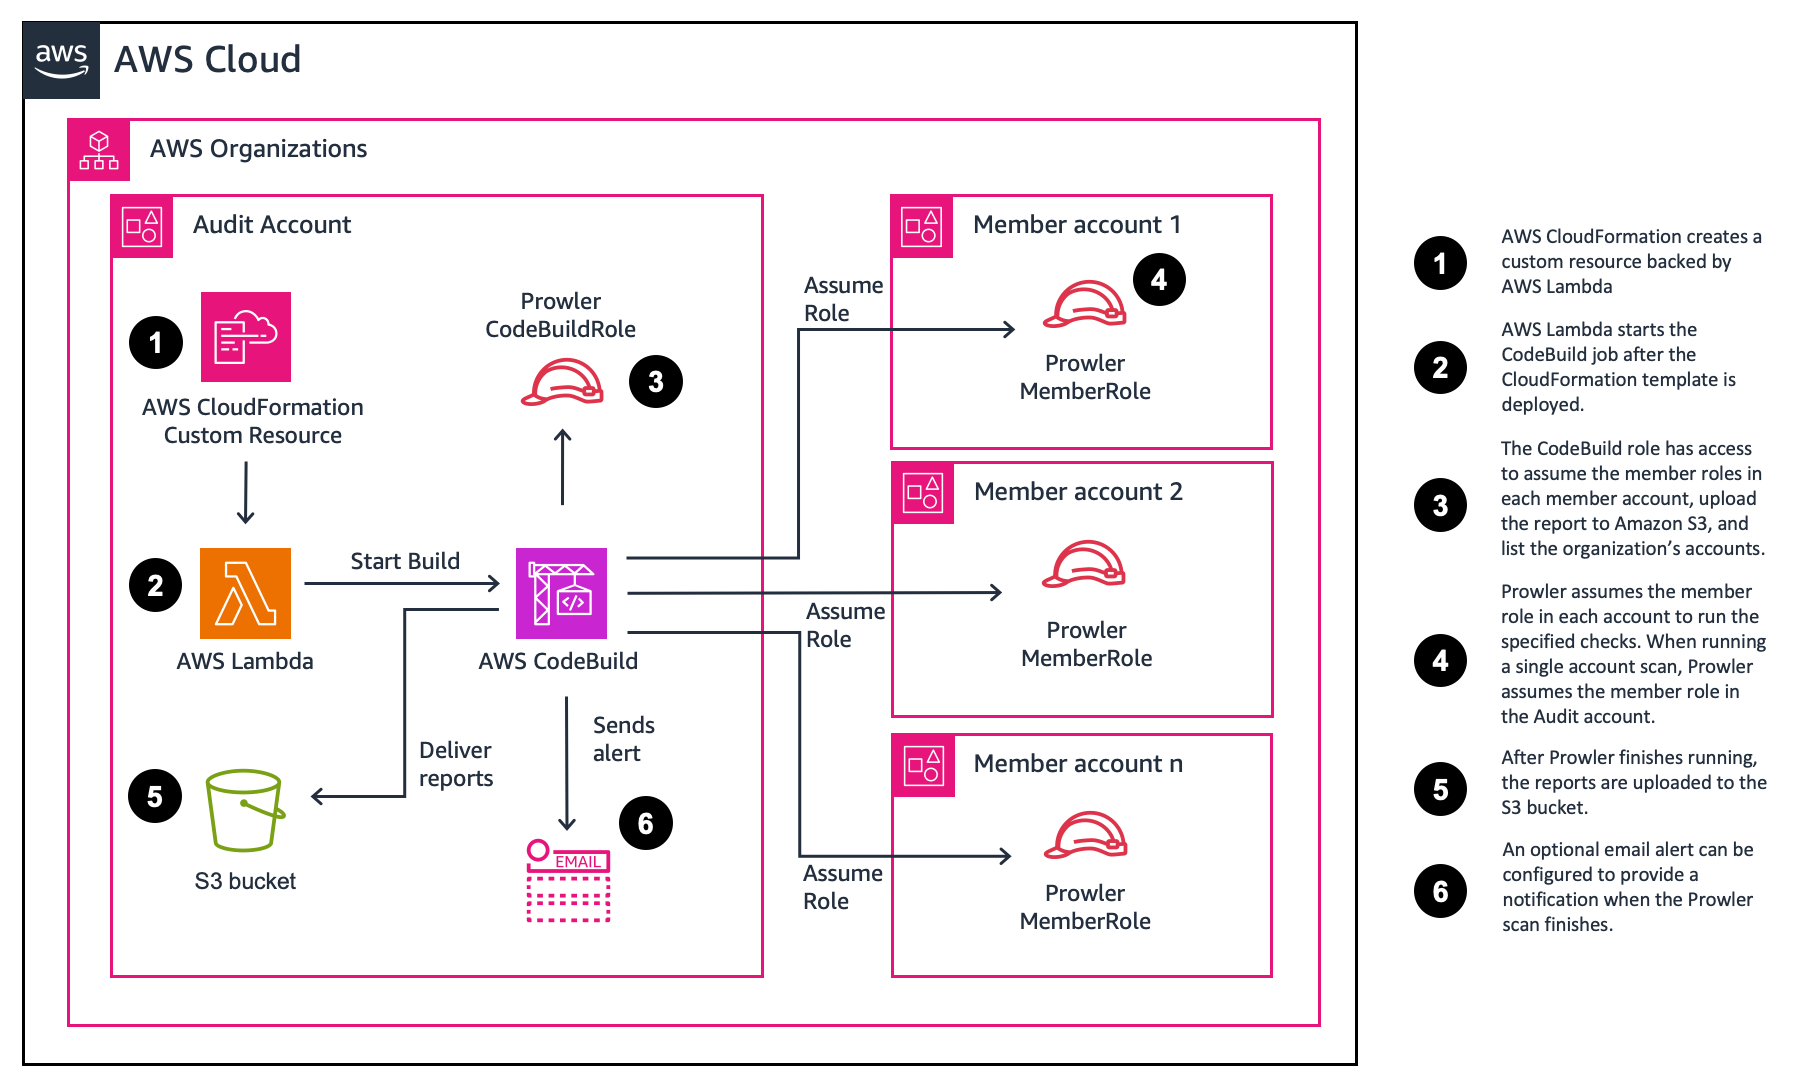
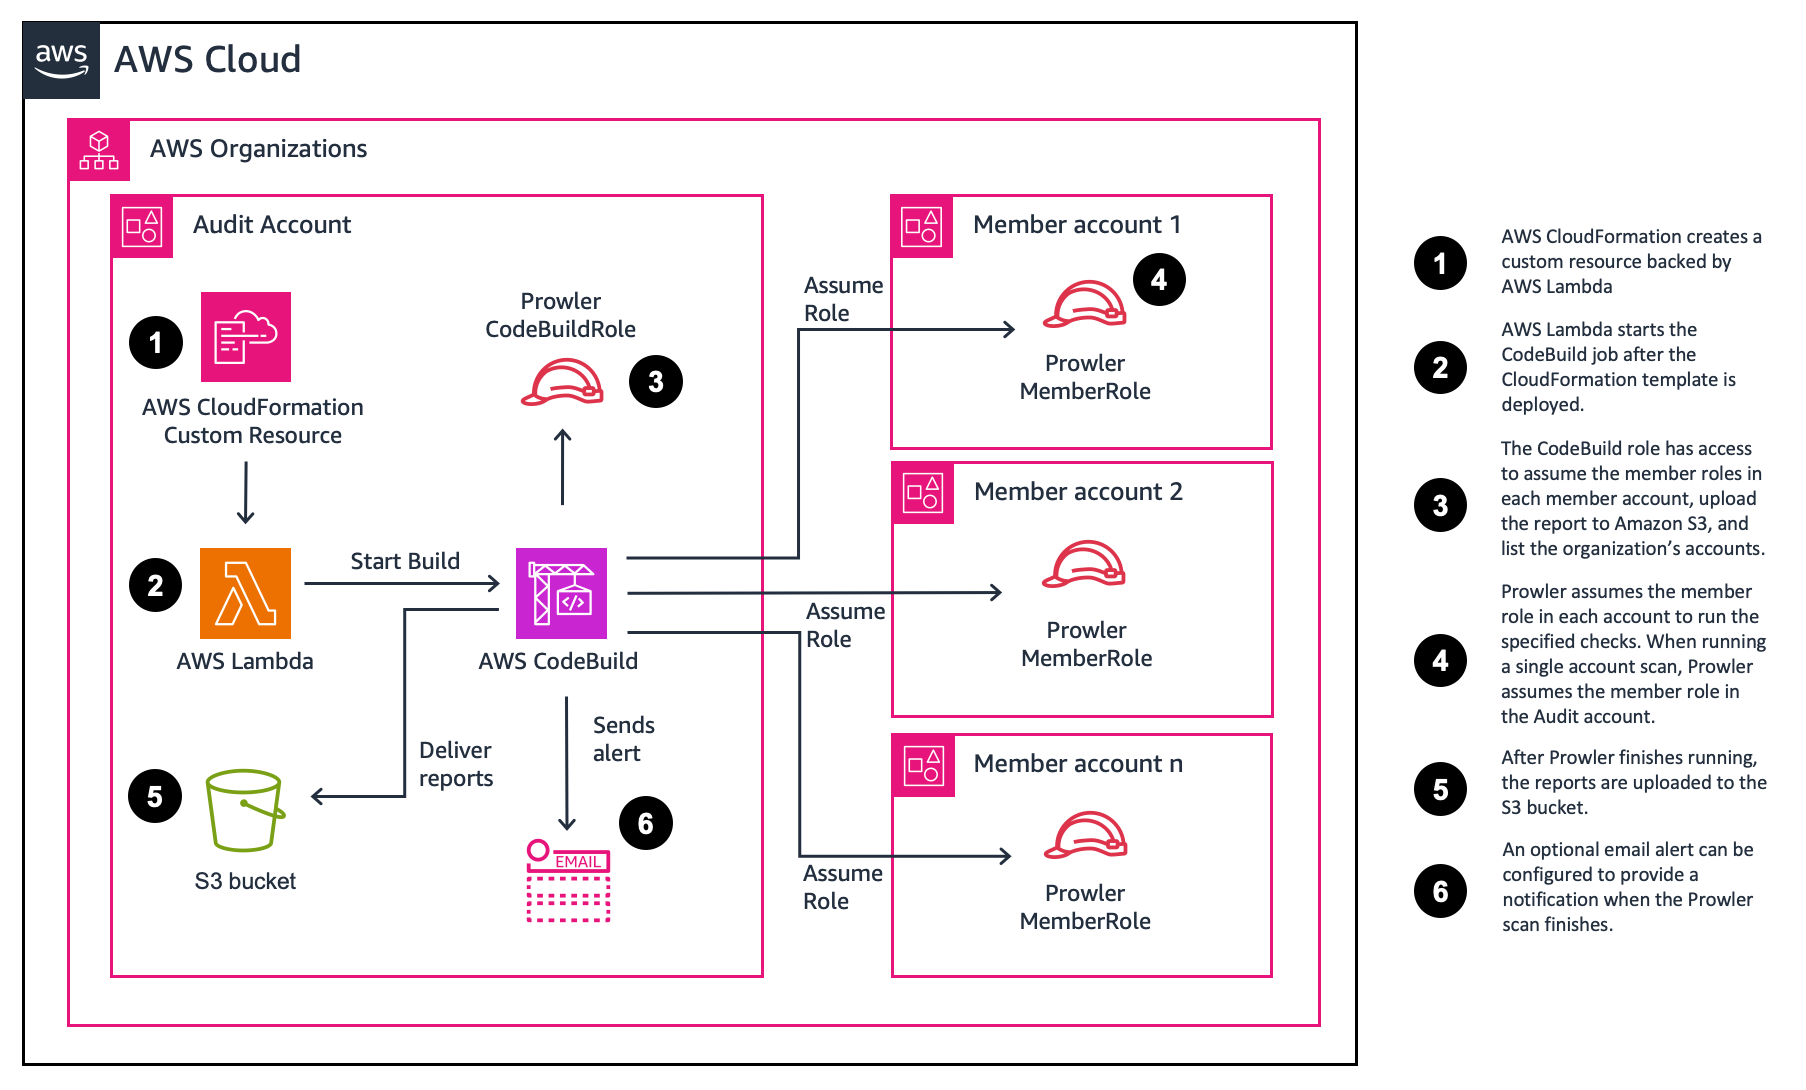
The solution is deployed with AWS CloudFormation. When deployed, an AWS CodeBuild project and an Amazon S3 bucket to store the Prowler generated reports are created. An AWS Lambda function is then used to start the AWS CodeBuild project.
The parameter (user input) defaults will run a basic scan in a single account. However, you can choose different parameters to run more extensive scans or to scan multiple accounts. The deployment process takes less than 5 minutes to complete. The solution’s AWS CloudFormation templates are provided for review in this Github repository.
Once the template is deployed, the CodeBuild project will run. The default assessment takes around 5 minutes to complete. The time to complete a security assessment will vary depending on the number of resources and the scan options selected. At the end of the assessments the reports are delivered to the created S3 Bucket.

SATv2 can be customized by updating the CloudFormation parameters. This section summarizes the available options and provides a link to the section with more information.
| Parameter | Description | More information |
|---|---|---|
| ProwlerScanType | Specify which type of scan to perform. Selecting full without specifying different ProwlerOptions will do a full scan. To perform a specific check, choose Full and append -c to ProwlerOptions. | Scan types |
| MultiAccountScan | Set this to true if you want to scan all accounts in your organization. You must have deployed the prerequisite template to provision a role, or specify a different ProwlerRole with the appropriate permissions. | Multi-account scan |
| Reporting | Set this to true if you want to summarize the Prowler reports into a single csv. This is helpful when scanning multiple accounts. | Reporting Summary |
| EmailAddress | Specify an address if you want to receive an email when the assessment completes. | Notifications |
| Advanced Parameters | ||
| ConcurrentAccountScans | For multi-account scans, specify the number of accounts to scan concurrently. This is useful for large organizations with many accounts. Selecting more than three changes the size of the CodeBuild instance and may incur additional costs. | |
| CodeBuildTimeout | Set the timeout for the CodeBuild job. The default is 300 minutes (5 hours). | |
| MultiAccountListOverride | Specify a space delimited list of accounts to scan. Leaving this blank will scan all accounts in your organization. Ensure that you have set MultiAccountScan parameter above to true if you want to scan specific accounts. If you can't provide delegated ListAccount access, you can provide the MultiAccountListOverride parameter. | Multi-account scan |
| ProwlerOptions | Specify the parameters for Prowler. The --role and ARN will automatically be added to the end of the parameters you specify. This can also be used to specify a single check. | Full scan |
| ProwlerRole | The role that Prowler should assume to perform the scan. Change this if you want to specify your own role with different permissions. |
You can use this project to run Prowler across multiple accounts in an AWS Organization, or a single account. We provide instructions to use AWS CloudShell or the AWS console. Choose an option to get started.
To run the Self-Service Security Assessment solution (SATv2) against a single account, follow the instructions below. You can choose to use the AWS CLI or the AWS Console.
Login to your AWS account.
In the navigation bar, choose AWS CloudShell.
To download the CloudFormation template, enter the following command.
wget https://raw.githubusercontent.com/awslabs/aws-security-assessment-solution/main/2-sat2-codebuild-prowler.yaml
To create an S3 bucket to stage the template, enter the following commands. The template is larger than 51,200 bytes, so CloudFormation requires it to be uploaded to S3 rather than passed inline.
TEMPLATE_BUCKET=sat2-cfn-templates-$(aws sts get-caller-identity --query Account --output text)-$AWS_REGION
aws s3 mb s3://$TEMPLATE_BUCKET --region $AWS_REGION
To deploy the CloudFormation template, enter the following command. The --s3-bucket option uploads the template to the bucket before creating the stack.
aws cloudformation deploy --template-file 2-sat2-codebuild-prowler.yaml \
--stack-name sat2 \
--capabilities CAPABILITY_NAMED_IAM \
--s3-bucket $TEMPLATE_BUCKET
After the stack is created, you can delete the staging bucket. It is only used to hand the template to CloudFormation.
aws s3 rb s3://$TEMPLATE_BUCKET --force
Self-Service Security Assessment solution (SAT) also supports multi-account scans. You must deploy a prerequisite role to each account you want to perform the scan on. To run SATv2 for multiple accounts, follow the instructions below. You can choose to use the AWS CLI or the AWS Console.
These instructions assume you already have the prerequisites for stack set operations. For more information, visit the AWS CloudFormation User Guide.
Note: StackSets don't apply to the management account. To assess the management account, deploy the 1-sat2-member-role as a CloudFormation Stack.
Login to your AWS Management account.
In the navigation bar, choose AWS CloudShell.
Identify which account you will run the Prowler scan from. Customers typically use a security tooling account, or audit account. Take note of the account ID for the ProwlerAccountID parameter.
To download the CloudFormation template, enter the following command.
wget https://raw.githubusercontent.com/awslabs/aws-security-assessment-solution/main/1-sat2-member-roles.yaml
Deploy the CloudFormation template via CloudFormation StackSets. Update the following parameters:
aws cloudformation create-stack-set --template-body file://1-sat2-member-roles.yaml \
--stack-set-name sat2-member-roles \
--permission-model SERVICE_MANAGED \
--auto-deployment Enabled=true,RetainStacksOnAccountRemoval=false \
--capabilities CAPABILITY_NAMED_IAM \
--parameters ParameterKey=ProwlerAccountID,ParameterValue=<aws-account-id> \
--region <region>
Use the following command to create stack instances for each account in your organization. You can target a specific OU, or the root OU. Update the following parameters:
aws cloudformation create-stack-instances --stack-set-name sat2-member-roles \
--deployment-targets OrganizationalUnitIds='["<root-ou>"]' \
--regions '["<region>"]' \
--operation-preferences FailureTolerancePercentage=100,MaxConcurrentPercentage=100 \
--region <region>
Determine if you have delegated admin or a resource policy that already exists for your Prowler account. Only one option is needed and resource policy is encouraged as it is more granular.
Note: Resource policies are not available in GovCloud, so you will need to use a delegated admin.
7a. Your Prowler account might already have a delegation. You can use the following commands to check:
aws organizations list-delegated-administrators
7b. Your Prowler account might already have a resource policy. You can use the following commands to check:
aws organizations describe-resource-policy
If you don't have a delegated admin or a resource policy you can use the following commands to add the appropriate access.
Note: If you can't provide delegated ListAccount access, you can provide the MultiAccountListOverride parameter in the
2-sat2-codebuild-prowler template.
Note: If you are using GovCloud, use step 8a to create a delegated admin. If you are using a commercial region, use step 8b to provide least privilege access to ListAccounts.
8a. Use the following command to delegate an admin if you do not already have one. Replace <aws-account-id> with the account ID you will run Prowler from.
aws organizations register-delegated-administrator <aws-account-id>
8b. Use the following commands to add a resource policy.
Replace <aws-account-id> with the account ID you will run Prowler from.
aws organizations put-resource-policy --content \
'{
"Version": "2012-10-17",
"Statement": [
{
"Sid": "Statement",
"Effect": "Allow",
"Principal": {
"AWS": "arn:aws:iam::<aws-account-id>:root"
},
"Action": [
"organizations:ListAccounts",
"organizations:DescribeAccount",
"organizations:ListTagsForResource",
"organizations:ListParents",
"organizations:DescribeOrganizationalUnit"
],
"Resource": "*"
}
]
}'
Note:
ListParentsand are what fill in the and columns in the findings. Omit them and the rest of the scan still works, but those two columns come back empty.
Note: Make sure you switched to the account you specified will run Prowler.
To download the template, open AWS CloudShell in the Prowler account and enter the following command.
wget https://raw.githubusercontent.com/awslabs/aws-security-assessment-solution/main/2-sat2-codebuild-prowler.yaml
To create an S3 bucket to stage the template, enter the following commands. The template is larger than 51,200 bytes, so CloudFormation requires it to be uploaded to S3 rather than passed inline.
TEMPLATE_BUCKET=sat2-cfn-templates-$(aws sts get-caller-identity --query Account --output text)-$AWS_REGION
aws s3 mb s3://$TEMPLATE_BUCKET --region $AWS_REGION
To deploy the template in the Prowler account. Set MultiAccountScan to true to scan all the accounts in your organization. The --s3-bucket option uploads the template to the bucket before creating the stack.
aws cloudformation deploy --template-file 2-sat2-codebuild-prowler.yaml \
--stack-name sat2-prowler \
--capabilities CAPABILITY_NAMED_IAM \
--s3-bucket $TEMPLATE_BUCKET \
--parameter-overrides MultiAccountScan=true
After the stack is created, you can delete the staging bucket. It is only used to hand the template to CloudFormation.
aws s3 rb s3://$TEMPLATE_BUCKET --force
Download the 1-sat2-member-roles.yaml and 2-sat2-codebuild-prowler.yaml files.
Deploy the CloudFormation template via CloudFormation StackSets. Update the following parameters:
Navigate to the AWS CloudFormation console.
In the navigation pane, choose StackSets.
Choose Create StackSet.
For Permissions, leave Service-managed permissions selected.
Under Specify template, select Upload a template file.
Choose 1-sat2-member-roles.yaml you downloaded in step 1-1.
Choose Next.
For Stack name, enter sat2-member-role.
For Parameters, enter the following:
Choose Next.
On the Configure StackSet options page, choose Next.
On the Set deployment options, enter the following:
Choose Next.
On the Review page, select the box I acknowledge that AWS CloudFormation might create IAM resources. and choose Submit.
Determine if you have delegated administrator or a resource policy that already exists for the account you wish to deploy Prowler in. It is recommended that you run Prowler from your security tooling (Audit) account. To update or verify that the audit account has permissions to ListAccounts, follow these steps.
Navigate to the AWS Organization console.
In the navigation pane, choose Settings.
For Delegated administrator for AWS Organizations, include the following statement.
{
"Version": "2012-10-17",
"Statement": [
{
"Sid": "Statement",
"Effect": "Allow",
"Principal": {
"AWS": "arn:aws:iam::<aws-account-id>:root"
},
"Action": [
"organizations:ListAccounts",
"organizations:DescribeAccount",
"organizations:ListTagsForResource",
"organizations:ListParents",
"organizations:DescribeOrganizationalUnit"
],
"Resource": "*"
}
]
}
Note:
ListParentsandDescribeOrganizationalUnitare what fill in theaccount_ou_uidandaccount_ou_namecolumns in the findings. Omit them and the rest of the scan still works, but those two columns come back empty.
Navigate to the AWS CloudFormation console in the account you will run the tool from (ProwlerAccountID).
In the navigation pane, choose Stacks.
Choose Create stack.
Under Specify template, select Upload a template file.
Choose 2-sat2-codebuild-prowler.yaml you downloaded in step 1-1.
Choose Next.
For Stack name, enter sat2-prowler.
In the Parameters section, for MultiAccountScan, select true.
You can optionally enable reporting to get a summary of all accounts in a single csv file. For Reporting, select true.
Choose Next.
On the Configure stack options page, choose Next.
On the Review SAS page, select the box I acknowledge that AWS CloudFormation might create IAM resources. and choose Submit.
After the solution is deployed, a Lambda function starts the CodeBuild project. After the CodeBuild project is finished building, the Prowler results will be uploaded to the created Amazon S3 bucket. If you configured notifications, you will get an email when the Prowler scan is complete. If you configured reporting, you will have a consolidated csv file in the /reports folder.
If you didn't configure email alerts, you can monitor the progress from the CodeBuild console.
To review the results, follow these steps.
Navigate to the Amazon S3 console in the account you deployed Prowler.
Select the bucket that starts with sat2-prowler-prowlerfindingsbucket-
Choose the folder for the output format you want, then the scan_date= and scan_time= folders for the run you want to review.
Each output format has its own top level folder, and every run writes into a scan_date=YYYY-MM-DD/scan_time=HHMMSS subfolder beneath it. The time is the UTC time the scan started:
csv/scan_date=2026-09-01/scan_time=204955/ Prowler's CSV findings, as written
html/scan_date=2026-09-01/scan_time=204955/ per-account HTML reports
json/scan_date=2026-09-01/scan_time=204955/ per-account JSON
ocsf-json/scan_date=2026-09-01/scan_time=204955/ per-account OCSF JSON
parquet/scan_date=2026-09-01/scan_time=204955/ the copy Athena queries
compliance/scan_date=2026-09-01/scan_time=204955/ compliance CSVs, when produced
reports/ consolidated CSV and dashboard
Every run gets its own folder, so running the solution again never mixes new findings in with old ones, including when you run it more than once on the same day. Previous runs are kept so you can compare them.
For each account, there will be 4 file types (csv, html, json, json-ocsf) in the format prowler-output-<aws-account-id>-<datetime>.
Select one of the html objects.
Choose Open.

A new window will open with your report. You can use the filters to identify and prioritize the findings.

If you enabled reporting, a static html dashboard will be in the reporting folder.
Note: Do not share your presigned URL with anyone. A presigned URL uses security credentials to grant time-limited permission to download objects. The URL can be entered in a browser or used by a program to download the object. The credentials used by the presigned URL are those of the AWS user who generated the URL. For more information, review Sharing objects with presigned URLs.
Prowler has a built in dashboard to review the results. To use the Prowler dashboard, Prowler must be installed locally and you must download the results of Prowler locally.
You must have the AWS Command Line Interface (CLI) and valid credentials. For more information, review the AWS Command Line interface user guide.
Install Prowler. For more information, review the Prowler installation instructions.
pip install prowler
Get the name of the Amazon S3 bucket. The name of the bucket is in the CloudFormation console as ProwlerFindingsBucket resource. Alternatively, navigate to the S3 console and look for a bucket in the format {stack_name}-prowlerfindingsbucket-{ID}
Download the CSVs and compliance data from S3. If you did not run a full scan, you may not have compliance data. Replace {bucket_name} with the name of your bucket, and {scan_date} and {scan_time} with the run you want to load, for example 2026-09-01 and 204955. To list the available runs, use aws s3 ls s3://{bucket_name}/csv/scan_date={scan_date}/.
aws s3 sync s3://{bucket_name}/compliance/scan_date={scan_date}/scan_time={scan_time}/ output/compliance/
aws s3 sync s3://{bucket_name}/csv/scan_date={scan_date}/scan_time={scan_time}/ output/
Note: Sync one run at a time. The Prowler dashboard reads
output/*.csvand does not search subfolders, so copying thescan_date=folders themselves intooutput/will produce an empty dashboard. Loading two runs at once would show each finding twice.
Run the dashboard. Use the following command to run the dashboard. By default, it will start on http://127.0.0.1:11666/.
prowler dashboard
By default, SAT2 will run a basic scan which includes 13 checks. You can choose to run an intermediate or full check by choosing a different ProwlerScanType parameter value.
For example, a single account scan using the intermediate scan option would use this command:
aws cloudformation deploy --template-file 2-sat2-codebuild-prowler.yaml \
--stack-name sat2-prowler \
--capabilities CAPABILITY_NAMED_IAM \
--s3-bucket $TEMPLATE_BUCKET \
--parameter-overrides ProwlerScanType=Intermediate
Note: The
--s3-bucketoption is required because the template is larger than 51,200 bytes, the maximum CloudFormation accepts inline.$TEMPLATE_BUCKETis the staging bucket created in the CloudShell deployment steps above. It applies to everyaws cloudformation deployexample in this README.
Checks are frequently added, to see the latest checks, run prowler aws --list-checks command. An example has been provided below for each check level.
To see a list of checks, review basic checks.
To see a list of checks, review intermediate checks.
This scan will add --severity critical high to the Prowler scan options. With this selected Prowler will run all security checks that result in critical or high severity.
To see a list of checks, review full checks.
This option doesn't add any additional parameters to the Prowler scan. It will result in Prowler running 500+ checks.
You can also use the full scan to customize the scan however you would like.
For ProwlerScanType choose Full.
For ProwlerOptions, append the check. For example, to check only if GuardDuty is enabled, enter:
aws --ignore-exit-code-3 -c guardduty_is_enabled
You can optionally specify an email address in the EmailAddress parameter when you deploy the CloudFormation template. This will create an SNS topic and send an email when the CodeBuild job completes.
This may be helpful when running longer scans, or across many accounts.
For example, a single account scan with email notifications would use this command:
aws cloudformation deploy --template-file 2-sat2-codebuild-prowler.yaml \
--stack-name sat2-prowler \
--capabilities CAPABILITY_NAMED_IAM \
--s3-bucket $TEMPLATE_BUCKET \
--parameter-overrides [email protected]
With or without the optional EmailAddress parameter set, you can view the progress in the CodeBuild console.
Navigate to the CodeBuild console.
In the navigation pane, under Build, choose Build projects.
Choose the Build project that begins with ProwlerCodeBuild-.
Under Build history, you will see the last run.

Optionally, you can choose Start build to run another scan with the options you choose when you deployed the solution.
You can optionally enable reporting to summarize multiple Prowler scan results into a single file. This may be helpful when running Prowler across multiple accounts in an AWS Organization. The reporting summary feature is off by default. To enable reporting, set the Reporting parameter to true when you deploy the CloudFormation template. This will create an Athena WorkGroup, a Glue table, and automatically run a query to consolidate the results. The summarized csv file is located in the same S3 bucket as the Prowler results in the /reports folder.
If you specify an email address while reporting is enabled, you will get a second email when the Athena query is finished.
Athena queries the parquet/ copy of the findings rather than Prowler's CSV. The CodeBuild project converts each CSV to Parquet before uploading it, and the Glue table prowler points at parquet/.
The conversion exists because Prowler 5.17.0 and later ship multi-line markdown in their check metadata, so the DESCRIPTION, RISK and REMEDIATION_* fields contain newlines. Prowler quotes those fields correctly, but Athena reads CSV through Hive's TextInputFormat, which splits records on newlines before any SerDe runs. A CSV-backed table therefore returns one row per physical line instead of one row per finding, and silently drops the columns that follow the first multi-line field. Parquet does not use newlines as record boundaries, so the text survives intact. Parquet also compresses the repeated remediation text heavily, which makes queries cheaper: a 116 MB set of CSVs becomes roughly 3 MB of Parquet.
The csv/ folder is left exactly as Prowler wrote it, so the Prowler dashboard and any existing CSV tooling keep working.
The table is partitioned on scan_date and scan_time, so every run of the solution gets its own partition. Two things follow from this:
/reports covers only the most recent run, so re-running the solution never double counts findings, and findings that no longer exist do not linger in the report.scan_date and scan_time are normal columns, so you can compare results between runs. The Prowler scan trend saved query does this, one row per run.Partitioning on the date alone is not sufficient. A second scan on the same day would write into the same partition, and its findings would be merged with the earlier run's rather than replacing them. Any finding that the newer scan no longer reports, because a resource was deleted, an account left the organization, a member role stopped working, or the scan type was narrowed, would still appear in the report and look current.
New partitions are registered automatically: the reporting Lambda runs MSCK REPAIR TABLE before it runs the consolidation query, so there is no crawler to schedule and nothing to add by hand.
If you write your own Athena queries, restrict them to a single run or you will aggregate every scan in the bucket at once. Both keys are fixed width, so comparing them concatenated orders runs chronologically:
SELECT severity, count(*)
FROM "{bucket_name}"."prowler"
WHERE status = 'FAIL'
AND concat(scan_date, scan_time) = (
SELECT max(concat(scan_date, scan_time)) FROM "{bucket_name}"."prowler"
)
GROUP BY severity
To query a whole day across all of its runs, filter on scan_date alone.
Note: If you are upgrading a deployment that used the earlier
scan_date-only layout, results from before the upgrade are not visible to the new table, because their S3 paths have noscan_time=level. The data is untouched in S3. Either let the next scan repopulate the table, or move the old files into ascan_time=folder, for exampleaws s3 mv s3://{bucket_name}/parquet/scan_date={scan_date}/ s3://{bucket_name}/parquet/scan_date={scan_date}/scan_time=000000/ --recursive, and then runMSCK REPAIR TABLE prowlerin Athena.
For example, a multi-account scan with reporting and email alerts enabled would use this command:
aws cloudformation deploy --template-file 2-sat2-codebuild-prowler.yaml \
--stack-name sat2-prowler \
--capabilities CAPABILITY_NAMED_IAM \
--s3-bucket $TEMPLATE_BUCKET \
--parameter-overrides MultiAccountScan=true Reporting=true [email protected]

Two saved queries are created as examples:
| Saved query | What it shows |
|---|---|
| Prowler organization summary | Failed checks across every assessed account, for the most recent scan. |
| Prowler scan trend | Failed checks per scan date and severity, to compare runs over time. |
To review and run a query, follow these steps:
Navigate to the Amazon Athena console.
Choose the workgroup that begins with sat2-prowler-*.
Choose the Saved queries tab.
Select the query you want to run by choosing the ID.

Choose Run to run the query.

| Check | Mitigation |
|---|---|
| Check if Lambda functions invoke API operations are being recorded by CloudTrail. | CloudTrail is an AWS account level configuration. CloudTrail should be enabled independent of SATv2. |
| Enable termination protection for Cloudformation Stacks | SATv2 is intended to be ran for a point in time, and then deleted. If the Stack is terminated, the findings are still retained in the S3 bucket. |
| Check if CloudWatch log groups are protected by AWS KMS. | Log group data is always encrypted in CloudWatch Logs. By default, CloudWatch Logs uses server-side encryption for the log data at rest. Customer managed KMS key is not configured to save on costs. |
| Check if CloudWatch Log Groups have a retention policy of specific days. | Log group retention is set to 7 days by design. This check looks for Log groups with retention less than a year. |
| Check if S3 buckets have KMS encryption enabled. | All Amazon S3 buckets have encryption configured by default, and objects are automatically encrypted by using server-side encryption with Amazon S3 managed keys (SSE-S3). Customer managed KMS key is not configured to save on costs. |
| Check if S3 bucket MFA Delete is not enabled. | Prowler assessment results can be regenerated and do not require MFA delete. |
| Check if S3 buckets have object lock enabled | Prowler assessment results can be regenerated and do not require S3 object lock. |
| Check if S3 buckets have server access logging enabled | Prowler assessment results do not require server access logging. |
After you run the solution, you should delete the CloudFormation Stacks to remove resources that are no longer needed. The S3 bucket with the Prowler scan results will remain.
To remove the security assessment solution from your account, follow these steps.
Navigate to the AWS CloudFormation console in the account you ran the tool from (ProwlerAccountID).
In the navigation pane, choose Stacks.
Choose the sat2-prowler Stack.
Choose Delete.
If you deployed the member role StackSet to scan multiple accounts, follow these steps.
Navigate to the AWS CloudFormation console in the account you created the member role StackSet.
In the navigation pane, choose StackSets.
Choose the sat2-member-roles StackSet.
Choose Actions, then Delete stacks form StackSet.
Specify the same AWS OU ID when you created the StackSet.
For Specify regions, choose Add all regions.
Choose Next, and Submit.
After change finishes, you can delete the StackSet.
Choose the sat2-member-roles StackSet.
Choose Actions, then Delete StackSet.
If you want to remove the Amazon S3 bucket with the scan results, follow the steps in the Amazon S3 user guide to delete the objects and bucket. If you run the solution again, a new S3 bucket will be created for your results.
See CONTRIBUTING for more information.
This project is licensed under the Apache-2.0 License.
DescribeOrganizationalUnitaccount_ou_uidaccount_ou_name