
 0xballpoint/load
Lord Of Active Directory - AWS पर स्वचालित असुरक्षित एक्टिव डायरेक्टरी


AWS-Redteam-Lab और OCD GOAD पर आधारित
एक महीने में 125 घंटे लैब चलाने की लागत लगभग 14$ है। Free Tier के साथ आपको प्रति माह 750h EC2 मिलता है, वहाँ 6 मशीनें हैं इसलिए 125h। लेकिन आपको केवल 30Gb स्टोरेज मिलता है। इसलिए आपको बाकी 5 VMs के लिए स्टोरेज चाहिए: 30Gb * 5 = 150Gb = 14$ / माह
GOAD प्रोजेक्ट की तरह ही, स्थापना दो भागों में है:
अब तक लैब का परीक्षण केवल Linux मशीन पर किया गया है, लेकिन यह macOS पर भी काम करना चाहिए। Ansible को Windows होस्ट्स के साथ कुछ समस्याएँ हैं, इसलिए मुझे उसके बारे में नहीं पता।
सेटअप को ठीक से काम करने के लिए आपको इंस्टॉल करना होगा:
यदि आप docker कंटेनर से प्रोविज़निंग करना चाहते हैं, तो कंटेनर तैयार करने के लिए आप निम्न कमांड चला सकते हैं
sudo docker build -t loadansible .
यदि आप अपने होस्ट से ansible चलाना चाहते हैं, तो आपको निम्न कमांड चलानी चाहिए:
sudo apt install git
git clone [email protected]:0xBallpoint/LOAD.git
cd LOAD/ansible
sudo apt install python3.8-venv
python3.8 -m virtualenv .venv
source .venv/bin/activate
.venv में ansible और pywinrm इंस्टॉल करें
python3 -m pip install --upgrade pip
python3 -m pip install ansible-core==2.12.6
python3 -m pip install pywinrm
ansible-galaxy install -r requirements.yml
Terraform इंस्टॉल करने के लिए आपको उनकी वेबसाइट hashicorp.com पर दिए गए गाइड का पालन करना होगा
यदि आप Linux पर Terraform को मैन्युअल रूप से इंस्टॉल करना चाहते हैं:
sudo apt-get update && sudo apt-get install -y gnupg software-properties-common

# Install the HasiCorp GPG key
wget -O- https://apt.releases.hashicorp.com/gpg | \
    gpg --dearmor | \
    sudo tee /usr/share/keyrings/hashicorp-archive-keyring.gpg

# Verify the key's fingerprint
gpg --no-default-keyring \
    --keyring /usr/share/keyrings/hashicorp-archive-keyring.gpg \
    --fingerprint
# It must match E8A0 32E0 94D8 EB4E A189 D270 DA41 8C88 A321 9F7B (from https://www.hashicorp.com/security)

# Add the official HashiCorp repository to your system
echo "deb [signed-by=/usr/share/keyrings/hashicorp-archive-keyring.gpg] \
    https://apt.releases.hashicorp.com $(lsb_release -cs) main" | \
    sudo tee /etc/apt/sources.list.d/hashicorp.list

# Update, install, verify
sudo apt update
sudo apt install terraform
terraform -help
AWS के लिए अपनी access keys कॉन्फ़िगर करने हेतु आपको AWS CLI की आवश्यकता होगी। आपको उनकी वेबसाइट docs.aws.amazon.com पर दिए गए इंस्टॉल गाइड का पालन करना चाहिए
Linux के लिए:
curl "https://awscli.amazonaws.com/awscli-exe-linux-x86_64.zip" -o "awscliv2.zip"
unzip awscliv2.zip
sudo ./aws/install
डिफ़ॉल्ट डोमेन middle-earth.local होगा, subnet 10.0.1.0/24 पर, और प्रत्येक मशीन को केवल 1CPU और 1024MB मेमोरी (t2.micro) आवंटित की गई है। यदि आप इनमें से कुछ performance सेटिंग्स बदलना चाहते हैं, तो आप फ़ाइल: terraform/ami-instance.tf संशोधित कर सकते हैं
लैब को चालू और कार्यशील करने के लिए आपको ये कमांड चलानी चाहिए:
pwd
/opt/LOAD  # place yourself in the LOAD folder (where you cloned the project)
cd terraform # start with AWS configuration
अगले चरण दिखाते हैं कि AWS पर अपने VMs को कैसे कॉन्फ़िगर करें:
var.tf.example को var.tf में कॉपी करें और मान बदलें:
अपने AWS console पर, आपको एक terraform यूज़र बनाना चाहिए और अपनी AWS keys प्राप्त करनी चाहिए:
terraformAccess key - Programmatic accessAccess key ID और Secret access key कॉपी करेंAWS CLI के साथ अपनी मशीन पर keys जोड़ें:
aws configure --profile terraform
    AWS Access Key ID [None]: <access_key_id>
    AWS Secret Access Key [None]: <secret_access_key>
cd LOAD
ssh-keygen -t rsa -N "" -b 2048 -C "TerraformKey" -f ./terraform/keys/TerraformKey.pem
terraform init
terraform apply
यदि आप अपना लैब destroy करना चाहते हैं:
terraform destroy
जब भी आपके EC2 instances शुरू हों, आपको ansible/hosts फ़ाइल में उनका public IP बदलना होगा। इस कमांड का आउटपुट फ़ाइल के अंत में जोड़ें:
aws ec2 describe-instances --profile terraform --region eu-central-1 --query "Reservations[*].Instances[*].{Name:Tags[?Key=='Name'].Value|[],PublicIP:PublicIpAddress}" --filters "Name=instance-state-name,Values=running" --output text |tac |awk 'NR%2 ==0 {print $0}; NR%2 != 0 {print "["tolower(substr($2,5))"]"};'
VMs को कॉन्फ़िगर करने के लिए ansible-playbook कमांड का उपयोग करें। सामान्य चलने का समय: 1h30
ansible-playbook main.yml # this will configure the vms in order to play ansible when the vms are ready
Docker कंटेनर से provisioning चलाने के लिए निम्न कमांड चलाएँ (आपको Dockerfile वाले फ़ोल्डर में होना चाहिए। अभी परीक्षण नहीं किया गया है):
sudo docker run -ti --rm --network host -h loadansible -v $(pwd):/load -w /load/ansible loadansible ansible-playbook main.yml
इंस्टॉल के दौरान कभी-कभी कोई त्रुटि हो सकती है। अधिकतर बार, आप प्लेबुक को फिर से चला सकते हैं और यह काम कर जानी चाहिए। प्लेबुक्स को एक-एक करके चलाने के लिए:
# The main.yml playbook is build in multiples parts. each parts can be re-run independently but the play order must be keep in cas you want to play one by one :

ansible-playbook prepare.yml         # updates, passwords, dns settings...
ansible-playbook ad-servers.yml      # create servers configuration
ansible-playbook ad-trusts.yml       # create the trust relationships
ansible-playbook ad-data.yml         # import the ad datas : users/groups...
ansible-playbook ad-groups.yml       # set the rights and the group domains relations
ansible-playbook servers.yml         # create IIS and MSSQL
ansible-playbook adcs.yml            # add adcs and adcs templates
ansible-playbook ad-acl.yml          # set ACL
ansible-playbook linux.yml           # configure linux entrypoint with GLPI

ansible-playbook security.yml        # enable or disable windows defender here
ansible-playbook vulnerabilities.yml # specifics vulns linked to the scenario are here

# You can also install wireguard VPN on the linux host, for that check the VPN paragraph
यदि आप प्लेबुक का केवल एक विशेष भाग चलाना चाहते हैं, तो आप tags का उपयोग कर सकते हैं (हमेशा data को tag के रूप में रखें):
ansible-playbook servers.yml
ansible-playbook servers.yml --tags data,iis
ansible-playbook linux.yml --tags data,glpi
आपके AWS लैब को प्रबंधित करने में सहायता के लिए कुछ कमांड्स (यह बदसूरत है लेकिन काम करता है):
# aws cli profile : terraform
# region : eu-central-1

# Disable instance metadata
for i in $(aws ec2 --profile terraform --region eu-central-1 describe-instances --filters "Name=tag:Name,Values=lab-*" --query 'Reservations[].Instances[].InstanceId' |cut -d '"' -f2); do aws ec2 --profile terraform --region eu-central-1 modify-instance-metadata-options --http-endpoint disabled --instance-id $i --output json --no-cli-pager;done

# Start instances
aws ec2 --profile terraform --region eu-central-1 start-instances --instance-ids `aws ec2 --profile terraform --region eu-central-1 describe-instances --filters "Name=tag:Name,Values=lab-*" "Name=instance-state-name,Values=stopping,stopped" --query 'Reservations[].Instances[].InstanceId' --output text`

# Get running instance and output it to ansible format
aws ec2 describe-instances --profile terraform --region eu-central-1 --query "Reservations[*].Instances[*].{Name:Tags[?Key=='Name'].Value|[],PublicIP:PublicIpAddress}" --filters "Name=instance-state-name,Values=running" --output text |tac |awk 'NR%2 ==0 {print $0}; NR%2 != 0 {print "["tolower(substr($2,5))"]"};'
वैकल्पिक रूप से, आप Linux होस्ट पर एक VPN सर्वर जोड़ सकते हैं, और अपनी इच्छानुसार जितने चाहें clients कॉन्फ़िगर कर सकते हैं। VPN सर्वर के लिए keys बनाकर शुरू करें और clients की संख्या बदलें:
apt install wireguard

# generate wireguard keys
privkey=$(wg genkey) sh -c 'echo "
    server_privkey: $privkey
    server_pubkey: $(echo $privkey | wg pubkey)"'

# encrypt server_privkey with ansible-vault and
ansible-vault encrypt_string --ask-vault-password --stdin-name server_privkey

# Add the result to group_vars/all.yml
# You can change the number of client configuration files it will create. By default it creates 6 clients.
VPN प्लेबुक को इस कमांड के साथ चलाएँ (यह हर बार कमांड चलाने पर clients की keys बदल देगा):
ansible-playbook --ask-vault-password vpn.yml
यदि आपको यह त्रुटि मिले Timeout (12s) waiting for privilege escalation prompt, तो बस कमांड को फिर से चलाएँ।
आपको अपनी client configuration फ़ाइल ansible/wireguard/lab_client[0-9].conf में मिलेगी।
VPN से कनेक्ट करने के लिए, आपको client फ़ाइलों को private key सहित अपने local होस्ट में /etc/wireguard/ पर कॉपी करना होगा।
पहले client के लिए VPN कनेक्शन इस प्रकार शुरू करें:
sudo wg-quick up lab_client1
आपको 10.0.20.0/24 में एक IP मिलेगा
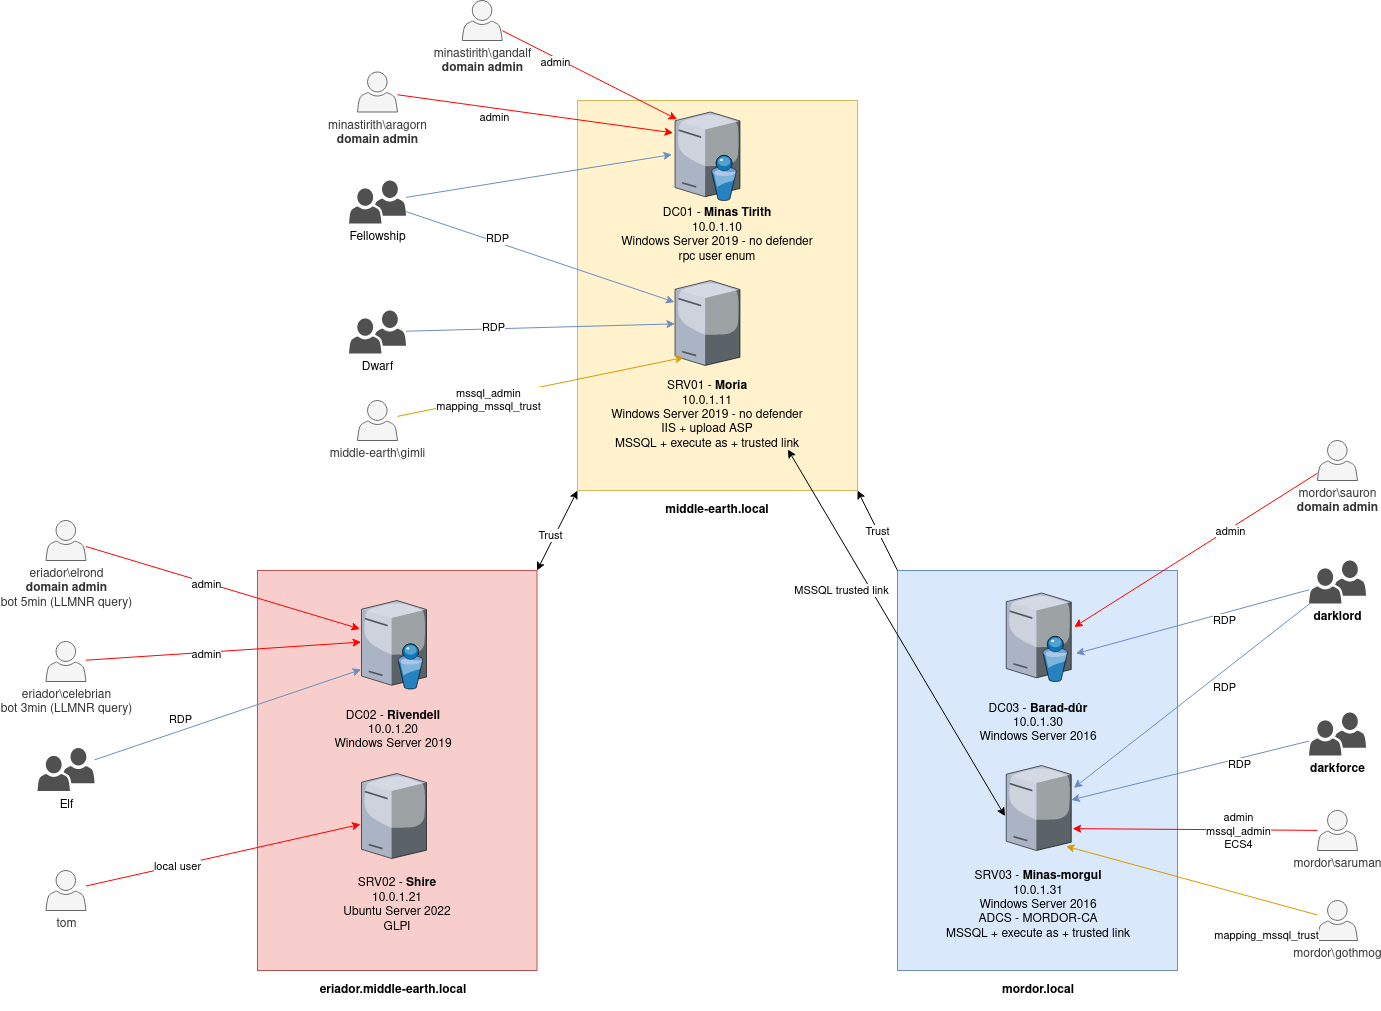
SHIRE (srv02)
    - GLPI SQLi
    - GLPI-htmlawed-CVE-2022-35914

USERS
    - privesc user with vulnerable crontab
    - privesc root with password in bash_history and sudo nopasswd for /bin/systemctl
RIVENDELL (dc02)
    - anonymous RPC (enum users, pass pol, groups / rpcclient)
    - brute force users names

ELF
    - celebrian    Responder crack hash (bot 3min)
    - elrond:      Responder with NTLM relay domain admin (bot 5min)

HOBBIT
    - bilbo:       password in description
    - pippin:      ASREPROAST
    - merry:       Constrained delegation with protocol transition / Kerberoasting
    - froddo:
    - sam:
MINAS-TIRITH(dc01)
    - Open share RW, LNK exploit
    - khamul.easterling : Open backup share, with GPO with cpassword, password increment

MORIA (srv01)
    - MSSQL trusted link : donPapi to get sql_svc password
    - mitm6 SRV01 -> DC01

MEN
    - denethor:    DOMAIN ADMIN
    - theoden:     ACL self-self-membership-on-group DOMAIN ADMIN
    - faramir:     ACL genericwrite-on-user Denethor
    - boromir:     ACL genericall-on-user Denethor
                   ACL forcechangepassword on Faramir
                   WriteDACL MEN

FELLOWSHIP
    - legolas:     execute as user on MSSQL
                   KERBEROASTING
    - gimli:       ACL genericall-on-computer MORIA
                   ACL writeproperty-self-membership DOMAIN ADMIN
    - aragorn:     execute as login on mssql / administrator
    - gandalf:     mssql admin
                   group cross domain
                   mssql trusted link
                   ACL writeproperty-self-membership Domain Admins #TODO change for someone who is not administrator, he has DCSYNC (administrator?)

ENTS
    - treebeard:   ACL writeproperty-on-group DOMAIN ADMIN
    - skinbark:    ACL genericall-on-group DOMAIN ADMIN
    - ginglas:     ACL write owner on group DOMAIN ADMIN
BARAD-DUR (dc03)
    - Coerced DC + ntlmrelayx to ldaps
    - ADCS ESC1, ESC2, ESC3, ESC4, ESC8
    - NTLM downgrade attack

MINAS-MORGL (srv03)
    - IIS upload webshell
    - Privilege escalation Windows 2016 : SeImpersontePrivilege

DARKFORCE
    - sauron:     domain admin MORDOR
    - saruman:    mssql admin / GenericAll on gothmog (shadow credentials) / GenericAll on ECS4
    - balrog:

PRISONER
    - gollum:     mssql trusted link
                  password spray -> user=pwd
ORC
    - gothmog:    DOMAIN ADMIN
    - lurtz:
    - ugluk:
    - guritz:

NAZGUL
    - angmar:
