 christophe.duvernois/usb-spy
Intercepts and analyzes USB Mass Storage traffic at the block and file level, emulates USB devices, and supports custom Python stubs for security research, forensics, and TOCTOU vulnerability testing.




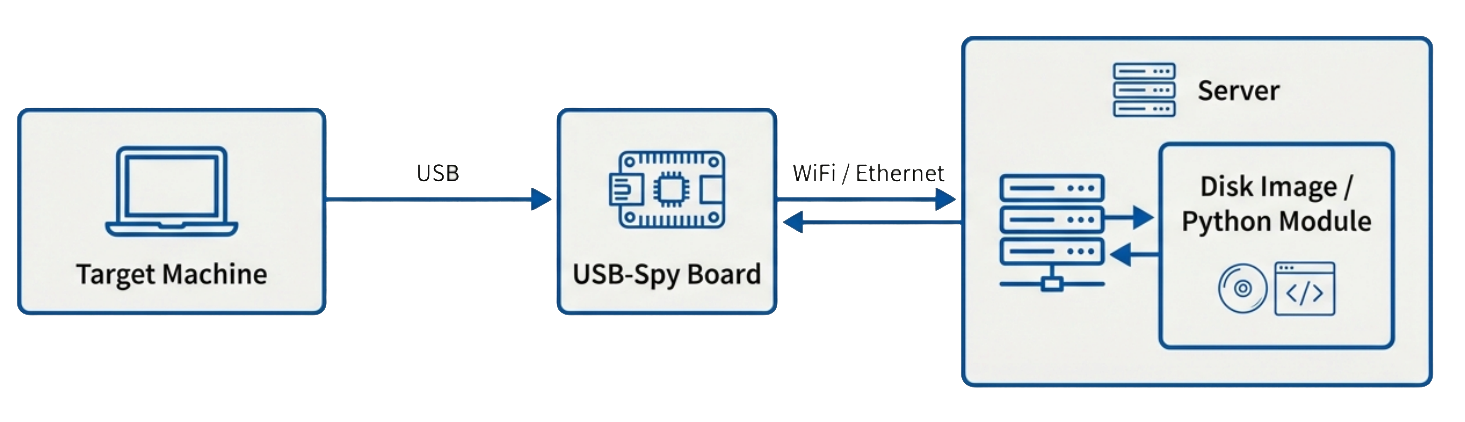
usb-spy is a USB Mass Storage traffic analyzer built around a WiFi or Ethernet-enabled microcontroller.
The board exposes a disk image (FAT or any filesystem) as a fake USB Mass Storage device to a target system, while the actual storage data is provided by a remote server over WiFi or Ethernet. This setup allows usb-spy to intercept and analyze every block access performed by the target.
Beyond raw block-level tracing, usb-spy understands filesystems and can map each accessed block back to the corresponding file and directory, making it easy to immediately see which file is being read or written, instead of only raw sector numbers.
Additionally, usb-spy can emulate any USB device by customizing device properties such as vendor ID, product ID, serial number, manufacturer, and product name through a JSON configuration file. This allows you to impersonate specific USB devices for testing and analysis purposes.
The tool is easily extendable through user-written Python stubs, allowing you to implement custom logic for handling USB read/write events and block-level operations.
When a supported filesystem is detected, usb-spy:
Currently supported filesystems:
Support for additional filesystems will be added in the future.
If the filesystem is not supported, usb-spy can still be used:
This ensures usb-spy remains useful even with unknown, custom, or proprietary filesystems.
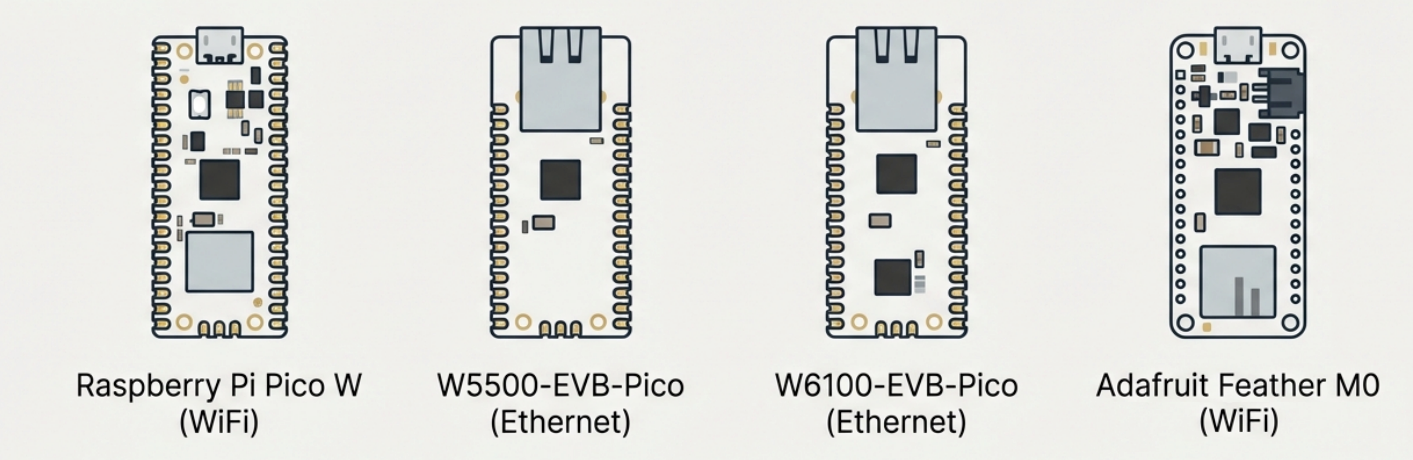
Firmware build instructions for each supported board are described here:
The source code is in the src directory. It will load a fat image, expose it through a TCP port and will log every access made to the image. To print files and directories information, the tool relies on TheSleuthKit library.
To build, run the following commamd in the root directory
Fetch all submodules
git submodule update --init --recursive
Then run the waf configure command.
./waf configure
If you want to build without Python embedding support, configure with:
./waf configure --disable-python
It will check and build all dependencies it needs, then to actually build the project run
./waf build
The binary will be in the wbuild directory
When built with --disable-python, the --py and --py-args runtime options are not available.
We can easily do this with the mtools utilitary package
Create a 2 MB file
dd if=/dev/zero of=disk.img bs=1M count=2
Put a FAT filesystem on it (use -F for FAT32, otherwise it's automatic)
mformat -i disk.img ::
Add a file to it
mcopy -i disk.img example.txt ::
List files
mdir -i disk.img ::
Extract a file
mcopy -i disk.img ::/example.txt extracted.txt
Run the spy with the newly created image
./usb-spy -v disk.img
To force raw mode and skip filesystem autodetection:
./usb-spy --raw disk.img
To proxy access directly to a real block device:
./usb-spy --proxy /dev/sda
Plug the board into target usb port.
To emulate a specific USB device, parameters can be overrided through a json config file:
The following json file will emulate a Kingston DataTraveler USB device :
{
	"vendor_id": 2385,
	"product_id": 5734,
	"bcd_device": 272,
	"product_rev": "3.0",
	"manufacturer": "Kingston",
	"product_name": "DataTraveler",
	"serial": "509C4BBFACCDE742880C026B",
	"language": 1033
}
Run the spy with this configuration file
./usb-spy -c config/kingston.json disk.img
The dmesg output for this device:
usb 1-8: New USB device found, idVendor=0951, idProduct=1666, bcdDevice= 1.10
usb 1-8: New USB device strings: Mfr=1, Product=2, SerialNumber=3
usb 1-8: Product: DataTraveler
usb 1-8: Manufacturer: Kingston
usb 1-8: SerialNumber: 509C4BBFACCDE742880C026B
usb-storage 1-8:1.0: USB Mass Storage device detected
scsi host6: usb-storage 1-8:1.0
scsi 6:0:0:0: Direct-Access     Kingston DataTraveler     3.0  PQ: 0 ANSI: 2
If you want to implement your own logic for every read/write event, you can easily do it in python.
Implement the USBImage class in python like this dummy image :
class USBImage:
    def __init__(self, *args, **kwargs):
        """
        Initialize the USBImage.
        :param args: should contain:
            - filename: The name of the file to manage.
        :param kwargs: Arbitrary arguments passed from the c++ command line including:
            readOnly: Whether the interface is read-only.
            verbose: Whether to enable verbose logging.
            block: Whether to enable block mode.
        """
        pass

    def getBlockNumber(self):
        """Get block number"""
        return 100

    def getBlockSize(self):
        """Get block size"""
        return 512

    def read(self, lba, buffer, size):
        """Read block"""
        print(f"read block={lba} size={size}")
        for i in range(size):
            buffer[i] = (lba + i) % 256  # Simulate reading data
        return size

    def write(self, lba, buffer, size):
        """Write block"""
        print(f"write block={lba} size={size}")
        print(buffer)
        return size

    def flush(self):
        """Flush block"""
        print("flush data")
And run the spy with your python module module.
./usb-spy --py python/dummy.py disk.img
You can also pass arbitrary arguments from the command line to your python class. Aguments are available in the kwargs.
./usb-spy --py python/dummy.py --py-args arg1=2 --py-args arg2=Hello disk.img
You can also start from the rawimage example that provides a complete implementation (~100 lines of code) of what's implemented in the usb-spy binary natively.
This project is provided "as‑is". There is no guarantee of correctness, security, or suitability for any particular purpose.
