 memn0ps/matrix-rs
Rusty Hypervisor - Windows Kernel Blue Pill Type-2 Hypervisor in Rust (Codename: Matrix)


Blog: https://memn0ps.github.io/hypervisors-for-memory-introspection-and-reverse-engineering/
A lightweight, memory-safe, and blazingly fast Rust-based type-2 research hypervisor with hooks for Intel VT-x, focused on studying the core concepts of virtualization.
Note: The Illusion hypervisor (Windows UEFI Blue Pill Type-1 Hypervisor in Rust) is more stable, supports more features, and is overall better designed. The Matrix hypervisor (Windows Kernel Blue Pill Type-2 Hypervisor in Rust) is an older, experimental version and is not intended for production use. Both projects serve as templates to help people get started with hypervisor development in Rust.
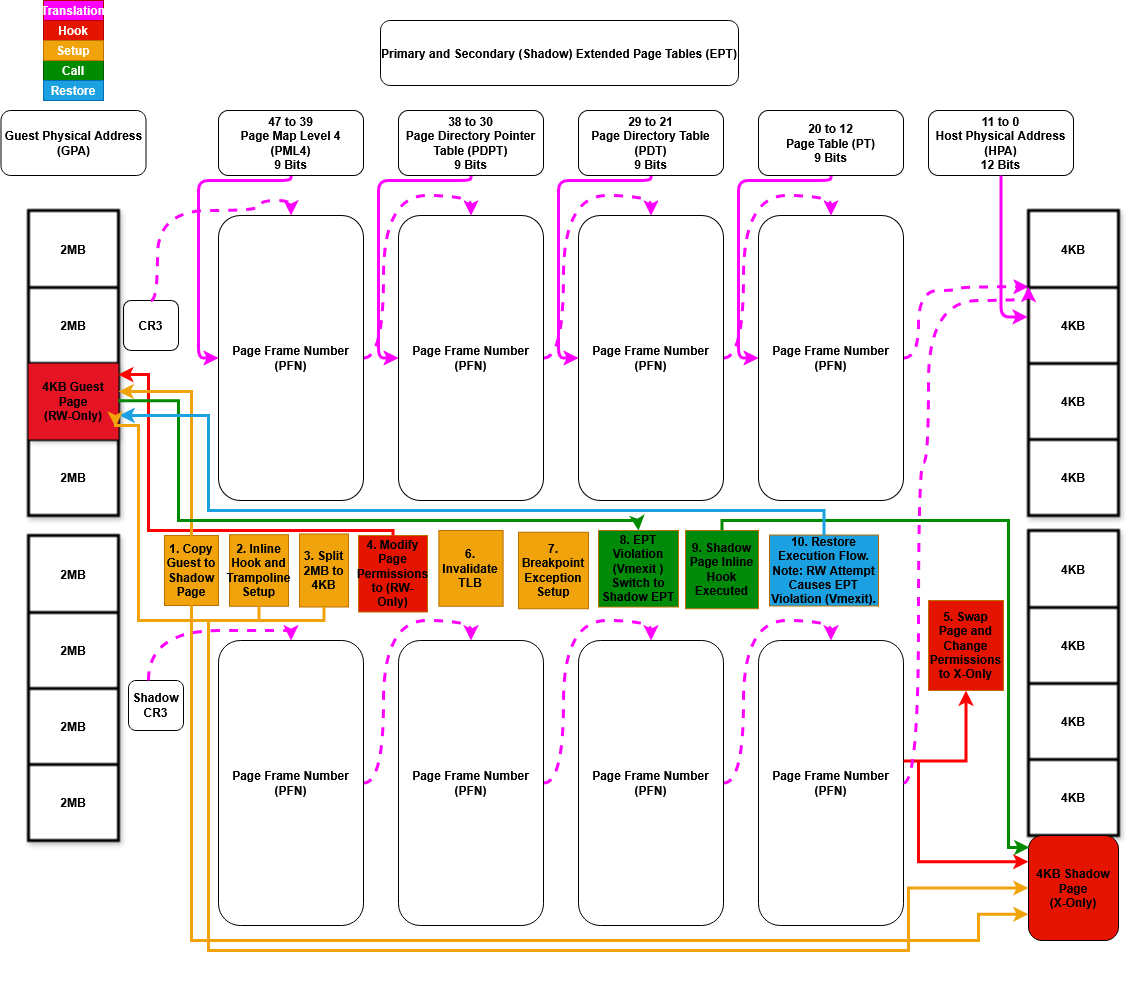 Figure 0: Extended Page Tables (EPT) Hooks (Matrix)
ExceptionOrNmi (#GP, #PF, #BP, #UD), Cpuid, Getsec, Vmcall, Vmclear, Vmlaunch, Vmptrld, Vmptrst, Vmresume, Vmxon, Vmxoff Rdmsr, Wrmsr, Invd, Rdtsc, EptViolation, EptMisconfiguration, Invept, Invvpid, Xsetbv.int3) hooks.rustup toolchain install nightly and rustup default nightly.winget install LLVM.LLVM.cargo install cargo-make cargo-expand cargo-edit cargo-workspaces.WDKContentRoot environment variable to point to your WDK installation path, If it hasn't been set automatically during the WDK installation:[System.Environment]::SetEnvironmentVariable("WDKContentRoot", "C:\Program Files (x86)\Windows Kits\10", [System.EnvironmentVariableTarget]::User)
cargo make --profile development.cargo make --profile release.bcdedit.exe /set testsigning on.bcdedit.exe /bootdebug {bootmgr} on
bcdedit.exe /bootdebug on
bcdedit.exe /debug on
Setup: bcdedit.exe /dbgsettings net hostip:w.x.y.z port:n.
regedit.exe.HKLM\SYSTEM\CurrentControlSet\Control\Session Manager.Debug Print Filter with DEFAULT DWORD = 8.$serialPort = New-Object System.IO.Ports.SerialPort COM2,9600,None,8,One; $serialPort.Open().Use Service Controller (sc.exe) to create and manage the hypervisor service:
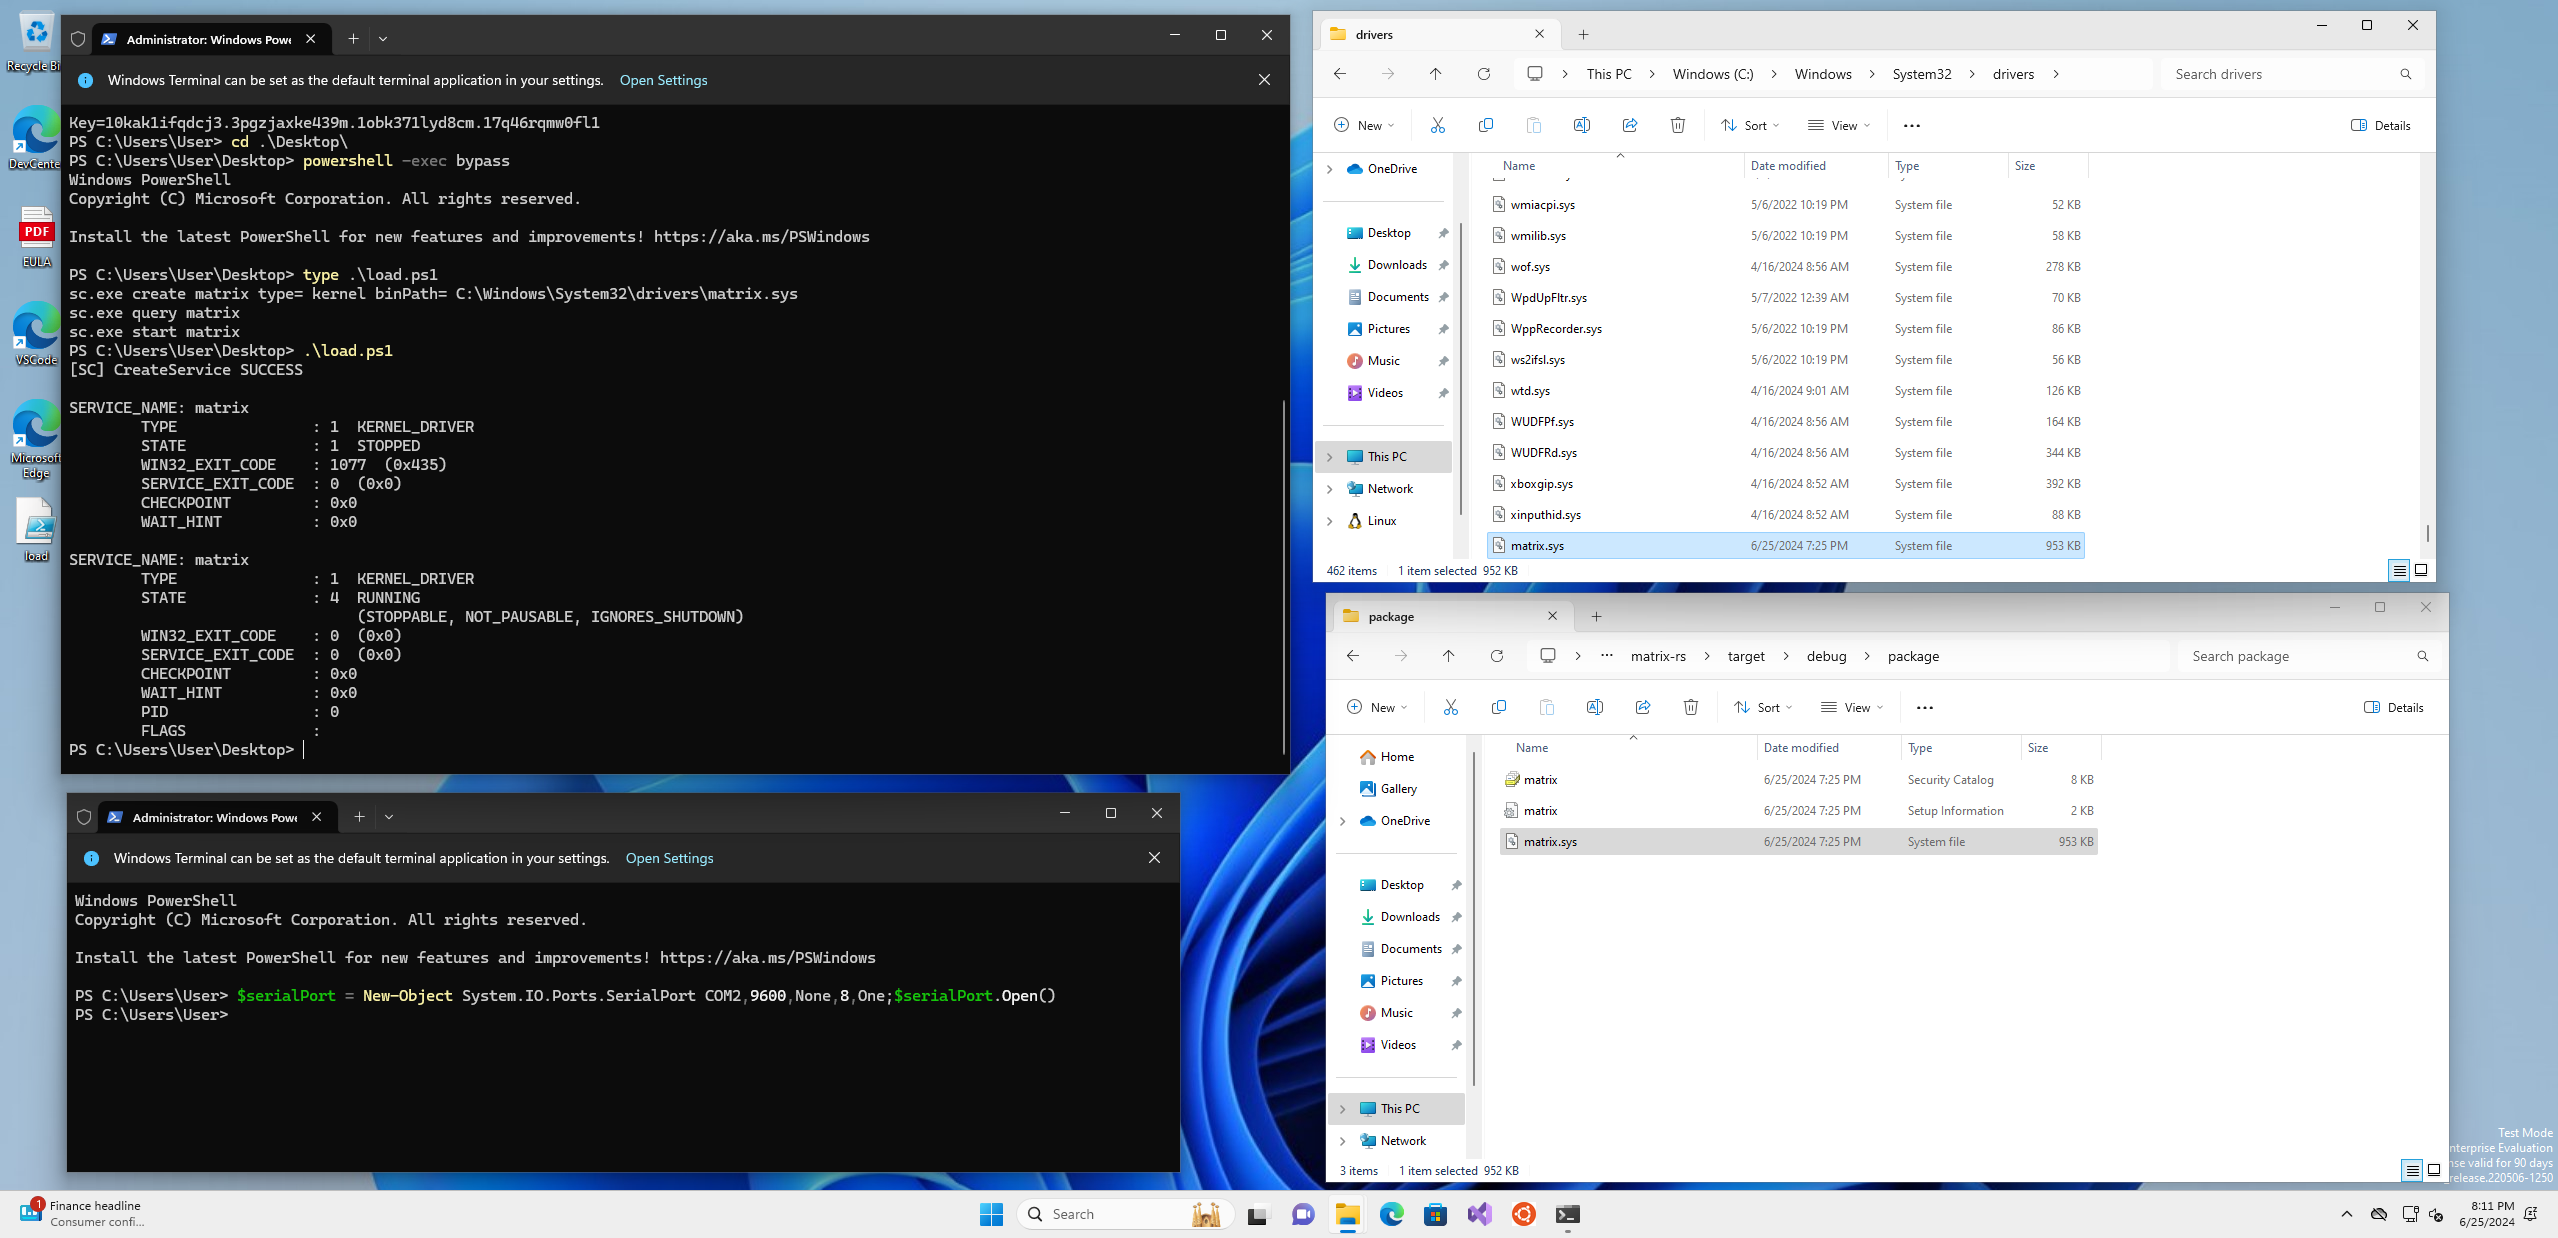
sc.exe create matrix type= kernel binPath= C:\Windows\System32\drivers\matrix.sys
sc.exe query matrix
sc.exe start matrix
Setup for VMware Workstation
Build the Project: Follow the build instructions provided in the previous sections to compile the project.
Set Up VMware Workstation
Configure the VMware serial port for debugging.
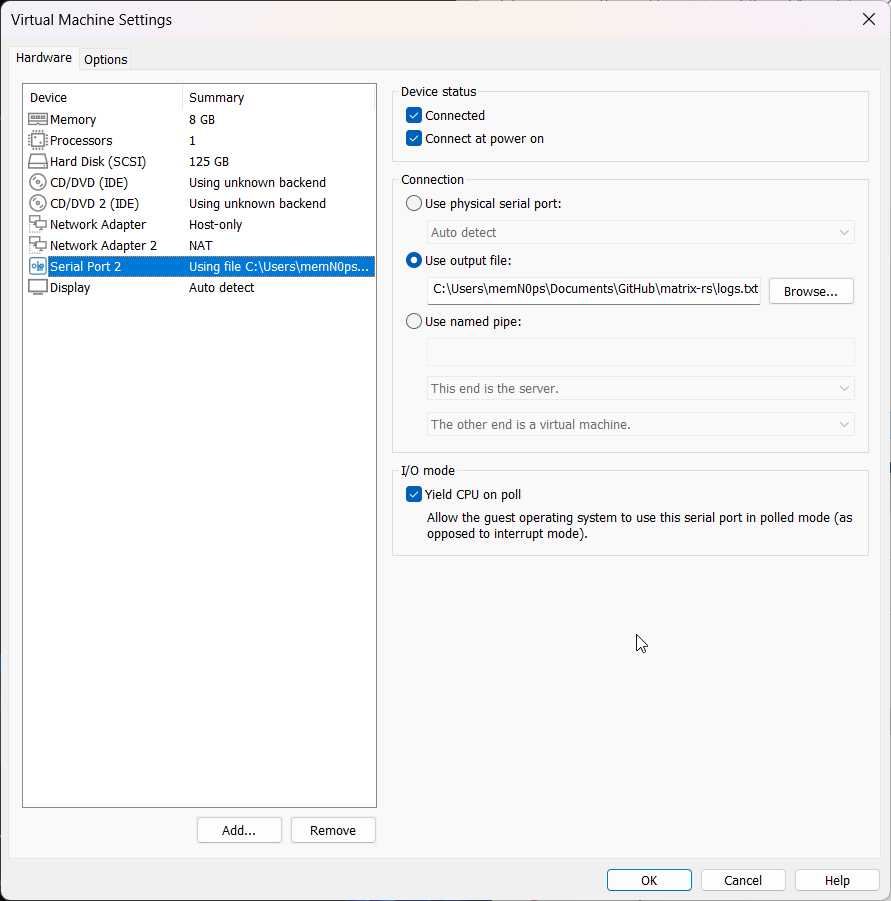 Figure 1: VMware Serial Port Settings
Ensure that "Virtualize Intel VT-x/EPT or AMD-V/RVI" is enabled and "Virtualize IOMMU (IO memory management unit)" is enabled.
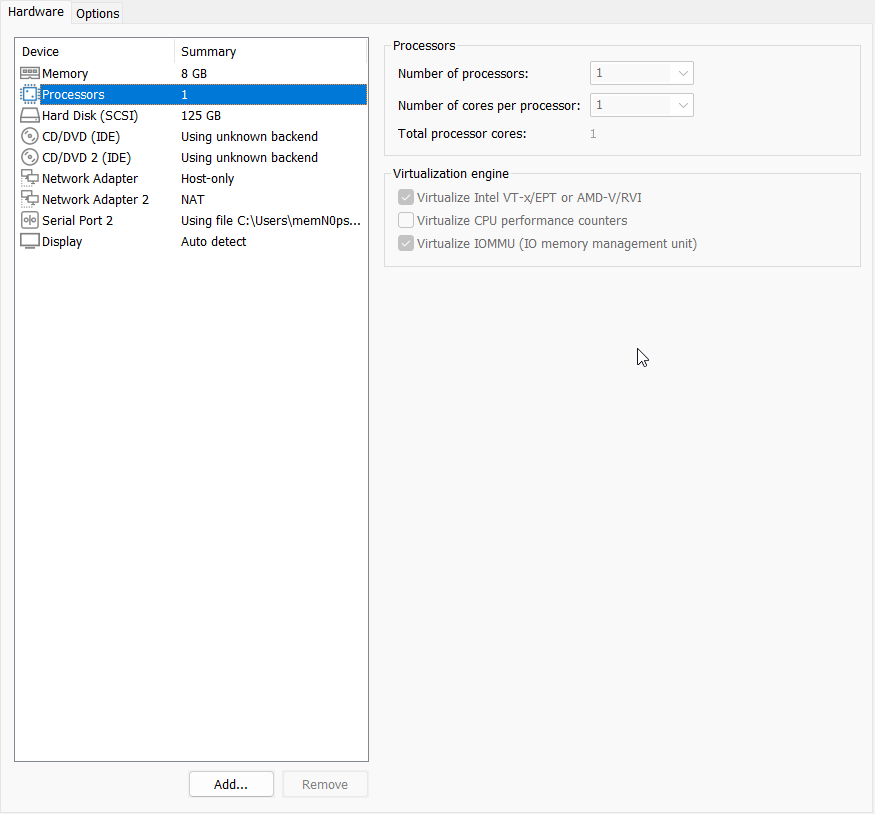 Figure 2: VMware Processors Settings
Copy the Driver
Copy the matrix.sys driver to the C:\Windows\System32\drivers directory.
VMware Serial Port Debugging
Execute the PowerShell script in the Serial Port Debugging section to open the serial port.
Load the Hypervisor
Use the load.ps1 PowerShell script shown in the Service Management section to create and start the hypervisor service.
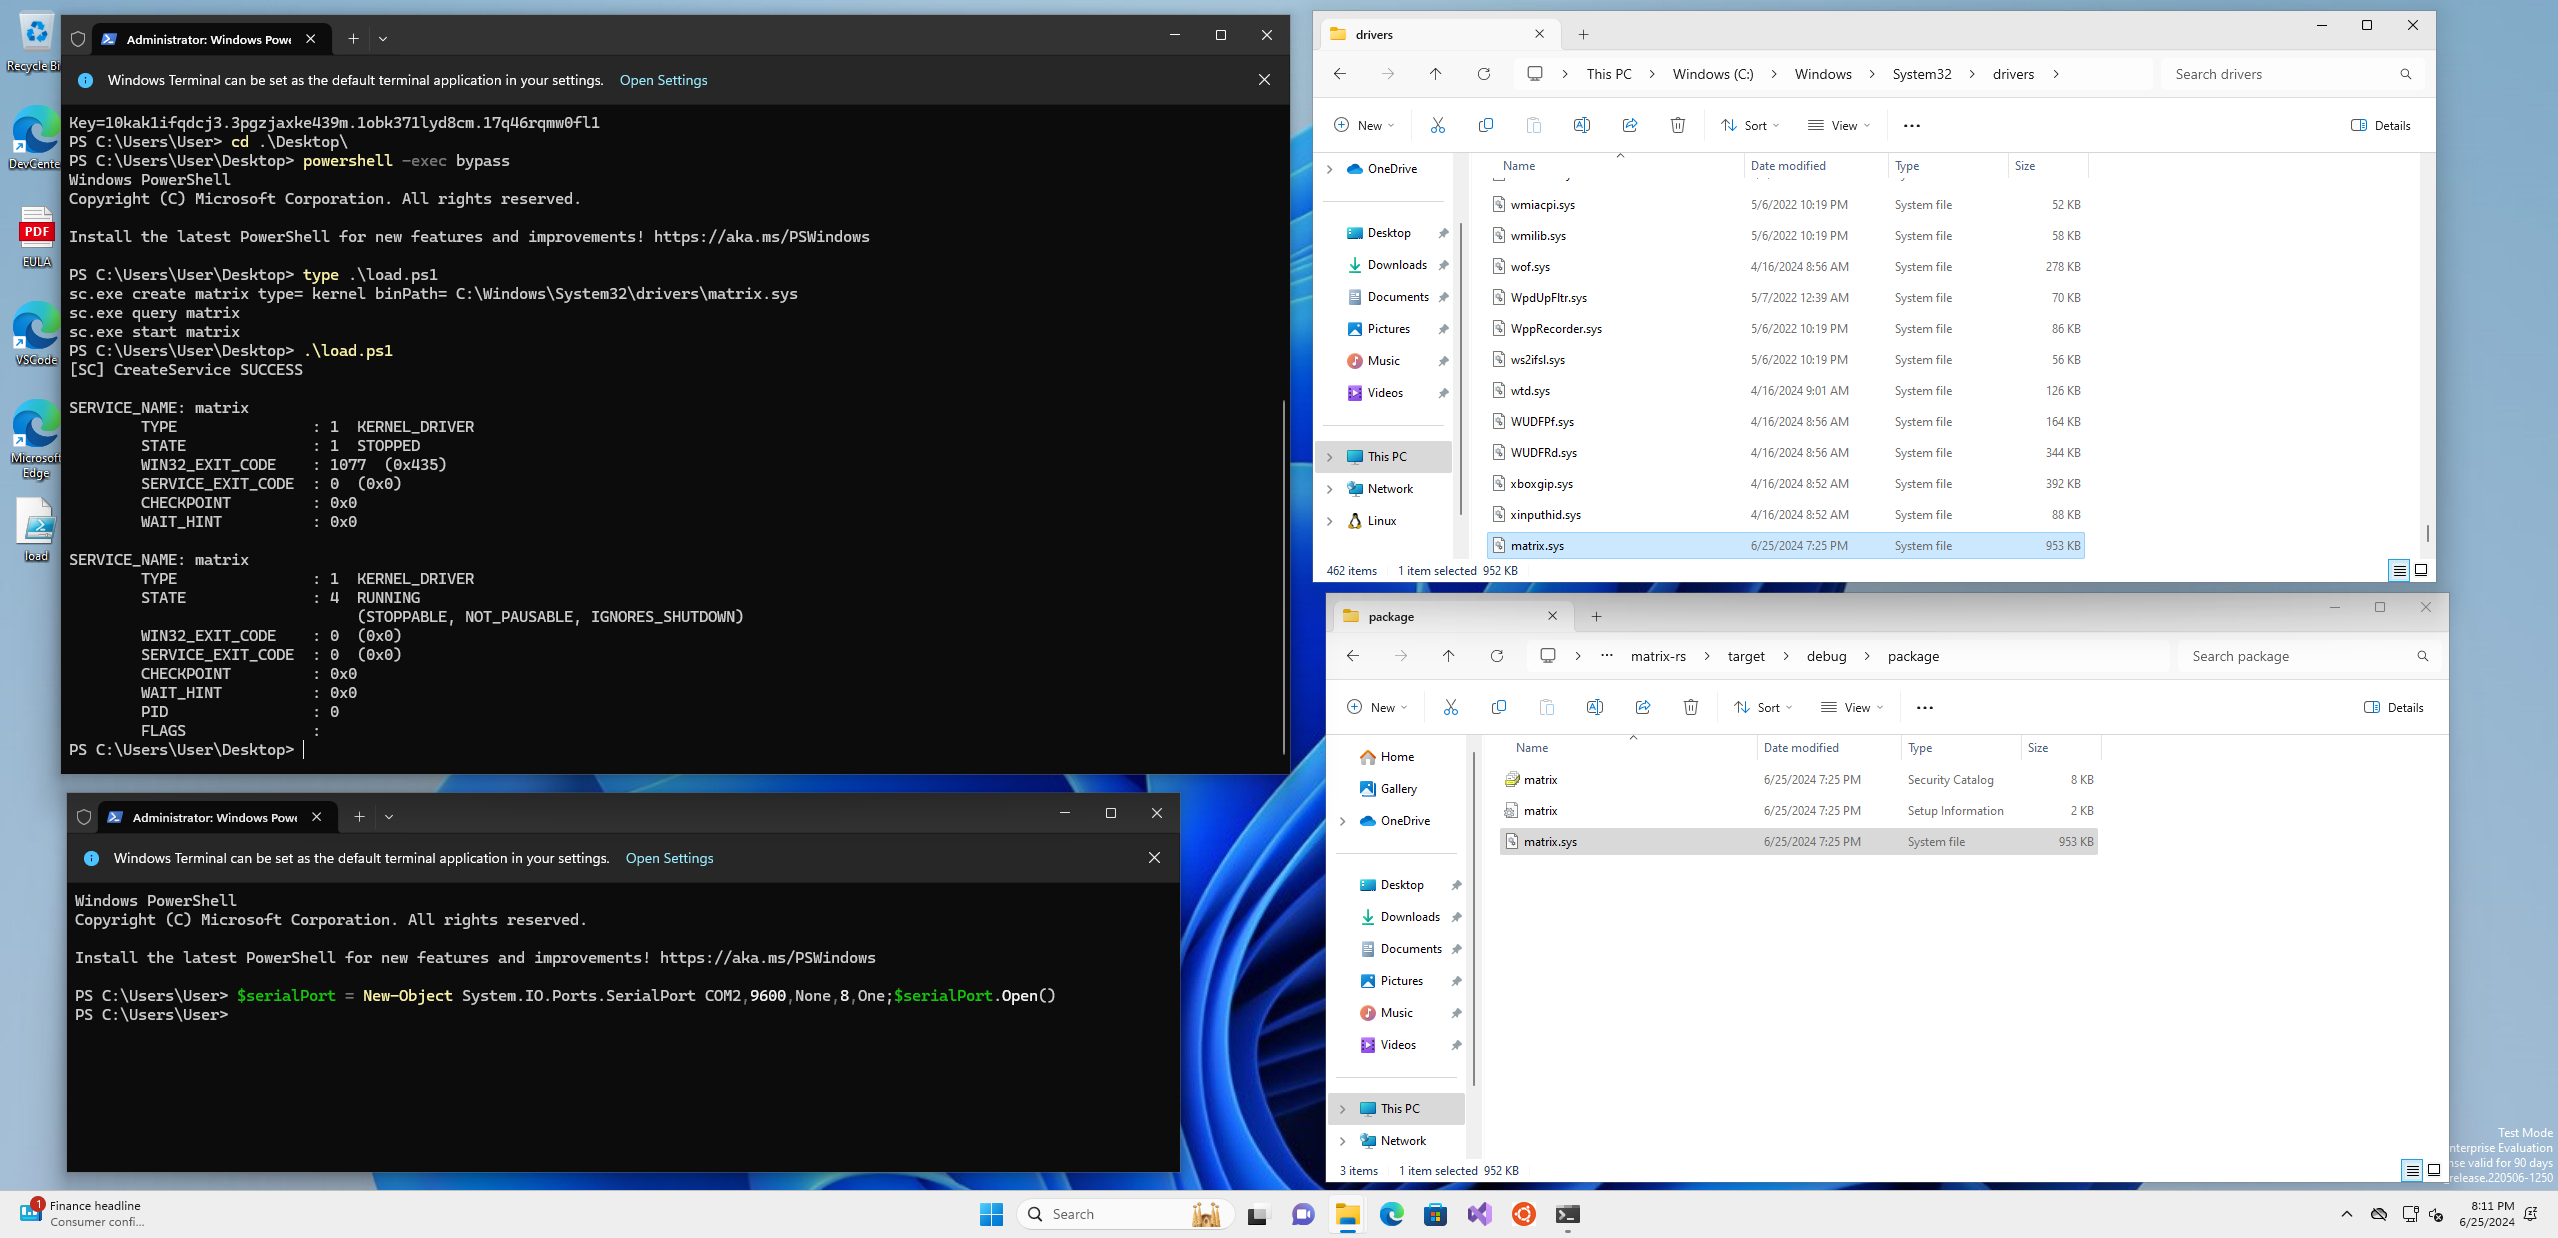 Figure 3: Load Hypervisor
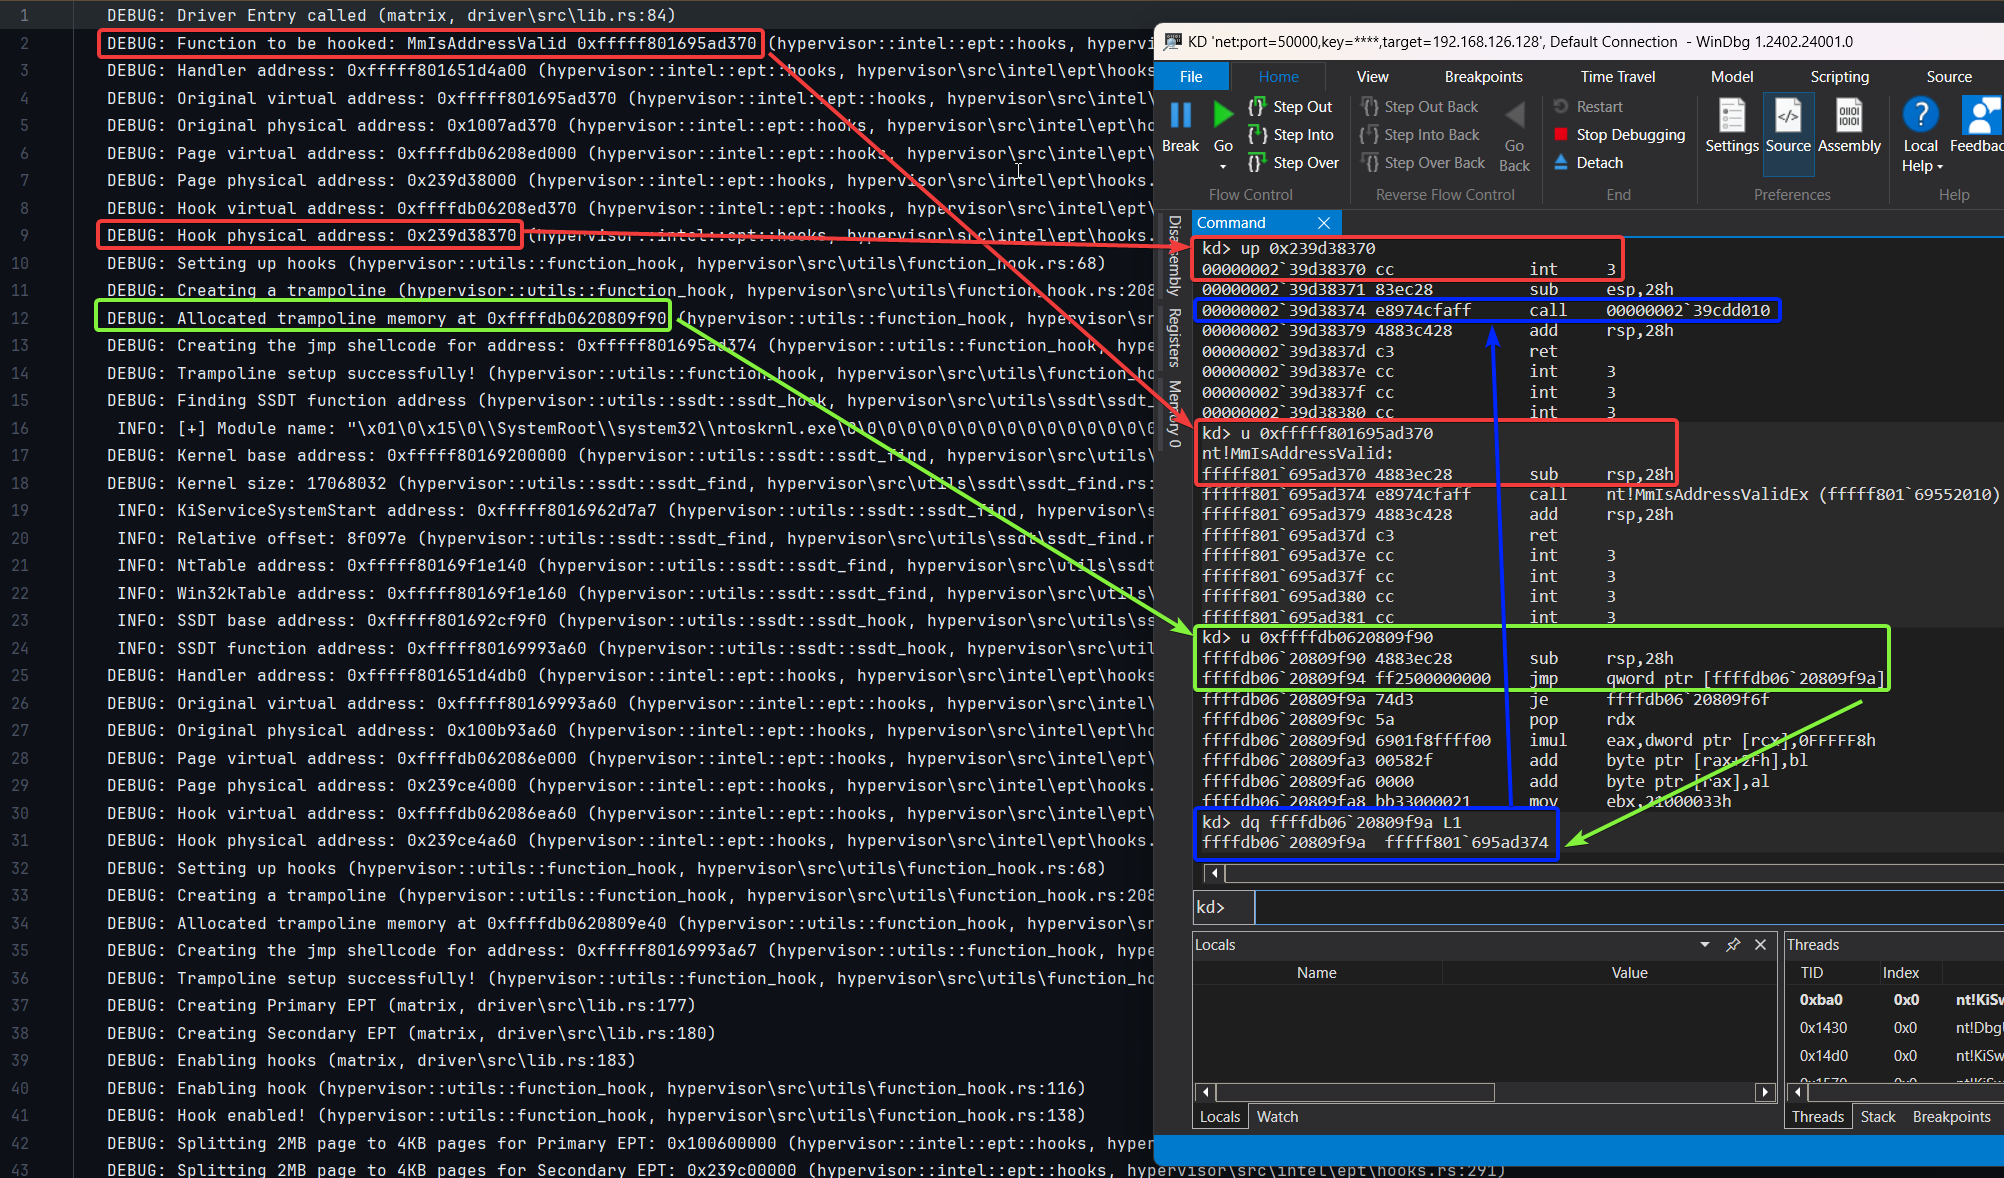 Figure 4: Logs and Windbg PoC Setup
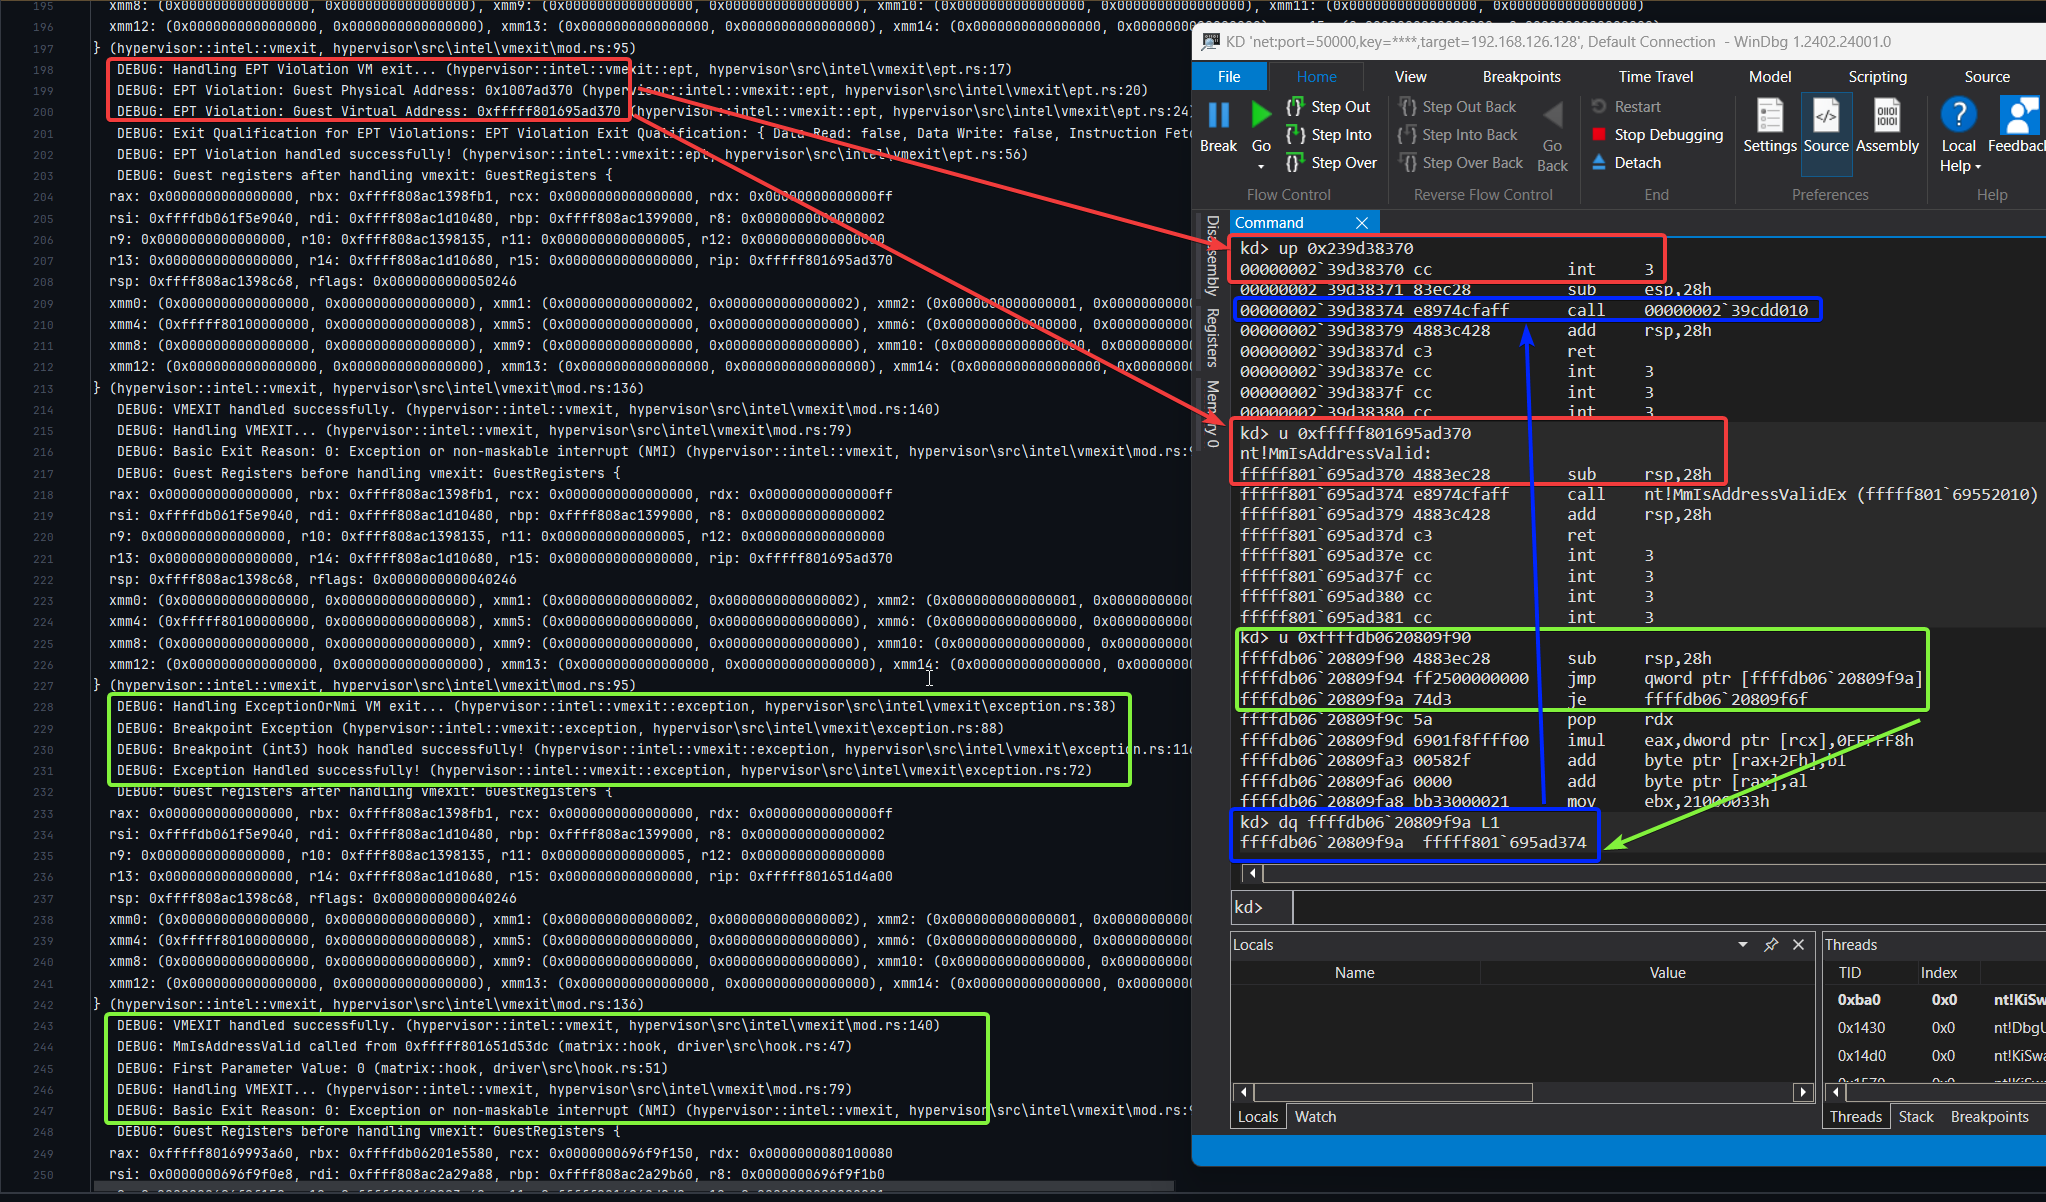 Figure 5: Logs and Windbg PoC Execute
Big thanks to the amazing people and resources that have shaped this project. A special shout-out to everyone listed below. While I didn't use all these resources in my work, they've been goldmines of information, super helpful for anyone diving into hypervisor development, including me.
Daax (@daaximus): For his outstanding free series on hypervisor development, which is one of the best resources available and has greatly influenced my work with its thorough research and clear explanations. His support and answers to my questions were invaluable in getting me started with hypervisor development:
Satoshi Tanda (@tandasat): Satoshi Tanda's guidance, projects, and structured training programs have been incredibly helpful. His detailed explanations and contributions on GitHub have significantly enhanced my understanding, making him a great mentor throughout my journey:

