
zafrida-ui v0.3.7
A Frida UI tool window inside PyCharm / JetBrains IDEs.
中文 | English
 ZAFrida UI - PyCharm Frida Plugin
Current Version: 0.3.6




Project Introduction
Frida GUI Tool for PyCharm/IntelliJ
ZAFrida UI is a Frida graphical interface plugin integrated into PyCharm and JetBrains IDEs. It aims to solve the complexity of Frida command-line operations and script management by providing a complete UI interaction interface to manage devices, processes, scripts, and logs.
The core highlight is its "Checkbox-style" Template Management System: users can dynamically insert code snippets into the main script or comment them out simply by checking/unchecking boxes, enabling a "block-building" style of Hook script assembly. Additionally, the plugin features built-in Project Management (zafrida-project.xml), supporting quick switching between multiple devices and environment configurations.
ZAFrida does not replace Frida but serves as a powerful UI wrapper for frida-tools, seamlessly connecting with your existing Python and Frida environment.
Simplified Wiki: ZAFrida UI Simplified Wiki (BBS) (This is a simpler wiki) Full Wiki: ZAFrida UI Wiki (EN)
Home
Quick Start
- Install Plugin: Search for "ZAFrida" in the IDE Plugin Marketplace or install via disk.
- Configure Environment: Go to
Settings->Tools->ZAFridaand configurefridaexecutable paths (if not auto-detected). - Create Project: Right-click in Project View ->
New Frida Project. - Write/Select Script: Select your
agent.jsin the Run Panel. - Hook & Debug:
- Connect device (USB or Remote).
- Select target process or package name.
- Click Run.
- Use Templates: Switch to the
Templatestab, check the Hook functions you need (e.g., "SSL Pinning Bypass"), and the code will be automatically injected into your script. - Skills Automation (Optional): Disabled by default. Go to
Settings/Preferences -> ZAFrida -> Skills HTTP API, checkEnable Skillsto auto-start the local API (or use manualStart/Stop). CLI and template locations:skills-cli/zafrida_skill_cli.pyskills-template/zafrida-http-control/
Features
-
Device & Process Management
Integrated withfrida-ls-devicesandfrida-ps, supporting one-click device refresh and viewing running processes, apps, or installed packages. -
Multiple Connection Modes
Full support for USB, Remote, and Gadget modes, with customizable remote host and port—no need to manually construct complex CLI arguments. -
Interactive Script Execution (Run / Attach)
- Supports Run (default Spawn) and Attach as explicit execution actions rather than a simple mode switch.
- Supports Force Stop to terminate target applications.
- Built-in console output with automatic log persistence to the
zafrida-logs/directory.
-
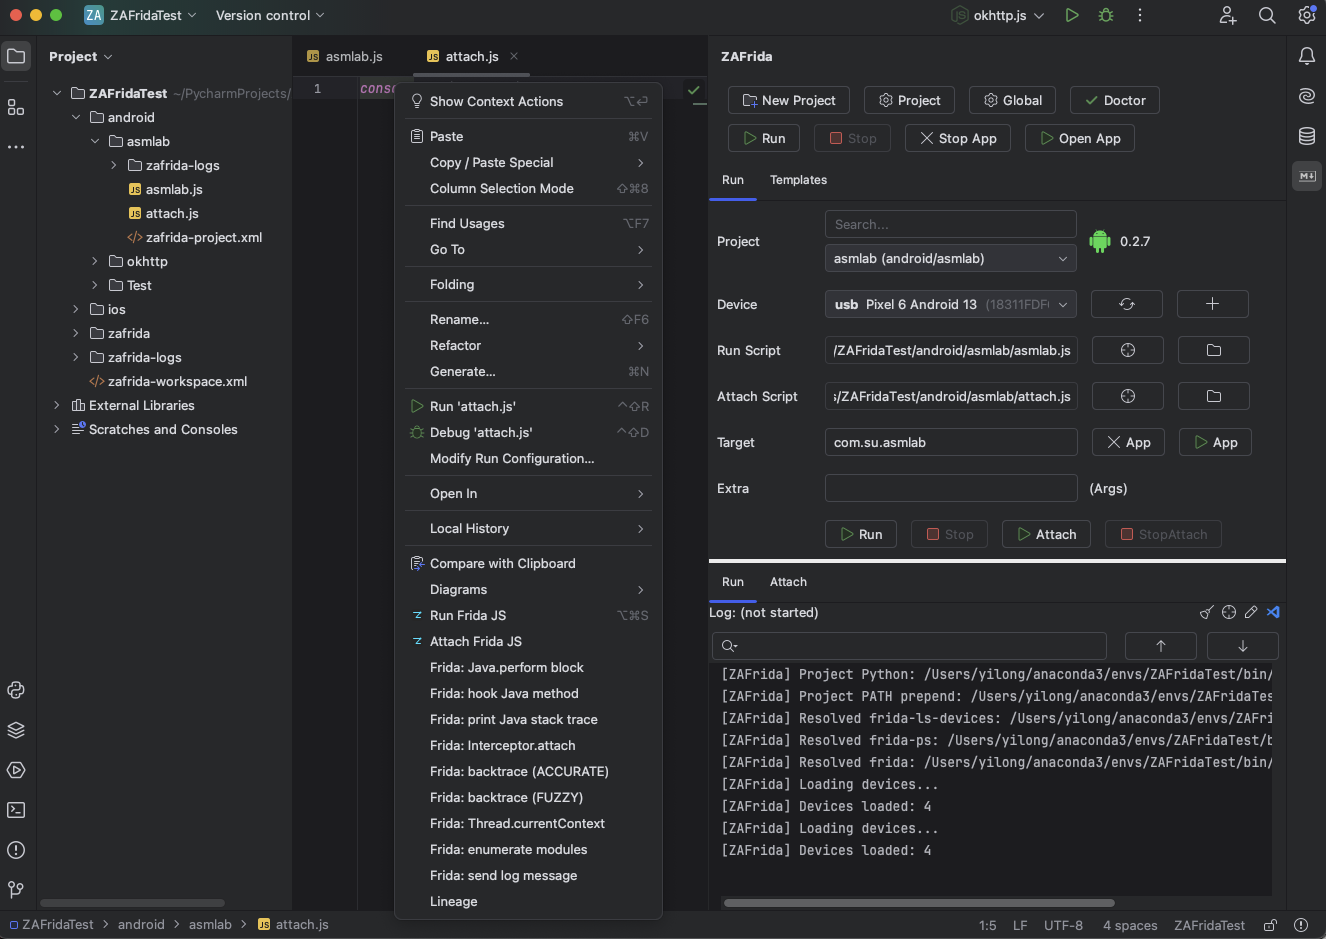
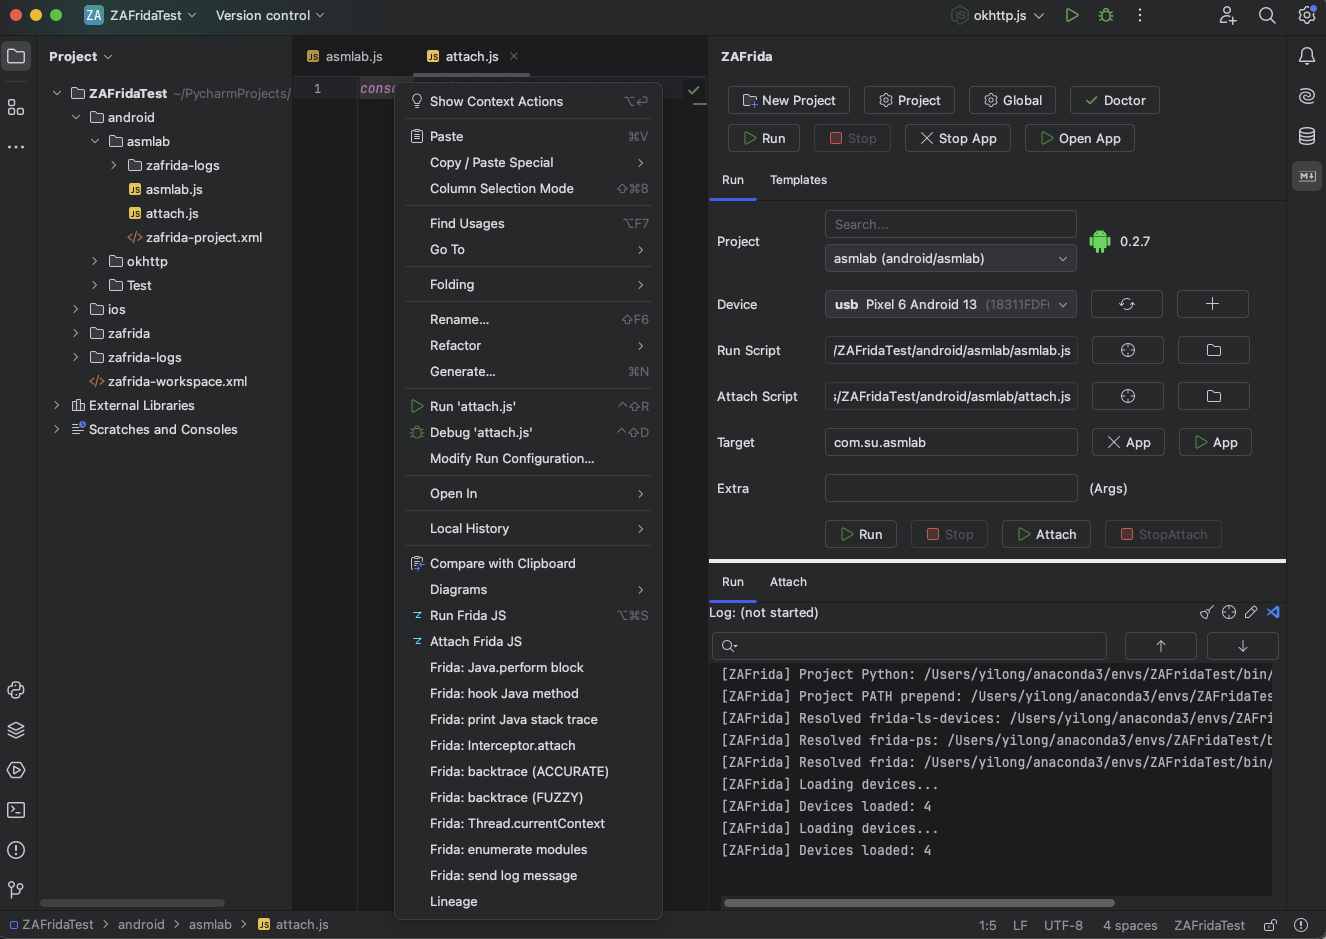
JS Editor Context Menu (Important)
- Right-click inside a Frida JS editor to directly choose:
- Run Frida JS – run the currently opened JS file as the main script (default Spawn).
- Attach Frida JS – attach the currently opened JS file to an already running target process.
- The file is automatically saved before execution, and the corresponding ZAFrida Project is auto-selected.
- Ideal for quick PoC validation, demos, Gadget mode, or attaching to live processes.
- Shortcut:
- Windows / Linux:
Ctrl + Alt + S - macOS:
⌘ + ⌥ + S
- Windows / Linux:
- Right-click inside a Frida JS editor to directly choose:
-
Editor Snippets Insertion
- Provides ZAFrida Frida Snippets in the JS editor context menu.
- One-click insertion of common Frida code patterns, including:
Java.performwrappers- Java method hook templates
- Native hooks via
Interceptor.attach - Module / export enumeration
send()log helpers
- Insertions are performed via WriteCommandAction, fully undo/redo safe.
-
Dynamic Template System (Core Innovation)
- Built-in Android / iOS hook templates (e.g., SSL Pinning Bypass, Method Hook, Native Hook).
- Checkbox-driven control: check to insert code, uncheck to automatically comment it out—no manual deletion required.
- Supports custom templates with real-time preview inside the IDE.
-
Run Script + Attach Script Separation
- Supports a primary Run Script and an independent Attach Script.
- Enables clean separation between startup hooks and runtime injection logic for advanced debugging workflows.
-
Project-Based Configuration (ZAFrida Project)
- Introduces the ZAFrida Project concept to persist devices, targets, scripts, attach scripts, and connection parameters as a complete working context.
- In the Project View, supports:
New Frida ProjectSelect Frida ProjectLoad Frida Project
- UI state and configuration are automatically restored when switching projects.
-
Smart Python / Frida Environment Resolution
- Automatically detects the current PyCharm project’s Python SDK (venv / conda).
- Dynamically injects PATH to ensure the correct
frida/frida-toolsare used. - Handles Remote and Gadget scenarios to avoid incorrect local environment injection.
-
Developer Aids
- One-click installation of
frida-gum.d.tsfor type hints and intelligent code completion in Frida JS.
- One-click installation of
-
Skills Local Automation API
- Adds a local Skills HTTP API (disabled by default) for scripted control: project switching, device/connection mode setup, Run/Attach actions, and run/attach log path/content reading.
- How to enable:
Settings/Preferences -> ZAFrida -> Skills HTTP API, then checkEnable Skills. - Bundled CLI and template:
skills-cli/zafrida_skill_cli.pyskills-template/zafrida-http-control/
Use Cases
ZAFrida UI is suitable for all scenarios involving reverse engineering with Frida, especially:
- Android / iOS App penetration testing and reverse analysis.
- Debugging processes requiring frequent switching of different Hook scripts.
- Engineers accustomed to using IDEs (PyCharm/IDEA) for mixed Python and JS development.
Technical Documentation
-
Requirements:
- IntelliJ IDEA or PyCharm (Recommended 2024.3+)
- Python3 and
frida-toolsinstalled locally (pip install frida-tools) - Ensure
frida,frida-ps, andfrida-ls-devicesare in the system PATH or configured in plugin settings.
-
Issues: Github Issues
Start the Project
- Clone source:
git clone https://github.com/yilongmd/zafrida-ui.git - Open the project in IntelliJ IDEA.
- Run the Gradle task
runIdeto start the debug environment.