
Skip to content
KitploitKITPLOIT
ToolsBlog
Einreichen
ToolsBlog
Einreichen

Hacking-, PenTest- und Cybersicherheits-Tools für Ihr Sicherheitsarsenal!

Kitploit ist ein Verzeichnis von Hacking-, Cybersicherheits- und Pentesting-Tools. Entdecken Sie die neuesten Projekt-Updates, um Schwachstellen zu finden, Systeme zu analysieren, Tests zu automatisieren und Ihre Sicherheit zu stärken.

··Feeds·Kontakt·Datenschutz·© 2026 Kitploit

Tool-Verzeichnis

Kategorien

Alle Kategorien anzeigen
Loading categories
zscan — Zscan ein Scan-Blasting-Toolset | Kitploit
Tools/GitHubGitHub/zyylhn/zscan
AufklärungSchwachstellenscannerNetzwerkkartierungPasswortangriffePort-ScanningExploitationPenetrationstests
GitHubzyylhn/zscan

zscan

Zscan ein Scan-Blasting-Toolset

Repository anzeigen
539744vor 2 JahrenVon Kitploit geprüft

Beliebteste

Alle anzeigen →

Entdecken Sie die meistgenutzten Tools unserer Community.

Alle Tools erkunden

Durchsuchen Sie unsere Tool-Sammlung

Alle Tools anzeigen →
Teilen

Zscan – ein Scan- und Blasting-Toolset

Licens Releases go

📄Englisches Dokument

Update-Inhalte siehe log

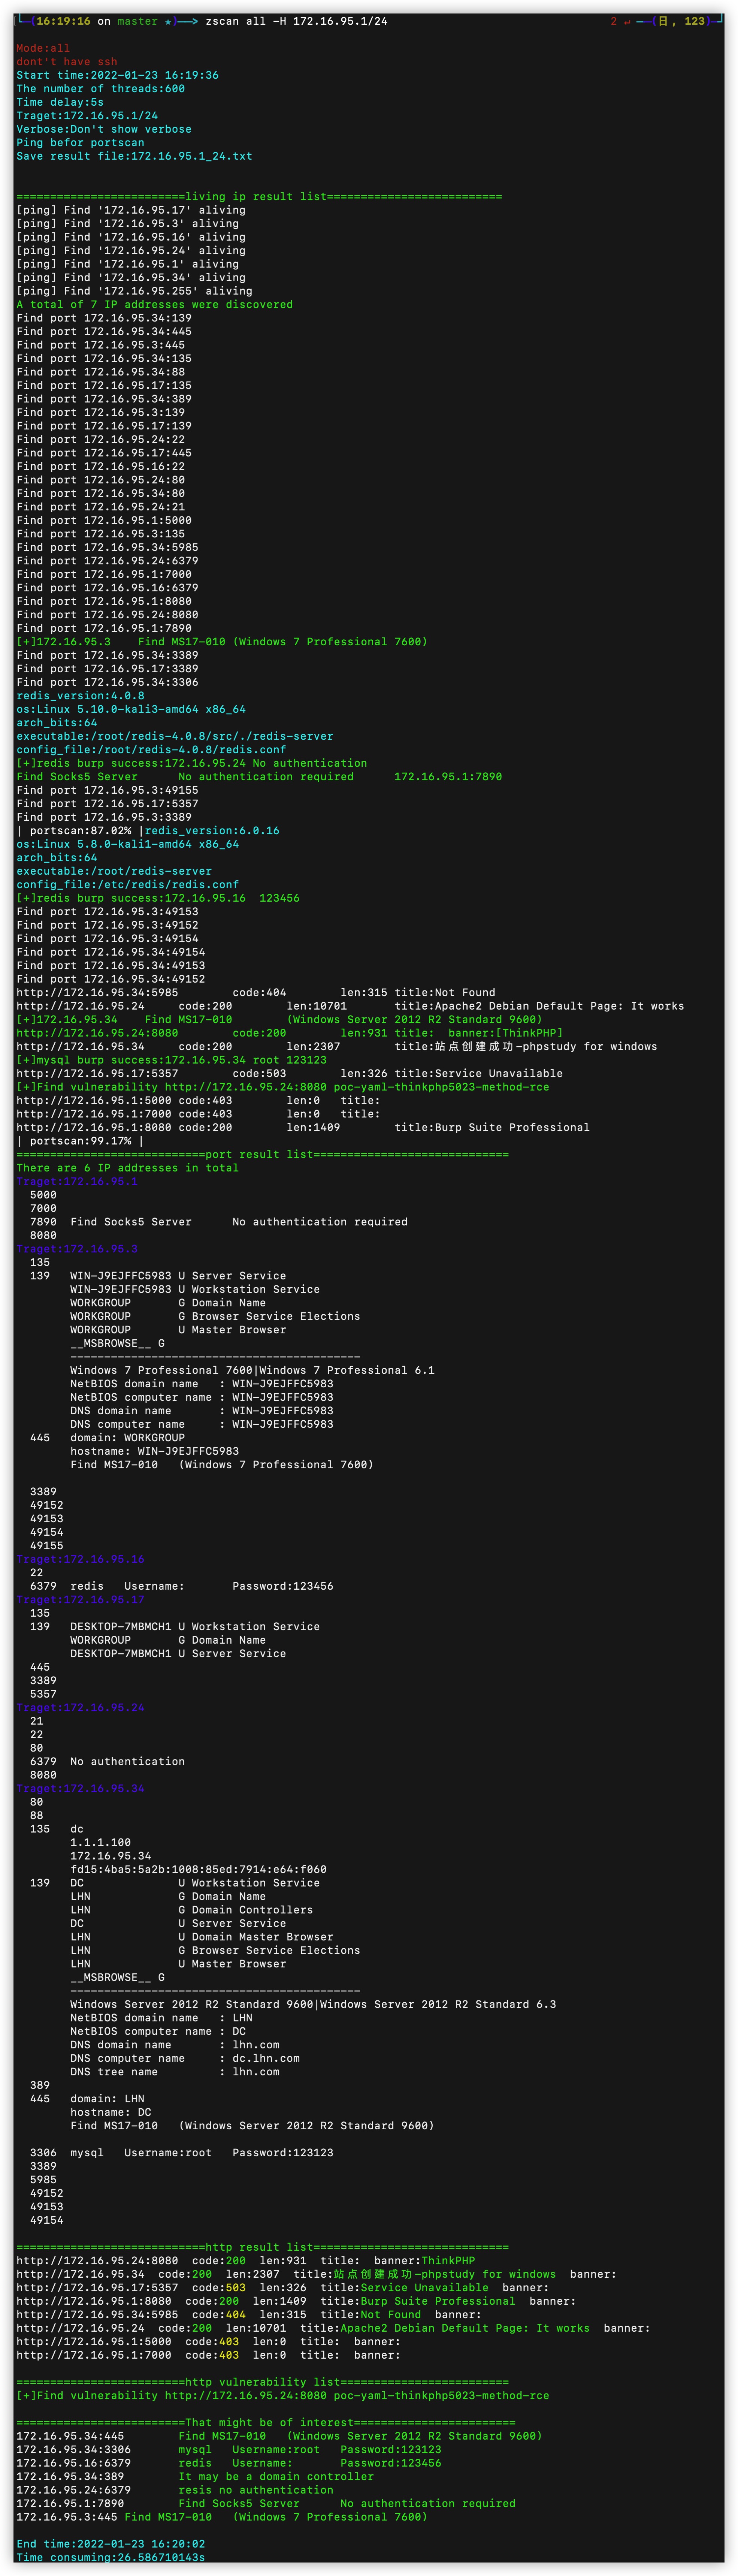
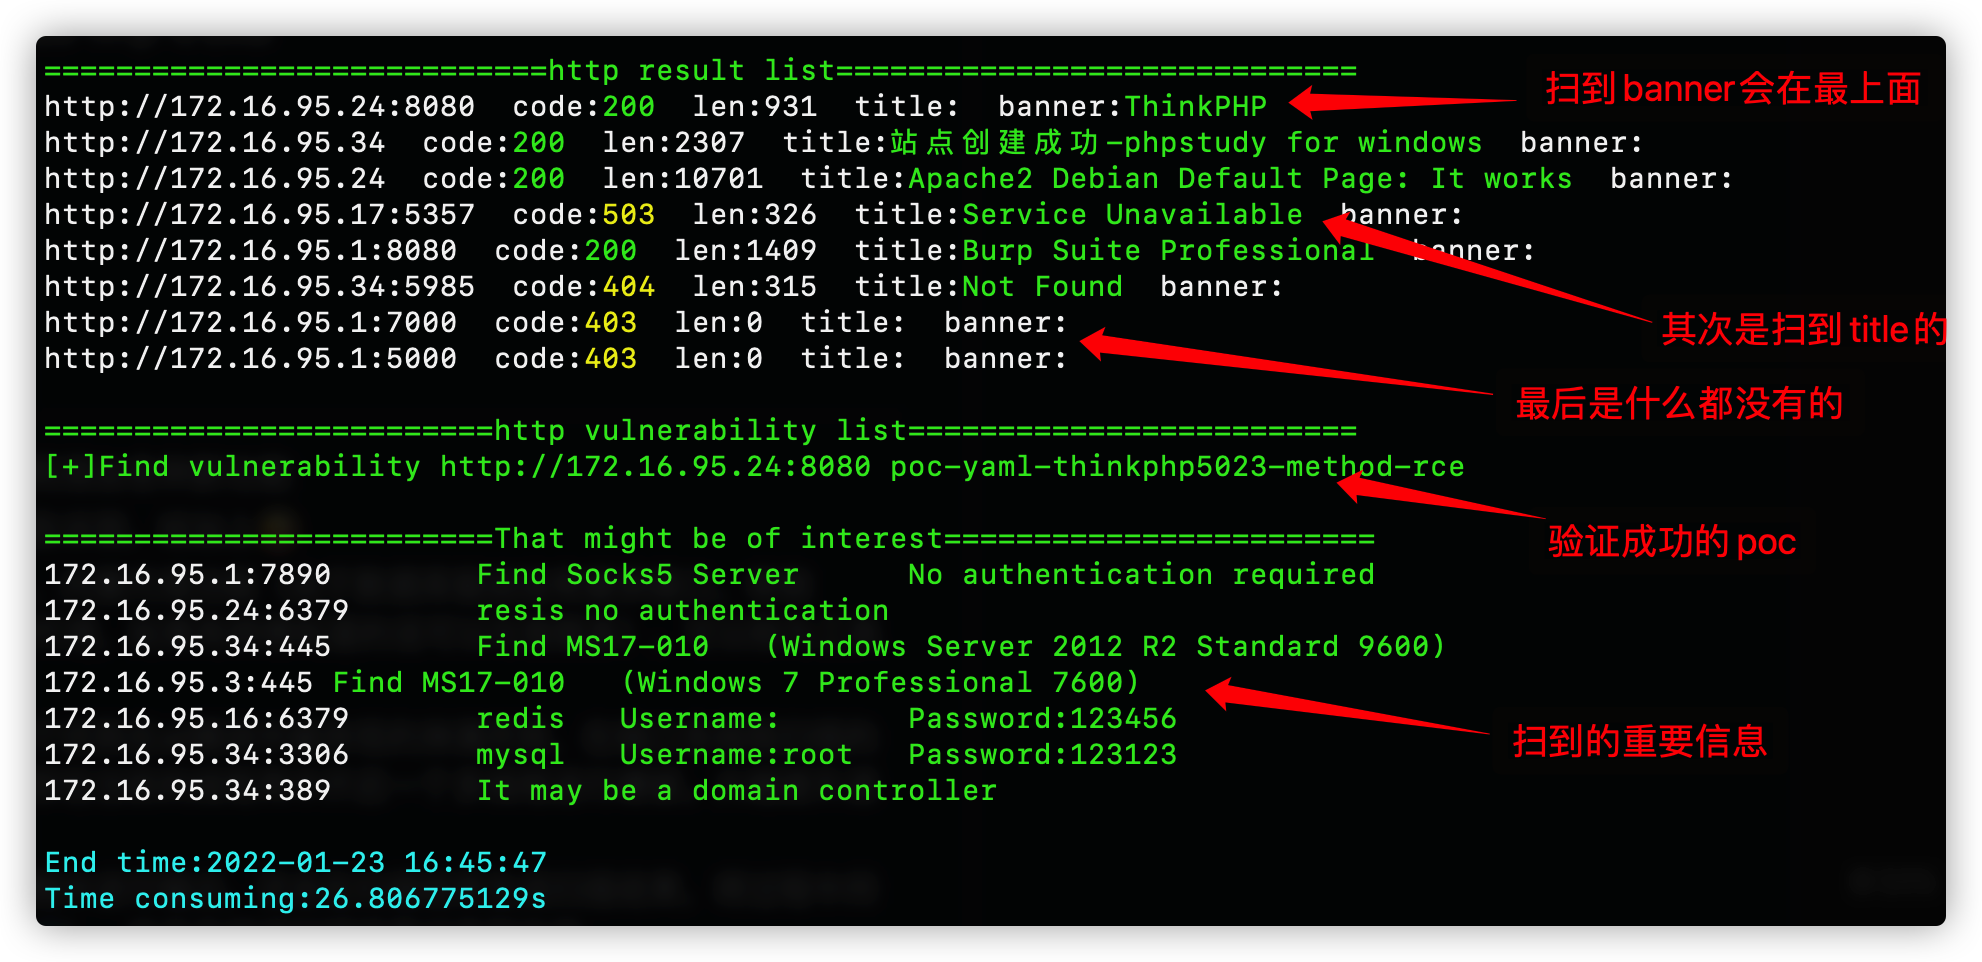
Format der Ergebnisausgabe -Einige Screenshots der Ausgabe, unterteilt in zwei Phasen: Die erste Phase ist die Ausgabe während des Scanvorgangs, beginnend mit dem Ende der Host-Erkennung. Die zweite Phase ist die Zusammenstellung aller Scanergebnisse, beginnend mit der Ausgabe der Port-Ergebnisliste.

Einführung🎉

​ Zscan ist ein Open-Source-Toolkit für interne Netzwerk-Portscanner, Brute-Force-Werkzeuge und andere nützliche Tools. Es kann als Werkzeugpaket bezeichnet werden. Basierend auf der Erkennung von internen Netzwerksegmenten, Hosts und Ports können im Blast-Module Dienste wie MySQL, MSSQL, Redis, Mongo, PostgreSQL, FTP, SSH, LDAP, RDP, SMB mit Brute-Force angegriffen werden. Im Scan-Module werden Scans wie NetBIOS, SMB, Oxid, SOCKS-Server (Proxyserver-Scan), MS17-010, HTTP-PoC-Scans durchgeführt. Standardmäßig werden HTTP-Titel und Fingerabdrücke erfasst. Im Server-Module können ein HTTP-Server (mit Datei-Upload/Download) und ein SOCKS5-Server (Proxy-Server) gestartet werden. Im Tools-Module ist derzeit nur NC als praktisches kleines Werkzeug integriert. Neu hinzugefügt wurde das Exploit-Module, das nach erfolgreichem Brute-Force Angriffen genutzt werden kann, z. B. interaktive SSH-Anmeldung (Benutzername/Passwort oder Schlüssel), Redis-Master-Slave-Replikation und Lua-Sandbox-Escape (Datei-Upload und Befehlsausführung), LDAP-Abfragen (mit integrierten gängigen Abfragen). Außerdem gibt es das All-Module, das beim Scannen alle Scan- und Brute-Force-Module aufruft. Es unterstützt IPv6-Scans und die Eingabe von Domänen mit automatischer CDN-Erkennung. Die spezifischen Modulfunktionen sind wie folgt.

Das Tool ist relativ groß; später wird eine abgespeckte Version erscheinen. Durch das modulare Design lassen sich unnötige Funktionen leicht entfernen.``` all 调用所有扫描和爆破模块 ping 主机发现和网段发现 ps 基本的端口扫描和http指纹识别title抓取 scan 扫描模块 --->ms17010扫描 --->poc漏洞扫描(内置380个poc) --->proxyfind内网代理服务器扫描 --->winscan Windows的smb,netbios和oxid扫描 blast 爆破服务模块(包括以下爆破模块) --->ftp --->ldap --->mongo --->mssql --->mysql --->postgres --->rdp --->redis --->smb --->ssh server start http server or socks5 server --->http服务器(可上传下载文件) --->socks5服务器(可启动一个代理服务器,支持身份验证) exploit 漏洞利用模块 --->ldap查询 --->redis组从复制上传文件执行命令,lua沙箱逃逸RCE --->snmp查询 --->ssh登陆 --->sunlogin向日葵RCE tools 实用工具模块 --->nc简单的nc,可以开放端口连接端口 --->searchfile支持多线程正则搜索文件

root@kitploit:~
Das Verwendungsformat ist```
zscan 模块 参数

Funktionsmodule

openrasp_iast umfasst hauptsächlich die folgenden Funktionsmodule:

  • Schwachstellenerkennung
    • Unterstützt die Erkennung von OWASP TOP 10-Schwachstellen
    • Unterstützt die Erkennung folgender verschiedener Schwachstellentypen
      • Reflektierte/gespeicherte XSS-Schwachstelle
      • SQL-Injection
      • SSRF-Schwachstelle
      • Beliebiger Datei-Upload
      • Befehlsinjektion
      • Befehlsausführung
      • XXE-Schwachstelle (standardmäßig deaktiviert)
      • Deserialisierungsschwachstelle (standardmäßig deaktiviert)
      • Verzeichnis-Traversal (standardmäßig deaktiviert)
      • Unsicherer Zufallszahlengenerator (standardmäßig deaktiviert)
      • Unsicherer Hash-Algorithmus (standardmäßig deaktiviert)
      • Unsicherer Verschlüsselungsalgorithmus (standardmäßig deaktiviert)
      • Externe Entitätsinjektion (standardmäßig deaktiviert)
      • Denial of Service (standardmäßig deaktiviert)
      • Log-Fälschung (standardmäßig deaktiviert)
      • E-Mail-Header-Injektion (standardmäßig deaktiviert)
      • LDAP-Injektion (standardmäßig deaktiviert)
      • Offenlegung von SQL-Ausnahmen (standardmäßig deaktiviert)
      • Skriptcode-Injektion (standardmäßig deaktiviert)
      • Pfadmanipulation (standardmäßig deaktiviert)
      • Cookie ohne HttpOnly gesetzt (standardmäßig deaktiviert)
      • Cookie ohne Samesite gesetzt (standardmäßig deaktiviert)
      • Cookie ohne Secure gesetzt (standardmäßig deaktiviert)
      • Unsicherer XSS-Schutz (standardmäßig deaktiviert)
      • Fehlerhafte CORS-Richtlinienkonfiguration (standardmäßig deaktiviert)
      • Unsichere CORS-Richtlinie (standardmäßig deaktiviert)
      • Unsichere CSP-Richtlinie (standardmäßig deaktiviert)
      • MIME-Sniffing (standardmäßig deaktiviert)
      • Unsichere URL (standardmäßig deaktiviert)
      • Unsichere URL-Weiterleitung (standardmäßig deaktiviert)
      • Unsicherer Datei-Download (standardmäßig deaktiviert)
      • Unsicheres JSONP (standardmäßig deaktiviert)
      • Unsichere HTTP-Methoden (standardmäßig deaktiviert)
      • Unsichere HTML5-Nachrichten (standardmäßig deaktiviert)
      • Unsicherer WebSocket (standardmäßig deaktiviert)
      • Unsichere SSL/TLS-Konfiguration (standardmäßig deaktiviert)
      • Unsichere CORS-Konfiguration (standardmäßig deaktiviert)
      • Unsichere CSP-Konfiguration (standardmäßig deaktiviert)
      • Unsichere X-Frame-Options (standardmäßig deaktiviert)
      • Unsichere X-Content-Type-Options (standardmäßig deaktiviert)
      • Unsichere X-XSS-Protection (standardmäßig deaktiviert)

/___ \ /\ \ /\ \ /\ __ \ /\ "-.\ \
/
/ /
\ _
\ \ \ _
__ \ \ __ \ \ \ -. \
/_\ /_\ \ ___\ \ _\ _\ \ _\"_\ // // /_____/ //// // //

Usage: zscan [command]

Available Commands: all Use all scan mode blast Common service blasting exploit sshlogin,redisexec help Help about any command ping ping scan to find computer ps Port Scan scan ms17010,proxyfind,snmp,winscan(smb,netbios,oxid),poc server start http server or socks5 server

Flags: -h, --help help for zscan --nobar disable portscan progress bar -o, --output string the path of result file (default "result.txt") --proxy string Connect with a proxy(user:[email protected]:1080 or 172.16.95.1:1080) -T, --thread thread Set thread eg:2000 (default 600) -t, --timeout time Set timeout(s) eg:5s (default 5s) -v, --verbose Show verbose information

root@kitploit:~
模块里面的Flag代表当前命令的参数,Global Flags代表全局参数(所有命令都可以用)
这里的Flags为全局参数,所有模块都可以使用

- --log:启用这个参数会将当前运行结果以追加的形式写到log.txt(可以记下每次运行的结果)
- -o --output:默认在当前目录的中文件名为Hosts -o指定路径
- --proxy :设置代理,用户名密码(user:pass@ip:port)不需要省份验证(ip:port)
- -T --thread:指定线程数,默认100
- -t --timeout:设置延时,网络条件好追求速度的话可以设置成1s
- -v --verbose:设置显示扫描过程信息

## 功能模块😈

目前已有模块:

<details>
<summary><b>ping模块:普通用户权限调用系统ping,root权限可以选择使用icmp数据包</b></summary>```
zscan ping 

Unterstützt die Zeichenfolgensuche und Hexadezimalsuche für Dateien beliebigen Typs, einschließlich der Dateityperkennung basierend auf Magic-Signaturen.``` Usage: zscan ping [flags]

Flags: -d, --discover string Live network segment found,local parameter uses the local NIC information。eg:zscan ping -d local/zscan ping -d 172.18.0.0,172.19.0.0 -h, --help help for ping -H, --host hosts Set hosts(The format is similar to Nmap) --hostfile string Set host file -i, --icmp Icmp packets are sent to check whether the host is alive(need root)

Global Flags: --nobar disable portscan progress bar -o, --output string the path of result file (default "result.txt") --proxy string Connect with a proxy(user:[email protected]:1080 or 172.16.95.1:1080) -T, --thread thread Set thread eg:2000 (default 600) -t, --timeout time Set timeout(s) eg:5s (default 5s) -v, --verbose Show verbose information

root@kitploit:~
必须指定host和hostfile两个参数其中的一个,当有root权限的时候可以使用-i不调用本地的ping而是自己发icmp数据包(线程开的特别高的话几千那种,调用本地ping命令会导致cpu占用过高)

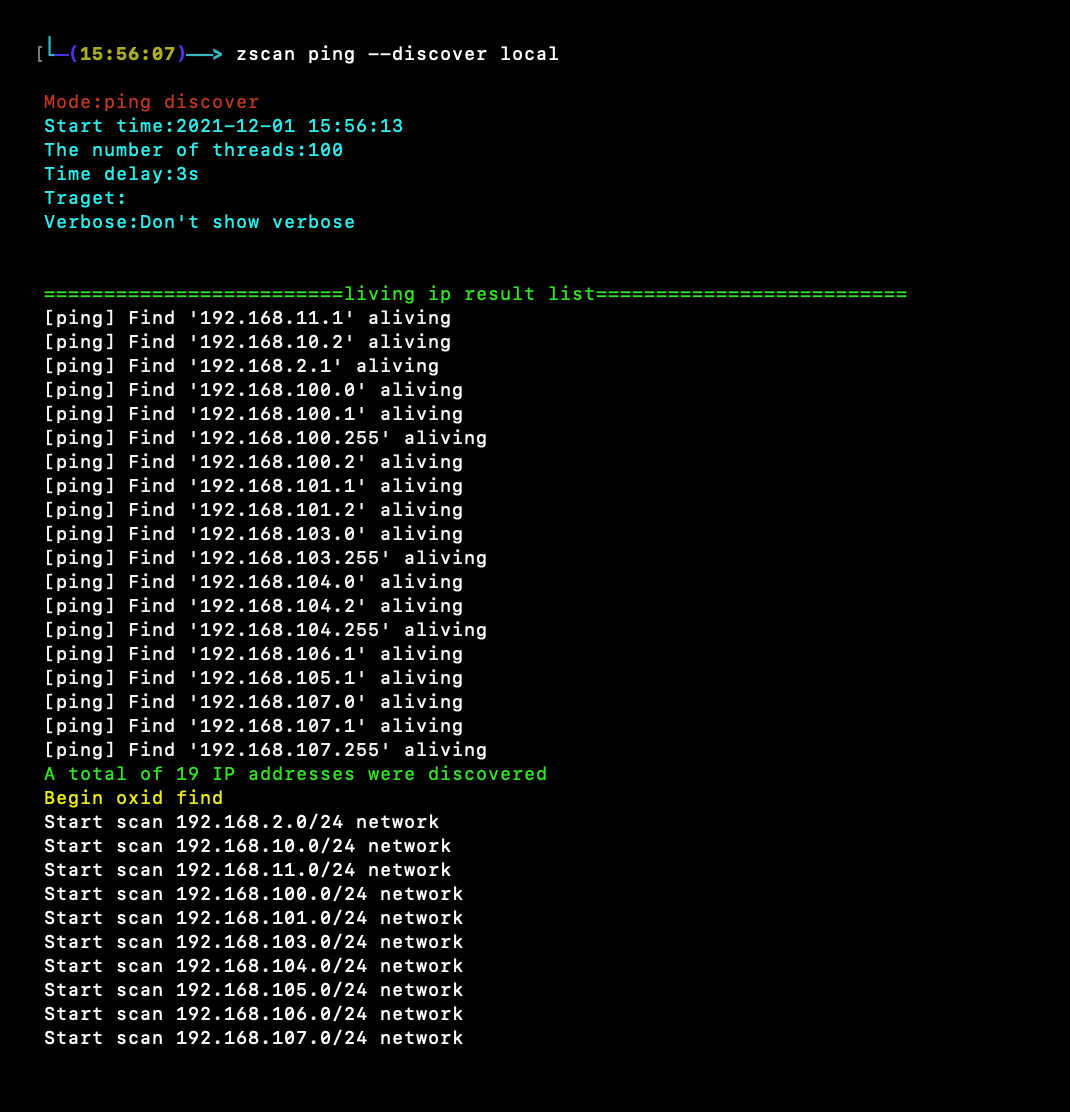
--discover两种网段发现模式,一种是ping网络b段网关,一种是oxid扫描

--discover后面需要给一个参数,如果给local(zscan ping --disconver local)就会读取本地网卡信息,去扫描本地的网络b段,例如读取到本地的两张网卡192.168.13.13和172.16.95.23,那么他就会去ping192.168.0.0/16和172.16.0.0/16这两个b段

还可以给定一个或者多个b段ip例如172.17.0.0或者172.18.0.0,10.10.0.0,多个ip段用逗号隔开

</details>

<details>
<summary><b>ps-Modul: Portscan und Abrufen des HTTP-Titels</b></summary>```
zscan ps

💻Tool-Einführung

image

Dieses Tool heißt FAM, ein Linux-Systemüberwachungstool, das uns Symbole bietet, CPU, Speicher, Netzwerk und andere Informationen anzeigt und gleichzeitig die Diagrammanalyse seiner Überwachungsindikatoren anzeigt und aufzeichnet. Das Tool basiert auf Electron und ist ein Akronym aus [**F**ast] [**A**nd] [**M**onitoring]. FAM bietet derzeit offizielle Installationspakete wie deb, rpm, pacman an, kann auch direkt als AppImage-Datei heruntergeladen werden und unterstützt zudem die Überwachung von Windows.

``` Usage: zscan ps [flags]

Flags: -b, --banner Return banner information -h, --help help for ps -H, --host hosts Set hosts(The format is similar to Nmap) eg:192.168.1.1/24,172.16.95.1-100,127.0.0.1 --hostfile string Set host file -i, --icmp Icmp packets are sent to check whether the host is alive(need root) --noping not ping discovery before port scanning --nowebscan Whether to perform HTTP scanning (httpTitle and HTTP vulnerabilities)(default on) -p, --port port Set port eg:1-1000,3306,3389 or use " zscan ps -p l" ) to scan less port(thirty port) -s, --syn use syn scan --vulscan Whether to perform HTTP vulnerabilities(default off)

Global Flags: --nobar disable portscan progress bar -o, --output string the path of result file (default "result.txt") --proxy string Connect with a proxy(user:[email protected]:1080 or 172.16.95.1:1080) -T, --thread thread Set thread eg:2000 (default 600) -t, --timeout time Set timeout(s) eg:5s (default 5s) -v, --verbose Show verbose information

root@kitploit:~
--host und --hostfile geben das Ziel an

-p gibt den Port an, falls nicht angegeben wird der Standardport verwendet, oder "l" für Less-Ports (etwa 30 gängige Ports)

--noping scannt alle Ziele direkt, ohne vorher zu pingen

--icmp verwendet beim Ping ICMP-Pakete zur Host-Erkennung

--nowebscan deaktiviert den Web-Scan und führt nur einen Port-Scan durch

--vulscan aktiviert die POC-Erkennung (nur sinnvoll, wenn der Web-Scan aktiviert ist, sonst bedeutungslos)

--syn verwendet SYN-Scan (erfordert erhöhte Rechte)

</details>

<details>
<summary><b>all-Modul: Ruft alle Scan- und Brute-Force-Module zum Scannen auf</b></summary>```
zscan all

Bitte fügen Sie den zu übersetzenden Markdown-Text ein.``` Usage: zscan all [flags]

Flags: -h, --help help for all -H, --host hosts Set hosts(The format is similar to Nmap) eg:192.168.1.1/24,172.16.95.1-100,127.0.0.1 --hostfile string Set host file -i, --icmp Icmp packets are sent to check whether the host is alive(need root) --noburp Set postgres passworddict path --noping Not ping before port scanning --novulscan disable http vulnerability scan --passdict string Set postgres passworddict path -P, --password string Set postgres password -p, --port port Set port eg:1-1000,3306,3389 or use " zscan all -p l" ) to scan less port(thirty port) -U, --username string Set user name

Global Flags: --nobar disable portscan progress bar -o, --output string the path of result file (default "result.txt") --proxy string Connect with a proxy(user:[email protected]:1080 or 172.16.95.1:1080) -T, --thread thread Set thread eg:2000 (default 600) -t, --timeout time Set timeout(s) eg:5s (default 5s) -v, --verbose Show verbose information

root@kitploit:~
all模块本质是和ps模块基本相同,只不过all模块扫到对应的端口的时候会在当前线程中进行指纹识别或者用户名密码爆破

all模块参数和ps模块相同,就多了一个密码字典,是用来设置扫到需要爆破的端口时候的字典,其他都一样

--notburp 不进行爆破只进行扫描

--novulscan 由于all模块会调用所有模块,这个参数用于禁止漏洞扫描

</details>

<details>
<summary><b>blast: Brute-Force-Modul, das Brute-Force-Funktionen für gängige Dienste enthält</b></summary>```
zscan blast

[Kein Inhalt zur Übersetzung bereitgestellt.]``` Usage: zscan blast [command]

Available Commands: ftp burp ftp username and password ldap burp ldap username and password mongo burp mongodb username and password mssql burp mssql username and password mysql burp mysql username and password postgres burp postgres username and password rdp burp remote desktop(3389) redis burp redis password smb burp smb usernamae and password ssh burp ssh username password or traverse the key

Flags: -h, --help help for blast

Global Flags: --nobar disable portscan progress bar -o, --output string the path of result file (default "result.txt") --proxy string Connect with a proxy(user:[email protected]:1080 or 172.16.95.1:1080) -T, --thread thread Set thread eg:2000 (default 600) -t, --timeout time Set timeout(s) eg:5s (default 5s) -v, --verbose Show verbose information

root@kitploit:~
Im Grunde funktionieren alle Brute-Force-Module gleich: Man gibt einen Benutzernamen und ein Passwort oder eine Passwort-Wörterbuch-Datei an und kann auch die Anzahl der Brute-Force-Threads festlegen. Dieser Thread unterscheidet sich vom Thread der Option `-T`. `-T` steht für die Anzahl der Ziele, die wir parallel scannen (dieses Ziel ist eine Kombination aus IP und Port, jeder parallele Scan entspricht dem Senden eines Datenpakets an das Ziel). `burptheard` bedeutet, dass, wenn wir in einem einzelnen Thread des parallelen Scans unseren Zielport (z. B. MySQL) entdecken, im aktuellen Scan-Thread ein Multi-Thread-Brute-Force gestartet wird (hier sind die Ziele eine bestimmte IP und ein bestimmter Port; hier ist eine Ratenbegrenzung erforderlich, da eine zu hohe Geschwindigkeit zur Unbrauchbarkeit des Zieldienstes führen kann).

</details>

<details>
<summary><b>Scan-Modul: Häufige Scan-Module</b></summary>```
Usage:
  zscan scan [command]

Available Commands:
  ms17010     MS17_010 scan
  poc         poc check
  proxyfind   Scan proxy
  snmp        snmp scan
  winscan     netbios、smb、oxid scan

Flags:
  -h, --help   help for scan

Global Flags:
      --nobar           disable portscan progress bar
  -o, --output string   the path of result file (default "result.txt")
      --proxy string    Connect with a proxy(user:[email protected]:1080 or 172.16.95.1:1080)
  -T, --thread thread   Set thread eg:2000 (default 600)
  -t, --timeout time    Set timeout(s) eg:5s (default 5s)
  -v, --verbose         Show verbose information


proxyfind-Modul: Scannt nach Proxys im Netzwerk, unterstützt derzeit SOCKS4/5, später wird HTTP hinzugefügt``` zscan scan proxyfind ``` - **Python-Version**: 3.8+

Funktionen

  • Unterstützt alle standardmäßigen HTTP-Methoden (GET, POST, PUT, DELETE, HEAD, OPTIONS, PATCH)
  • Automatische Weiterleitungen verfolgen
  • Unterstützt HTTP- und SOCKS-Proxys (http, https, socks4, socks5)
  • Anpassbare Anfrage-Header, Cookies, Timeout
  • Unterstützt Datei-Uploads (multipart/form-data)
  • Automatische Dekomprimierung (gzip, deflate)
  • Unterstützt HTTPS-Zertifikatsüberprüfung
  • Sitzungserhaltung (Session)
  • Detaillierte Fehlerbehandlung und Protokollierung

Installation

Mit pip

root@kitploit:~
pip install request-master

Installation aus dem Quellcode

root@kitploit:~
git clone https://github.com/example/request-master.git
cd request-master
pip install .

Anwendungsbeispiele

Einfache GET-Anfrage

root@kitploit:~
import request_master

response = request_master.get('https://api.example.com/users')
print(response.status_code)
print(response.json())
winscan-Modul: enthält oxid-, smb- und netbios-Scanfunktionen``` Usage: zscan scan winscan [flags]

Flags: -h, --help help for winscan -H, --host string Set target --hostfile string Set host file --netbios netbios scan --oxid oxid scan --smb smb scan

Global Flags: --log Record the scan results in chronological order,Save path./log.txt -O, --output Whether to enter the results into a file(default ./result.txt),can use --path set --path string the path of result file (default "result.txt") -T, --thread thread Set thread eg:2000 (default 100) -t, --timeout time Set timeout(s) eg:5s (default 3s) -v, --verbose Show verbose information

root@kitploit:~
Wenn Sie das Ziel direkt angeben, werden netbios, oxid und smb gleichzeitig gescannt. Sie können -- verwenden, um nur eines anzugeben.

</details>

<details>
<summary><b>poc-Modul: sowohl ein eigenständiges Modul als auch eine Funktion, die in anderen Modulen aufgerufen wird</b></summary>```
poc check

Usage:
  zscan scan poc [flags]

Flags:
  -h, --help             help for poc
  -l, --listpoc          List built in poc
      --pocname string   set the poc name
      --pocpath string   set target url
      --pocthread int    set poc scan thread (default 500)
  -u, --url string       set target url
      --urlfile string   set target file

Global Flags:
      --nobar           disable portscan progress bar
  -o, --output string   the path of result file (default "result.txt")
      --proxy string    Connect with a proxy(user:[email protected]:1080 or 172.16.95.1:1080)
  -T, --thread thread   Set thread eg:2000 (default 600)
  -t, --timeout time    Set timeout(s) eg:5s (default 5s)
  -v, --verbose         Show verbose information

-l/--list: Listet die integrierten PoCs des Tools auf

--pocname: Ein Filter, der PoCs auswählt, deren Namen das angegebene Feld enthalten (verfügbar für Scans und Ansicht)

Server-Modul: Server-Modul aktivieren``` Usage: zscan server [command]

Available Commands: httpserver Start an authentication HTTP server socks5 Create a socks5 server

Flags: -h, --help help for server

Global Flags: --nobar disable portscan progress bar -o, --output string the path of result file (default "result.txt") --proxy string Connect with a proxy(user:[email protected]:1080 or 172.16.95.1:1080) -T, --thread thread Set thread eg:2000 (default 600) -t, --timeout time Set timeout(s) eg:5s (default 5s) -v, --verbose Show verbose information

root@kitploit:~
<details>
<summary><b>socks5-Modul: Starten eines socks5-Servers</b></summary>```
zscan socks5

Beispiele

1. Erkennung verdächtiger PowerShell-Download-Skripte

Hier ist ein Beispiel, wie man Elasticsearch-Wildcard-Abfragen und Sigma-Regeln verwendet, um verdächtige PowerShell-Download-Aktivitäten zu erkennen. Zuerst speichert man den Inhalt der PowerShell-Skripte in einem Elasticsearch-Index und sucht dann mit Wildcard-Abfragen nach Schlüsselfeldern wie CommandLine und ParentImage, um verdächtige Downloads zu identifizieren. Durch Anpassen der Abfrageparameter kann man die Suchergebnisse auf Downloads von verdächtigen Domains wie *.example.com oder *.malicious.net eingrenzen. Zusätzlich können Sigma-Regeln verwendet werden, um bestimmte PowerShell-Befehle und -Parameter zu prüfen, z.B. solche, die -EncodedCommand oder enthalten.

tools-Modul: Integriert häufig verwendete Werkzeuge``` Usage: zscan tools [command]

Available Commands: nc A easy nc

Flags: -h, --help help for tools

Global Flags: --nobar disable portscan progress bar -o, --output string the path of result file (default "result.txt") --proxy string Connect with a proxy(user:[email protected]:1080 or 172.16.95.1:1080) -T, --thread thread Set thread eg:2000 (default 600) -t, --timeout time Set timeout(s) eg:5s (default 5s) -v, --verbose Show verbose information

root@kitploit:~
<details>
<summary><b>nc-Modul: Ein einfacher nc, der Ports öffnen und verbinden kann</b></summary>```
zscan nc

[Kein Inhalt zur Übersetzung bereitgestellt.]``` Usage: zscan nc [flags]

Flags: -a, --addr string listen/connect host address eg(listen):-a 0.0.0.0:4444 eg(connect):-a 172.16.95.1:4444 -h, --help help for nc -l, --listen listen mode(default connect)

Global Flags: --log Record the scan results in chronological order,Save path./log.txt -O, --output Whether to enter the results into a file(default ./result.txt),can use --path set --path string the path of result file (default "result.txt") -T, --thread thread Set thread eg:2000 (default 100) -t, --timeout time Set timeout(s) eg:5s (default 3s) -v, --verbose Show verbose information

-a指定地址,不使用-l的话代表连接目标,使用-l为监听端口

root@kitploit:~
</details>

<details>
<summary><b>searchfile-Modul: Mehrere Threads durchsuchen Dateien und unterstützen reguläre Ausdrücke</b></summary>```
Search files that support regular matching

Usage:
  zscan tools searchfile [flags]

Flags:
  -d, --dir string           set search base Dir
  -f, --file stringArray     set filename eg:zscan tools searchfile -d ./ -f pass.txt -f user.txt
  -h, --help                 help for searchfile
  -r, --regexp stringArray   Specifies the re matching parameters
      --walk int             Traversal turns on multithreading depth(Try not to go above 5) (default 3)

Global Flags:
      --nobar           disable portscan progress bar
  -o, --output string   the path of result file (default "result.txt")
      --proxy string    Connect with a proxy(user:[email protected]:1080 or 172.16.95.1:1080)
  -T, --thread thread   Set thread eg:2000 (default 600)
  -t, --timeout time    Set timeout(s) eg:5s (default 5s)
  -v, --verbose         Show verbose information
exploit-Modul: Nutzungsmodul nach erfolgreichem Brute-Force des Dienstes``` Usage: zscan exploit [command]

Available Commands: ldap Ldap queries redis Redis utilizes modules snmp snmp scan sshlogin Login using a user name, password, or key sunlogin sunlogin RCE CNVD-2022-10270

Flags: -h, --help help for exploit

Global Flags: --nobar disable portscan progress bar -o, --output string the path of result file (default "result.txt") --proxy string Connect with a proxy(user:[email protected]:1080 or 172.16.95.1:1080) -T, --thread thread Set thread eg:2000 (default 600) -t, --timeout time Set timeout(s) eg:5s (default 5s) -v, --verbose Show verbose information

root@kitploit:~
<details>
<summary><b>snmp-Modul:snmp-Scan</b></summary>```
Usage:
  zscan exploit snmp [flags]

Anpassung für ältere Geräteversionen

Derzeitige Tests auf Android 10 weisen Probleme auf, daher ist es vorübergehend nicht freigegeben. Falls einige Geräte mit angepassten Systemen möglicherweise ebenfalls eine niedrigere Version benötigen, können Sie die Projektstruktur lesen und selbst kompilieren.

Bekannte noch zu verbessernde Punkte

  • Der smbport-Parameter von smb zeigte in tatsächlichen Tests, dass nach Abschluss der Portweiterleitung keine anderen Ports als 445 zugänglich sind – liegt es am Design des smb-Protokolls mit nur einem Port oder an meiner Implementierung? Muss noch überprüft werden.
  • Nachdem der -Client die Verbindung trennt, kann der Server die Verbindung nicht automatisch schließen und zum nächsten Lauschvorgang übergehen – eine nicht-ursachenbezogene Umgehung wurde in platziert, aber dies muss hier behoben werden; ein Heartbeat-Design zwischen Server und Client wird in Betracht gezogen;
sshlogin: Ermöglicht SSH-Anmeldung mit Passwort und Schlüssel``` Usage: zscan exploit sshlogin [flags]

Flags: -h, --help help for sshlogin -H, --host string Set ssh server host -d, --keypath string Set public key path -k, --login_key Use public key login -P, --password string Set ssh password -p, --port int Set ssh server port (default 22) -U, --username string Set ssh username

Global Flags: --nobar disable portscan progress bar -o, --output string the path of result file (default "result.txt") --proxy string Connect with a proxy(user:[email protected]:1080 or 172.16.95.1:1080) -T, --thread thread Set thread eg:2000 (default 600) -t, --timeout time Set timeout(s) eg:5s (default 5s) -v, --verbose Show verbose information

root@kitploit:~
​	Anmeldung mit Benutzername/Passwort: ./zscan exploit ssh -H 172.16.95.24 -U root -P 123456

​	Anmeldung mit öffentlichem Schlüssel: ./zscan exploit ssh -H 172.16.95.24 -U root -k 

​	Die Anmeldung mit öffentlichem Schlüssel sucht standardmäßig nach dem privaten Schlüssel im Verzeichnis ./ssh des aktuellen Benutzers. Mit -d/--keypath kann der Pfad zum privaten Schlüssel angegeben werden.

</details>

<details>
<summary><b>redis:redis Ausnutzungsmodul</b></summary>```
Usage:
  zscan exploit redis [flags]

Flags:
  -c, --command string    Set the command you want to execute eg:(zscan exploit redis -H 172.16.95.16 -P 123456 -c "keys *")
      --dstpath string    set target path
      --exec              use execute the command mode
  -h, --help              help for redis
  -H, --host string       Set redis server host
      --lhost string      set listen host(!!!Make sure the target has access!!!)
      --lport int         set listen port(!!!Make sure the target has access!!!) (default 20001)
      --lua               use CVE-2022-0543 to attack
  -P, --password string   Set redis password
  -p, --port int          Set redis server port (default 6379)
      --so string         set .so file path
      --srcpath string    set upload file path
      --upload            use upload mode

Global Flags:
      --nobar           disable portscan progress bar
  -o, --output string   the path of result file (default "result.txt")
      --proxy string    Connect with a proxy(user:[email protected]:1080 or 172.16.95.1:1080)
  -T, --thread thread   Set thread eg:2000 (default 600)
  -t, --timeout time    Set timeout(s) eg:5s (default 5s)
  -v, --verbose         Show verbose information
sunlogin 模块: 向日葵 RCE 利用模块``` sunlogin RCE CNVD-2022-10270

Usage: zscan exploit sunlogin [flags]

Flags: -c, --command string command you want to execute -h, --help help for sunlogin -H, --host string Set redis server host -p, --port int Set RCE port

Global Flags: --nobar disable portscan progress bar -o, --output string the path of result file (default "result.txt") --proxy string Connect with a proxy(user:[email protected]:1080 or 172.16.95.1:1080) -T, --thread thread Set thread eg:2000 (default 600) -t, --timeout time Set timeout(s) eg:5s (default 5s) -v, --verbose Show verbose information

root@kitploit:~
漏洞发现可以使用ps模块或者all模块对40000-65535进行扫描,可以自动识别出漏洞端口

可以使用-c执行一条命令,不使用-c进入交互式(伪交互式)按照输入执行命令

-p指定端口

</details>

</details>

## Verwendungsbeispiele🤪

<details>
<summary><b>Ping-Subnetz-Erkennung: zscan ping --discover local</b></summary>```
zscan ping --discover local或者
zscan ping --discover 192.168.0.0

ps-Portscan:zscan ps -H ip``` zscan ps -H 172.16.95.1-30 [--noping禁用ping] zscan ps -H 172.16.95.1-30 --vulsacn //扫描完http banner之后进行poc探测 zscan ps -H 172.16.95.1-30 --nowebscan //只扫描端口,不进行http探测 ``` ![](https://assets.kitploit.com/production/public/readmes/5177/abda5c86b9152f1cbaa2bf48453657a948970a1d197fc6b37f55612db639032c.jpg) ![](https://assets.kitploit.com/production/public/readmes/5177/cd58bdc53b1644a3681763fe0bb3ffb0c5144c4e86fcd05ad72c6a6ac82f9611.jpg) ![](https://assets.kitploit.com/production/public/readmes/5177/1b2134fb3d91c5065923862db6eeaf838befb73a0ca0d5c9f3ffe20d817fabbe.jpg)
SSH-Modul Brute-Force/Login``` 爆破 zscan blast ssh -H 172.16.95.24 登录 zscan exploit ssh -H 172.16.95.24 -U root -P 123123 ``` ![](https://assets.kitploit.com/production/public/readmes/5177/b7c12e48ab63ea4592a1a8b37b39d35aa305f5dcec44a61a0e03eb83b766c7c0.jpg)
Redis-Modul: Brute-Force / Befehlsausführung``` 爆破 zscan blast redis -H 172.16.95.1-30 登录 zscan exploit redis -H 172.16.95.16 -c cmd ``` ![](https://assets.kitploit.com/production/public/readmes/5177/c105a39b6a4230ee42485b8e3b6fe93624b6ff77a13e061450361946712c5c0a.jpg)

winscan-Modul:zscan scan winscan -H ip``` zscan scan winscan -H 172.16.95.1-33 ``` ![](https://assets.kitploit.com/production/public/readmes/5177/4741150f5ed9a47d1770e04ab344b459e3624ad02634648d4c08a92f9b58397b.jpg)
Alle Scan-Brute-Force-Module aufrufen:zscan all -H ip``` zscan all -H 172.16.95.1-30 zscan all -H 172.16.95.1-30 --novulscan //不进行poc探测 ``` ![](https://assets.kitploit.com/production/public/readmes/5177/35c973af3de607d1483c3d657b5573ae82d27735bc22e64cb033c56c2635fff2.jpg)
PoC-Scan-Modul:zscan scan poc -u url``` zscan scan poc -l //列出所有内置poc zscan scan poc -l --pocname weblogic //列出内置和weblogic有关的poc zscan scan poc -u http://172.16.95.24:8080 //使用所有内置poc扫描目标 zscan scan poc -u http://172.16.95.24:8080 --pocname weblogic //只使用weblogic的poc zscan scan poc -U http://172.16.95.24:8080 --pocpath /root/pocs //使用整个pocs目录下的poc zscan scan poc --urlfile url.txt --pocpath /root/pocs/weblogic.yml //使用单个poc批量扫描目标 ```

Vorteile des Tools 🚀

  • Befehle sind einfach und bequem, Modulfunktionen sind klar aufgerufen und einfach zu erweitern, um neue Funktionen hinzuzufügen oder unnötige Module zu entfernen
  • Einzigartige Netzsegment-Erkennungsfunktion; wenn jemand eine bessere Erkennungsmethode hat, lasst es mich wissen und ich füge sie hinzu 😜
  • Nicht nur ein Scanner, sondern integriert auch verschiedene gängige praktische Funktionen, mit einer integrierten Proxy-Funktion (da die Datenbanktreiber keine Schnittstellen bereitstellen, funktionieren Brute-Force und Befehlsausführung für MSSQL, MongoDB und PostgreSQL nicht über den Proxy; falls jemand eine Lösung kennt, kontaktiert mich bitte). Kann als Toolkit bezeichnet werden.
  • Nahtlose Integration von Portscan und Brute-Force, was die Scan-Geschwindigkeit erheblich erhöht: Dieser Vorteil wird im all-Modul deutlich. Während des Multithread-Portscans wird geprüft, ob ein Port offen ist; falls der Port für Brute-Force geeignet ist, wird sofort ein weiterer Multithread im aktuellen Thread gestartet, um Brute-Force durchzuführen. Dadurch wird die Geschwindigkeit drastisch gesteigert und der Zwischenschritt, zunächst offene Ports zu ermitteln und dann Brute-Force zu starten, entfällt.
  • Übersichtliches und lesbares Ausgabeformat: Farbcodierte Ausgabe, nicht nur während des Prozesses, sondern auch nach Abschluss des Scans, die alle Ergebnisse der Scans und Brute-Force-Angriffe anzeigt (siehe Ausgabeformat oben in der Einleitung). Zudem kann das Scanergebnis in einer Datei gespeichert werden.
  • Nicht nur Brute-Force für Dienste, sondern nach erfolgreichem Brute-Force auch Befehlsausführung. Später wird noch eine Ein-Klick-Ausnutzungsfunktion hinzugefügt.
  • In ständiger Entwicklung; falls jemand Probleme, Bugs oder interessante Funktionswünsche hat, kontaktiert mich bitte.

Quellcode-Kompilierung 👨

Es wird empfohlen, selbst zu kompilieren, da die Release-Versionen manchmal nicht auf dem neuesten Stand sind. Aus bestimmten Gründen werden keine vorkompilierten Versionen von zscan mehr bereitgestellt. Die Kompilierungsbefehle sind unten zu finden.``` go get github.com/zyylhn/zscan go bulid 或者docker编译 docker pull golang docker run -v "$GOPATH":/go -v "$PWD":/go/src/zscan -w /go/src/zscan -e GOOS="darwin" -e GOARC H="amd64" golang go build -v -ldflags="-s -w" -trimpath -o zscan_mac_x64 docker run -v "$GOPATH":/go -v "$PWD":/go/src/zscan -w /go/src/zscan -e GOOS="windows" -e GOAR CH="amd64" golang go build -v -ldflags="-s -w" -trimpath -o zscan_x64.exe docker run -v "$GOPATH":/go -v "$PWD":/go/src/zscan -w /go/src/zscan -e GOOS="linux" -e GOARCH ="amd64" golang go build -v -ldflags="-s -w" -trimpath -o zscan_linux_x64

root@kitploit:~
## Haftungsausschluss 🧐

Dieses Tool ist ausschließlich für **rechtmäßig autorisierte** Sicherheitsmaßnahmen in Unternehmen gedacht. Falls Sie die Verwendbarkeit des Tools testen möchten, richten Sie bitte selbst eine Zielumgebung ein.

Bei der Nutzung dieses Tools zur Durchführung von Prüfungen müssen Sie sicherstellen, dass Ihr Handeln den lokalen Gesetzen und Vorschriften entspricht und dass ausreichende Genehmigungen eingeholt wurden. **Scannen Sie keine nicht autorisierten Ziele.**

Sollten Sie bei der Nutzung dieses Tools rechtswidrige Handlungen begehen, tragen Sie die entsprechenden Konsequenzen selbst. Wir übernehmen keinerlei rechtliche oder damit verbundene Haftung.

Bevor Sie dieses Tool installieren und nutzen, **lesen und verstehen Sie bitte sorgfältig alle Klauseln**. Einschränkungen, Haftungsausschlüsse oder andere Klauseln, die Ihre wesentlichen Rechte betreffen, können durch Fettdruck, Unterstreichungen oder andere Mittel hervorgehoben werden. Sofern Sie nicht alle Bestimmungen dieser Vereinbarung vollständig gelesen, verstanden und akzeptiert haben, installieren und nutzen Sie dieses Tool bitte nicht. Ihre Nutzung oder die anderweitige ausdrückliche oder stillschweigende Annahme dieser Vereinbarung gilt als Ihr Einverständnis, diese Vereinbarung gelesen zu haben und an sie gebunden zu sein.

## Referenzlinks 👀

https://github.com/shadow1ng/fscan

https://github.com/k8gege/LadonGo

## Fortschrittsaktualisierungen 💪

### Funktionsmodule

- [x] Ping-Modul: Host-Erkennung durch Ping
  - [x] System-Ping aufrufen
  - [x] ICMP-Pakete senden
  - [x] Erkennung des internen Netzwerkbereichs
    - [x] Ping des Gateways im B-Netzbereich
    - [x] OXID-Scan
- [x] Port-Scan-Modul (ps)
  - [x] HTTP-Titel und Statuscodes abrufen
  - [x] HTTP-Fingerprint-Erkennung
  - [x] HTTP-PoC-Validierung
  - [x] Banner-Informationen zurückgeben
  - [x] Erst ping, dann scannen
- [x] All-Modul: Ruft alle Module auf
- [x] Blast-Modul
    - [x] SSH-Modul
    - [x] FTP-Modul
    - [x] MySQL-Modul
    - [x] MSSQL
    - [x] MongoDB-Modul
    - [x] Redis-Modul
    - [x] PostgreSQL-Modul
    - [x] LDAP
    - [x] SMB
    - [x] RDP
- [x] Scan-Modul
    - [x] Modul zum Scannen von Proxyservern
        - [x] SOCKS5-Proxy-Server-Scan
    - [x] WinScan-Modul @https://github.com/shenzhibuqins
        - [x] SMB-Scan-Funktion
        - [x] OXID-Scan-Funktion
        - [x] NetBIOS-Scan-Funktion
    - [x] 17010-Scan-Modul
    - [x] PoC
        - [x] Unterstützt Xray v1
        - [ ] Unterstützt Xray v2

- [x] Server-Modul
  - [x] SOCKS-Server-Modul
    - [x] Benutzername/Passwort-Authentifizierung
  - [x] HTTP-Server-Modul starten
      - [x] Authentifizierungsfunktion
      - [x] Datei-Upload-Funktion

- [x] Tool-Modul
    - [x] NC-Modul
        - [x] Port-Überwachungsfunktion
        - [x] Port-Verbindungsfunktion

    - [x] Dateisuche-Funktion
        - [x] Gleichzeitige Suche nach mehreren Dateien, Multithreading
        - [x] Regex-Suche
        - [ ] Suche nach Dateiinhalten
    - [ ] Ordner-Paketierungsfunktion

- [x] Exploit-Modul
    - [x] SSH-Login-Modul
        - [x] Benutzername/Passwort-Login (interaktiv)
        - [x] Schlüssel-Login (interaktiv)
    - [x] Redis-Modul
        - [x] Redis-Befehle ausführen
        - [x] Lua-Sandbox-Escape-Schwachstelle
        - [x] Master-Slave-Replikation RCE
    - [x] LDAP-Abfrage
    - [ ] SNMP-Abfrage
    - [ ] WMI-Modul

- [ ] ..........

### Werkzeuginterne Funktionen

- [x] Ausgabeergebnisse in Datei
- [x] Log-Funktion zur Aufzeichnung jeder Ausführung
- [x] Thread-Einstellungsfunktion (Scan unterstützt extrem hohe Threadzahlen)
- [x] Timeout-Einstellungsfunktion
- [x] Proxy-Funktion
	- [ ] UDP-Proxy-Funktion
	- [x] TCP-Proxy-Funktion
	- [x] Proxy-Funktion für Service-Brute-Force und Befehlsausführung
		- [x] MySQL
		- [ ] MSSQL
		- [x] Redis
		- [x] MongoDB
		- [ ] PostgreSQL
		- [x] SSH
		- [x] FTP
- [x] Zielliste aus Datei einlesen
- [x] Brute-Force unterstützt extrem große Wörterbücher
- [ ] ..........

### Zukünftige Ziele

- [ ] Vervollständigung der aktuellen Version der Server-Brute-Force-Module, Unterstützung weiterer Befehle, möglichst uneingeschränkte Befehlsnutzung anstreben und Datenbank-Nutzungsmodule hinzufügen (Nutzung nach erfolgreichem Brute-Force-Zugriff)
  - [ ] MySQL
  - [ ] MSSQL
  - [ ] PostgreSQL
  - [ ] MongoDB
  - [ ] FTP
- [ ] Kompakte Version von ZSCNA veröffentlichen
  - [ ] Entfernen aller Datenbanktreiber zur Größenreduzierung (Konsequenz: keine Befehlsausführung mehr möglich)
  - [ ] Entfernen seltener genutzter oder unnötiger Datenbankmodule

Danke für die Sterne, Kumpel! 🥳

Fragen sind willkommen 👏

Teilt gerne Web-Fingerprints und PoCs

Wer gerne Go-Tools schreibt, kann uns beitreten: [email protected] 😃
Tool herunterladen
  • Unsichere Referrer-Policy (standardmäßig deaktiviert)
  • Unsichere Feature-Policy (standardmäßig deaktiviert)
  • Unsichere Expect-CT (standardmäßig deaktiviert)
  • Unsichere Public-Key-Pins (standardmäßig deaktiviert)
  • Unsichere Strict-Transport-Security (standardmäßig deaktiviert)
  • Unsichere Content-Security-Policy (standardmäßig deaktiviert)
  • Unsichere Access-Control-Allow-Origin (standardmäßig deaktiviert)
  • Andere Arten von Schwachstellen (standardmäßig deaktiviert)
  • Unterstützung für benutzerdefinierte Schwachstellenerkennungsregeln```
  • Usage: zscan proxyfind [flags]

    Flags: -h, --help help for proxyfind -H, --host hosts Set hosts(The format is similar to Nmap) eg:192.168.1.1/24,172.16.95.1-100,127.0.0.1 --hostfile string Set host file -p, --ports port Set port eg:1-1000,3306,3389 (default "1080,1089,8080,7890,10808") --type string Set the scan proxy type(socks4/socks5/http) (default "socks5")

    Global Flags: --log Record the scan results in chronological order,Save path./log.txt -O, --output Whether to enter the results into a file(default ./result.txt),can use --path set --path string the path of result file (default "result.txt") -T, --thread thread Set thread eg:2000 (default 100) -t, --timeout time Set timeout(s) eg:5s (default 3s) -v, --verbose Show verbose information

    root@kitploit:~
    Scannen von Proxyservern im internen Netzwerk
    
    -H gibt das Ziel an, -p gibt den Port an, --type gibt den zu scannenden Proxy-Protokolltyp an (derzeit werden socks4/5 unterstützt, andere Protokolle sind in Arbeit)
    </details>
    
    <details>
    <summary><b>ms17010-Modul: Batch-Scan für die ms17010-Schwachstelle</b></summary>```
    Usage:
      zscan scan ms17010 [flags]
    
    Flags:
      -h, --help              help for ms17010
      -H, --host string       Set target
          --hostfile string   Set host file
    
    Global Flags:
          --log             Record the scan results in chronological order,Save path./log.txt
      -O, --output          Whether to enter the results into a file(default ./result.txt),can use --path set
          --path string     the path of result file (default "result.txt")
      -T, --thread thread   Set thread eg:2000 (default 100)
      -t, --timeout time    Set timeout(s) eg:5s (default 3s)
      -v, --verbose         Show verbose information
    

    只需要指定目标即可

    --pocpth: Wenn ein Verzeichnis angegeben wird, werden alle PoCs in diesem Verzeichnis verwendet; wenn eine bestimmte PoC angegeben wird, wird nur diese verwendet.

    --pocthread: Threads für den PoC-Scan

    --url/--urlfile: Ziel angeben. Mit -u/--url ein einzelnes Ziel, über eine TXT-Datei können mehrere Ziele gestapelt gescannt werden.

    -ExecutionPolicy Bypass

    Sigma-Regelbeispiel:

    root@kitploit:~
    title: PowerShell Suspicious Download
    description: Detects suspicious PowerShell download activities
    status: experimental
    logsource:
        category: process_creation
        product: windows
    detection:
        selection:
            Image|endswith: '\powershell.exe'
            CommandLine|contains|all:
                - 'DownloadFile'
                - 'http'
        condition: selection
    falsepositives:
        - Unknown
    level: high
    tags:
        - attack.t1059.001
        - attack.execution
    

    2. Analyse von Lateral-Movement-Verhalten im internen Netzwerk

    Wenn ein Angreifer Lateral-Movement im internen Netzwerk durchführt, erzeugt dies typischerweise spezifische Netzwerkverkehrsmuster und Ereignisprotokolle. Sigma-Regeln können helfen, solche Aktivitäten zu erkennen, z.B. anomale SMB-Verbindungen, WMI-Remoteausführung oder die Verwendung von PSExec. Ereignisse aus verschiedenen Datenquellen (z.B. Firewall-Protokolle und Endpoint-Sicherheitsprotokolle) können in Elasticsearch zentralisiert und mit Sigma-Regeln korreliert werden.

    Hier ist eine Sigma-Regel zur Erkennung von Remote-WMI-Ausführungen:

    root@kitploit:~
    title: Potential Remote WMI Execution
    description: Detects potential remote WMI execution
    status: experimental
    logsource:
        category: process_creation
        product: windows
    detection:
        selection:
            Image|endswith: '\wmiprvse.exe'
            ParentImage|endswith: '\svchost.exe'
            CommandLine|contains: 'Win32_Process'
        condition: selection
    falsepositives:
        - Legitimate administration activities
    level: medium
    tags:
        - attack.t1047
    

    3. Verwendung des Ludown-Skript-Tools

    Ludown ist ein Befehlszeilen-Tool für die Verwaltung von LUIS- und QnA-Maker-Ressourcen. Es bietet eine einfache Möglichkeit, .lu-Dateien in TSV-, CSV- oder MSBot-Dateien zu konvertieren. Im Folgenden wird die Verwendung von Ludown-Befehlen beschrieben.

    Um .lu-Dateien in einem bestimmten Ordner zu konvertieren, verwenden Sie folgenden Befehl:

    root@kitploit:~
    ludown parse toluis --in ../examples/MyLuisApp.lu --out_folder ../output
    

    Dieser Befehl konvertiert die Datei MyLuisApp.lu in das TSV-Format und gibt sie im Verzeichnis ../output aus. Mit dem -s-Flag können Sie den zu parsenden Dateityp angeben, und mit --help lassen sich alle verfügbaren Optionen anzeigen.``` Usage: zscan server socks5 [flags]

    Flags: -a, --addr string Specify the IP address and port of the Socks5 service (default "0.0.0.0:1080") -h, --help help for socks5 -P, --password string Set the socks5 service authentication password -U, --username string Set the socks5 service authentication user name

    Global Flags: --log Record the scan results in chronological order,Save path./log.txt -O, --output Whether to enter the results into a file(default ./result.txt),can use --path set --path string the path of result file (default "result.txt") -T, --thread thread Set thread eg:2000 (default 100) -t, --timeout time Set timeout(s) eg:5s (default 3s) -v, --verbose Show verbose information

    root@kitploit:~
    可以使用-a指定socks5服务监听的ip和端口
    
    -p和-u指定代理的用户名和密码
    
    </details>
    
    <details>
    <summary><b>http_server-Modul: Startet einen HTTP-Server mit Authentifizierung und Dateiupload</b></summary>```
    Usage:
     zscan server httpserver [flags]
    
    Flags:
      -a, --addr string   set http server addr (default "0.0.0.0:7001")
      -d, --dir string    set HTTP server root directory (default ".")
      -h, --help          help for httpserver
      -P, --pass string   Set the authentication password
      -U, --user string   Set the authentication user
    
    Global Flags:
          --log             Record the scan results in chronological order,Save path./log.txt
      -O, --output          Whether to enter the results into a file(default ./result.txt),can use --path set
          --path string     the path of result file (default "result.txt")
      -T, --thread thread   Set thread eg:2000 (default 100)
      -t, --timeout time    Set timeout(s) eg:5s (default 3s)
      -v, --verbose         Show verbose information
    

    Öffne einen einfachen HTTP-Server, der Dateien herunterladen und hochladen kann. Zum Hochladen von Dateien wird der Parameter -u benötigt.

    -a legt die zu überwachende IP und Adresse fest

    -d legt das Stammverzeichnis des HTTP-Servers fest

    -P und -U legen den Benutzernamen und das Passwort für die Authentifizierung fest

    -d指定搜索的根目录,linux可以使用相对路径,winsows上需要绝对路径

    -f指定要搜索的文件名,可以使用-f 文件名1 -f 文件名2 来搜索多个文件

    -r是使用正则,其实本质上-f也是使用正则只不过给替换成^文件名$

    --walk是指遍历开启线程的目录深度:逻辑上是在给定的目录下面遍历有多少文件夹,然后开启多少线程去遍历这些子文件夹,所有这个深度不要太高,虽然越深越快,但是会导致cpu利用过高(三层其实就已经会占用很高了,所以特殊场景建议使用1)

    smb
    start_daemon
  • Unterstützung für Traffic-Statistiken;
  • Unterstützung für group_ips IP-Gruppierung;
  • Unterstützung für sichere Kommunikation zwischen daemon und client;
  • Plugin-Unterstützung, derzeitiger Fokus liegt auf msf und cs;``` Flags: --burpthread int Set burp password thread(recommend not to change) (default 100) --get string set an oid -h, --help help for snmp -H, --host string Set target --hostfile string Set host file -l, --listoid List commonly used OIDs --password string set a password (default "public") --passwordfile string passwords dict file, eg: ./dict/password.txt -p, --port port Set port (default 161) --version string specifies SNMP version to use. 1|2c|3 (default "2c") --walk string set an oid
  • Global Flags: --log Record the scan results in chronological order,Save path./log.txt -O, --output Whether to enter the results into a file(default ./result.txt),can use --path set --path string the path of result file (default "result.txt") -T, --thread thread Set thread eg:2000 (default 100) -t, --timeout time Set timeout(s) eg:5s (default 3s) -v, --verbose Show verbose information

    root@kitploit:~
    --listoid listet allgemeine Abfrageinformationen auf```
    0: 系统基本信息         SysDesc                 GET     1.3.6.1.2.1.1.1.0
    1: 监控时间             sysUptime               GET     1.3.6.1.2.1.1.3.0
    2: 系统联系人           sysContact              GET     1.3.6.1.2.1.1.4.0
    3: 获取机器名           SysName                 GET     1.3.6.1.2.1.1.5.0
    4: 机器所在位置         SysLocation             GET     1.3.6.1.2.1.1.6.0
    5: 机器提供的服务       SysService              GET     1.3.6.1.2.1.1.7.0
    6: 系统运行的进程列表   hrSWRunName             WALK    1.3.6.1.2.1.25.4.2.1.2
    7: 系统安装的软件列表   hrSWInstalledName       WALK    1.3.6.1.2.1.25.6.3.1.2
    8: 网络接口列表         ipAdEntAddr             WALK    1.3.6.1.2.1.4.20.1.1
    

    Die Abfrage kann mit --walk und --get durchgeführt werden.

    Wenn kein Passwort angegeben wird, wird standardmäßig 'public' verwendet.

    -c 用于执行普通的 Redis 命令模式

    --exec:使用主从复制执行命令模式

    --upload:使用主从复制的上传文件模式

    --lua:使用 Lua 沙箱逃逸漏洞模式

    以上四个参数必须需要其中一个

    --detpath:用于指定主从复制将文件上传到目标的绝对路径

    --lport:主从复制时主节点(也就是 zscan)监听的端口,默认 20001

    --lhost:主从复制时主节点(也就是 zscan)监听的地址,必须确保目标 Redis 能访问到

    --so:主从复制执行命令时上传到目标上的 so 文件

    --srcpath:主从复制上传文件的源文件