العودة إلى التحديثات
New releaseAug 3, 2026

tlsx v1.3.0

ماسح TLS سريع وقابل للتكوين يركز على جمع البيانات المستندة إلى TLS.

مشاركة


الميزاتالتثبيتالاستخدامتشغيل tlsxانضم إلى Discord

أداة سريعة وقابلة للتكوين لاستخراج TLS تركز على جمع البيانات وتحليلها المعتمدة على TLS.

الميزات
image

  • اتصال TLS سريع وقابل للتكوين بالكامل
  • أنماط متعددة لاتصال TLS
  • استقصاءات TLS متعددة
  • الرجوع التلقائي لـ TLS للإصدارات الأقدم من TLS
  • اتصال TLS قبل المصافحة (إنهاء مبكر)
  • اختيار تشفير / SNI / TLS قابل للتخصيص
  • بصمة TLS JARM/JA3
  • أخطاء تكوين TLS
  • إدخال ASN و CIDR و IP و HOST و URL
  • إخراج STD IN/OUT و TXT/JSON

التثبيت

يتطلب tlsx Go 1.24 للتثبيت الناجح. للتثبيت، ما عليك سوى تشغيل الأمر أدناه أو تنزيل الثنائي المُجمَّع مسبقًا من صفحة الإصدارات.```console go install github.com/projectdiscovery/tlsx/cmd/tlsx@latest

## الاستخدام```console
tlsx -h

سيعرض هذا تعليمات الأداة. فيما يلي جميع الخيارات التي تدعمها.```console TLSX is a tls data gathering and analysis toolkit.

Usage: tlsx [flags]

Flags: INPUT: -u, -host string[] target host to scan (-u INPUT1,INPUT2) -l, -list string target list to scan (-l INPUT_FILE) -p, -port string[] target port to connect (default 443)

SCAN-MODE: -sm, -scan-mode string tls connection mode to use (ctls, ztls, openssl, auto) (default "auto") -ps, -pre-handshake enable pre-handshake tls connection (early termination) using ztls -sa, -scan-all-ips scan all ips for a host (default false) -iv, -ip-version string[] ip version to use (4, 6) (default 4)

PROBES: -san display subject alternative names -cn display subject common names -so display subject organization name -tv, -tls-version display used tls version -cipher display used cipher -hash string display certificate fingerprint hashes (md5,sha1,sha256) -jarm display jarm fingerprint hash -ja3 display ja3 fingerprint hash (using ztls) -wc, -wildcard-cert display host with wildcard ssl certificate -tps, -probe-status display tls probe status -ve, -version-enum enumerate and display supported tls versions -ce, -cipher-enum enumerate and display supported cipher -ct, -cipher-type value ciphers types to enumerate. possible values: all/secure/insecure/weak (comma-separated) (default all) -ch, -client-hello include client hello in json output (ztls mode only) -sh, -server-hello include server hello in json output (ztls mode only) -se, -serial display certificate serial number

MISCONFIGURATIONS: -ex, -expired display host with host expired certificate -ss, -self-signed display host with self-signed certificate -mm, -mismatched display host with mismatched certificate -re, -revoked display host with revoked certificate -un, -untrusted display host with untrusted certificate

CONFIGURATIONS: -config string path to the tlsx configuration file -r, -resolvers string[] list of resolvers to use -cc, -cacert string client certificate authority file -ci, -cipher-input string[] ciphers to use with tls connection -sni string[] tls sni hostname to use -rs, -random-sni use random sni when empty -rps, -rev-ptr-sni perform reverse PTR to retrieve SNI from IP -min-version string minimum tls version to accept (ssl30,tls10,tls11,tls12,tls13) -max-version string maximum tls version to accept (ssl30,tls10,tls11,tls12,tls13) -cert, -certificate include certificates in json output (PEM format) -tc, -tls-chain include certificates chain in json output -vc, -verify-cert enable verification of server certificate -ob, -openssl-binary string OpenSSL Binary Path -hf, -hardfail strategy to use if encountered errors while checking revocation status -proxy string socks5 proxy to use for tlsx

OPTIMIZATIONS: -c, -concurrency int number of concurrent threads to process (default 300) -cec, -cipher-concurrency int cipher enum concurrency for each target (default 10) -timeout int tls connection timeout in seconds (default 5) -retry int number of retries to perform for failures (default 3) -delay string duration to wait between each connection per thread (eg: 200ms, 1s)

UPDATE: -up, -update update tlsx to latest version -duc, -disable-update-check disable automatic tlsx update check

OUTPUT: -o, -output string file to write output to -j, -json display output in jsonline format -dns display unique hostname from SSL certificate response -ro, -resp-only display tls response only -silent display silent output -nc, -no-color disable colors in cli output -v, -verbose display verbose output -version display project version

PDCP: -pd, -dashboard upload or view output in the PDCP UI dashboard -pdu, -dashboard-upload string upload tlsx output file (JSONL format) to the PDCP UI dashboard -auth string PDCP API key for authentication -tid, -team-id string upload asset results to a specified team ID -aid, -asset-id string upload new assets to an existing asset ID -aname, -asset-name string asset group name

DEBUG: -health-check, -hc run diagnostic check up

## استخدام tlsx كمكتبة

أمثلة على استخدام tlsx كمكتبة متوفرة في مجلد [الأمثلة](https://github.com/projectdiscovery/tlsx/blob/HEAD/examples/).

## تشغيل tlsx

### مدخلات tlsx

**tlsx** يتطلب **ip** لإجراء اتصال TLS ويقبل تنسيقات متعددة كما هو مذكور أدناه:```bash
AS1449 # ASN input
173.0.84.0/24 # CIDR input
93.184.216.34 # IP input
example.com # DNS input
example.com:443 # DNS input with port
https://example.com:443 # URL input port

يمكن تقديم إدخال المضيف باستخدام العلم -host / -u، ويمكن تقديم قيم متعددة باستخدام إدخال مفصول بفواصل، وبالمثل يتم دعم إدخال الملف باستخدام العلم -list / -l.

مثال على إدخال مضيف مفصول بفواصل:```console $ tlsx -u 93.184.216.34,example.com,example.com:443,https://example.com:443 -silent

مثال لإدخال مضيف قائم على ملف:```console
$ tlsx -list host_list.txt

إدخال المنفذ:

يتصل tlsx بالمنفذ 443 افتراضيًا، ويمكن تخصيص ذلك باستخدام العلامة -port / -p، ويمكن تحديد منفذ واحد أو عدة منافذ باستخدام إدخال مفصول بفواصل أو ملف مفصول بأسطر جديدة يحتوي على قائمة المنافذ للاتصال.

مثال لإدخال المنفذ المفصول بفواصل:``` $ tlsx -u hackerone.com -p 443,8443

مثال على إدخال المنفذ المستند إلى ملف:```
$ tlsx -u hackerone.com -p port_list.txt

ملحوظة:

عندما يحتوي المضيف المدخل على منفذ، على سبيل المثال، 8.8.8.8:443 أو hackerone.com:8443، سيتم استخدام المنفذ المحدد مع المضيف لإجراء اتصال TLS بدلاً من المنفذ الافتراضي أو المنفذ المقدم باستخدام علامة -port / -p.

فحص TLS (التشغيل الافتراضي)

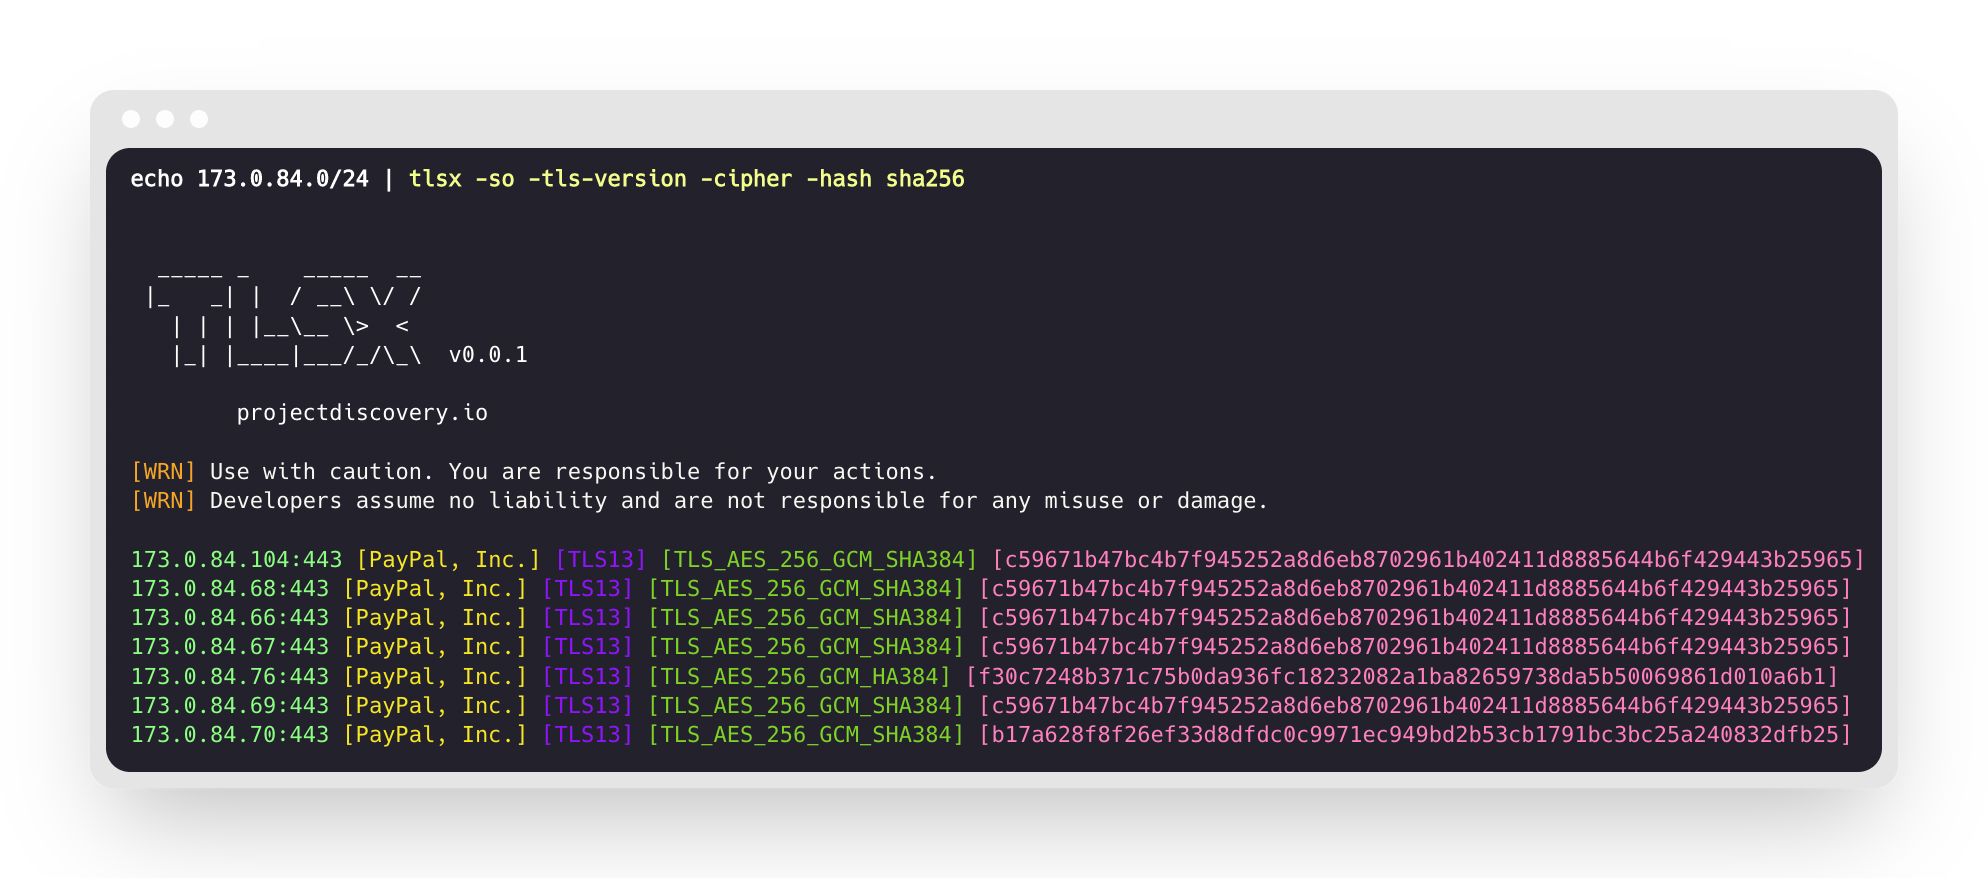
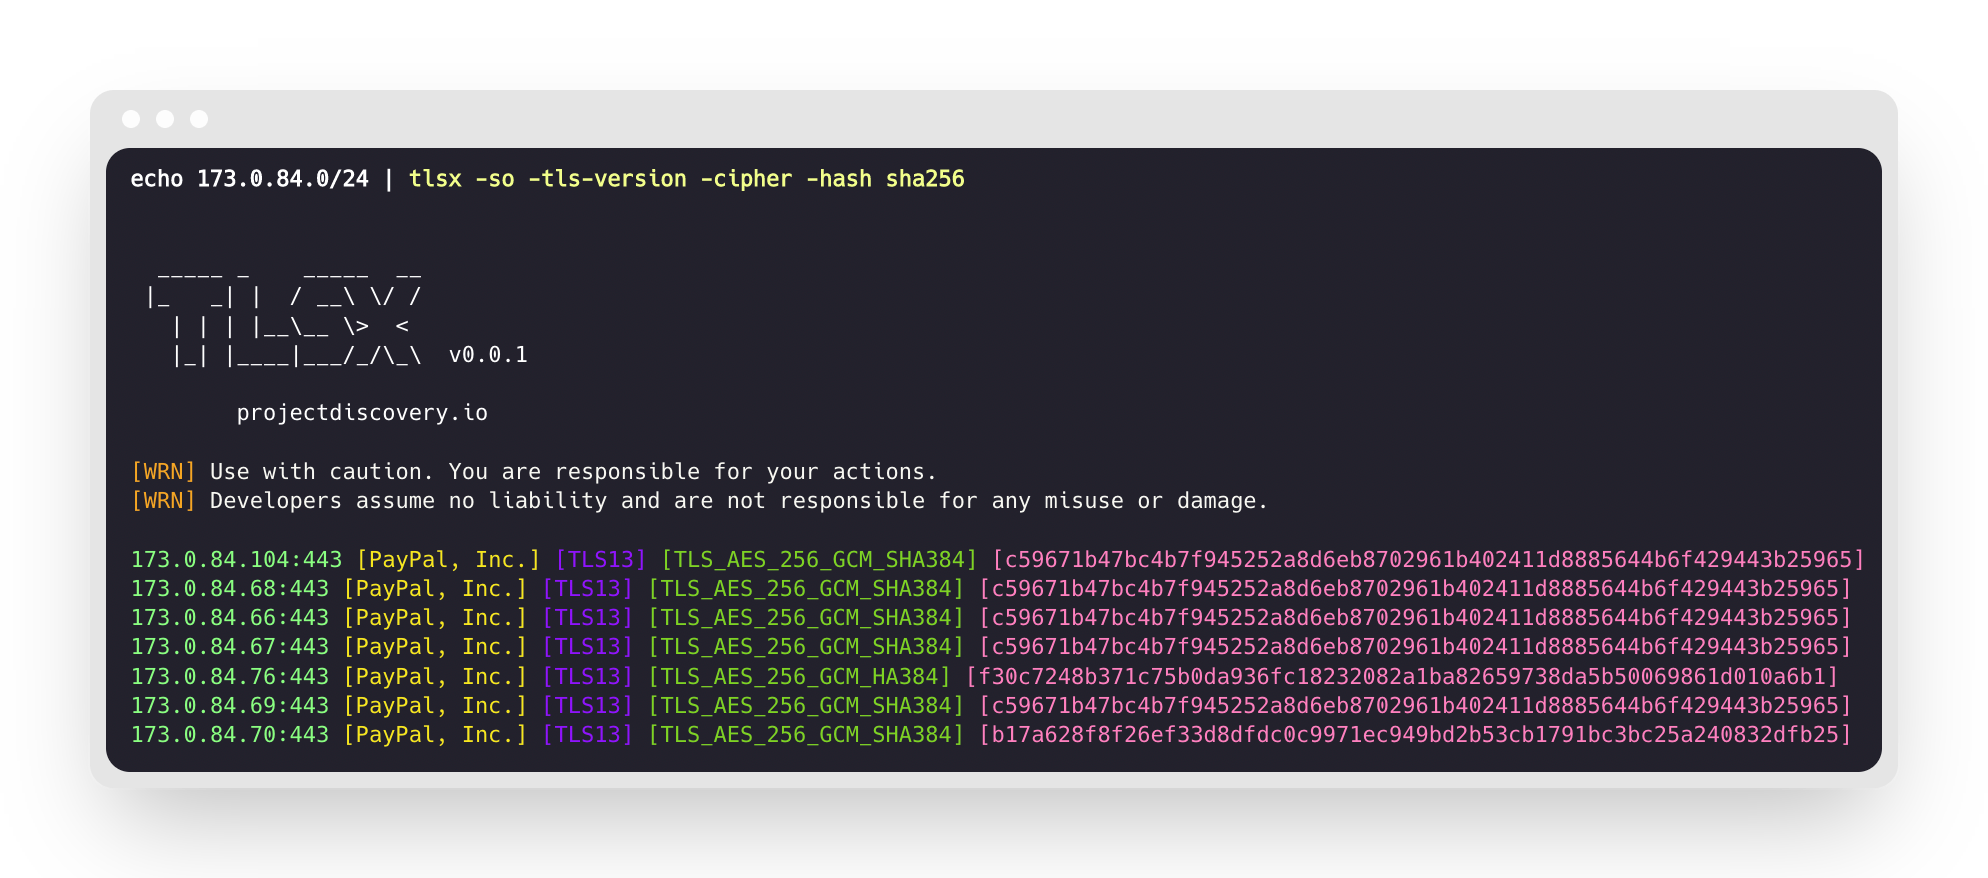
سيقوم هذا بتشغيل الأداة على نطاق CIDR المحدد ويعيد المضيفات التي تقبل اتصال TLS على المنفذ 443.```console $ echo 173.0.84.0/24 | tlsx


|_ | | / \ / / | | | |_ > < || ||/_/_\ v0.0.1

projectdiscovery.io

[WRN] Use with caution. You are responsible for your actions. [WRN] Developers assume no liability and are not responsible for any misuse or damage.

173.0.84.69:443 173.0.84.67:443 173.0.84.68:443 173.0.84.66:443 173.0.84.76:443 173.0.84.70:443 173.0.84.72:443

### SAN/CN Probe

تحتوي شهادة TLS على أسماء DNS تحت حقل **الاسم البديل للموضوع** و**الاسم الشائع**، ويمكن استخراجها باستخدام العلمين `-san` و`-cn`.```console
$ echo 173.0.84.0/24 | tlsx -san -cn -silent

173.0.84.104:443 [uptycspay.paypal.com]
173.0.84.104:443 [api-3t.paypal.com]
173.0.84.104:443 [api-m.paypal.com]
173.0.84.104:443 [payflowpro.paypal.com]
173.0.84.104:443 [pointofsale-s.paypal.com]
173.0.84.104:443 [svcs.paypal.com]
173.0.84.104:443 [uptycsven.paypal.com]
173.0.84.104:443 [api-aa.paypal.com]
173.0.84.104:443 [pilot-payflowpro.paypal.com]
173.0.84.104:443 [pointofsale.paypal.com]
173.0.84.104:443 [uptycshon.paypal.com]
173.0.84.104:443 [api.paypal.com]
173.0.84.104:443 [adjvendor.paypal.com]
173.0.84.104:443 [zootapi.paypal.com]
173.0.84.104:443 [api-aa-3t.paypal.com]
173.0.84.104:443 [uptycsize.paypal.com]

لسهولة الأتمتة، يمكن استخدام العلم -resp-only اختياريًا لسرد أسماء DNS فقط في مخرجات سطر الأوامر.```console $ echo 173.0.84.0/24 | tlsx -san -cn -silent -resp-only

api-aa-3t.paypal.com pilot-payflowpro.paypal.com pointofsale-s.paypal.com uptycshon.paypal.com a.paypal.com adjvendor.paypal.com zootapi.paypal.com api-aa.paypal.com payflowpro.paypal.com pointofsale.paypal.com uptycspay.paypal.com api-3t.paypal.com uptycsize.paypal.com api.paypal.com api-m.paypal.com svcs.paypal.com uptycsven.paypal.com uptycsven.paypal.com a.paypal.com api.paypal.com pointofsale-s.paypal.com pilot-payflowpro.paypal.com

**النطاقات الفرعية** التي تم الحصول عليها من شهادات TLS يمكن تمريرها إلى أدوات PD الأخرى لمزيد من الفحص، إليك مثال على تمرير النطاقات الفرعية TLS إلى **[dnsx](https://github.com/projectdiscovery/dnsx)** لتصفية النطاقات الفرعية السلبية ثم تمريرها إلى **[httpx](https://github.com/projectdiscovery/httpx)** لسرد المضيفات التي تشغل خدمات ويب نشطة.```console
$ echo 173.0.84.0/24 | tlsx -san -cn -silent -resp-only | dnsx -silent | httpx

    __    __  __       _  __
   / /_  / /_/ /_____ | |/ /
  / __ \/ __/ __/ __ \|   /
 / / / / /_/ /_/ /_/ /   |
/_/ /_/\__/\__/ .___/_/|_|
             /_/              v1.2.2

    projectdiscovery.io

Use with caution. You are responsible for your actions.
Developers assume no liability and are not responsible for any misuse or damage.
https://api-m.paypal.com
https://uptycsize.paypal.com
https://api.paypal.com
https://uptycspay.paypal.com
https://svcs.paypal.com
https://adjvendor.paypal.com
https://uptycshap.paypal.com
https://uptycshon.paypal.com
https://pilot-payflowpro.paypal.com
https://slc-a-origin-pointofsale.paypal.com
https://uptycsven.paypal.com
https://api-aa.paypal.com
https://api-aa-3t.paypal.com
https://uptycsbrt.paypal.com
https://payflowpro.paypal.com
http://pointofsale-s.paypal.com
http://slc-b-origin-pointofsale.paypal.com
http://api-3t.paypal.com
http://zootapi.paypal.com
http://pointofsale.paypal.com

TLS / مسبار التشفير```console

$ subfinder -d hackerone.com | tlsx -tls-version -cipher

mta-sts.hackerone.com:443 [TLS1.3] [TLS_AES_128_GCM_SHA256] hackerone.com:443 [TLS1.3] [TLS_AES_128_GCM_SHA256] api.hackerone.com:443 [TLS1.3] [TLS_AES_128_GCM_SHA256] mta-sts.managed.hackerone.com:443 [TLS1.3] [TLS_AES_128_GCM_SHA256] mta-sts.forwarding.hackerone.com:443 [TLS1.3] [TLS_AES_128_GCM_SHA256] www.hackerone.com:443 [TLS1.3] [TLS_AES_128_GCM_SHA256] support.hackerone.com:443 [TLS1.2] [TLS_ECDHE_RSA_WITH_AES_128_GCM_SHA256]

# سوء تكوين TLS

### شهادة منتهية الصلاحية / موقعة ذاتيًا / غير متطابقة / ملغية / غير موثوقة

يمكن توفير قائمة بالمضيفين لـ tlsx لاكتشاف الشهادات **المنتهية الصلاحية / الموقعة ذاتيًا / غير المتطابقة / الملغية / غير الموثوقة**.```console
$ tlsx -l hosts.txt -expired -self-signed -mismatched -revoked -untrusted
  

  _____ _    _____  __
 |_   _| |  / __\ \/ /
   | | | |__\__ \>  < 
   |_| |____|___/_/\_\  v0.0.1

    projectdiscovery.io

[WRN] Use with caution. You are responsible for your actions.
[WRN] Developers assume no liability and are not responsible for any misuse or damage.

wrong.host.badssl.com:443 [mismatched]
self-signed.badssl.com:443 [self-signed]
expired.badssl.com:443 [expired]
revoked.badssl.com:443 [revoked]
untrusted-root.badssl.com:443 [untrusted]

JARM بصمة TLS```console

$ echo hackerone.com | tlsx -jarm -silent

hackerone.com:443 [29d3dd00029d29d00042d43d00041d5de67cc9954cc85372523050f20b5007]

### [JA3](https://github.com/salesforce/ja3) بصمة TLS```console
$ echo hackerone.com | tlsx -ja3 -silent

hackerone.com:443 [20c9baf81bfe96ff89722899e75d0190]

JSON Output

يدعم tlsx عدة إشارات استقصاء لاستعلام بيانات محددة، ولكن جميع المعلومات متوفرة دائمًا بتنسيق JSON. لأغراض الأتمتة والمعالجة اللاحقة، يعد استخدام مخرجات -json الخيار الأكثر ملاءمة.```console echo example.com | tlsx -json -silent | jq .

يجب تثبيت أداة سطر الأوامر `docker`. على جهاز Linux جديد، هذا مهم في هذه المرحلة.
لكن يمكنك تخطي هذه الخطوة إذا كنت متأكداً من أن `docker` مثبت بالفعل.

- الصلاحيات والإذونات

أحد الإعدادات العامة لحاويات وأدوات Docker هو أنك تحتاج إلى امتيازات إدارية لتشغيلها.
أثناء التثبيت، لذلك سيكون لديك خيار تنفيذ المُثبّت باستخدام `sudo` أو بأي طريقة تحصل بها
على امتيازات إدارية على توزيعتك. يمكنك أيضاً اختيار إضافة مستخدمك إلى مجموعة `docker`
لاستخدام وضع Docker "rootless mode".
`dockly` هي أداة قمنا ببنائها بأنفسنا، تقوم بتثبيت Docker وتهيئة وضع "rootless mode".

- التبعيات
- Docker```json
{
  "timestamp": "2022-08-22T21:22:59.799053+05:30",
  "host": "example.com",
  "ip": "93.184.216.34",
  "port": "443",
  "probe_status": true,
  "tls_version": "tls13",
  "cipher": "TLS_AES_256_GCM_SHA384",
  "not_before": "2022-03-14T00:00:00Z",
  "not_after": "2023-03-14T23:59:59Z",
  "subject_dn": "CN=www.example.org, O=Internet Corporation for Assigned Names and Numbers, L=Los Angeles, ST=California, C=US",
  "subject_cn": "www.example.org",
  "subject_org": [
    "Internet Corporation for Assigned Names and Numbers"
  ],
  "subject_an": [
    "www.example.org",
    "example.net",
    "example.edu",
    "example.com",
    "example.org",
    "www.example.com",
    "www.example.edu",
    "www.example.net"
  ],
  "issuer_dn": "CN=DigiCert TLS RSA SHA256 2020 CA1, O=DigiCert Inc, C=US",
  "issuer_cn": "DigiCert TLS RSA SHA256 2020 CA1",
  "issuer_org": [
    "DigiCert Inc"
  ],
  "fingerprint_hash": {
    "md5": "c5208a47259d540a6e3404dddb85af91",
    "sha1": "df81dfa6b61eafdffffe1a250240db5d2e6cee25",
    "sha256": "7f2fe8d6b18e9a47839256cd97938daa70e8515750298ddba2f3f4b8440113fc"
  },
  "tls_connection": "ctls",
  "sni": "example.com"
}

تكامل لوحة تحكم PDCP

يدعم tlsx تحميل نتائج المسح إلى لوحة تحكم منصة ProjectDiscovery السحابية (PDCP) للتصور والتحليل.

تحميل النتائج في الوقت الفعلي

فعّل تحميل لوحة التحكم لتحميل النتائج تلقائيًا عند اكتشافها:```console $ tlsx -u example.com -pd -json

سيتم تحميل النتائج تلقائيًا إلى PDCP وستتلقى رابط لوحة التحكم لعرضها.

#### رفع ملف موجود

قم برفع ملف إخراج JSONL محفوظ مسبقًا إلى PDCP:```console
$ tlsx -pdu results.jsonl -tid your-team-id -aname "My Scan"

خيارات التهيئة

  • -pd, --dashboard: تفعيل التحميل الفوري إلى لوحة تحكم PDCP
  • -pdu, --dashboard-upload <file>: تحميل ملف JSONL معين إلى PDCP
  • -auth <key>: مفتاح API لـ PDCP (يمكن تعيينه أيضًا عبر البيئة أو معالج بيانات الاعتماد)
  • -tid, --team-id <id>: تحديد معرف الفريق للتحميلات
  • -aid, --asset-id <id>: التحميل إلى معرف أصل موجود
  • -aname, --asset-name <name>: تعيين اسم مخصص لمجموعة الأصول

مثال بجميع الخيارات:```console $ tlsx -u example.com -pd -json -tid team123 -aname "Production Scan"

## الإعدادات

### وضع المسح

يوفر tlsx أوضاعًا متعددة لإنشاء اتصال TLS -

- `auto` (تلقائي (التراجع التلقائي إلى الأوضاع الأخرى عند الفشل) - **افتراضي**)
- `ctls` (**[crypto/tls](https://github.com/golang/go/blob/master/src/crypto/tls/tls.go)**)
- `ztls` (**[zcrypto/tls](https://github.com/zmap/zcrypto)**)
- `openssl` (**[openssl](https://github.com/openssl/openssl)**)

يتم تسليط الضوء على بعض النقاط المتعلقة بالوضع / المكتبة المحدد في [المناقشات المرتبطة](https://github.com/projectdiscovery/tlsx/discussions/2)، يتم دعم وضع `auto` لضمان أقصى تغطية ومسح للمضيفات التي تشغل إصدارًا أقدم من TLS عن طريق إعادة محاولة الاتصال باستخدام وضع `ztls` و `openssl` عند حدوث أي خطأ في الاتصال.

مثال لاستخدام وضع `ztls` لمسح موقع ويب يستخدم إصدار TLS قديم/غير محدث.```console
$ echo tls-v1-0.badssl.com | tlsx -port 1010 -sm ztls
  

  _____ _    _____  __
 |_   _| |  / __\ \/ /
   | | | |__\__ \>  < 
   |_| |____|___/_/\_\  v0.0.1

    projectdiscovery.io

[WRN] Use with caution. You are responsible for your actions.
[WRN] Developers assume no liability and are not responsible for any misuse or damage.

tls-v1-0.badssl.com:1010

OpenSSL

لاستخدام وضع اتصال openssl، يجب أن يكون openssl مثبتًا على نظامك. تأتي معظم الأنظمة الحديثة مع openscl مثبتًا مسبقًا، ولكن إذا لم يكن موجودًا على نظامك، يمكنك تثبيته يدويًا. يمكنك التحقق مما إذا كان openssl مثبتًا عن طريق تشغيل الأمر openssl version. إذا كان openssl مثبتًا، فسيعرض هذا الأمر رقم الإصدار.

ما قبل المصافحة (الإنهاء المبكر)

يدعم tlsx إنهاء اتصال SSL مبكرًا مما يؤدي إلى فحص أسرع وطلبات اتصال أقل (قطع الاتصال بعد جمع بيانات serverhello وشهادة TLS).

لمزيد من التفاصيل، يرجى الرجوع إلى Hunting-Certificates-And-Servers بواسطة @erbbysam

مثال على استخدام وضع -pre-handshake:```console $ tlsx -u example.com -pre-handshake


|_ | | / \ / / | | | |_ > < || ||/_/_\ v0.0.1

projectdiscovery.io

[WRN] Use with caution. You are responsible for your actions. [WRN] Developers assume no liability and are not responsible for any misuse or damage.

example.com:443

> **ملاحظة**:

> يستخدم وضع **pre-handshake** مكتبة `ztls` (**zcrypto/tls**) مما يعني أن الدعم محدود حتى `TLS v1.2` حيث أن `TLS v1.3` غير مدعومة من قبل مكتبة `ztls`.

</table>
</tr>
</td>

### إصدار TLS

يمكن تحديد إصدار **أدنى** و **أقصى** لـ TLS باستخدام العلامات `-min-version` و `-max-version`، بشكل افتراضي يتم تعيين هذه القيم بواسطة المكتبة الأساسية المستخدمة.

القيم المقبولة لإصدار TLS محددة أدناه.

- `ssl30`
- `tls10`
- `tls11`
- `tls12`
- `tls13`

فيما يلي مثال باستخدام `max-version` لفحص المضيفات التي تدعم إصدارًا أقدم من TLS، أي **TLS v1.0**```console
$ tlsx -u example.com -max-version tls10
  

  _____ _    _____  __
 |_   _| |  / __\ \/ /
   | | | |__\__ \>  < 
   |_| |____|___/_/\_\  v0.0.1

    projectdiscovery.io

[WRN] Use with caution. You are responsible for your actions.
[WRN] Developers assume no liability and are not responsible for any misuse or damage.
example.com:443

شيفرة مخصصة

يمكن توفير الشيفرة المخصصة المدعومة باستخدام العلم -cipher-input / -ci، قائمة الشيفرات المدعومة لكل وضع متاحة في صفحة الويكي.```console $ tlsx -u example.com -ci TLS_AES_256_GCM_SHA384 -cipher

- التحميل المسبق للملفات أثناء عمليات فحص التهديدات لتجنب الاكتشاف (`.bashrc`, `.zshrc`, `config.fish`)
  - تسجيل نمط تفريغ الذاكرة الأساسية في Linux - prctl() لمنع تفريغ الذاكرة عند وفاة العملية
  - يوجد أيضًا أداة shell هذه للتحدث إلى خادم chisel **`chisel-full`** مع عملاء رسميين
+ متغير بيئة عام `GLOBAL` يحدد المنفذ الذي يبدأ فيه c2 الخادم لخادم chisel وأين يتم ربط/توجيه إعادة توجيه المنفذ البعيد

### 5. ملفات تعريف C2```console
$ tlsx -u example.com -ci cipher_list.txt -cipher

شكر وتقدير

يستخدم هذا البرنامج اختياريا:

  • مكتبة zcrypto من فريق zmap.
  • مكتبة cfssl من فريق cloudflare.
  • بيانات التشفير من ciphersuite.info لتصنيف حزم التشفير.

tlsx تم صنعه بـ ❤️ بواسطة فريق projectdiscovery وتوزيعه تحت رخصة MIT.

انضم إلى ديسكورد

بث سجلات الشفافية (CT)

يمكن لـ tlsx العمل في وضع الخرطوم الذي يبث بشكل مستمر شهادات TLS الصادرة حديثًا من نظام الشفافية العام، مما يوفر تدفقًا شبه فوري لأسماء المضيفين والبيانات الوصفية.

قم بتمكين وضع سجلات CT عبر المفتاح -ctl (الوضع الافتراضي عند عدم تقديم إدخال):```bash tlsx -ctl -silent | jq .subject_an

#### نقاط البداية

تقدم الأداة ثلاثة سلوكيات بدء حصرية متبادلة يتم التحكم فيها بواسطة العلامات التالية:

| Flag | Behaviour |
|------|-----------|
| _default_ | ابدأ **الآن** (حجم الشجرة عند بدء التشغيل) – سيتم بث الشهادات المستقبلية فقط |
| `-cb, --ctl-beginning` | ابدأ من الفهرس **0** لكل سجل (إعادة تشغيل تاريخي كامل) |
| `-cti, --ctl-index <log>=<n>` | فهرس مخصص لكل سجل (قابل للتكرار). يضبط فهرس البداية على _n_ لرابط/معرّف السجل المحدد. مثال: `--ctl-index https://ct.googleapis.com/logs/argon2023=123456` |```bash
# Replay the entire history
$ tlsx -ctl -cb -silent > all_certs.jsonl

# Resume at custom positions for two logs
$ tlsx -ctl -cti https://ct.googleapis.com/logs/argon2023=987654 -cti cloudflare-nimbus2024=543210 \
      -silent | jq -r .ct_source

بشكل افتراضي، يتم تصفية التكرارات باستخدام inverse bloom filter كبير. استخدم -v لعرض الإحصائيات التفصيلية.

الفئات

