
Skip to content
KitploitKITPLOIT
FerramentasBlog
Enviar
FerramentasBlog
Enviar

Ferramentas de Hacking, PenTest e Cibersegurança para o seu Arsenal de Segurança!

Kitploit é um diretório de ferramentas de hacking, cibersegurança e pentesting. Descubra as últimas atualizações de projetos para encontrar vulnerabilidades, analisar sistemas, automatizar testes e fortalecer sua segurança.

··Feeds·Contato·Privacidade·© 2026 Kitploit

Diretório de Ferramentas

Categorias

Ver todas as categorias
Loading categories
wafparan01d3 — Quick WAF "paranoid" Doctor Evaluation | WAFPARAN01D3 Tool | Kitploit
Ferramentas/GitHubGitHub/alt3kx/wafparan01d3
Defensive ToolsScripting & AutomationConfiguration AuditingWeb SecurityPenetration Testing
GitHubalt3kx/wafparan01d3

wafparan01d3

Quick WAF "paranoid" Doctor Evaluation | WAFPARAN01D3 Tool

Ver Repositório
246há 4 anosRevisado pelo Kitploit

Mais Populares

Ver todos →

Descubra as ferramentas mais usadas pela nossa comunidade.

Explore todas as ferramentas

Navegue pela nossa coleção de ferramentas

Ver todas as ferramentas →
Compartilhar

Avaliação Rápida do Doutor WAF "paranoico"

wafparano1d3
WAFPARAN01D3

A Ferramenta de Teste de Nível de Paranoia do Firewall de Aplicação Web.
— De alt3kx.github.io

Introdução aos Níveis de Paranoia

Em essência, o Nível de Paranoia (PL) permite definir o quão agressivo é o Core Rule Set.
Referência: https://coreruleset.org/20211028/working-with-paranoia-levels/

Como funciona

  • O script python3 wafparan01d3.py envia requisições maliciosas usando payloads codificados colocados em diferentes partes das requisições HTTP com base em parâmetros GET. Os resultados da avaliação são registrados no arquivo de debug wafparan01d3.log criado na sua máquina.
  • Observe o comportamento e a resposta para cada nível de paranoia do WAF, configurando diferentes ataques ou payloads usando o nível de configuração padrão.
  • O PoC abaixo fornece a instalação e configuração básica do zero e reutiliza o WAF atualmente implantado configurando um "Mock" básico e simulando o backend.
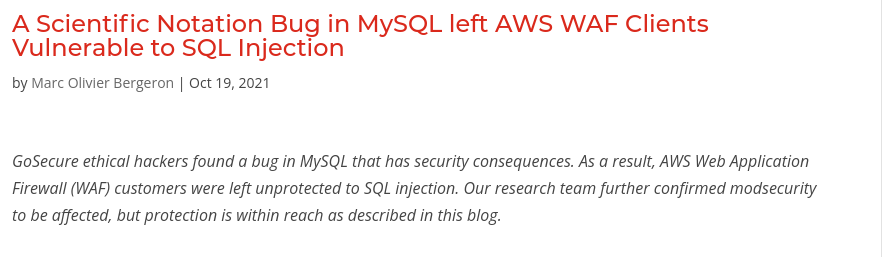
  • Os payloads padrão disponíveis foram chamados de mysql_gosecure.txt, com base na pesquisa "A Scientific Notation Bug in MySQL left AWS WAF Clients Vulnerable to SQL Injection" da gosecure, disponível aqui https://www.gosecure.net/blog/2021/10/19/a-scientific-notation-bug-in-mysql-left-aws-waf-clients-vulnerable-to-sql-injection/ avaliando nossos WAFs usando modsecurity em seus diferentes níveis de paranoia, seja em uma configuração padrão ou desabilitando diferentes regras / IDs de forma escalonada e rápida.
Abordagem

  • Pentesters: Escopo GreyBox com acesso limitado à máquina Linux do WAF usando um "shell" com privilégios para iniciar/recarregar e editar arquivos de configuração do Apache do WAF em ambientes DEV/STG/TEST, enviando diferentes payloads.
  • Oficiais de Segurança: Tomar a melhor decisão para aplicar o nível de paranoia do WAF para cada solução na sua organização.
  • Blueteamers: Aplicação de regras, melhores alertas, menos resultados de falsos positivos na sua organização.
  • Integradores: Realizar um troubleshooting mais aprofundado e definir o nível adequado de paranoia do WAF rapidamente, personalizando regras ou criando patches virtuais.

Prova de Conceito: Baseado no Ubuntu 20.04.3 e OWASP Core Rule Set (CRS) v3.3.2

Referência: https://www.inmotionhosting.com/support/server/apache/install-modsecurity-apache-module/

Instalação inicial

  1. Atualize os repositórios de software:
root@kitploit:~
$ sudo apt update -y && sudo apt dist-upgrade -y
  1. Instale os pacotes essenciais:
root@kitploit:~
$ sudo apt-get install build-essential -y
  1. Instale o apache2 para ubuntu (se não estiver instalado):
root@kitploit:~
$ sudo apt-get install apache2 -y
  1. Baixe e instale o módulo Apache ModSecurity:
root@kitploit:~
$ sudo apt install libapache2-mod-security2 -y
  1. Instale o curl para ubuntu (se não estiver instalado):
root@kitploit:~
$ sudo apt-get install curl vim gridsite-clients net-tools -y
  1. Reinicie o serviço Apache:
root@kitploit:~
$ sudo systemctl restart apache2
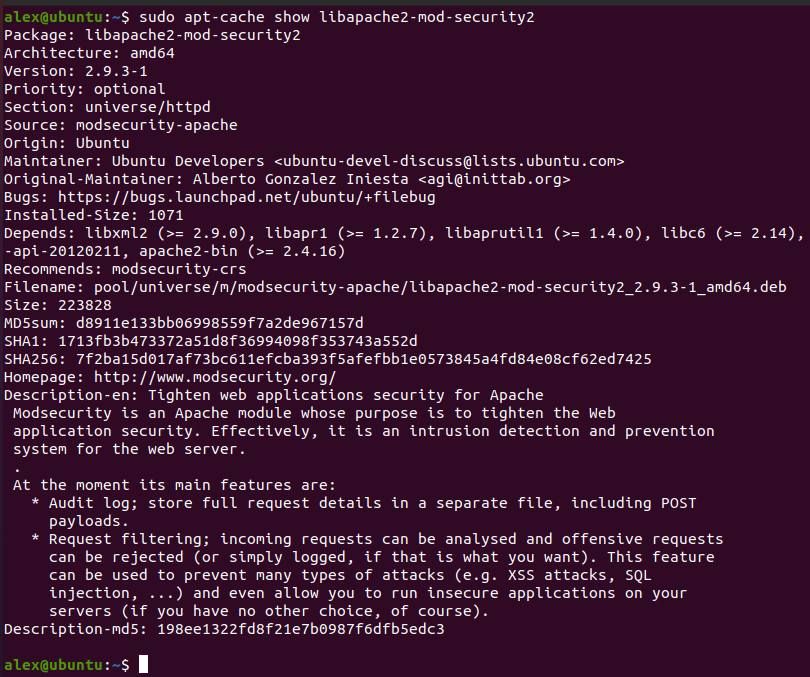
  1. Garanta que a versão do software instalado seja pelo menos 2.9.x:
root@kitploit:~
$ sudo apt-cache show libapache2-mod-security2
install

Configurar o ModSecurity

  1. Copie e renomeie o arquivo:
root@kitploit:~
$ sudo cp /etc/modsecurity/modsecurity.conf-recommended /etc/modsecurity/modsecurity.conf

Em seguida, altere o modo de detecção do ModSecurity. Primeiro, entre na pasta cd /etc/modsecurity
2. Edite o arquivo de configuração do ModSecurity com vi, vim, emacs ou nano.

root@kitploit:~
$ sudo vim /etc/modsecurity/modsecurity.conf
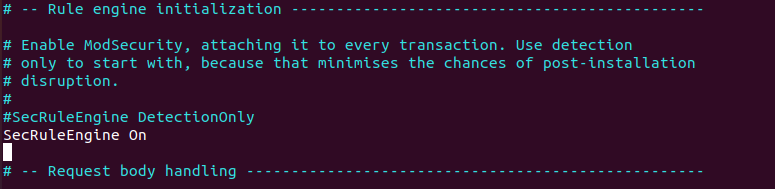
  1. Perto do topo do arquivo, você verá SecRuleEngine DetectionOnly. Altere DetectionOnly para On.

Valor original: SecRuleEngine DetectionOnly
Novo valor: SecRuleEngine On
modsec

  1. Salve as alterações.
  2. Reinicie o Apache:
root@kitploit:~
$ sudo systemctl restart apache2

Baixar o OWASP Core Rule Set

  1. Baixe o CRS mais recente em CoreRuleSet.org/installation
root@kitploit:~
$ cd ~
$ wget https://github.com/coreruleset/coreruleset/archive/refs/tags/v3.3.2.zip
  1. Verifique a soma de verificação, certifique-se de que corresponde à disponibilizada publicamente aqui: https://coreruleset.org/installation/
root@kitploit:~
$ sha1sum v3.3.2.zip && echo ProvidedChecksum
88f336ba32a89922cade11a4b8e986f2e46a97cf  v3.3.2.zip
ProvidedChecksum 
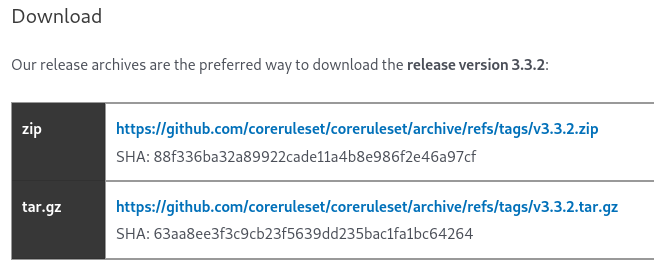
checksum

  1. Descompacte o arquivo zip.
root@kitploit:~
$ unzip v3.3.2.zip
  1. Mova o arquivo de configuração do CRS do novo diretório para o seu diretório ModSecurity:
root@kitploit:~
$ sudo mv coreruleset-3.3.2/crs-setup.conf.example /etc/modsecurity/crs/crs-setup.conf
  • (Opcional, mas recomendado) Mova o diretório de regras do novo diretório para o seu diretório ModSecurity:
root@kitploit:~
$ sudo mv coreruleset-3.3.2/rules/ /etc/modsecurity/crs/
  1. Edite o arquivo security2.conf do Apache para garantir que ele carregará as regras do ModSecurity:
root@kitploit:~
$ sudo vim /etc/apache2/mods-enabled/security2.conf
# Default Debian dir for modsecurity's persistent data SecDataDir /var/cache/modsecurity
root@kitploit:~
    # Include all the *.conf files in /etc/modsecurity.
    # Keeping your local configuration in that directory
    # will allow for an easy upgrade of THIS file and
    # make your life easier
    IncludeOptional /etc/modsecurity/crs-setup.conf
    IncludeOptional /etc/modsecurity/rules/*.conf

    # Include OWASP ModSecurity CRS rules if installed
    #IncludeOptional /usr/share/modsecurity-crs/*.load
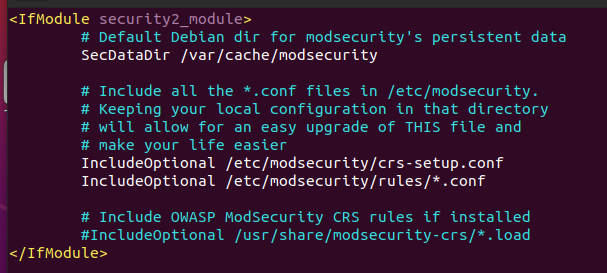
root@kitploit:~
![secmodule](https://assets.kitploit.com/production/public/readmes/43981/0d12086433ccffc5a221b8665d45f5aebe33c3651541c41774027bbeb47715f2.png)

6. Garanta que tanto o arquivo de configuração padrão do ModSecurity quanto o novo arquivo de configuração do CRS estejam listados. O caminho da primeira linha do arquivo de configuração pode já estar incluído. 
O segundo caminho deve ser onde você moveu o diretório /rules.  </br>
7. Edite /etc/apache2/apache2.conf  </br>

$ sudo vim /etc/apache2/apache2.conf

root@kitploit:~
Copie e cole o código a seguir e salve-o. </br>

Include list of ports to listen on

Include ports.conf

Include /etc/modsecurity/modsecurity.conf Include /etc/modsecurity/crs/crs-setup.conf Include /etc/modsecurity/crs/rules/*.conf
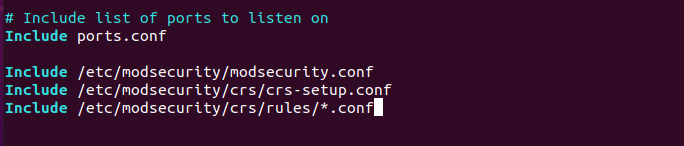
root@kitploit:~
![ports](https://assets.kitploit.com/production/public/readmes/43981/f9a2190845ab3827dfc9eefd4a19e5d2841b08871a5319f1ba7dd31abc2f1102.png)

#### Módulos de Carregamento do Apache Rewrite & Proxy
1. Copie os seguintes módulos. Habilite os módulos Proxy e Rewrite.  </br>

$ cd /etc/apache2 $ sudo cp mods-available/proxy_http.load mods-enabled $ sudo cp mods-available/proxy.load mods-enabled/ $ sudo cp mods-available/rewrite.load mods-enabled/

root@kitploit:~
2. Reinicie o Apache </br>

$ sudo systemctl restart apache2

root@kitploit:~
#### Adicionar Virtualhosts para testar "Mocks"
1. Adicione as portas, edite `/etc/apache2/ports.conf` </br>

$ sudo vim /etc/apache2/ports.conf

root@kitploit:~
Copie e cole o código a seguir e salve-o. </br>

If you just change the port or add more ports here, you will likely also

have to change the VirtualHost statement in

/etc/apache2/sites-enabled/000-default.conf

Listen 8080 Listen 18080

Listen 443 Listen 443 ``` ![ports2](https://assets.kitploit.com/production/public/readmes/43981/b6bfb06e99542ebacf05e52adf16d891e465baf33d1992ae501c12adf560b9d1.png)
  1. Vá para /etc/apache2/sites-enabled, crie o arquivo 001-test.conf
root@kitploit:~
$ cd /etc/apache2/sites-enabled/
$ sudo touch 001-test.conf
$ sudo vim 001-test.conf

Copie e cole o código a seguir e salve-o.

root@kitploit:~
<VirtualHost *:8080>
        ServerName test.domain:8080

        SecRuleEngine On

        ErrorLog ${APACHE_LOG_DIR}/test_error.log
        CustomLog ${APACHE_LOG_DIR}/test_access.log combined
        SecAuditLog ${APACHE_LOG_DIR}/test_audit.log

        ProxyPass / http://127.0.0.1:18080/
        ProxyPassReverse / http://127.0.0.1:18080/
</VirtualHost>
  1. Vá para /etc/apache2/sites-enabled, crie o arquivo 002-moc.conf
root@kitploit:~
$ cd /etc/apache2/sites-enabled/
$ sudo touch 002-moc.conf
$ sudo vim 002-moc.conf

Copie e cole o código a seguir e salve-o.

root@kitploit:~
<VirtualHost 127.0.0.1:18080>

        ErrorLog ${APACHE_LOG_DIR}/moc_error.log
        CustomLog ${APACHE_LOG_DIR}/moc_access.log combined

        RewriteEngine On
        RewriteRule ^(.*)$ $1 [R=200,L]
</VirtualHost>
  1. Reinicie o apache
root@kitploit:~
$ sudo systemctl restart apache2
  1. Crie o arquivo wafparan01d3_rulesremove.conf dentro de /etc/apache2/conf-enabled
root@kitploit:~
$ sudo touch /etc/apache2/conf-enabled/wafparan01d3_rulesremove.conf
  1. Recarregue o Apache
root@kitploit:~
$ sudo service apache2 reload

Teste seu FE e BE (mock)

root@kitploit:~
Must be specify a domain , edit the following lines:  

Windows:
C:\Windows\System32\drivers\etc\hosts
192.168.56.106 test.domain <-- add this line and specify your IP address  

Linux: 
/etc/hosts
192.168.1.23 test.domain <-- add this line and specify your IP address 

$ curl -i -k -s -XGET http://test.domain:8080/
HTTP/1.1 200 OK
Date: Mon, 22 Nov 2021 06:31:41 GMT
Server: Apache/2.4.41 (Ubuntu)
Content-Length: 571
Content-Type: text/html; charset=iso-8859-1
Vary: Accept-Encoding

<!DOCTYPE HTML PUBLIC "-//IETF//DTD HTML 2.0//EN">
<html><head>
<title>200 OK</title>
</head><body>
<h1>OK</h1>
<p>The server encountered an internal error or
misconfiguration and was unable to complete
your request.</p>
<p>Please contact the server administrator at 
 [no address given] to inform them of the time this error occurred,
 and the actions you performed just before this error.</p>
<p>More information about this error may be available
in the server error log.</p>
<hr>
<address>Apache/2.4.41 (Ubuntu) Server at 127.0.0.1 Port 18080</address>
</body></html>

$ curl -i -k -s -XGET http://localhost:18080/
HTTP/1.1 200 OK
Date: Mon, 22 Nov 2021 06:27:17 GMT
Server: Apache/2.4.41 (Ubuntu)
Content-Length: 571
Content-Type: text/html; charset=iso-8859-1

<!DOCTYPE HTML PUBLIC "-//IETF//DTD HTML 2.0//EN">
<html><head>
<title>200 OK</title>
</head><body>
<h1>OK</h1>
<p>The server encountered an internal error or
misconfiguration and was unable to complete
your request.</p>
<p>Please contact the server administrator at 
 [no address given] to inform them of the time this error occurred,
 and the actions you performed just before this error.</p>
<p>More information about this error may be available
in the server error log.</p>
<hr>
<address>Apache/2.4.41 (Ubuntu) Server at localhost Port 18080</address>
</body></html>

Como utilizar

Para obter ajuda, você pode usar a opção help. O uso básico é passar diferentes argumentos definidos.
Exemplo:

root@kitploit:~
$ sudo python3 wafparan01d3.py -h 

           (                                  )   ) (       )
 (  (      ))\ )          ) (      )        ( /(( /( )\ ) ( /(
 )\))(  ( /(()/( `  )  ( /( )(  ( /(  (     )\())\()|()/( )\())
((_)()\ )(_))(_))/(/(  )(_)|()\ )(_)) )\ ) ((_)((_)\ ((_)|(_)\
_(()((_|(_)(_) _((_)_\((_)_ ((_|(_)_ _(_/( /  (_) (_)_| |__ (_)
\ V  V / _` |  _| '_ \) _` | '_/ _` | ' \)) () || |/ _` ||_ \
 \_/\_/\__,_|_| | .__/\__,_|_| \__,_|_||_| \__/ |_|\__,_|___/
                |_|

                    ~ WAFPARANO1D3 : v1.1 ~
     The Web Application Firewall Paranoia Level Test Tool.

usage: wafparan01d3.py [-h] [--run [_RUN]] [--debug [_DEBUG]] [--pl [_PARANOIALEVEL ...]] [--proxy [_PROXY]] [--payload [_PAYLOAD]] [--rules-remove [_RULESREMOVE]] [--log [_LOG]] [--domain [_DOMAIN]] [--conf-file [_CONF_FILE]]
                       [--time-sleep [_TIME_TO_SLEEP]] [--time-sleep-request [_TIME_TO_SLEEP_REQUEST]] [--desc [_DESC]] [--output-desc [_OUTPUT_DESC]]

optional arguments:
  -h, --help            show this help message and exit
  --run [_RUN]          Run script
  --debug [_DEBUG]      Debug mode
  --pl [_PARANOIALEVEL ...]
                        Define paranoia level Ex. -pl 2
  --proxy [_PROXY]      Define Proxy. Ex: http://127.0.0.1:8081
  --payload [_PAYLOAD]  Define payload file. Ex. --payload payload2.txt
  --rules-remove [_RULESREMOVE]
                        Define rules remove file. Ex. --rules-remove rules1.txt
  --log [_LOG]          Define path of the log file. Ex. --log /var/log/apache/wafparan01d3.log
  --domain [_DOMAIN]    Define your domain. Ex. --domain example.domain:8080
  --conf-file [_CONF_FILE]
                        Define configuration file. Ex. --conf-file /opt/modsecurity/crs/rules/INITIALIZATION.conf
  --time-sleep [_TIME_TO_SLEEP]
                        Sleep time per PL. Ex. --time-sleep 3
  --time-sleep-request [_TIME_TO_SLEEP_REQUEST]
                        Sleep time per Request. Ex. --time-sleep-request 3
  --desc [_DESC]        Description of the script and authors
  --output-desc [_OUTPUT_DESC]
                        Description of the output on console mode.
                                                              

Argumentos Opcionais

root@kitploit:~
$ sudo python3 wafparan01d3.py -h 
	- show the help message

$ sudo python3 wafparan01d3.py --run
	- run the script with default options.

$ sudo python3 wafparan01d3.py --run --debug
	- Print every line on console.
	
$ sudo python3 wafparan01d3.py --run --pl 1
	- Run the script in assigned Paranoia Level.
	- By default runs on Paranoia Level 1, 2, 3, 4

$ sudo python3 wafparan01d3.py --run --payload file_payload2.txt
	- Define the payload file that you want to send to WAF.
	- By default takes the file mysql_gosecure.txt

$ sudo python3 wafparan01d3.py --run --rules-remove rules_removex.txt
	- Define the rules that you want to remove on GWAF.
	- Example of the file: 
		- Default 920000 920001 920002
	- By default takes the files: rules_remove1.txt, rules_remove2.txt, rules_remove3.txt, rules_remove4.txt

$ sudo python3 wafparan01d3.py --run --log /home/waf_user/paranoia.log
	- Define LOG File.
	- By default print the log on paranoia_debug.log

$ sudo python3 wafparan01d3.py --run --domain mydomain.test.com
	- Define Domain of Front End WAF.
	- By default runs over domain domain.test:8080
	
$ sudo python3 wafparan01d3.py --run --conf-file /opt/modsecurity/crs/rules/INITIALIZATION.conf
	- Define the configuration file to update the Paranoia Level
	- By default takes /etc/modsecurity/crs/rules/REQUEST-901-INITIALIZATION.conf

$ sudo python3 wafparan01d3.py --run --time-sleep 3
	- Define the time to sleep per Paranoia Level.

$ sudo python3 wafparan01d3.py --run --time-sleep-request 2
	- Define the time to sleep per request send to WAF.

$ sudo python3 wafparan01d3.py --desc
	- Print the description of the script and the authors.

Demonstrações

Você pode testar o wafparan01d3.py executando o ambiente de VM (Ubuntu) que implanta o WAF ModSecurity & 'Mock' usando o OWASP Core Rule Set mais recente CRS 3.3.2, avaliando os níveis de paranoia do ModSecurity de forma facilmente personalizável.

Para executar:

root@kitploit:~
$ git clone https://github.com/alt3kx/wafparan01d3.git
$ cd wafparan01d3
$ sudo python3 wafparan01d3.py --help 
root@kitploit:~
$ sudo python3 wafparan01d3.py --run

wafparan01d3_001

root@kitploit:~
$ sudo python3 wafparan01d3.py --run --debug --proxy http://192.168.56.1:8081

wafparan01d3_002

root@kitploit:~
$ sudo python3 wafparan01d3.py --run --debug --pl 1 2 --proxy http://192.168.56.1:8081 --log test.log --domain vulnerable.domain:8080 --time-sleep-request 1 --time-sleep 1 --rules-remove my_rules_remove.txt --payload my_payload.txt

wafparan01d3_003

WAF Rule Scientific Notation

https://github.com/mindhack03d/WAF-Rule-Scientific-Notation

Autores

Alex Hernandez aka (@_alt3kx_)
Jesus Huerta aka @mindhack03d

Baixar ferramenta