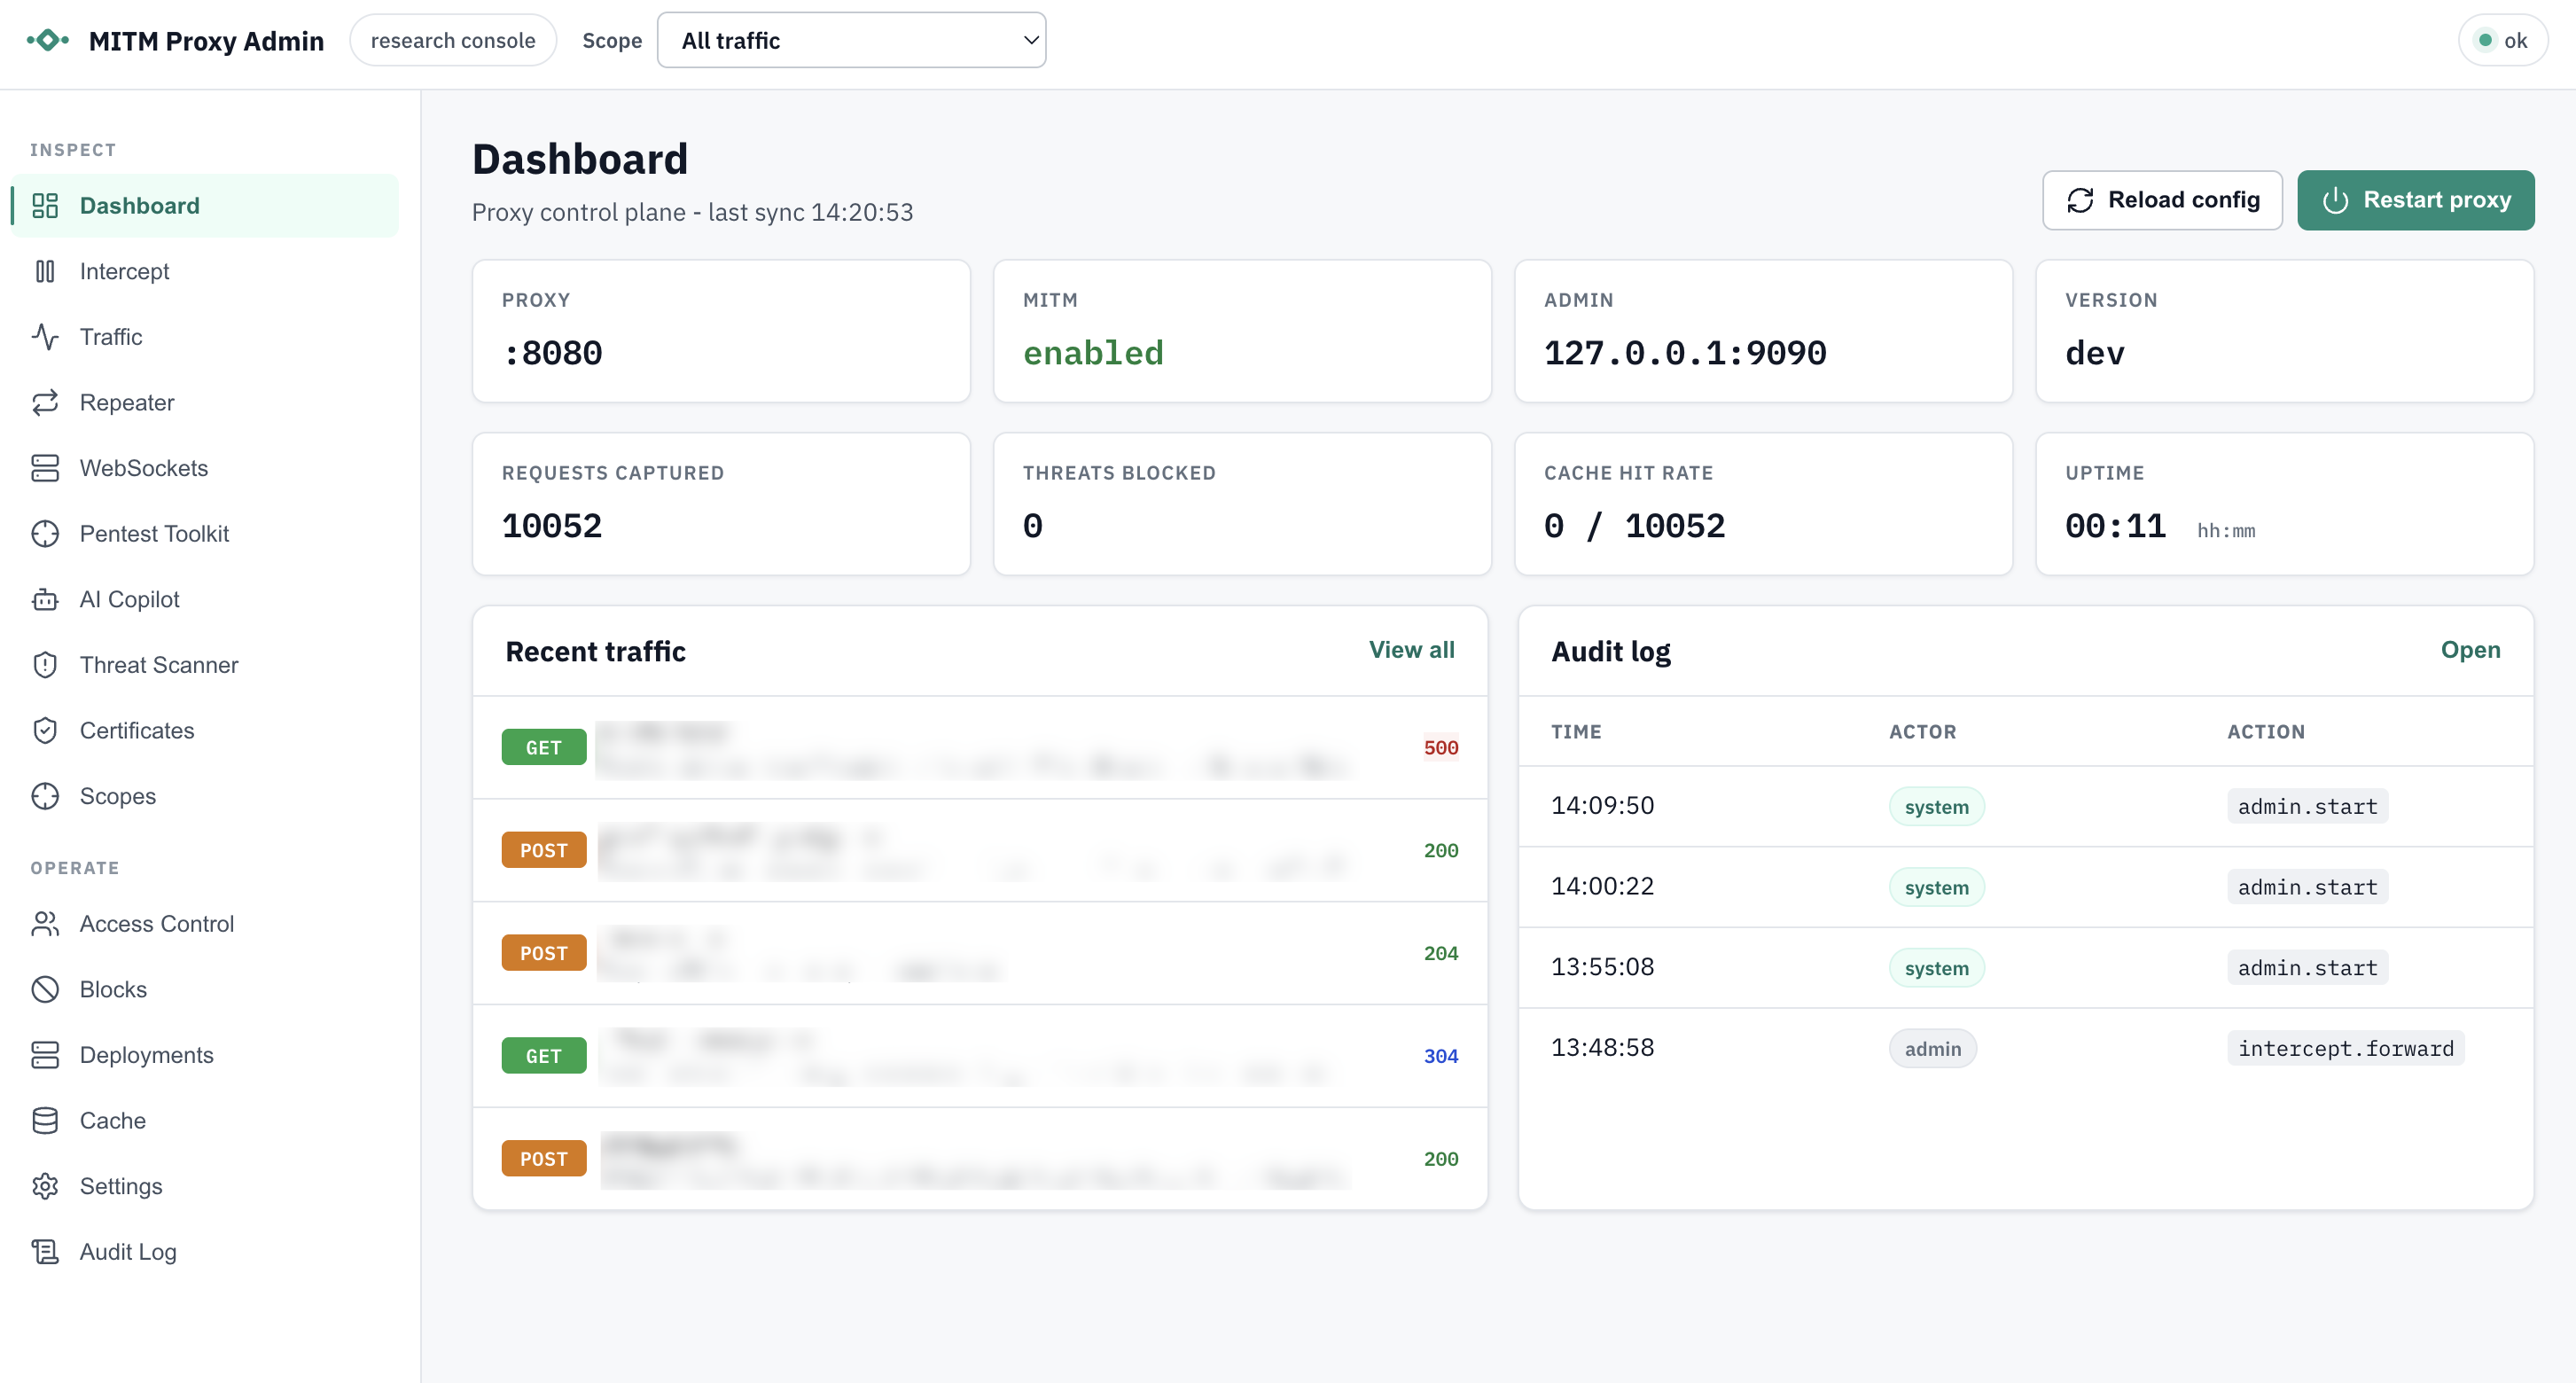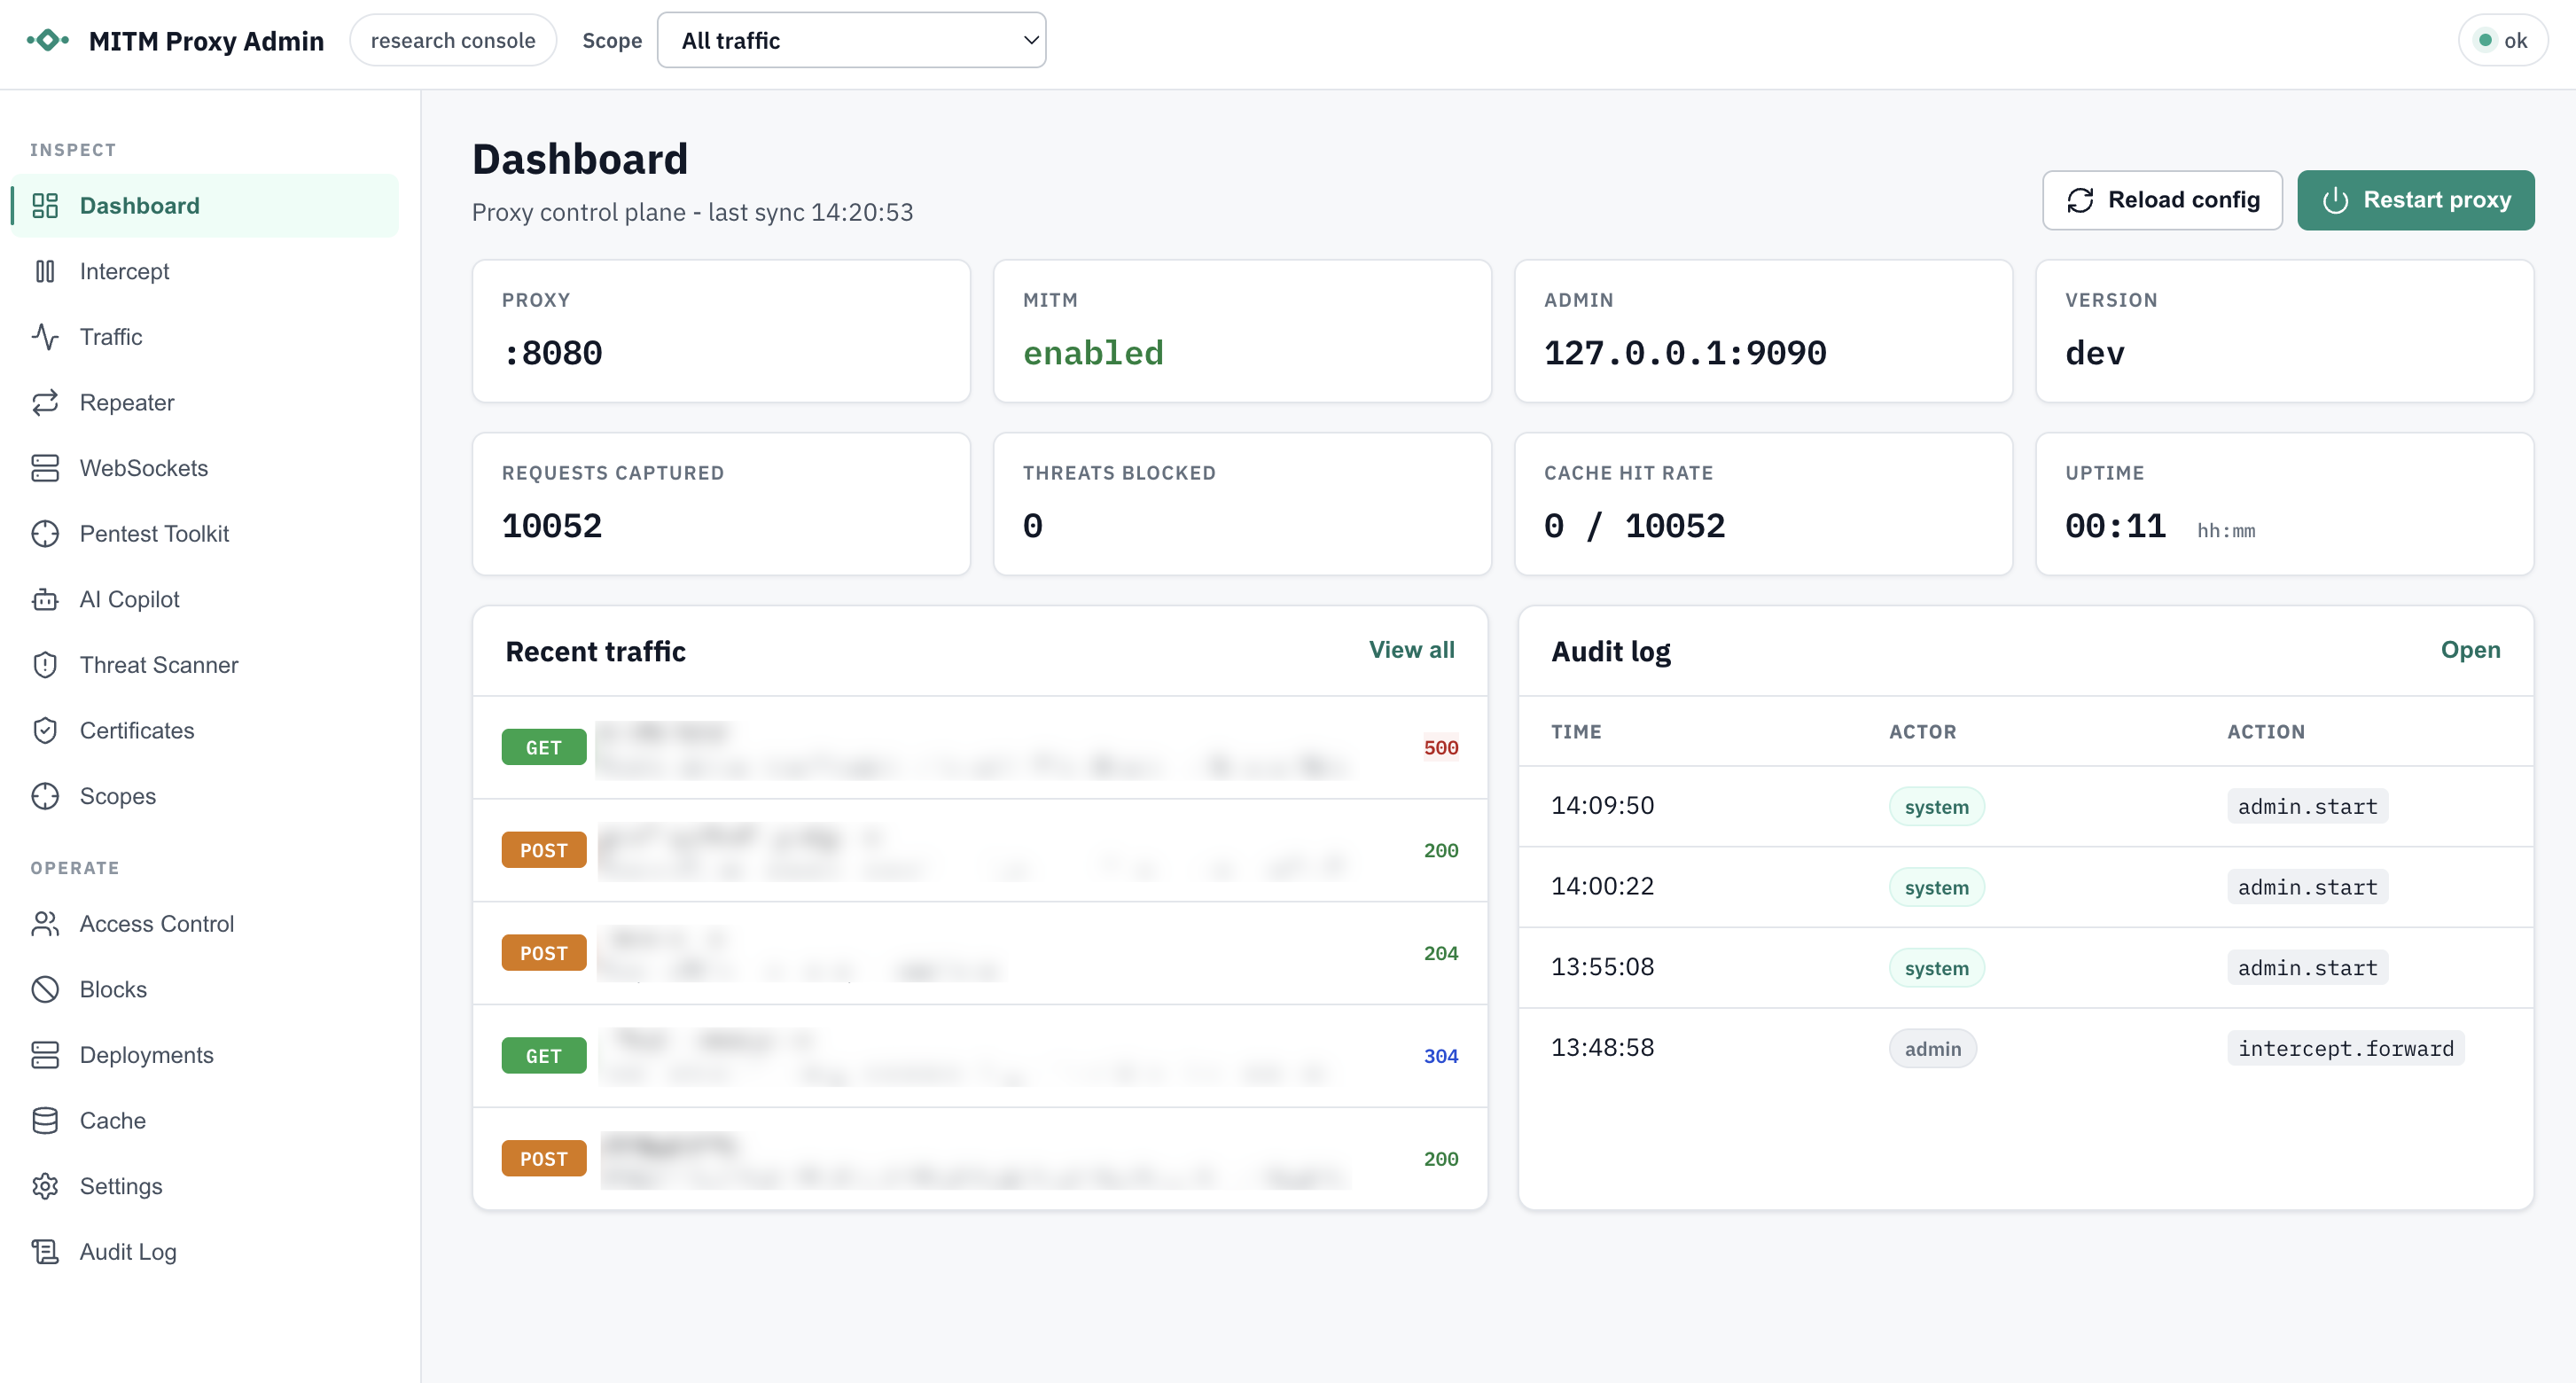

GoベースのMITM HTTP/HTTPSプロキシ。HTTP/2およびHTTP/1.1の傍受、ローカルCA/ホスト単位の証明書生成、CONNECT/WebSocketトンネリング、ディスクキャッシュ、管理ダッシュボード、トラフィックキャプチャ、ブロックポリシー、そして任意で利用可能なAI支援の脅威スキャン(編集、隔離、監査ログ付き)を備えています。
Goで書かれた、軽量で開発者に優しい中間者(MITM)HTTP/HTTPSプロキシです。HTTP/1.1およびHTTP/2、CONNECTトンネリング、WebSocketトンネリング(ws/wss)、柔軟なフィルタを備えたディスク上のレスポンスキャッシュ、設定のライブリロードをサポートします。


Go MITM Proxyは、デバッグ、テスト、学習、およびHTTP(S)トラフィックの制御された傍受を目的としたインターセプトプロキシです。MITMが有効な場合、ローカルCAによって署名されたホストごとのリーフ証明書を動的に生成し、プロキシがHTTPSトラフィックを復号化して検査できるようにします。また、MITMが無効な場合、または除外されたドメイン/ポートに対しては、透過的TCPトンネルとしても機能します。
重要: このアプリケーションは、HTTPSトラフィックを復号化するためのTLS証明書の生成と使用を含む、能動的なMan-in-the-Middle(中間者)傍受を実行します。お住まいの法域やネットワーク環境によっては、影響を受けるすべてのユーザーから明確な事前同意を得ずにトラフィックを傍受することは違法となる可能性があり、プライバシー、職場のポリシー、または規制要件に違反する恐れがあります。
このソフトウェアを、ご自身のローカルマシン以外の環境で使用する前に:
このプロキシがトラフィックを傍受する可能性のあるネットワークのすべてのユーザーは、HTTP(S)の傍受と検査が行われることを明確に通知されなければなりません。同意は明示的であり、可能であれば文書化されるべきです。
所有も管理もしておらず、テストまたは監視する明示的な許可を得ていないネットワーク上でこのソフトウェアを実行しないでください。
多くの地域では、ユーザーデータの傍受、ログ記録、保存を規制する厳格な法律(例:GDPR、CCPA、盗聴法)があります。使用が適用されるすべての規制に準拠していることを確認する責任はあなたにあります。
生成されたCA秘密鍵(通常は ca-key.pem)により、保持者は対応する証明書を信頼するユーザーに対してあらゆるドメインを偽装できます。
このプロキシは開発、デバッグ、制御されたテスト、または教育目的のために設計されています。隠密な監視や不正な監視のためではありません。
このソフトウェアを使用することにより、お客様の使用が合法的かつ倫理的であり、影響を受けるすべてのユーザーに適切に伝えられていることを確認する完全な責任を認め、受け入れるものとします。
前提条件:
クローンしてビルド: ```bash git clone https://github.com/Welfordian/mitm-proxy.git cd mitm-proxy go build ./
これにより、プロジェクトルートに mitm-proxy (Windows では mitm-proxy.exe) バイナリが生成されます。
## クイックスタート
1) デフォルト設定でプロキシを実行します (:8080 で待ち受けます): ```bash
./mitm-proxy
初回起動時に、ローカル CA が作成され、ca-cert.pem と ca-key.pem に保存されます。
ブラウザまたは curl が http://localhost:8080 のプロキシを使用するように設定してください。
HTTPS インターセプトを許可するには、生成された CA 証明書 (ca-cert.pem) を OS/ブラウザで信頼してください。Trusting the Local CA を参照してください。
プロキシ経由で HTTPS サイトにアクセスし、ログを確認してください。より詳細な情報を得るには、verbose モードを使用してください: ```bash ./mitm-proxy --verbose
## 使い方
### コマンドラインフラグ
- --config string: config.json ファイルへのパス
- --listen string: リッスンアドレス(設定を上書き)
- --ca-cert string: 既存の CA 証明書へのパス(設定を上書き)
- --ca-key string: 既存の CA キーへのパス(設定を上書き)
- --mitm bool: MITM インターセプトを有効にする(デフォルト: true。false に設定するとトンネリングを強制)
- --verbose bool: 詳細ログを有効にする
- --watch-config bool: config.json の変更を監視して自動適用する(デフォルト: true)
- --admin-enabled bool: ローカル管理 API/ダッシュボードを有効にする(デフォルト: true)
- --admin-addr string: 管理 API/ダッシュボードのリッスンアドレス(デフォルト: 127.0.0.1:9090)
- --admin-token string: 管理用ベアラートークン(省略時は起動時に生成)
- --admin-read-token string: GET/HEAD/OPTIONS の管理アクセス用読み取り専用ベアラートークン
- --admin-ui bool: 組み込み管理 UI を配信する(デフォルト: true)
- --admin-store string: 管理 SQLite ストアのパス(デフォルト: dashboard.db)
CLI フラグは、注記がある場合に設定ファイルの値を上書きします。
### 設定(config.json)
リポジトリには config.json の例が含まれています: ```json
{
"listen_addr": ":8080",
"proxy_name": "MITM-Proxy",
"ca_cert_path": null,
"ca_key_path": null,
"ca_cert_output_path": "ca-cert.pem",
"ca_key_output_path": "ca-key.pem",
"enable_mitm": true,
"admin_enabled": true,
"admin_addr": "127.0.0.1:9090",
"admin_token": "",
"admin_read_token": "",
"admin_ui": true,
"admin_store": "dashboard.db",
"excluded_domains": [],
"blocked_ports": [25, 445, 3389],
"blocked_domains": [],
"blocked_ips": [],
"block_action": "deny",
"block_response_status": 403,
"traffic_capture": {
"store_bodies": false,
"max_body_bytes": 32768,
"redact_bodies": true,
"store_headers": true,
"redacted_headers": ["Authorization", "Cookie", "Proxy-Authorization", "Set-Cookie", "X-Api-Key"],
"store_cookies": true,
"redacted_cookies": []
},
"proxy_auth": {
"enabled": false,
"realm": "MITM Proxy",
"require_auth_for_loopback": false,
"default_action": "allow"
},
"verbose_logging": true,
"log_requests": true,
"max_idle_conns": 200,
"idle_conn_timeout_seconds": 90,
"tls_handshake_timeout_seconds": 10,
"min_tls_version": "1.2",
"tls_next_protos": ["h2", "http/1.1"],
"cache": {
"enabled": true,
"directory": "/var/cache/mitm-proxy",
"include_domains": [],
"exclude_domains": [],
"include_extensions": ["jpg", "png", "webp", "css", "js"],
"exclude_extensions": [],
"ttl": 3600
}
}
注記:
管理サーバーはデフォルトで http://127.0.0.1:9090/admin/ にダッシュボードを提供します。API ルートには Authorization: Bearer <token> が必要です。ローカルブラウザで使用する場合、/admin/?token=<token> はトークンをブラウザのローカルストレージに保存します。
初期のダッシュボード/API の対象範囲は以下のとおりです。
ダッシュボードには、初回実行時の責任ある使用の確認が含まれています。CA の秘密鍵が管理 API を通じて公開されることはありません。
ダッシュボードの状態は、デフォルトでは SQLite の dashboard.db に保存されます。ダッシュボードで変更された設定は即座に適用され、設定された JSON ファイルに書き戻されます。プロキシがデフォルト設定から起動された場合は config.json に書き戻されます。
管理フロントエンドは internal/admin/ui にある Vite/React アプリです。その本番ビルドは internal/admin/ui/dist に出力され、Go バイナリに埋め込まれます。ダッシュボードのアセットを更新するには:```bash
cd internal/admin/ui
npm install
npm run build
### アップストリームプロキシチェーン
送信トラフィックは、Burp、ZAP、または企業のイグレスプロキシなどのアップストリームHTTP/HTTPSプロキシを介してチェーン化できます。有効にすると、通常のHTTP(S)転送、CONNECTパススルートンネル、WebSocket、およびRepeater送信は、ホストが `no_proxy` に一致しない限り、アップストリームプロキシを使用します。```json
{
"upstream_proxy": {
"enabled": true,
"url": "http://127.0.0.1:8080",
"username": "",
"password_env": "UPSTREAM_PROXY_PASSWORD",
"no_proxy": ["localhost", "127.0.0.1", "*.internal"],
"chain_tunnels": true,
"apply_to_repeater": true
}
}
Only http:// and https:// upstream proxy URLs are supported in v1. If Basic auth is needed, set username and provide the password through the named environment variable; credentials embedded in the URL are rejected and are never shown in dashboard settings. If the upstream proxy is enabled but unavailable, affected requests fail visibly instead of silently falling back to direct connections.
The dashboard's Access Control view manages client proxy users and ordered allow/deny ACL rules. Proxy users are stored in SQLite with bcrypt password hashes; plaintext passwords are accepted only when creating or resetting a user and are never returned by the API.
Enable Basic proxy authentication through proxy_auth in config.json or the Settings view. When enabled, clients must send Proxy-Authorization: Basic ... unless loopback clients are exempt. ACL rules are evaluated by priority and can match username, source IP/CIDR, host or wildcard host, port or port range, method, and research scope. Empty matcher lists mean "any".
Proxy-Authorization is stripped before forwarding, upstream chaining, traffic capture, cache lookup, threat scanning, and Repeater cloning. Captured traffic includes proxy_user attribution when available, and the Traffic search box can match proxy usernames.
The dashboard's Repeater view lets security researchers clone captured HTTP traffic into saved editable cases. A case stores the method, URL, headers, body sample, timeout, and optional source traffic flow ID. Each send stores a run with status, duration, response headers, a capped response body sample, and any upstream error.
Captured request bodies are only prefilled when traffic_capture.store_bodies was enabled at capture time. If body redaction was enabled, the repeater receives the redacted sample; uncaptured bodies remain empty and can be edited manually.
The legacy POST /api/traffic/{id}/replay endpoint remains available for one-shot replay, while the repeater is intended for repeatable request mutation and response comparison.
The dashboard's Pentest Toolkit view builds passive target maps from captured traffic. Rebuilding a map analyzes only stored traffic for the selected scope, groups endpoints by normalized path, extracts query/body/cookie/header parameters, records reflected and interesting parameters, and adds passive hints such as missing security headers, cookie attribute gaps, permissive CORS, and verbose errors.
Pentest maps are persisted in SQLite and can be deleted independently. The toolkit never sends requests, crawls, fuzzes, or mutates targets; endpoint evidence can be cloned into Repeater for manual testing.
The dashboard's Scopes view lets researchers define named target boundaries with host, URL substring, and optional method patterns. Enabled scopes are matched automatically when traffic is captured; matching flows, cloned Repeater cases, and threat scanner events receive a single scope_id.
The global scope selector filters Traffic, Repeater, and Threat Scanner views across all traffic, a selected enabled scope, or out-of-scope items. Deleting a scope clears related scope_id values without deleting captured traffic, Repeater cases, runs, or threat data.
Scope filters are available on GET /api/traffic, GET /api/repeater/cases, and GET /api/threats/events with scope_id=<id> or scope_id=__out_of_scope__. Add include_out_of_scope=true to include unscoped rows beside a selected scope.
The dashboard's AI Copilot view stores AI-generated research notes linked to Traffic, Repeater cases, runs, scopes, or threat events. Traffic detail can ask the copilot to explain a request or suggest next manual tests; Repeater can suggest tests for a saved case or compare the latest two runs.
The copilot is advisory only. It never sends traffic, edits Repeater cases, changes scopes, changes settings, or purges data. Out-of-scope traffic can be explained, but active testing suggestions are intentionally withheld.
Enable it through ai_copilot in config.json or the Settings view:```json
{
"ai_copilot": {
"enabled": true,
"provider": "openai",
"model": "gpt-5.4-nano",
"timeout_ms": 10000,
"max_body_bytes": 32768,
"redact_before_ai": true,
"openai_api_key_env": "OPENAI_API_KEY"
}
}
OpenAI APIキーは設定された環境変数から読み取られ、ダッシュボードや設定ファイルには保存されません。`redact_before_ai` が有効な場合、機密性の高いヘッダー、ボディサンプル、クエリ値は、AIコンテキストが送信される前にマスクされます。保存されるノートには、モデル、プロンプトハッシュ、要約、構造化されたAI出力が含まれ、完全なプロンプトは含まれません。
### AI脅威スキャン
脅威スキャナーは、ローカルのヒューリスティックを使用してHTTPリクエストとレスポンスを検査し、設定されている場合は、疑わしいトラフィックをブロックする前にOpenAIにセカンドオピニオンを求めることができます。
1. OpenAI APIキーを作成し、プロキシプロセスに公開します:```powershell
$env:OPENAI_API_KEY = "sk-..."
macOS/Linuxの場合:```bash export OPENAI_API_KEY="sk-..."
2. `config.json` でスキャナーを有効にします:```json
{
"threat_scanner": {
"enabled": true,
"mode": "suspicious_only",
"provider": "openai",
"model": "gpt-5.4-nano",
"second_opinion_model": "gpt-5.4-mini",
"scan_requests": true,
"scan_responses": true,
"max_body_bytes": 131072,
"max_ai_body_bytes": 32768,
"ai_timeout_ms": 750,
"block_threshold": 0.85,
"warn_threshold": 0.65,
"require_ai_confirmation_for_block": true,
"block_critical_local_on_ai_failure": true,
"fail_open": true,
"scan_content_types": [
"text/html",
"text/plain",
"application/json",
"application/javascript",
"text/javascript",
"application/xml"
],
"skip_content_types": [
"image/",
"video/",
"audio/",
"font/",
"application/octet-stream"
],
"trusted_domains": [
"accounts.google.com",
"login.microsoftonline.com",
"github.com"
],
"allowlist_domains": [],
"malicious_domains": [],
"malicious_file_hashes": [],
"threat_intel_updated": "",
"quarantine_dir": "quarantine",
"debug_log_path": "threats.log",
"redact_before_ai": true,
"store_bodies": false,
"openai_api_key_env": "OPENAI_API_KEY"
}
}
The dashboard's **Threat Scanner** view shows scanned request/response counts, AI call counts, detections, verdict details, top local rules, and override actions.
Scanner modes:
- `suspicious_only`: デフォルト。ローカルヒューリスティックがAIを呼び出すタイミングを決定します。
- `all_text`: テキストに似たトラフィックに対してAIを呼び出します。
- `paranoid`: テキストに似たトラフィックに対してもAIを呼び出し、高感度テストを目的としています。
- `metadata_only`: AIによるボディレビューなしで、ヘッダー、URL、ホスト、メタデータを使用します。
- `off`: スキャンを無効にします。
Useful safety and privacy controls:
- `redact_before_ai`: OpenAIにエビデンスを送信する前に、一般的なシークレットと個人データを秘匿化します。
- `max_ai_body_bytes`: AIエビデンスに含めるボディサンプルのサイズを制限します。
- `require_ai_confirmation_for_block`: AIが確認しない限りローカルヒューリスティックによるブロックを防ぎます。ただし、重要なローカルエビデンスに対して`block_critical_local_on_ai_failure`が有効な場合を除きます。
- `fail_open`: スキャナが失敗した場合にトラフィックを許可します。ただし、より厳格なブロック設定が適用される場合は除きます。
- `trusted_domains` と `allowlist_domains`: 既知の正常なホストに対する誤検知を減らします。
- `malicious_domains` と `malicious_file_hashes`: AIを待たずにローカルの脅威インテリジェンスヒットを追加します。
- `debug_log_path`: スキャナの判定をデバッグ用にローカルのJSONL形式のログに書き込みます。
APIキーに別の環境変数名を使用するには、`openai_api_key_env`を設定し、プロキシを起動する前にその変数をエクスポートしてください。APIキーを`config.json`に直接置かないでください。
### ローカルCAを信頼する
HTTPSをインターセプトするには、OS/ブラウザにca-cert.pemをインポートして信頼してください:
- macOS: キーチェーンアクセス → ログイン/システム → 証明書 → ca-cert.pemをインポート → 「常に信頼」に設定。
- Windows: certmgr.msc → 信頼されたルート証明機関 → 証明書 → ca-cert.pemをインポート。
- Linux(ディストリビューションにより異なる): 例: update-ca-certificates、またはブラウザ固有のストア(Firefox: 設定 → プライバシーとセキュリティ → 証明書 → 表示 → 認証局 → インポート)。
CAを信頼しない場合、ブラウザはインターセプトされたサイトに対して証明書の警告を表示します。
### プロキシを使用する
HTTP/HTTPSプロキシをリスンアドレス(デフォルトはhttp://localhost:8080)に設定してください。
curlを使用した例: ```bash
# HTTP
curl -x http://localhost:8080 http://example.com/
# HTTPS (after trusting the CA for full MITM)
curl -x http://localhost:8080 https://example.com/
# Disable MITM and tunnel only
./mitm-proxy --mitm=false
# Change listen address
./mitm-proxy --listen=127.0.0.1:9090
WebSocket ノート:
キャッシュはファイルベースで、有効な場合、HTTP GET リクエストのみを対象とします。選択は次の項目によって制御されます:
キャッシュヒット時、レスポンスには次が含まれます:
キャッシュディレクトリは起動時と設定変更時に保証されます。ディレクトリが設定されていない場合、./cache にデフォルト設定されます。
go build ./ ./mitm-proxy --config ./config.json
サーバーは設定された listen_addr にバインドし、ALPN を使用して HTTP + HTTPS を処理します。
## ロードマップ
- プロキシ認証(Basic/NTLM)とACL
- アップストリームプロキシ/チェーン対応
- PACファイルの生成とヘルパースクリプト
- フローとキャッシュエントリを検査するためのUI
- TLSフィンガープリントの制御とJA3スタイル
- メトリクス/ヘルスエンドポイントとPrometheus統合
## コントリビューション
Issueとプルリクエストは歓迎します。大幅な変更については、まずIssueを開いてスコープと設計について話し合ってください。
コーディングスタイル: 変更は最小限かつ焦点を絞ったものにし、明確さと小さく組み合わせ可能な関数を優先してください。