プロジェクトは以下のリポジトリで構成されています:
これは教育目的専用です。
本番のActive Directory (AD) ドメインでの使用は避けてください。
いかなる貢献者も、その使用について一切の責任を負いません。
Red Teamコミュニティの Telegramチャンネル をチェックしてください。
視覚的な説明については、diagrams.net ツールを使用して ダイアグラムファイル を開いてください。
アプリは以下で構成されています:
DC Sonar Community は、アカウントに関連するセキュリティリスクのためにADドメインを分析する機能を提供します:
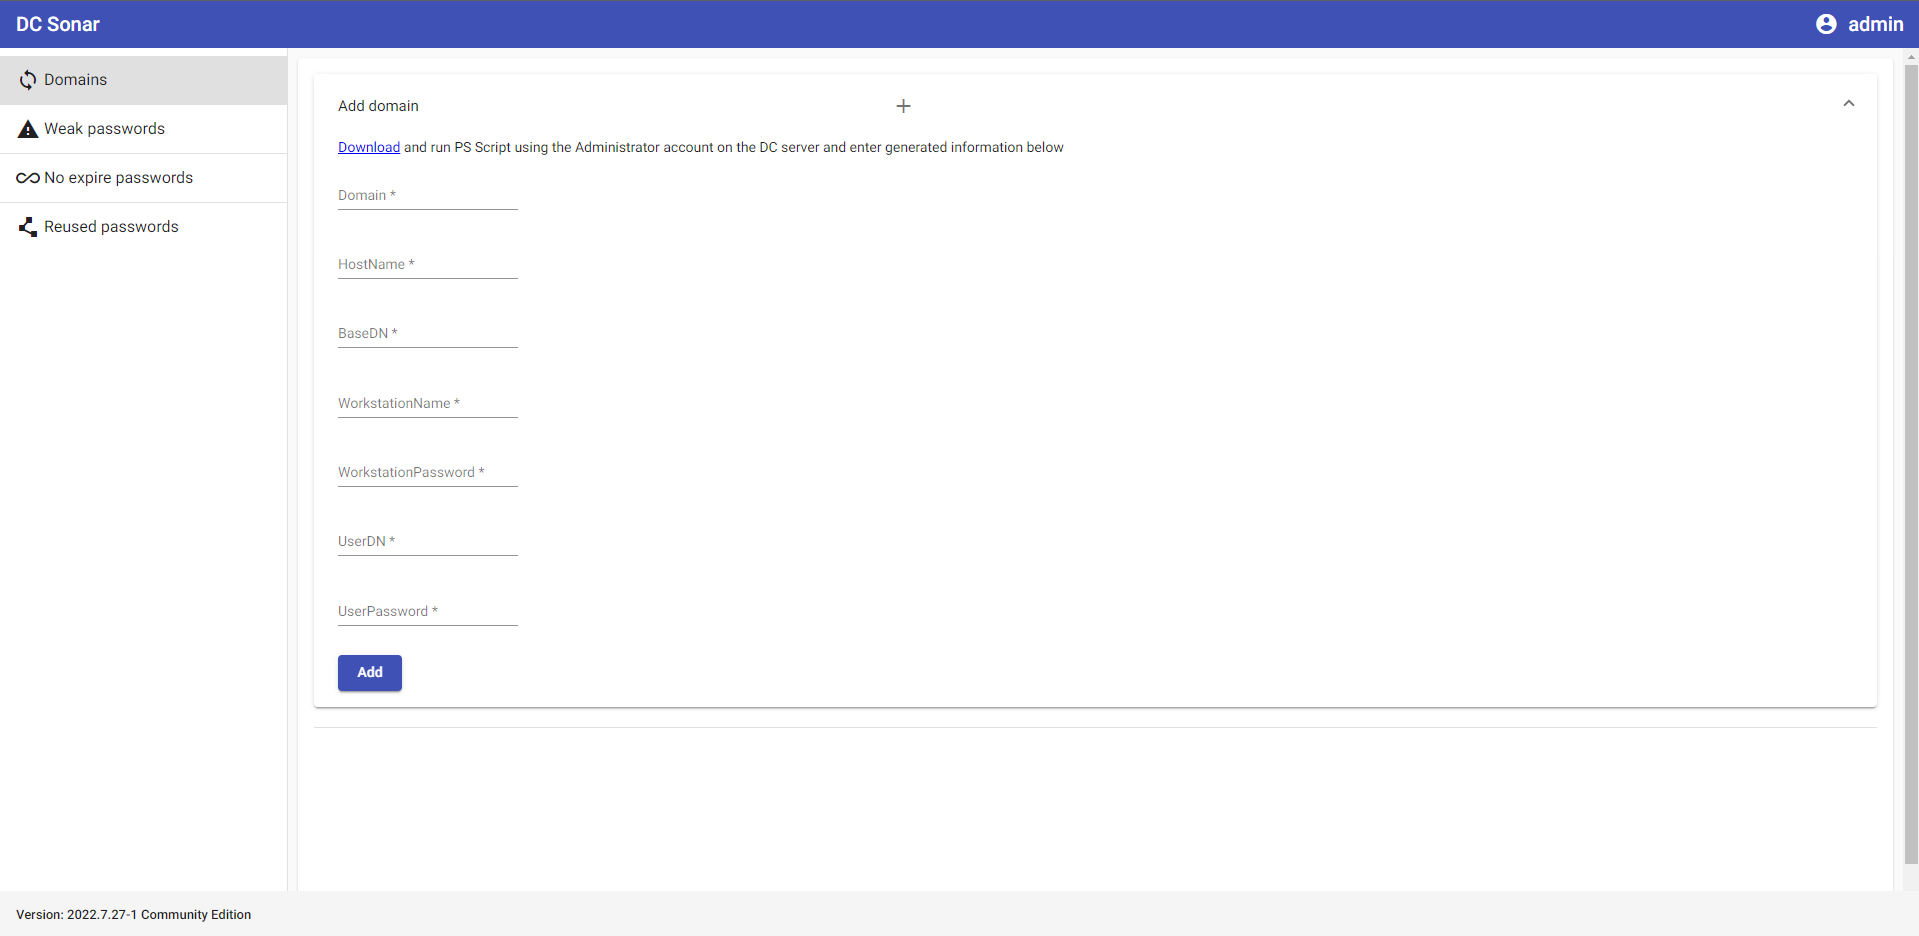
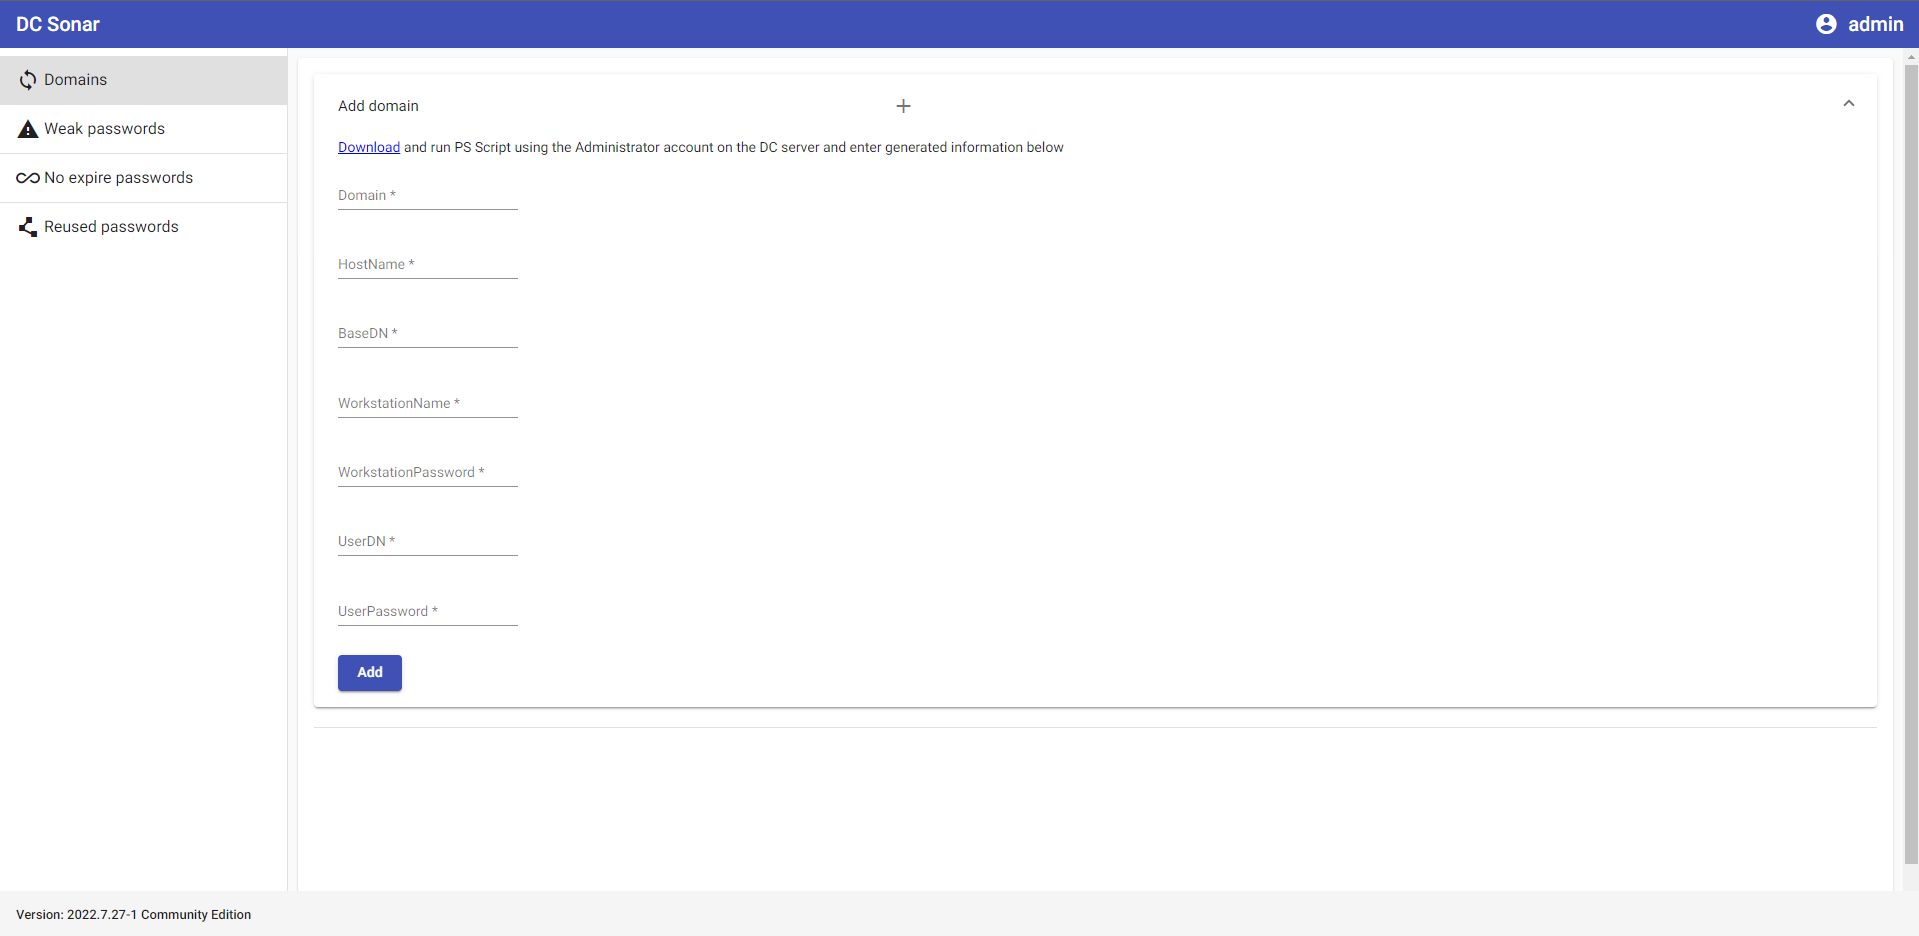
アプリでADドメインの分析を登録
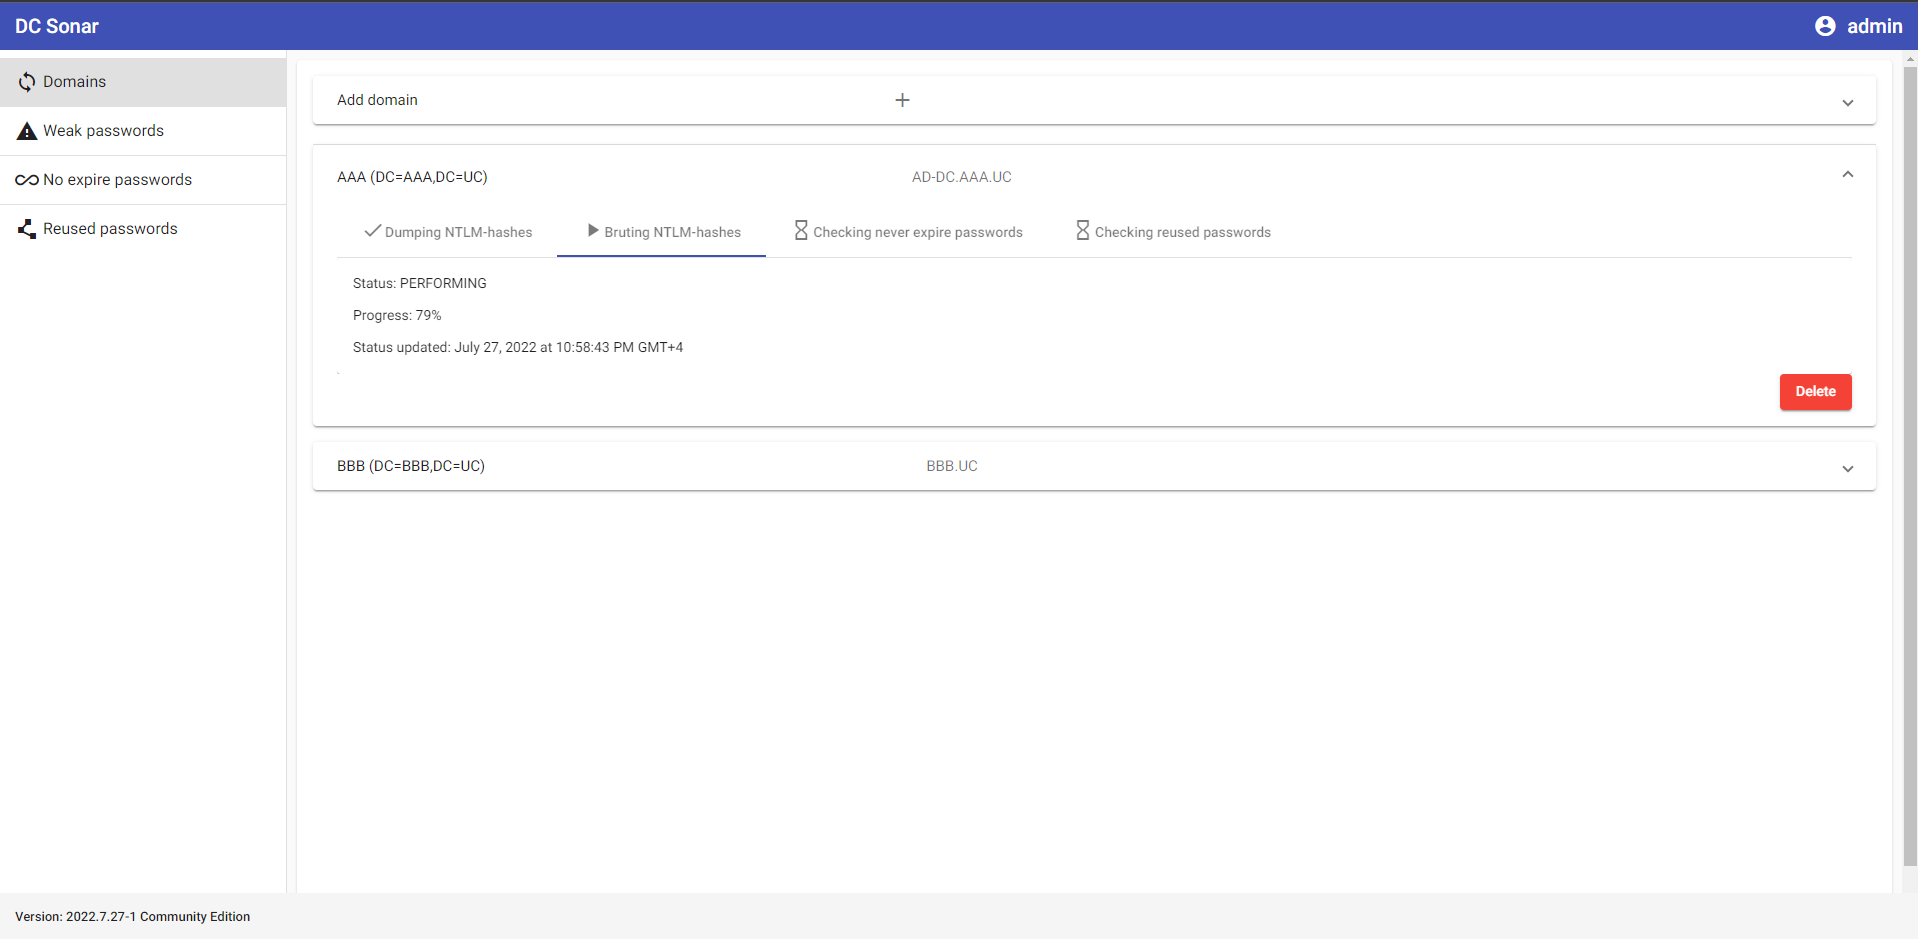
ドメイン分析プロセスのステータスを確認
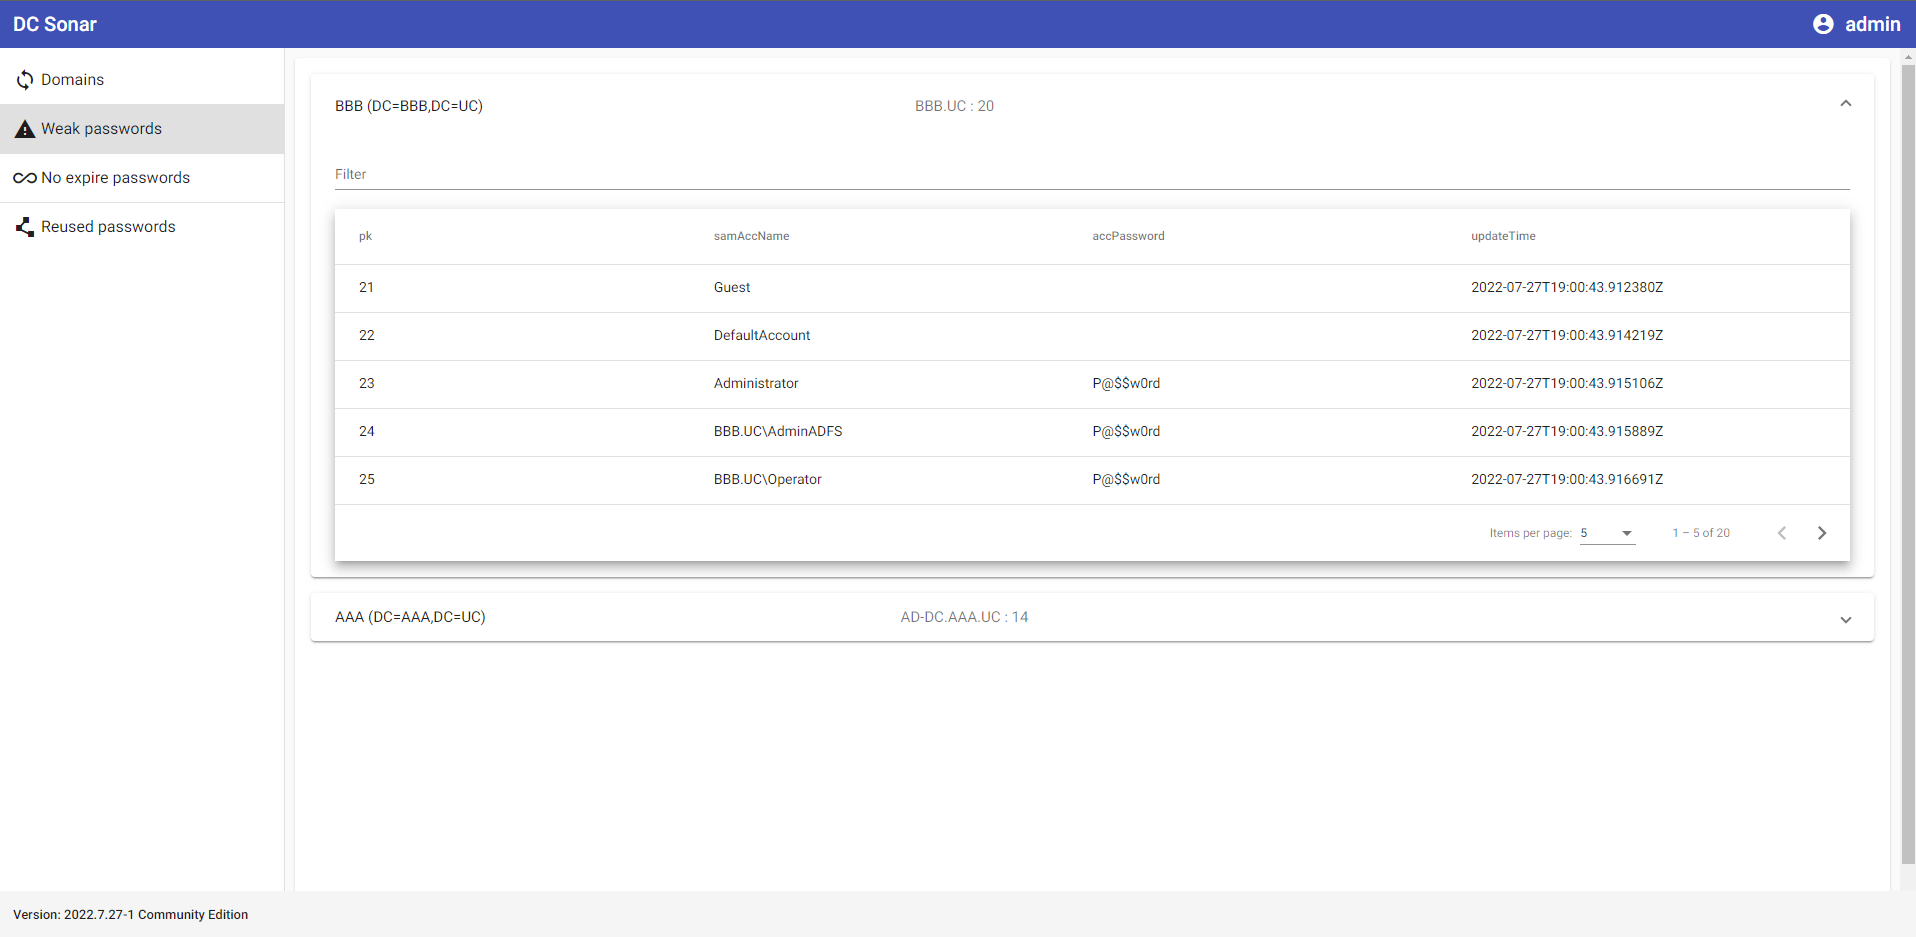
設定されたADドメインからNTLMハッシュをダンプし、ブルートフォースして脆弱なパスワードを持つアカウントをリストアップ
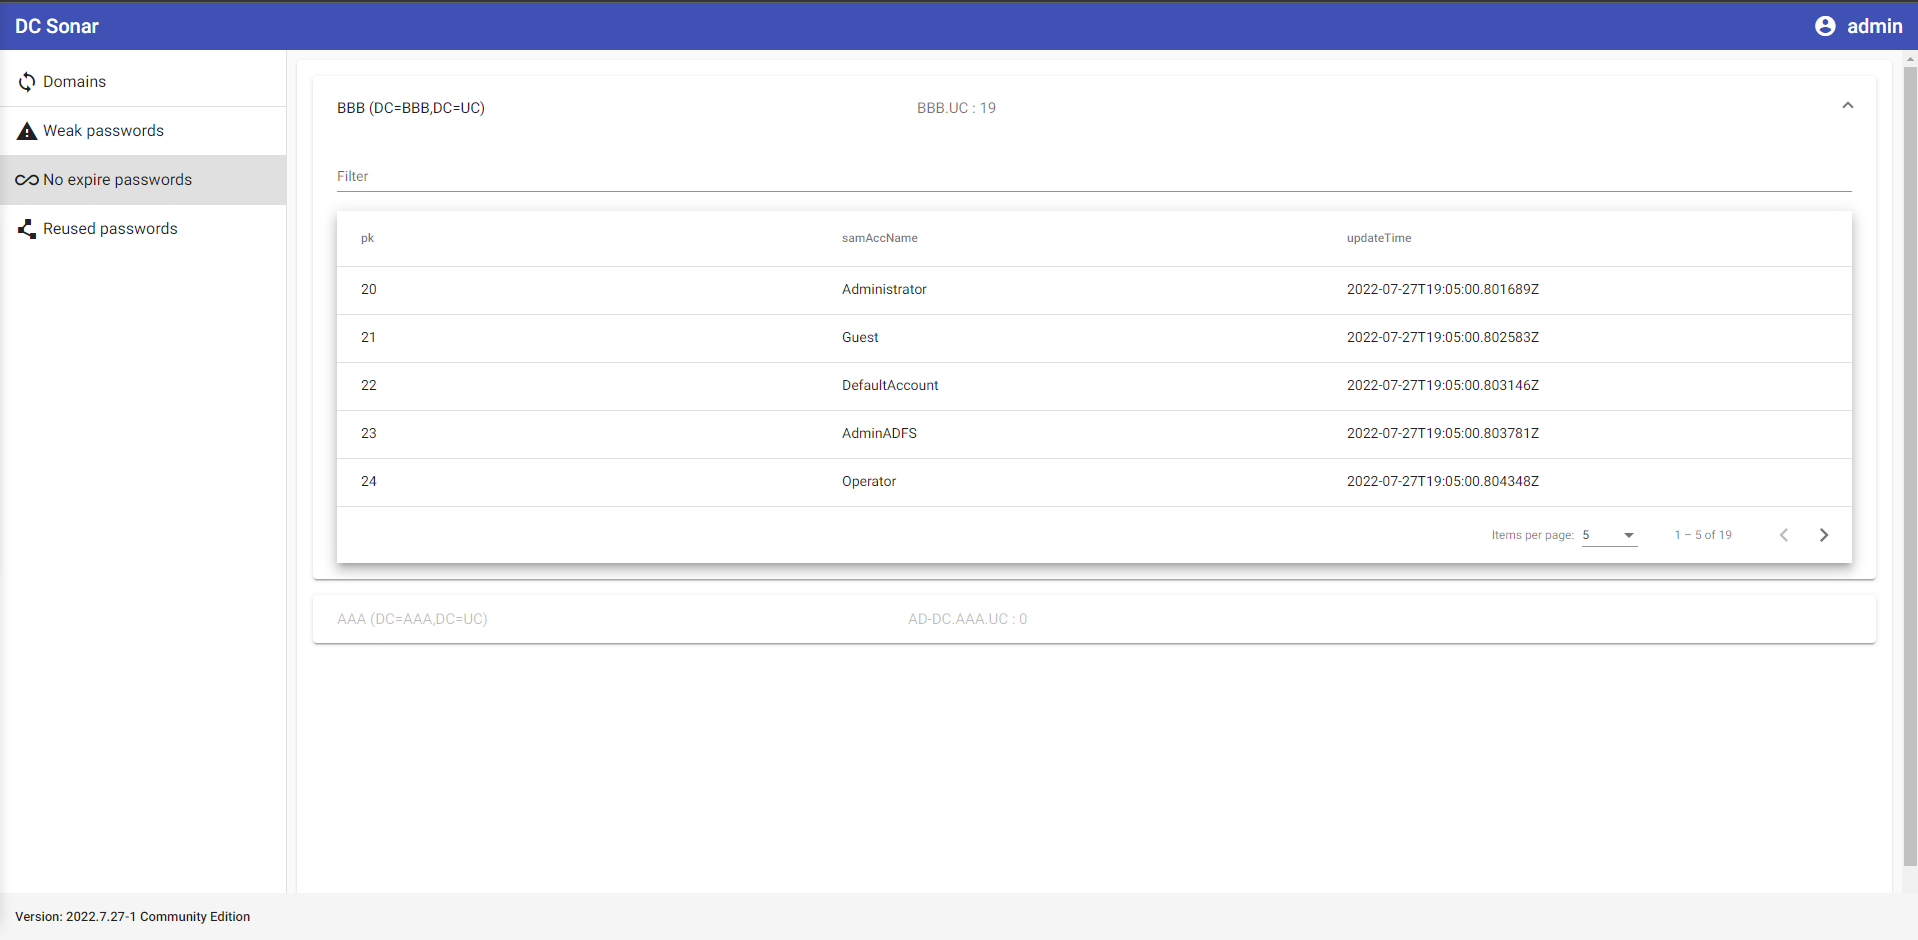
ADドメインアカウントを分析して、パスワードが無期限のものをリストアップ
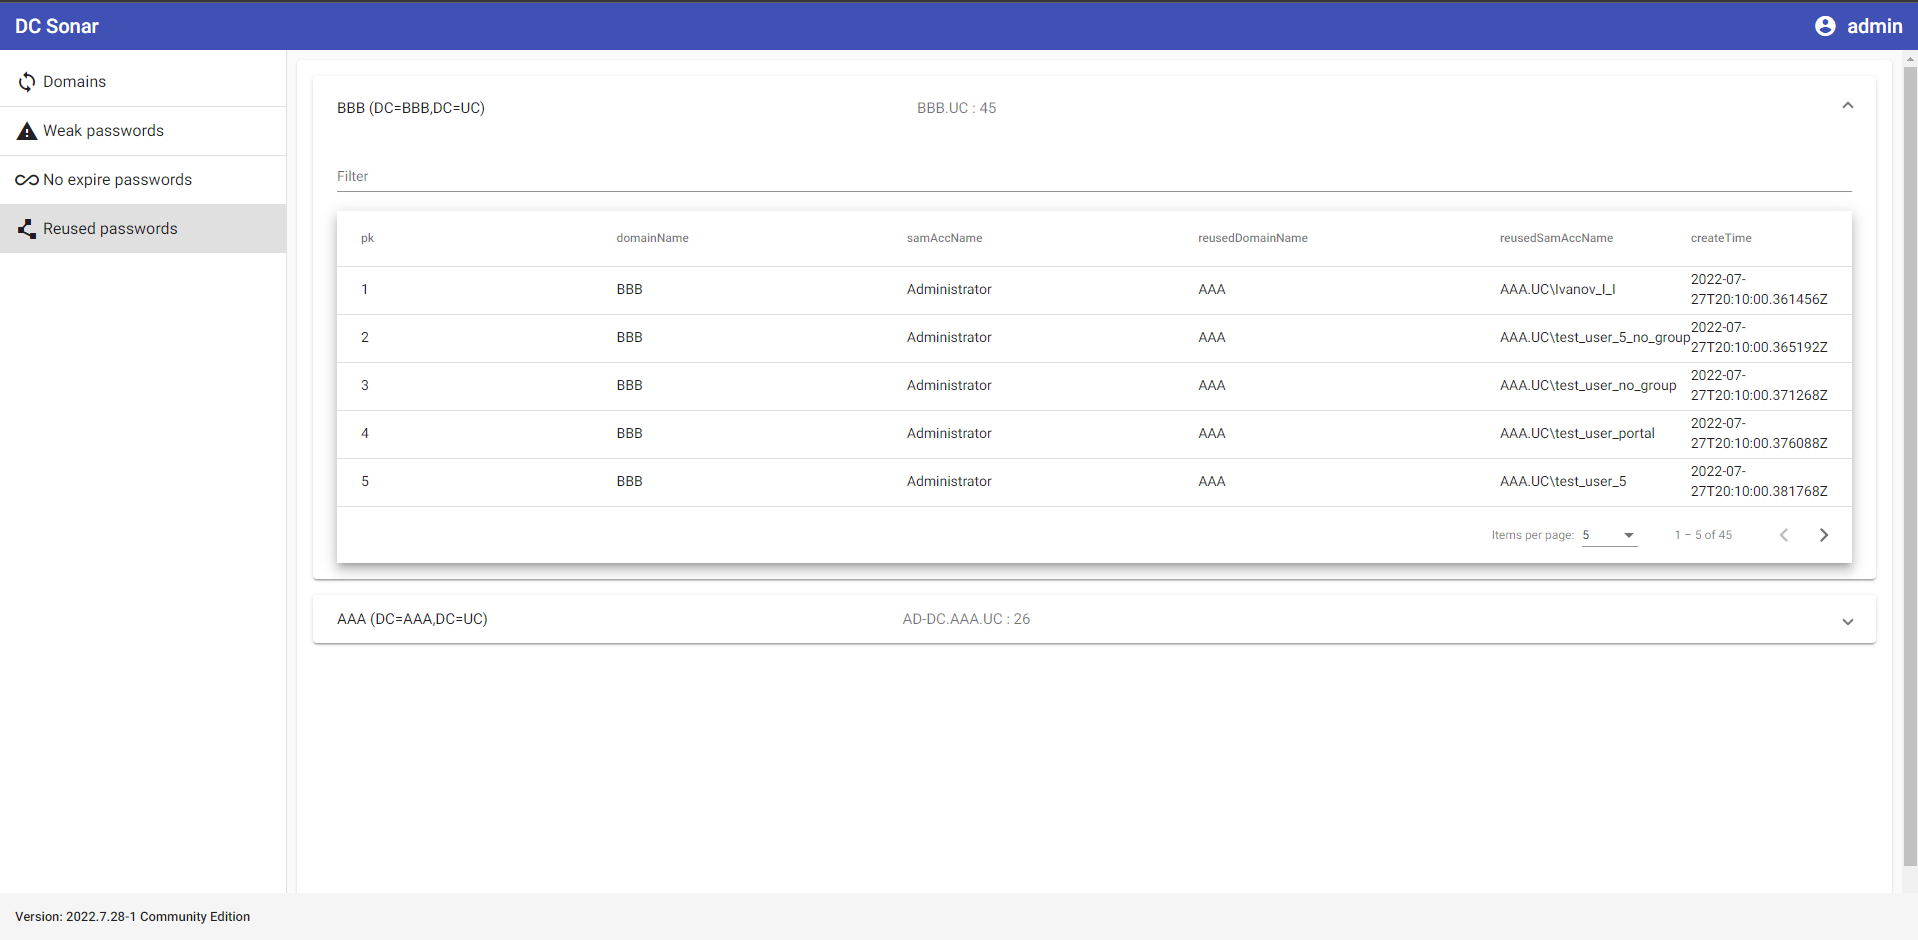
ADドメインアカウントをNTLMパスワードハッシュで分析し、パスワードが再利用されているアカウントとドメインを特定
準備中 ...
クリーンな Ubuntu Server 22.04 と、ユーザー名 "user" のアカウントがあることを前提としています。
アプリは /home/user/dc-sonar にインストールされます。
今後のリリースでは、より柔軟なインストールが可能になるかもしれません。
最新の配布物 から dc_sonar_NNNN.N.NN-N_amd64.tar.gz をサーバーにダウンロードします。
ファイルを展開するフォルダを作成します:
mkdir dc_sonar_NNNN.N.NN-N_amd64
ダウンロードしたアーカイブを展開します:
tar -xvf dc_sonar_NNNN.N.NN-N_amd64.tar.gz -C dc_sonar_NNNN.N.NN-N_amd64
展開したファイルがあるフォルダに移動します:
cd dc_sonar_NNNN.N.NN-N_amd64/
PostgreSQLをインストールします:
sudo bash install_postgresql.sh
RabbitMQをインストールします:
sudo bash install_rabbitmq.sh
依存関係をインストールします:
sudo bash install_dependencies.sh
ppa:deadsnakes/ppa リポジトリの追加確認を求められます。Enter を押してください。
dc-sonar自体をインストールします:
sudo dpkg -i dc_sonar_NNNN.N.NN-N_amd64.deb
Django管理者ユーザー作成のための情報を求められます。ユーザー名、メールアドレス、パスワードを入力してください。
自己署名SSL証明書作成のための情報を2回求められます。必要な情報を入力してください。
インストールプロセス中に設定したDjango管理者の認証情報を入力します。
STYLE_GUIDE.md を参照してください。
準備中 ...
この場合、Windowsホスト上でコードを編集し、Ubuntuゲスト上でPythonコードを実行する環境をセットアップします。
2 CPU、2048 MB RAM、10GB SSDの仮想マシンを Ubuntu Server 22.04 ISOを使用して VirtualBox で 作成 します。
UbuntuインストーラーがVMインストール前にUbuntuインストーラーの更新を求めてきた場合 - 同意します。
OpenSSHサーバーのインストールを選択します。
VirtualBoxのポートフォワーディングルール:
Python 3.10.5 をダウンロード してインストールします。
DC Sonarプロジェクト用のフォルダを作成します。
Git for Windows を使用してプロジェクトフォルダに移動します:
cd '{PATH_TO_FOLDER}'
dc-sonar-user-layer のWindowsインストール手順を実行します。
dc-sonar-workers-layer のWindowsインストール手順を実行します。
ntlm-scrutinizer のWindowsインストール手順を実行します。
dc-sonar-frontend のWindowsインストール手順を実行します。
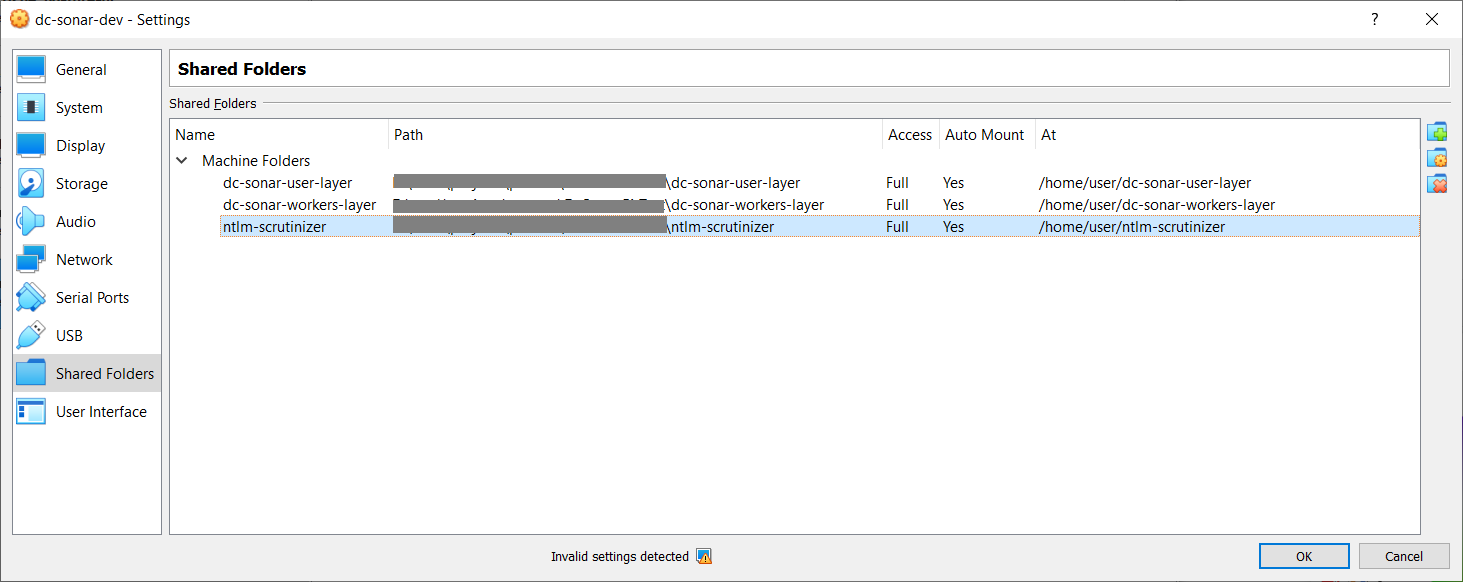
「Open VirtualBox」から「Reboot VM」までの 手順 を実行します。ただし、以下の画像のように、VM VirtualBoxに「自動マウント」付きの共有フォルダを追加してください:
再起動後、次のコマンドを実行します:
sudo adduser $USER vboxsf
使用しているユーザーアカウントでログアウトしてログインします。
/home/user ディレクトリで、マウントされたフォルダを使用できます:
ls -l
Output:
total 12
drwxrwx--- 1 root vboxsf 4096 Jul 19 13:53 dc-sonar-user-layer
drwxrwx--- 1 root vboxsf 4096 Jul 19 10:11 dc-sonar-workers-layer
drwxrwx--- 1 root vboxsf 4096 Jul 19 14:25 ntlm-scrutinizer
Ubuntu 20.04に PostgreSQLをインストール します:
sudo apt update
sudo apt install postgresql postgresql-contrib
sudo systemctl start postgresql.service
adminデータベースアカウントを作成します:
sudo -u postgres createuser --interactive
Output:
Enter name of role to add: admin
Shall the new role be a superuser? (y/n) y
dc_sonar_workers_layerデータベースアカウントを作成します:
sudo -u postgres createuser --interactive
Output:
Enter name of role to add: dc_sonar_workers_layer
Shall the new role be a superuser? (y/n) n
Shall the new role be allowed to create databases? (y/n) n
Shall the new role be allowed to create more new roles? (y/n) n
dc_sonar_user_layerデータベースアカウントを作成します:
sudo -u postgres createuser --interactive
Output:
Enter name of role to add: dc_sonar_user_layer
Shall the new role be a superuser? (y/n) n
Shall the new role be allowed to create databases? (y/n) n
Shall the new role be allowed to create more new roles? (y/n) n
back_workers_dbデータベースを作成します:
sudo -u postgres createdb back_workers_db
web_app_dbデータベースを作成します:
sudo -u postgres createdb web_app_db
psqlを実行します:
sudo -u postgres psql
adminアカウントのパスワードを設定します:
ALTER USER admin WITH PASSWORD '{YOUR_PASSWORD}';
dc_sonar_workers_layerアカウントのパスワードを設定します:
ALTER USER dc_sonar_workers_layer WITH PASSWORD '{YOUR_PASSWORD}';
dc_sonar_user_layerアカウントのパスワードを設定します:
ALTER USER dc_sonar_user_layer WITH PASSWORD '{YOUR_PASSWORD}';
back_workers_dbデータベースに対するdc_sonar_workers_layerアカウントのCRUD権限を付与します:
\c back_workers_db
GRANT CONNECT ON DATABASE back_workers_db to dc_sonar_workers_layer;
GRANT USAGE ON SCHEMA public to dc_sonar_workers_layer;
GRANT ALL ON ALL TABLES IN SCHEMA public TO dc_sonar_workers_layer;
GRANT ALL ON ALL SEQUENCES IN SCHEMA public TO dc_sonar_workers_layer;
GRANT ALL ON ALL FUNCTIONS IN SCHEMA public TO dc_sonar_workers_layer;
web_app_dbデータベースに対するdc_sonar_user_layerアカウントのCRUD権限を付与します:
\c web_app_db
GRANT CONNECT ON DATABASE web_app_db to dc_sonar_user_layer;
GRANT USAGE ON SCHEMA public to dc_sonar_user_layer;
GRANT ALL ON ALL TABLES IN SCHEMA public TO dc_sonar_user_layer;
GRANT ALL ON ALL SEQUENCES IN SCHEMA public TO dc_sonar_user_layer;
GRANT ALL ON ALL FUNCTIONS IN SCHEMA public TO dc_sonar_user_layer;
psqlを終了します:
\q
pg_hba.confファイルを開きます:
sudo nano /etc/postgresql/12/main/pg_hba.conf
ホストマシンからPostgreSQLへの接続を許可する行を追加し、変更を保存してファイルを閉じます:
# IPv4 local connections:
host all all 127.0.0.1/32 md5
host all admin 0.0.0.0/0 md5
postgresql.confファイルを開きます:
sudo nano /etc/postgresql/12/main/postgresql.conf
以下のパラメータを変更し、変更を保存してファイルを閉じます:
listen_addresses = 'localhost,10.0.2.15'
shared_buffers = 512MB
work_mem = 5MB
maintenance_work_mem = 100MB
effective_cache_size = 1GB
PostgreSQLサービスを再起動します:
sudo service postgresql restart
PostgreSQLサービスのステータスを確認します:
service postgresql status
必要に応じてログファイルを確認します:
tail -f /var/log/postgresql/postgresql-12-main.log
これで、Windowsから DBeaver などのクライアントを使用して、adminアカウントで作成したデータベースに接続できます。
スクリプト を使用してRabbitMQをインストールします。
管理プラグインを有効にします:
sudo rabbitmq-plugins enable rabbitmq_management
RabbitMQ管理者アカウントを作成します:
sudo rabbitmqctl add_user admin {YOUR_PASSWORD}
作成したユーザーに完全な管理UIとHTTP APIアクセスのタグを付けます:
sudo rabbitmqctl set_user_tags admin administrator
管理UIを http://localhost:15672/ で開きます。
システムが最新であり、必要なパッケージがインストールされていることを確認します:
sudo apt update && sudo apt upgrade -y
カスタムPPAを追加するために必要な依存関係をインストールします:
sudo apt install software-properties-common -y
次に、dead snakes PPAをAPTパッケージマネージャーのソースリストに追加します:
sudo add-apt-repository ppa:deadsnakes/ppa
Python 3.10をダウンロードします:
sudo apt install python3.10=3.10.5-1+focal1
依存関係をインストールします:
sudo apt install python3.10-dev=3.10.5-1+focal1 libpq-dev=12.11-0ubuntu0.20.04.1 libsasl2-dev libldap2-dev libssl-dev
venvモジュールをインストールします:
sudo apt-get install python3.10-venv
インストールされたPythonのバージョンを確認します:
python3.10 --version
Output:
Python 3.10.5
ドメインコントローラーのIPアドレスを /etc/hosts に追加します
sudo nano /etc/hosts
VM VirtualBoxが共有フォルダ内にvenvを作成することを許可しないため、一つ上のレベルにvenvを作成する必要があります。
共有フォルダがあるホームディレクトリに移動します:
cd /home/user
Ubuntu上でdc-sonar-user-layerの デプロイ手順 を実行します。
Ubuntu上でdc-sonar-workers-layerの デプロイ手順 を実行します。
Ubuntu上でntlm-scrutinizerの 実行準備手順 を実行します。
Ubuntu上でdc-sonar-user-layerの 設定手順 を実行します。
Ubuntu上でdc-sonar-workers-layerの 設定手順 を実行します。
Ubuntu上でntlm-scrutinizerの 実行準備手順 を実行します。
Ubuntu上でntlm-scrutinizerの 実行手順 を実行します。
Ubuntu上でdc-sonar-user-layerの 実行手順 を実行します。
Ubuntu上でdc-sonar-workers-layerの 実行手順 を実行します。
Windows上でdc-sonar-frontendの 実行手順(開発) を実行します。
Windowsホストのブラウザで https://localhost:8000/admin/ を開き、自己署名証明書に同意します。
Windowsホストのブラウザで https://localhost:4200/ を開き、作成したDjangoユーザーとしてログインします。
| 名前 | プロトコル | ホストIP | ホストポート | ゲストIP | ゲストポート |
|---|
| SSH | TCP | 127.0.0.1 | 2222 | 10.0.2.15 | 22 |
| RabbitMQ management console | TCP | 127.0.0.1 | 15672 | 10.0.2.15 | 15672 |
| Django Server | TCP | 127.0.0.1 | 8000 | 10.0.2.15 | 8000 |
| NTLM Scrutinizer | TCP | 127.0.0.1 | 5000 | 10.0.2.15 | 5000 |
| PostgreSQL | TCP | 127.0.0.1 | 25432 | 10.0.2.15 | 5432 |
