Skip to content
KitploitKITPLOIT
ツールブログ
提出
ツールブログ
提出

ハッキング、侵入テスト、サイバーセキュリティツールをあなたのセキュリティアーセナルに!

Kitploitはハッキング、サイバーセキュリティ、ペネトレーションテストのツールディレクトリです。最新のプロジェクトアップデートを見つけて、脆弱性の発見、システム分析、テストの自動化、セキュリティの強化を行いましょう。

··フィード·お問い合わせ·プライバシー·© 2026 Kitploit

ツールディレクトリ

カテゴリ

すべてのカテゴリを見る
Loading categories
go-http-proxy-to-socks — CLI MITMプロキシで、SOCKS4/SOCKS5をHTTP/HTTPS/HTTP2/HTTP3プロキシに変換し、透過的なTCP/UDPリダイレクション、ARP/NDP/DNSスプーフィング、トラフィックスニッフィング、パケットキャプチャを備えています。Pure Go、libpcap不要。 | Kitploit
ツール/GitHubGitHub/shadowy-pycoder/go-http-proxy-to-socks
パケットスニッフィングと分析ウェブプロキシと傍受IDS/IPS回避ネットワークセキュリティペネトレーションテストユーティリティとフレームワークDNSファジングレッドチーミングDNS分析
GitHubshadowy-pycoder/go-http-proxy-to-socks

go-http-proxy-to-socks

CLI MITMプロキシで、SOCKS4/SOCKS5をHTTP/HTTPS/HTTP2/HTTP3プロキシに変換し、透過的なTCP/UDPリダイレクション、ARP/NDP/DNSスプーフィング、トラフィックスニッフィング、パケットキャプチャを備えています。Pure Go、libpcap不要。

リポジトリを見る
693182ヶ月前Kitploit レビュー済み

人気

すべて見る →

コミュニティで最も使われているツールを見つけましょう。

すべてのツールを探索

ツールコレクションを閲覧

すべてのツールを見る →
共有

GoHPTS - HTTP(S)およびTCP/UDP透過プロキシからSOCKS4/SOCKS5プロキシ(チェーン)へ - Goで書かれた

License: GPL v3 Go Reference GitHub go.mod Go version AUR Version AUR Last Modified AUR Maintainer Docker Pulls GitHub Release GitHub Downloads (all assets, all releases) GitHub Downloads (all assets, latest release)

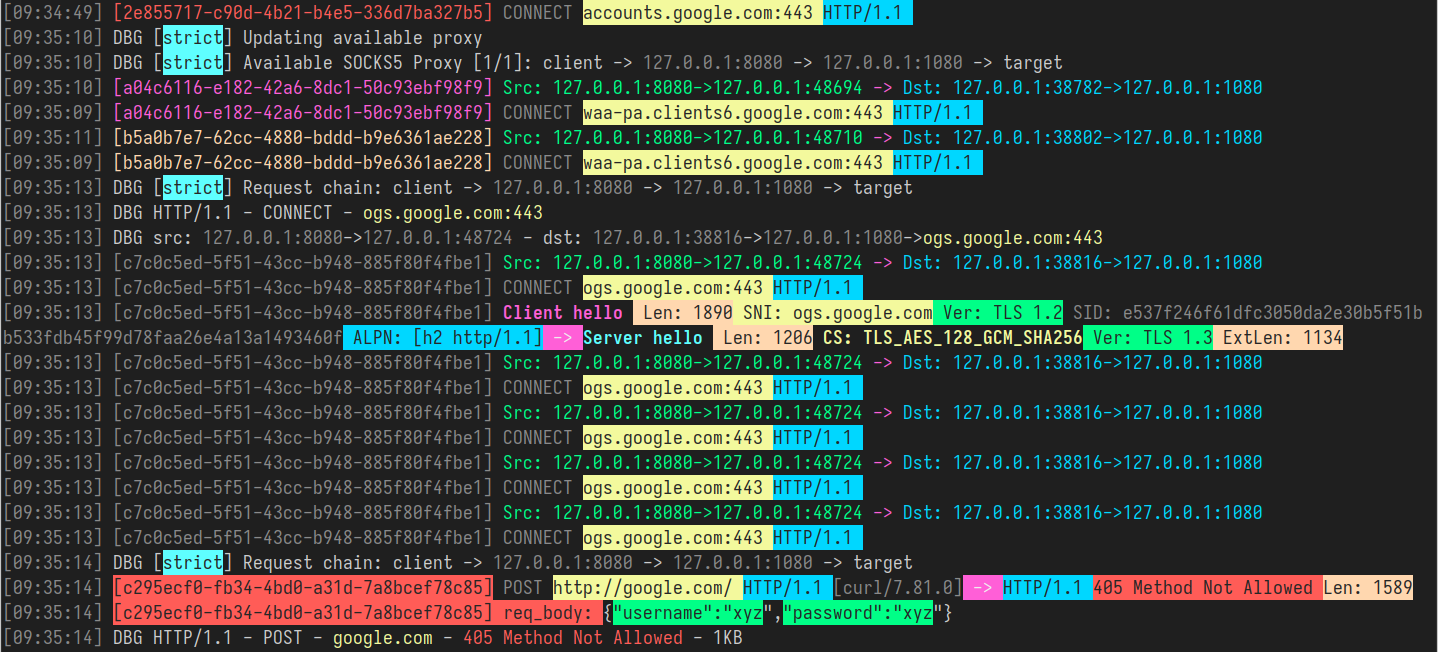
GoHPTS - Colors example

目次

  • はじめに
  • 機能
  • インストール
  • 使用方法
    • CLIフラグによる設定
    • YAMLファイルによる設定
  • 透過プロキシ
    • リダイレクト(NATとSO_ORIGINAL_DSTを使用)
    • リダイレクトモードの自動設定
    • tproxy(MANGLEとIP_TRANSPARENTを使用)
    • tproxyモードの自動設定
    • UDPサポート
    • Androidサポート
    • YAML設定
  • トラフィックスニッフィング
    • JSON形式
    • カラー形式
  • HTTP2およびHTTP3サポート
    • 自己署名証明書を使用した設定例
    • 接続テスト
    • ブラウザでの接続テスト
  • IPv4およびIPv6サポート
  • ARPスプーフィング
  • NDPスプーフィング
  • DNSスプーフィング
  • パケットキャプチャ
  • ネットワーク名前空間
    • プレイグラウンドのセットアップ
    • 使用例
  • 混合サーバー
  • リンク
  • 貢献
  • ライセンス

はじめに

[戻る]

GoHPTS CLIツールは、HTTPクライアントとSOCKS5プロキシサーバー(または複数のサーバー(チェーン))間のブリッジです。ローカルでHTTPプロキシとして待機し、標準的なHTTPまたはHTTPS(CONNECT経由)リクエストを受け入れ、SOCKS5プロキシを介して接続を転送します。http-proxy-to-socksおよびProxychainsに触発されています。

考えられるユースケース:Postmanを介して外部APIに接続する必要があるが、そのAPIは一部のリモートサーバーからのみ利用可能な場合。以下のコマンドでこのタスクを実行できます:

ssh経由でSOCKS5プロキシサーバーを作成:```shell ssh -D 1080 -Nf

root@kitploit:~
`gohpts` を使用して HTTP から SOCKS5 への接続を作成する```shell
gohpts -s :1080 -l :8080

Postman のプロキシ設定で HTTP サーバーを指定する

機能

[戻る]

  • プロキシチェーン機能
    strict、dynamic、random、round_robin の SOCKS4/SOCKS5 プロキシチェーンをサポート

  • 透過プロキシ
    redirect (SO_ORIGINAL_DST) および tproxy (IP_TRANSPARENT) モードをサポート

  • IPv4 および IPv6 サポート
    IPv4-only、IPv6-only、または dual stack モードで動作

  • TCP および UDP 透過プロキシ
    tproxy と tlocal (IP_TRANSPARENT) が TCP および UDP トラフィックを処理

  • トラフィックスニッフィング
    プロキシは HTTP ヘッダー、TLS ハンドシェイク、DNS メッセージなどを解析可能

  • ARP スプーフィング
    ARP スプーフィング手法でサブネット全体をプロキシ

  • NDP スプーフィング
    ルーター/近隣広告および RDNSS 注入を使用して IPv6 接続をプロキシ。

  • DNS スプーフィング
    DNS レコード操作でクライアントを任意のドメインにリダイレクト

  • パケットキャプチャ
    トラフィックを txt/pcap/pcapng ファイルにキャプチャし、Wireshark で分析

  • DNS リーク保護
    DNS 解決は SOCKS5 サーバー側で行われます。

  • CONNECT メソッドのサポート
    HTTP CONNECT トンネリングをサポートし、HTTPS およびその他の TCP ベースのプロトコルを有効にします。

  • HTTP2/HTTP3 サポート
    最新の HTTP/2 および HTTP/3 トランスポートをサポートし、TLS 1.3 上で効率的な多重接続を実現

  • ネットワーク名前空間のサポート
    リッスンソケットとアウトバウンド接続用のカスタム Linux ネットワーク名前空間をサポート

  • トレーラーヘッダーのサポート
    HTTP トレーラーヘッダーを処理

  • チャンク転送エンコーディング
    チャンクおよびストリーミング応答を処理

  • SOCKS5 認証サポート
    SOCKS5 プロキシのユーザー名/パスワード認証をサポート。

  • HTTP 認証サポート
    HTTP プロキシサーバーのユーザー名/パスワード認証をサポート。

  • 軽量で高速
    最小限のオーバーヘッドと効率的なリクエスト処理で設計。

  • クロスプラットフォーム
    主要なすべてのオペレーティングシステムと互換性があります。

インストール

[戻る]

  • Arch Linux/CachyOS/EndeavourOS ```shell yay -S gohpts
    root@kitploit:~

または paru: ```shell paru -S gohpts

root@kitploit:~
- お使いのプラットフォーム用のバイナリを [Releases](https://github.com/shadowy-pycoder/go-http-proxy-to-socks/releases) ページからダウンロードしてください:  ```shell
GOHPTS_RELEASE=v1.15.5; wget -v https://github.com/shadowy-pycoder/go-http-proxy-to-socks/releases/download/$GOHPTS_RELEASE/gohpts-$GOHPTS_RELEASE-linux-amd64.tar.gz -O gohpts && tar xvzf gohpts && mv -f gohpts-$GOHPTS_RELEASE-linux-amd64 gohpts && ./gohpts -h
  • インストールは go install コマンドを使用します(Go 1.26 以降が必要): ```shell CGO_ENABLED=0 go install -ldflags "-s -w" -trimpath github.com/shadowy-pycoder/go-http-proxy-to-socks/cmd/gohpts@latest
    root@kitploit:~

これにより、gohptsバイナリが$GOPATH/binディレクトリにインストールされます。

  • ソースからビルド: ```shell git clone https://github.com/shadowy-pycoder/go-http-proxy-to-socks.git cd go-http-proxy-to-socks make build ./bin/gohpts
    root@kitploit:~
  • Dockerで実行: ```shell docker run -it --privileged --network host -v "$PWD/gohpts.yaml:/config.yaml" shadowypycoder/gohpts:latest -f config.yaml
    root@kitploit:~

使い方

[戻る]```shell gohpts -h


/ | | | | | __ _ / ____| | | __ ___ | || | |) | | | | (__ | | |_ |/ _ | __ | / | | _
| |__| | (
) | | | | | | | ) | _|_/|| ||| || |___/

GoHPTS: HTTP(S) Proxy to SOCKS4/SOCKS5 proxy by shadowy-pycoder GitHub: https://github.com/shadowy-pycoder/go-http-proxy-to-socks Codeberg: https://codeberg.org/shadowy-pycoder/go-http-proxy-to-socks

Usage: gohpts [OPTIONS] OPTIONS: General: -h Show this help message and exit -v Show version and build information -D Run as a daemon (provide -logfile to see logs) -I Display list of network interfaces and exit -f Path to proxy configuration file in YAML format

Proxy: -l Address of HTTP proxy server (Default: "127.0.0.1:8080" for IPv4, "[::1]:8080" for IPv6) -s Address of SOCKS proxy server (Default: "127.0.0.1:1080" for IPv4 "[::1]:1080" for IPv6) -c Path to certificate PEM encoded file -k Path to private key PEM encoded file -U User for HTTP proxy (basic auth). This flag invokes prompt for password (not echoed to terminal) -u User for SOCKS proxy authentication. This flag invokes prompt for password (not echoed to terminal) -i Bind proxy to specific network interface (either by interface name or index) -4 Force IPv4 stack for TCP and UDP (Default: dual stack) -6 Force IPv6 stack for TCP and UDP (Default: dual stack) -socks4 Use SOCKS4/SOCKS4a protocol for upstream proxy and mixed server (default: SOCKS5/SOCKS5h) -nohttp Disable HTTP proxy server -nosocks Disable SOCKS upstream proxy -dns Use custom DNS server (Example: "8.8.8.8" or "2001:4860:4860::8888") -mixed Accept SOCKS connections on HTTP proxy server address

Logs: -d Show logs in DEBUG mode -j Show logs in JSON format -logfile Log file path (Default: stdout) -nocolor Disable colored output for logs (no effect if -j flag specified) -pprof Address of pprof server with profiling data

Sniffing: -sniff Enable traffic sniffing for HTTP and TLS -snifflog Sniffed traffic log file path (Default: the same as -logfile) -body Collect request and response body for HTTP traffic (credentials, tokens, etc)

TProxy: -T Address of transparent proxy server -Tu Address of transparent UDP proxy server -M Transparent proxy mode: (redirect, tproxy, tlocal) -w Number of instances of transparent proxy server (Default: number of CPU cores) -wu Number of instances of transparent UDP proxy server (Default: number of CPU cores) -auto Automatically setup iptables and kernel parameters for transparent proxy (requires elevated privileges) -mark Set mark for each packet sent through transparent proxy (Default: redirect 0, tproxy 100, tlocal 100) -P Comma separated list of ports to ignore when proxying traffic (Example: "22,80,443,9092") -dump Dump iptables rules and other system settings generated by -auto flag

Spoofing: -arpspoof Enable ARP spoof proxy for selected targets (Example: "targets 10.0.0.1,10.0.0.5-10,192.168.1.*,192.168.10.0/24;fullduplex false;debug true;interval 10s") -ndpspoof Enable NDP spoof proxy for selected targets (Example: "ra true;na true;targets fe80::3a1c:7bff:fe22:91a4;fullduplex false;debug true;interval 10s")

Packet Capture: -pcap Enable packet capture (Example: "promisc true;expr ip proto tcp;snaplen 65535;timeout 10s;packet_count 100;packet_buffer 8192;exts txt,pcap,pcapng")

Namespaces: -in-netns Name or path of network namespace for inbound listeners (Default: default namespace) -out-netns Name or path of network namespace for outbound connections (Default: default namespace)

root@kitploit:~
### CLIフラグによる設定

[[Back]](#table-of-contents)```shell
gohpts -s 1080 -l 8080 -d -j

出力:```shell {"level":"info","time":"2025-05-28T06:15:18+00:00","message":"SOCKS5 Proxy: :1080"} {"level":"info","time":"2025-05-28T06:15:18+00:00","message":"HTTP Proxy: :8080"} {"level":"debug","time":"2025-05-28T06:15:22+00:00","message":"HTTP/1.1 - CONNECT - www.google.com:443"}

root@kitploit:~
SOCKS5プロキシサーバーのユーザー名とパスワードを指定してください:```shell
gohpts -s 1080 -l 8080 -d -j -u user
SOCKS5 Password: #you will be prompted for password input here

HTTPプロキシサーバーのユーザー名とパスワードを指定してください:```shell gohpts -s 1080 -l 8080 -d -j -U user HTTP Password: #you will be prompted for password input here

root@kitploit:~
`-u` と `-U` の両方が存在する場合、2回プロンプトが表示されます

TLS接続上でHTTPプロキシを実行する```shell
gohpts -s 1080 -l 8080 -c "path/to/certificate" -k "path/to/private/key"

プロキシをデーモンとして実行する(ログ出力にはログファイルが必要です。そうしないと何も表示されません)```shell gohpts -D -logfile /tmp/gohpts.log

root@kitploit:~
入力:```shell
# output
gohpts pid: <pid>

| --enable_* | 機能を有効化(例: --enable_http) | なし | | --disable_* | 機能を無効化(例: --disable_https) | なし | | --only_* | 機能を有効化し排他的に使用(例: --only_web) | なし | | --if_* | 依存関係が存在する場合に機能を有効化(例: --if_snmp) | なし | | --prefix | インストールパス | --prefix /home/ubuntu | | --all | すべての機能を有効化 | なし | | --everything | リスクや実験的な機能も含むすべての機能を有効化 | なし | | --color | 色付き出力の切り替え | --color |

オプションは基本から高度な順に並んでいますが、すべての設定がすべてのプラットフォームでテストされているわけではありません。

Usage

root@kitploit:~
cd ~/project
./configure
make
sudo make install
``````shell
# kill the process
kill <pid>
#or
kill $(pidof gohpts)

-u および -U フラグはデーモンモードでは機能しません(したがって認証も機能しません)が、設定ファイルを提供することはできます(以下参照)

YAMLファイルによる設定

[Back]

設定ファイルは、CLIをあまりいじらずにプロキシを事前設定したい場合や、異なるニーズに応じて複数のプロファイルを使用したい場合に便利です。

SOCKS5プロキシチェーンモードでHTTPプロキシを実行する(YAML設定ファイルでサーバー設定を指定)```shell gohpts -f "~/gohtps.yaml" -d -j

root@kitploit:~
設定例:```yaml
# bind proxy to specific network interface (either by interface name or index)
interface: "eth0" # if specified, overrides http server IP address
disable_http: false # disable http proxy (default: false)
disable_socks: false # disable upstream socks proxy (default: false)
# if ipv4 and ipv6 are both false or both true, dual stack is assumed
ipv4: false # this must be enabled for arpspoof (default: false)
ipv6: false # this must be enabled for ndpspoof (default: false)
socks4: false # use SOCKS4/SOCKS4a protocol (tcp only protocol, no udp tproxy or http3 possible) (default: false)
dns: 8.8.8.8 # custom DNS server (used in direct dialer, namespaces, spoofing)

http_server:
  address: 127.0.0.1:8080
  # username and password for adding basic authentication (comment out to disable auth)
  username: username
  password: password

# list of socks5 proxy
# if proxy_chain is disabled, uses first server in a list as upstream
proxy_list:
  - address: 127.0.0.1:1080
  - address: 127.0.0.1:1081
  - address: :1082 # empty host means localhost

proxy_chain:
  enabled: false
  # Explanations for chains taken from /etc/proxychains4.conf

  # strict - Each connection will be done via chained proxies
  # all proxies chained in the order as they appear in the list
  # all proxies must be online to play in chain

  # dynamic - Each connection will be done via chained proxies
  # all proxies chained in the order as they appear in the list
  # at least one proxy must be online to play in chain
  # (dead proxies are skipped)

  # random - Each connection will be done via random proxy
  # (or proxy chain, see  chain_len) from the list.
  # this option is good to test your IDS :)

  # round_robin - Each connection will be done via chained proxies
  # of chain_len length
  # all proxies chained in the order as they appear in the list
  # at least one proxy must be online to play in chain
  # (dead proxies are skipped).
  # the start of the current proxy chain is the proxy after the last
  # proxy in the previously invoked proxy chain.
  # if the end of the proxy chain is reached while looking for proxies
  # start at the beginning again.
  # These semantics are not guaranteed in a multithreaded environment.
  type: strict # dynamic, strict, random, round_robin
  length: 2 # maximum number of proxy in a chain (works only for random chain and round_robin chain)

logging:
  debug: true
  json: false
  # defaults to standard output
  #logfile: /tmp/gohpts.log
  # use colored output in logs (no effect if json enabled)
  nocolor: false
  # profiling data
  pprof: 127.0.0.1:8081

設定ファイルで指定されたほぼすべての設定を、対応するCLIフラグを指定することで上書きできます:```shell gohpts -l :6969 -f "~/gohtps.yaml" -nocolor

root@kitploit:~
Proxyは`~/gohpts.yaml`で指定されたすべての設定を適用しますが、HTTPサーバーを`127.0.0.1:8080`の代わりに`127.0.0.1:6969`で起動し、ログの色付き出力も無効にします。

一部の設定(例: proxy_chainやDNSフィルター)はファイルでしか設定できません。

設定の完全版はこちら: [example_gohpts.yaml](https://github.com/shadowy-pycoder/go-http-proxy-to-socks/blob/main/resources/example_gohpts.yaml)

プロキシチェーンの詳細については、[Proxychains Github](https://github.com/rofl0r/proxychains-ng)を参照してください。

## 透過プロキシ

[[Back]](#table-of-contents)

> また、`intercepting proxy`、`inline proxy`、`forced proxy`とも呼ばれる透過プロキシは、特別なクライアント設定を必要とせずに通常のアプリケーション層通信をインターセプトします。クライアントはプロキシの存在を知る必要はありません。透過プロキシは通常、クライアントとインターネットの間に位置し、ゲートウェイやルーターの一部の機能を実行します。
>
> -- _[Wiki](https://en.wikipedia.org/wiki/Proxy_server)より_

この機能はLinuxシステムとAndroid(arm64)でのみ利用可能であり、追加のセットアップ(`iptables`、ip routeなど)が必要です。

`-T address`フラグは透過プロキシサーバーのアドレスを指定します。

`-M`フラグで指定できる3つのモードがあります: `redirect`、`tproxy`、`tlocal`(`tproxy`と同じですが、ローカルトラフィックもインターセプトします)。

### `redirect` (_NAT_ と _SO_ORIGINAL_DST_ を介して)

[[Back]](#table-of-contents)

このモードでは、プロキシ処理は`iptables`の`nat`テーブルと`REDIRECT`ターゲットを使用して行われます。着信パケットのホストは実行中の`redirect`透過プロキシのアドレスに変更されますが、`getsockopt(SO_ORIGINAL_DST)`で取得できる元の宛先も保持されます。

このモードで`GoHPTS`を実行するには、`-T`フラグと`-M redirect`を使用します。

### 例

[[Back]](#table-of-contents)```shell
# run the proxy
gohpts -s 1080 -T 1090 -M redirect -d

INPUT:```shell

run socks5 server on 127.0.0.1:1080

ssh remote -D 1080 -Nf

root@kitploit:~
オペレーティングシステムをセットアップする:```shell
# commands below require elevated privileges (you can run it with `sudo -i`)

#enable ip forwarding
sysctl -w net.ipv4.ip_forward=1

# create `GOHPTS` nat chain
iptables -t nat -N GOHPTS

# set no redirection rules for local, http proxy, ssh and redirect proxy itself
iptables -t nat -A GOHPTS -d 127.0.0.0/8 -j RETURN
iptables -t nat -A GOHPTS -p tcp --dport 8080 -j RETURN
iptables -t nat -A GOHPTS -p tcp --dport 1090 -j RETURN
iptables -t nat -A GOHPTS -p tcp --dport 22 -j RETURN

# redirect traffic to transparent proxy
iptables -t nat -A GOHPTS -p tcp -j REDIRECT --to-ports 1090

# setup prerouting by adding our proxy
iptables -t nat -A PREROUTING -p tcp -j GOHPTS

# intercept local traffic for testing
iptables -t nat -A OUTPUT -p tcp -j GOHPTS

接続テスト:```shell #traffic should be redirected via 127.0.0.1:1090 curl http://example.com

root@kitploit:~
- **Query Context:** このパラメータは、LLMが全仕様の中でどの正確なコンテキストがクエリされたか、その情報がドキュメント全体のどこに存在するかを把握できるように追加されています。rawファイルはOEMにとって膨大な一つの仕様書である可能性があるため、LLMが情報の正確な場所を把握できることは非常に役立ちます。さらに、ドキュメント全体ではなく正確なコンテキストを直接特定するため、トークンの使用量も大幅に節約されます。
- `rawtagger.args.context.extractor`: rawファイルから正確なコンテキストを抽出または準備します。詳細については、`rawtagger/args/context_extractor_test.go` ファイルを参照してください。```shell
#traffic should be redirected via 127.0.0.1:8080
curl --proxy http://127.0.0.1:8080 http://example.com

すべてを元に戻す:```shell sysctl -w net.ipv4.ip_forward=0 iptables -t nat -D PREROUTING -p tcp -j GOHPTS iptables -t nat -D OUTPUT -p tcp -j GOHPTS iptables -t nat -F GOHPTS iptables -t nat -X GOHPTS

root@kitploit:~
### `redirect` モードの自動設定

[[戻る]](#table-of-contents)

システムを自動設定するには、次のコマンドを実行してください:```shell
sudo env PATH=$PATH gohpts -d -T 8888 -M redirect -auto

注意:自動設定には sudo が必要であり、非常に一般的なため、お客様のニーズに適さない可能性があります。必要に応じて -mark <value> を指定することで、プロキシループの発生を防ぐことができます。```shell sudo env PATH=$PATH gohpts -d -T 8888 -M redirect -auto -mark 100

root@kitploit:~
### `tproxy` (経由 _MANGLE_ と _IP_TRANSPARENT_)

[[戻る]](#table-of-contents)

このモードでは、プロキシ処理は `iptables` の `mangle` テーブルと `TPROXY` ターゲットを使用して行われます。透過プロキシは宛先アドレスをそのまま見ます。カーネルによって書き換えられることはありません。これを機能させるには、プロキシはソケットオプション `IP_TRANSPARENT` でバインドし、`iptables` は TPROXY ターゲットを使用してトラフィックをインターセプトし、ルーティングルールはマークされたパケットが元の宛先を変更せずにローカルプロキシに送られるように指示します。

このモードでは、`GoHPTS` を実行するために昇格された権限が必要です。以下のコマンドを実行することで行えます:```shell
sudo setcap 'cap_net_admin+ep' ~/go/bin/gohpts

このモードで GoHPTS を実行するには、-T フラグと -M tproxy を使用します。

例

[戻る]```shell

run the proxy

gohpts -s 1080 -T 0.0.0.0:1090 -M tproxy -d

root@kitploit:~
I input is empty, there is nothing to translate.```shell
# run socks5 server on 127.0.0.1:1080
ssh remote -D 1080 -Nf

オペレーティングシステムのセットアップ:```shell ip netns add ns-client ip link add dev veth0 type veth peer name veth1 netns ns-client ip addr add 10.0.0.1/24 dev veth0 ip link set dev veth0 up ip netns exec ns-client ip addr add 10.0.0.2/24 dev veth1 ip netns exec ns-client ip link set dev lo up ip netns exec ns-client ip link set dev veth1 up ip netns exec ns-client ip route add default via 10.0.0.1 sysctl -w net.ipv4.ip_forward=1

iptables -t mangle -A PREROUTING -i veth0 -p tcp -j TPROXY --on-port 1090 --tproxy-mark 0x1/0x1

ip rule add fwmark 1 lookup 100 ip route add local 0.0.0.0/0 dev lo table 100

root@kitploit:~
テスト接続:```shell
ip netns exec ns-client curl http://1.1.1.1

すべてを元に戻す:```shell sysctl -w net.ipv4.ip_forward=0 iptables -t mangle -F ip rule del fwmark 1 lookup 100 ip route flush table 100 ip netns del ns-client

root@kitploit:~
### `tproxy` モードの自動設定

[[戻る]](#table-of-contents)

システムを自動的に設定するには、次のコマンドを実行します(例:別のVM上で):```shell
ssh remote -D 1080 -Nf
sudo env PATH=$PATH gohpts -d -T 8888 -M tproxy -auto -mark 100

ホスト上で以下を実行してください:```shell ip route show default > /tmp/default-route.txt

ip route add 0.0.0.0/1 via 192.168.0.1 # change with ip of your VM ip route add 128.0.0.0/1 via 192.168.0.1

root@kitploit:~
接続テスト:```shell
curl http://example.com #check logs on your VM

すべてを元に戻す:```shell ip route del 0.0.0.0/1 via 192.168.0.1 2>/dev/null || true ip route del 128.0.0.0/1 via 192.168.0.1 2>/dev/null || true

if [[ -f /tmp/default-route.txt ]]; then eval $(awk '{print "ip route add "$0}' /tmp/default-route.txt) rm -f /tmp/default-route.txt else echo "Something went wrong" fi

root@kitploit:~
### UDPサポート

[[Back]](#table-of-contents)

`GoHPTS` は `tproxy` および `tlocal` モードで有効にできるUDPサポートを備えています。この設定を機能させるには、UDP接続(`UDP ASSOCIATE`)を提供できるsocks5サーバーに接続する必要があります。例えば、[https://github.com/wzshiming/socks5](https://github.com/wzshiming/socks5) を使用して、リモートまたはローカルマシン上にUDP対応のsocks5サーバーをデプロイできます。接続先のサーバーが準備できたら、次のコマンドを実行します:```shell
sudo env PATH=$PATH gohpts -s remote -Tu :8989 -M tproxy -auto -mark 100 -d

このコマンドは、オペレーティングシステムの設定とサーバーのセットアップを 0.0.0.0:8989 アドレスで行います。

ローカルでテストするには、UDPトランスペアレントプロキシと -arpspoof フラグを組み合わせることができます。例:

  1. お使いのシステム上に、tproxy をサポートする任意のLinuxディストリビューション(例えばKali Linux)でVMをセットアップします。
  2. VMがホストマシンにアクセスできるように、bridged ネットワークを有効にします。
  3. gohpts バイナリをVMに(例えば ssh 経由で)移動するか、OSやアーキテクチャが異なる場合はVM上でビルドします。
  4. VM上で次のコマンドを実行します:```shell

Do not forget to replace and with actual addresses

sudo ./gohpts -s -T 8888 -Tu :8989 -M tproxy -sniff -body -auto -mark 100 -d -arpspoof "targets ;fullduplex true;debug false"

root@kitploit:~
5. ホストマシンで接続を確認してください。トラフィックはKaliマシンを経由するはずです。

### Android サポート

[[戻る]](#table-of-contents)

透過プロキシは、rootアクセス権を持つAndroidデバイス(arm64)で有効にできます。[Termux](https://github.com/termux/termux-app) をインストールして、そこで CLI ツールとして `GoHPTS` を実行できます。```shell
# you need to root your device first
pkg install tsu iproute2
# Android support added in v1.10.2
GOHPTS_RELEASE=v1.10.2; wget -v https://github.com/shadowy-pycoder/go-http-proxy-to-socks/releases/download/$GOHPTS_RELEASE/gohpts-$GOHPTS_RELEASE-android-arm64.tar.gz -O gohpts && tar xvzf gohpts && mv -f gohpts-$GOHPTS_RELEASE-android-arm64 gohpts && ./gohpts -h
# use your phone as router for LAN devices redirecting their traffic to remote socks5 server
sudo ./gohpts -s remote -T 8888 -Tu :8989 -M tproxy -sniff -body -auto -mark 100 -d -arpspoof "fullduplex true;debug false"

YAML 設定

[Back]```yaml transparent_proxy: tcp: enabled: true address: 0.0.0.0:8888 # number of instances of transparent proxy server (Default: number of CPU cores) workers: 1 udp: enabled: true address: 0.0.0.0:8889 # number of instances of transparent UDP proxy server (Default: number of CPU cores) workers: 1 mode: "tproxy" # available modes are "redirect", "tproxy" and "tlocal" (udp requires tproxy or tlocal mode)

automatically setup iptables and kernel parameters for transparent proxy (requires elevated privileges)

auto: true

dump iptables rules and other system settings generated by auto setting

dump_rules: false

list of ports to ignore when proxying traffic (Example: [22,80,443,9092])

ignored_ports: []

set mark for each packet sent through transparent proxy (Default: redirect 0, tproxy 100, tlocal 100)

mark: 100

root@kitploit:~
## トラフィックスニッフィング

[[Back]](#table-of-contents)

<p align="center"><img alt="MrGopher" src="https://assets.kitploit.com/production/public/readmes/11401/ac38691c0f511a6265baf784c236e4ca9557e6c2b7744271f09b1b657af92ca7.png"/>

`GoHPTS`プロキシは、サービスを通過するトラフィックをキャプチャして監視する機能を提供します。このプロセスは`トラフィックスニッフィング`、`パケットスニッフィング`、または単に`スニッフィング`として知られています。具体的には、プロキシは平文(HTTP)かTLSトラフィックかを識別しようとし、識別後、リクエスト/レスポンスのメタデータを解析してファイルやコンソールに書き込みます。`GoHTPS`プロキシの場合、解析されたメタデータは以下のようになります(TLSハンドシェイク):

### JSON形式

[[Back]](#table-of-contents)```json
[
  {
    "connection": {
      "tproxy_mode": "redirect",
      "src_local": "127.0.0.1:8888",
      "src_remote": "192.168.0.107:51142",
      "dst_local": "127.0.0.1:56256",
      "dst_remote": "127.0.0.1:1080",
      "original_dst": "216.58.209.206:443"
    }
  },
  {
    "tls_request": {
      "sni": "www.youtube.com",
      "type": "Client hello (1)",
      "version": "TLS 1.2 (0x0303)",
      "session_id": "2670a6779b4346e5e84d46890ad2aaf7a53b08adcfe0c9f6868c2d9882242e39",
      "cipher_suites": [
        "TLS_AES_128_GCM_SHA256 (0x1301)",
        "TLS_CHACHA20_POLY1305_SHA256 (0x1303)",
        "TLS_AES_256_GCM_SHA384 (0x1302)",
        "TLS_ECDHE_ECDSA_WITH_AES_128_GCM_SHA256 (0xc02b)",
        "TLS_ECDHE_RSA_WITH_AES_128_GCM_SHA256 (0xc02f)",
        "TLS_ECDHE_ECDSA_WITH_CHACHA20_POLY1305_SHA256 (0xcca9)",
        "TLS_ECDHE_RSA_WITH_CHACHA20_POLY1305_SHA256 (0xcca8)",
        "TLS_ECDHE_ECDSA_WITH_AES_256_GCM_SHA384 (0xc02c)",
        "TLS_ECDHE_RSA_WITH_AES_256_GCM_SHA384 (0xc030)",
        "TLS_ECDHE_ECDSA_WITH_AES_256_CBC_SHA (0xc00a)",
        "TLS_ECDHE_ECDSA_WITH_AES_128_CBC_SHA (0xc009)",
        "TLS_ECDHE_RSA_WITH_AES_128_CBC_SHA (0xc013)",
        "TLS_ECDHE_RSA_WITH_AES_256_CBC_SHA (0xc014)",
        "TLS_RSA_WITH_AES_128_GCM_SHA256 (0x9c)",
        "TLS_RSA_WITH_AES_256_GCM_SHA384 (0x9d)",
        "TLS_RSA_WITH_AES_128_CBC_SHA (0x2f)",
        "TLS_RSA_WITH_AES_256_CBC_SHA (0x35)"
      ],
      "extensions": [
        "server_name (0)",
        "extended_master_secret (23)",
        "renegotiation_info (65281)",
        "supported_groups (10)",
        "ec_point_formats (11)",
        "session_ticket (35)",
        "application_layer_protocol_negotiation (16)",
        "status_request (5)",
        "delegated_credential (34)",
        "signed_certificate_timestamp (18)",
        "key_share (51)",
        "supported_versions (43)",
        "signature_algorithms (13)",
        "psk_key_exchange_modes (45)",
        "record_size_limit (28)",
        "compress_certificate (27)",
        "encrypted_client_hello (65037)"
      ],
      "alpn": ["h2", "http/1.1"]
    }
  },
  {
    "tls_response": {
      "type": "Server hello (2)",
      "version": "TLS 1.2 (0x0303)",
      "session_id": "2670a6779b4346e5e84d46890ad2aaf7a53b08adcfe0c9f6868c2d9882242e39",
      "cipher_suite": "TLS_AES_128_GCM_SHA256 (0x1301)",
      "extensions": ["key_share (51)", "supported_versions (43)"],
      "supported_version": "TLS 1.3 (0x0304)"
    }
  }
]

そして、curlを使用したHTTPリクエスト:```json [ { "connection": { "tproxy_mode": "redirect", "src_local": "127.0.0.1:8888", "src_remote": "192.168.0.107:45736", "dst_local": "127.0.0.1:37640", "dst_remote": "127.0.0.1:1080", "original_dst": "96.7.128.198:80" } }, { "http_request": { "host": "example.com", "uri": "/", "method": "GET", "proto": "HTTP/1.1", "header": { "Accept": ["/"], "My": ["Header"], "User-Agent": ["curl/7.81.0"] } } }, { "http_response": { "proto": "HTTP/1.1", "status": "200 OK", "content-length": 1256, "header": { "Cache-Control": ["max-age=2880"], "Connection": ["keep-alive"], "Content-Length": ["1256"], "Content-Type": ["text/html"], "Date": ["Tue, 17 Jun 2025 14:43:24 GMT"], "Etag": [""84238dfc8092e5d9c0dac8ef93371a07:1736799080.121134""], "Last-Modified": ["Mon, 13 Jan 2025 20:11:20 GMT"] } } } ]

root@kitploit:~
使用法は、`-sniff` フラグを通常のフラグと一緒に指定するだけです```shell
gohpts -d -T 8888 -M redirect -sniff -j

また、スニッフィングしたトラフィックを書き込むファイルを指定することもできます。```shell gohpts -sniff -snifflog ~/sniff.log -j

root@kitploit:~
### カラーフォーマット

[[戻る]](#table-of-contents)

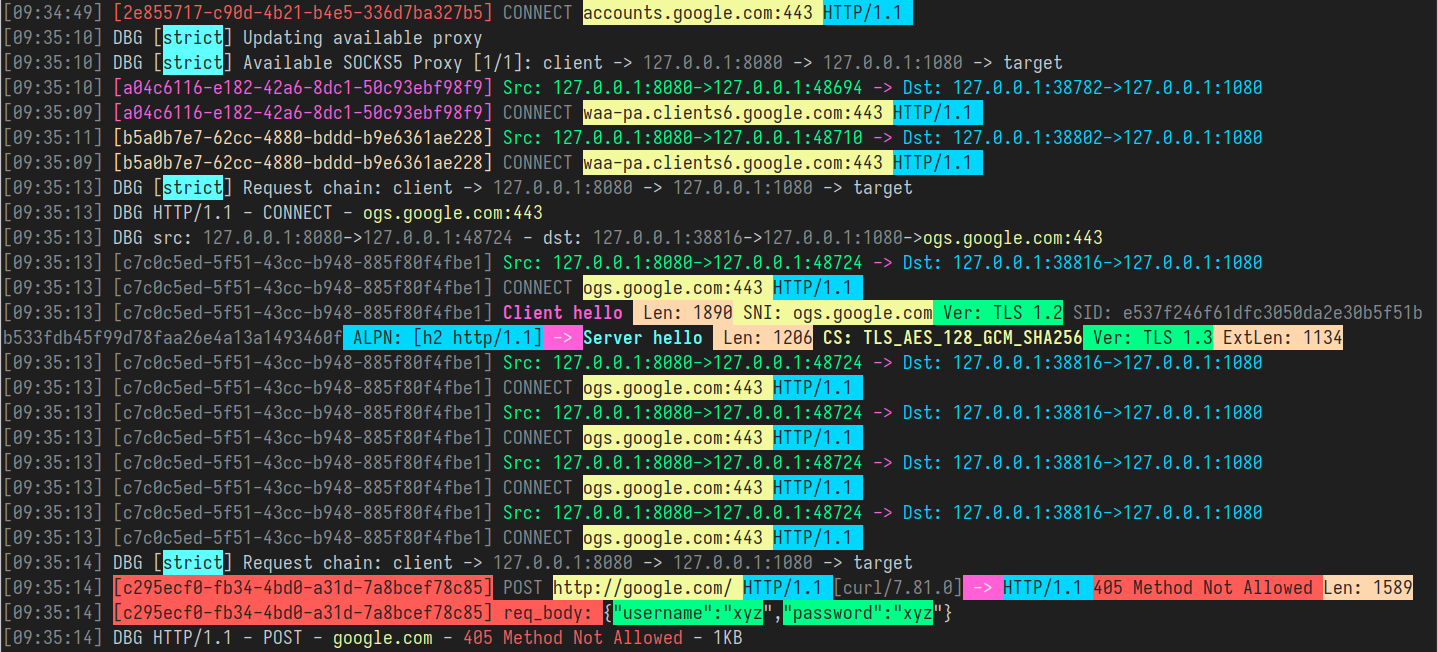
上の画像にカラーフォーマット出力の例が示されています。このモードでは、`GoHPTS` は TLS ハンドシェイク、HTTP メタデータ、ログイン/パスワードのように見えるもの、またはさまざまな種類の認証やシークレットトークンなど、重要な情報を強調表示しようとします。出力は JSON に比べて限定的ですが、人間にとってははるかに読みやすくなります。

`GoHPTS` をこのモードで実行するには、以下のフラグを使用します:```shell
gohpts -sniff -body

スニッフィングと透過モードを組み合わせることができます:```shell ./gohpts -T 8888 -M redirect -sniff -body

root@kitploit:~
色を無効にするには `-nocolor` を追加してください:```shell
gohpts -sniff -body -nocolor

HTTP2 および HTTP3 サポート

[戻る]

GoHPTS プロキシは、同一のサーバアドレスと TLS 証明書を使用して HTTP/1.1、HTTP/2、および HTTP/3 のリクエストを処理します。これにより、クライアントは設定を変更することなく、利用可能な最適なプロトコルを自動的に選択できます。TLS 証明書は、クラウドプロバイダー(Google、AWS、Cloudflare)、Let's Encrypt による無料証明書、または openssl(Linux/macOS)や New-SelfSignedCertificate(Windows)を使用して自己署名証明書を作成するなど、複数の方法で取得できます。

自己署名証明書を使用した設定例

[戻る]

  • key.pem および cert.pem ファイルを作成します: ```shell openssl req -x509 -newkey rsa:2048
    -keyout key.pem
    -out cert.pem
    -sha256
    -days 365
    -nodes
    -subj "/C=XX/ST=StateName/L=CityName/O=CompanyName/OU=CompanySectionName/CN=127.0.0.1"
    -addext "subjectAltName=IP:127.0.0.1"
    root@kitploit:~
  • UDP ASSOCIATE 対応の socks5 サーバーを準備する ```shell git clone https://github.com/wzshiming/socks5.git && cd socks5 go build -o socks5_server ./cmd/socks5/main.go ./socks5_server -a 0.0.0.0:1080
    root@kitploit:~
  • 別の端末を開き、GoHPTS プロキシをインストールしてください: ```shell go install github.com/shadowy-pycoder/go-http-proxy-to-socks/cmd/gohpts@latest
    root@kitploit:~

インストールセクションで説明されている他の方法を使用することもできます。

  • 最後に:

    1. プロキシの最小限の設定を作成します ```yaml

    gohpts_config.yaml

    http_server: address: 127.0.0.1:8080 cert_file: ./cert.pem key_file: ./key.pem

    proxy_list:

    • address: 127.0.0.1:1080

    logging: debug: true

    sniffing: enabled: true body: true

    root@kitploit:~

プロキシを実行してください: ```shell gohpts -f ./gohpts_config.yaml

root@kitploit:~
2. または、コマンドライン引数を希望する場合:  ```shell
gohpts -l :8080 -s 1080 -c ./cert.pem -k ./key.pem -d -sniff -body

そのようなものが表示されるはずです: ```shell [15:20:32] INF SOCKS5 Proxy: 127.0.0.1:1080 [15:20:32] INF HTTPS Proxy: 127.0.0.1:8080 [15:20:32] INF HTTP3 Proxy (QUIC): 127.0.0.1:8080

root@kitploit:~
### 接続テスト

[[Back]](#table-of-contents)

- HTTP/2 プロキシサーバーには `curl` を使用できます:  ```shell
  curl -Nvk --http2 --proxy-insecure --proxy-http2 --proxy https://localhost:8080 "https://stream.wikimedia.org/v2/stream/recentchange"

Ctrl+C を押してストリームの実行を停止します。

  • HTTP/3 の場合は異なります(執筆時点では curl が HTTP3 プロキシをサポートしていないため)。そのため、テスト用に作成したカスタムクライアントを使用します。

    Simple HTTP3 to SOCKS5 proxy example をダウンロードしてインストールします。 ```shell git clone https://github.com/shadowy-pycoder/http3-socks-proxy.git && cd http3-socks-proxy make

    root@kitploit:~

次のコマンドを実行してください: ```shell ./bin/client -a 127.0.0.1:8080 www.google.com

root@kitploit:~
ブラウザのHTMLページのように見える意味不明な文字列が表示されるはずです。

`GoHPTS` プロキシのターミナルタブに移動してログを確認すると、すべてのリクエストが表示されているはずです。

### ブラウザでの接続テスト

[[戻る]](#table-of-contents)

- ブラウザ用の適切な自己署名証明書を作成します:  ```shell
git clone https://github.com/shadowy-pycoder/go-http-proxy-to-socks.git
cd go-http-proxy-to-socks
cp ./resources/makecert.sh makecert.sh && chmod +x makecert.sh
./makecert.sh

詳細情報はこちら: ブラウザから信頼される自己署名SSL証明書の作成

  • 新しく作成した rootCA.crt をシステムのトラストストアに追加する:
    1. Debian/Ubuntu: ```shell sudo cp rootCA.crt /usr/local/share/ca-certificates/rootCA.crt sudo update-ca-certificates
    root@kitploit:~
  1. Arch Linux/CachyOS/EndeavourOS: ```shell sudo trust anchor rootCA.crt
root@kitploit:~
- プロキシを `server.crt` と `server.key` を使って実行します:  ```shell
gohpts -l :8080 -s 1080 -c ./server.crt -k ./server.key -d -sniff -body
  • ブラウザを起動して、任意のウェブサイトにアクセスしてください: ```shell chromium --proxy-server="https://127.0.0.1:8080"
    root@kitploit:~

IPv4 と IPv6 のサポート

[Back]

ネットワーク層の処理において、GoHPTS は3つのモードで動作します: dual stack、IPv4-only、IPv6-only。ユーザーは -4 および -6 フラグを指定することでモードを制御できます。いずれかのフラグが設定されると、プロキシは対応するモードで起動します。両方のフラグが存在するか、両方とも省略された場合は、dual stack と見なされます。なお、"only" モードでは、特定バージョンのIPアドレスのみが許可され、すべてのドメインは(可能であれば)特定のIPバージョンに解決され、すべてのリスニングアドレスは同じバージョンを使用する必要があるなどに注意してください。

IPv4-only モードを有効にするには、-4 フラグを追加するだけです:```shell sudo ./gohpts -sniff -body -d -4

root@kitploit:~
IPv4モードでプロキシをテストするには、任意のLinux VMを使用できます。

1. 仮想マシン上で:```shell
# add your host machine as gateway for VM
export GATEWAY="<host IPv4 address>"
ip route add 0.0.0.0/1 via "$GATEWAY"
ip route add 128.0.0.0/1 via "$GATEWAY"
  1. ホスト上で:```shell

run proxy on your host

sudo ./gohpts -T 8888 -Tu 8889 -M tproxy -sniff -body -auto -d -4

root@kitploit:~
3. 仮想マシン上の任意のWebサイトにアクセスし、プロキシログでトラフィックを確認します

`IPv6-only` モードを有効にするには、`-6` フラグを追加してください。例えば、透過プロキシを使用する場合:```shell
sudo ./gohpts -T 8888 -M redirect -sniff -body -auto -mark 100 -d -6

これを機能させるには、あなたのISPとリモートのsocks5プロキシがアクティブなIPv6サポートを持っている必要があります。https://test-ipv6.com/にアクセスして、IPv6アドレスにアクセスできるかどうかを確認できます。 IPv6モードでプロキシをテストするには、任意のLinux VMを使用できます:

  1. 仮想マシン上で:```shell

add your host machine as gateway IPv6 for VM

export GATEWAY6="" ip -6 route add ::/1 via "$GATEWAY6" dev eth0 ip -6 route add 8000::/1 via "$GATEWAY6" dev eth0

root@kitploit:~
2. ホスト上で:```shell
# run proxy on your host
sudo ./gohpts -T 8888 -Tu 8889 -M tproxy -sniff -body -auto -d -6
  1. 仮想マシン上で任意のウェブサイトにアクセスし、プロキシログでトラフィックを確認する

ARPスプーフィング

[戻る]

GoHPTSには、LAN上のすべてのTCP通信デバイスがプロキシサーバーを経由してインターネットに接続できるようにする、ARPスプーファーが組み込まれています。これは、セミコロンで区切られた複数のパラメータとともに-arpspoofフラグを追加することで実現されます。

例:```shell ssh remote -D 1080 -Nf sudo env PATH=$PATH gohpts -d -T 8888 -M tproxy -sniff -body -auto -mark 100 -arpspoof "targets 192.168.10.0/24;fullduplex true;debug true"

root@kitploit:~
Proxyはサブネット `192.168.10.0/24` 内のデバイスをスキャンし、それらにARPパケットを送信してゲートウェイになりすまします。`fullduplex` が true の場合、proxyはゲートウェイにもARPパケットを送信し、私たちのproxyがサブネット上の各IPを持っていると信じ込ませます。

`Ctrl+C` でproxyを停止すると、自動的にすべてのターゲットのunspoofを行います。

`GoHPTS` は [Bettercap](https://github.com/bettercap/bettercap) のようなツールと組み合わせて、ARPスプーフィングされたトラフィックをプロキシするためにも使用できます。

proxyを実行する:```shell
ssh remote -D 1080 -Nf
sudo env PATH=$PATH gohpts -d -T 8888 -M tproxy -sniff -body -auto -mark 100

以下のコマンドで bettercap を実行します(ドキュメント を参照):```shell sudo bettercap -eval "net.probe on;net.recon on;set arp.spoof.fullduplex true;arp.spoof on"

root@kitploit:~
Check proxy logs for traffic from other devices from your LAN

For more information about arpspoof options see `gohpts -h` and [https://github.com/shadowy-pycoder/arpspoof](https://github.com/shadowy-pycoder/arpspoof)

## NDP スプーフィング

[[戻る]](#table-of-contents)

`GoHPTS` has in-built functionality to perform NDP spoofing in IPv6 networks with Router Advertisement (RA) and Neighbor Advertisement (NA) packets. It also includes RDNSS option in RA packets to put host as a IPv6 nameserver for affected clients. When combined with transparent proxy mode (TCP/UDP), NDP spoofing allows `gohpts` to proxy traffic for clients in the local networks. As is the case with [ARP spoofing](#arp-spoofing), you can set ndp spoof options with single `-ndpspoof` flag:

例:```shell
sudo env PATH=$PATH gohpts -d -T 8888 -M tproxy -sniff -body -auto -mark 100 -ndpspoof "ra true;na true;targets fe80::3a1c:7bff:fe22:91a4;fullduplex false;debug true"

ndpspoof のオプションの詳細については、gohpts -h および https://github.com/shadowy-pycoder/ndpspoof を参照してください。

rdnss、gateway、interface などの一部のオプションは、プロキシとして正しく機能するために gohpts 自身によって自動的に設定されることに注意してください。

gohpts はすべての接続を上流の SOCKS5 サーバー経由でプロキシするため、IPv4/IPv6 および TCP/UDP をサポートする動作可能なサーバーが必要です。当然ながら、リモートマシン (例: VPS) も IPv6 接続が機能している必要があります。言うまでもなく、gohpts を実行するマシンは IPv6 対応のネットワークに属している必要があります。

NDP スプーフィングを正しく機能させるためのセットアップ例:

  1. VPS に接続する```shell ssh [email protected]
root@kitploit:~
2. 依存関係をインストール```shell
GO_VERSION=$(curl 'https://go.dev/VERSION?m=text' | head -n1)
cd ~/Downloads/ && wget https://go.dev/dl/$GO_VERSION.linux-amd64.tar.gz
sudo rm -rf /usr/local/go && sudo tar -C /usr/local -xzf $GO_VERSION.linux-amd64.tar.gz
  1. SOCKS5サーバーのセットアップ(使用するポートがファイアウォールルールでブロックされていないことを確認)```shell git clone https://github.com/wzshiming/socks5.git && cd socks5 go build -o ./bin/socks5_server ./cmd/socks5/*.go ./bin/socks5_server -a :3000
root@kitploit:~
4. ホストマシンに戻り、`gohpts` をインストールしてください([インストール](#installation)を参照)

5. `gohtps` を実行してください:```shell
gohpts -s 203.0.113.10:3000 -T 8888 -Tu 8889 -M tproxy -sniff -body -auto -mark 100 -arpspoof "fullduplex true;debug true" -ndpspoof "ra true;debug true" -4 -6 -d
  1. 別のデバイス(スマートフォン、タブレットなど)を用意し、同じネットワークに接続します。インターネットにアクセスして、ホストマシンにトラフィックが表示されるか確認してください。オンラインツールを使用してパブリックIPアドレスを確認します(この場合はVPSアドレス203.0.113.10またはグローバルIPv6アドレスと一致するはずです)

  2. Ctrl+Cを押してプロキシを停止します

  3. 成功!

DNSスプーフィング

[Back]

DNSフィルタを適用し、DNSレコードを変更してターゲットをスプーフィングするには、GoHPTSを実行しているホストがLANデバイスのデフォルトゲートウェイになる必要があります。これを機能させるには、udpを有効にした透過プロキシを実行し、さらにARP/NDPスプーフィングを実行してターゲットがあなたのDNSサーバーを使用するようにします。

GoHPTSによって作成されたDNS応答は、ルーターや信頼されたDNSサーバー(Google、Cloudflare)からの通常のパケットのように見えるため、クライアントはあなたが指定した内容でキャッシュを更新します。ただし、これは「標準の」暗号化されていないDNSトラフィックに対してのみ機能することに注意してください(DOT/DOHはフィルタリングまたはスプーフィングされません)。

スプーフィング用のDNSフィルタとドメインは、yamlファイル設定のdns_filterセクションで設定できます。すべてのリストは、URL、ファイルパス、およびhostsファイルによく見られる形式のエントリを受け付けます。詳細は https://en.wikipedia.org/wiki/Hosts_(file)>) を参照してください。

例:```yaml

dns filters require udp transparent proxy and arpspoof/ndpspoof

filters accept hosts like entries (use either links, file paths or just plain comma separated lists

dns_filter: enabled: true whitelist: ["/tmp/whitelisted_domains.txt", "example.com", "*.google.com"] # ip is optional, domains can start with *. to match all subdomains blacklist: ["https://raw.githubusercontent.com/StevenBlack/hosts/master/hosts"] blacklist_all: false # block all non whitelisted domains spooflist: ["127.0.0.1 example.com"] # ip address is required here

root@kitploit:~
Use cases:

- すべてのLANデバイス向け広告・トラッカーブロッカー
- 特定カテゴリのウェブサイトをブロックするペアレンタルコントロール
- 既知のフィッシング・マルウェアドメインをブロック
- 分析のためのトラフィックリダイレクト
- リダイレクトによる認証情報の収集
- トラフィックのハイジャックと操作(広告、スクリプト、トラッキングの注入)
- 監視とプロファイリング

最小構成:```yaml
# gohpts_dns_spoof.yaml
proxy_list:
  - address: 127.0.0.1:1080 # point to socks5 server supporting TCP/UDP

sniffing:
  enabled: true
  body: true

transparent_proxy:
  tcp:
    enabled: true
    address: 0.0.0.0:8888
  udp:
    enabled: true
    address: 0.0.0.0:8889
  mode: "tproxy"
  auto: true

arpspoof:
  enabled: true
  settings: "fullduplex 1;debug 1;interval 1s"

dns_filter:
  enabled: true
  whitelist: []
  blacklist: [
      "https://raw.githubusercontent.com/StevenBlack/hosts/master/hosts",
    ] # list of domains to filter
  blacklist_all: true
  # all requests for example.com will be redirected to 0.0.0.0 address
  spooflist: ["0.0.0.0 example.com"]

実行:```shell sudo ./gohpts -f ./gohpts_dns_spoof.yaml

root@kitploit:~
詳細はこちらで確認できます:[https://en.wikipedia.org/wiki/DNS_spoofing](https://en.wikipedia.org/wiki/DNS_spoofing)

## パケットキャプチャ

[[戻る]](#table-of-contents)

トラフィックはpcap、pcapng、またはカスタムtxt形式でキャプチャされ、後でWireshark、tcpdumpなどのツールで分析できます。

まず、`GoHPTS` 実行可能ファイルが生のパケットをキャプチャできるように昇格された権限を持っていることを確認してください。次の2つのオプションがあります:

- `sudo setcap cap_net_raw+ep ~/go/bin/gohpts` を1回実行して、プロキシに生のトラフィックアクセスを付与します
- CLIで`-pcap`フラグを指定する場合、またはファイル設定で`pcap.enabled`を指定する場合、`sudo` でプロキシを実行します。

CLIを使用してプロキシを構成します:```shell
gohpts -pcap "promisc true;timeout 10s;exts txt,pcap,pcapng"

設定ファイル:```yaml pcap: enabled: true settings: "promisc true;expr ip proto tcp;snaplen 65535;timeout 10s;packet_count 100;packet_buffer 8192;exts txt,pcap,pcapng"

root@kitploit:~
これらのコマンドは、後でさまざまなツールで分析できる、対応する形式の3つのパケットキャプチャファイルを生成します。

pcapオプションの詳細については、`gohpts -h` および [https://github.com/shadowy-pycoder/mshark](https://github.com/shadowy-pycoder/mshark) を参照してください。

## ネットワーク名前空間

[[戻る]](#table-of-contents)

デフォルトでは、`GoHPTS` プロキシは単一のネットワーク名前空間内で実行されますが、これは上書き可能です。`GoHPTS` によって作成されたリスニングソケット(例:HTTPサーバーや透過プロキシサーバー)およびアウトバウンドソケット(SOCKSプロキシや直接ダイヤラー)は、Linux/Androidの [network_namespaces (7)](https://man7.org/linux/man-pages/man7/network_namespaces.7.html) で分離できます。プロキシプロセスを起動する際、ユーザーは `-in-netns`(リスナー用)および `-out-netns`(ダイヤラー用)フラグにネットワーク名前空間の名前またはパスを指定して、どの隔離環境でソケットを作成するかを制御できます。リスナーまたはダイヤラーを現在の(デフォルト)名前空間に作成する場合は、単にフラグを省略してください。ホスト名前空間を明示的に指定するには、パス `/proc/1/ns/net` を使用できます。これにより、プロキシがシステムネームサーバーを正しく識別できるようになります。

`GoHPTS` は、`/etc/netns/NAME/` ディレクトリ内のファイルを介してネットワーク設定を提供するための [ip-netns (8)](https://man7.org/linux/man-pages/man8/ip-netns.8.html) の規則をサポートしています。したがって、`ns1` ネットワーク名前空間にカスタムネームサーバーを指定するには、次のようにします。```shell
sudo mkdir -p /etc/netns/ns1
sudo tee /etc/netns/ns1/resolv.conf << EOF
nameserver 8.8.8.8
nameserver 2001:4860:4860:0:0:0:0:8888
EOF

設定が見つからない場合、ドメイン名の解決にはGoogle DNSサーバーが使用されます。

システムで systemd-resolved.service (8) が有効になっている場合、カスタムネットワーク名前空間を使用してクエリを実行する際に一時的に無効にするとよいでしょう:```shell sudo ip netns exec ns1 unshare --mount bash -c ' mount --bind /dev/null /run/systemd/resolve/io.systemd.Resolve curl -Nvk https://example.com'

root@kitploit:~
特定のシェルインスタンスに対して永続化する方法:```shell
sudo ip netns exec ns1 unshare --mount bash -c '
    mount --bind /dev/null /run/systemd/resolve/io.systemd.Resolve
    exec bash --login'

プレイグラウンドのセットアップ

[Back]

  • UDP ASSOCIATE サポート付きの socks5 サーバーを実行する ```shell git clone https://github.com/wzshiming/socks5.git && cd socks5 go build -o socks5_server ./cmd/socks5/main.go ./socks5_server -a 0.0.0.0:1080
    root@kitploit:~
  • ダウンロードしてインストール Simple HTTP3 to SOCKS5 proxy example: ```shell git clone https://github.com/shadowy-pycoder/http3-socks-proxy.git cd http3-socks-proxy make
    root@kitploit:~
  • リポジトリをクローンしてコンパイルする ```shell git clone https://github.com/shadowy-pycoder/go-http-proxy-to-socks.git cd go-http-proxy-to-socks make
    root@kitploit:~
  • key.pem と cert.pem ファイルを作成します: ```shell openssl req -x509 -newkey rsa:2048
    -keyout key.pem
    -out cert.pem
    -sha256
    -days 365
    -nodes
    -subj "/C=XX/ST=StateName/L=CityName/O=CompanyName/OU=CompanySectionName/CN=127.0.0.1"
    -addext "subjectAltName=IP:127.0.0.1"
    root@kitploit:~
  • ネットワーク名前空間 ns1 を作成し、veth ネットワークを構成する ```shell sudo ip netns add ns1 sudo ip link add dev veth0 type veth peer name veth1 netns ns1 sudo ip addr add 10.0.0.1/24 dev veth0 sudo ip -6 addr add fd12:3456:789a::1/64 dev veth0 sudo ip link set dev veth0 up sudo ip netns exec ns1 ip addr add 10.0.0.2/24 dev veth1 sudo ip netns exec ns1 ip -6 addr add fd12:3456:789a::2/64 dev veth1 sudo ip netns exec ns1 ip link set dev lo up sudo ip netns exec ns1 ip link set dev veth1 up
    root@kitploit:~
  • wlan0のIPアドレスを特定し、ローカルのsocks5に接続できるようにする ```shell WLAN_IP=$(ip -4 -c=never route get 8.8.8.8 | awk '{print $7}' | tr -d '\n')
    root@kitploit:~

使用例

[戻る]

  1. HTTP プロキシ - ns1 内のプロキシリスナー(デフォルトルートなし、インターネットアクセスなし)、ホスト上のアウトバウンドソケット

    プロキシを実行: ```shell sudo ./bin/gohpts -s 0.0.0.0:1080 -l :8083 -4 -6 -d -sniff -body -in-netns ns1

    root@kitploit:~

リクエストを ns1 経由で送信 ```shell sudo ip netns exec ns1 curl -Nv --proxy http://127.0.0.1:8083 https://example.com

root@kitploit:~
リクエストは成功するはずです

2. **HTTP2プロキシ - `ns1` 内のプロキシリスナー(デフォルトルートなし、インターネットアクセスなし)、ホスト上のアウトバウンドソケット**

プロキシを実行:   ```shell
sudo ./bin/gohpts -s 0.0.0.0:1080 -l :8083 -4 -6 -d -sniff -body -in-netns ns1 -c ./cert.pem -k ./key.pem

ns1 を介してリクエストを行う ```shell sudo ip netns exec ns1 curl -Nvk --http2 --proxy-insecure --proxy-http2 --proxy https://127.0.0.1:8083 https://example.com

root@kitploit:~
リクエストは成功するはずです

3. **HTTP3 プロキシ - `ns1` 内のプロキシリスナー(デフォルトルートなし、インターネットアクセスなし)、ホスト上のアウトバウンドソケット**

プロキシを実行:   ```shell
sudo ./bin/gohpts -s 0.0.0.0:1080 -l :8083 -4 -6 -d -sniff -body -in-netns ns1 -c ./cert.pem -k ./key.pem

ns1 経由でリクエストを行う ```shell sudo ip netns exec ns1 ./http3-socks-proxy/bin/client -a 127.0.0.1:8083 www.google.com

root@kitploit:~
リクエストは成功するはずです

4. **透過プロキシのリダイレクト (`-M redirect`) - `ns1` 内のプロキシリスナー(デフォルトルート、インターネットアクセスなし)、ホスト上のアウトバウンドソケット**

プロキシを実行:   ```shell
sudo ./bin/gohpts -s 0.0.0.0:1080 -l :8083 -4 -6 -d -sniff -body -in-netns ns1 -nohttp -M redirect -T :8888 -auto

ns1 を介してリクエストを行う ```shell sudo ip netns exec ns1 curl -Nv https://example.com

root@kitploit:~
リクエストは失敗するはずです

デフォルトルートを `ns1` に追加します   ```shell
sudo ip netns exec ns1 ip route add default via 10.0.0.1
sudo ip netns exec ns1 ip -6 route add default via fd12:3456:789a::1

再試行 ```shell sudo ip netns exec ns1 curl -Nv https://example.com

root@kitploit:~
Now request should succeed

5. **HTTP proxy - proxy listeners on host, outbound sockets in `ns1` (default route, internet access)**

Add NAT rules to allow `ns1` connect to internet via `wlan0`   ```shell
sudo iptables -t nat -A POSTROUTING -s 10.0.0.0/24 -o wlan0 -j MASQUERADE
sudo ip6tables -t nat -A POSTROUTING -s fd12:3456:789a::/64 -o wlan0 -j MASQUERADE

プロキシを実行: ``` sudo ./bin/gohpts -s :1080 -l :8083 -4 -6 -d -sniff -body -out-netns ns1 -i wlan0

root@kitploit:~
ホスト経由でリクエストを行う   ```shell
curl -Nv --proxy http://$WLAN_IP:8083 https://example.com

リクエストは成功するはずです

  1. HTTP3 プロキシ - ホスト上のプロキシリスナー、ns1内のアウトバウンドソケット(デフォルトルート、インターネットアクセス)

    プロキシを実行: ``` sudo ./bin/gohpts -s :1080 -l :8083 -4 -6 -d -sniff -body -out-netns ns1 -i wlan0 -c ./cert.pem -k ./key.pem

    root@kitploit:~

ホストを介してリクエストを行う ```shell ./http3-socks-proxy/bin/client -a $WLAN_IP:8083 www.google.com

root@kitploit:~
リクエストは成功するはずです

7. **透過プロキシのリダイレクト - ホスト上のプロキシリスナー、`ns1`のアウトバウンドソケット(デフォルトルート、インターネットアクセス)**

プロキシを実行(私の場合、`-auto`はローカルのsocks5サーバーで動作しないので、リモートを使用):

socat TCP-LISTEN:9050,fork,reuseaddr TCP:remote-socks5:9050 sudo ./bin/gohpts -s -4 -6 -d -sniff -body -out-netns ns1 -nohttp -M redirect -T :8888 -auto

root@kitploit:~
ホスト経由でリクエストを行う   ```shell
curl -Nv https://example.com

リクエストは成功する必要があります

  1. HTTPプロキシ - LAN (ns2 (プロキシリスナー), ns3, ns4)、ns1 のアウトバウンドソケット (デフォルトルート、インターネットアクセス)

    LANの作成 ```shell sudo ip link add br0 type bridge sudo ip addr add 10.0.1.1/24 dev br0 sudo ip -6 addr add fd12:3456:789b::1/64 dev br0 sudo ip link set br0 up

    sudo ip netns add ns2 sudo ip link add veth2 type veth peer name veth3 netns ns2 sudo ip link set veth2 master br0 sudo ip link set veth2 up sudo ip netns exec ns2 ip addr add 10.0.1.2/24 dev veth3 sudo ip netns exec ns2 ip -6 addr add fd12:3456:789b::2/64 dev veth3 sudo ip netns exec ns2 ip link set lo up sudo ip netns exec ns2 ip link set veth3 up sudo ip netns exec ns2 ip route add default via 10.0.1.1 sudo ip netns exec ns2 ip -6 route add default via fd12:3456:789b::1

    sudo ip netns add ns3 sudo ip link add veth4 type veth peer name veth5 netns ns3 sudo ip link set veth4 master br0 sudo ip link set veth4 up sudo ip netns exec ns3 ip addr add 10.0.1.3/24 dev veth5 sudo ip netns exec ns3 ip -6 addr add fd12:3456:789b::3/64 dev veth5 sudo ip netns exec ns3 ip link set lo up sudo ip netns exec ns3 ip link set veth5 up sudo ip netns exec ns3 ip route add default via 10.0.1.1 sudo ip netns exec ns3 ip -6 route add default via fd12:3456:789b::1

    sudo ip netns add ns4 sudo ip link add veth6 type veth peer name veth7 netns ns4 sudo ip link set veth6 master br0 sudo ip link set veth6 up sudo ip netns exec ns4 ip addr add 10.0.1.4/24 dev veth7 sudo ip netns exec ns4 ip -6 addr add fd12:3456:789b::4/64 dev veth7 sudo ip netns exec ns4 ip link set lo up sudo ip netns exec ns4 ip link set veth7 up sudo ip netns exec ns4 ip route add default via 10.0.1.1 sudo ip netns exec ns4 ip -6 route add default via fd12:3456:789b::1

    root@kitploit:~

プロキシを実行: ``` sudo ./bin/gohpts -s $WLAN_IP:1080 -l 0.0.0.0:8083 -4 -6 -d -sniff -body -in-netns ns2 -out-netns ns1

root@kitploit:~
リクエストを送信する   ```shell
curl -Nv --proxy http://10.0.1.2:8083 http://example.com
sudo ip netns exec ns2 curl -Nv --proxy http://10.0.1.2:8083 https://example.com
sudo ip netns exec ns3 curl -Nv --proxy http://10.0.1.2:8083 https://example.com
sudo ip netns exec ns4 curl -Nv --proxy http://10.0.1.2:8083 https://example.com

すべてのリクエストは成功するはずです

  1. HTTP3 proxy - LAN (ns2 (プロキシリスナー), ns3, ns4), アウトバウンドソケットは ns1 (デフォルトルート, インターネットアクセス)

    プロキシを実行: ``` sudo ./bin/gohpts -s $WLAN_IP:1080 -l 0.0.0.0:8083 -4 -6 -d -sniff -body -in-netns ns2 -out-netns ns1 -c ./cert.pem -k ./key.pem

    root@kitploit:~

リクエストを作成する ```shell ./http3-socks-proxy/bin/client -a 10.0.1.2:8083 www.google.com sudo ip netns exec ns2 ./http3-socks-proxy/bin/client -a 10.0.1.2:8083 www.google.com sudo ip netns exec ns3 ./http3-socks-proxy/bin/client -a 10.0.1.2:8083 www.google.com sudo ip netns exec ns4 ./http3-socks-proxy/bin/client -a 10.0.1.2:8083 www.google.com

root@kitploit:~
全てのリクエストが成功するはずです

10. **リダイレクト透過プロキシ - LAN (`ns2` (プロキシリスナー), `ns3`, `ns4`), `ns1` 内のアウトバウンドソケット (デフォルトルート、インターネットアクセス)**

 プロキシを実行:

 ```shell
 sudo ./bin/gohpts -s $WLAN_IP:1080 -4 -6 -d -sniff -body -in-netns ns2 -out-netns ns1 -nohttp -M redirect -T :8888 -auto
 ```

 リクエストを送信

 ```shell
 sudo ip netns exec ns2 curl -Nv https://example.com
 ```

 `ns3` および `ns4` の場合、リクエストは失敗します

11. **`IP_TRANSPARENT` を使用した透過プロキシ (ARP/NDPスプーフィング有効) LAN (`ns2` (プロキシリスナー), `ns3`, `ns4`), `ns1` 内のアウトバウンドソケット (デフォルトルート、インターネットアクセス)**

 プロキシを実行:

 ```shell
 sudo ./bin/gohpts -s $WLAN_IP:1080 -4 -6 -d -sniff -body -in-netns ns2 -out-netns ns1 -nohttp -M tproxy -T :8888 -auto -arpspoof "fullduplex 1;debug 1;interval 1s" -ndpspoof "ra true;interval 10s;debug 1"
 ```

 これで `ns3` および `ns4` での以前のリクエストが動作するはずです

 ```
 sudo ip netns exec ns3 curl -Nv https://example.com
 sudo ip netns exec ns4 curl -Nv https://example.com
 ```

12. **HTTP3プロキシ - `ns1` 内のプロキシリスナー、ホスト上のアウトバウンドソケット、`-nosocks` フラグ**

 プロキシを実行:

 ```shell
 sudo ./bin/gohpts -l 0.0.0.0:8083 -4 -6 -d -sniff -body -in-netns ns1 -c ./cert.pem -k ./key.pem -nosocks
 ```

 リクエストを送信

 ```shell
 ./http3-socks-proxy/bin/client -a 10.0.0.2:8083 www.google.com
 ```

 リクエストは成功するはずです

13. **HTTP3プロキシ - ホスト上のプロキシリスナー、`ns1` 内のアウトバウンドソケット、`-nosocks` フラグ**

 プロキシを実行:

 ```shell
 sudo ./bin/gohpts -l 0.0.0.0:8083 -4 -6 -d -sniff -body -out-netns ns1 -c ./cert.pem -k ./key.pem -nosocks
 ```

 リクエストを送信

 ```shell
 ./http3-socks-proxy/bin/client -a 127.0.0.1:8083 www.google.com
 ```

 リクエストは失敗するはずです

 `FORWARD` チェーンにルールを追加

 ```shell
 sudo iptables -A FORWARD -i wlan0 -o veth0 -m conntrack --ctstate RELATED,ESTABLISHED -j ACCEPT
 sudo iptables -A FORWARD -i veth0 -o wlan0 -j ACCEPT

 sudo ip6tables -A FORWARD -i veth0 -j ACCEPT
 sudo ip6tables -A FORWARD -o veth0 -m conntrack --ctstate RELATED,ESTABLISHED -j ACCEPT
 ```

 リクエストを送信

 ```shell
 ./http3-socks-proxy/bin/client -a 127.0.0.1:8083 www.google.com
 ```

 リクエストは成功するはずです

## ミックスサーバー

[[戻る]](#table-of-contents)

`GoHPTS` は、`-mixed` フラグを追加することで、HTTPサーバーと同じアドレスでSOCKS接続をリッスンするように設定できます。追加のSOCKSサーバーを起動します。これにより、`GoHPTS` は `HTTP-to-SOCKS` プロキシとしてだけでなく、`SOCKS-to-SOCKS` プロキシとしても動作します。ローカルのSOCKS5サーバーは `UDP ASSOCIATE` コマンドをサポートしているため、技術的にはユーザーはこのミックスサーバーでUDPデータグラムを送信できます。

プロキシを実行:```shell
gohpts -s :1080 -l :8080 -mixed

接続テスト:```shell curl -Nv --proxy socks5://127.0.0.1:8080 "https://example.com"

root@kitploit:~
または、アップストリームのSOCKSプロキシを無効にして直接接続するには、`-nosocks`を追加します:```shell
gohpts -l :8080 -mixed -nosocks

接続テスト:```shell curl -Nv --proxy socks5://127.0.0.1:8080 "https://example.com"

root@kitploit:~
代わりに`-socks4`フラグを追加してSOCKS4プロトコルを使用します:```shell
# :1080 should be a socks4 server
gohpts -s :1080 -l :8080 -mixed -socks4

接続テスト:```shell curl -Nv --proxy socks4://127.0.0.1:8080 "https://example.com"

root@kitploit:~
## リンク

[[Back]](#table-of-contents)

透過プロキシの詳細については、以下のリンクをご参照ください。

- [Linuxカーネルにおける透過プロキシサポート](https://docs.kernel.org/networking/tproxy.html)
- [Gostによる透過プロキシチュートリアル](https://latest.gost.run/en/tutorials/redirect/)
- [シンプルなtproxyの例](https://github.com/FarFetchd/simple_tproxy_example)
- [Golang TProxy](https://github.com/KatelynHaworth/go-tproxy)
- [eBPFとGoを用いた透過プロキシの実装](https://medium.com/all-things-ebpf/building-a-transparent-proxy-with-ebpf-50a012237e76)
- [https://github.com/heiher/hev-socks5-tproxy](https://github.com/heiher/hev-socks5-tproxy)

  `UDP ASSOCIATE` をサポートする `socks5` プロキシ:

- [https://github.com/wzshiming/socks5](https://github.com/wzshiming/socks5)
- [https://github.com/things-go/go-socks5](https://github.com/things-go/go-socks5)
- [https://github.com/0990/socks5](https://github.com/0990/socks5)
- [https://github.com/dizda/fast-socks5](https://github.com/dizda/fast-socks5)
- [https://github.com/semigodking/redsocks](https://github.com/semigodking/redsocks)
- [https://github.com/ginuerzh/gost](https://github.com/ginuerzh/gost)

IPv4/IPv6 ネットワークセキュリティ:

- [https://caster0x00.com/legless/](https://caster0x00.com/legless/)
- [https://caster0x00.com/intercept/](https://caster0x00.com/intercept/)
- [https://www.prosec-networks.com/en/blog/ipv6-mitm/](https://www.prosec-networks.com/en/blog/ipv6-mitm/)

## 貢献

[[Back]](#table-of-contents)

開発者の方ですか?

- リポジトリをフォークする
- 機能ブランチを作成:`git switch -c my-new-feature`
- 変更をコミット:`git commit -am 'Add some feature'`
- ブランチにプッシュ:`git push origin my-new-feature`
- プルリクエストを送信する

## ライセンス

[[Back]](#table-of-contents)

GPLv3
ツールをダウンロード