 projectdiscovery/tlsx
TLSベースのデータ収集に特化した、高速で設定可能なTLSグラバー。

<h1 align="center">
<img src="https://assets.kitploit.com/production/public/readmes/41152/5378854a9ce1d6b8be992803fef258be9a652c389d699c22f4636b6db34acdf6.png" width="200px">
<br>
</h1>
<p align="center">
<a href="https://opensource.org/licenses/MIT"><img src="https://img.shields.io/badge/license-MIT-_red.svg"></a>
<a href="https://goreportcard.com/badge/github.com/projectdiscovery/tlsx"><img src="https://goreportcard.com/badge/github.com/projectdiscovery/tlsx"></a>
<a href="https://pkg.go.dev/github.com/projectdiscovery/tlsx/pkg/tlsx"><img src="https://img.shields.io/badge/go-reference-blue"></a>
<a href="https://github.com/projectdiscovery/tlsx/releases"><img src="https://img.shields.io/github/release/projectdiscovery/tlsx"></a>
<a href="https://twitter.com/pdiscoveryio"><img src="https://img.shields.io/twitter/follow/pdiscoveryio.svg?logo=twitter"></a>
<a href="https://discord.gg/projectdiscovery"><img src="https://img.shields.io/discord/695645237418131507.svg?logo=discord"></a>
</p>
<p align="center">
<a href="#features">機能</a> •
<a href="#installation">インストール</a> •
<a href="#usage">使い方</a> •
<a href="#running-tlsx">tlsxの実行</a> •
<a href="https://discord.gg/projectdiscovery">Discordに参加</a>
</p>
TLSベースの**データ収集と分析**に焦点を当てた、高速で設定可能なTLSグラバーです。
# 機能
- 高速かつ完全に設定可能なTLS接続
- 複数の**TLS接続モード**
- 複数の**TLSプローブ**
- 旧TLSバージョンのための**自動TLSフォールバック**
- **事前ハンドシェイク** TLS接続(早期終了)
- カスタマイズ可能な**Cipher / SNI / TLS**選択
- **JARM/JA3** TLSフィンガープリント
- **TLS設定ミス**
- **ASN,CIDR,IP,HOST,**および**URL**入力
- STD **IN/OUT**および**TXT/JSON**出力
## インストール
tlsxのインストールには**Go 1.24**が必要です。インストールするには、以下のコマンドを実行するか、[リリースページ](https://github.com/projectdiscovery/tlsx/releases)からプリコンパイル済みバイナリをダウンロードしてください。```console
go install github.com/projectdiscovery/tlsx/cmd/tlsx@latest
```
## 使用方法```console
tlsx -h
```
これはツールのヘルプを表示します。サポートされているすべてのスイッチは次のとおりです。```console
TLSX is a tls data gathering and analysis toolkit.
Usage:
tlsx [flags]
Flags:
INPUT:
-u, -host string[] target host to scan (-u INPUT1,INPUT2)
-l, -list string target list to scan (-l INPUT_FILE)
-p, -port string[] target port to connect (default 443)
SCAN-MODE:
-sm, -scan-mode string tls connection mode to use (ctls, ztls, openssl, auto) (default "auto")
-ps, -pre-handshake enable pre-handshake tls connection (early termination) using ztls
-sa, -scan-all-ips scan all ips for a host (default false)
-iv, -ip-version string[] ip version to use (4, 6) (default 4)
PROBES:
-san display subject alternative names
-cn display subject common names
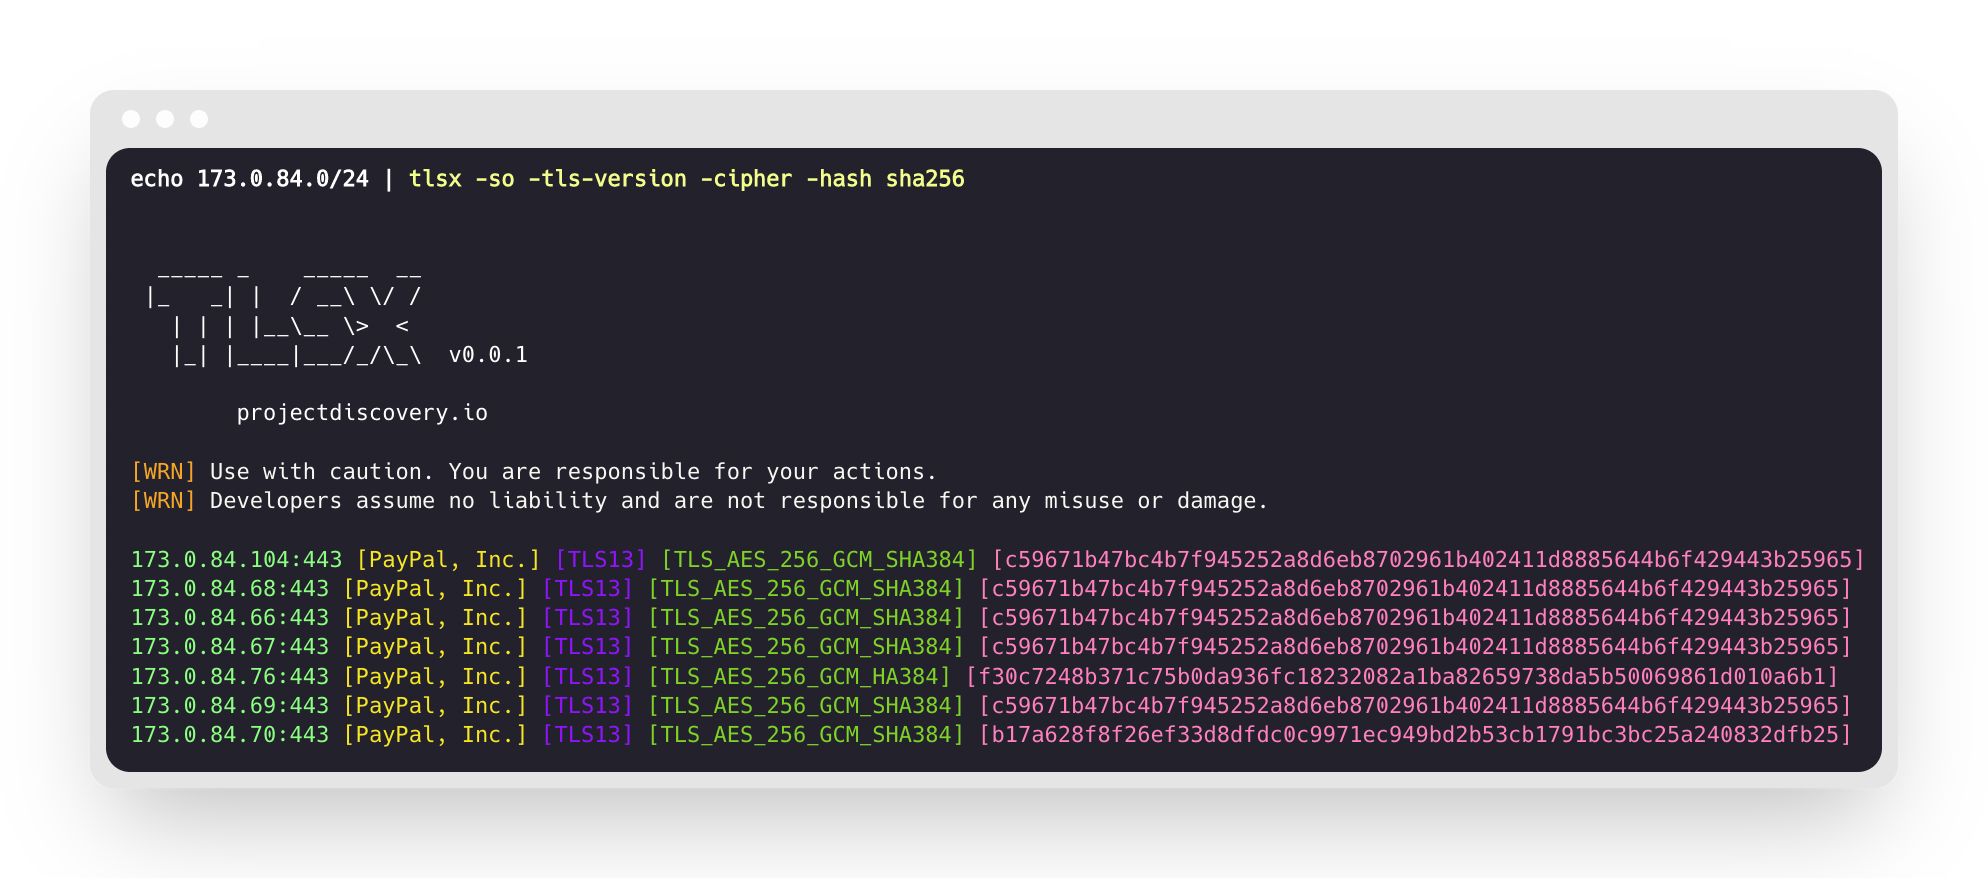
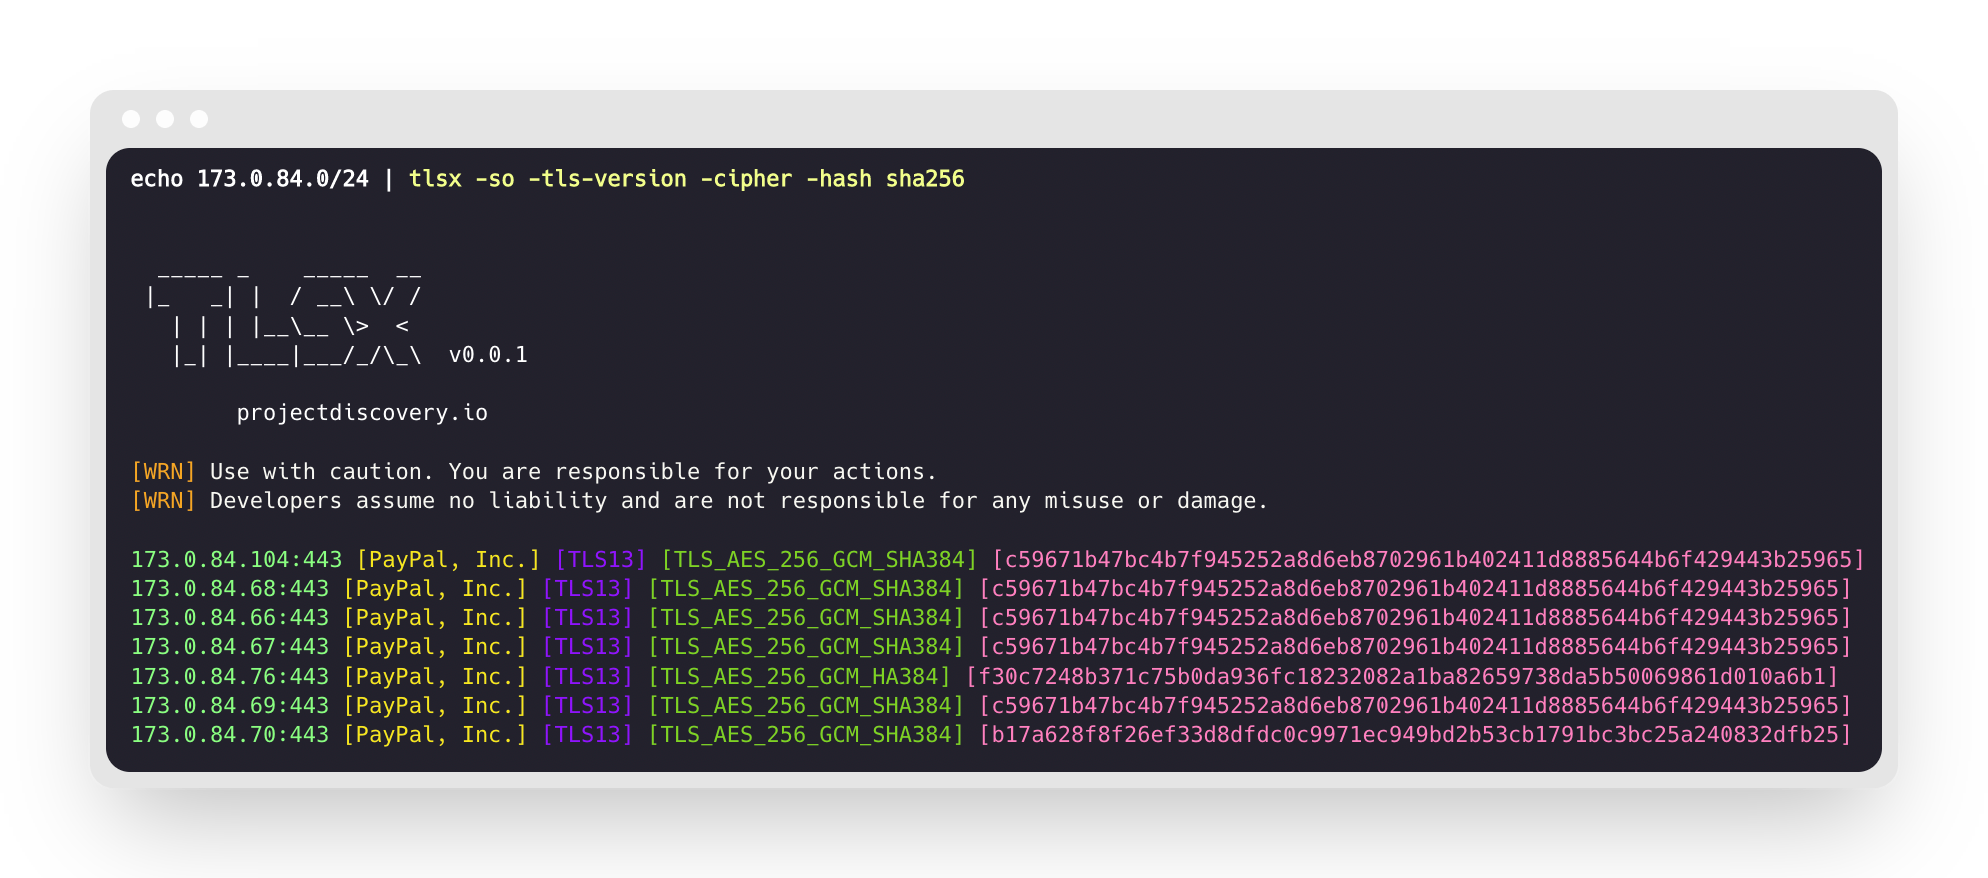
-so display subject organization name
-tv, -tls-version display used tls version
-cipher display used cipher
-hash string display certificate fingerprint hashes (md5,sha1,sha256)
-jarm display jarm fingerprint hash
-ja3 display ja3 fingerprint hash (using ztls)
-wc, -wildcard-cert display host with wildcard ssl certificate
-tps, -probe-status display tls probe status
-ve, -version-enum enumerate and display supported tls versions
-ce, -cipher-enum enumerate and display supported cipher
-ct, -cipher-type value ciphers types to enumerate. possible values: all/secure/insecure/weak (comma-separated) (default all)
-ch, -client-hello include client hello in json output (ztls mode only)
-sh, -server-hello include server hello in json output (ztls mode only)
-se, -serial display certificate serial number
MISCONFIGURATIONS:
-ex, -expired display host with host expired certificate
-ss, -self-signed display host with self-signed certificate
-mm, -mismatched display host with mismatched certificate
-re, -revoked display host with revoked certificate
-un, -untrusted display host with untrusted certificate
CONFIGURATIONS:
-config string path to the tlsx configuration file
-r, -resolvers string[] list of resolvers to use
-cc, -cacert string client certificate authority file
-ci, -cipher-input string[] ciphers to use with tls connection
-sni string[] tls sni hostname to use
-rs, -random-sni use random sni when empty
-rps, -rev-ptr-sni perform reverse PTR to retrieve SNI from IP
-min-version string minimum tls version to accept (ssl30,tls10,tls11,tls12,tls13)
-max-version string maximum tls version to accept (ssl30,tls10,tls11,tls12,tls13)
-cert, -certificate include certificates in json output (PEM format)
-tc, -tls-chain include certificates chain in json output
-vc, -verify-cert enable verification of server certificate
-ob, -openssl-binary string OpenSSL Binary Path
-hf, -hardfail strategy to use if encountered errors while checking revocation status
-proxy string socks5 proxy to use for tlsx
OPTIMIZATIONS:
-c, -concurrency int number of concurrent threads to process (default 300)
-cec, -cipher-concurrency int cipher enum concurrency for each target (default 10)
-timeout int tls connection timeout in seconds (default 5)
-retry int number of retries to perform for failures (default 3)
-delay string duration to wait between each connection per thread (eg: 200ms, 1s)
UPDATE:
-up, -update update tlsx to latest version
-duc, -disable-update-check disable automatic tlsx update check
OUTPUT:
-o, -output string file to write output to
-j, -json display output in jsonline format
-dns display unique hostname from SSL certificate response
-ro, -resp-only display tls response only
-silent display silent output
-nc, -no-color disable colors in cli output
-v, -verbose display verbose output
-version display project version
PDCP:
-pd, -dashboard upload or view output in the PDCP UI dashboard
-pdu, -dashboard-upload string upload tlsx output file (JSONL format) to the PDCP UI dashboard
-auth string PDCP API key for authentication
-tid, -team-id string upload asset results to a specified team ID
-aid, -asset-id string upload new assets to an existing asset ID
-aname, -asset-name string asset group name
DEBUG:
-health-check, -hc run diagnostic check up
```
## ライブラリとしての tlsx の使用
tlsx をライブラリとして使用する例は、[examples](https://github.com/projectdiscovery/tlsx/blob/main/examples) フォルダにあります。
## tlsx の実行
### tlsx への入力
**tlsx** は TLS 接続を行うために **ip** を必要とし、以下に示す複数の形式を受け付けます:```bash
AS1449 # ASN input
173.0.84.0/24 # CIDR input
93.184.216.34 # IP input
example.com # DNS input
example.com:443 # DNS input with port
https://example.com:443 # URL input port
```
`-host / -u`フラグを使用して入力ホストを指定でき、複数の値はカンマ区切りの入力で指定できます。同様に、**file**入力は`-list / -l`フラグを使用してサポートされています。
カンマ区切りのホスト入力の例:```console
$ tlsx -u 93.184.216.34,example.com,example.com:443,https://example.com:443 -silent
```
ファイルベースのホスト入力の例:```console
$ tlsx -list host_list.txt
```
**Port Input:**
**tlsx** はデフォルトでポート **443** に接続します。これは `-port / -p` フラグを使用してカスタマイズできます。単一または複数のポートは、カンマ区切りの入力または接続するポートのリストを含む改行区切りのファイルを使用して指定できます。
カンマ区切りのポート入力の例:```
$ tlsx -u hackerone.com -p 443,8443
```
ファイルベースのポート入力の例:```
$ tlsx -u hackerone.com -p port_list.txt
```
**注記:**
> 入力ホストにポートが含まれている場合(例: `8.8.8.8:443` や `hackerone.com:8443`)、ホストで指定されたポートが、デフォルトまたは `-port / -p` フラグで指定されたポートの代わりにTLS接続に使用されます。
### TLSプローブ(デフォルト実行)
これは、指定されたCIDRレンジに対してツールを実行し、ポート443でTLS接続を受け付けるホストを返します。```console
$ echo 173.0.84.0/24 | tlsx
_____ _ _____ __
|_ _| | / __\ \/ /
| | | |__\__ \> <
|_| |____|___/_/\_\ v0.0.1
projectdiscovery.io
[WRN] Use with caution. You are responsible for your actions.
[WRN] Developers assume no liability and are not responsible for any misuse or damage.
173.0.84.69:443
173.0.84.67:443
173.0.84.68:443
173.0.84.66:443
173.0.84.76:443
173.0.84.70:443
173.0.84.72:443
```
### SAN/CN プローブ
TLS証明書の**subject alternative name**および**common name**フィールドにはDNS名が含まれており、`-san`、`-cn`フラグを使用して抽出できます。```console
$ echo 173.0.84.0/24 | tlsx -san -cn -silent
173.0.84.104:443 [uptycspay.paypal.com]
173.0.84.104:443 [api-3t.paypal.com]
173.0.84.104:443 [api-m.paypal.com]
173.0.84.104:443 [payflowpro.paypal.com]
173.0.84.104:443 [pointofsale-s.paypal.com]
173.0.84.104:443 [svcs.paypal.com]
173.0.84.104:443 [uptycsven.paypal.com]
173.0.84.104:443 [api-aa.paypal.com]
173.0.84.104:443 [pilot-payflowpro.paypal.com]
173.0.84.104:443 [pointofsale.paypal.com]
173.0.84.104:443 [uptycshon.paypal.com]
173.0.84.104:443 [api.paypal.com]
173.0.84.104:443 [adjvendor.paypal.com]
173.0.84.104:443 [zootapi.paypal.com]
173.0.84.104:443 [api-aa-3t.paypal.com]
173.0.84.104:443 [uptycsize.paypal.com]
```
自動化を容易にするために、オプションで `-resp-only` フラグを使用すると、CLI出力にDNS名のみを一覧表示できます。```console
$ echo 173.0.84.0/24 | tlsx -san -cn -silent -resp-only
api-aa-3t.paypal.com
pilot-payflowpro.paypal.com
pointofsale-s.paypal.com
uptycshon.paypal.com
a.paypal.com
adjvendor.paypal.com
zootapi.paypal.com
api-aa.paypal.com
payflowpro.paypal.com
pointofsale.paypal.com
uptycspay.paypal.com
api-3t.paypal.com
uptycsize.paypal.com
api.paypal.com
api-m.paypal.com
svcs.paypal.com
uptycsven.paypal.com
uptycsven.paypal.com
a.paypal.com
api.paypal.com
pointofsale-s.paypal.com
pilot-payflowpro.paypal.com
```
TLS証明書から取得された**サブドメイン**は、さらに検査するために他のPDツールにパイプで渡すことができます。以下は、TLSサブドメインを**[dnsx](https://github.com/projectdiscovery/dnsx)**にパイプしてパッシブサブドメインをフィルタリングし、**[httpx](https://github.com/projectdiscovery/httpx)**に渡してアクティブなWebサービスを実行しているホストを一覧表示する例です。```console
$ echo 173.0.84.0/24 | tlsx -san -cn -silent -resp-only | dnsx -silent | httpx
__ __ __ _ __
/ /_ / /_/ /_____ | |/ /
/ __ \/ __/ __/ __ \| /
/ / / / /_/ /_/ /_/ / |
/_/ /_/\__/\__/ .___/_/|_|
/_/ v1.2.2
projectdiscovery.io
Use with caution. You are responsible for your actions.
Developers assume no liability and are not responsible for any misuse or damage.
https://api-m.paypal.com
https://uptycsize.paypal.com
https://api.paypal.com
https://uptycspay.paypal.com
https://svcs.paypal.com
https://adjvendor.paypal.com
https://uptycshap.paypal.com
https://uptycshon.paypal.com
https://pilot-payflowpro.paypal.com
https://slc-a-origin-pointofsale.paypal.com
https://uptycsven.paypal.com
https://api-aa.paypal.com
https://api-aa-3t.paypal.com
https://uptycsbrt.paypal.com
https://payflowpro.paypal.com
http://pointofsale-s.paypal.com
http://slc-b-origin-pointofsale.paypal.com
http://api-3t.paypal.com
http://zootapi.paypal.com
http://pointofsale.paypal.com
```
### TLS / 暗号プローブ```console
$ subfinder -d hackerone.com | tlsx -tls-version -cipher
mta-sts.hackerone.com:443 [TLS1.3] [TLS_AES_128_GCM_SHA256]
hackerone.com:443 [TLS1.3] [TLS_AES_128_GCM_SHA256]
api.hackerone.com:443 [TLS1.3] [TLS_AES_128_GCM_SHA256]
mta-sts.managed.hackerone.com:443 [TLS1.3] [TLS_AES_128_GCM_SHA256]
mta-sts.forwarding.hackerone.com:443 [TLS1.3] [TLS_AES_128_GCM_SHA256]
www.hackerone.com:443 [TLS1.3] [TLS_AES_128_GCM_SHA256]
support.hackerone.com:443 [TLS1.2] [TLS_ECDHE_RSA_WITH_AES_128_GCM_SHA256]
```
# TLS 設定ミス
### 期限切れ / 自己署名 / 不一致 / 失効 / 信頼されていない証明書
ホストのリストを tlsx に渡すことで、**期限切れ / 自己署名 / 不一致 / 失効 / 信頼されていない**証明書を検出できます。```console
$ tlsx -l hosts.txt -expired -self-signed -mismatched -revoked -untrusted
_____ _ _____ __
|_ _| | / __\ \/ /
| | | |__\__ \> <
|_| |____|___/_/\_\ v0.0.1
projectdiscovery.io
[WRN] Use with caution. You are responsible for your actions.
[WRN] Developers assume no liability and are not responsible for any misuse or damage.
wrong.host.badssl.com:443 [mismatched]
self-signed.badssl.com:443 [self-signed]
expired.badssl.com:443 [expired]
revoked.badssl.com:443 [revoked]
untrusted-root.badssl.com:443 [untrusted]
```
### [JARM](https://engineering.salesforce.com/easily-identify-malicious-servers-on-the-internet-with-jarm-e095edac525a/) TLS フィンガープリント```console
$ echo hackerone.com | tlsx -jarm -silent
hackerone.com:443 [29d3dd00029d29d00042d43d00041d5de67cc9954cc85372523050f20b5007]
```
### [JA3](https://github.com/salesforce/ja3) TLSフィンガープリント```console
$ echo hackerone.com | tlsx -ja3 -silent
hackerone.com:443 [20c9baf81bfe96ff89722899e75d0190]
```
### JSON出力
**tlsx** は特定のデータを照会するための複数のプローブフラグをサポートしていますが、すべての情報は常にJSON形式で利用可能です。自動化や後処理には `-json` 出力を使用するのが最も便利なオプションです。```console
echo example.com | tlsx -json -silent | jq .
```
I need to translate the content from English to Japanese. However, I notice that the INPUT section is empty—there's no actual content provided after "INPUT:".
Since there is no content to translate, there is nothing to output. I'll return an empty response.```json
{
"timestamp": "2022-08-22T21:22:59.799053+05:30",
"host": "example.com",
"ip": "93.184.216.34",
"port": "443",
"probe_status": true,
"tls_version": "tls13",
"cipher": "TLS_AES_256_GCM_SHA384",
"not_before": "2022-03-14T00:00:00Z",
"not_after": "2023-03-14T23:59:59Z",
"subject_dn": "CN=www.example.org, O=Internet Corporation for Assigned Names and Numbers, L=Los Angeles, ST=California, C=US",
"subject_cn": "www.example.org",
"subject_org": [
"Internet Corporation for Assigned Names and Numbers"
],
"subject_an": [
"www.example.org",
"example.net",
"example.edu",
"example.com",
"example.org",
"www.example.com",
"www.example.edu",
"www.example.net"
],
"issuer_dn": "CN=DigiCert TLS RSA SHA256 2020 CA1, O=DigiCert Inc, C=US",
"issuer_cn": "DigiCert TLS RSA SHA256 2020 CA1",
"issuer_org": [
"DigiCert Inc"
],
"fingerprint_hash": {
"md5": "c5208a47259d540a6e3404dddb85af91",
"sha1": "df81dfa6b61eafdffffe1a250240db5d2e6cee25",
"sha256": "7f2fe8d6b18e9a47839256cd97938daa70e8515750298ddba2f3f4b8440113fc"
},
"tls_connection": "ctls",
"sni": "example.com"
}
```
### PDCPダッシュボード統合
**tlsx** は、スキャン結果をProjectDiscovery Cloud Platform (PDCP) ダッシュボードにアップロードして、可視化および分析することをサポートしています。
#### リアルタイムでの結果のアップロード
ダッシュボードアップロードを有効にすると、結果が検出された時点で自動的にアップロードされます:```console
$ tlsx -u example.com -pd -json
```
結果は自動的にPDCPにアップロードされ、表示用のダッシュボードURLが届きます。
#### 既存ファイルのアップロード
以前に保存したJSONL出力ファイルをPDCPにアップロード:```console
$ tlsx -pdu results.jsonl -tid your-team-id -aname "My Scan"
```
#### 設定オプション
- `-pd, --dashboard`: PDCPダッシュボードへのリアルタイムアップロードを有効にする
- `-pdu, --dashboard-upload <file>`: 特定のJSONLファイルをPDCPにアップロードする
- `-auth <key>`: PDCP APIキー(環境変数または資格情報ハンドラーで設定することも可能)
- `-tid, --team-id <id>`: アップロード用のチームIDを指定する
- `-aid, --asset-id <id>`: 既存のアセットIDにアップロードする
- `-aname, --asset-name <name>`: アセットグループにカスタム名を設定する
すべてのオプションを使用した例:```console
$ tlsx -u example.com -pd -json -tid team123 -aname "Production Scan"
```
## 設定
### スキャンモード
tlsx は TLS 接続を確立するための複数のモードを提供します -
- `auto` (失敗時に他のモードへ自動フォールバック) - **デフォルト**
- `ctls` (**[crypto/tls](https://github.com/golang/go/blob/master/src/crypto/tls/tls.go)**)
- `ztls` (**[zcrypto/tls](https://github.com/zmap/zcrypto)**)
- `openssl` (**[openssl](https://github.com/openssl/openssl)**)
特定のモード / ライブラリに関するいくつかのポイントは、[リンクされたディスカッション](https://github.com/projectdiscovery/tlsx/discussions/2) で強調されています。`auto` モードは、接続エラー時に `ztls` および `openssl` モードを使用して接続を再試行することで、最大のカバレッジを確保し、古いバージョンの TLS を実行しているホストをスキャンするためにサポートされています。
古い / 旧式の TLS バージョンを使用するウェブサイトをスキャンするための `ztls` モードの使用例。```console
$ echo tls-v1-0.badssl.com | tlsx -port 1010 -sm ztls
_____ _ _____ __
|_ _| | / __\ \/ /
| | | |__\__ \> <
|_| |____|___/_/\_\ v0.0.1
projectdiscovery.io
[WRN] Use with caution. You are responsible for your actions.
[WRN] Developers assume no liability and are not responsible for any misuse or damage.
tls-v1-0.badssl.com:1010
```
### OpenSSL
openssl 接続モードを使用するには、システムに openssl がインストールされている必要があります。最近のシステムのほとんどには openssl がプリインストールされていますが、システムにない場合は手動でインストールできます。openssl がインストールされているかどうかは、`openssl version` コマンドを実行することで確認できます。openssl がインストールされていれば、このコマンドはバージョン番号を表示します。
<table>
<tr>
<td>
### Pre-Handshake (早期終了)
**tlsx** は SSL 接続を早期に終了することをサポートしており、これによりスキャンが高速化され、接続リクエストが少なくなります(TLS `serverhello` と証明書データが収集された後に切断します)。
詳細については、[@erbbysam](https://twitter.com/erbbysam) による [Hunting-Certificates-And-Servers](https://github.com/erbbysam/Hunting-Certificates-And-Servers/blob/master/Hunting%20Certificates%20%26%20Servers.pdf) を参照してください。
`-pre-handshake` モードの使用例:
</td>
</tr>
</table>```console
$ tlsx -u example.com -pre-handshake
_____ _ _____ __
|_ _| | / __\ \/ /
| | | |__\__ \> <
|_| |____|___/_/\_\ v0.0.1
projectdiscovery.io
[WRN] Use with caution. You are responsible for your actions.
[WRN] Developers assume no liability and are not responsible for any misuse or damage.
example.com:443
```
> **注記**:
> **pre-handshake** モードは `ztls` (**zcrypto/tls**) を利用します。これは、`ztls` ライブラリが `TLS v1.3` をサポートしていないため、サポートが `TLS v1.2` までに限定されることを意味します。
</table>
</tr>
</td>
### TLS バージョン
**最小**および**最大** TLS バージョンは、`-min-version` および `-max-version` フラグを使用して指定できます。デフォルトでは、これらの値は使用中の基盤ライブラリによって設定されます。
TLS バージョンに指定できる値は以下のとおりです。
- `ssl30`
- `tls10`
- `tls11`
- `tls12`
- `tls13`
次に、`max-version` を使用して、より古いバージョンの TLS、すなわち **TLS v1.0** をサポートするホストをスキャンする例を示します。```console
$ tlsx -u example.com -max-version tls10
_____ _ _____ __
|_ _| | / __\ \/ /
| | | |__\__ \> <
|_| |____|___/_/\_\ v0.0.1
projectdiscovery.io
[WRN] Use with caution. You are responsible for your actions.
[WRN] Developers assume no liability and are not responsible for any misuse or damage.
example.com:443
```
### カスタム暗号
サポートされているカスタム暗号は `-cipher-input / -ci` フラグを使用して指定できます。各モードでサポートされている暗号の一覧は [Wikiページ](https://github.com/projectdiscovery/tlsx/wiki/Ciphers) で確認できます。```console
$ tlsx -u example.com -ci TLS_AES_256_GCM_SHA384 -cipher
```
The input chunk is empty — no source text was provided to translate. Please supply the Markdown content for chunk 51 of 57.```console
$ tlsx -u example.com -ci cipher_list.txt -cipher
```
## Acknowledgements
This program optionally uses:
- [zcrypto](https://github.com/zmap/zcrypto) library from the zmap team.
- [cfssl](https://github.com/cloudflare/cfssl) library from the cloudflare team
- cipher data from [ciphersuite.info](https://ciphersuite.info) for ciphersuite classification
--------
<div align="center">
tlsx is made with ❤️ by the [projectdiscovery](https://projectdiscovery.io) team and distributed under [MIT License](https://github.com/projectdiscovery/tlsx/blob/main/LICENSE).
<a href="https://discord.gg/projectdiscovery"><img src="https://assets.kitploit.com/production/public/readmes/41152/d0624f94cb9ea6401be5a089bb694bc963c47fa82aa3b758c893e3b0bbfdf663.png" width="300" alt="Join Discord"></a>
</div>
### Certificate Transparency (CT) Logs Streaming
`tlsx` can operate in a _fire-hose_ mode that continuously streams newly-issued TLS certificates from the public Certificate Transparency ecosystem, providing a near-real-time feed of hostnames and metadata.
Enable CT logs mode via the `-ctl` switch (default when no input is provided):```bash
tlsx -ctl -silent | jq .subject_an
```
#### 開始オフセット
このツールは、以下のフラグによって制御される、相互に排他的な3つの開始動作を提供します。
| フラグ | 動作 |
|------|-----------|
| _デフォルト_ | **今すぐ**開始(起動時のツリーサイズ)– 将来の証明書のみがストリームされます |
| `-cb, --ctl-beginning` | すべてのログについてインデックス**0**から開始(完全な履歴リプレイ) |
| `-cti, --ctl-index <log>=<n>` | ログごとのカスタムインデックス(繰り返し指定可能)。指定されたログURL/IDの開始インデックスを _n_ に設定します。例: `--ctl-index https://ct.googleapis.com/logs/argon2023=123456` |```bash
# Replay the entire history
$ tlsx -ctl -cb -silent > all_certs.jsonl
# Resume at custom positions for two logs
$ tlsx -ctl -cti https://ct.googleapis.com/logs/argon2023=987654 -cti cloudflare-nimbus2024=543210 \
-silent | jq -r .ct_source
```
デフォルトでは、重複は大きな逆ブルームフィルタを使用して除外されます。詳細な統計情報を表示するには `-v` を渡してください。