 dliv3/venom
Venom - ペネトレーションテスター向けマルチホッププロキシ

Venomは、ペネトレーションテスター向けにGoで開発されたマルチレベルプロキシツールです。
Venomは複数のノードを接続し、それらのノードを踏み台として多段プロキシを構築できます。
ペネトレーションテスターはVenomを使用して、ネットワークトラフィックを簡単に多層内部ネットワークにプロキシし、プロキシノードを簡単に管理できます。
このツールはセキュリティ研究および教育目的に限定されています。ユーザーはこのツールの使用に起因するすべての法的および関連責任を負うものとします。作者は一切の法的および関連責任を負いません。
IoTデバイス(ARM/MIPS等)は通常リソースが限られているため、このプロジェクトのIoT環境向けにコンパイルされたバイナリは、ポート再利用とSSHトンネルの機能をサポートしていません。また、メモリ使用量を抑えるため、ネットワーク同時接続数とバッファサイズを制限しています。
リリースからコンパイル済みの実行可能ファイルを直接ダウンロードして使用できます。
ソースからコンパイルする場合は、Go >= 1.11 をインストールし、以下のコマンドを実行してください。
go get -u github.com/Dliv3/Venom/...

# $GOPATH はGoインストール時に設定される環境変数です。go env コマンドで確認できます。
cd $GOPATH/src/github.com/Dliv3/Venom

# コンパイルされたバイナリはカレントディレクトリのreleaseフォルダに配置されます。
./build.sh
YouTubeデモ動画: https://www.youtube.com/playlist?list=PLtZO9vwOND91vZ7yCmlAvISmEl2iQKjdI
adminノードとagentノードはどちらも接続を待ち受けることも、接続を開始することもできます。
adminがポートを待ち受け、agentが接続する場合:
./admin_macos_x64 -lport 9999
./agent_linux_x64 -rhost 192.168.0.103 -rport 9999
agentがポートを待ち受け、adminが接続する場合:
./agent_linux_x64 -lport 8888
./admin_macos_x64 -rhost 192.168.204.139 -rport 8888
agentノードはポート再利用をサポート
agentは2つのポート再利用方法を提供します。
Venomのポート再利用機能により、Windows上ではApache、MySQLなどのサービスポートを再利用できます(RDP、IISなどのサービスポートは現在再利用不可)。Linux上ではほとんどのサービスポートを再利用可能です。再利用されたポートは元のサービスを通常通り提供し続けられます。
第一のポート再利用方法
# Windows上のApacheを例に
# Apacheの80番ポートを再利用。ApacheのHTTPサービスには影響しません。
# -lhost の値はローカルIPアドレスである必要があります。0.0.0.0 は使用できません。
./agent.exe -lhost 192.168.204.139 -reuse-port 80
./admin_macos_x64 -rhost 192.168.204.139 -rport 80
第二のポート再利用方法
# Linux上のApacheを例に
# root権限が必要
sudo ./agent_linux_x64 -lport 8080 -reuse-port 80
この方法では、ローカルに iptables ルールを設定し、reuse-port へのトラフィックを lport に転送し、agentがトラフィックを分配します。
注意点:プログラムが sigterm または sigint シグナル(kill または Ctrl-C)で終了した場合、プログラムは iptables ルールを自動的にクリーンアップできます。kill -9 で agent が強制終了された場合は、自動的にクリーンアップできません(agent は sigkill シグナルを処理できないため)。その場合は手動でクリーンアップする必要があります。
iptables ルールが自動的にクリーンアップされず、ペネトレーションテスターが80番ポートのサービスにアクセスできなくなるのを防ぐため、第二の方法では iptables -m recent を使用して、特別なTCPパケットで iptables 転送ルールの有効/無効を制御します。
実装は https://threathunter.org/topic/594545184ea5b2f5516e2033 を参考にしています。
# Linuxホスト上で agent を起動し、iptables ルールを設定
# rhost が内部ネットワークにある場合、SOCKS5プロキシを使用してスクリプトのトラフィックをプロキシできます(SOCKS5の使用方法は後述)
python scripts/port_reuse.py --start --rhost 192.168.204.135 --rport 80

# agentノードに接続
./admin_macos_x64 -rhost 192.168.204.135 -rport 80

# 転送ルールを無効にする場合
python scripts/port_reuse.py --stop --rhost 192.168.204.135 --rport 80
ノード間通信の暗号化
Venom はノード間通信の暗号化機能を提供します。-passwd オプションでパスワードを指定すると、そのパスワードが AES 暗号化の鍵生成に使用されます。
# -passwd でパスワードを指定(例: dlive@dubhe)
./admin_macos_x64 -lport 8889 -passwd dlive@dubhe

# agent は同じパスワードを指定して admin ノードに接続
./agent_macos_x64 -rhost 192.168.0.103 -rport 8889 -passwd dlive@dubhe
help ヘルプ情報を表示
(admin node) >>> help

  help                                     Help information.
  exit                                     Exit.
  show                                     Display network topology.
  getdes                                   View description of the target node.
  setdes     [info]                        Add a description to the target node.
  goto       [id]                          Select id as the target node.
  listen     [lport]                       Listen on a port on the target node.
  connect    [rhost] [rport]               Connect to a new node through the target node.
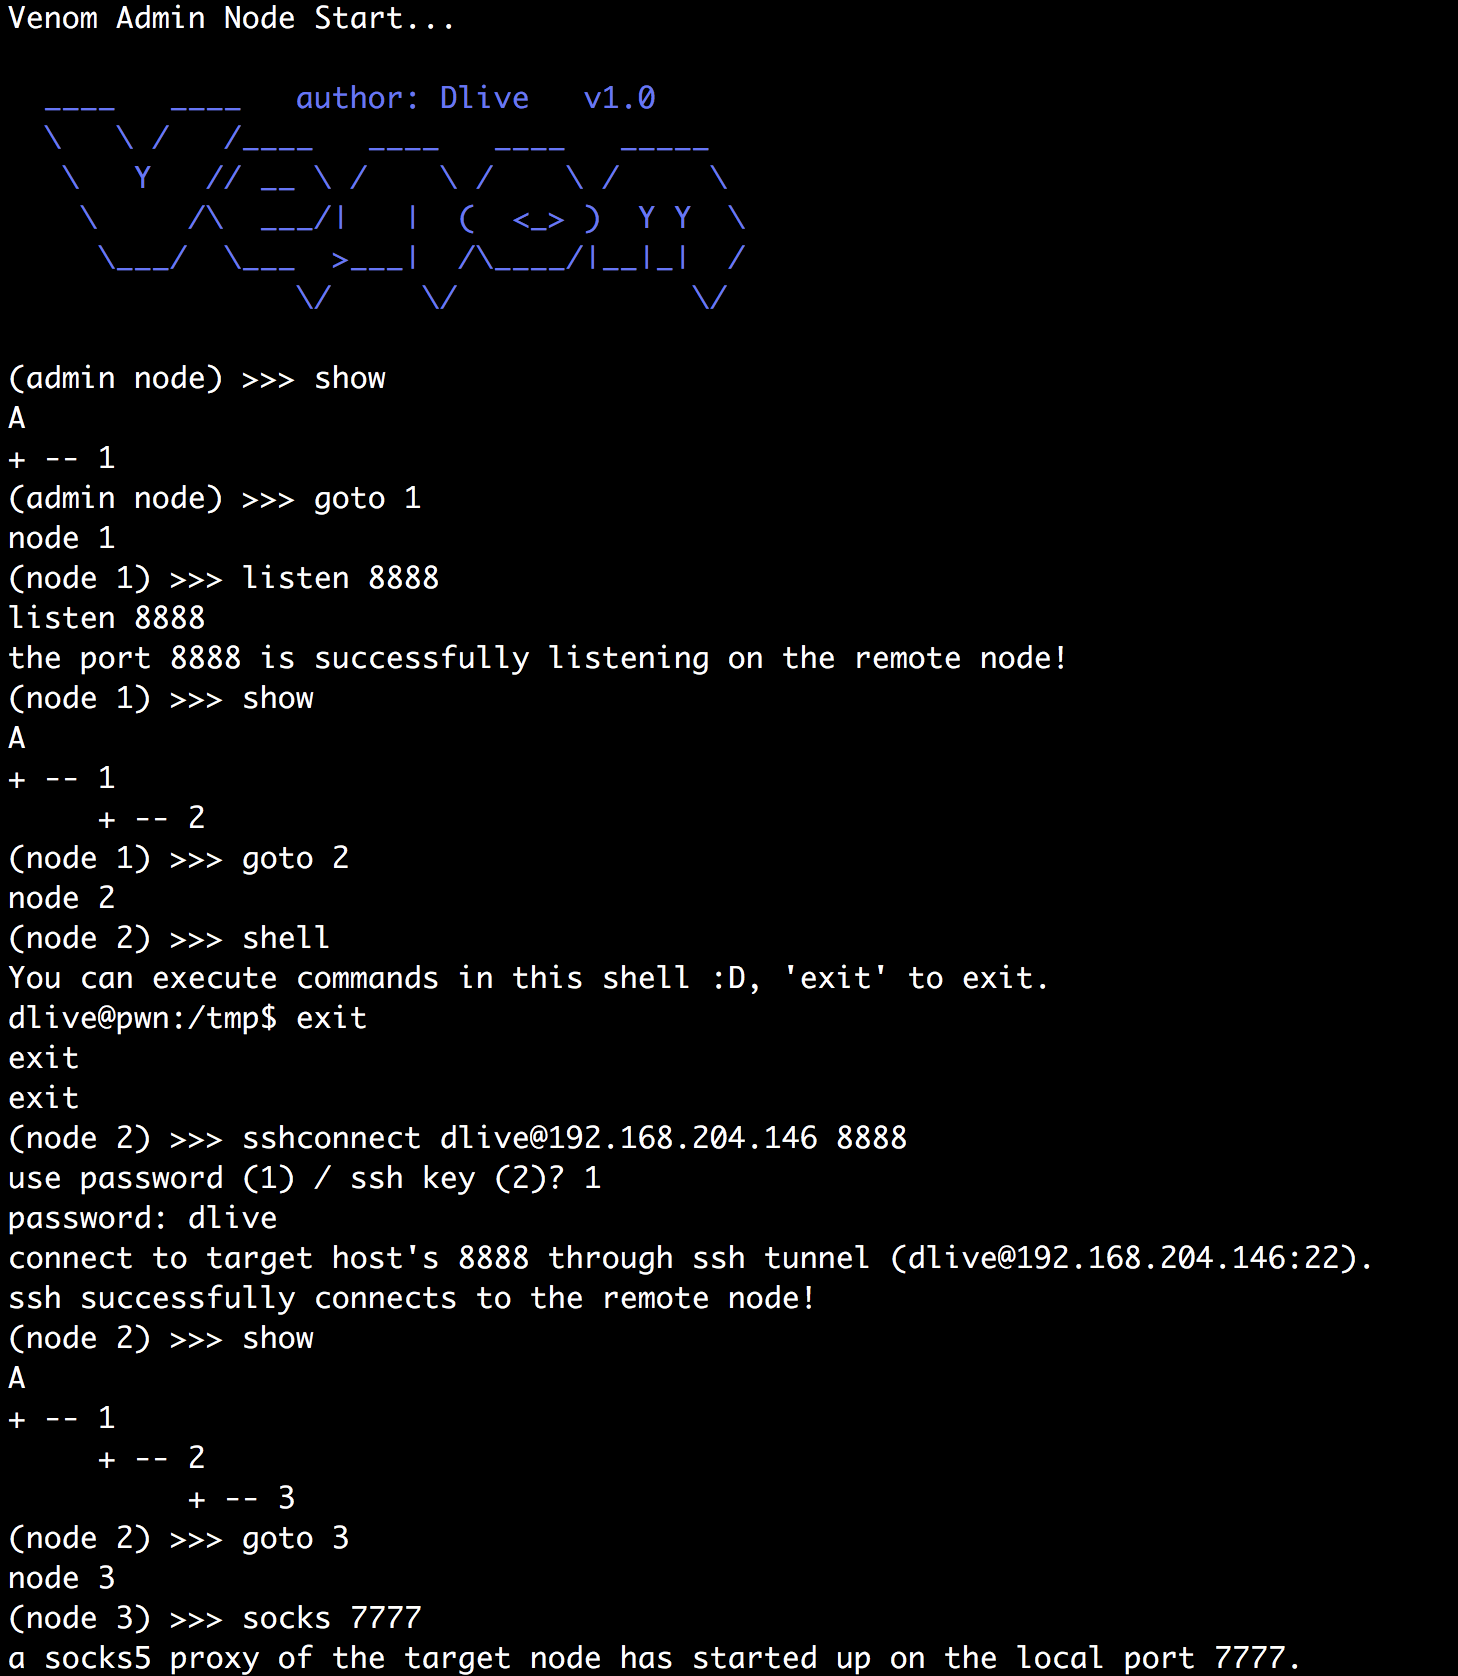
  sshconnect [user@ip:port] [dport]        Connect to a new node through ssh tunnel.
  shell                                    Start an interactive shell on the target node.
  upload     [local_file]  [remote_file]   Upload files to the target node.
  download   [remote_file]  [local_file]   Download files from the target node.
  socks      [lport]                       Start a socks5 server.
  lforward   [lhost] [sport] [dport]       Forward a local sport to a remote dport.
  rforward   [rhost] [sport] [dport]       Forward a remote sport to a local dport.
show ネットワークトポロジを表示
Aはadminノード、数字はagentノードを示します。
以下のトポロジ図は、adminノードの下にノード1が接続され、ノード1の下にノード2、4が接続され、ノード2の下にノード3が接続されていることを示します。
(node 1) >>> show
A
+ -- 1
     + -- 2
          + -- 3
     + -- 4
新しく追加されたノードを操作するには、最初にadminノードで show コマンドを実行してネットワークトポロジとノード番号を同期する必要があることに注意してください。
goto ノードを選択
(admin node) >>> goto 1
(node 1) >>>
ノードを選択すると、以下のコマンドが使用可能になります。
getdes/setdes ノード情報の説明を取得/設定
(node 1) >>> setdes linux x64 blahblahblah
(node 1) >>> getdes
linux x64 blahblahblah
connect/listen/sshconnect ノード間の相互接続
ノード1が192.168.0.103の9999ポートに接続
(node 1) >>> connect 192.168.0.103 9999
connect to 192.168.0.103 9999
successfully connect to the remote port!
(node 1) >>> show
A
+ -- 1
     + -- 2
ノード1でポート9997を待ち受け、別のマシンで ./agent_linux_x64 -rhost 192.168.204.139 -rport 9997 を実行してノード1に接続
(node 1) >>> listen 9997
listen 9997
the port 9997 is successfully listening on the remote node!
(node 1) >>> show
A
+ -- 1
     + -- 2
     + -- 3
192.168.0.104 で ./agent_linux_x64 -lport 9999 を実行し、ノード3から sshconnect を使用して SSH トンネル経由で192.168.0.104の9999ポートに接続。認証にはパスワードまたはSSH秘密鍵を使用できます。
(node 1) >>> goto 3
(node 3) >>> sshconnect [email protected]:22 9999
use password (1) / ssh key (2)? 2
file path of ssh key: /Users/dlive/.ssh/id_rsa
connect to target host's 9999 through ssh tunnel ([email protected]:22).
ssh successfully connects to the remote node!
(node 3) >>> show
A
+ -- 1
     + -- 2
     + -- 3
          + -- 4
shell ノードのインタラクティブシェルを取得
(node 1) >>> shell
You can execute commands in this shell :D, 'exit' to exit.
bash: no job control in this shell
bash-3.2$ whoami
whoami
dlive
bash-3.2$ exit
exit
exit
upload/download ノードにファイルをアップロード/ノードからファイルをダウンロード
ローカルの /tmp/test.pdf をノード1の /tmp/test2.pdf にアップロード
(node 1) >>> upload /tmp/test.pdf /tmp/test2.pdf
upload /tmp/test.pdf to node 1: /tmp/test2.pdf
this file is too large(>100M), do you still want to upload it? (y/n)y
 154.23 MiB / 154.23 MiB [========================================] 100.00% 1s
upload file successfully!
ノード1のファイル /tmp/test2.pdf をローカルの /tmp/test3.pdf にダウンロード
(node 1) >>> download /tmp/test2.pdf /tmp/test3.pdf
download /tmp/test2.pdf from node 1: /tmp/test3.pdf
this file is too large(>100M), do you still want to download it? (y/n)y
 154.23 MiB / 154.23 MiB [========================================] 100.00% 1s
download file successfully!
socks ノードへのSOCKS5プロキシを確立
(node 1) >>> socks 7777
a socks5 proxy of the target node has started up on local port 7777
socks コマンドが成功すると、admin ノードのローカルにポート(上記の例では7777)が開かれ、そのポートを使用してSOCKS5プロキシが利用可能になります。
lforward/rforward ローカルポートをリモートに転送/リモートポートをローカルに転送
lforward は admin ノードのローカルポート8888をノード1のポート8888に転送します。
