
Skip to content
KitploitKITPLOIT
ツールブログ
提出
ツールブログ
提出

ハッキング、侵入テスト、サイバーセキュリティツールをあなたのセキュリティアーセナルに!

Kitploitはハッキング、サイバーセキュリティ、ペネトレーションテストのツールディレクトリです。最新のプロジェクトアップデートを見つけて、脆弱性の発見、システム分析、テストの自動化、セキュリティの強化を行いましょう。

··フィード·お問い合わせ·プライバシー·© 2026 Kitploit

ツールディレクトリ

カテゴリ

すべてのカテゴリを見る
Loading categories
wafparan01d3 — Quick WAF "paranoid" Doctor Evaluation | WAFPARAN01D3 Tool | Kitploit
ツール/GitHubGitHub/alt3kx/wafparan01d3
Defensive ToolsScripting & AutomationConfiguration AuditingWeb SecurityPenetration Testing
GitHubalt3kx/wafparan01d3

wafparan01d3

Quick WAF "paranoid" Doctor Evaluation | WAFPARAN01D3 Tool

リポジトリを見る
2464年前Kitploit レビュー済み

人気

すべて見る →

コミュニティで最も使われているツールを見つけましょう。

すべてのツールを探索

ツールコレクションを閲覧

すべてのツールを見る →
共有

クイックWAF「パラノイド」ドクター評価

wafparano1d3
WAFPARAN01D3

Web アプリケーションファイアウォールのパラノイアレベルテストツールです。
— alt3kx.github.io より

パラノイアレベル入門

つまり、パラノイアレベル(PL)は、Core Rule Set がどの程度攻撃的であるかを定義できるようにするためのものです。
参照: https://coreruleset.org/20211028/working-with-paranoia-levels/

動作の仕組み

  • wafparan01d3.py の Python3 スクリプトは、GET パラメータに基づいて HTTP リクエストのさまざまな部分に配置されたエンコード済みペイロードを使用した悪意のあるリクエストを取得します。評価結果は、お使いのマシンに作成されるレポートデバッグファイル wafparan01d3.log に記録されます。
  • デフォルトの設定レベルを使用して、さまざまな攻撃やペイロードを設定した各 WAF パラノイアレベルについて、動作と応答を観察します。
  • 以下の PoC は、ゼロからの基本的なインストールと設定を提供し、基本的な「Mock」を設定してバックエンドをシミュレートすることで、現在展開されている WAF を再利用します。
  • 利用可能なデフォルトのペイロードは mysql_gosecure.txt で、gosecure の調査「A Scientific Notation Bug in MySQL left AWS WAF Clients Vulnerable to SQL Injection」(https://www.gosecure.net/blog/2021/10/19/a-scientific-notation-bug-in-mysql-left-aws-waf-clients-vulnerable-to-sql-injection/)に基づいています。この調査では、ModSecurity を異なるパラノイアレベルで使用している WAF を、デフォルト設定またはさまざまなルール / ID を段階的かつ迅速に無効化して評価しています。
アプローチ

  • Pentesters: GreyBox スコープで、DEV/STG/TEST 環境で WAF Apache 設定ファイルを起動/再ロードおよび編集する特権を持つ「シェル」を使用して、WAF Linux ボックスへの限定的なアクセス権を持ち、さまざまなペイロードを送信します。
  • Secutity Officers: 組織内の各ソリューションに適用する WAF パラノイアレベルについて、最善の判断を下します。
  • Blueteamers: ルールの適用、最適なアラート、組織内の誤検知の削減を実現します。
  • Integrators: より深いトラブルシューティングを実行し、ルールをカスタマイズしたり仮想パッチを作成したりして、WAF パラノイアの適切なレベルを迅速に定義します。

概念実証: Ubuntu 20.04.3 と OWASP Core Rule Set (CRS) v3.3.2 に基づく

参照: https://www.inmotionhosting.com/support/server/apache/install-modsecurity-apache-module/

初期インストール

  1. ソフトウェアリポジトリを更新します:
root@kitploit:~
$ sudo apt update -y && sudo apt dist-upgrade -y
  1. 必須パッケージをインストールします:
root@kitploit:~
$ sudo apt-get install build-essential -y
  1. ubuntu に apache2 をインストールします(未インストールの場合):
root@kitploit:~
$ sudo apt-get install apache2 -y
  1. ModSecurity Apache モジュールをダウンロードしてインストールします:
root@kitploit:~
$ sudo apt install libapache2-mod-security2 -y
  1. ubuntu 用の curl をインストールします(未インストールの場合):
root@kitploit:~
$ sudo apt-get install curl vim gridsite-clients net-tools -y
  1. Apache サービスを再起動します:
root@kitploit:~
$ sudo systemctl restart apache2
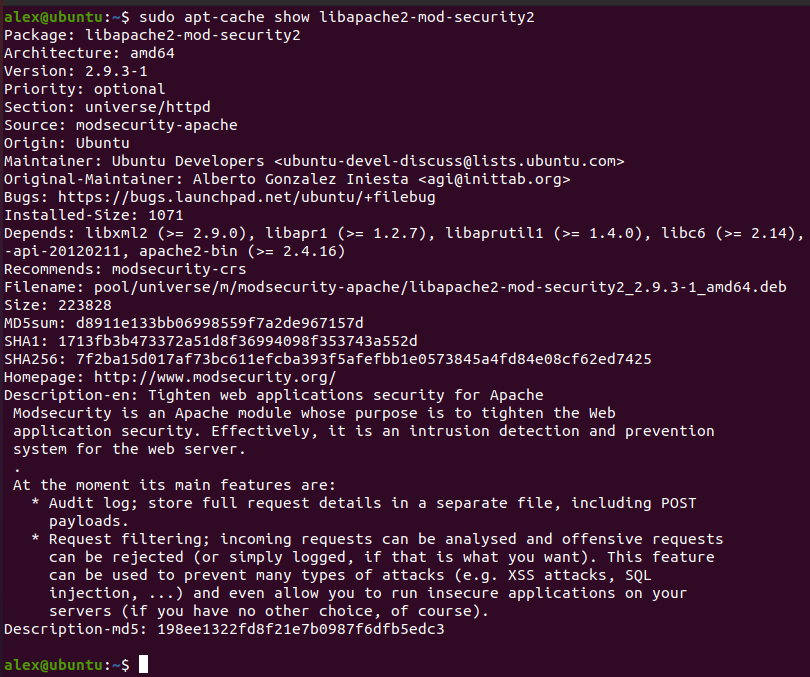
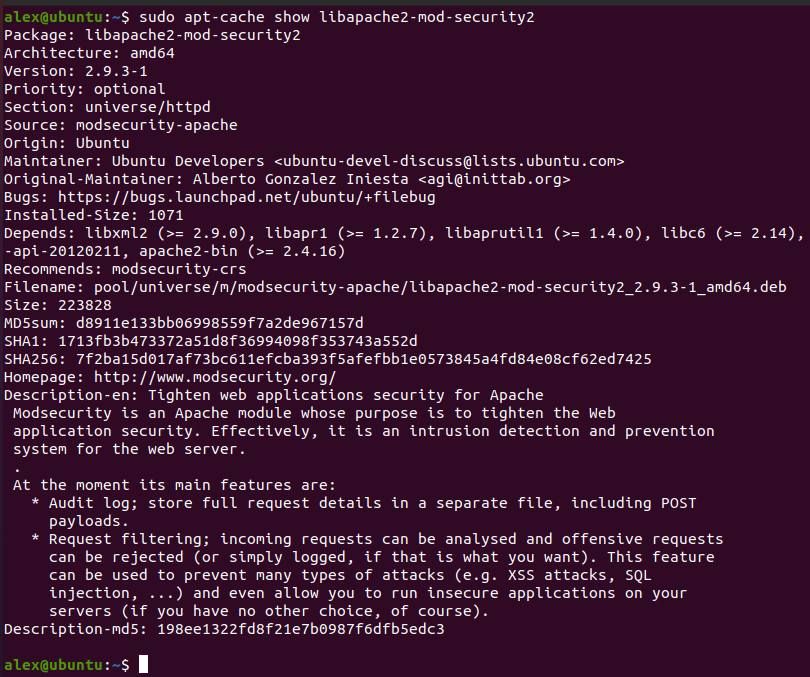
  1. インストールされているソフトウェアのバージョンが少なくとも 2.9.x であることを確認します:
root@kitploit:~
$ sudo apt-cache show libapache2-mod-security2
インストール

ModSecurity の設定

  1. ファイルをコピーして名前を変更します:
root@kitploit:~
$ sudo cp /etc/modsecurity/modsecurity.conf-recommended /etc/modsecurity/modsecurity.conf

次に、ModSecurity の検出モードを変更します。まず、cd /etc/modsecurity フォルダに移動します
2. vi、vim、emacs、または nano を使用して ModSecurity 設定ファイルを編集します。

root@kitploit:~
$ sudo vim /etc/modsecurity/modsecurity.conf
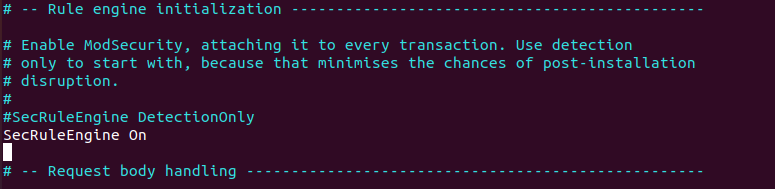
  1. ファイルの先頭付近に SecRuleEngine DetectionOnly があります。DetectionOnly を On に変更します。

元の値: SecRuleEngine DetectionOnly
新しい値: SecRuleEngine On
modsec

  1. 変更を保存します。
  2. Apache を再起動します:
root@kitploit:~
$ sudo systemctl restart apache2

OWASP Core Rule Set のダウンロード

  1. 最新の CRS を CoreRuleSet.org/installation からダウンロードします
root@kitploit:~
$ cd ~
$ wget https://github.com/coreruleset/coreruleset/archive/refs/tags/v3.3.2.zip
  1. チェックサムを確認し、https://coreruleset.org/installation/ で公開されているものと一致することを確認します。
root@kitploit:~
$ sha1sum v3.3.2.zip && echo ProvidedChecksum
88f336ba32a89922cade11a4b8e986f2e46a97cf  v3.3.2.zip
ProvidedChecksum 
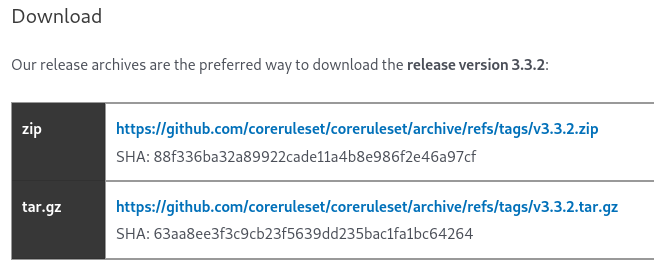
チェックサム

  1. zip ファイルを解凍します。
root@kitploit:~
$ unzip v3.3.2.zip
  1. 新しいディレクトリから CRS セットアップファイルを ModSecurity ディレクトリに移動します:
root@kitploit:~
$ sudo mv coreruleset-3.3.2/crs-setup.conf.example /etc/modsecurity/crs/crs-setup.conf
  • (任意ですが推奨)新しいディレクトリから rules ディレクトリを ModSecurity ディレクトリに移動します:
root@kitploit:~
$ sudo mv coreruleset-3.3.2/rules/ /etc/modsecurity/crs/
  1. ModSecurity ルールを確実にロードできるように、Apache の security2.conf ファイルを編集します:
root@kitploit:~
$ sudo vim /etc/apache2/mods-enabled/security2.conf
root@kitploit:~
<IfModule security2_module>
        # Default Debian dir for modsecurity's persistent data
        SecDataDir /var/cache/modsecurity

        # Include all the *.conf files in /etc/modsecurity.
        # Keeping your local configuration in that directory
        # will allow for an easy upgrade of THIS file and
        # make your life easier
        IncludeOptional /etc/modsecurity/crs-setup.conf
        IncludeOptional /etc/modsecurity/rules/*.conf

        # Include OWASP ModSecurity CRS rules if installed
        #IncludeOptional /usr/share/modsecurity-crs/*.load
</IfModule>
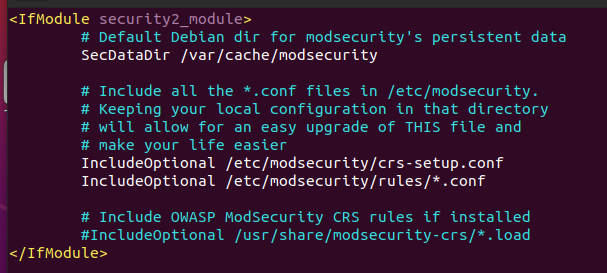
secmodule

  1. デフォルトの ModSecurity と新しい CRS の両方の設定ファイルがリストされていることを確認します。最初の conf ファイルのパスはすでに含まれている場合があります。2 番目のファイルパスは、/rules ディレクトリを移動した場所にする必要があります。
  2. /etc/apache2/apache2.conf を編集します
root@kitploit:~
$ sudo vim /etc/apache2/apache2.conf

次のコードをコピー&ペーストして保存します。

root@kitploit:~
# Include list of ports to listen on
Include ports.conf

Include /etc/modsecurity/modsecurity.conf
Include /etc/modsecurity/crs/crs-setup.conf
Include /etc/modsecurity/crs/rules/*.conf
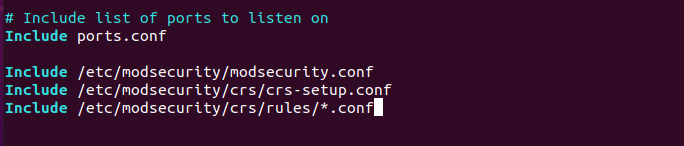
ポート

Apache の Rewrite モジュールと Proxy モジュールのロード

  1. 次のモジュールをコピーします。Proxy モジュールと Rewrite モジュールを有効にします。
root@kitploit:~
$ cd /etc/apache2
$ sudo cp mods-available/proxy_http.load mods-enabled
$ sudo cp mods-available/proxy.load mods-enabled/
$ sudo cp mods-available/rewrite.load mods-enabled/
  1. Apache を再起動します
root@kitploit:~
$ sudo systemctl restart apache2

テスト用の「モック」仮想ホストを追加する

  1. ポートを追加し、/etc/apache2/ports.conf を編集します
root@kitploit:~
$ sudo vim /etc/apache2/ports.conf

次のコードをコピー&ペーストして保存します。

root@kitploit:~
# If you just change the port or add more ports here, you will likely also
# have to change the VirtualHost statement in
# /etc/apache2/sites-enabled/000-default.conf

Listen 8080
Listen 18080

<IfModule ssl_module>
        Listen 443
</IfModule>

<IfModule mod_gnutls.c>
        Listen 443
</IfModule>
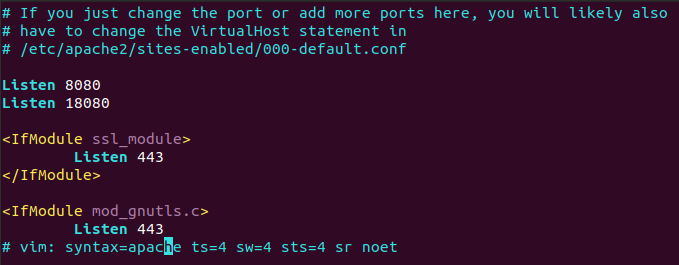
ports2

  1. /etc/apache2/sites-enabled に移動し、001-test.conf ファイルを作成します
root@kitploit:~
$ cd /etc/apache2/sites-enabled/
$ sudo touch 001-test.conf
$ sudo vim 001-test.conf

次のコードをコピー&ペーストして保存します。

root@kitploit:~
<VirtualHost *:8080>
        ServerName test.domain:8080

        SecRuleEngine On

        ErrorLog ${APACHE_LOG_DIR}/test_error.log
        CustomLog ${APACHE_LOG_DIR}/test_access.log combined
        SecAuditLog ${APACHE_LOG_DIR}/test_audit.log


        ProxyPass / http://127.0.0.1:18080/
        ProxyPassReverse / http://127.0.0.1:18080/
</VirtualHost>
  1. /etc/apache2/sites-enabled に移動し、002-moc.conf ファイルを作成します
root@kitploit:~
$ cd /etc/apache2/sites-enabled/
$ sudo touch 002-moc.conf
$ sudo vim 002-moc.conf

次のコードをコピー&ペーストして保存します。

root@kitploit:~
<VirtualHost 127.0.0.1:18080>

        ErrorLog ${APACHE_LOG_DIR}/moc_error.log
        CustomLog ${APACHE_LOG_DIR}/moc_access.log combined

        RewriteEngine On
        RewriteRule ^(.*)$ $1 [R=200,L]
</VirtualHost>
  1. Apache を再起動します
root@kitploit:~
$ sudo systemctl restart apache2
  1. /etc/apache2/conf-enabled 内に wafparan01d3_rulesremove.conf ファイルを作成します
root@kitploit:~
$ sudo touch /etc/apache2/conf-enabled/wafparan01d3_rulesremove.conf
  1. Apache をリロードします
root@kitploit:~
$ sudo service apache2 reload

FE と BE(モック)をテストする

root@kitploit:~
Must be specify a domain , edit the following lines  

Windows:
C:\Windows\System32\drivers\etc\hosts
192.168.56.106 test.domain <-- add this line and specify your IP address  

Linux: 
/etc/hosts
192.168.1.23 test.domain <-- add this line and specify your IP address 

$ curl -i -k -s -XGET http://test.domain:8080/
HTTP/1.1 200 OK
Date: Mon, 22 Nov 2021 06:31:41 GMT
Server: Apache/2.4.41 (Ubuntu)
Content-Length: 571
Content-Type: text/html; charset=iso-8859-1
Vary: Accept-Encoding

<!DOCTYPE HTML PUBLIC "-//IETF//DTD HTML 2.0//EN">
<html><head>
<title>200 OK</title>
</head><body>
<h1>OK</h1>
<p>The server encountered an internal error or
misconfiguration and was unable to complete
your request.</p>
<p>Please contact the server administrator at 
 [no address given] to inform them of the time this error occurred,
 and the actions you performed just before this error.</p>
<p>More information about this error may be available
in the server error log.</p>
<hr>
<address>Apache/2.4.41 (Ubuntu) Server at 127.0.0.1 Port 18080</address>
</body></html>

$ curl -i -k -s -XGET http://localhost:18080/
HTTP/1.1 200 OK
Date: Mon, 22 Nov 2021 06:27:17 GMT
Server: Apache/2.4.41 (Ubuntu)
Content-Length: 571
Content-Type: text/html; charset=iso-8859-1

<!DOCTYPE HTML PUBLIC "-//IETF//DTD HTML 2.0//EN">
<html><head>
<title>200 OK</title>
</head><body>
<h1>OK</h1>
<p>The server encountered an internal error or
misconfiguration and was unable to complete
your request.</p>
<p>Please contact the server administrator at 
 [no address given] to inform them of the time this error occurred,
 and the actions you performed just before this error.</p>
<p>More information about this error may be available
in the server error log.</p>
<hr>
<address>Apache/2.4.41 (Ubuntu) Server at localhost Port 18080</address>
</body></html>

使い方

ヘルプを表示するには、help オプションを使用できます。基本的な使い方は、定義されたさまざまな引数を渡すことです。
例:

root@kitploit:~
$ sudo python3 wafparan01d3.py -h 

           (                                  )   ) (       )
 (  (      ))\ )          ) (      )        ( /(( /( )\ ) ( /(
 )\))(  ( /(()/( `  )  ( /( )(  ( /(  (     )\())\()|()/( )\())
((_)()\ )(_))(_))/(/(  )(_)|()\ )(_)) )\ ) ((_)((_)\ ((_)|(_)\
_(()((_|(_)(_) _((_)_\((_)_ ((_|(_)_ _(_/( /  (_) (_)_| |__ (_)
\ V  V / _` |  _| '_ \) _` | '_/ _` | ' \)) () || |/ _` ||_ \
 \_/\_/\__,_|_| | .__/\__,_|_| \__,_|_||_| \__/ |_|\__,_|___/
                |_|

                    ~ WAFPARANO1D3 : v1.1 ~
     The Web Application Firewall Paranoia Level Test Tool.

usage: wafparan01d3.py [-h] [--run [_RUN]] [--debug [_DEBUG]] [--pl [_PARANOIALEVEL ...]] [--proxy [_PROXY]] [--payload [_PAYLOAD]] [--rules-remove [_RULESREMOVE]] [--log [_LOG]] [--domain [_DOMAIN]] [--conf-file [_CONF_FILE]]
                       [--time-sleep [_TIME_TO_SLEEP]] [--time-sleep-request [_TIME_TO_SLEEP_REQUEST]] [--desc [_DESC]] [--output-desc [_OUTPUT_DESC]]

optional arguments:
  -h, --help            show this help message and exit
  --run [_RUN]          Run script
  --debug [_DEBUG]      Debug mode
  --pl [_PARANOIALEVEL ...]
                        Define paranoia level Ex. -pl 2
  --proxy [_PROXY]      Define Proxy. Ex: http://127.0.0.1:8081
  --payload [_PAYLOAD]  Define payload file. Ex. --payload payload2.txt
  --rules-remove [_RULESREMOVE]
                        Define rules remove file. Ex. --rules-remove rules1.txt
  --log [_LOG]          Define path of the log file. Ex. --log /var/log/apache/wafparan01d3.log
  --domain [_DOMAIN]    Define your domain. Ex. --domain example.domain:8080
  --conf-file [_CONF_FILE]
                        Define configuration file. Ex. --conf-file /opt/modsecurity/crs/rules/INITIALIZATION.conf
  --time-sleep [_TIME_TO_SLEEP]
                        Sleep time per PL. Ex. --time-sleep 3
  --time-sleep-request [_TIME_TO_SLEEP_REQUEST]
                        Sleep time per Request. Ex. --time-sleep-request 3
  --desc [_DESC]        Description of the script and authors
  --output-desc [_OUTPUT_DESC]
                        Description of the output on console mode.
                                                              

オプション引数

root@kitploit:~
$ sudo python3 wafparan01d3.py -h 
	- show the help message

$ sudo python3 wafparan01d3.py --run
	- run the script with default options.

$ sudo python3 wafparan01d3.py --run --debug
	- Print every line on console.
	
$ sudo python3 wafparan01d3.py --run --pl 1
	- Run the script in assigned Paranoia Level.
	- By default runs on Paranoia Level 1, 2, 3, 4

$ sudo python3 wafparan01d3.py --run --payload file_payload2.txt
	- Define the payload file that you want to send to WAF.
	- By default takes the file mysql_gosecure.txt

$ sudo python3 wafparan01d3.py --run --rules-remove rules_removex.txt
	- Define the rules that you want to remove on GWAF.
	- Example of the file: 
		- Default 920000 920001 920002
	- By default takes the files: rules_remove1.txt, rules_remove2.txt, rules_remove3.txt, rules_remove4.txt

$ sudo python3 wafparan01d3.py --run --log /home/waf_user/paranoia.log
	- Define LOG File.
	- By default print the log on paranoia_debug.log

$ sudo python3 wafparan01d3.py --run --domain mydomain.test.com
	- Define Domain of Front End WAF.
	- By default runs over domain domain.test:8080
	
$ sudo python3 wafparan01d3.py --run --conf-file /opt/modsecurity/crs/rules/INITIALIZATION.conf
	- Define the configuration file to update the Paranoia Level
	- By default takes /etc/modsecurity/crs/rules/REQUEST-901-INITIALIZATION.conf

$ sudo python3 wafparan01d3.py --run --time-sleep 3
	- Define the time to sleep per Paranoia Level.

$ sudo python3 wafparan01d3.py --run --time-sleep-request 2
	- Define the time to sleep per request send to WAF.

$ sudo python3 wafparan01d3.py --desc
	- Print the description of the script and the authors.

デモ

最新の OWASP Core Rule Set CRS 3.3.2 を使用して WAF ModSecurity と「Mock」を展開する VM 環境(Ubuntu)を実行することで、wafparan01d3.py を試すことができます。ModSecurity のパラノイアレベルを簡単にカスタマイズして評価できます。

実行方法:

root@kitploit:~
$ git clone https://github.com/alt3kx/wafparan01d3.git
$ cd wafparan01d3
$ sudo python3 wafparan01d3.py --help 
root@kitploit:~
$ sudo python3 wafparan01d3.py --run

wafparan01d3_001

root@kitploit:~
$ sudo python3 wafparan01d3.py --run --debug --proxy http://192.168.56.1:8081

wafparan01d3_002

root@kitploit:~
$ sudo python3 wafparan01d3.py --run --debug --pl 1 2 --proxy http://192.168.56.1:8081 --log test.log --domain vulnerable.domain:8080 --time-sleep-request 1 --time-sleep 1 --rules-remove my_rules_remove.txt --payload my_payload.txt

wafparan01d3_003

WAF ルールの科学的表記

https://github.com/mindhack03d/WAF-Rule-Scientific-Notation

著者

Alex Hernandez 別名 (@_alt3kx_)
Jesus Huerta 別名 @mindhack03d

ツールをダウンロード
