<a href="https://artifacthub.io/packages/search?repo=akto" _target="blank">
<img src="https://img.shields.io/endpoint?url=https://artifacthub.io/badge/repository/akto"/>
</a>
<a href="https://www.akto.io/blog/akto-takes-center-stage-at-black-hat-2023-in-las-vegas" _target="blank">
<img src="https://img.shields.io/badge/Black_Hat_Arsenal-USA_2023-blue?style=square"/>
</a>
<a href="https://www.akto.io/blog/akto-presentation-at-defcon-2023-in-las-vegas" _target="blank">
<img src="https://img.shields.io/badge/Defcon-USA_2023-blue?style=square"/>
</a>
<br/>
<a href="https://github.com/akto-api-security/akto/commits/master" _target="blank">
<img src="https://img.shields.io/github/commit-activity/m/akto-api-security/akto?label=commits&logo=github"/>
</a>
<a href="https://github.com/akto-api-security/akto/releases" _target="blank">
<img src="https://img.shields.io/github/release-date/akto-api-security/akto?label=latest%20release&logo=docker"/>
</a>
<a href="https://discord.gg/Wpc6xVME4s" _target="blank">
<img src="https://img.shields.io/discord/1070706429402562733?logo=Discord"/>
</a>
<a href="https://hub.docker.com/r/aktosecurity/akto-api-security-dashboard/tags?page=1&name=local" _target="blank">
<img src="https://img.shields.io/docker/image-size/aktosecurity/akto-api-security-dashboard?logo=docker"/>
</a>
<a href="https://github.com/akto-api-security/akto/issues?q=label%3Ahackfest" _target="blank">
<img src="https://img.shields.io/github/issues/akto-api-security/akto/hackfest?logo=github"/>
</a>
<!--a href="https://hub.docker.com/r/aktosecurity/akto-api-security-dashboard" _target="blank">
<img src="https://img.shields.io/docker/pulls/aktosecurity/akto-api-security-dashboard?logo=docker"/>
</a-->
<a href="https://hub.docker.com/r/aktosecurity/akto-api-security-dashboard" _target="blank">
<img src="https://img.shields.io/badge/Docker_pulls-10K+-blue?logo=docker"/>
</a>
# Akto.io API セキュリティ
## コントリビューター
<a href="https://github.com/akto-api-security/akto/graphs/contributors">
<img src="https://contrib.rocks/image?repo=akto-api-security/akto" />
</a>
# Akto とは?
[仕組み](https://docs.akto.io/#how-it-works) • [はじめ方](https://docs.akto.io/#how-to-get-started) • [API インベントリ](https://docs.akto.io/api-inventory/api-collections) • [API テスト](https://docs.akto.io/testing/run-test) • [テストの追加](https://docs.akto.io/testing/test-library) • [Discord コミュニティに参加](https://discord.com/invite/Wpc6xVME4s) •
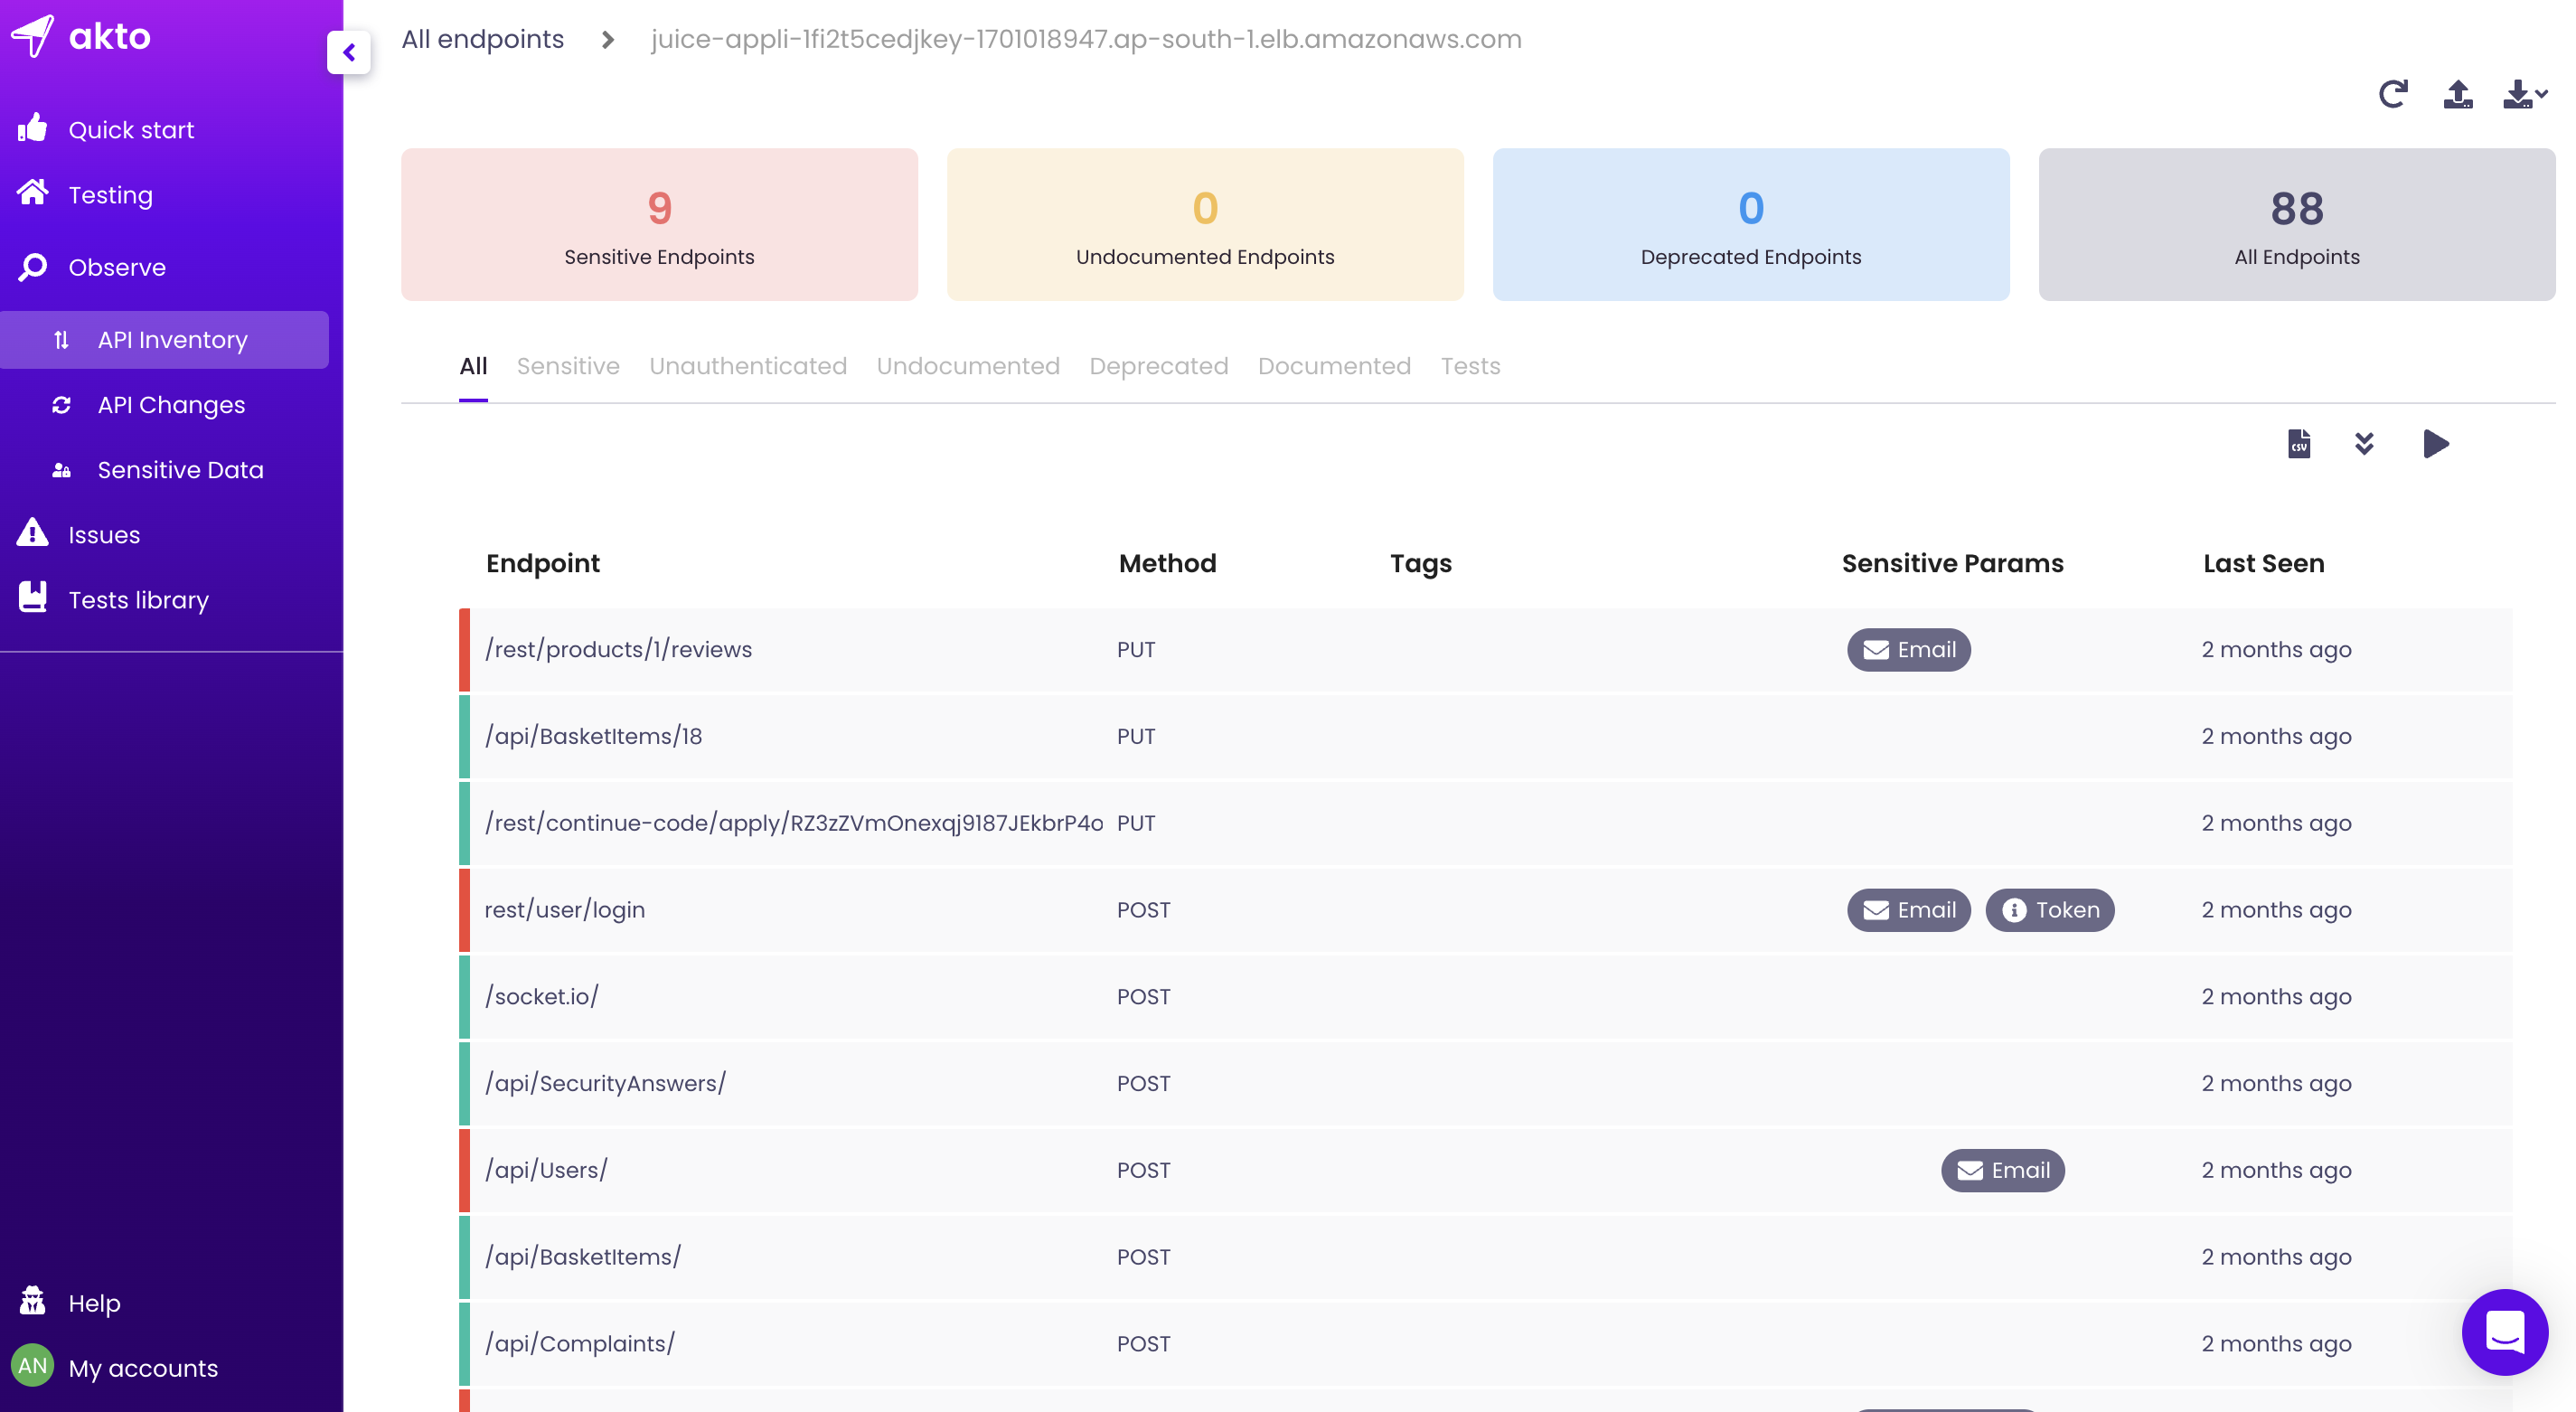
Akto は、わずか 60 秒で使い始められる、インスタントでオープンソースの API セキュリティプラットフォームです。Akto はセキュリティチームによって、API の継続的なインベントリの維持、API の脆弱性テスト、ランタイムの問題の発見に使用されています。Akto は、BOLA、認証、SSRF、XSS、セキュリティ設定など、OWASP Top 10 と HackerOne Top 10 の全カテゴリをカバーしています。Akto の強力なテストエンジンは、トラフィックデータを読み取って API トラフィックパターンを理解することで、さまざまなビジネスロジックテストを実行し、誤検知を減らします。Akto は、burpsuite、AWS、postman、GCP、ゲートウェイなど、複数のトラフィックソースと統合できます。今四半期の[公開ロードマップ](https://github.com/orgs/akto-api-security/projects/8)はこちらです。
Akto は、セキュリティチームとエンジニアリングチームが次の 3 つの方法で API を保護できるようにします。
1. [API インベントリ](https://docs.akto.io/api-inventory/api-collections)
2. [CI/CD でビジネスロジックテストを実行](https://docs.akto.io/testing/run-test)
3. [実行時に脆弱性を発見](https://docs.akto.io/api-inventory/sensitive-data)
https://user-images.githubusercontent.com/91306853/216407351-d18c396b-5cd0-4cbc-a350-10a76b1d67b3.mp4
## 仕組み
ステップ 1: インベントリを作成
<figure><img src="https://assets.kitploit.com/production/public/readmes/placeholders/f0fc86cfe65f76d40e15aaec61704ec8220a56dc89d4be03c46f67cb31b9fa8c.svg" alt=""><figcaption></figcaption></figure>
ステップ 2: テストを実行
<figure><img src="https://assets.kitploit.com/production/public/readmes/placeholders/f0fc86cfe65f76d40e15aaec61704ec8220a56dc89d4be03c46f67cb31b9fa8c.svg" alt=""><figcaption></figcaption></figure>
## はじめ方
### docker-compose を使用する(Docker がインストールされた任意のマシンで動作します)
次のコマンドを実行して Akto をインストールします。コンテナを実行するには、curl と Docker がインストールされている必要があります。
1. 次のコマンドを使用して Akto リポジトリをクローンします: `git clone https://github.com/akto-api-security/akto.git`
2. クローンしたディレクトリに移動します: `cd akto`
3. `docker-compose up -d` を実行します
<details>
<summary><h4>独自のクラウド(AWS/GCP/Heroku)でセットアップする場合は、このセクションをお読みください</h4></summary>
セキュリティ上のベストプラクティスのために、以下を確認してください。
1. ポート 9090 のみのインバウンドセキュリティルールを開放します。また、送信元 CIDR を VPC CIDR または自身の IP のみに制限します。
2. プライベートサブネットの EC2 を使用します -
a. これにより、誰もマシンへのインバウンドリクエストを行えなくなります。
b. このプライベートサブネットがインターネットにアクセスできることを確認してください。アウトバウンドコールが成功するように!
c. `ssh -i pemfile ec2-user@vpn-public-instance -L 9090:private-instance:9090` を使用して VPN 経由でインスタンスにアクセスするためのトンネリングを設定する必要があるかもしれません。
d. ブラウザで `http://private-instance:9090` にアクセスします。
3. パブリックサブネットの EC2 を使用します - お勧めしません! それでも行いたい場合は、2.b と 2.c をスキップできます。`http://ip:9090` でインスタンスにアクセスするだけです。
アプリケーションのミラーリングされたトラフィックを提供できる場合、Akto はクラウドデプロイで非常に強力です(パフォーマンスへの影響は 0)。CI/CD でテストをスケジュールしたり、ダッシュボードに他のチームメンバーを招待したりすることもできます。そのためには、[ここ](https://stairway.akto.io) から入手できる Akto Enterprise エディションをインストールしてください。[ここ](https://www.akto.io/pricing) で詳細をお読みください。
</details>
## API セキュリティテストチュートリアル
| タイトル | リンク |
| ------------- | ------------- |
| はじめに | https://www.youtube.com/watch?v=oFt4OVmfE2s |
| **チュートリアル 1:** SSRF ポートスキャン(OWASP API7:2023) | https://www.youtube.com/watch?v=WjNNh6asAD0 |
## 開発と貢献
<details>
<summary><h3>VSCode Devcontainers を使用したクイックセットアップ</h3></summary>
### 前提条件:
1. [VSCode をインストール](https://code.visualstudio.com/)
2. [VSCode Dev Containers 拡張機能をインストール](https://marketplace.visualstudio.com/items?itemName=ms-vscode-remote.remote-containers)
3. **Windows:** Windows 10 Pro/Enterprise では [Docker Desktop](https://www.docker.com/products/docker-desktop) 2.0+。Windows 10 Home(2004+)では Docker Desktop 2.3+ と [WSL 2 バックエンド](https://aka.ms/vscode-remote/containers/docker-wsl2) が必要です。
4. **macOS**: [Docker Desktop](https://www.docker.com/products/docker-desktop) 2.0+。
5. **Linux**: [Docker CE/EE](https://docs.docker.com/install/#supported-platforms) 18.06+ と [Docker Compose](https://docs.docker.com/compose/install) 1.21+。
**注**: Docker Desktop を使用する場合は、パフォーマンス向上のためにメモリ割り当てを 8 GB に変更することを検討してください。
### 手順:
#### リポジトリをクローンして VSCode で開く
1. ターミナルを開く
2. `mkdir ~/akto_code`
3. `cd ~/akto_code`
4. `git clone https://github.com/akto-api-security/akto`
5. VSCode で開く: `code akto`
#### Dev Container を起動
1. View > Command Palette に移動し、「Dev Containers: Reopen in Container」と入力します。
<img src="https://assets.kitploit.com/production/public/readmes/6063/55316a486d156017f3282896483e4ec8fa41a3f3a65bb3f8987ca169e55451ac.png"></img>
2. Dev Container のセットアップが完了するまで待ちます。
3. Web ブラウザで **localhost:9090** を開いて Akto ダッシュボードを表示します。
</details>
<details>
<summary><h3> 手動セットアップ手順</h3> </summary>
### 前提条件
OpenJDK 8, node(v18.7.0+ [リンク](https://nodejs.org/download/release/v18.7.0/)), npm(v8.15.0+), maven (v3.6.3 [リンク](https://dlcdn.apache.org/maven/maven-3/3.6.3/binaries/)), MongoDB (v5.0.3+ [リンク](https://www.mongodb.com/docs/manual/administration/install-community/))
#### リポジトリをクローン
1. `mkdir ~/akto_code`
2. `cd akto_code`
3. `git clone https://github.com/akto-api-security/akto`
#### データベースのセットアップ
1. `新しいターミナルタブを開く`
2. `cd ~`
3. `mkdir ~/akto_mongo_data`
4. `<path_to_mongo_folder>/bin/mongod --dbpath ~/akto_mongo_data`
#### フロントエンドのセットアップ
1. `新しいターミナルタブを開く`
2. `cd ~/akto_code/akto`
3. `cd apps/dashboard/web/polaris_web`
4. `npm install`
5. `npm run hot`
#### ダッシュボードのセットアップ
1. `新しいターミナルタブを開く`
2. `cd ~/akto_code/akto`
3. `export AKTO_MONGO_CONN="mongodb://localhost:27017"`
4. `export DASHBOARD_MODE="local_deploy"`
5. `mvn clean install`
6. `mvn --projects :dashboard --also-make jetty:run -Djetty.port=9090`
#### テストのセットアップ
1. `新しいターミナルタブを開く`
2. `cd ~/akto_code/akto`
3. `cd apps/testing`
4. `export AKTO_MONGO_CONN="mongodb://localhost:27017"`
5. `mvn compile; mvn exec:java -Dexec.mainClass="com.akto.testing.Main"`
</details>
#### Testing CLI ツールの使用
Testing CLI ツールを実行するには、次のコマンドを実行します
```bash
docker run -v ./:/out \ # needed to generate test report on host machine
-e TEST_IDS='JWT_NONE_ALGO REMOVE_TOKENS' \ # space separated test ids
-e AKTO_DASHBOARD_URL='<AKTO_DASHBOARD_URL>' \
-e AKTO_API_KEY='<AKTO_API_KEY>' \
-e API_COLLECTION_ID='123' \ # api collection id on which you want to run tests
-e TEST_APIS='https://demo.com/api/books https://demo.com/api/cars' \ # space separated apis from the api collection on which you want to run tests. If not present, all apis in the collection will be tested. [optional]
-e OVERRIDE_APP_URL='https://dummy.com' \ # If you want to test on a separate host. [optional]
aktosecurity/akto-api-testing-cli
```
### 試してみる
1. お気に入りのブラウザで `localhost:9090` を開きます
2. 初回ログイン時にはサインアップが必要です。次回以降はログインできます。
<details>
<summary><h3>デバッグ</h3></summary>
1. フロントエンドをデバッグするには、[ここ](https://devtools.vuejs.org/guide/installation.html) から Vue.js Chrome 拡張機能をインストールします。
2. バックエンドをデバッグするには、Web サーバーを実行する前に以下を実行します -
a. Java プロセスでデバッグを有効にするために MAVEN_OPTS 変数を設定します
export MAVEN_OPTS="-Xdebug -Xrunjdwp:transport=dt_socket,server=y,suspend=n,address=8081, -Dcom.sun.management.jmxremote=true -Dcom.sun.management.jmxremote.port=9010 -Dcom.sun.management.jmxremote.rmi.port=9010 -Dcom.sun.management.jmxremote.local.only=false -Dcom.sun.management.jmxremote.authenticate=false -Dcom.sun.management.jmxremote.ssl=false"
b. Visual Studio Code で、任意の行番号をクリックしてブレークポイントを設定します。
c. Run and Debug モードから Java デバッガーをアタッチします。初めて行う場合は、「Create launch.json file」をクリックし、次に「Add configuration」をクリックします。「Java: Attach process by ID」を選択してファイルを保存します。 <br/>
<img width="426" alt="img1" src="https://assets.kitploit.com/production/public/readmes/6063/8066e85fcd60acda23d905ff2a64969cb39d640cff06738418d0f4d4d864b990.png"><br/>
d. 実行中の Java プロセスの一覧が表示されます。Web サーバープロセスを選択してデバッガーをアタッチします。
</details>
<a href="https://hits.sh/github.com/akto-api-security/hits.svg?label=Hits%20since%2020%2F5&color=FFFFFF&labelColor=FFFFFF"><img alt="Hits" src="https://hits.sh/github.com/akto-api-security/hits.svg?label=Hits%20since%2020/5&color=FFFFFF&labelColor=FFFFFF"/></a>
## 貢献
このプロジェクトへの貢献を歓迎します。参加方法の詳細については、[CONTRIBUTING.md](https://github.com/akto-api-security/akto/blob/master/CONTRIBUTING.md) をお読みください。
## ライセンス
このプロジェクトは [MIT License](https://github.com/akto-api-security/akto/blob/master/LICENSE.md) の下でライセンスされています。