
Skip to content
KitploitKITPLOIT
उपकरणब्लॉग
जमा करें
उपकरणब्लॉग
जमा करें

हैकिंग, पेनटेस्ट और साइबर सुरक्षा उपकरण आपके सुरक्षा शस्त्रागार के लिए!

Kitploit हैकिंग, साइबर सुरक्षा और पेंटेस्टिंग टूल्स की एक निर्देशिका है। कमजोरियों को खोजने, सिस्टम का विश्लेषण करने, परीक्षण को स्वचालित करने और अपनी सुरक्षा को मजबूत करने के लिए नवीनतम प्रोजेक्ट अपडेट खोजें।

··फ़ीड·संपर्क·गोपनीयता·© 2026 Kitploit

टूल निर्देशिका

श्रेणियाँ

सभी श्रेणियाँ देखें
Loading categories
trivy-action — आपके Docker कंटेनर इमेज में भेद्यताओं की जाँच के लिए Trivy को GitHub action के रूप में चलाता है। | Kitploit
उपकरण/GitHubGitHub/aquasecurity/trivy-action
भेद्यता स्कैनरकंटेनर सुरक्षाकोड विश्लेषणक्लाउड सुरक्षाDevSecOpsसीक्रेट डिटेक्शनआपूर्ति श्रृंखला सुरक्षागलत कॉन्फ़िगरेशन
GitHubaquasecurity/trivy-action

trivy-action

आपके Docker कंटेनर इमेज में भेद्यताओं की जाँच के लिए Trivy को GitHub action के रूप में चलाता है।

रिपॉजिटरी देखें
1.4k3571126 दिन पहलेKitploit द्वारा समीक्षित

सबसे लोकप्रिय

सभी देखें →

हमारे समुदाय द्वारा सबसे अधिक उपयोग किए जाने वाले उपकरण खोजें।

सभी उपकरण खोजें

हमारे उपकरणों का संग्रह ब्राउज़ करें

सभी उपकरण देखें →
साझा करें

Trivy Action

GitHub Action Trivy के लिए

[![GitHub Release][release-img]][release] [![GitHub Marketplace][marketplace-img]][marketplace] [![लाइसेंस][license-img]][license]
विषय-सूची

  • उपयोग
    • CI पाइपलाइन स्कैन करें
    • CI पाइपलाइन स्कैन करें (Trivy Config के साथ)
    • कैश
    • Trivy सेटअप
    • टारबॉल स्कैन करना
    • टेम्पलेट्स के साथ Trivy का उपयोग करना
    • GitHub Code Scanning के साथ Trivy का उपयोग करना
    • अपने Git रिपॉज़िटरी को स्कैन करने के लिए Trivy का उपयोग करना
    • अपनी rootfs निर्देशिकाओं को स्कैन करने के लिए Trivy का उपयोग करना
    • Infrastructure as Code स्कैन करने के लिए Trivy का उपयोग करना
    • SBOM जनरेट करने के लिए Trivy का उपयोग करना
    • अपने निजी रजिस्ट्री को स्कैन करने के लिए Trivy का उपयोग करना
    • यदि आपके पास कोड स्कैनिंग सक्षम नहीं है तो Trivy का उपयोग करना
  • कस्टमाइज़ करना
  • इनपुट्स
  • पर्यावरण चर
  • Trivy कॉन्फ़िग फ़ाइल

उपयोग

CI पाइपलाइन स्कैन करें```yaml

name: build on: push: branches: - main pull_request: jobs: build: name: Build runs-on: ubuntu-24.04 steps: - name: Checkout code uses: actions/checkout@v4 - name: Build an image from Dockerfile run: docker build -t docker.io/my-organization/my-app:${{ github.sha }} . - name: Run Trivy vulnerability scanner uses: aquasecurity/[email protected] with: image-ref: 'docker.io/my-organization/my-app:${{ github.sha }}' format: 'table' exit-code: '1' ignore-unfixed: true vuln-type: 'os,library' severity: 'CRITICAL,HIGH'

root@kitploit:~
### CI पाइपलाइन स्कैन करें (Trivy Config के साथ)```yaml
name: build
on:
  push:
    branches:
    - main
  pull_request:
jobs:
  build:
    name: Build
    runs-on: ubuntu-24.04
    steps:
    - name: Checkout code
      uses: actions/checkout@v4

    - name: Run Trivy vulnerability scanner in fs mode
      uses: aquasecurity/[email protected]
      with:
        scan-type: 'fs'
        scan-ref: '.'
        trivy-config: trivy.yaml

इस मामले में trivy.yaml एक YAML कॉन्फ़िगरेशन है जिसे रेपो के हिस्से के रूप में चेक इन किया जाता है। विस्तृत जानकारी Trivy वेबसाइट पर उपलब्ध है लेकिन एक उदाहरण इस प्रकार है:```yaml format: json exit-code: 1 severity: CRITICAL secret: config: config/trivy/secret.yaml

root@kitploit:~
`trivy.yaml` फ़ाइल में सभी विकल्पों को परिभाषित करना संभव है। एक्शन के माध्यम से व्यक्तिगत विकल्प निर्दिष्ट करना केवल पिछड़ी संगतता (backward compatibility) उद्देश्यों के लिए छोड़ा गया है। निम्नलिखित को परिभाषित करना आवश्यक है क्योंकि इन्हें कॉन्फ़िग फ़ाइल के साथ परिभाषित नहीं किया जा सकता है:
- `scan-ref`: यदि `fs, repo` स्कैन का उपयोग कर रहे हैं।
- `image-ref`: यदि `image` स्कैन का उपयोग कर रहे हैं।
- `scan-type`: स्कैन प्रकार को परिभाषित करने के लिए, जैसे `image`, `fs`, `repo`, आदि।

#### विकल्पों के लिए प्राथमिकता क्रम
Trivy [Viper](https://github.com/spf13/viper) का उपयोग करता है जिसमें विकल्पों के लिए एक निर्धारित प्राथमिकता क्रम होता है। क्रम इस प्रकार है:
- GitHub Action फ़्लैग
- पर्यावरण चर (Environment variable)
- कॉन्फ़िग फ़ाइल
- डिफ़ॉल्ट

### कैश (Cache)
एक्शन में [वल्नरेबिलिटी DB](https://github.com/aquasecurity/trivy-db), [जावा DB](https://github.com/aquasecurity/trivy-java-db) और [चेक्स बंडल](https://github.com/aquasecurity/trivy-checks) को कैश और पुनर्स्थापित करने की अंतर्निहित कार्यक्षमता है, यदि वे स्कैन के दौरान डाउनलोड किए जाते हैं।
कैश डिफ़ॉल्ट रूप से `$GITHUB_WORKSPACE/.cache/trivy` निर्देशिका में संग्रहीत होता है।
कैश स्कैन शुरू होने से पहले पुनर्स्थापित किया जाता है और स्कैन समाप्त होने के बाद सहेजा जाता है।

यह अंतर्निहित रूप से [actions/cache](https://github.com/actions/cache) का उपयोग करता है लेकिन इसके लिए कम कॉन्फ़िगरेशन सेटिंग्स की आवश्यकता होती है।
कैच इनपुट वैकल्पिक है, और कैशिंग डिफ़ॉल्ट रूप से चालू रहती है।

#### कैशिंग अक्षम करना
यदि आप कैशिंग अक्षम करना चाहते हैं, तो `cache` इनपुट को `false` पर सेट करें, लेकिन हम अनुशंसा करते हैं कि रेट लिमिटिंग समस्याओं से बचने के लिए इसे सक्षम रखें।```yaml
    - name: Run Trivy scanner without cache
      uses: aquasecurity/[email protected]
      with:
        scan-type: 'fs'
        scan-ref: '.'
        cache: 'false'

डिफ़ॉल्ट शाखा में कैश अपडेट करना

कृपया ध्यान दें कि GitHub Actions में शाखाओं के बीच कैश एक्सेस पर प्रतिबंध हैं। डिफ़ॉल्ट रूप से, एक वर्कफ़्लो वर्तमान शाखा या डिफ़ॉल्ट शाखा (आमतौर पर main या master) में बनाए गए कैश को एक्सेस और पुनर्स्थापित कर सकता है। यदि आपको शाखाओं के बीच कैश साझा करने की आवश्यकता है, तो आपको डिफ़ॉल्ट शाखा में एक कैश बनाने और उसे वर्तमान शाखा में पुनर्स्थापित करने की आवश्यकता हो सकती है।

अपने वर्कफ़्लो को अनुकूलित करने के लिए, आप डिफ़ॉल्ट शाखा में नियमित रूप से कैश अपडेट करने के लिए एक क्रॉन जॉब सेट कर सकते हैं। यह बाद के स्कैन को इसे फिर से डाउनलोड किए बिना कैश किए गए DB का उपयोग करने की अनुमति देता है।```yaml

Note: This workflow only updates the cache. You should create a separate workflow for your actual Trivy scans.

In your scan workflow, set TRIVY_SKIP_DB_UPDATE=true and TRIVY_SKIP_JAVA_DB_UPDATE=true.

name: Update Trivy Cache

on: schedule: - cron: '0 0 * * *' # Run daily at midnight UTC workflow_dispatch: # Allow manual triggering

jobs: update-trivy-db: runs-on: ubuntu-latest steps: - name: Setup oras uses: oras-project/setup-oras@v1

root@kitploit:~
  - name: Get current date
    id: date
    run: echo "date=$(date +'%Y-%m-%d')" >> $GITHUB_OUTPUT

  - name: Download and extract the vulnerability DB
    run: |
      mkdir -p $GITHUB_WORKSPACE/.cache/trivy/db
      oras pull ghcr.io/aquasecurity/trivy-db:2
      tar -xzf db.tar.gz -C $GITHUB_WORKSPACE/.cache/trivy/db
      rm db.tar.gz

  - name: Download and extract the Java DB
    run: |
      mkdir -p $GITHUB_WORKSPACE/.cache/trivy/java-db
      oras pull ghcr.io/aquasecurity/trivy-java-db:1
      tar -xzf javadb.tar.gz -C $GITHUB_WORKSPACE/.cache/trivy/java-db
      rm javadb.tar.gz

  - name: Cache DBs
    uses: actions/cache/save@v4
    with:
      path: ${{ github.workspace }}/.cache/trivy
      key: cache-trivy-${{ steps.date.outputs.date }}
root@kitploit:~
स्कैन चलाते समय, डाउनलोड प्रक्रिया को छोड़ने के लिए पर्यावरण चर `TRIVY_SKIP_DB_UPDATE` और `TRIVY_SKIP_JAVA_DB_UPDATE` सेट करें।```yaml
    - name: Run Trivy scanner without downloading DBs
      uses: aquasecurity/[email protected]
      with:
        scan-type: 'image'
        scan-ref: 'myimage'
      env:
        TRIVY_SKIP_DB_UPDATE: true
        TRIVY_SKIP_JAVA_DB_UPDATE: true

Trivy सेटअप

डिफ़ॉल्ट रूप से, एक्शन पहले चरण के रूप में aquasecurity/setup-trivy को कॉल करता है जो version इनपुट द्वारा निर्दिष्ट trivy संस्करण को स्थापित करता है। यदि आपने पहले से ही trivy को अन्य तरीकों से स्थापित किया है, जैसे कि aquasecurity/setup-trivy को सीधे कॉल करके, या इस एक्शन को कई बार चला रहे हैं, तो आप skip-setup-trivy इनपुट का उपयोग करके इस चरण को अक्षम कर सकते हैं।

Trivy को मैन्युअल रूप से सेटअप करना```yaml

name: build on: push: branches: - main pull_request: jobs: build: name: Build runs-on: ubuntu-24.04 steps: - name: Checkout code uses: actions/checkout@v4

root@kitploit:~
- name: Manual Trivy Setup
  uses: aquasecurity/[email protected]
  with:
    cache: true
    version: v0.72.0

- name: Run Trivy vulnerability scanner in repo mode
  uses: aquasecurity/[email protected]
  with:
    scan-type: 'fs'
    ignore-unfixed: true
    format: 'sarif'
    output: 'trivy-results.sarif'
    severity: 'CRITICAL'
    skip-setup-trivy: true
root@kitploit:~
#### ट्रिवी एक्शन को कई बार कॉल करते समय सेटअप छोड़ना
एक और सामान्य उपयोग-मामला तब होता है जब कोई बिल्ड इस एक्शन को कई बार कॉल करता है, इस स्थिति में हम बाद के इनवोकेशन में `skip-setup-trivy` को 
`true` पर सेट कर सकते हैं, उदा.```yaml
name: build

on:
  push:
    branches:
      - main
  pull_request:

jobs:
  test:
    runs-on: ubuntu-latest
    permissions:
      contents: read
    steps:
      - name: Check out Git repository
        uses: actions/checkout@v4

      # The first call to the action will invoke setup-trivy and install trivy
      - name: Generate Trivy Vulnerability Report
        uses: aquasecurity/[email protected]
        with:
          scan-type: "fs"
          output: trivy-report.json
          format: json
          scan-ref: .
          exit-code: 0

      - name: Upload Vulnerability Scan Results
        uses: actions/upload-artifact@v4
        with:
          name: trivy-report
          path: trivy-report.json
          retention-days: 30

      - name: Fail build on High/Criticial Vulnerabilities
        uses: aquasecurity/[email protected]
        with:
          scan-type: "fs"
          format: table
          scan-ref: .
          severity: HIGH,CRITICAL
          ignore-unfixed: true
          exit-code: 1
          # On a subsequent call to the action we know trivy is already installed so can skip this
          skip-setup-trivy: true

Trivy स्थापित करने के लिए गैर-डिफ़ॉल्ट टोकन का उपयोग करें

GitHub Enterprise Server (GHES) https://github.com सर्वर के लिए एक अमान्य github.token का उपयोग करता है। इसलिए, आप setup-trivy एक्शन का उपयोग करके Trivy स्थापित नहीं कर सकते।

इस समस्या को ठीक करने के लिए, आपको token-setup-trivy इनपुट का उपयोग करके setup-trivy के लिए टोकन को ओवरराइट करना होगा:```yaml - name: Run Trivy scanner without cache uses: aquasecurity/[email protected] with: scan-type: 'fs' scan-ref: '.' token-setup-trivy: ${{ secrets.GITHUB_PAT }}

root@kitploit:~
GitHub के पास समान मामलों के लिए [create-github-app-token](https://github.com/actions/create-github-app-token) भी है।

### टारबॉल को स्कैन करना```yaml
name: build
on:
  push:
    branches:
    - main
  pull_request:
jobs:
  build:
    name: Build
    runs-on: ubuntu-24.04
    steps:
    - name: Checkout code
      uses: actions/checkout@v4

    - name: Generate tarball from image
      run: |
        docker pull <your-docker-image>
        docker save -o vuln-image.tar <your-docker-image>

    - name: Run Trivy vulnerability scanner in tarball mode
      uses: aquasecurity/[email protected]
      with:
        input: /github/workspace/vuln-image.tar
        severity: 'CRITICAL,HIGH'

Trivy का उपयोग टेम्पलेट्स के साथ

यह एक्शन [Trivy टेम्पलेट्स][trivy-templates] का समर्थन करता है।

टेम्पलेट फ़ाइल का पथ निर्दिष्ट करने के लिए template इनपुट का उपयोग करें (पथ को @ से प्रीफिक्स करना याद रखें)।```yaml name: build on: push: branches: - main pull_request: jobs: build: name: Build runs-on: ubuntu-24.04 steps: - name: Checkout code uses: actions/checkout@v4

root@kitploit:~
  - name: Run Trivy vulnerability scanner
    uses: aquasecurity/[email protected]
    with:
      scan-type: "fs"
      scan-ref: .
      format: 'template'
      template: "@path/to/my_template.tpl"
root@kitploit:~
#### डिफ़ॉल्ट टेम्पलेट्स
Trivy के पास [डिफ़ॉल्ट टेम्पलेट्स][trivy-default-templates] हैं।

डिफ़ॉल्ट रूप से, `setup-trivy` उन्हें `$HOME/.local/bin/trivy-bin/contrib` निर्देशिका में स्थापित करता है।```yaml
name: build
on:
  push:
    branches:
      - main
  pull_request:
jobs:
  build:
    name: Build
    runs-on: ubuntu-24.04
    steps:
      - name: Checkout code
        uses: actions/checkout@v4

      - name: Run Trivy vulnerability scanner
        uses: aquasecurity/[email protected]
        with:
          scan-type: "fs"
          scan-ref: .
          format: 'template'
          template: "@$HOME/.local/bin/trivy-bin/contrib/html.tpl"

GitHub Code Scanning के साथ Trivy का उपयोग करना

यदि आपके पास GitHub code scanning उपलब्ध है, तो आप Trivy को स्कैनिंग टूल के रूप में निम्नानुसार उपयोग कर सकते हैं:```yaml name: build on: push: branches: - main pull_request: jobs: build: name: Build runs-on: ubuntu-24.04 permissions: contents: read # Required to checkout and read repo files security-events: write # Required to upload SARIF files to Security tab steps: - name: Checkout code uses: actions/checkout@v4

root@kitploit:~
  - name: Build an image from Dockerfile
    run: |
      docker build -t docker.io/my-organization/my-app:${{ github.sha }} .

  - name: Run Trivy vulnerability scanner
    uses: aquasecurity/[email protected]
    with:
      image-ref: 'docker.io/my-organization/my-app:${{ github.sha }}'
      format: 'sarif'
      output: 'trivy-results.sarif'

  - name: Upload Trivy scan results to GitHub Security tab
    uses: github/codeql-action/upload-sarif@v4
    with:
      sarif_file: 'trivy-results.sarif'
root@kitploit:~
आप यहाँ एक अधिक विस्तृत उदाहरण पा सकते हैं: https://github.com/aquasecurity/trivy-sarif-demo/blob/master/.github/workflows/scan.yml

यदि आप Trivy Scan से गैर-शून्य exit code आने पर भी SARIF परिणामों को GitHub Code scanning पर अपलोड करना चाहते हैं, तो आप अपने अपलोड स्टेप में निम्नलिखित जोड़ सकते हैं:```yaml
name: build
on:
  push:
    branches:
      - main
  pull_request:
jobs:
  build:
    name: Build
    runs-on: ubuntu-24.04
    permissions:
      contents: read          # Required to checkout and read repo files
      security-events: write  # Required to upload SARIF files to Security tab
    steps:
      - name: Checkout code
        uses: actions/checkout@v4

      - name: Build an image from Dockerfile
        run: |
          docker build -t docker.io/my-organization/my-app:${{ github.sha }} .

      - name: Run Trivy vulnerability scanner
        uses: aquasecurity/[email protected]
        with:
          image-ref: 'docker.io/my-organization/my-app:${{ github.sha }}'
          format: 'sarif'
          output: 'trivy-results.sarif'

      - name: Upload Trivy scan results to GitHub Security tab
        uses: github/codeql-action/upload-sarif@v4
        if: always()
        with:
          sarif_file: 'trivy-results.sarif'

अधिक विवरण के लिए यह देखें: https://docs.github.com/en/actions/learn-github-actions/expressions#always

अपने Git रेपो को स्कैन करने के लिए Trivy का उपयोग करना

Trivy के बिल्ट-इन रेपो स्कैन से अपने git रेपोज़ को स्कैन करना भी संभव है। यह तब उपयोगी हो सकता है जब आप अपने रेपो में खोले जाने वाले प्रत्येक PR पर Trivy को बिल्ड-टाइम जाँच के रूप में चलाना चाहते हैं। इससे आप उन संभावित कमज़ोरियों की पहचान कर सकते हैं जो प्रत्येक PR के साथ आ सकती हैं।

यदि आपके पास GitHub कोड स्कैनिंग उपलब्ध है, तो आप Trivy को स्कैनिंग टूल के रूप में इस प्रकार उपयोग कर सकते हैं:```yaml name: build on: push: branches: - main pull_request: jobs: build: name: Build runs-on: ubuntu-24.04 permissions: contents: read # Required to checkout and read repo files security-events: write # Required to upload SARIF files to Security tab steps: - name: Checkout code uses: actions/checkout@v4

root@kitploit:~
  - name: Run Trivy vulnerability scanner in repo mode
    uses: aquasecurity/[email protected]
    with:
      scan-type: 'fs'
      ignore-unfixed: true
      format: 'sarif'
      output: 'trivy-results.sarif'
      severity: 'CRITICAL'

  - name: Upload Trivy scan results to GitHub Security tab
    uses: github/codeql-action/upload-sarif@v4
    with:
      sarif_file: 'trivy-results.sarif'
root@kitploit:~
### अपने rootfs निर्देशिकाओं को स्कैन करने के लिए Trivy का उपयोग करना
अपने rootfs निर्देशिकाओं को Trivy के अंतर्निहित rootfs स्कैन से स्कैन करना भी संभव है। यह तब उपयोगी हो सकता है जब आप अपने रेपो में खोले जाने वाले प्रत्येक PR पर Trivy को बिल्ड-टाइम जांच के रूप में चलाना चाहते हैं। यह आपको उन संभावित कमजोरियों की पहचान करने में मदद करता है जो प्रत्येक PR के साथ पेश हो सकती हैं।

यदि आपके पास [GitHub कोड स्कैनिंग](https://docs.github.com/en/github/finding-security-vulnerabilities-and-errors-in-your-code/about-code-scanning) उपलब्ध है, तो आप Trivy को स्कैनिंग टूल के रूप में इस प्रकार उपयोग कर सकते हैं:```yaml
name: build
on:
  push:
    branches:
      - main
  pull_request:
jobs:
  build:
    name: Build
    runs-on: ubuntu-24.04
    permissions:
      contents: read          # Required to checkout and read repo files
      security-events: write  # Required to upload SARIF files to Security tab
    steps:
      - name: Checkout code
        uses: actions/checkout@v4

      - name: Run Trivy vulnerability scanner with rootfs command
        uses: aquasecurity/[email protected]
        with:
          scan-type: 'rootfs'
          scan-ref: 'rootfs-example-binary'
          ignore-unfixed: true
          format: 'sarif'
          output: 'trivy-results.sarif'
          severity: 'CRITICAL'

      - name: Upload Trivy scan results to GitHub Security tab
        uses: github/codeql-action/upload-sarif@v4
        with:
          sarif_file: 'trivy-results.sarif'

इंफ्रास्ट्रक्चर ऐज़ कोड स्कैन करने के लिए Trivy का उपयोग करना

Trivy के अंतर्निहित रिपॉजिटरी स्कैन से अपने IaC रिपॉजिटरीज़ को स्कैन करना भी संभव है। यह तब उपयोगी हो सकता है जब आप अपने रिपॉजिटरी में खोले गए प्रत्येक PR पर Trivy को बिल्ड-टाइम जांच के रूप में चलाना चाहते हैं। यह आपको उन संभावित सुरक्षा कमजोरियों की पहचान करने में मदद करता है जो प्रत्येक PR के साथ शामिल हो सकती हैं।

यदि आपके पास GitHub code scanning उपलब्ध है, तो आप Trivy का उपयोग स्कैनिंग टूल के रूप में निम्नानुसार कर सकते हैं:```yaml name: build on: push: branches: - main pull_request: jobs: build: name: Build runs-on: ubuntu-24.04 permissions: contents: read # Required to checkout and read repo files security-events: write # Required to upload SARIF files to Security tab steps: - name: Checkout code uses: actions/checkout@v4

root@kitploit:~
  - name: Run Trivy vulnerability scanner in IaC mode
    uses: aquasecurity/[email protected]
    with:
      scan-type: 'config'
      hide-progress: true
      format: 'sarif'
      output: 'trivy-results.sarif'
      exit-code: '1'
      severity: 'CRITICAL,HIGH'

  - name: Upload Trivy scan results to GitHub Security tab
    if: always()
    uses: github/codeql-action/upload-sarif@v4
    with:
      sarif_file: 'trivy-results.sarif'
root@kitploit:~
**नोट**: यदि आपके Terraform कॉन्फ़िगरेशन में निजी मॉड्यूल शामिल हैं, तो Git को उन्हें होस्ट करने वाले रिपॉज़िटरी के साथ प्रमाणित करने के लिए कॉन्फ़िगर करें। 
यह आपके CI वर्कफ़्लो में एक चरण जोड़कर किया जा सकता है जो एक्सेस सेट करता है, उदाहरण के लिए Personal Access Token (PAT) या SSH कुंजियों का उपयोग करके:```yaml
- name: Configure Git for private modules
  run: |
    git config --global url."https://$GITHUB_USER:[email protected]/".insteadOf "https://github.com/"
  env:
    GITHUB_USER: ${{ github.actor }}
    PRIVATE_REPO_TOKEN: ${{ secrets.PRIVATE_REPO_TOKEN }}

यह सुनिश्चित करता है कि Trivy निजी मॉड्यूल डाउनलोड कर सके।

Trivy का उपयोग करके SBOM उत्पन्न करना

Trivy के लिए आपकी निर्भरताओं का SBOM उत्पन्न करना और उन्हें GitHub Dependency Graph जैसे उपभोक्ता को सबमिट करना संभव है।

GitHub को SBOM भेजने की सुविधा केवल तभी उपलब्ध है जब आपके रिपॉजिटरी में GitHub Dependency Graph सक्षम हो।

परिणामों को GitHub Dependency Graph पर भेजने के लिए, आपको एक GitHub PAT बनाना होगा या GitHub installation access token (जिसे GITHUB_TOKEN भी कहा जाता है) का उपयोग करना होगा:```yaml

name: Generate SBOM on: push: branches: - main

GITHUB_TOKEN authentication, add only if you're not going to use a PAT

permissions: contents: write

jobs: generate-sbom: runs-on: ubuntu-latest steps: - name: Checkout code uses: actions/checkout@v4

root@kitploit:~
  - name: Run Trivy in GitHub SBOM mode and submit results to Dependency Graph
    uses: aquasecurity/[email protected]
    with:
      scan-type: 'fs'
      format: 'github'
      output: 'dependency-results.sbom.json'
      scan-ref: '.'
      github-pat: ${{ secrets.GITHUB_TOKEN }} # or ${{ secrets.github_pat_name }} if you're using a PAT
root@kitploit:~
छवियों को स्कैन करते समय आप वास्तविक आउटपुट JSON को पार्स करना चाह सकते हैं, क्योंकि Github Dependency सभी विवरण नहीं दिखाता है, जैसे कि प्रत्येक निर्भरता का फ़ाइल पथ।

आप रिपोर्ट को एक आर्टिफैक्ट के रूप में अपलोड कर सकते हैं और उसे डाउनलोड कर सकते हैं, उदाहरण के लिए [upload-artifact action](https://github.com/actions/upload-artifact) का उपयोग करके:```yaml
---
name: Generate SBOM
on:
  push:
    branches:
    - main

## GITHUB_TOKEN authentication, add only if you're not going to use a PAT
permissions:
  contents: write

jobs:
  generate-sbom:
    runs-on: ubuntu-latest
    steps:
      - name: Scan image in a private registry
        uses: aquasecurity/[email protected]
        with:
          image-ref: "private_image_registry/image_name:image_tag"
          scan-type: image
          format: 'github'
          output: 'dependency-results.sbom.json'
          github-pat: ${{ secrets.GITHUB_TOKEN }} # or ${{ secrets.github_pat_name }} if you're using a PAT
          severity: "MEDIUM,HIGH,CRITICAL"
          scanners: "vuln"
        env:
          TRIVY_USERNAME: "image_registry_admin_username"
          TRIVY_PASSWORD: "image_registry_admin_password"

      - name: Upload trivy report as a Github artifact
        uses: actions/upload-artifact@v4
        with:
          name: trivy-sbom-report
          path: '${{ github.workspace }}/dependency-results.sbom.json'
          retention-days: 20 # 90 is the default

अपने निजी रजिस्ट्री को स्कैन करने के लिए Trivy का उपयोग करना

Trivy के अंतर्निहित इमेज स्कैन से अपनी निजी रजिस्ट्री को स्कैन करना भी संभव है। आपको बस ENV वेरिएबल्स सेट करने हैं।

Docker Hub रजिस्ट्री

Docker Hub को TRIVY_USERNAME और TRIVY_PASSWORD की आवश्यकता होती है। सार्वजनिक रिपॉजिटरी से डाउनलोड करते समय आपको ENV वेरिएबल्स सेट करने की आवश्यकता नहीं है।```yaml name: build on: push: branches: - main pull_request: jobs: build: name: Build runs-on: ubuntu-24.04 permissions: contents: read # Required to checkout and read repo files security-events: write # Required to upload SARIF results to the GitHub Security tab steps: - name: Checkout code uses: actions/checkout@v4

root@kitploit:~
  - name: Run Trivy vulnerability scanner
    uses: aquasecurity/[email protected]
    with:
      image-ref: 'docker.io/my-organization/my-app:${{ github.sha }}'
      format: 'sarif'
      output: 'trivy-results.sarif'
    env:
      TRIVY_USERNAME: Username
      TRIVY_PASSWORD: Password

  - name: Upload Trivy scan results to GitHub Security tab
    uses: github/codeql-action/upload-sarif@v4
    with:
      sarif_file: 'trivy-results.sarif'
root@kitploit:~
#### AWS ECR (Elastic Container Registry)
Trivy AWS SDK का उपयोग करता है। आपको `aws` CLI टूल इंस्टॉल करने की आवश्यकता नहीं है।
आप [AWS CLI के ENV Vars][env-var] का उपयोग कर सकते हैं।

[env-var]: https://docs.aws.amazon.com/cli/latest/userguide/cli-configure-envvars.html%60%60%60yaml
name: build
on:
  push:
    branches:
      - main
  pull_request:
jobs:
  build:
    name: Build
    runs-on: ubuntu-24.04
    permissions:
      contents: read          # Required to checkout and read repo files
      security-events: write  # Required to upload SARIF files to Security tab
    steps:
      - name: Checkout code
        uses: actions/checkout@v4

      - name: Run Trivy vulnerability scanner
        uses: aquasecurity/[email protected]
        with:
          image-ref: 'aws_account_id.dkr.ecr.region.amazonaws.com/imageName:${{ github.sha }}'
          format: 'sarif'
          output: 'trivy-results.sarif'
        env:
          AWS_ACCESS_KEY_ID: key_id
          AWS_SECRET_ACCESS_KEY: access_key
          AWS_DEFAULT_REGION: us-west-2

      - name: Upload Trivy scan results to GitHub Security tab
        uses: github/codeql-action/upload-sarif@v4
        with:
          sarif_file: 'trivy-results.sarif'

GCR (Google Container Registry)

Trivy गूगल क्लाउड SDK का उपयोग करता है। आपको gcloud कमांड इंस्टॉल करने की आवश्यकता नहीं है।

यदि आप लक्ष्य प्रोजेक्ट के रिपॉज़िटरी का उपयोग करना चाहते हैं, तो आप इसे GOOGLE_APPLICATION_CREDENTIALS के माध्यम से सेट कर सकते हैं।```yaml name: build on: push: branches: - main pull_request: jobs: build: name: Build runs-on: ubuntu-24.04 permissions: contents: read # Required to checkout and read repo files security-events: write # Required to upload SARIF files to Security tab steps: - name: Checkout code uses: actions/checkout@v4

root@kitploit:~
  - name: Run Trivy vulnerability scanner
    uses: aquasecurity/[email protected]
    with:
      image-ref: 'docker.io/my-organization/my-app:${{ github.sha }}'
      format: 'sarif'
      output: 'trivy-results.sarif'
    env:
      GOOGLE_APPLICATION_CREDENTIALS: /path/to/credential.json

  - name: Upload Trivy scan results to GitHub Security tab
    uses: github/codeql-action/upload-sarif@v4
    with:
      sarif_file: 'trivy-results.sarif'
root@kitploit:~
#### स्व-होस्टेड
BasicAuth सर्वर को `TRIVY_USERNAME` और `TRIVY_PASSWORD` की आवश्यकता है।
यदि आप 80 पोर्ट का उपयोग करना चाहते हैं, तो NonSSL `TRIVY_NON_SSL=true` का उपयोग करें।```yaml
name: build
on:
  push:
    branches:
      - main
  pull_request:
jobs:
  build:
    name: Build
    runs-on: ubuntu-24.04
    permissions:
      contents: read          # Required to checkout and read repo files
      security-events: write  # Required to upload SARIF files to Security tab
    steps:
      - name: Checkout code
        uses: actions/checkout@v4

      - name: Run Trivy vulnerability scanner
        uses: aquasecurity/[email protected]
        with:
          image-ref: 'docker.io/my-organization/my-app:${{ github.sha }}'
          format: 'sarif'
          output: 'trivy-results.sarif'
        env:
          TRIVY_USERNAME: Username
          TRIVY_PASSWORD: Password

      - name: Upload Trivy scan results to GitHub Security tab
        uses: github/codeql-action/upload-sarif@v4
        with:
          sarif_file: 'trivy-results.sarif'

यदि आपके पास कोड स्कैनिंग सक्षम नहीं है तो Trivy का उपयोग करना

वर्कफ़्लो सारांश में स्कैन परिणाम को ब्राउज़ करना भी संभव है।

यह चरण विशेष रूप से उन निजी रिपॉजिटरी के लिए उपयोगी है जिनके पास GitHub Advanced Security लाइसेंस नहीं है।```yaml

  • name: Run Trivy scanner uses: aquasecurity/[email protected] with: scan-type: config hide-progress: true output: trivy.txt

  • name: Publish Trivy Output to Summary run: | if [[ -s trivy.txt ]]; then { echo "### Security Output" echo "

    Click to expand" echo "" echo 'terraform' cat trivy.txt echo '' echo "
    " } >> $GITHUB_STEP_SUMMARY fi

root@kitploit:~
## अनुकूलन

कॉन्फ़िगरेशन प्राथमिकता:
- [इनपुट्स](#inputs)
- [पर्यावरण चर](#environment-variables)
- [Trivy कॉन्फ़िग फ़ाइल](#trivy-config-file)
- डिफ़ॉल्ट मान


### inputs

निम्नलिखित इनपुट्स को `step.with` कुंजियों के रूप में उपयोग किया जा सकता है:

| नाम                         | प्रकार    | डिफ़ॉल्ट                            | विवरण                                                                                                                                                      |
|------------------------------|---------|------------------------------------|------------------------------------------------------------------------------------------------------------------------------------------------------------------|
| `scan-type`                  | String  | `image`                            | स्कैन प्रकार, जैसे `image` या `fs`                                                                                                                                  |
| `input`                      | String  |                                    | Tar संदर्भ, जैसे `alpine-latest.tar`                                                                                                                          |
| `image-ref`                  | String  |                                    | इमेज संदर्भ, जैसे `alpine:3.10.2`                                                                                                                            |
| `scan-ref`                   | String  | `/github/workspace/`               | स्कैन संदर्भ, जैसे `/github/workspace/` या `.`                                                                                                                 |
| `format`                     | String  | `table`                            | आउटपुट प्रारूप (`table`, `json`, `template`, `sarif`, `cyclonedx`, `spdx`, `spdx-json`, `github`, `cosign-vuln`)                                                  |
| `template`                   | String  |                                    | आउटपुट टेम्पलेट (`@$HOME/.local/bin/trivy-bin/contrib/gitlab.tpl`, `@$HOME/.local/bin/trivy-bin/contrib/junit.tpl`)                                              |
| `tf-vars`                    | String  |                                    | Terraform वेरिएबल फ़ाइल का पथ                                                                                                                                 |
| `output`                     | String  |                                    | परिणामों को एक फ़ाइल में सहेजें                                                                                                                                           |
| `exit-code`                  | String  | `0`                                | जब निर्दिष्ट कमजोरियां पाई जाती हैं तो एग्ज़िट कोड                                                                                                               |
| `ignore-unfixed`             | Boolean | false                              | बिना पैच/बिना सुधारी गई कमजोरियों को अनदेखा करें                                                                                                                         |
| `vuln-type`                  | String  | `os,library`                       | कमजोरियों के प्रकार (os,library)                                                                                                                                 |
| `severity`                   | String  | `UNKNOWN,LOW,MEDIUM,HIGH,CRITICAL` | स्कैन और प्रदर्शन के लिए कमजोरियों की गंभीरताएँ                                                                                                       |
| `skip-dirs`                  | String  |                                    | कॉमा से अलग की गई निर्देशिकाओं की सूची जहाँ ट्रैवर्सल छोड़ दिया जाता है                                                                                                   |
| `skip-files`                 | String  |                                    | कॉमा से अलग की गई फ़ाइलों की सूची जहाँ ट्रैवर्सल छोड़ दिया जाता है                                                                                                         |
| `cache-dir`                  | String  | `$GITHUB_WORKSPACE/.cache/trivy`   | कैश निर्देशिका। नोट: यह मान `trivy.yaml` द्वारा कॉन्फ़िगर नहीं किया जा सकता।                                                                                          |
| `timeout`                    | String  | `5m0s`                             | स्कैन टाइमआउट अवधि                                                                                                                                            |
| `ignore-policy`              | String  |                                    | OPA rego भाषा के साथ कमजोरियों को फ़िल्टर करें                                                                                                                    |
| `hide-progress`              | String  | `false`                            | प्रगति बार और लॉग आउटपुट को छिपाएँ                                                                                                                             |
| `list-all-pkgs`              | String  |                                    | कमजोरी की परवाह किए बिना सभी पैकेज आउटपुट करें                                                                                                                  |
| `scanners`                   | String  | `vuln,secret`                      | कॉमा से अलग की गई सूची कि कौन-सी सुरक्षा समस्याओं का पता लगाना है (`vuln`,`secret`,`misconfig`,`license`)                                                                   |
| `trivyignores`               | String  |                                    | रिपॉजिटरी के भीतर एक या अधिक `.trivyignore` फ़ाइलों या एक एकल `.trivyignore.yaml` फ़ाइल के सापेक्ष पथों की कॉमा-से-अलग सूची।                          |
| `trivy-config`               | String  |                                    | trivy.yaml कॉन्फ़िग का पथ                                                                                                                                        |
| `github-pat`                 | String  |                                    | GitHub Dependency Graph को SBOM स्कैन परिणाम भेजने में सक्षम करने के लिए प्रमाणीकरण टोकन। यह GitHub Personal Access Token (PAT) या GITHUB_TOKEN हो सकता है।          |
| `limit-severities-for-sarif` | Boolean | false                              | डिफ़ॉल्ट रूप से *SARIF* प्रारूप कॉन्फ़िगर की गई गंभीरताओं की परवाह किए बिना सभी कमजोरियों का आउटपुट लागू करता है। इस व्यवहार को ओवरराइड करने के लिए इस पैरामीटर को **true** पर सेट करें।   |
| `docker-host`                | String  |                                    | डिफ़ॉल्ट रूप से यह `unix://var/run/docker.sock` पर सेट होता है, लेकिन कंटेनरीकृत इन्फ्रास्ट्रक्चर मानों में मदद के लिए इसे अपडेट किया जा सकता है (`unix:/` या अन्य उपसर्ग आवश्यक है)। |
| `version`                    | String  | `v0.72.0`                          | उपयोग करने के लिए Trivy संस्करण, जैसे `latest` या `v0.72.0`                                                                                                                 |
| `skip-setup-trivy`           | Boolean | false                              | `trivy` स्थापित करने के लिए `setup-trivy` एक्शन को कॉल करना छोड़ें                                                                                                         |
| `token-setup-trivy`          | Boolean |                                    | `trivy` रिपॉजिटरी को चेकआउट करने के लिए `setup-trivy` द्वारा उपयोग किए जाने वाले `github.token` को ओवरराइट करें।                                                                                |

### Environment variables
आप आवश्यक विकल्प सेट करने के लिए [Trivy पर्यावरण चर][trivy-env] का उपयोग कर सकते हैं (जिसमें वे फ़्लैग भी शामिल हैं जो [इनपुट्स](#inputs) द्वारा समर्थित नहीं हैं, जैसे `--secret-config`)।

**NB** एक्शन के कुछ पुराने संस्करणों में एक बग था जिसके कारण एक एक्शन कॉल के इनपुट 
एक्शन के बाद के कॉलों में लीक हो जाते थे।  इससे एक्शन को कई बार कॉल करने वाले वर्कफ़्लो, जैसे कि 
कई स्कैन चलाने, या विभिन्न आउटपुट प्रारूपों के साथ समान स्कैन, वांछित आउटपुट नहीं दे पाते थे।  आप देख सकते हैं कि
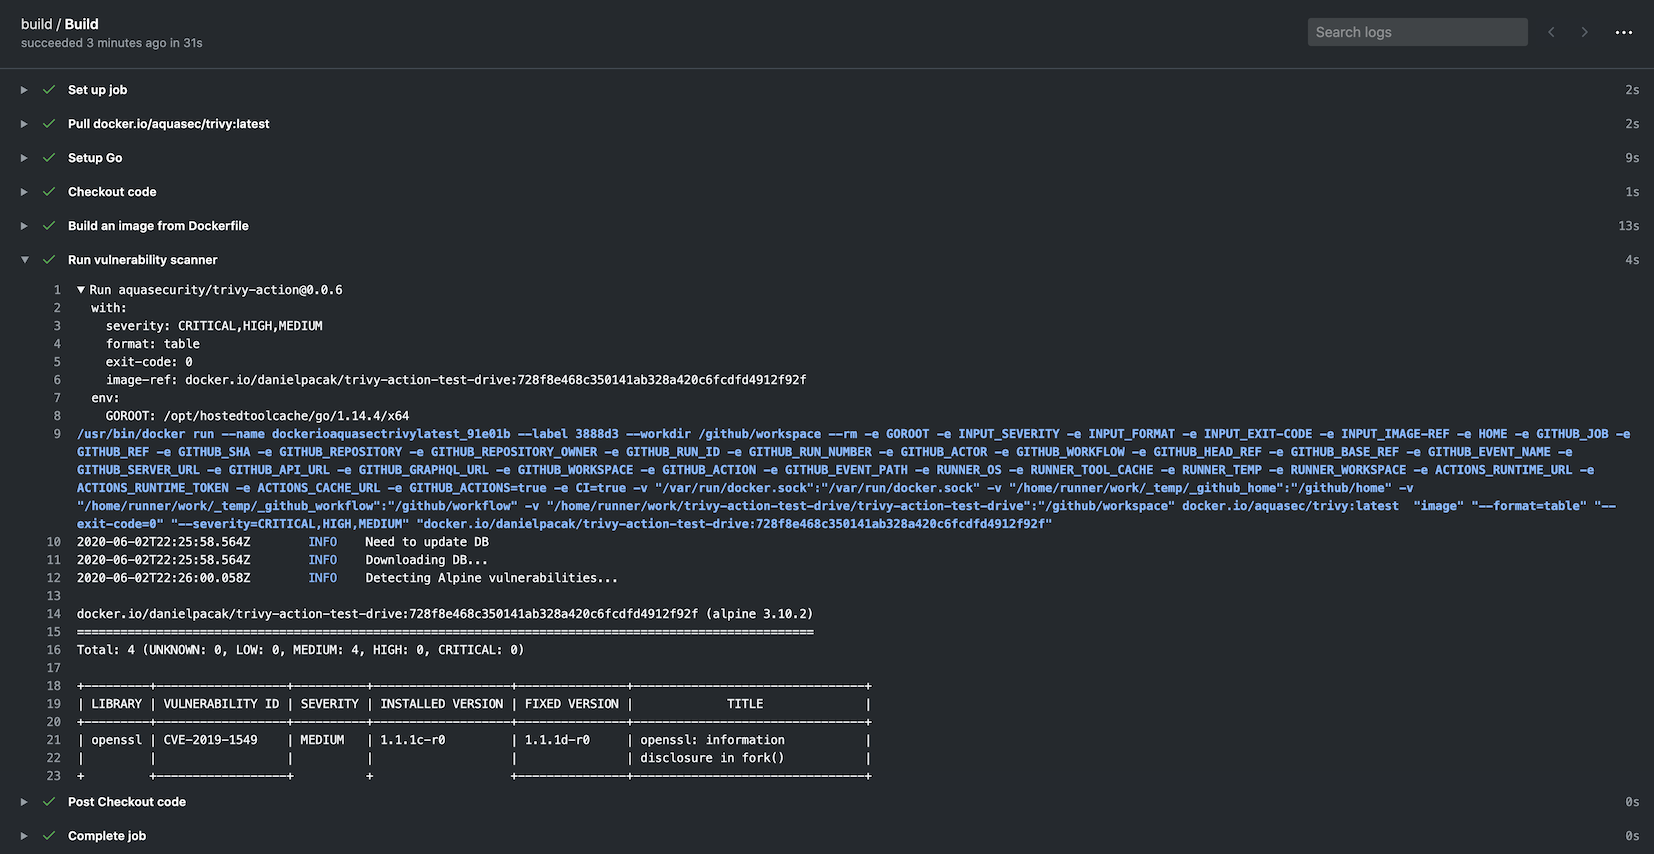
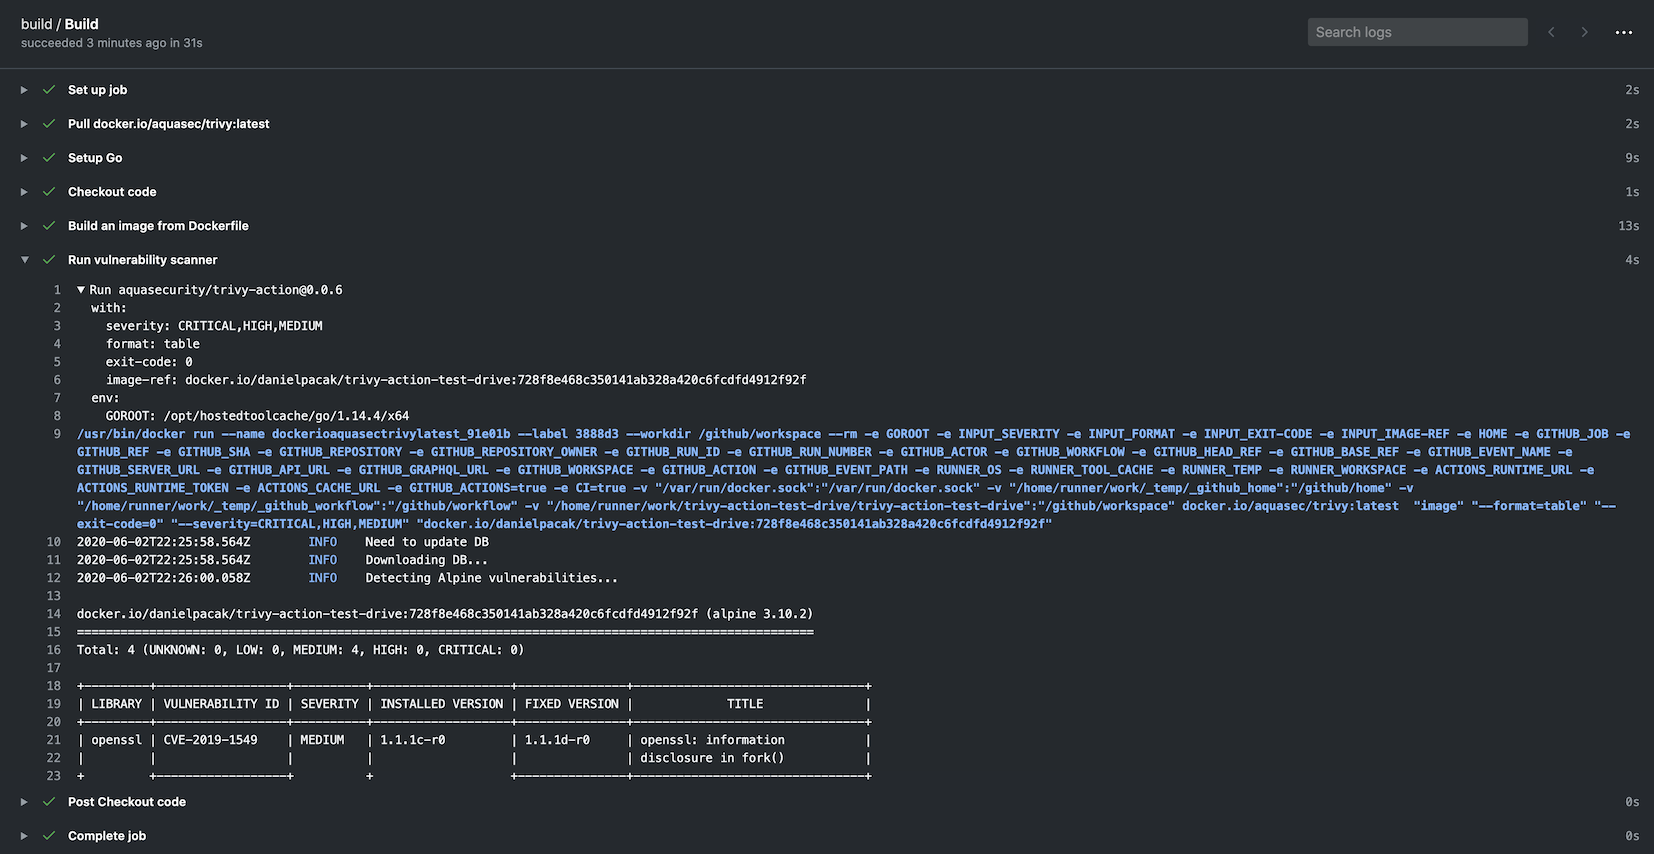
यह मामला है या नहीं, GitHub Actions चरण जानकारी देखकर; यदि आपके Actions आउटपुट में दिखाया गया `env` अनुभाग 
उन `TRIVY_*` पर्यावरण चरों को शामिल करता है जिन्हें आपने स्पष्ट रूप से सेट नहीं किया था, तो आप इस बग से प्रभावित हो सकते हैं और 
आपको नवीनतम एक्शन संस्करण में अपग्रेड करना चाहिए।

### Trivy config file
`trivy-config` [इनपुट](#inputs) का उपयोग करते समय, आप [Trivy कॉन्फ़िग फ़ाइल][trivy-config] का उपयोग करके विकल्प सेट कर सकते हैं (जिसमें वे फ़्लैग भी शामिल हैं जो [इनपुट्स](#inputs) द्वारा समर्थित नहीं हैं, जैसे `--secret-config`)।

[release]: https://github.com/aquasecurity/trivy-action/releases/latest
[release-img]: https://img.shields.io/github/release/aquasecurity/trivy-action.svg?logo=github
[marketplace]: https://github.com/marketplace/actions/aqua-security-trivy
[marketplace-img]: https://img.shields.io/badge/marketplace-trivy--action-blue?logo=github
[license]: https://raw.githubusercontent.com/aquasecurity/trivy-action/master/LICENSE
[license-img]: https://img.shields.io/github/license/aquasecurity/trivy-action
[trivy-env]: https://aquasecurity.github.io/trivy/latest/docs/configuration/#environment-variables
[trivy-config]: https://aquasecurity.github.io/trivy/latest/docs/references/configuration/config-file/
[trivy-templates]: https://aquasecurity.github.io/trivy/latest/docs/configuration/reporting/#template
[trivy-default-templates]: https://aquasecurity.github.io/trivy/latest/docs/configuration/reporting/#template
टूल डाउनलोड करें