
Skip to content
KitploitKITPLOIT
ToolsBlog
Submit
ToolsBlog
Submit

Hacking, PenTest, and Cybersecurity Tools for Your Security Arsenal!

Kitploit is a directory of hacking, cybersecurity, and pentesting tools. Discover the latest project updates to find vulnerabilities, analyze systems, automate testing, and strengthen your security.

··Feeds·Contact·Privacy·© 2026 Kitploit

Tool Directory

Categories

View all categories
Loading categories
So You Want To Build A Nethunter Kernel — Step-by-step guide to building custom Kali NetHunter kernels for Android: source retrieval, toolchain selection, cross-compilation, and flashing. | Kitploit
Tools/GitLabGitLab/akabulous/so_you_want_to_build_a_nethunter_kernel
Android SecurityEmbedded Systems SecurityPenetration TestingMobile SecurityLearning & EducationLearning Paths & Courses
GitLabakabulous/so_you_want_to_build_a_nethunter_kernel

So You Want To Build A Nethunter Kernel

Step-by-step guide to building custom Kali NetHunter kernels for Android: source retrieval, toolchain selection, cross-compilation, and flashing.

Most Popular

View all →

Discover the most used tools by our community.

Explore all tools

Browse our collection of tools

View all tools →
Share
View RepositoryWebsite
3182 months agoNot yet reviewed

So You Want To Build A Nethunter Kernel

Introduction

The biggest hurdle for most people who want to set up a Nethunter device is the kernel requirement. Unless your device already has a prebuilt (and maintained) kernel, then you will be told to build one yourself. There is a lot of documentation on this process already, but in my experience it can be difficult to know what applies in your case and what does not.

This problem is confounded by assholes people who write guides with clickbait-y titles like “Build a Nethunter kernel for ANY Android device!” or with false promises like “Learn how to compile a Nethunter kernel in ten minutes!” It is also an unfortunate reality of the internet in 2025 that many idiots people think that ChatGPT or other large language models have authoritative answers to their questions, when all that those models really have is information they scraped from the aforementioned assholes.

I am writing this guide as thoroughly and honestly as I possibly can. It is not intended to be the only document that you will need to read for this process, however – surely you will have questions that this document cannot answer. I would like to encourage you to search for answers to these questions in the relevant software documentation, and NOT on YouTube or from ChatGPT.

Requirements

Before you begin ANY of this process, you should have ALREADY:

  • Unlocked the bootloader on your device
  • Installed an AOSP (Android Open-Source Project) based ROM (LineageOS, crDroid, etc) (optional: installed a custom recovery)
  • Rooted your phone with Magisk 28.1 + enabled Zygisk (EDIT: with the newest versions of NHTerm, you can now safely update Magisk to the newest version , but if you encounter problems when opening NHTerm, revert to 28.1)
  • Flashed the kali-nethunter-2025.4-generic-arm64-minimal.zip in Magisk (newest at time of writing)
  • Check that the Nethunter app + Nethunter Terminal app work
  • Updated all installed packages apt update && apt upgrade -y (optional: added metapackages)
  • Flashed the wireless firmware for Nethunter Magisk module

In order to complete this process, you will need:

  • A desktop/laptop computer using x86_64 processor architecture (Intel/AMD) with GNU/Linux installed - (yes, you can use a virtual machine or a Docker instance if necessary, but I cannot orient you on the usage of such things, as I simply run GNU/Linux on “bare metal” and would recommend you do the same for performance reasons)
  • At least 8GB of RAM + 20GB of free disk space
  • A good internet connection - (semi-optional: an account on GitHub or GitLab. This will make it easier for you to track your changes, and also to distribute your kernel if you are successful in building it. If you do not make an account, then do not expect to share your kernel with anyone else – nobody is interested in a non-GPL compliant kernel image that does not come with source code!)
  • Basic knowledge of navigating the Linux command line (cd, rm, ls, mkdir, find, diff, grep, etc)
  • Basic knowledge of using a command-line based editor (vim for the cool kids, otherwise nano)
  • Basic knowledge of C programming language/Makefile syntax
  • Your distribution’s build-from-source metapackage installed (build-devel on Arch-based distros, build-essential on Debian based) – I would also recommend you install Perl + Python3 as some kernel makefiles require these

Is this going to be possible for my device?

The Linux kernel is licensed under the GNU General Public License 2.0, which is a copyleft license. This means that the source code for the Linux kernel is freely distributed and you may alter the source code as you wish (as each Android manufacturer has done), HOWEVER, your resulting source code must ALSO be distributed freely.

To the surprise of absolutely no one, many of the gigantic corporations who use GPL-licensed code flaunt the terms of this license. They either refuse to distribute their source code or only release part of it (usually broken, outdated, and with inline binary blobs). If there is no source code available for the kernel for your device, then there is no way to create a Nethunter kernel for it.

Your ability to unlock the bootloader and install a custom ROM also depends greatly on the whims of your device manufacturer. Even if they allow unlocking the bootloader and you have been able to root your phone with Magisk, if they do not publish device trees, there are likely no custom ROMs for your device. In this case, it is extremely doubtful that the kernel source code they published (if any) has received any maintenance since its release, or that it will build even without modifications. If you do not see anyone else maintaining anything (kernels, ROMs, recoveries) for your device, then it will be difficult, if not impossible for you to turn that device into a full Nethunter.

A Note On Kernel Versions

Let us imagine that there are regularly updated and maintained custom ROMs/kernels/recoveries for your device, but simply no Nethunter kernel. In this case, you should be able to complete this process, but the process will vary depending on which version of the Linux kernel your device uses.

The information in this guide is based on my experience modifying 4.14.x kernels. There are older guides written that talk about using GCC toolchains (instead of LLVM/clang, as we will be using) that apply to 3.x kernels. If your device uses a 5.x/6.x version of the Linux kernel, then the information in this guide will not be sufficient to complete this process. The Android build method changes all the time, and you should look for a guide that covers GKI kernels and the use of Bazel/Kleaf.

First Steps: Source, Toolchain, and Configuration

A good way to find repos containing the kernel source for your device is to use its codename. Every Android has one, although some manufacturers (i.e. OnePlus) have a bit more fun with this than others (i.e. Samsung). The codename for my Xiaomi Poco X3 NFC is "surya", whereas the codename for my Samsung A51 is "SM-A515F". Typically, kernel source repos follow the naming convention android_kernel_MANUFACTURER_CODENAME where the manufacturer is the parent company, i.e. android_kernel_xiaomi_surya, not android_kernel_poco_surya. However, there may also be repos based around the SoC (system-on-a-chip) for your device, sometimes “unified” to include source files for other devices with the same SoC. This is the case for the Samsung I mentioned, whose source repo is called android_kernel_samsung_exynos9611. Have a look through github/gitlab and see what you can find.

For the purposes of this guide, I will be using the latest LineageOS 22.2 (built 2025-08-04) on surya, therefore, I will want to clone the kernel source from the LineageOS repo. But before I do that, I want to copy two files from my device to the computer I will be using to build the kernel: /proc/config.gz and /proc/version. I could copy the first file, /proc/config.gz, to /sdcard, pull it from the device with ADB, gunzip it, and rename it. But that seems like a lot of steps, so what I did instead was this:

01

Then, on the device itself, I ran (as root)

02

What’s happening here?

On my laptop: nc (netcat) -l (listen for incoming connections) -p (port) 4545 (really this could be any number between 1024-65535, but I usually use 4545) > (write to file) surya-defconfig-lineageos22.2-20250804 (descriptive filename) < (input from file) /dev/null (null device – this ensures if I touch the keyboard it won’t send the keystroke into the file I’m receiving, potentially messing it up).

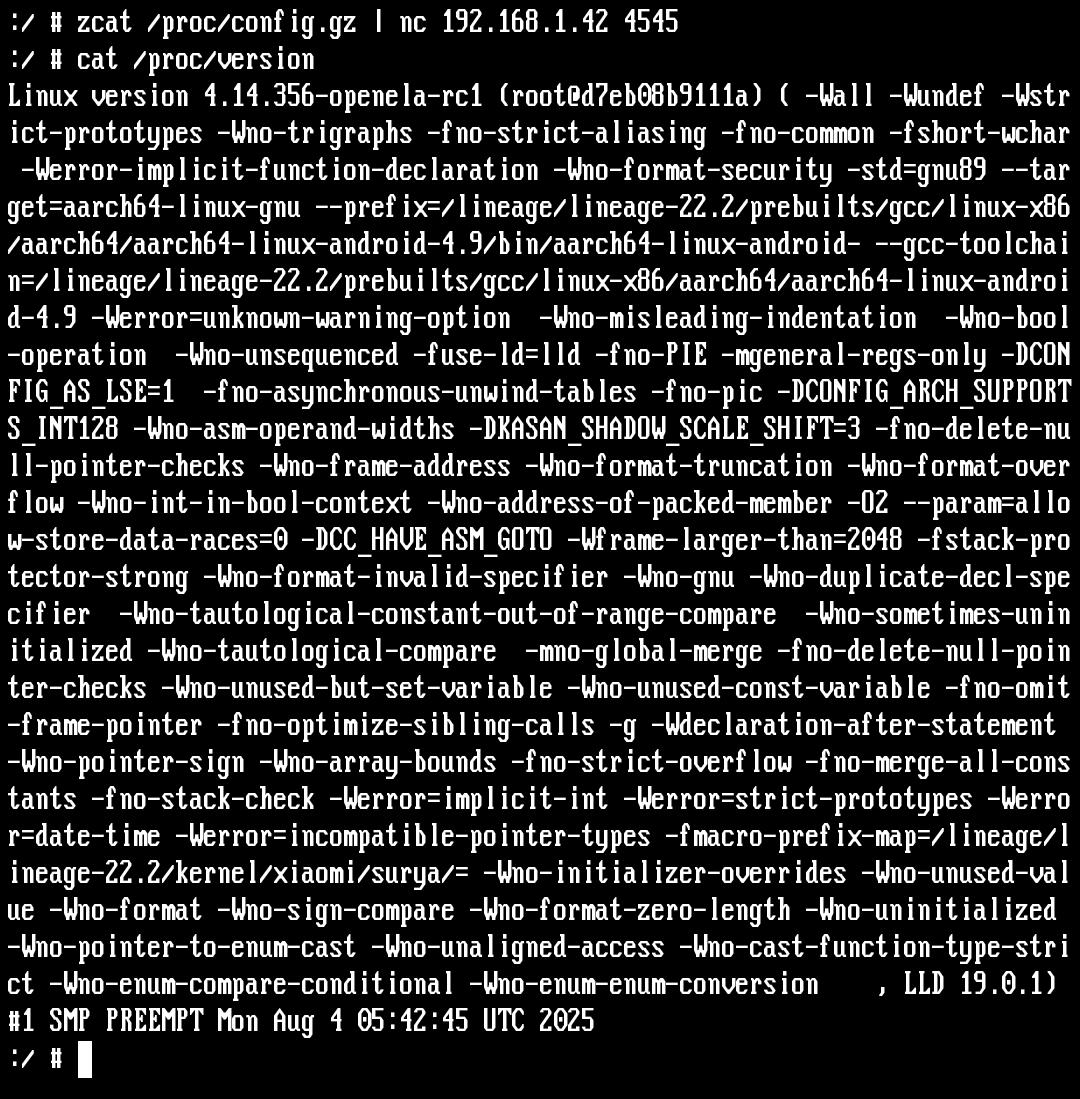
On the phone: zcat (like the command cat for concatenate but for gzipped files) /proc/config.gz (the kernel configuration that the currently running kernel was built with) | (send output from that process as input to next process) nc (netcat again) 192.168.1.42 (my laptop’s local IP address) 4545 (port I set before)

While this ought to give you the .config file that was used to build your currently-running kernel, this isn't always the case. Some more modern devices/newer ROM builds will refuse to boot if the config saved in /proc/config.gz does not match the .config that was used to build the stock kernel. Luckily, that's the only check that takes place (not something much harder to defeat like a SHA256 checksum of the entire kernel itself), so some clever folks have come up with a way of spoofing the file in /proc/config.gz to match the stock kernel, in spite of their modifications. If you're unsure of whether the file in your device is real or spoofed, you can execute zcat /proc/config.gz | head and then uname -r. If the release numbers don't match, then the file in /proc was spoofed. In that case, while you can still proceed with this guide, you may want to run diff to compare the extracted config with some of the files you find in your kernel source's arch/arm64/configs directory.

As for /proc/version, it might not be so necessary to send that file, as all that we really need is the information on which version of clang/ld.lld was used to compile it. So we can simply run cat /proc/version, and have a look:

03

Uh oh! Looks like whoever built this kernel did a bit of an “oopsie” and their Makefile recorded all of the -CFLAGS they ran with clang, but not the version of Clang. However, we can see that they used a prebuilt Android toolchain, and that they used ld.lld version 19.0.1.

Here’s a slightly more helpful image. The first output is from /proc/version before modifying, building and installing a new kernel on Samsung A51. The second output is from /proc/version currently.

04

Notice anything? (No, not my bizarre username and hostname).

The best trick to picking a toolchain to use is to use the EXACT toolchain that compiled the currently running kernel.

In this case, that was Neutron clang 18.0.0git, which was quite easy to find:

05

And would you look at that, the md5sums match and everything.

Just for fun, let’s have a quick look at the /proc/version string from a considerably older device, Samsung J7 (2016), codename j7xelte:

06

This is an old enough device that it still used GCC toolchains to compile the kernel.

But when I search for “gcc version 4.9.x 20150123 prerelease,” I find two repositories:

07

So which one should I download?

The answer: both. GCC is different to Clang in that when building compilers/binutils/linkers/etc for cross compiling, it requires a separate toolchain to be built for each “target triple.” Target triple (supposedly) takes the format

machine-vendor-operating_system

But as we’ll see, this “rule” has a million exceptions. But let’s start with “machine.”

In the “you will need” section of this document, I said that you needed a 64-bit computer using an Intel or AMD processor running GNU/Linux. That’s because the toolchains we will be using are compiled to be executed on x86_64-linux-gnu.

However, these toolchains are cross-compilers, meaning the machine code that they generate from the C source code files won’t run on that computer, but a different one with its own target triple.

Aarch64, also known as arm64, is the architecture nearly every Android device uses. Arm, without the “64,” refers to the 32-bit implementations of ARM chips. Most Android kernels are compiled using both an aarch64 and arm triple, to provide backward-compatibility with 32 bit software.

Moving on to the next part: “Linux.” Self-explanatory. It’s a Linux kernel.

But the last part of these “triples” is worth explaining, at least briefly, because it’s such a convoluted mess and each compiler that uses “triples” (GCC, Rust, Go, LLVM) does so slightly differently. “Android,” the first example, makes sense, but what is “androideabi?” EABI stands for “embedded application binary interface”, but you really don’t have to worry too much about that – let’s just consider EABI to be the “base” third value. You’ll also see “gnueabi”, which makes a bit more sense now – the GNU implementation of the EABI, right? (What this really refers to is GNU's C library, glibc, which is why you will also see triples like arm-linux-musleabi when building against an alternative C library like musl). You might also see “gnueabihf.” HF stands for “hard float,” and if you want to know about how ARM implemented an on-chip solution for floating point integer operations, go read a Wikipedia article.

Here’s what we need to know:

If using an LLVM toolchain, we will declare our intention to cross-compile by setting CROSS_COMPILE=aarch64-linux-gnu- CROSS_COMPILE_32=arm-linux-gnueabi- (like that, with the trailing - at the end) on the command line.

If compiling for a very old device and therefore using a GCC toolchain, we will need two sets of files, prefixed with different triples. These might be the same as the values in the LLVM example, or they might be different, like in the toolchains for j7xelte.

But WHY are there so many ways to write the same thing? i386, i686, 386, i32, i64, x86, x64, x86_64, amd64 -- what possible reason could there be for such variation?!

Relevant comic from xkcd:

08

Back to the example I’ll be compiling today (surya), I happened to save the /proc/version information from another kernel, which read:

09

This is more or less how it should look, with the link, checksums, versions of compiler/linker, etc. And since the clang and LLD versions here were both 17.0.3 and the mangled /proc/version we have from current LineageOS shows LLD 19.0.3, I think it stands to reason that we should look for a toolchain that has 19.0.3 for both. After about three minutes of searching, I found a repo we can clone as a submodule (to make it easier to have a reproducible build) here: https://gitlab.com/kei-space/clang/r536225/ That toolchain turned out to have serious problems, so I went with Neutron Clang 19. (We will come back to this).

So we have our source and our toolchain ready to clone, bringing us to:

Setting Up Environment

I decided to make a new user for this tutorial, mostly so I could use gh auth login and run commits without accidentally making them to my main github account. But to do that, I had to make an account (in a browser), set up a new user, generate SSH keys for them…

10

Copy .ssh/id_ed25519.pub into GitHub, then run gh back in the terminal

11

And then I am set

12

…almost. I still have to fork the repo in my browser,

13

then init/clone it in the terminal.

14

So once everything is ready (sources up to date, origin set, etc) we can begin cloning submodules.

15

The syntax is git submodule add URL directory/

16

Remember, for a very clean commit history we want to run git add . and git commit -a after each change. 17

I’m not going to run git push just yet, but when I eventually do, it will update all of the commits.

Test Kernel

Here is where you’re probably expecting the guide to talk about making modifications to the kernel source to add Nethunter support. That’s coming – soon. FIRST, however, let’s see how the unmodified source compiles with our toolchain and configuration.

18

That config from the currently running kernel needs to be copied into the kernel source directory, but since we’re going to use out/ for our compiled binaries I need to copy it there, too. I also need to append my PATH variable with the toolchain’s bin/ directory. I could write export PATH=/home/build_user/android_kernel_xiaomi_surya/toolchain/bin:$PATH but an easier way is to simply cd to that directory and then run export PATH=$(pwd):$PATH. $() expands to the result of a command it contains, and pwd will list the entire path to the current working directory.

I’ve also listed the contents of the toolchain’s bin/ directory so you can see how LLVM binutils have their own prefix. Ideally, the Makefile contains an instruction where if I declare LLVM=1, then it automatically sets that AR=llvm-ar, AS=llvm-as, etc. So let’s see what’s in the Makefile.

19

Excellent! I can simply declare LLVM=1 and not have to individually declare the rest… mostly. I also need to use the LLVM assembler, but that has its own declaration, LLVM_IAS:

20

So now all I will need to declare is ARCH=arm64 LLVM=1 LLVM_IAS=1 AS=llvm-as O=out CROSS_COMPILE=aarch64-linux-gnu- CROSS_COMPILE_32=arm-linux-gnueabi-. That might seem like a lot, but it’s far less than declaring each individual binutil.

So let’s run our command to open the configuration….

Wait. Looks like this toolchain has some problems. So I have decided to deinit the submodule and instead get Neutron Clang 19.0.0 from here, and I will download that with wget 21

Then extract into a newly created toolchain/ directory (forgetting the syntax for extracting .tar.zst files at first) 22

And then I add this directory to the .gitignore file.

Now when I run this:

23

It works, opening up the nconfig menu:

24

Many tutorials will tell you to use menuconfig, but I prefer nconfig because 1) it looks nicer 2) it doesn’t have the same tendency menuconfig does to not load because it can’t find the ncurses libraries you already installed. In any event, this is just a test kernel, so we can load .config and save it (again as .config) and we’re done for now. And now we try to build Image.gz, and…

25

Our first error! Hooray!

According to this, this is because an Arch update broke something.

Although Arch taketh away, Arch also giveth, in this case in the form of the AUR package libxml-legacy. So I installed that, ran make again, and this time:

26

Kudos to the LineageOS maintainers, because the entire kernel built with only one warning:

27

So now in out/arch/arm64/boot/ we can find Image.gz. But how would we flash this to our device?

We need to make an AnyKernel3 zip.

There’s two ways you can do this:

  1. Make it from scratch
  2. Take an already-existing kernel zip for your device and simply update the kernel image inside with your newly compiled file

I prefer number 2 as it’s far less effort. It also has the benefit of allowing us to see what our device needs to have in a kernel zip. This might be an uncompressed image called Image, it might be the Image.gz we created and nothing more, it might be Image.gz-dtb (a combined device tree/kernel image – these are less common nowadays, but if your device is expecting one, then you'll have to enable "Build a concatenated Image.gz-dtb" in your kernel configuration), or it might be Image.gz, dtbo.img, and/or dtb.img.

28

For the purposes of this guide, I downloaded one of the many kernels that is distributed on telegram with a stupid anime name and no source linked. Never install one of these kernels.

But we won’t be doing that, don’t worry, we’re just borrowing their AnyKernel zip configuration. So I rename and unzip the file

29

And I edited the anykernel.sh script to change the kernel name string as well. Now let’s overwrite the Image.gz from that zip with our new one

30

Using zip -f (for “freshen”) will simply replace the file inside with the new version. 0 is for zero compression.

Let’s see if I can flash this kernel and if it will boot, but first:

31

It’s much easier to keep track of kernel zips when you include time and date strings.

32

However, in the interest of being thorough (and of depending on Telegram kernels as little as possible), I'll tell you how to make your own dtb.img and/or dtbo.img files, as the documentation regarding this is painfully inadequate.

There are two AOSP programs that exist for this purpose. One of them, mkdtboimg, is written in Python, making it easy to simply download and run mkdtboimg.py from the official AOSP website. However, you may also need the other one, mkdtimg, which is written in C and shipped without a Makefile. According to the documentation, the Android.bp files are sufficient -- you just have to checkout the entire AOSP code so you can run the commands they list there. I find this to be completely insane, so I took the Makefile someone else had made long ago to build this tool on its own, updated the source files with the latest version, and then static-PIE built it against Musl. You can download this binary (which will run on any x86_64 Linux computer, like the one you're using to build the kernel) from here, or build it yourself from the source code.

Now here's the tricky part: the .dtbo files that are produced during a kernel build are not going to be convertible to dtb.img/dtbo.img files without a little extra effort. Android needs the call to dtc to include the flag -a 64. Since we're already calling DTC_EXT=/usr/bin/dtc to force the Makefile to use our nice updated DTC from our package manager and not the broken one found in many kernels, it isn't that difficult to simply stick that command inside single quotes and add the flag. You can simply pass DTC_EXT='/usr/bin/dtc -a 64'. In my case, however, I like to make (and test) build.sh scripts for all of the kernels I maintain, so that even without reading this guide, anyone, no matter how n00b, can build their own from source. As I was struggling with layers upon layers of single-quote and double-quote bash logic, I found a simple, if inelegant, solution, which ensures DTC is called with the correct flag: a wrapper script.

I simply made an executable file called dtc in my kernel's top-level directory, which contained the following lines:

#!/bin/sh

exec /usr/bin/dtc -a 64 $@

Then I pointed DTC_EXT= to that file, and that took care of it.

You might be wondering, "What .dtbo files? My kernel builds never generate those!" in which case you should check that this kernel symbol is enabled:

61

So, how do we use these tools? The first thing I did was to analyze the dtb.img and dtbo.img files I found in other kernel zips to see what kind of files they were. (I know, I know, we don't want to depend on the weird custom ROM scene kernels for our own, but this is worth checking). The command file dtb.img returned:

dtb.img: Device Tree Blob version 17, size=345849, boot CPU=0, string block size=31481, DT structure block size=314312

which is (almost) exactly the same result I get when I run file ../arch/arm64/boot/dts/qcom/sdmmagpie.dtb:

../arch/arm64/boot/dts/qcom/sdmmagpie.dtb: Device Tree Blob version 17, size=345856, boot CPU=0, string block size=31481, DT structure block size=314312

That slight difference was worrying to me, until I ran diff <(strings dtb.img) <(strings ../arch/arm64/boot/dts/qcom/sdmmagpie.dtb) and found they contained the exact same things. So I could now safely assume that creating my own dtb.img was just a matter of copying sdmmagpie.dtb and changing the name.

As for dtbo.img, we don't get much help from file:

dtbo.img: data

But here's where we can use either mkdtimg or mkdtboimg.py to analyze it. When I run mkdtimg dump dtbo.img, I get:

61

So I know when creating my own, I should pass either

mkdtimg create dtbo.img --page_size=4096 ../arch/arm64/boot/dts/qcom/sdmmagpie-idp-overlay.dtbo

or

mkdtboimg create --page_size=4096 dtbo.img ../arch/arm64/boot/dts/qcom/sdmmagpie-idp-overlay.dtbo

Both commands produce identical files. You can also run mkdtimg dump dtbo.img afterwards and compare the values to the other file. If you need to include more than one .dtbo file in your image, simply append its path at the end of either command.

Now back to the test kernel we created. The good news is that it flashed without any trouble, the bad news is I’m going to have to fix that Makefile that creates such an ugly /proc/version. But that can wait. Now, finally, we have come to:

Turning the Kernel into a Nethunter Kernel

Time to add some submodules. First, this one which comes with very easy to follow instructions. (Edit: It also now contains the CAN subsystem kernel symbols, as my pull request adding them was merged, though you won't see that in the screenshots below).

33

And now when I make nconfig again (same command as before)

34

We have this lovely new option

35

That will enable all of these things. Select that, save as .config – but be careful, that will save it in out/.config and we’ll be deleting that entire directory before we build again. So once you exit nconfig, copy that file to the kernel source directory.

Now it’s time to patch some source files, so let’s add the nethunter build scripts repo as a submodule:

36

We cd to the new directory and run ./build.sh, and choose option 4: Apply Nethunter kernel patches.

37

If you get any messages that say “the test run was completed with errors,” DO NOT apply the patch. Otherwise, go for it. In my case I applied patches 4, 5, and 8.

Now that we’ve made changes, let’s go back to the top kernel source directory and commit them.

38

At this point you could simply build the kernel again and you’d be done. But I’m extra, and I want to include support for a bunch of extra stuff, namely:

  • Aircrack-ng drivers for rtl88xxau/rtl8188eus – this shouldn’t be too difficult
  • Realtek drivers for rtl88x2bu and rtl8188fu – as long as we build these as modules, they should be fine
  • Mediatek drivers mt76 (mt76x0u and mt76x2u) – these are a bit trickier as they were introduced upstream in 4.19, and this is a 4.14 kernel. However, it’s not as tricky as you might think
  • WireGuard kernel level support – this one is quite easy, it’s just enabling it in the kernel configuration
  • Docker support – should be easy, as it has a similar Kconfig as we just used for the Nethunter changes

Being Extra

39

We’ll need to modify the Kconfig and Makefile in drivers/net/wireless/realtek in order to pick up these newly added drivers in the configuration, but also:

40

Make sure you switch the platform in the rtl8812au/Makefile to ANDROID_ARM64 (as well as for rtl8188eus).

It’s also worth double-checking the Kconfig in newly added drivers to see what the config option is called:

41

Now I know I need to refer to it as 88XXAU in the Makefile one level above it.

42

Luckily, the Kconfig just gets sourced like this:

43

I’m going to have to edit these files again after adding rtl88x2bu and the ARM branch of rtl8188fu as well. (And as it turns out, rtl88x2bu’s config option is called RTL8822BU, which is why it’s always worth checking).

Now for the MediaTek backported drivers. Using this commit as a guide, I have successfully ported these drivers to two different devices using 4.14.x kernels. (See why commit history is important?) But first we need the mt76 directory with all of its files.

Akabulous Hooks You Up

Rather than having to git clone some 4.19 kernel and copy the files out of there, then make the necessary patches to those files in your new copy, you can simply add https://github.com/akabul0us/mt76.git as a submodule. Then edit the Makefile and Kconfig in the drivers/net/wireless/mediatek directory:

44

By adding this repo with the patches from the previously mentioned commit already applied to their source, we can skip to the modifications we need to make to other kernel files. The first one is this:

45

But it turns out our kernel source already has this struct:

46

So we move onto the next file to modify, include/linux/overflow.h. This one does have some modifications, but since they’re quite clear to read in the original commit I’ll spare you more screenshots. include/linux/skbuff.h and include/linux/scatterplot.h also have changes, but none are necessary for include/net/cfg80211.h. The necessary changes to include/net/mac80211.h are minor – just inserting RX_ENC_HE, as a final line within enum mac80211_rx_encoding { } and adding u8 vht_flag; into struct ieee80211_rx_status { }. The file net/wireless/of.c already exists and is the same as the one in the commit that we’re cherry picking, so we’re done with that. (Phew!)

As for Docker support, well, thanks (once more) to cyberknight777 for this, we can just copy and paste

47

And now we’re ready to make nconfig again! …almost. First, commit and push changes, then rm -rf out/ (making sure you saved your .config outside of there), mkdir -p out, and THEN we can get back into the configuration.

48

A note about the out-of-tree Realtek USB drivers we’ve added into the kernel: They kind of suck. If you try to build more than one of them inline, you’ll get errors at linking time. A long-standing solution is to build just one (1) inline and the rest as modules. The Mediatek drivers, however, can be built inline with no trouble.

I wound up enabling a whole bunch of other things, if you’d like to see the full diff I put it here: here but anyway, let’s build!

49

Off to a good start - it’s always nice when you catch a glimpse of new object files you’ve just added being compiled without errors or warnings.

50

This? Less nice, but easy to fix. We just have to remove -Wno-stringop-overread from whichever Makefile has that as a warning flag. And while we’re at it, -Werror is a bit hardcore, wouldn’t you say? (This flag means ‘treat all warnings as errors,’ stopping compilation on ANY hiccup, including an unknown -W flag).

51

At least this one is easy to fix.

52

A quick # in front of that line and we’re ready to run make again – and this time, it made it all the way through!

But since I’ve configured some drivers as modules, we’re not quite done. We need to run make modules, or more specifically, make -j $(nproc --all) ARCH=arm64 O=out CROSS_COMPILE=aarch64-linux-gnu- CROSS_COMPILE_32=arm-linux-gnueabi- LLVM=1 LLVM_IAS=1 AS=llvm-as modules. And oh boy, is the Realtek driver code for rtl8188fu a shitshow:

53

Could I manually fix each one of the lines causing these warnings? Sure. Will I? No. There’s a reason I compile these drivers as modules and not in-line, and actively encourage everyone to avoid Realtek based adapters. However:

54

They compiled successfully, at least. Back to those in a moment. First let’s freshen our kernel zip:

55

(Almost forgot - this isn’t a “test” kernel anymore, it’s a proper Nethunter one).

As for the modules, .tar files are really the way to go because they preserve everything about the files they contain – however, they will also preserve paths. Unless we do something about that, when we extract our modules tarball we’ll create a bunch of directories, like drivers/net/wireless/realtek/rtl8188fu/rtl8188fu.ko for example, so let’s make a directory (and add it to .gitignore), copy them into there, and then make the archive.

56

Can you flash these like you would a kernel?

57

These need to be extracted somewhere on your device. I say “somewhere” because it doesn’t really matter where, as long as when you run insmod /whatever/path/to/whatever.ko the module loads. You could do it in /sdcard, that would be fine, but remember, I’m extra, so I’ll be extracting them in the “proper” place for this device, /vendor/lib/modules. Of course, /vendor is mounted read-only, so first I’ll need to fire up a root shell (NOT in the Nethunter terminal – that’s a chroot – although you can use the Nethunter terminal app if you select “New Session → Root Shell”) and run mount -o rw,remount /vendor before I can do anything to that partition. Then cd /vendor/lib/modules; tar xzvf /sdcard/or/wherever/you/saved/the/tarball.tgz; mount -o ro,remount /vendor and you’re done with modules.

If you get an error about no space available at that partition, you can also just use a symbolic link – stash the file in, for example, /sdcard/modules, and then make a link using the absolute path. So if we did this with 88x2bu.ko, we would run ln -s /storage/emulated/0/modules/88x2bu.ko /vendor/lib/modules/88x2bu.ko.

58

Give your repo one last push, and if you like, save the .config you used as a new defconfig for nethunter. (This really lends a hand to people building from source).

And Now - The Money Shot

Does it work? It flashes okay, sure, but does it work?

Well, it’s pretty late here so I’m not going to test absolutely every single feature right now, but let’s go with the crucial one: monitor mode/packet injection on the drivers that I added into the kernel. Let’s start with rtl88x2bu:

59

Not too shabby, for a Realtek driver.

And now for the main event: mt76x2u:

60

Now that’s a pentesting device!

The final step is to upload your .zip and .tar.gz to github as a release. Then go post about it on xdaforums, Telegram, Twitter, wherever you think other users of the same device/ROM will find it and benefit from it.

And when some ungrateful jabroni with an unwashed asshole responds to your post with “NOW U MAKE KARNEL FOR DEVICE BUTTPHONE 34AC PRO EDITION?!!?”, give them the link to this guide and tell them to git gud.

Good night, y’all.

--Akabul0us

Download Tool