 treehacks/botnet-hackpack
Build a basic Command & Control botnet in C

This hackpack will walk you through implementing a basic framework that fundamentally characterizes a botnet. It might help if you've worked with C before. If you liked this tutorial, be sure to star this repo!
Note: Don't use anything you learn here for malevolent purposes. This hackpack is solely a case study of botnets for educational purposes. The concepts learned in this hackpack have far reaching use cases (basically anything having to do with networking). Most importantly, this hackpack is meant to be tested and deployed locally (so please don't share anything you build related to this hackpack with other hackers). Privacy is important so please respect it.
Before you build a botnet, its important to understand what a botnet is. A botnet is a network of computers that are capable of recieving commands remotely and deploying them locally. Optionally, they can choose to relay information back to other nodes in the network. They've been used for everything from Distributed Denial of Service attacks to widely deploying spyware. You may have heard of many botnets in the past. Most prominent are perhaps the Mirai and Gameover Zeus which controlled 3.8 thousand and 3.6 million IoT devices respectively. There is a lot of variance between how botnets implement certain tasks. But in order to build our botnet successfully, we need to ensure the following features in our working network.
Our botnet should:
This structure is characteristic of what's known as Command & Control botnets. These botnets have one master server and many slave servers. However, this style of botnets is anitquated and can easily be taken down by cutting access to the master domain. More recent and sophisticated botnets follow peer-to-peer architecture, where admin rights are distributed across either all nodes or a subset of nodes in the network. These botnets pose a large headache to security experts because there's no central point of control and can grow to millions of nodes. Taking down such botnets is an interesting read by itself. However, for the purposes of this hackpack, let's keep things simple. We'll implement a simple slave node for a C&C botnet.
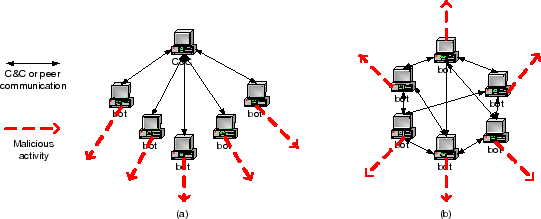
This hackpack will primarily deal with implementing the client malware. For the master server, we can use an open-source TCP server callet Netcat. Netcat has nothing to do with botnets. It's just a convienient, established tool that we can re-purpose to send text packets to an from clients (which is all a master really is). I've slightly adjusted the netcat server and compiled it to a binary called "master". No more work needed here! Our master is ready for use.
Let's move on to the more interesting bit: recieving and executing remote commands (We'll worry about disguising our malware later). The goal here is to make our slave node as simple as possible and adhere to the requirements detailed above. Note that many constants have been defined in lib/macros.h so feel free to use those. All implemented function signatures can be found in either lib/connect.h or lib/utils.h.
Open the bot.c file. When starting a new node in our server, we should probably name it so master knows which clients to deploy commands to. There are many naming conventions that can be used. Using an IP address is probably the best because it's a unique identifier for each client. However, to make things more readable for regular humans, let's use the computer's username. Using the C function getenv() with argument "USER" returns whatever the computer has stored in the USER environment variable. This is one place the user's username is stored so let's use that. Also, now that your slave is running, let's find master. To do this, we must know our master's IP address. Every network device has an IP address. It's responsible for identifying other nodes and location addressing. Further, master can have many servers running at different ports. So, not only do we have to connect to master, but we should also specify the correct port. This port is chosen by master but can be changed. In this hackpack, we want to test locally. So, we'll use your computer as our network. Every computer's local IP address (which "localhost" also resolves to) is "127.0.0.1". In master, I specified it to run on port 9999. With these three things (master ip address, master port, and slave name), we can start a communications pipeline between the server and client called a socket. Pass these three arguments into the function init_socket() to create a socket. init_function() is not a builtin C command. Rather, we need to implement it. Then, we need to allocate some space on the stack to hold incoming messages. Let's be quite generous here and use around 10KB of stack space. Call this stack pointer msg. Lastly, there's a printf statement to indicate that all is going well.
char* name = //Get the client's username and store it in name
int channel = //initiate a channel given SERVER, PORT, and name;
//Allocate stack space of size CMD_LENGTH to hold data of type char. Call the stack pointer msg
printf("%s joining the botnet\n", name);
Now switch over to lib/connect.c. Let's implement init_channel(). First I have defined a stack char buffer called msg of length CMD_LENGTH and a special C networking construct called server that holds information about our connection to master. First convert your passed in ip address from a human readable format (with numbers and dots) to a binary format in network byte order. This is done using a special C function called inet_addr() from the socket library. It simply takes in an ip address and spits it out in network usable binary. In C, we can easily specify a network by filling in the fields of a struct called sockaddr_in. Our instance of that struct is called server. We need to fill in 3 fields of this struct: server.sin_addr.s_addr (the master IP address), server.sin_family (a 1 byte value specifying the communications domain), and server.sin_port (the port we will connect to on master). The sin_family can given C macros that are provided by the socket library. Usually, as in this case, we set this field to AF_INET. This means that our connection identifies network nodes through their IP addresses which is what we want. However, it is also possible to use PF_INET which is similar to AF_INET but specifies that the network can use anything within the protocol to identify specific nodes. There are also many supposed historical reasons why both exist but that's something that I don't really know about or really care about. Just use AF_INET. Lastly, when setting the server port, we must pass port through a special function called htons() (host to network short). This converts the data from host byte order to network byte order. This byte order mess has to do with something called Endianness. You can read more about it here.
