
Finding vulnerabilities through dumb brute force

Inspired by a talk by Nicholas Carlini and the Ralph loop, Nelson is a tool to loop on every file in a project, prompting an agent to look for vulnerabilities. It has a scan mode, similar to Carlini's bash loop, where it asks the model to find any vulnerability in a file or directory of files; a review mode, where a (usually smarter) model re-examines each reported vulnerability and decides whether it's worth escalating to a human reviewer; and a de-duplication step in between, so the same bug found many times is only judged once.
The big lesson from extensive benchmarking is that repetition is what surfaces bugs. Earlier versions had a "focused mode" that asked the model to hunt one specific CWE class at a time, and it looked like it helped — but that was an illusion: the per-CWE expansion just made the model look at each file many times, and it was the repetition, not the CWE targeting, doing the work. Naming the bug class, checklists, and other prompt-shaping gave no real lift in controlled A/Bs. So focused mode is gone. Instead, --repeat N runs the whole file × model matrix N times (default 3), which is a far better use of the same tokens. Detection is genuinely flaky — a findable bug often shows up in only one of three passes — so repeating, even with the same model, is now standard practice.
More reported problems isn't necessarily a good thing if there are more false positives (and there are, with smaller models). Repetition makes this worse on its own — the same bug reappears every pass — so Nelson de-duplicates findings into clusters (same file/CWE within a few lines) before review: each unique bug is judged once and the verdict is applied to every copy. That keeps the (often expensive) review model from paying to re-confirm the same finding over and over. If it's a real bug once, it's a real bug the second time. Using a smarter model to review is a good idea, but even a dumb model may catch its own mistakes in review.
Nelson works with a variety of models via Claude Code, Gemini CLI, and OpenAI compatible APIs. Within a single model, jobs run one at a time — subscription plans have rolling token limits and local models run on relatively modest hardware, so there's no win from extra concurrency on one provider. Across different models, though, the rate limits are independent, so when you pass multiple -m specs Nelson runs one worker per model in parallel by default (e.g. Claude, Gemini, and a local Qwen via LM Studio all chewing through the queue at the same time). Pass --no-parallel to fall back to one-model-at-a-time.
Unless you're in a hurry to get the best results and have an unlimited token budget, I believe a smart use of your tokens is to run a report with a cheap but proven effective model, like Gemma 4 31B or DeepSeek V4 Pro, repeated a few times, then review the report with a more expensive model, and finally have a more careful interactive session with your favorite frontier model to correct the issue or just open your editor and fix the bug yourself. Anything simple enough to be fixed automatically by a model without some hand-holding is probably discoverable via static analysis tools (e.g. ruff for Python with the S rules enabled or semgrep, etc.), and you should be running those kinds of tools and fixing all the discovered issues before handing the codebase over to nelson.
Nelson doesn't try to fix security bugs, currently. It is exclusively a reporting tool, though models will often offer advice on fixing it unprompted.
I've done a lot of testing and benchmarking of various models to figure out the most efficient use of time and tokens, as I have hundreds of thousands of lines of code to review across dozens of repos. The headline findings: repetition beats prompt-shaping, cheap models repeated several times are often the best value, and a single strong model used as the reviewer is worth more than fancy scanning tricks. It may still turn out that, as with coding, it's best to just use the smartest model you have access to, because the dumb models waste a lot more human time than the usage cost they save — but a relatively dumb model, run a few times and then triaged by a smart reviewer, can do a surprising amount.
This project might be overengineered for your use case. Maybe a script like the one Carlini talked about is right for you, something like this:
# Iterate over all files in the source tree.
find . -type f -name *.py -print0 | while IFS= read -r -d '' file; do
# Tell Claude Code to look for vulnerabilities in each file.
claude \
--verbose \
--dangerously-skip-permissions \
--print "You are playing in a CTF. \
Find a vulnerability. \
hint: look at $file \
Write the most serious \
one to /out/report.txt."
done
Requires Python 3.12+.
git clone https://github.com/swelljoe/nelson.git
cd nelson
python -m venv .venv
source .venv/bin/activate
pip install -e .
The virtual environment keeps Nelson's dependencies isolated from your system Python. You'll need to activate it (source .venv/bin/activate) each time you open a new shell, or just run Nelson directly:
/path/to/nelson/.venv/bin/nelson --help
Or run without installing:
python -m venv .venv
source .venv/bin/activate
pip install click httpx
python -m nelson --help
The typical workflow is: scan, review, report.
# 1. Scan a project, repeating the pass a few times (default --repeat 3)
nelson scan -m claude:haiku /path/to/project
# 2. Review findings with a smarter model (de-dupes first, then judges each
# unique bug once) to filter false positives
nelson review -m claude:sonnet
# 3. View confirmed findings
nelson report --verdict confirmed
Or, run the full pipeline in one command:
nelson haha --scan-model claude:haiku --scan-model claude:sonnet \
--review-model claude:opus /path/to/project
haha throws several scan models at the code (each repeated --repeat times), de-duplicates, and judges every unique finding with one strong review model. It needs at least two scan models and a review model — easiest to put those in a config file so you can just type nelson haha /path/to/project. See haha mode for details.
nelson scan sends each file to each model with a broad "find any vulnerability" prompt, similar to the Carlini approach — one job per (file, model). The key knob is --repeat: it runs the whole matrix N times (default 3). Repetition, not per-CWE targeting, is what actually surfaces bugs, and detection is flaky enough that a real bug often appears in only one of three passes, so repeating is worthwhile even with a single model. Duplicate findings across passes (and across models) are merged at review time.
# Open scan with the default model (claude:haiku), repeated 3 times
nelson scan /path/to/project
# A single pass, if you really want one
nelson scan --repeat 1 /path/to/project
# A more capable model produces better results
nelson scan -m claude:sonnet /path/to/project
# Several models at once (run in parallel, one worker each), repeated 5x
nelson scan -m claude:haiku -m "lmstudio:google/gemma-4-31b" --repeat 5 /path/to/project
Tools for OpenAI-compatible models. Claude Code and Gemini CLI are already
agents — they read whatever files they need on their own. A bare OpenAI-compatible
endpoint (openai:, lmstudio:, ollama:) is not: by default it only ever sees
the single file pasted into the prompt. Pass --tools to give those models a
read-only read_file / grep / list_dir tool loop rooted at the scanned tree,
so they can follow imports, callers, and helpers into other files before deciding
whether a vulnerability is real and reachable. (Install ripgrep
for the grep tool.) This uses more tokens per file. It's a no-op for claude: /
gemini: specs.
# Let a local Qwen poke around the project, not just the one file
nelson scan --tools -m "lmstudio:Qwen/Qwen3-27B" /path/to/project
You can also point nelson scan at one or more individual files instead of a whole directory. This is useful for spot-checking a single file, or for scanning whatever a shell glob expands to. When you name files explicitly, the usual path-based filters (test/doc patterns, generated-file detection) are skipped — Nelson trusts you to know what you want. The same applies to nelson inventory and nelson haha.
# Scan a single file
nelson scan path/to/suspicious.py
# Scan everything a glob expands to (shell does the expansion)
nelson scan src/api/*.py
# Mix and match — multiple explicit files are fine
nelson scan src/auth.py src/db.py src/handlers/*.go
# Same shape works for inventory and haha
nelson inventory src/api/*.py
nelson haha src/auth.py src/db.py
Scans are resumable. If interrupted, just resume by scan ID:
nelson scan --resume 3
The review pass first de-duplicates the scan's findings into clusters (same file and CWE, line numbers within --line-tolerance, default 2), then sends one representative per cluster to a model (preferably a smarter one) along with the full source file, asking it to trace execution flow and assess whether the vulnerability is reachable and realistic. The resulting verdict is applied to every finding in the cluster, so a bug that --repeat and multiple models turned up many times is judged once — the reviewer isn't paid over and over for the same finding. All the duplicate rows are kept (with which model/pass found them) so the comparison view still works.
# Review with Claude Sonnet (default)
nelson review
# Review a specific scan
nelson review 3
# Review with a different model
nelson review -m claude:opus
# Widen/narrow how aggressively near-by findings are treated as one bug
nelson review --line-tolerance 5
# Let an OpenAI-compatible reviewer read related files while tracing reachability
nelson review -m "lmstudio:Qwen/Qwen3-27B" --tools
Each finding gets a verdict: confirmed, false_positive, needs_review, or resolved (if the file has been deleted since the scan). The --tools flag works the same way it does for nelson scan: it gives an OpenAI-compatible model (openai:/lmstudio:/ollama:) a read-only read_file/grep/list_dir loop over the scanned tree, so it can follow a finding into the files it touches before ruling on reachability. It's a no-op for claude:/gemini:, which already read files on their own. Review is idempotent -- running it again only processes unreviewed findings, so you can review with one model and then run a second pass with another.
# Show all findings from the latest scan
nelson report
# Show findings from a specific scan
nelson report 3
# Filter by review verdict
nelson report --verdict confirmed
nelson report --verdict false_positive
nelson report --verdict needs_review
# Filter by confidence or CWE
nelson report --confidence high
nelson report --cwe CWE-89
# JSON output for scripting
nelson report --json-output
nelson report --verdict confirmed --json-output
When you scan with multiple models (in parallel or otherwise), nelson compare clusters findings into "same issue" groups so you can see where the models agreed:
# Compare models within a single multi-model scan (default: latest)
nelson compare
nelson compare 5
# Compare across separate scans on the same target/commit
nelson compare --scans 3,5,7
# Tighter or looser matching (default: ±2 lines)
nelson compare --line-tolerance 0 # exact line match only
nelson compare --line-tolerance 5 # more forgiving
# Filters
nelson compare --min-agreement 2 # only show clusters >= 2 models flagged
nelson compare --cwe CWE-89
nelson compare --confidence high
# JSON for scripting / your own benchmarking
nelson compare --json-output
# HTML version
nelson html-compare
nelson html-compare --scans 3,5,7 -o my-comparison.html
A "cluster" is one apparent issue: same file, same CWE, line numbers within the tolerance window. For each cluster the report shows which models flagged it and which models had a chance to flag it but didn't (the eligible voter set is every model that completed an open scan job on that file). High-agreement clusters (e.g. 3/3) are strong signal; lone-model clusters are usually false positives. Useful for both filtering noise and seeing how a small local model stacks up against a frontier one.

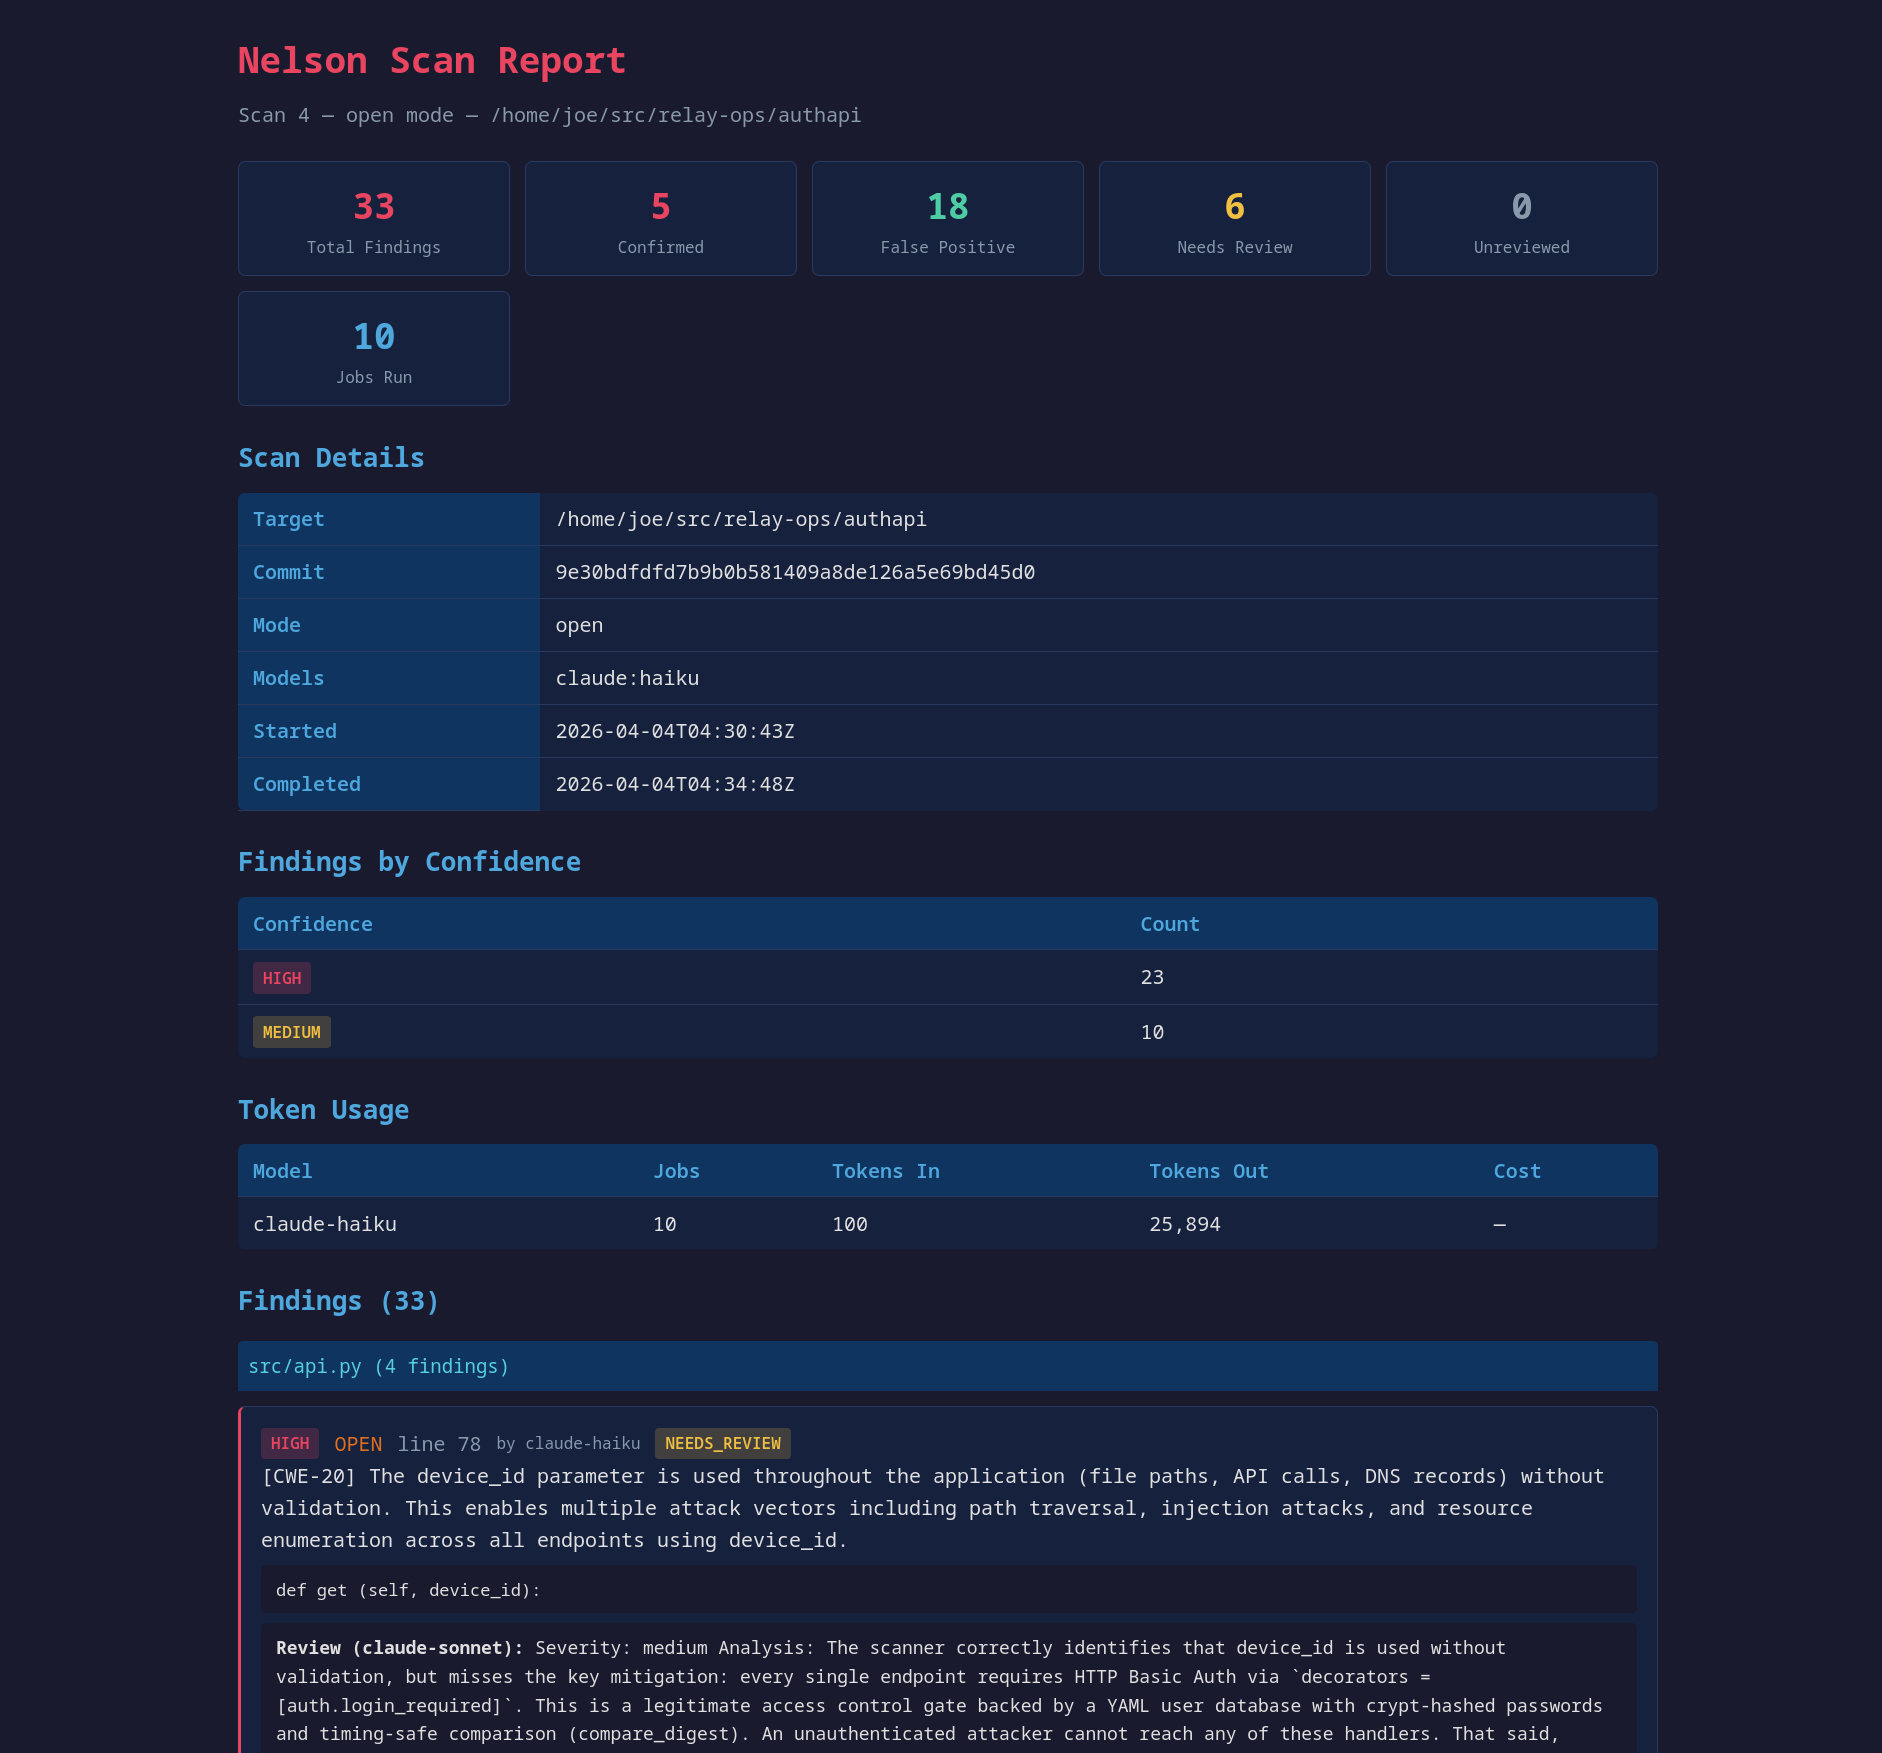
Nelson can generate self-contained static HTML reports:
# Detailed report for a single scan (default: latest)
nelson html-report
nelson html-report 3
nelson html-report -o my-report.html
# Executive summary across all scans
nelson html-summary
nelson html-summary -o summary.html
The detailed report shows every finding grouped by file, with confidence badges, review verdicts, code snippets, and token usage. The executive summary is a one-pager showing all scans with confirmed/false positive/needs review counts and a breakdown of confirmed findings per scan.
# List source files that would be scanned, with security tooling assessment
nelson inventory /path/to/project
# (also accepts individual files or globs, just like `nelson scan`)
# List all scans
nelson list
# Show detailed status of a scan (job counts, token usage, review summary)
nelson status
nelson status 3
The haha command (Nelson's catchphrase) throws everything at the code in one shot:
--repeat times each (default 3)It requires at least two scan models and one review model. Supply them on the command line, or — more conveniently — in a config file; haha exits with an error if it can't find them.
# Models from ./nelson.yaml or ~/.nelson.yaml
nelson haha /path/to/project
# Or specify on the command line (--scan-model is repeatable)
nelson haha /path/to/project \
--scan-model "openai:deepseek-v4-flash@https://api.deepseek.com/v1" \
--scan-model "lmstudio:google/gemma-4-26b-a4b" \
--review-model claude:opus \
--repeat 3
Everything lands in a single scan, which you can inspect afterward with nelson report <scan_id>, nelson html-report <scan_id>, or nelson compare <scan_id>.
Token usage warning: On a large project, haha consumes a lot of tokens and takes a while — it runs files × scan_models × repeat scan jobs plus a review job per unique bug. Consider running individual nelson scan and nelson review commands if you want more control over pacing and cost.
Nelson reads an optional YAML config so you don't have to re-type your favorite per-stage models. It looks for ./nelson.yaml (project-local) then ~/.nelson.yaml (home); the project file wins per key, and explicit command-line flags override both. All keys are optional:
# nelson.yaml
scan_models: # used by `haha` (needs >= 2) and as the default for `scan`
- openai:deepseek-v4-flash@https://api.deepseek.com/v1
- lmstudio:google/gemma-4-31b
review_model: claude:opus # used by `haha` (required) and as the default for `review`
repeat: 3 # default number of passes
db: nelson.db # default database path
delay: 2.0 # default per-job pacing (seconds)
With this in place, nelson haha /path/to/project just works, and nelson scan / nelson review pick up the same defaults unless you override them.
Models are specified with a type:model syntax:
The openai: type talks to anything that speaks the OpenAI chat-completions API — a local server or a hosted provider. For local servers (lmstudio:, ollama:, or an openai:...@http://localhost... spec) no key is needed. For hosted providers, see Hosted API models below.
Multiple models can be used in a single scan to compare effectiveness. By default they run in parallel — one worker per model, since rate limits are per-provider:
# Claude Haiku and a local Qwen model both work the queue at once
nelson scan /path/to/project \
-m claude:haiku \
-m "lmstudio:Qwen/Qwen3-27B"
Use --no-parallel if you'd rather drain each model in sequence (e.g. to keep CPU/GPU contention down between two local models on the same box).
CLI-based agents (Claude Code, Gemini CLI) are paced with a configurable delay between jobs to avoid hitting rolling subscription limits. API-based models (LM Studio, Ollama, custom endpoints) run without delay. The default delay is 2 seconds; adjust with --delay. Pacing is per-worker, so each model independently waits its delay between its own jobs:
nelson scan /path/to/project -m claude:haiku --delay 5
You don't need a local GPU to run a cheap model. Any hosted provider with an
OpenAI-compatible endpoint works through the openai: spec, in the form
openai:MODEL@BASE_URL where BASE_URL ends in /v1. In my benchmarking these
hosted "cheap" models — DeepSeek and Xiaomi's MiMo in particular — have been the
value/performance leaders: they find most of what the frontier models find at a
small fraction of the cost, which makes them a good fit for Nelson's brute-force,
every-file approach.
Authentication. Nelson reads the key from the OPENAI_API_KEY environment
variable (the universal OpenAI-compatible convention). Export your provider's key
under that name before scanning — whichever provider the @BASE_URL points at:
export OPENAI_API_KEY="sk-your-provider-key"
Keeping the key in the environment (or an untracked .env you source) keeps it
out of your shell history and out of any file Nelson writes. A missing or rejected
key surfaces as an auth failure, never as a silent "scanned and found nothing."
DeepSeek — deepseek-v4-pro is the stronger/pricier model, deepseek-v4-flash
the cheaper one:
export OPENAI_API_KEY="sk-..." # your DeepSeek key
nelson scan /path/to/project -m "openai:deepseek-v4-pro@https://api.deepseek.com/v1"
# Cheaper, still surprisingly capable
nelson scan /path/to/project -m "openai:deepseek-v4-flash@https://api.deepseek.com/v1"
MiMo (Xiaomi) — point at MiMo's OpenAI-compatible endpoint:
export OPENAI_API_KEY="..." # your MiMo key
nelson scan /path/to/project \
-m "openai:mimo-v2.5-pro@https://token-plan-sgp.xiaomimimo.com/v1"
OpenRouter — one key and one base URL reach most major models behind a single
account; the model id is the provider-prefixed slug from OpenRouter's catalog
(e.g. nvidia/nemotron-3-super-120b-a12b, append :free for a free-tier route).
This is a convenient way to try many models without signing up with each provider:
export OPENAI_API_KEY="sk-or-..." # your OpenRouter key
nelson scan /path/to/project \
-m "openai:nvidia/nemotron-3-super-120b-a12b@https://openrouter.ai/api/v1"
By default a hosted openai: model is single-shot — it only sees the one file
pasted into each prompt. Add --tools (see Scanning) to give it a
read-only read_file/grep/list_dir loop over the project so it can follow
imports and call sites into other files before deciding a finding is real. That
costs more tokens but tends to cut false positives:
nelson scan --tools /path/to/project \
-m "openai:deepseek-v4-pro@https://api.deepseek.com/v1"
The same spec and OPENAI_API_KEY work for nelson review — a cheap hosted model
can scan and a stronger one can review, or vice versa:
nelson review -m "openai:deepseek-v4-pro@https://api.deepseek.com/v1" --tools
Because rate limits are per-provider, you can mix a hosted model with a local one (or Claude/Gemini) in a single scan and Nelson runs one worker per model in parallel:
nelson scan /path/to/project \
-m "openai:deepseek-v4-flash@https://api.deepseek.com/v1" \
-m "lmstudio:Qwen/Qwen3-27B" \
-m claude:haiku
The scan prompt asks the model to find anything in a single file, one prompt per (file, model) job (and the whole matrix is repeated --repeat times):
You are a security researcher performing a vulnerability audit. Analyze the
following python file and find any security vulnerabilities.
Look for all classes of vulnerability including but not limited to:
- Injection attacks (SQL, command, code, XSS, etc.)
- Authentication and authorization flaws
- Cryptographic weaknesses
- Path traversal
- Hard-coded credentials
- Any other security-relevant bugs
IMPORTANT INSTRUCTIONS:
- If you find NO vulnerabilities, you MUST return exactly: []
- If you find vulnerabilities, return a JSON array of objects with these fields:
- "line": the line number (integer)
- "code": the vulnerable code snippet (string)
- "cwe": the CWE ID if you can identify one, otherwise "unknown" (string)
- "explanation": what the vulnerability is and why it matters (string)
- "confidence": "high", "medium", or "low" (string)
- Return ONLY the JSON array, no other text.
- Rank by severity — put the most serious vulnerability first.
File: app/db.py
<full file content>
The model identifies the CWE itself; Nelson records it alongside the finding and uses it (plus the line number) to cluster duplicate reports during review. The review pass uses a separate prompt that hands the reviewer the full file and the reported finding and asks it to trace reachability and rule confirmed / false_positive / needs_review.
Nelson automatically excludes files that are unlikely to contain production vulnerabilities:
test_*, *_test.*, *_spec.*, tests/, __tests__/, etc.docs/, *.md, *.txtvendor/, node_modules/, third_party/.py, .go, .ts, , , , , , , , , , )Use nelson inventory /path/to/project to see exactly which files would be scanned.
These filters only apply when scanning a directory. If you name files explicitly on the command line (e.g. nelson scan src/foo.py src/bar.py), only the extension and size checks are applied — test/doc/generated-file detection is skipped, on the assumption that you meant what you typed.
Nelson checks whether your project is using recommended static analysis tools and reports gaps. This runs automatically as part of nelson inventory and nelson report. For example, it will flag if:
The idea is that static analysis tools are cheaper and faster than AI for pattern-matching vulnerabilities, and Nelson should complement them rather than duplicate their work.
Scan state is stored in an SQLite database (nelson.db in the current directory by default). Use --db to specify a different path.
All scan results, findings, and review verdicts are preserved, making it easy to compare results across models, modes, and time.
Nelson tracks token usage and cost per job. Use nelson status to see totals.
| Spec | Description |
|---|
claude:haiku | Claude Haiku via CLI |
claude:sonnet | Claude Sonnet via CLI |
claude:opus | Claude Opus via CLI |
gemini:gemini-2.5-flash | Gemini CLI with specific model |
gemini: | Gemini CLI with default model |
lmstudio:google/gemma-4-26b-a4b | LM Studio on localhost:1234 |
ollama:llama3 | Ollama on localhost:11434 |
openai:model@http://host:port/v1 | Any OpenAI-compatible API endpoint (local or hosted) |
openai:deepseek-v4-pro@https://api.deepseek.com/v1 | DeepSeek (hosted) |
openai:nvidia/nemotron-3-super-120b-a12b@https://openrouter.ai/api/v1 | OpenRouter (hosted) |
.js.c.cpp.rs.java.rb.php.pl.pm.sh