Skip to content
KitploitKITPLOIT
ToolsBlog
Submit
ToolsBlog
Submit

Hacking, PenTest, and Cybersecurity Tools for Your Security Arsenal!

Kitploit is a directory of hacking, cybersecurity, and pentesting tools. Discover the latest project updates to find vulnerabilities, analyze systems, automate testing, and strengthen your security.

··Feeds·Contact·Privacy·© 2026 Kitploit

Tool Directory

Categories

View all categories
Loading categories
ChameleonMini — Portable NFC/RFID security tool for emulating and cloning contactless smartcards, reading tags, sniffing RF traffic, and recovering Mifare access keys. | Kitploit
Tools/GitHubGitHub/rfidresearchgroup/chameleonmini
RFID/NFC ToolsInformation GatheringWireless SecurityHardware HackingPenetration Testing
GitHubrfidresearchgroup/chameleonmini

ChameleonMini

Portable NFC/RFID security tool for emulating and cloning contactless smartcards, reading tags, sniffing RF traffic, and recovering Mifare access keys.

View Repository

Most Popular

View all →

Discover the most used tools by our community.

Explore all tools

Browse our collection of tools

View all tools →
Share
Website
439792 years agoReviewed by Kitploit

ChameleonMini

This is NOT the official repository of ChameleonMini, a freely programmable portable tool for NFC security analysis that can emulate and clone contactless cards, read RFID tags, and sniff/log RF data. This repository brings support for the Chameleon Tiny.

Our Project is based on the open-source project ChameleonMini RevG by Kasper & Oswald. They also have their own Webshop.

  • Information:
    • Chameleon Tiny Site: Here
    • Chameleon BLE API: Here
    • Doxygen: Here
      • For viewing some of the documentation
      • Binaries: Here
      • Install: Here
    • Documentation (RfidResearchgroup):
      • Source: Here
        • Need to manually download and view
        • Open Doc/Doxyfile and then in application Show HTML Output
    • Documentation (emsec):
      • Doxygen: Here
      • Source: Here
  • Tools:
    • Phone APP:
      • Android: Chameleon
        • The Android APP is currently NOT compatible with the official firmware
      • IOS: ChameleonTiny Manager
        • The IOS APP is currently NOT compatible with the official firmware
        • Credit to bettse
      • Password: e4g1
    • Optional GUI (Windows Only):
      • Windows: Here
      • Source: Here
    • Chameleon Firmware:
      • Compile the latest firmware: Here
        • Or use the precompiled: Here
      • The Chameleon Mini REV.G version uses the same firmware for both the Mini with Bluetooth version and Tiny
      • The hardware design of the RF part is exactly the same
      • The hardware is also compatible with the official firmware of the KAOS brothers
    • Terminal APP:
      • Putty or similar APP
    • DFU driver:
      • The DFU driver comes from ATMEL's official LIBUSB driver library
      • You can download it yourself or from the repo: Here
    • DFU Programmer:
      • Zip file from SourceForge: Here
  • Resellers:
    • Our Asia & Oceania Reseller: Here
    • Our Europe Reseller: Here
    • Our US Reseller: Here
  • Repository Structure:
    • Doc: A folder for doxygen documentation
    • Drivers: Chameleon drivers for Windows and Linux
    • Dumps: Dumps of different smartcards
    • Hardware: The layout and schematics of the PCB
    • Firmware: The complete firmware including a modified Atmel DFU bootloader and LUFA
    • Software: Contains a python tool for an easy configuration (and more) of the ChameleonMini
      • WARNING: This is currently under construction
    • RevE: Contains the entire contents of the discontinued RevE repository
    • RevE-light: Contains our development files for the RevE-light
      • WARNING: This is currently not supported / not functional

A. Upgrade to the latest firmware

A1. Upgrade Chameleon AVR Firmware


1. Obtain and Prepare Tools:

  • Optional GUI (Windows Only)
  • Terminal APP
  • Firmware
  • DFU Driver
  • DFU Programmer

2. Create a Working Directory

  1. Create a directory to work from
  2. Place the Chameleon firmware in the directory
  3. Unzip the DFU Programmer folder to the working directory
  4. If you are using the auto install on Windows, place ChameleonFirmwareUpgrade.bat in the working directory as well
  • Further information:
    • Here
    • emsec

3. Enter the Chameleon Direct Firmware Update (DFU) mode:

Method 1: GUI (Windows Only)
  • Mini or Tiny:

    1. If it is a Chameleon Mini, ensure it is in the OFF position
    2. Connect it via USB cable to your computer
      • On the Mini, it may be a good idea to remove the battery before putting the device into DFU mode
    3. Under the Settings tab, Send the Upgrade command while the Chameleon is connected
      • This only puts the Chameleon in DFU mode
      • It does NOT start installing the firmware at all
    4. Chameleon should now be in DFU mode
  • Further information:

    • emsec
    • Iceman GUI
Method 2: CLI
  • Mini:

    1. With the Chameleon in the OFF state, press and hold the black (Rev E) or yellow (Rev G) button near the USB while inserting it into the USB port
      • It may be a good idea to remove the battery before putting the device into DFU mode
    2. Use your favorite terminal application to connect to it. Type upgrade and hit Enter
      • This only puts the Chameleon in DFU mode
      • It does NOT start installing the firmware at all
    3. Chameleon should now be in DFU mode
  • Tiny:

    1. Press and hold the B button while inserting it into the USB port
    2. Use your favorite terminal application to connect to it. Type upgrade and hit Enter
      • This only puts the Chameleon in DFU mode
      • It does NOT start installing the firmware at all
    3. Chameleon should now be in DFU mode

4. Install DFU Driver:

Windows
  • Mini or Tiny:
    1. Download the drivers from the repo
    2. Ensure you have connected your Chameleon and that it is in DFU mode
    3. You should have an unknow USB device in device manager
    4. Update the device with the driver files from the repo
    5. You should now have an 'ATxmega*' device

5. Start Firmware Upgrade:

Method 1: Automatic (Windows Only)
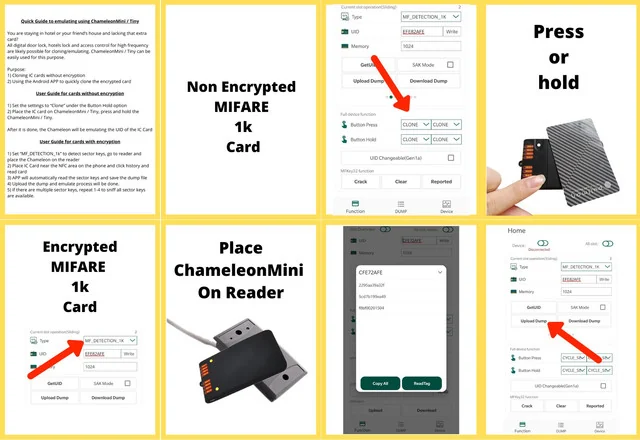
  • Mini or Tiny:
    1. If you haven't already, place ChameleonFirmwareUpgrade.bat in your working directory with your firmware and other tools
    2. Ensure Chameleon is in DFU mode
    3. Run the ChameleonFirmwareUpgrade.bat file AS ADMIN to automatically start the firmware upgrade
    4. It usually takes 2 - 5 seconds
    5. After the progress bar is complete, the firmware upgrade is complete
Method 2: Manual
  • Mini or Tiny:
    • Guides:

      • Icemans Guide (Windows): Here and Here
      • Icemans Guide (Linux): Here
      • Icemans Guide (Mac): Here
    • Note:

      • Replace any relevant files or other parts with the resources in this repo

A2. Upgrade (OTA) Bluetooth Firmware (Chameleon Mini only)


1. Obtain and Prepare Tools:

  • Optional GUI
  • Terminal APP
  • Phone APP
  • Firmware

2. Use APP to Connect to Chameleon Using Bluetooth:

  1. Press any button on the Mini and the white battery light should come ON
    • You can now connect via Bluetooth
  2. Open the APP again and click Connect to automatically connect the Chameleon

3. Start Bluetooth Firmware Upgrade:

  1. In the Device Information column, press BLE CMD Version 5 times
  2. On the OTA upgrade page, click Auto Upgrade
  3. The APP will immediately start to upgrade to the latest Bluetooth firmware that comes with it
  4. The APP will automatically exit after the upgrade is complete

B. Crash Course

B1. Detect Keys and Upload Card files


1. Obtain and Prepare Tools:

  1. Tools:

    • Optional GUI
    • Terminal APP
    • Phone APP
  2. Connect to the Chameleon Mini or Tiny using the APP

    • Connect via USB or Bluetooth
  • Note:
    • Both the Chameleon Mini and Tiny support direct connection to the mobile phone USB port
      • For the Mini, an additional OTG adapter needs to be purchased
      • Tiny uses its own dual-headed TYPE-C data cable to connect directly to TYPE-C mobile phones
    • Chameleon Mini has built-in Bluetooth BLE4.0. Press any button to wake up Bluetooth
    • Turn Bluetooth ON on your phone and the APP will automatically connect

2. Use APP to Enable Detection Mode:

  1. After connecting, click on a single card slot and select MF_DETECTION_1K or MF_DETECTION_4K in the Card Slot mode
  2. This card slot will now have the Detection mode turned ON
  3. Write the original card number in the UID Card Number column
    • If you don't know the UID number, you can fill in it at will
  4. Then click the Clear button below to clear the last detection record

3. Use APP to Get Keys:

  1. Take the Chameleon to the access control reader and swipe it across
  2. The key and access traces are recorded by the Chameleon when you swipe
  3. Connect back to the mobile phone and press the Crack button
  4. After a few seconds, the APP will automatically solve and list the results, as shown in the figure below:

Untitled-1

  1. The list shows which blocks the read head just visited, and what password was used for each access
  2. Click the History button. The APP will automatically list the keys separately and save them for other software to use
  3. If your mobile phone comes with an NFC function, you can put the original key directly on the mobile phone
  4. The APP will automatically use the key in the list to read the entire card, and after it is successful, it will automatically save the entire card data file on the mobile phone
  • Note:
    • Multiple red LEDs are on at the same time during detection, which means the memory is full, just clear the memory.

4. Use APP to Import Existing Card Files:

  1. Use QQ to send the card data file to the mobile phone QQ
    • Or connect the mobile phone to the computer and transfer the file to any directory on the mobile phone
  2. Open the APP and click the Dump column
  3. Click the Scanner in the plus sign in the upper right corner
  4. Click the three horizontal line buttons in the upper left corner and select this phone
  5. Select the root directory of the QQ receiving file or the previously copied directory, and click Allow Access
  6. All card data files will be automatically scanned into the Dump file interface, which can be uploaded or edited at will
  7. Click the card data file in the Dump column below, and click Upload below to upload to the card slot corresponding to the Chameleon

B2. Introduction to UID Mode and SAK Mode


1. UID Mode:

  1. Click the button UID Changeable (GEN1a) in the APP or directly send the command UIDMODE = 1 to turn it ON
    • UIDMODE = 0 to turn it OFF
  2. After the UID mode is turned ON, the card simulated by Chameleon will become a GEN1a card
    • Commonly known as a UID card or Chinese magic card
  3. The current card slot takes effect

2. SAK Mode:

  1. Click the SAK Mode button in the APP or directly send the command SAKMODE = 1 to turn it ON
    • SAKMODE = 0 to turn it OFF
  2. After the SAK Mode is turned ON, the card will feedback the real SAK value when it is found
  3. The SAK value is determined by the 0 sector, 0 block, and the position is the position of the sixth byte immediately after the UID number
  4. If the SAK Mode is not turned on, the SAK is a fixed value of 08, and 0 blocks of data are ignored
    • This function is useful when special SAK values cannot be used normally after being copied
    • This achieves better compatibility
  5. The current card slot takes effect

B3. Card Slot Functions


1. UID Card Function Class

2. Cracking and Card Reading Functions

3. Custom Button Functions

C. Hardware & Lights

C1. All Units


1. Charging:

  • Any time you connect USB, it will automatically start charging
  • The Mini will have a white light while the Tiny will have a red light over the USB port to indicate if it is charging

2. Charging and Standby Mode:

  • Charging method: Plug in the USB at any time and start charging immediately
  • Battery type: LIR2032H replaceable lithium-ion rechargeable battery
  • Charging time: 2 hours @ 0-100%
  • Charging current: 40mA
  • Start-up current: 38mA
  • Card reading current: 65mA
  • Sleep current: 5uA (9uA-MAX)
  • Battery capacity: 70mAh
  • Duration: Swipe the card 3 times a day for 5 seconds each time, and it can be used for one year on a single charge
  • Sleeping time: Fully charged, it can be left for two years when it is turned off and sleeping
  • Port type:
    • Mini: MicroUSB
    • Tiny: Type-C

3. Detect Memory Full:

  • If the memory is full during dense flow detection, multiple red LEDs will be abnormally lit

4. Usage Guide for New Functions:

EUd-Gl7w-Uw-AAg-Cf6

C2. Chameleon Mini


1. Turn on Bluetooth and Check the Battery:

  1. When the power is OFF, press any button once to turn ON the Bluetooth power, and at the same time, display the current power with a white LED
  2. With the Bluetooth in the ON state, click any button to turn OFF the Bluetooth power, the power LED goes out, and the system sleeps
  3. Bluetooth will sleep automatically after no operation for 15 seconds
    • Press any button once to shut down immediately

2. Turn On the Chameleon:

  1. With the Bluetooth in the ON state, double click any button
    • Or in the OFF state, triple click any button times to turn ON the Chameleon
  2. The red LED lights up to indicate the slot number
  3. Chameleon will automatically sleep and shut down after no operation for 5 seconds

3. Bootloader/DFU Firmware Upgrade Methods:

  • Section A1: Here

4. Schematics for Chameleon Mini:

  • Chameleon Mini: Here

5. Demos

  • ChameleonMini RevG In Lab Demo / Technical Explanation of Command Line Interface
  • Mifare Reader Attack: Sniffing, Cracking, Emulation, Open! LAB401 Academy - CHAMELEON MINI Tutorial
  • How to use the new Proxgrind Chameleon Tiny and Mini with the APP

C3. Chameleon Tiny


1. Turn Chameleon and Bluetooth On:

  1. With the Chameleon in the OFF state, press the A button once to turn ON the Chameleon power
  2. The red LED lights up to indicate the slot number
  3. Chameleon will automatically sleep and shut down after no operation for 5 seconds
    • This can be adjusted in the APP

2. Bootloader/DFU Firmware Upgrade

  • Section A1: Here

3. Schematics:

  • Same as the Mini ?

4. Demos

  • How to use the new Proxgrind Chameleon Tiny and Mini with the APP
  • ChameleonTiny 8 Prox in1 & Sniff - Crack RFID ~ NFC ~ UID
  • Chameleontiny pro -Standalone clone of a MIFARE 1K UID

D. Appendix

D1. Feature Comparison Table for Each Version


1. Comparison Table of Specs

2. Comparison Table of Analog Card Characteristics

3. Table of New Commands

D2. Complete Instruction List


1. Links:

  • Instruction Sheet: Here
  • emsec: Here
  • AndreasBujok/ChameleonMini

D3. Supported Cards, Encoding, & Simulation Types


1. Links:

  • emsec: Here

2. Comparison Table of Encoding/Simulation Types

3. Comparison Table of Sniff Modes

4. Comparison Table of Supported Reading Card Types

E. External Contributions


  • @iceman1001
  • Philippe Teuwen (@doegox)
  • Willok
  • DXL
  • ProxGrind aka Olaf
Download Tool
  • Further information: - Here - emsec

  • OptionTypeLength of UIDMemory Size
    MF_classic_1K 4B/7BM1 S504 Byte / 7 Byte1024 byte
    MF_classic_4K 4B/7BM1 S704 Byte / 7 Byte4096 byte
    MF_classic_mini_4BM1 mini S204 Byte / 7 Byte320 byte
    MF_ultralight_CM0 ultralight7 Byte192 byte
    MF_ultralight_EV1_80BM0 ultralight7 Byte80 byte
    MF_ultralight_EV1_164BM0 ultralight7 Byte164 byte
    Vicinity-8 Byte8192 byte
    SL2S2002-8 Byte8192 byte
    TITAGITSTANDARD-8 Byte44 byte
    EM4233-8 Byte208 byte
    OptionAbilityCracking TypeAPP Supported
    MF_DETECTION_1KDetecting reader to obtain keysMFKEY32V2List results directly
    MF_DETECTION_4KDetecting reader to obtain keysMFKEY32V2List results directly
    ISO14443A_READERReader Mode-Display UID
    ISO14443A_SNIFFSniffing-Not supported
    ISO15693_SNIFFSniffing-Supported
    Option namesDescription
    NONESet this button to have no function
    UID_RANDOMRandomly generated UID number in the current card slot after pressing
    UID_LEFT_INCREMENTAfter pressing, the highest byte of the UID number plus one (hexadecimal)
    UID_RIGHT_INCREMENTAfter pressing the lowest byte of the UID number plus one (hexadecimal)
    UID_LEFT_DECREMENTAfter pressing, the highest byte of the UID number is reduced by one (hexadecimal)
    UID_RIGHT_DECREMENTAfter pressing, the lowest byte of the UID number is reduced by one (hexadecimal)
    CYCLE_SETTINGSCard slot number sequence will increase after pressing
    CYCLE_SETTINGS_DECCard slot number sequence decreases after pressing
    STORE_MEMImmediately after pressing, the current card data in the temporary buffer is overwritten into the memory
    RECALL_MEMImmediately after pressing, the current card data in the memory is overwritten into the temporary buffer (Can be used to quickly restore card data)
    TOGGLE_FIELDClick once to turn off the antenna and click again to turn on the antenna function
    STORE_LOGWrite the log data in the temporary cache to the memory, which can be saved even when power is off
    CLEAR_LOGClear log data immediately after pressing
    CLONERead the UID card number immediately after pressing, continue searching, and simulate immediately after reading the card
    CLONE_MFUClones a Mifare Ultralight card that is in the range of the antenna to the current slot, which is then accordingly configured to emulate it
    -Rev.G Official by KAOSRev.E Old Rdv2.0 by ProxGrindRev.G by ProxGrindRev.G Tiny by ProxGrind
    SimulationGood performance, has blind areaPoor compatibilityPerfect performanceno blind area
    As a reader1-2cm for white tag0cm for keyfob×5-6cm for white tag
    Read current170mA×65mA60mA
    BLE nrf52832××√×
    Li-ion battery√×√√
    Battery indicator××√×
    Low power sleep××√√
    RF field wakeup×√√√
    Button wakeup×√√√
    Auto power off×√√√
    Official firmware compatible√√√√
    Replaceable Antenna××√×
    MFKEY32 crack×√√√
    8 LED for slot×√√√
    Android APP××√√
    Firmware anti lost××√×
    Rev.G Official By KAOSRev.E old RDV2.0 By PROXGRINDRev.G new RDV2.0 By PROXGRINDM1 white tag
    122U r/w full data1-2 sector onlySmoothSmoothSmooth
    122U Range61mm41mm73mm71mm
    PM3 r/w full data1-2 sector onlySmoothSmoothSmooth
    PM3 Range57mm74mm88mm89mm
    Phone NFC r/w full dataNoSmoothSmoothSmooth
    Phone NFC Range25mm18mm33mm32mm
    Magic back doorBy defaultNoDual modeNo
    SAK ATQA SupportNoNoModifiableNo
    CommandEffect RangeDescription
    UIDMODE?All slotReturns the configuration of the all slot
    UIDMODE=?All slotReturns a list of all supported configurations
    UIDMODE=[0;1]All slotActivates(1),deactivates(0),the magic card mode(It will has Chinese magic card back door)
    SAKMODE?Current slotReturns the configuration of the current slot
    SAKMODE=?Current slotReturns a list of all supported configurations
    SAKMODE=[0;1]Current slotActivates(1),deactivates(0),the real SAK ATQA mode (the SAK ATQA will be mapped from block 0)
    CONFIG=MF_DETECTION_1KCurrent slotSet current slot to detection 1K mode.
    CONFIG=MF_DETECTION_4KCurrent slotSet current slot to detection 4K mode.
    DETECTION=0DeviceClears the detection log memory
    DETECTION?DeviceWait for an XModem connection and then downloads the binary detection log data.
    Card TypeEncoding TypeWhether the hardware supportsDoes the software supportWhether the application layer supportsNote
    Non13.56MHzNoNoNo
    Mifare UltralightISO14443A/106 kbit/sSupportSupportSupport
    Mifare Ultralight Ev1ISO14443A/106 kbit/sSupportSupportSupport
    MifareClassic1K/4K 4B/7BISO14443A/106 kbit/sSupportSupportSupport
    Mifare DESFireISO14443A High RateSupports low rates, or possibly higher ratesOnly supported Low rateNo
    Mifare DESFire EV1ISO14443A High rateSupports low rates, or possibly higher ratesOnly supported Low rateNoBackward compatible
    Mifare DESFire EV2ISO14443A High rateSupports low rates, or possibly higher ratesOnly supportedLow rateNo
    Mifare PLUSISO14443A High rateSupports low rates, or possibly higher ratesOnly supported Low rateNo
    Sniff Mode NTAGISO14443A 106 kbit/sSupportSupportNo
    LEGIC primeLEGICprime/ ISO14443A/ ISO15693Possible but not supportedPossible but not supportedNo
    HID iCLASS125kHz/ISO15693/ISO14443BPossible but not supportedPossible but not supportedNo
    EpassISO14443A/BSupported / SupportedLow rate only / not supportedNo
    TiTagIT StandardISO15693SupportSupportSupport
    EM4233ISO15693SupportSupportSupport
    Encoding typeWhether the hardware supportsDoes the software supportWhether the application layer supportsNote
    Non-13.56MHzNot SupportedNot SupportedNot Supported
    ISO 14443 A 106 kbit/sReader -> card Direction sniffingMaybe support the other directionCurrently only supported Reader -> card Direction sniffing
    ISO 15693SupportSupportSupportSingle subcarrier only
    Card typeEncoding typeWhether the hardware stand byWhether the software stand byWhether the application layer supportsNote
    Non13.56MHzNot SupportedNot SupportedNot Supported
    Mifare UltralightISO14443A 106 kbit/sSupportSupportSupportCommand: dump_mfu
    MifareClassic1K/4K 4B/7BISO14443A 106 kbit/sSupportSupportNot SupportedNo card reading instruction, encryption function has been implemented
