

pyCobaltHound is an Aggressor script extension for Cobalt Strike which aims to provide a deep integration between Cobalt Strike and Bloodhound.

pyCobaltHound strives to assists red team operators by:
BloodHound database to discover escalation paths opened up by newly collected credentials.To accomplish this, pyCobaltHound uses a set of built-in queries. Operators are also able to add/remove their own queries to fine tune pyCobaltHound's monitoring capabilities. This grants them the flexibility to adapt pyCobaltHound on the fly during engagements to account for engagement-specific targets (users, hosts etc..).
To install pyCobaltHound clone this repository. Do not forget to also clone the included submodule!
You can use the following command:
git clone https://github.com/NVISOsecurity/pyCobaltHound.git --recurse-submodulesEnsure that the following dependencies are correctly installed:
PyCobalt is a Python API for Cobalt Strike. It exposes many Aggressor functions to be used directly from Python.
Ensure that you have Python3+ installed. While PyCobalt may work on macOS and Windows as well, we have only really tested it on Linux.
There are two ways to use the PyCobalt Python library:
pyCobaltHound takes this approach, setting the search path from within the Python program using the variable sys.path variable.PyCobalt Python library. To do so, run python3 setup.py install. You will have to modify pycobalthound.py to ensure that it used the installed library instead of the one in the included repository.PyCobalt project will be maintained in the future. In fact, the latest update to the project was to incorporate the changes made in Cobalt Strike 4.2. Since pyCobaltHound only really uses basic Aggressor functions to interface with Cobalt Strike and its operator however this is not a big problem for pyCobaltHound.PyCobalt submodule used in this project is a fork done by us. We do not control the PyCobalt repository however.PyCobalt comes with some Script Console commands to manage the running Python scripts. When you reload your Aggressor script you should explicitly stop the Python scripts first. Otherwise they'll run forever doing nothing. During pyCobaltHound's development we noticed that this can also lead to undefined behavior.
Reloading pyCobaltHound can be done as follows:
aggressor> python-stop-all`
[pycobalt] Asking script to stop: /root/pycobalthound/pycobalthound.py
[pycobalt] Script process exited: /root/pycobalthound/pycobalthound.py
aggressor> reload example.cna`
[pycobalt] Executing script /root/pycobalthound/pycobalthound.py
For PyCobalt to work properly you can only call PyCobalt in one Aggressor script. Keep this in mind if you want to use pyCobaltHound together with other Aggressor scripts that use PyCobalt. Our approach is to have an Aggressor script with a calls to python() and include() for every PyCobalt based tool.
notify2 is - or was - a package to display desktop notifications on Linux. As we will see later pyCobaltHound supports a few ways of notifying the operator. notify2 is used on Linux to send notifications to the notification daemon over D-Bus.
To enable this, notify2 needs to be installed using:
pip install notify2
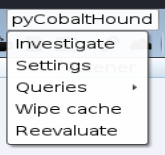
Using pyCobaltHound in Cobalt Strike is as simple as importing the pycobalthound.cna Aggressor script into your client. Once this is done you should see apyCobaltHound menu appear in your Cobalt Strike menubar.
pyCobaltHound's initial goal was to monitor Cobalt Strike's credential cache (View > Credentials) for new entries. It does this by reacting to the on_credentials event that Cobalt Strike fires when changed to the credential store are made.
When this event is fired, pyCobaltHound will:
Cobalt StrikeBloodHound databaseBloodHound database for each new entity using both built-in and custom queries.Since all of this takes place asynchronously from the main Cobalt Strike client this process should not block your UI so you can keep working while pyCobaltHound investigates away in the background.
pyCobaltHound uses seperate caches per teamserver to prevent issues when using multiple teamservers.
Sometimes there are situations where you would want to investigate specific users (or the entire credential store) again. This might be the case when you've uploaded new data into the BloodHound database.
Since pyCobaltHound should have investigated (and therefore cached) all entities in your credential store already it will not evaluate them against this new data without some operator intervention.
Two methods are available to operators to control which entities are cached.
In cases where you wish to remove a specific entity (or multiple) from the cache you can do so in the credential viewer (View > Credentials). Simply select your target(s) and click the remove from cache option under the pyCobaltHound menu entry.

In cases where you wish to remove all entities from the cache you can do so in pyCobaltHound's main menu (Cobalt Strike > pyCobaltHound > Wipe cache). This is most helpful when you want to reevaluate your entire credential store.

After removing your targets from the cache you can manually prompt pyCobaltHound to re-investigate the contents of the credential store. This follows exactly the same process as above.
pyCobaltHound contains functionality to interact with existing beacon sessions. This can be found in the beacon context menu. Note that these commands can be executed on a single beacon or a selections of beacons.
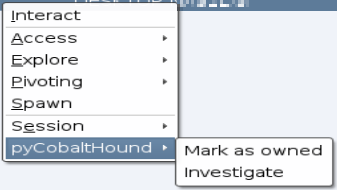
This functionality is especially useful when dealing with users and computers whose credentials have not been compromised (yet), but that are effectively under our control (e.g because we have a beacon running under their session token).
The Mark as owned functionality (pyCobaltHound > Mark as owned) can be used to mark a beacon (or collection of beacons) as owned in the BloodHound database.

This dialog will ask the operator for the following information:
pyCobaltHound will only mark computers as owned if the beacon session is running as local admin, SYSTEM or a high integrity session as another user.The Investigate functionality (pyCobaltHound > Mark as owned) can be used to investigate the users and hosts associated with a beacon (or collection of beacons).

This dialog will ask the operator for the following information:
pyCobaltHound will only investigate computers if the beacon session is running as local admin, SYSTEM or a high integrity session as another user.pyCobaltHound will investigate all entities without checking for integrity levels.pyCobaltHound contains functionality to freely investigate entities. This can be found in the main menu (Cobalt Strike > pyCobaltHound > Investigate ).
This functionality is especially useful when dealing with users and computers whose credentials have not been compromised and are not under our control.

This dialog will ask the operator for the following information:
pyCobaltHound's settings menu can be found under Cobalt Strike > pyCobaltHound > Settings.

pyCobaltHound will save your settings to disk. Every time pyCobaltHound is reloaded, it will check for the existence of a settings file and load the saved settings if it finds one.
pyCobaltHound saves a settings file per teamserver, so it is possible to have different settings on different teamservers.
To authenticate to the BloodHound database, pyCobaltHound will need the following information:
Note: if you choose to persistently save your settings (to preserve them across client/host reboots) pyCobaltHound will deserialize and store these credentials on disk.
As discussed before, pyCobaltHound uses caching to make sure it does not perform unnecessary work. This caching can be disabled in the settings. This is mostly useful when developing new queries so you don't constantly have to manage/wipe the cache.
pyCobaltHound supports a few different methods of notifying the operator once it has identified an entity of interest. It is possible to disable these notifications.
By default, pyCobaltHound will notify the operator using the default Aggressor messagebox. This option can the operators workflow. It is however the default method since it it supported on each platform you can run a Cobalt Strike client.

pyCobaltHound also supports displaying desktop notifications on Linux. This is our preferred option since it does not interrupt the operators workflow.

During some of its workflows, pyCobaltHound will generate an HTML report. This design choice was made to avoid spamming the operator with giant notifications in case a lot of entities were investigated. These reports will be generated in the reports folder. It is possible to disable the report generation.

By default, pyCobaltHound will synchronize queries across teamservers by using a central file for all query related settings. This means that queries that are enabled, added or deleted on one teamserver will also be enabled, added, delete to the queries made by other teamservers. This is mostly a convenience option and can be disabled, which is useful in cases where you are running engagement specific queries that do not apply to all the teamservers you are connected to.
When query synchronization is disabled, pyCobaltHound will check for the existence of unique query files. If these exists, it will load these and use these queries during its workflows. If the files do not exists, it will create and load them . This setting will persist through reloads
When query synchronization is enabled, pyCobaltHound will check for the existence of unique query files. If these exists, the operator will be prompted for a choice.

The operator has the following choices:
pyCobaltHound will simply remove the unique query files. All custom queries will be lost.pyCobaltHound will attempt to merge the unique query files into the general query files. Before merging a query, it will check if there is no query in the general file that has the same name or the same Cypher statement. If any merge conflicts occur, the operator will be asked if they want to keep the non-merged queries. They will be saved in a separate file. The unique query files will then be removed.pyCobaltHound will just leave the unique query files. All custom queries will be preserved and the files will be loaded again if query synchronization is disabled again.pyCobaltHound currently supports the following built-in queries:
Managing the various queries that pyCobaltHound uses can be done through the main menu (Cobalt Strike > pyCobaltHound > Queries).

The Update queries dialog allows operators to enable/disable specific queries. When using the this dialog, the operator will first be asked what type of queries they want to update. This is done to dynamically render/load the correct queries during this workflow.

After answering the first dialog, the operator will then be presented with a list of all available queries of that type. Here they can choose which queries they wish to enable/disable.

The query type option is an ugly workaround to pass the query type to the next function in the workflow and is of no concern to the operator.
The Add query functionality allows operators to add/remove their own queries to fine tune pyCobaltHound's investigation capabilities. This grants them the flexibility to adapt pyCobaltHound on the fly during engagements to account for engagement-specific targets (users, hosts etc..).

This dialog will ask the operator for the following information:
pyCobaltHounds workflows.pyCobaltHound needs to execute. Operators are quite free to define their queries. The only requirements are the following:
pyCobaltHound dynamically generates the following Cypher string based on the entity names it is investigating:
WITH [account names here] AS samAccountNames UNWIND samAccountNames AS names.MATCH (x) WHERE x.name STARTS WITH names(x:User)) depending on which query type you are adding.pyCobaltHound expects the query to return a distinct set of usernames.
RETURN DISTINCT (x.name)The Delete query dialog allows operators to remove specific custom queries from pyCobaltHound. When using the this dialog, the operator will first be asked what type of query they want to remove. This is done to dynamically render/load the correct queries during this workflow.

After answering the first dialog, the operator will then be presented with a list of all available queries of that type. Here they can choose which queries they wish to remove.

The query type option is an ugly workaround to pass the query type to the next function in the workflow and is of no concern to the operator.
pyCobaltHound uses/takes inspiration from the following:
pyCobaltHound uses for the custom query. This will be used in notifications & reports during pyCobaltHounds workflows.
pyCobaltHound will replace with the amount of results for this query.